
HeavyArty
Interesting. It looks like it will be a nice model. Not sure what I would use it for though.
Interesting. It looks like it will be a nice model. Not sure what I would use it for though.


I’d plan to use it for the same thing I use all my other models for. Having loads of fun building it and then sitting it on the shelf to look awesome.

This has real appeal for me - crying out for a Bare Metal Foil & paint finish .
Agreed.
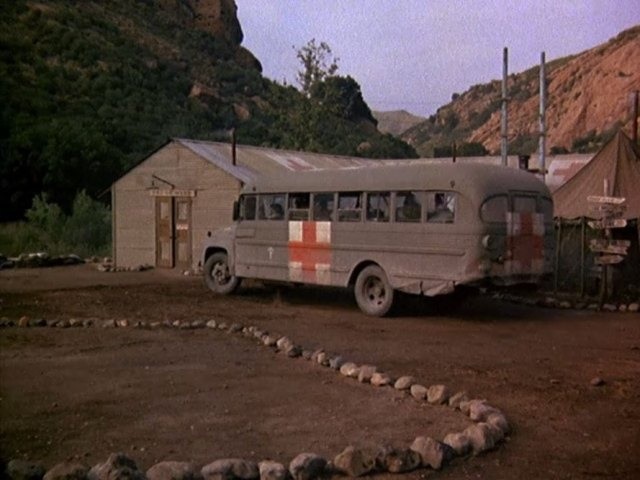
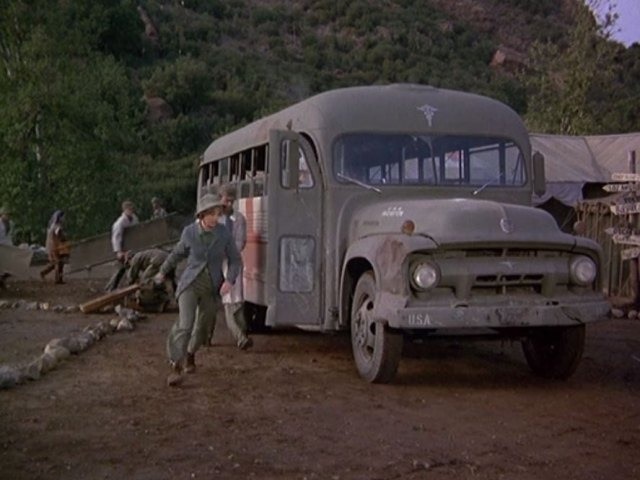
Too bad it is not more of a school bus design. It could be built as the M* A* S* H 4077 bus ambulance.
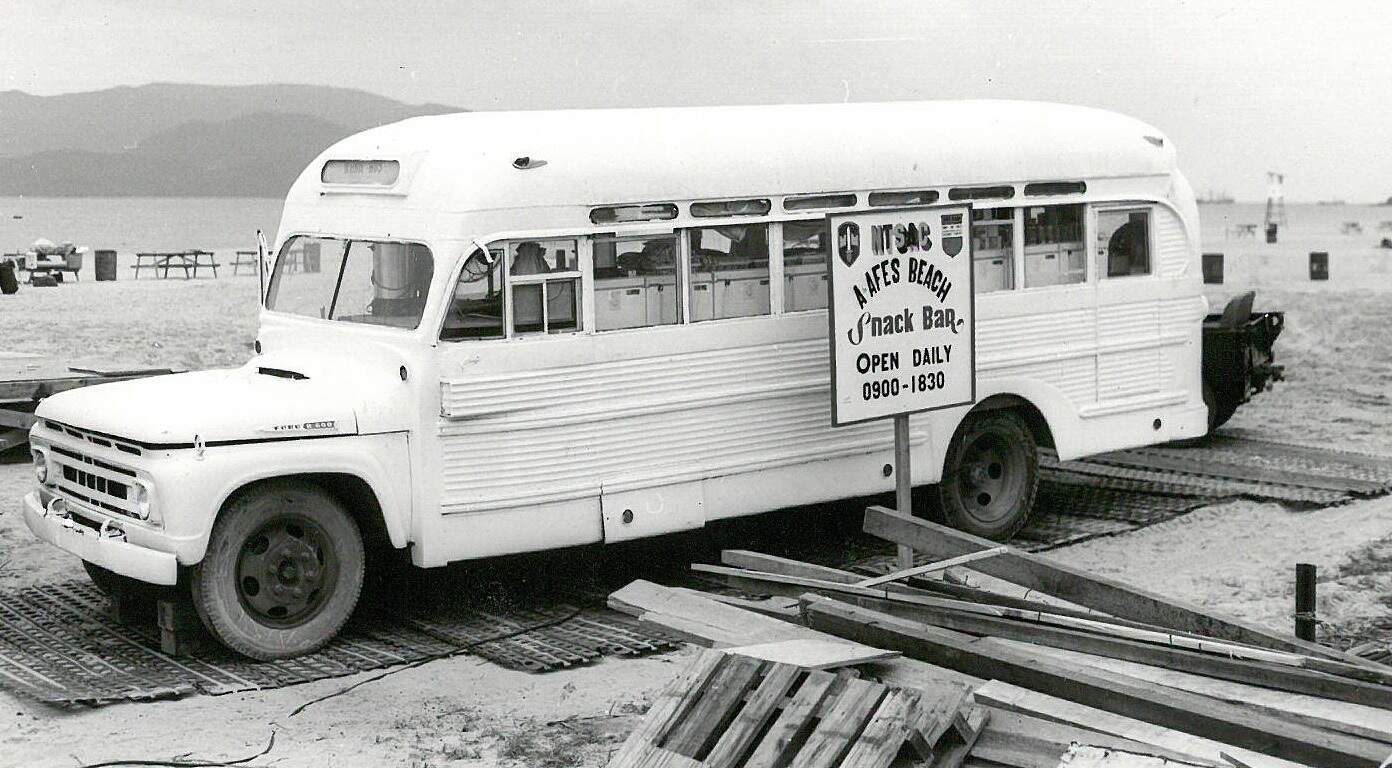
Or as the AAFES Snack Bar bus at China Beach, Vietnam.
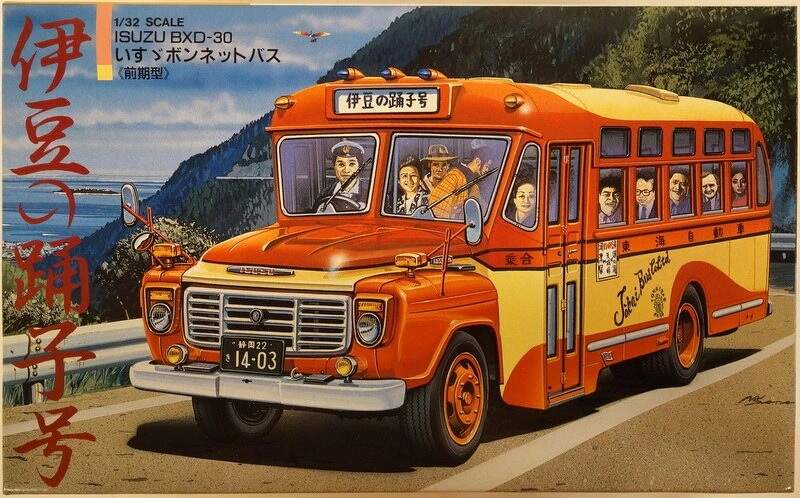
I have seen a couple made out of the 1/32 Arii Isuzu Bonnet Bus and a 1950s or '60s Chevy/Ford pick up front end. You also have to swap the door and driver’s controls to the other side (door right, driver left). It is doable though.
At least by the Aussies. I bet the US had some as well.


I really like the look of this kit. Lots of ideas, Grateful Dead tour bus, Zombie Apocolypse battle bus, rotting in a scrapyard. Might need more than one lol.
Regards Jason

Indeed. Now we need some '60’s era Drill Sergeants.
However, I picture a small town bus stop with a recruit about to get on, saying good bye to his girl.
Or, in a mix of scales, in front of my cardboard Hillbilly Hauler diorama. You do not want to know what I paid for that little piece of childhood memory.
Are you forgetting where you are!? I expect to see a full blown topic created on this subject with heart warming reflective meanderings as well as introspective revelations including detailed dialog explaining the build process, what motivated the undertaking, kit purchase price and several photo images from various revealing angles. ![]()
“We want dirty laundry” ![]()
Cajun ![]()

Looks quite interesting! I see the engine panels can be opened after assembly-I hope the passenger door is movable as well. It would be great to see them also eventually do an early 70s Greyhound bus.

You are showing your age… LOL
I just watched the repeats ! 

A very interesting kit. I have built 2 Roden kits in my life. RR Armored car and Opel Blitz Omnibus. I was not impressed with the quality of the kits. I hope the molding is better on this one because I plan on buying this one also. I love these big bus kits.

A very original release and perfect for an idea I had time ago 

I just got one of these in the mail the day after Christmas and I’m thinking about pushing it up to the front of the line. I could use a break from my armor projects. I’ve been watching the video I linked below but this gentleman didn’t leave the front door open so you could see the driver’s compartment. he also omitted a lot of parts for the sake of building it very quickly…even left the engine off so he could display it separately. If any of you have any images and ideas on how to keep the engine bay door open or the front door open…I’d love to see images of how you guys solved these problems. TIA
1947 GMC PD 3751 Silverside Greyhound Bus 1/35 Scale Model Kit Build How To Paint Glass Chrome Roden
1 reply
The kit contains parts to show the side door open.

The engine access doors are separate as well.

Actual.

You only need to add the prop rod on the center section.


Gino covered it. I will add Chris (YouTube builder) has a building/painting style that many here would not be fans of. He does have lots of built kits on the shelf which works for him and his channel. I find most of his builds entertaining to watch.
Thanks guys, I’ve been looking at the parts and from watching the video this kit is going to require some care to get everything lined up properly. I noticed in the video he built the body first and then just sleeved it over the chassis when he got done. the instructions have you build everything and then put it together at the end which makes no sense in regards to painting…
I think he added the engine bay doors and the front door so the body would be sturdy enough to sleeve over the lower section, but I don’t want those areas closed, so I’m going to have to find a different solution…
1 reply
No build log? ![]()

You could temporarily tape the doors on to fit the body, then untape them to attach in the open position…
Thank for suggesting this, and I WAS able to sleeve the body over the top even while leaving the front door posable…after painting all the interior…so I’m an armor guy, mostly Allied WW2 stuff and I don’t normally do vehicles but this one was a commission for someone that drove one for a small line after these buses had been retired by greyhound. I guess a bunch of them were auctioned off to small cities an used for a variety of different things after their peak service with Greyhound…Anyways the gentleman that I built it for drove one in the late 1960s well after the Silversides heyday…I didn’t have decals and he didn’t have much information to give me in regards to decals other than the overall color scheme which was green and white…his small line that he worked for I was unable to find any information on that either…but he was super happy with the bus and just seeing him an 88 year old man acting like a little kid on Christmas opening a new toy was awesome and well worth the work I put into it…
As for Sleeving the body over the top, I think it’s the best way to build this if you don’t want ugly seems all over the place, BUT the gentleman in the video doesn’t tell you that you have to shave off the ledges that the seats mount up to on the inside wall of the bus, otherwise you won’t be able to dry fit take it off and put it back on etc…
So the seats only have the inside leg that runs down the middle isle of the bus for support if you remove the ledges where the sides are supposed to butt up to them…I fixed this problem by making support legs out of styrene tubing and placing them in the very opposite corner of the seat where they were completely invisible thru the windows or thru the front door once the model was completely glued together at the end…
The interior featured a lot more work than I originally anticipated doing and definitely more than the fella in the video did on his…grey floor with black matting down the Isle and front steps, light brown seats with silver highlights for handles and the beige headrest covers that those seats had, then the interior lighting and the drivers compartment with all of it’s gauges, silver highlights, beige paint and brown leather highlights, it was super fun to detail this thing, I realize I probably could’ve skipped a lot of it as some of it you can’t truly appreciate without removing the body and I glued the body on it…
Once built the model is impressive size wise, I’d say about a foot long chunky beautiful bus…areas to be careful on this is that the wheels have tiny contact points to the suspension parts and the bus ends up being a heavy model once it’s all done, it’s a lot of plastic and Roden didn’t make sturdy in the connection points to the wheels…so I’m worried that the gentleman that has the one I build I worry that the tires will eventually snap off once it’s been on the shelf for a while, there’s just not that much there to hold them in place, I reinforced those areas as best as I could but if I build another one of these for myself, which I plan to…I will be more pro-active reinforcing the suspension stuff before I build it all up…
1 reply
The tires are molded onto the wheels so that can be a pain to paint as no wheel masks are provided in the kit…Guys, the engine bay is a delight! it’s like a separate little kit all in of itself and it was so much fun to paint that gorgeous L-71 Detroit Diesel, the transmission is there, air filters, radiator, and all sorts of little gadgets like fuel filters and pumps etc…there is a lot of information available to detail this thing and color everything the way it should be painted…mounting it on the bus should be one of the last steps when putting everything together…I learned that the best way is to build it paint it then glue it to the support/engine mount parts, THEN at that point once the firewall and all that stuff is painted you can glue everything together then and then if you want to add even more cables and wires etc you can take it up another couple notches…I left he rear doors removable and even tho they open independently in real life, I decided to glue the three parts together and just snap them on and snap them off when you want to see the engine compartment…
I can’t recommend this model enough, it’s an impressive model once it’s complete, I do recommend that it is displayed with a simple yet elegant jig in the middle to keep it off of it’s wheels, think like those bases that guys build to display their airplanes in flight…that’s something that I plan to build for mine that I didn’t have time to do for the commission. either way I still plan to reinforce the heck out for he connection points to the wheels…I have my own on order now and will hopefully build that within the next year before I forget everything I learned from the first build…
I’ll probably post some images of that one once I get that project going…

