Hey All, I got my Rye Field Panzer IV Ausf G/H in the mail from SprueBrothers today, along with the RFM Upgrade Set. I’ve now added even more to the insane number of kits in my stash, so now I have another model I will probably never build due to lack time before I kick the bucket. At least I can pick and choose which models to build first!
1 Like
cabasner if and when you start you RFM adventure 1 tip from me. Read the instructions front to back. Back to front. Do that several times before you start. Then work out a plan of attack based on how you will paint it. Having an idea of what’s coming saved me several times. With a bit of planning you can also build it so you can lift off the deck to show the interior.
Good luck. RFM make great kits.
bruce
1 Like
Thank you for the recommendations, Bruce. I’ve been building mostly 1/48 airplanes these days, and after you get used to a certain manufacturer’s plastic design for a given aircraft type, they are pretty easy to build and you know what’s coming. For a tank like this, especially with a full interior, I can only imagine the insane amount of pre-painting one must do. The only experience i have with a tank with interior is the Rye Field M1A1/A2, which I’ve only gotten half way through, and that tank is nice but it’s a pretty complex build; I have second one of those RFM M1 kits, and I know I will paint and assemble that one differently than this first one. So a detailed read-ahead and plan-ahead for the Panzer Mk. IV would certainly seem like a good idea. And…in my few attempts at building a Mk. IV even without an interior, there surely seems to be a HUGE amount of detail and parts on the outside, not to mention the interior!!! Thanks again!
You need to get out more…
Personally I am always grateful for all information provided, even to the last rivet and specially when comes from a reliable source.
Then I can decide if it is worth the work to correct it or not, but having all that information without the need to search on several books or internet is something we should appreciate -after all people are spending their time to share the knowledge.
2 Likes
I mentioned, back on 09/30/21, that I got the RFM 5055, the Pz. IV Ausf. G/H with full interior, and RFM Upgrade Solution Series (photo etch, resin, etc.) I’ve mentioned before, but perhaps worth mentioning again, how small even a 1/35 scale Pz IV tank is, especially compared to any modern tank, but even next to, for example, WWII Tiger Is, IIs or Panthers. The amount of detail, including, or perhaps especially, the interior, appears to be absolutely phenomenal! I want to decide, before beginning the build, which of the 4 paint schemes I will be building. I got a bunch of high end, high detail airbrushes for airplane models. But now I’m seeing the likely advantage of having these airbrushes for more highly detailed, and smaller, tanks. I’m inclined to want to do the Ausf G Late Production, from Kursk, and the scheme is dunklegelb and dark green. I think the 2 color scheme is going to be challenging enough for my airbrush skills!
If you want to see what’s in store, this is my blog of the RFM Panther G build.
I have this Mk IV in my limited stash, but its going to be a while before I build it, as the Panther has very nearly burnt me out… ironically, i’m going to do the opposite to what you’re doing, and go back to some 1/48 aircraft for a while. I have a P51D and an UHU ready to go…
I’m currently knee deep in the RFM Panzer IV. I’ve opted for the Ausf H. I’m also using some “Zimmerited” (is that even a word?!) bits left over from DML kits to save on putty smearing, just to make it even more difficult! I’m blown away by Michael’s collection of assemblies - that requires too much working out for me, I’m painting as I go, so it’s a lot slower. I’d recommend this kit over Mini Art, because IMHO they seem to use a lot of PE, which I don’t really like. There is PE in the RFM kit, but only where it’s really needed. Interesting that it’s doable to leave the hull top loose, sounds like a plan. A word of warning, the fit is very tight, even a coat of paint makes a difference, so a lot of test fitting before assembly required.
@Khouli: Wow, beautiful Panther! Great job on the interior, painting and all! I have only one Panther in my collection, a Dragon Ausf G with steel wheels that had been sitting around for several years, waiting on an inspiration to finish it. Ultimately, the inspiration came from a Michael Rinaldi build/paint of a winter whitewashed Panther, and mine came out…well, okay. I’d love a Panther with an interior, though!
It is however, the only way to do it with these kits.
Thanks, I guess I wanted to give you an idea of what you’re letting yourself in for with the RFM Mk IV. Although the Ausf J is a simplified design over previous Mks, you’re going to have your work cut out and your patience stretched to the limit.
I appreciate your help! I tend to paint as I go along on all my models. For airplanes, waiting the cockpits are obviously required prior to and concurrent with assembly, as well as wheel wells. For tanks, I find that certain kits have advantages in painting as you go. Particularly road wheels and tracks, and lower hull areas. However, with full interior kits, there is no choice BUT to paint the parts before assembly, if you want to paint the interiors at all. I have gotten about halfway through an RFM M1A2 Abrams with interior, and I painted the interior parts completely. I’m really not pleased with how that build went, probably why it’s been sitting for literally years about 1/2 done. I have another unstarted box of that kit, and I know I’ll do things differently on a second build. I DO need to finish that first one, though. It’s not so badly done that a completion won’t look decent, once completed and weathered.
@Michael_Walsh: Thank you, Michael, for the photos and your opinions! You are correct that the photos you posted of all the parts are SUPER intimidating, at least regarding how long it’s going to take to cut, trim, sand, and paint all the interior parts, and then put them together and leave some options for being able to open it up to look at all that interior work! I would love to start this tank, but I’ve already got maybe 10 kits, between tanks and airplanes, that I’ve started. I keep promising myself not to start another new kit until I finish ALL of the previously started ones, but I’m sure you know how that goes!! I’m going to be retiring in a month or so, thus I’ll have plenty more time to work on models…and hopefully I’ll actually finish some of them! 
2 Likes
I managed to finish my RFM iv J with both the turret and hull top removable. But it takes some pre planning. The side schurzen has to be removable. The hull top needs to be a loose fit.
But some filing. Some sanding sticks. Some patience and some cursing and it’s worth it…
bruce

2 Likes
That J looks really nice! I’m wondering about finishing mine in monochrome Dunkelgelb, but that’s about 6 months off… 
Hello Curt,
This kit like many with interiors are a lot of work to detail. Churning up a lot of benchtop time.
Could I suggest an option to blow the kit up to show the interior off. There are plenty of reference photo’s around.
Unfortunately I have fell in the same trap as well with starting new kits and not finish the one already started. Currently working on an M3 Lee with an Interior and the worst part is I have ordered the Miniart Panzer 4H with interior and when it arrives I might start that one on the side as well. 
Good luck in your retirement to get all your half finished kits and new ones off the workbench and on display.
I have a few years to go before retirement with more than enough models to keep me busy.
Bruce,
Nice effort on the Panzer 4J 

Michael 
Thats me about 90% of the time!
Ken
1 Like
Here is a Panzer iv (not sure which version) at the Long Island figure show November 20th that was displayed in an exploded view to show off the interior details. It was done by Manny Rodriguez from the DC club. Very creative way to show the interior.


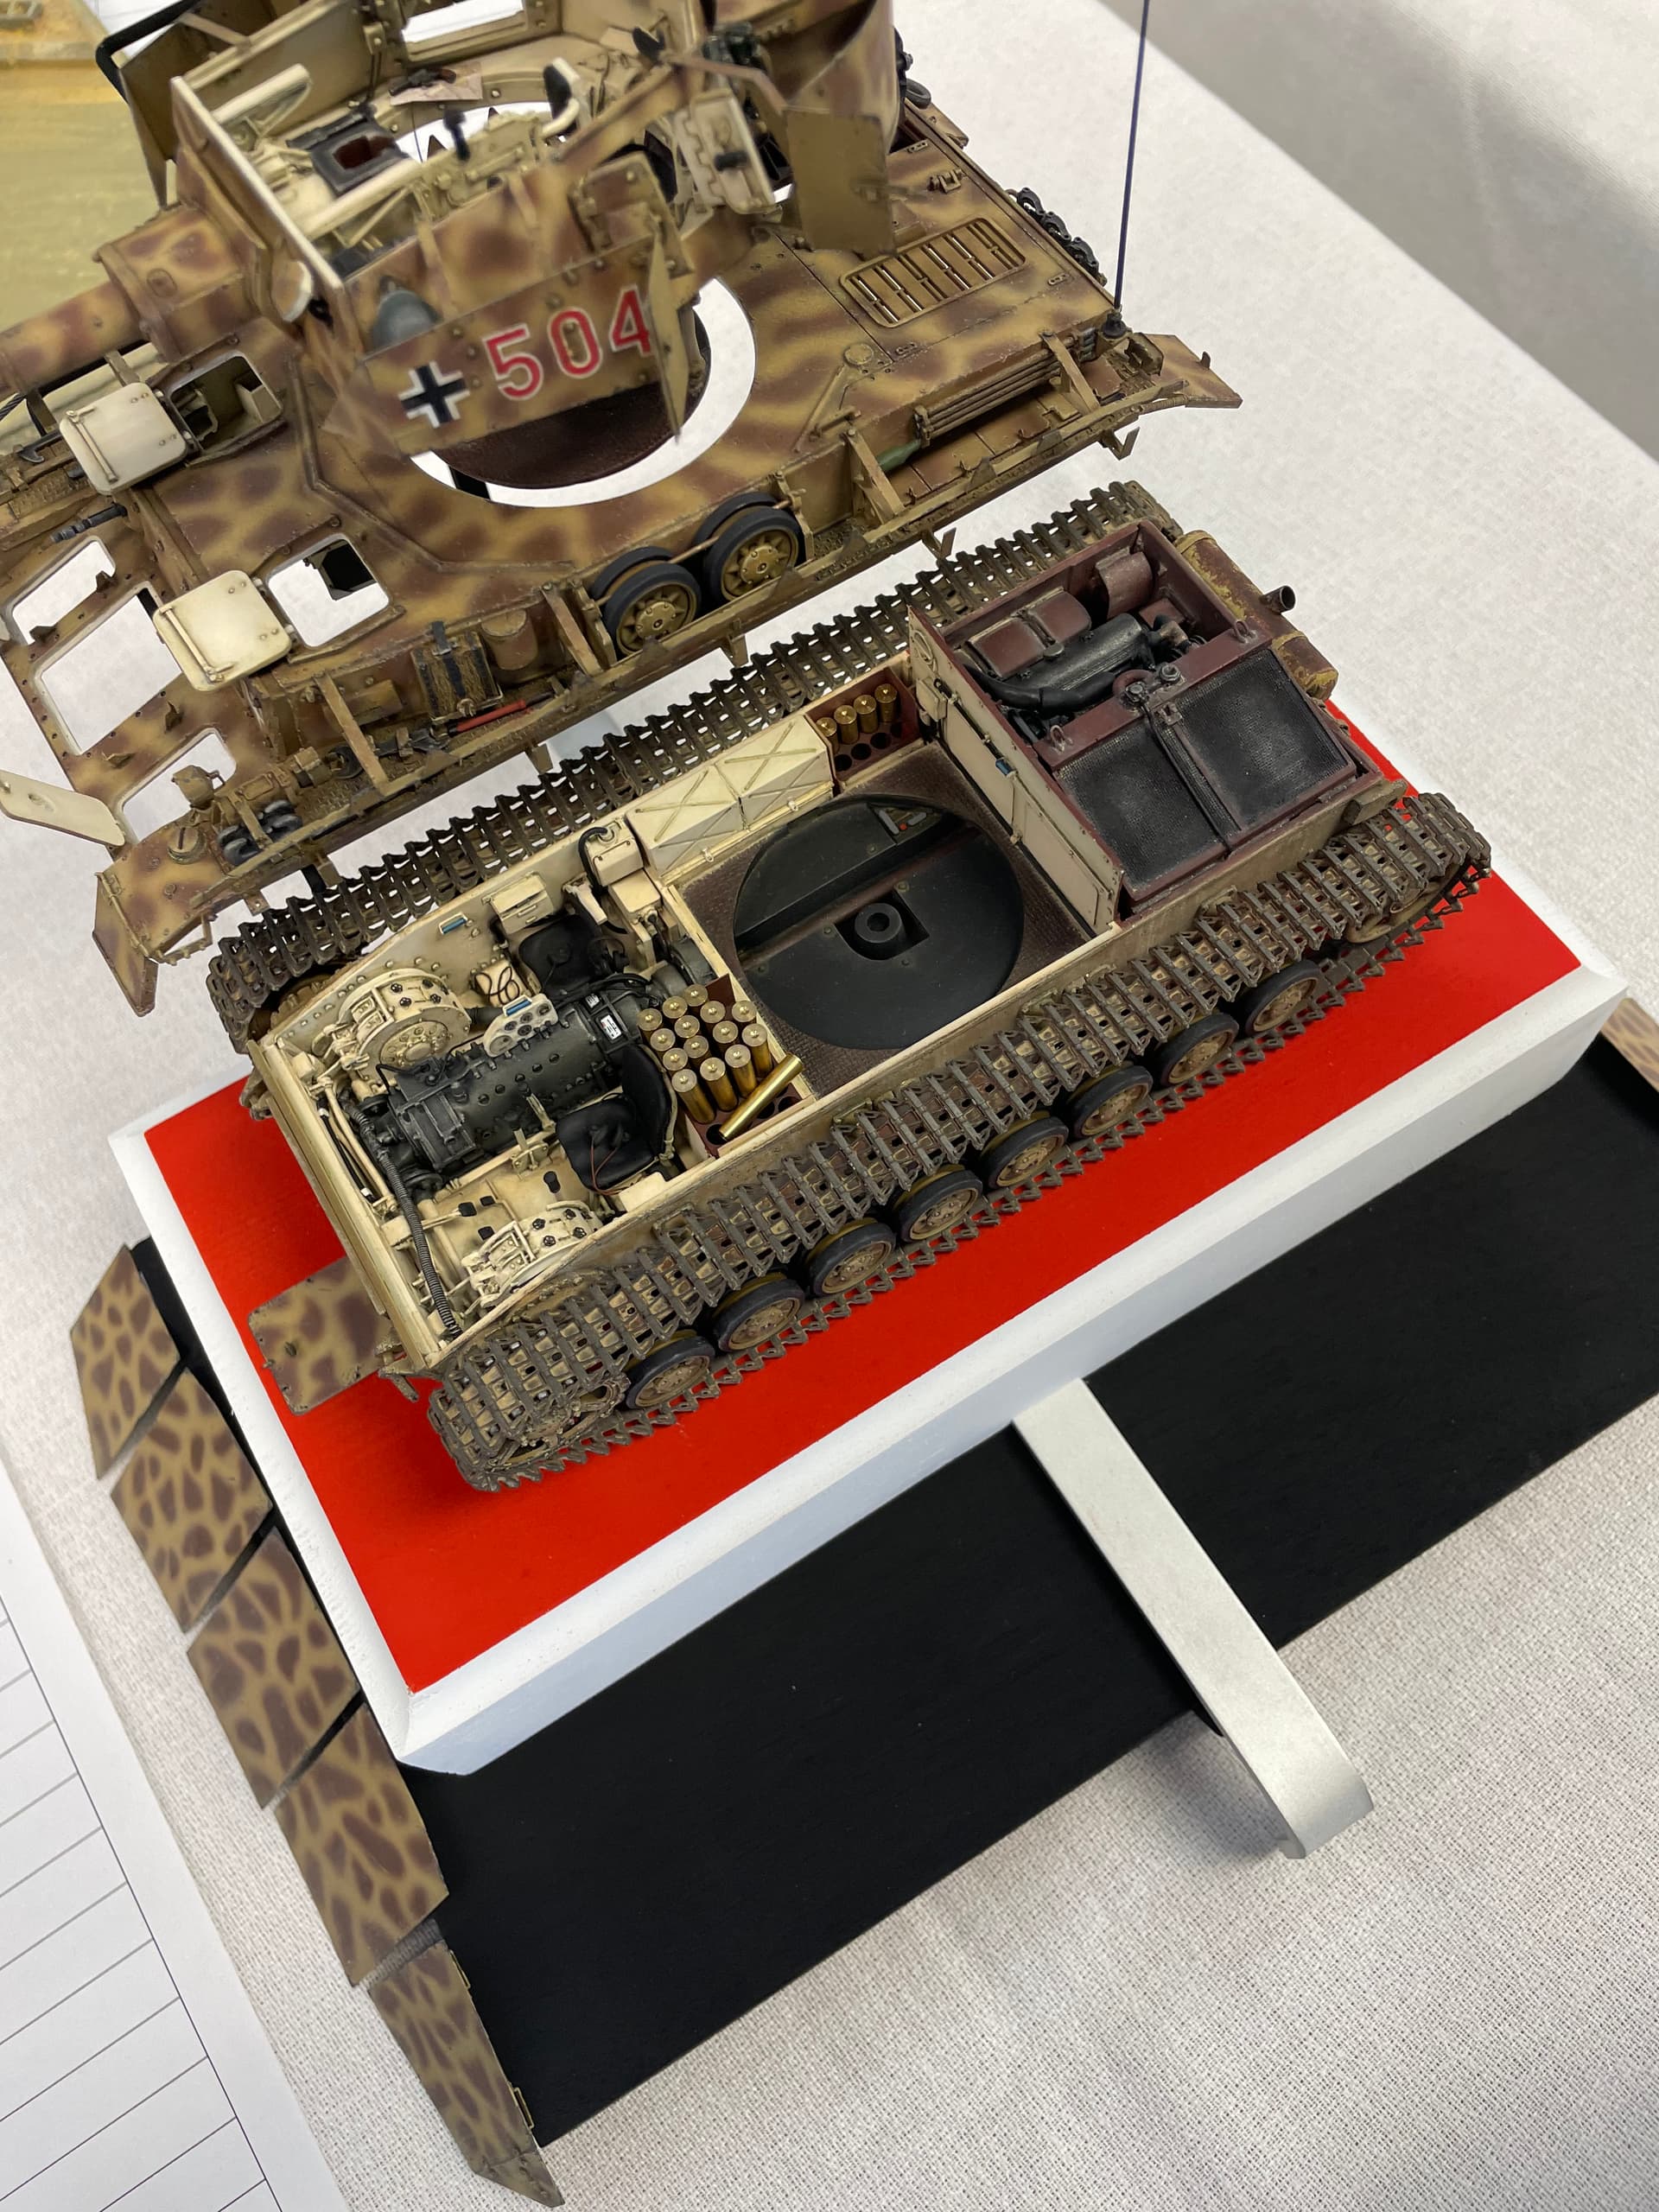
2 Likes
Hello Curt,
Here is the second build to go on the same diorama with the Ryefield Panzer 4.
MiniArt Panzer 4 H/G and as you can see the box contents are too the top.
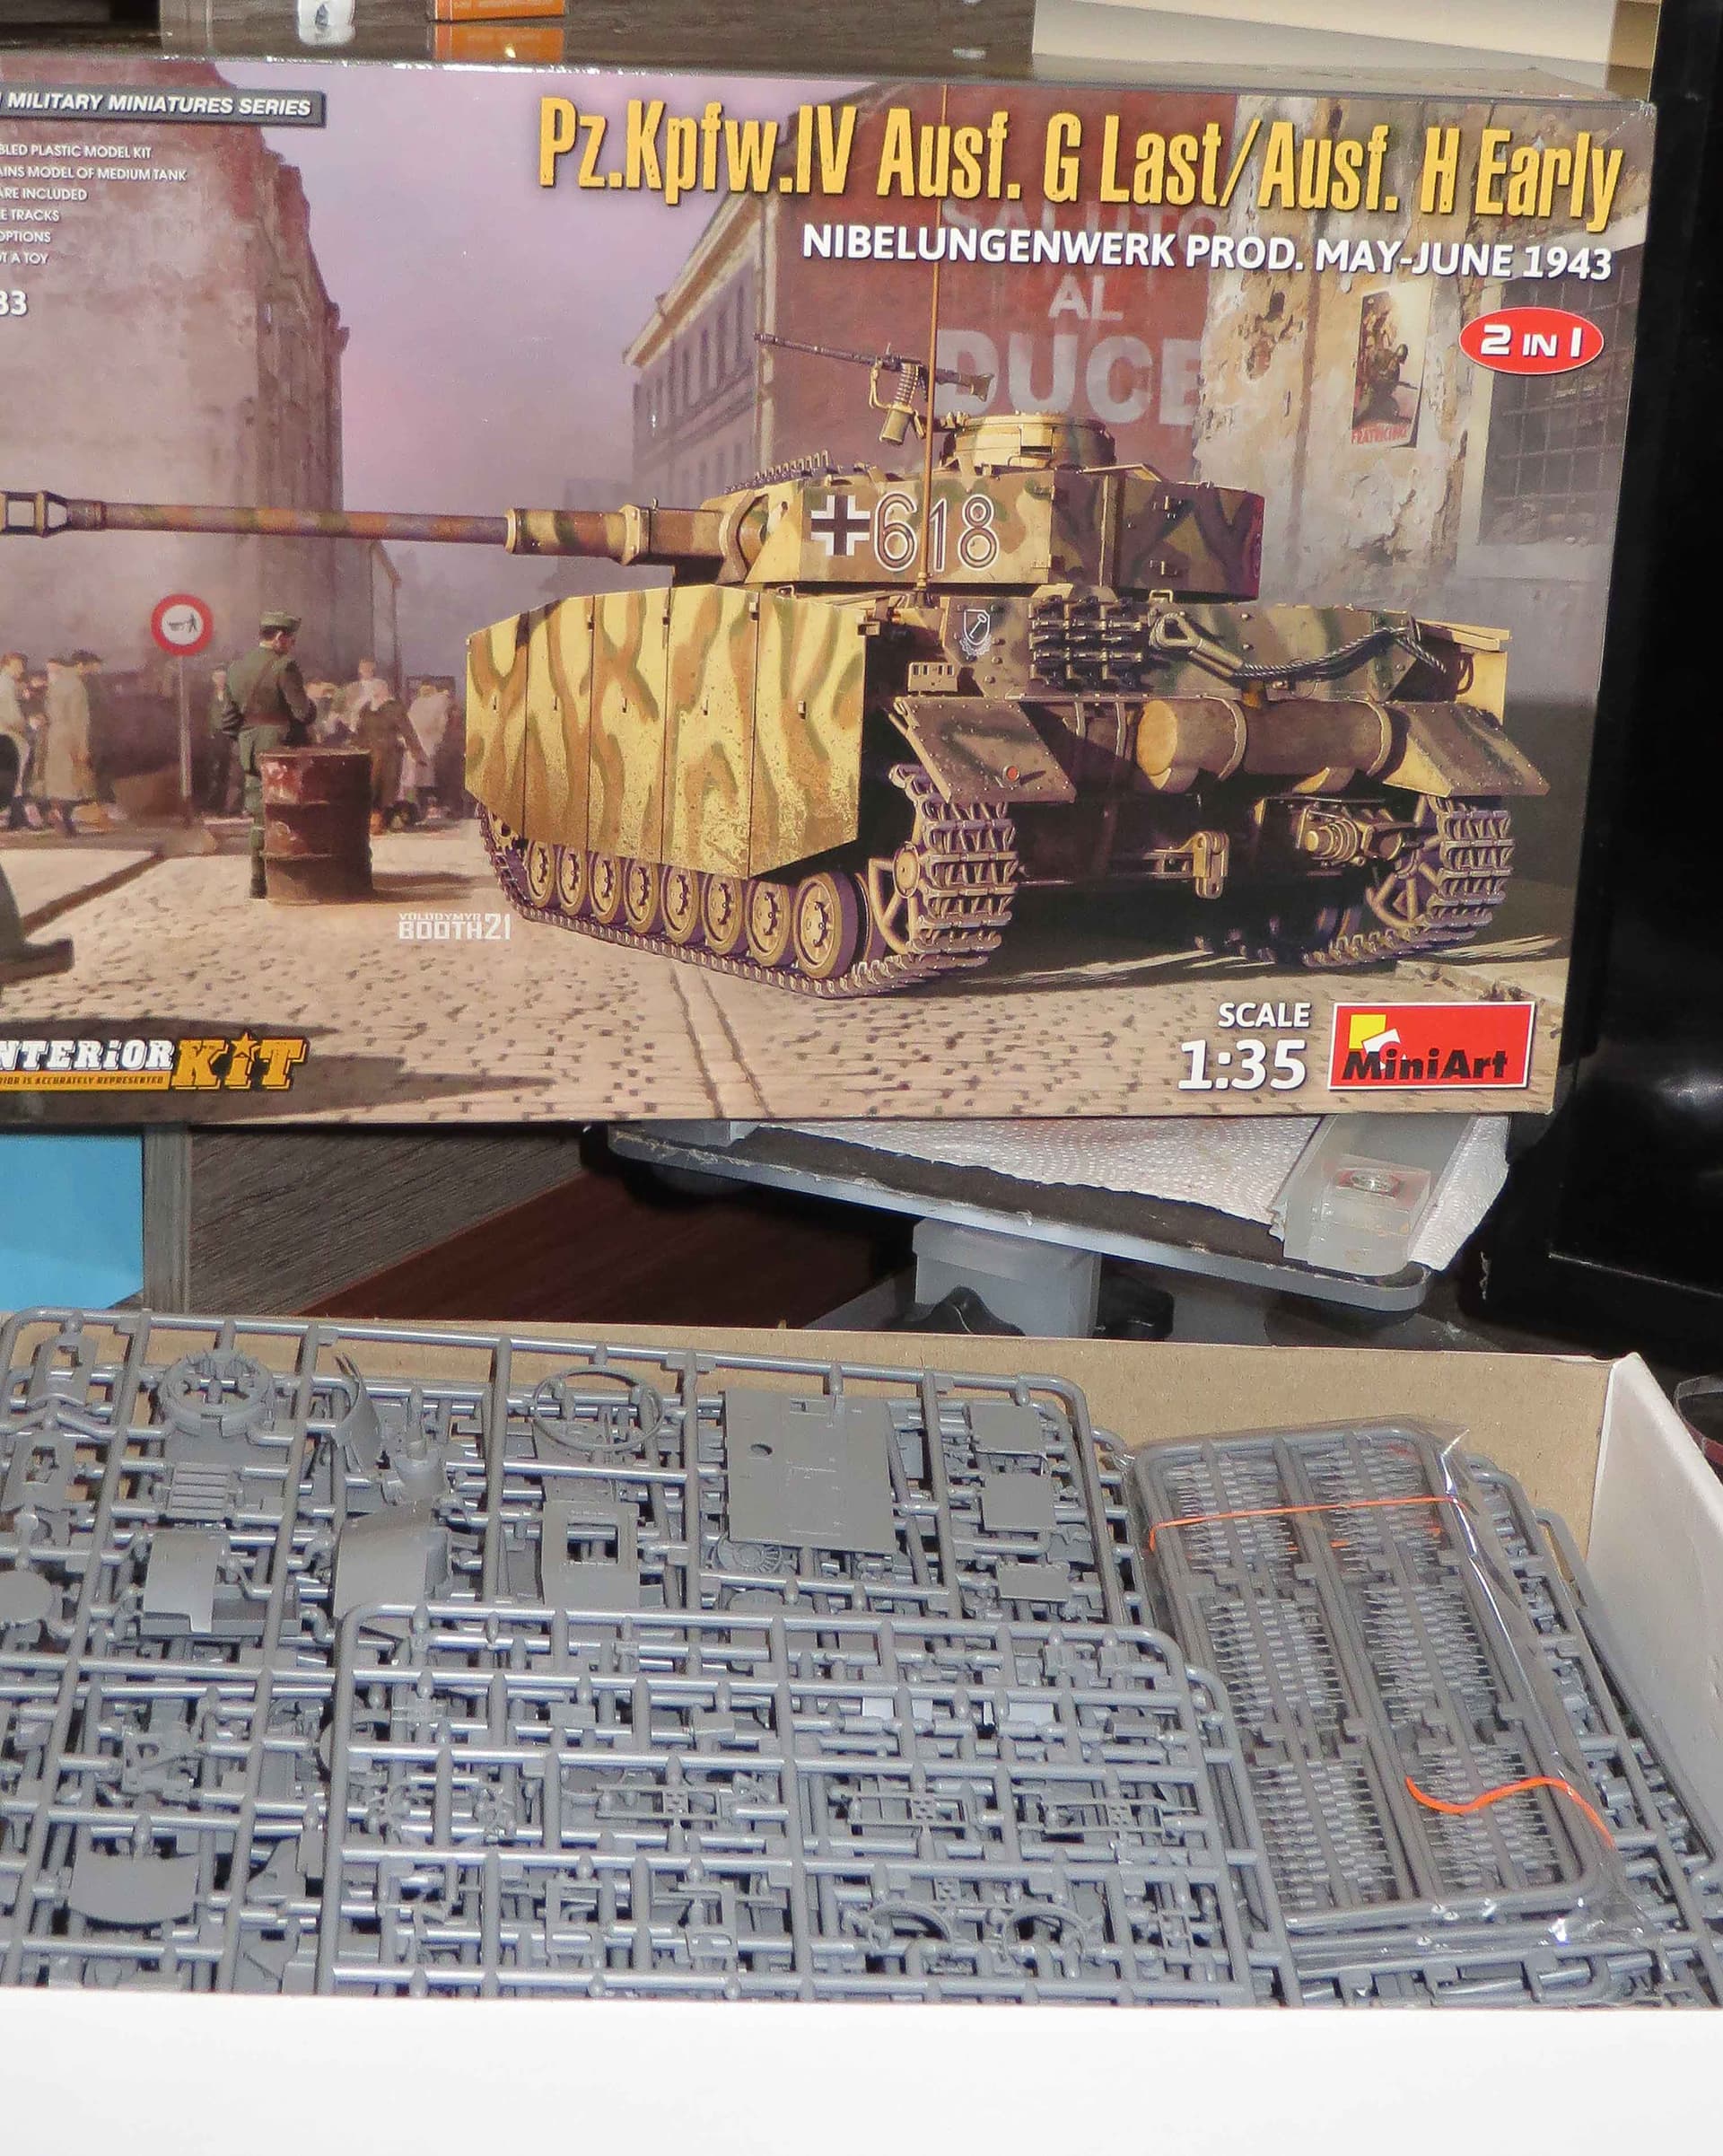

The Instructions appear to be more challenging than the Ryefield Panzer 4 and for detail wise I think the Miniart kit has a large amount of detail but it does not seem as sharp as the Ryefield kit.
At the end of the day once they are both painted up with figures I think it will be hard to distinguish
between the 2 brands.
I’m finding it hard not to start the build and finish the Miniart M3 Lee 
Michael
Hey all,
Sorry I hadn’t responded to say thanks for responses I got to my initial post on this topic. I’ve been a bit busy, and am now in my 4th week of retirement! Unfortunately, I’ve not used my new free time to do much modeling, though I did complete and Eduard 1/48 Fw190 A-3 airplane since retirement started.
1 Like