Building up nicely Tim. The extras you are doing will certainly add to the finished little gem. Neat work ![]()
2 Likes
Looking good Tim. Your detailing is going to make it pop.
2 Likes
Looking good with the masts in place Tim,
Nice worl on the flags too.
Cheers, Si
2 Likes
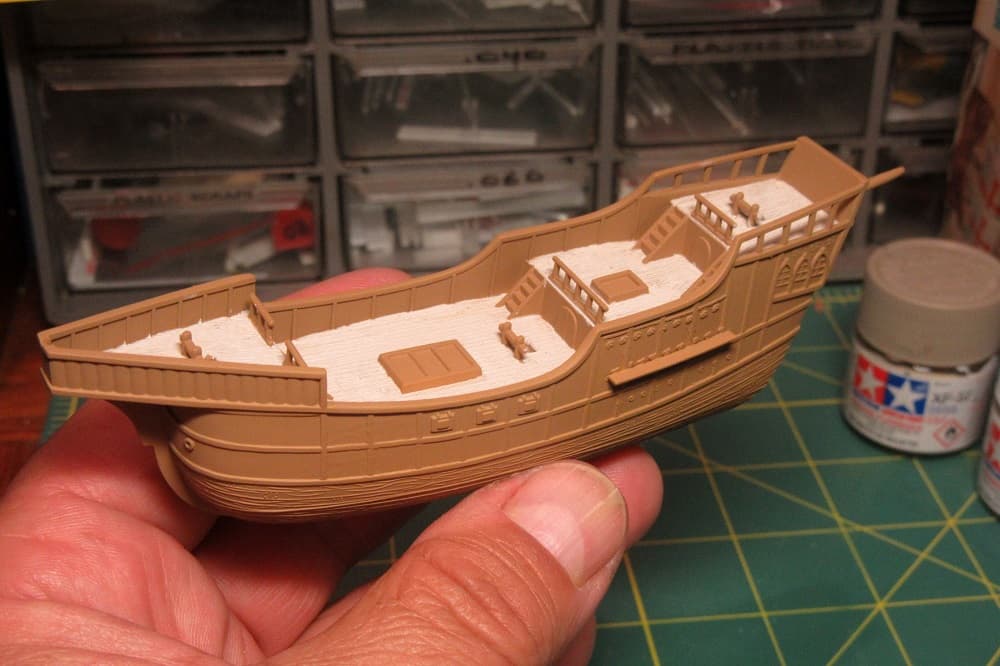
Thanks guys! I’ve never been fond of white molded plastic in kits, so now that the basic assembly is done I’m happy to throw on a little color!

The ship received an airbrushed coat of Tamiya XF-59 Desert Yellow acrylic to represent the “wood” base.

For the decks, Tamiya XF-57 Buff lightened with XF-25 Flat White did the job.

To get a smooth finish I wouldn’t normally brush paint wide surfaces like this – especially with acrylics – but over Pyro’s heavy detailing it works just fine!

The underwater hull was brush painted also. Fifteenth Century Spanish ships were unpainted except for the submerged portions of their hulls, which were coated with a crude antifouling made from a mixture of tallow and tar. I represented this with Tamiya XF-63 German Grey.
5 Likes
Very nice paint job, Tim. She’s already looking so much better!
Cheers
Jan
2 Likes

Very nice paint job, Tim. She’s already looking so much better!
Cheers
Jan

Thanks Jan. As final preparation before applying the oil wash I have filled in the stern windows with the same Tamiya XF-63 German Grey used for the antifouling.
6 Likes
Very nice paint job Tim, the XF63 gives more depth than pure black,
Cheers, Si
2 Likes
Tim,
The paint work is well thought out. It’s really coming together. Keep it coming.
John
2 Likes

Very nice paint job Tim, the XF63 gives more depth than pure black,
Cheers, Si

Tim,
The paint work is well thought out. It’s really coming together. Keep it coming.
John
Si and John, thanks. I often find painting to be one of the more stressful aspects of a build - it somehow feels like there is so much less control! ![]()
Anyway, diving in as with my previous Niña and Pinta builds, I coated the acrylic Tamiya paints with Grumbacher Raw Umber artist’s oil to try for natural wood effect.

Even though I had used this oil-over-acrylic technique before, It was still unsettling to slaver the dark raw umber oil paint all over that neatly painted hull!


Once again, though, the technique worked just fine. When wiped down with a thinner-dampened towel, enough of the oil paint remains behind to leave darkened shadows in the recesses and a pleasing wood tone over the rest of the wood areas. I also like that artist’s oils dry slowly; the oils were applied and wiped down last night, but this morning I’m still able to work with the as yet unfixed paint – plenty of time to fix mistakes!
5 Likes
Oil effects look very good indeed Tim,
Cheers, Si
1 Like
Oil effects look very good indeed Tim,
Cheers, Si
Thanks Si!

Artist’s oils may take some getting used to for us modelers, but their pigments are dense and vivid, and I find that the oils are actually easier to manipulate than many dedicated hobby paints.
5 Likes
Back in the day (i.e. when Airfix first released their 54mm Napoleonics) I found out (was told?) that for painting horses a thin oil paint wash over a matt enamel gave a nice, shaded, sheen that was just right for the nag’s coat…
Cheers,
M
2 Likes
That’s interesting, Tom - I don’t do a lot of horses, but that is worth trying next time I do! As for ship models, the effect artist’s oils can have is simple to achieve and really cool:

The difference between these pics is just the application of Burnt Umber oil over the acrylic base colors and then wiped off with a towel - nothing more!
3 Likes
There is a REASON they are named Pyro … You want to burn the things at the stake like the spawns of Satan they are.
 (They say Columbus got to the new world on 3 Galleons … but you can never trust what they say about the milage on those foreign cars!)
5 Likes

There is a REASON they are named Pyro … You want to burn the things at the stake like the spawns of Satan they are.
LOL! You have a point - these old Pyro kits are full of problems that can at times be exasperating… there are even a few (Golden Hind, Half Moon, La Reale, Barbary Pirate) that were so rough I actually abandoned construction part way through. Still, for me at least, these challenges are (perhaps perversely) also part of the fun of scale modeling. ![]()
By the way, I love the meme - I’m a huge fan of the Flying Circus!
1 Like
Gotta remember when that Santa Maria kit came out she was still afloat! My first kit was a Frog 1/72 Beaufort. 'Course I was 6-7 and it was around 68 or so … high tech for then.
2 Likes

Santa Maria’s launch is a single part with some nice clinker planking on the outside of the hull but without any detailing at all on the inside. This is fine as Pyro designed it to be stowed inverted on the ship’s main deck.

It is uncertain how the boat was actually stowed, though, and it was often towed behind the ship - so just for fun I added thwarts from .015 X .040 inch plastic strip so the boat could be shown either inverted or right side up.

The boat received the same oil stain over acrylic paint treatment as the ship.
7 Likes
How much you can achieve with so little - with your oil stain over acrylic that little boat really pops! I’m always amazed by your smart and effective approaches!
Cheers
Jan
3 Likes

How much you can achieve with so little - with your oil stain over acrylic that little boat really pops! I’m always amazed by your smart and effective approaches!
Cheers
Jan
Thanks Jan!
The stain over acrylic seems to have worked out, but I’m not so sure how “smart and effective” just painting up Pyro’s dopey molded flags might be ( ![]() ) …but I’ve made a start on them.
) …but I’ve made a start on them.

The Royal Standard carried by all of Columbus’ ships (repeated on the pennant) was the Bandera de Castilla y León (banner of Castile and León) quartered white and red with the coats of arms of Castile and León in yellow and red. This was the flag of Queen Ysabel (Isabella).


At this point the red sections have been added over the white. So much for the easy part – now for those castles and lions… ![]()
4 Likes
The biggest challenge of these flags was painting the tiny lions.

I’m no artist, so I just jumped in with my finest brush and did the best I could with them.

The pennant also received its lions – which were even smaller than the ones on the banner! When I did these very flags before on my Pyro Pinta build several years back, my then eleven year old daughter had graciously complimented me on my “cool flying monkeys.” Sadly, my skills don’t seem to have progressed much since then…

With the eight castles added in yellow, I’m calling these done. They are far from perfect, but my hope is that the less than elegant renderings will still harmonize with the heavy style of detailing on the rest of the kit.
8 Likes