Building Pyro's classic model of Colubus' least known ship
This is partial text from the full article (usually with photos) at https://modelshipwrights.com/news/building-pyro-s-pinta
Building Pyro's classic model of Colubus' least known ship
Hi All,
I just put this Building Pyro’s Pinta piece on the Features section of the MSW content page, but most of the pictures appear there as links. The following is the same article with the pictures directly visible - which should make for an easier read!
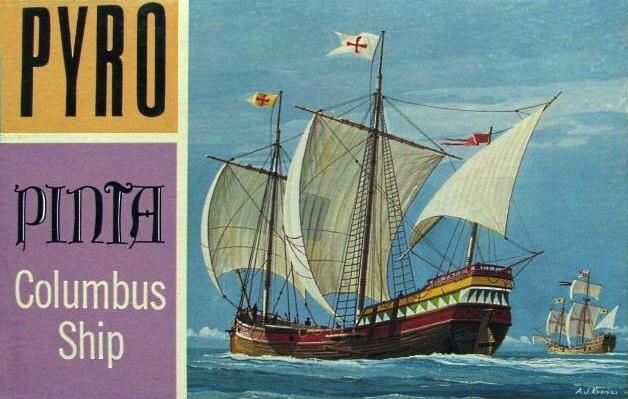
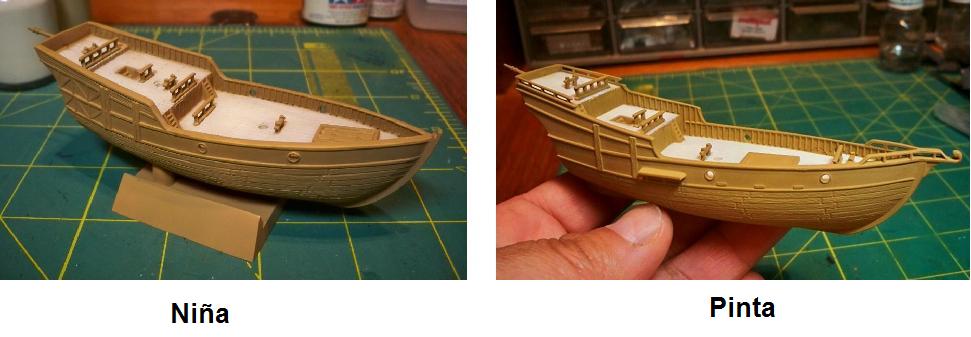
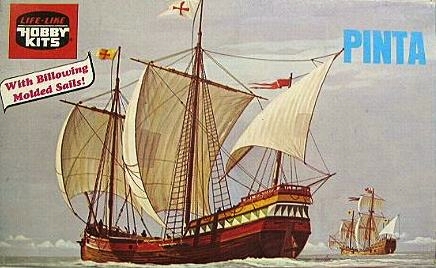
Number 12 of Pyro’s “Antique Ship” series, the Pinta was first issued way back in 1966. The kit has also been produced over the years by Life-Like and by Lindberg. The latest issue is as part of the recent Ships of Columbus: Niña, Pinta & Santa María release by Round 2 Models which features the same plastic as before along with the classic box art from the original Pyro releases. The Pinta’s hull measures 5 3/4 inches in length, scaling the model at about 1/150.
The Pinta is the ship of Columbus’ famous fleet about which we know the least. Like the Niña, the Pinta was a small carabela redonda (caravel). She was square rigged, probably about 73-75 feet in length, and had a crew of 26 (compared to Niña’s 24 and Santa María’s 40). The only historical records concerning the ship have to do with Columbus’ voyage of discovery in 1492. What we do know is that the Pinta was owned by Cristóbal Quintero of Palos, and that she was commandeered by Queen Ysabel (Isabella) of Castile for Columbus’ voyage. The ship was captained by Martín Alonso Pinzón, an experienced mariner ten years Columbus’ senior. Columbus mentions in his log that shortly after leaving Spain the Pinta had rudder trouble, but he was confident that Pinzón, “a man of energy and ingenuity”, could resolve the problem - which he did. Pinta’s captain was also reputedly instrumental in helping Columbus calm the mutinous crew of the Santa María during the outward passage. Unfortunately, Pinzón’s energy and ingenuity were not matched with discipline; throughout the voyage he had a habit of sailing off ahead and losing contact with the rest of the fleet. On October 12, 1492, this resulted in Pinta’s seaman Rodrigo de Triana being the first European since the Vikings to set eyes on the New World (although Columbus later cheated the man of his reward, claiming to have seen land himself the night before!) Later, as the fleet explored the Caribbean islands, Pinta again disappeared (apparently hunting for gold) for nearly four months before rejoining Columbus. No gold was found, but Pinta had earned the distinction of being the first ship to reach Haiti. Finally, as the ships were headed home, Captain Pinzón again abandoned Columbus midocean and the Pinta became the first ship to reach Europe with news of the Discovery.
After that …nothing. There was the so-called “Molasses Reef wreck” found in Turks & Caicos Islands near Cuba in 1976 which was thought by some to have been the Pinta, but although of the correct size and age, evidence for any specific identification of the wreck has never been found. As far as history is concerned, the story of the Pinta ends with her arrival home at Palos, Spain, in 1493.
I built this model from the Life-Like reissue.
The hull/deck went together quickly. The one small modification I couldn’t resist making was to cut away the unconvincing molded on shroud ends from the channels on the hull sides.
An interesting mystery concerning the Pinta is her name. We know the meanings of the names of Columbus’ ships Santa María (“Holy Mary”) and La Niña (“the little girl”), but what about the Pinta? The word pinta literally means “spot” or“ appearance” in Spanish, but neither of these would have made much sense as a ship name. Perhaps the name Pinta may suggest that the ship was painted in someway (pinta could be taken to mean “paint”). The idea is appealing; Pyro’s box art shows the ship in a very romantic, colorful paint scheme, but the inaccurate expedition flags (the actual designs and colors of which are well known) and white-and-green triangular motifs on the hull (which are accurate –but for ships of the English House of Tudor a century later) reveal that the box art colors are no more than artistic whims. Unfortunately, other than the possible hint in the name “Pinta”, there is no supporting evidence for any 15thCentury Spanish ship having been painted.
Although known as the Pinta, the ship’s real name is now lost. Spanish ships of the 15thCentury were officially christened with religious names, but unofficially they were often known by nicknames (the Niña was actually the Santa Clara, for example).These nicknames were sometimes puns on the family patronymic of the owner (such as Juan Niño de Moguer, Niña’s owner). So what about Pinta? The ship’s owner was Cristóbal Quintero of Palos, so that answer doesn’t really seem to fit. However, in his Admiral of the Ocean Sea - A Life of Christopher Columbus, historian Samuel Eliot Morrison offers the amusing conjecture that Pinta’ s owner Quintero might have been married to a woman of the Pinto family (there was a Pinto family in Palos at the time) who henpecked him – and the crew called their ship La Pinta (feminine form of Pinto) as a joke on him!
Another possibility is based on the fact that Spanish ship nicknames sometimes referred to some quality of the vessel itself. A caravel on one of Columbus’ later voyages, for example, was known as La Gorda (“the fat girl”). It is possible that “La Pinta”, which could mean “the painted girl,” was intended to mean prostitute or whore! Outrageous as this might seem, it is documented that Spanish sailors did at times give their ships such scurrilous names. A famous example is the galleon Nuestra Señora de La Concepción (Our Lady of the Immaculate Conception), which was known to her crew as the Cagafuego (“Shits-fire”). And Columbus’ log does record numerous technical problems that plagued the Pinta during the voyage – leaks, a sprung mizzen, and rudder that repeatedly jumped its grommets… Could the ship have been a temperamental old crank, difficult to sail? That might possibly have earned her an unflattering nickname from her crew! It is an amusing notion, but I suppose we’ll never know…
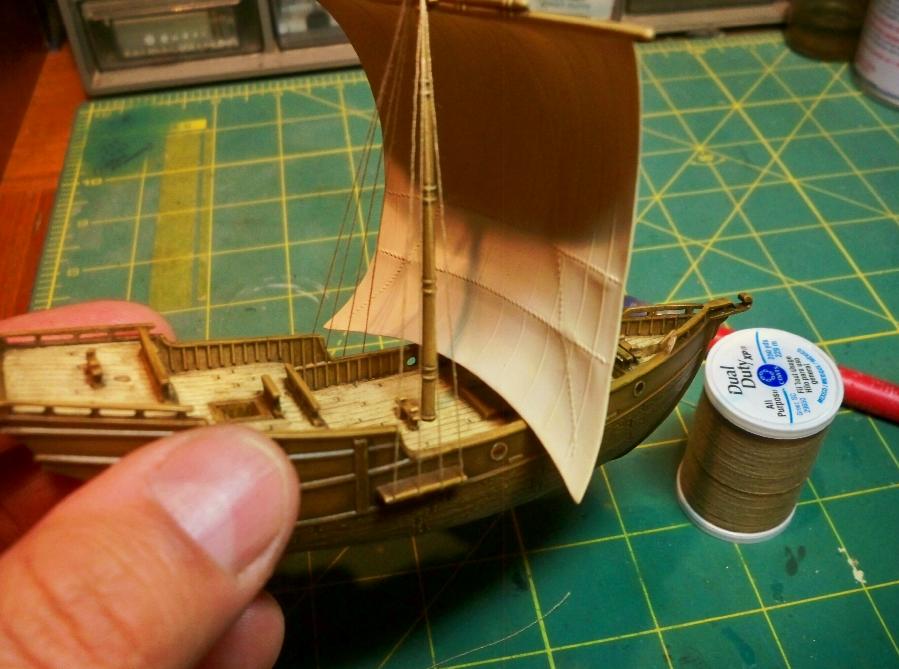
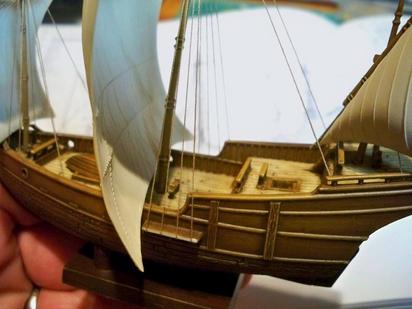
After cleaning up some nasty knockout pin marks on the sails, I attached them to the masts. Dry fitted to the hull, the little Pinta starts to take shape. Rather similar to the Niña, the square rig and bowsprit gives the Pinta a distinctly different look.
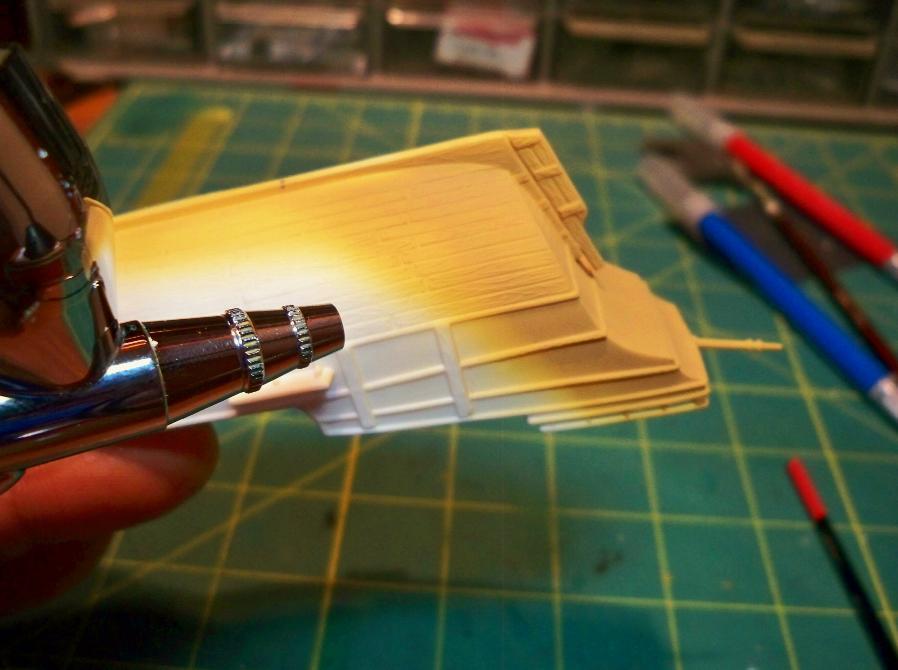
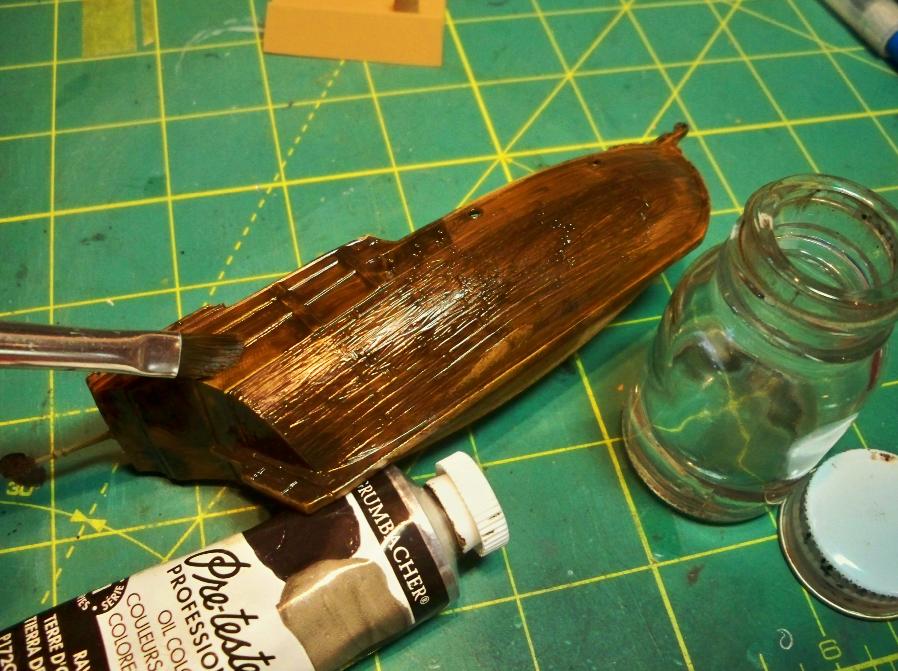
Although I played with the idea of painting the Pinta up in bright colors like the box art, in the end I just couldn’t find any historical support for it. So she got a “natural wood” finish with an initial coat of Tamiya XF-59 Desert Yellow acrylic on the hull.
The deck then got its light tan color (XF-57Buff and XF-59 White mix), with the rails, cleats, and hatch picked out in the same color as the hull. The ship’s boat, masts, and spars will be the same as the hull too.
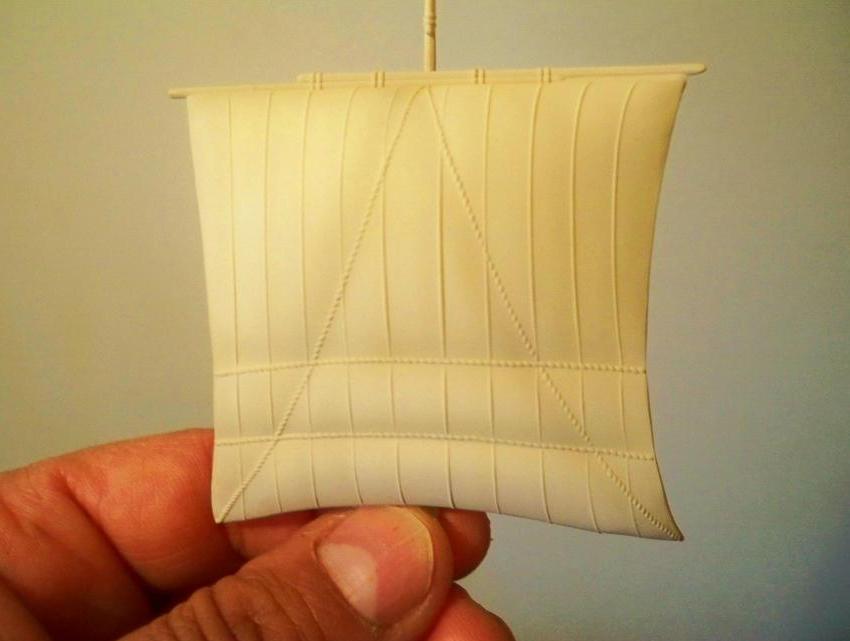
The sails got an airbrushed coat of the light tan mix I used for the deck. I also shot a slightly darker version of the same color along the vertical raised “seams” to give the sails a little more depth. The contrast is difficult to see in the picture, but it helps subtly define the separations between the main sail and the two horizontal canvas “bonnet” sections below it.
The Niña and Pinta hulls really are very similar…
To get a natural wood effect I coated the acrylic Tamiya paints with Grumbacher Raw Umber artist’s oil.
When wiped down with a thinner-dampened towel, enough of the oil paint remained behind to leave darkened shadows in the recesses and a pleasing wood tone over the rest of the wood areas. Test fitting the mainmast, things look good as I set the hull aside to give the slow drying oil paint a few days to cure.
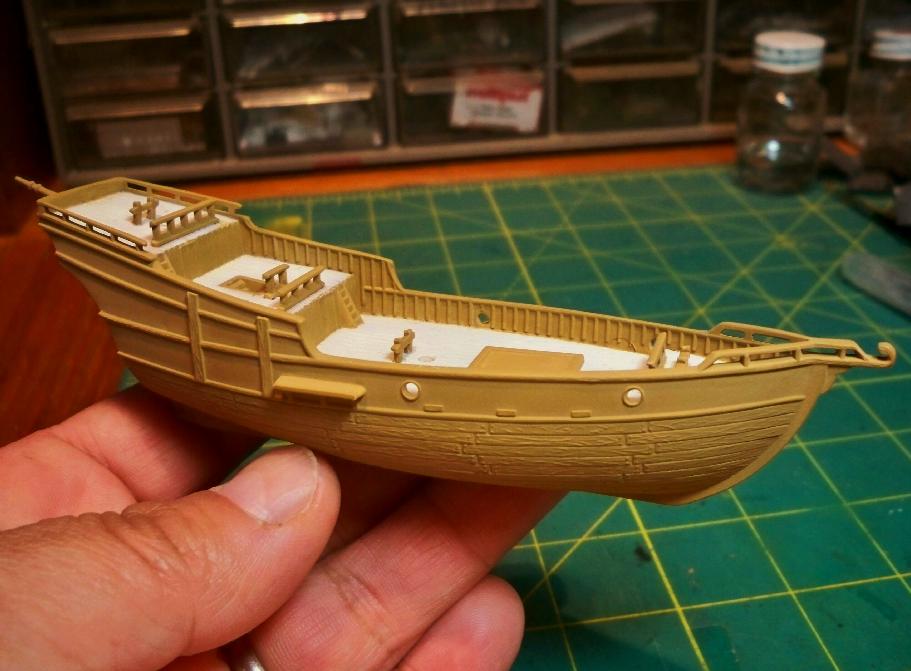
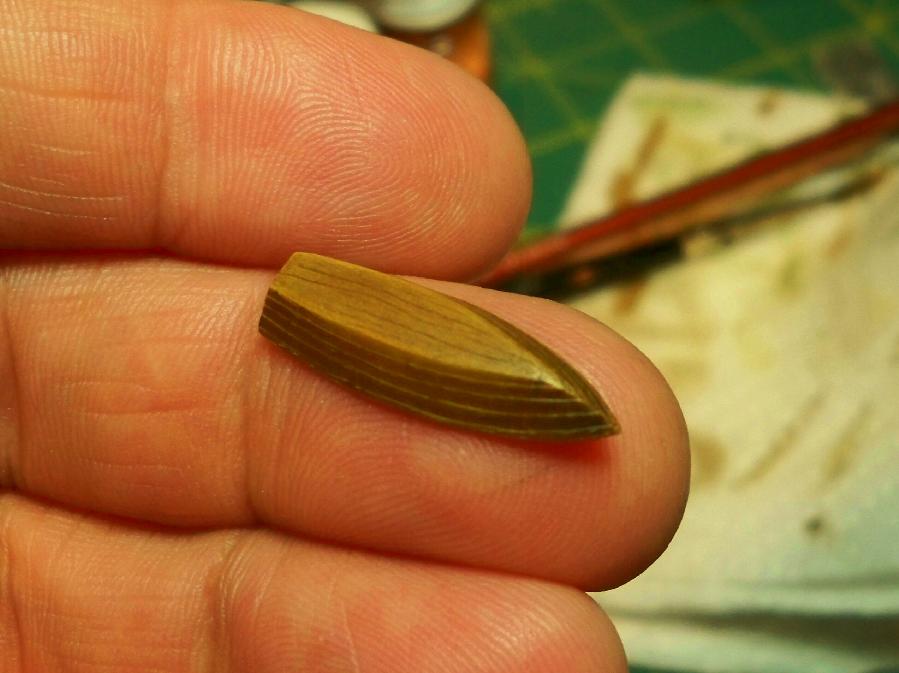
Along with the hull I also painted up the ship’s boat. The kit part had nice clinker style planking on the sides, but the bottom was featureless (and slightly concave). After sanding it flat I scribed some wavy lines on it with the tip of my x-acto. Under the stain, the lines suggest wood grain.
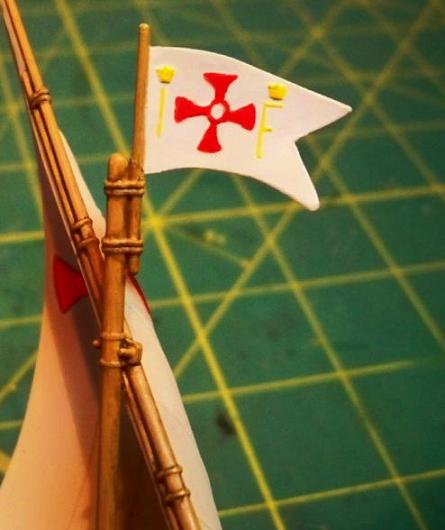
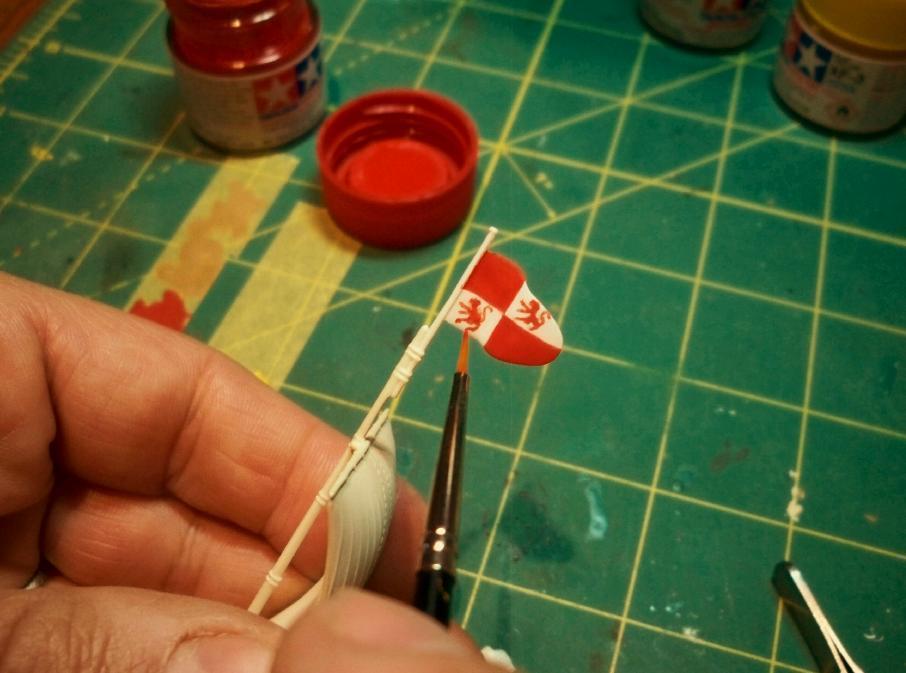
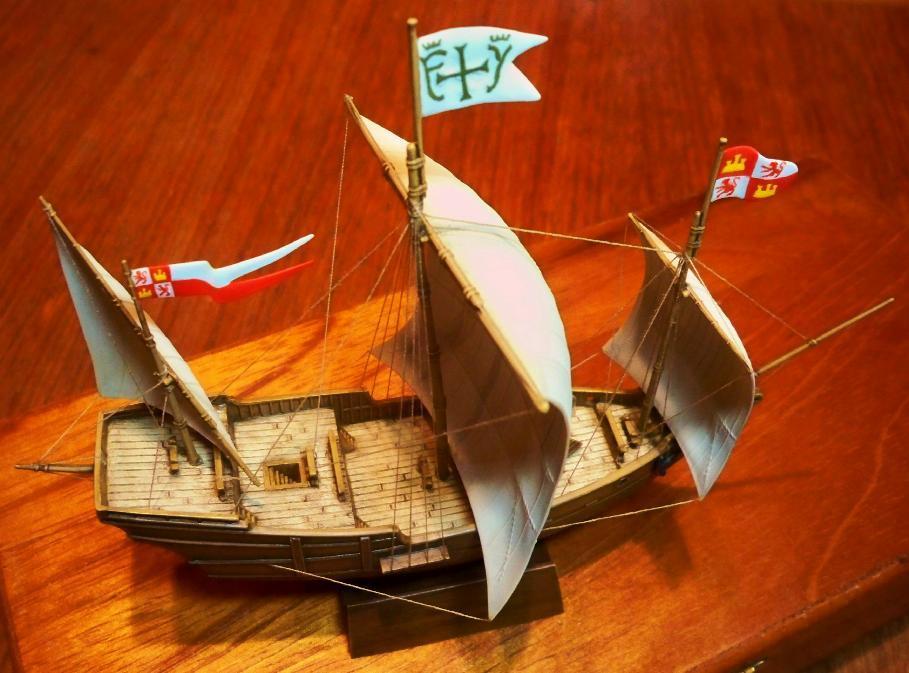
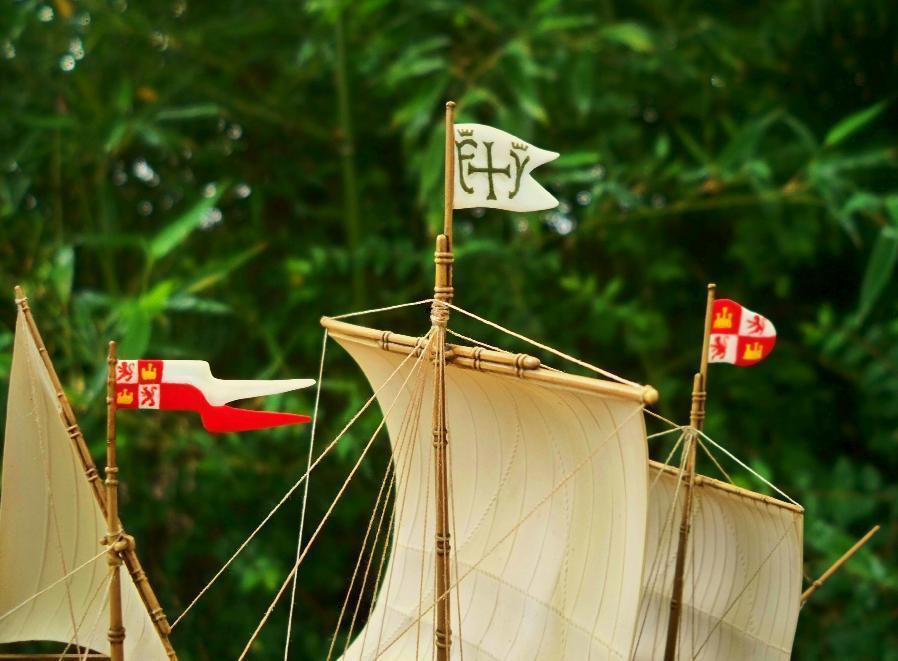
The first flag I wanted to take on was the simplest – the Expedition Standard. It consisted of the sacred cross flanked by the letters “F” for Fernando de Aragón (Ferdinand of Aragon) and “Y” for Ysabel de Castilla (Isabella of Castile). Each of the initials was topped with a crown.
I had painted this Standard before on the Pyro Niña build. The flag was depicted on the Niña box art with a red cross and yellow letters and crowns on a white background, which I duly replicated on the Niña model:
…WRONG!
I had violated the first rule of modeling by relying on the kit box art for reference. Although the design of the standard was basically right (except for the “I” in place of the “Y”, and the order), the colors were definitely not! (The Pinta kit box art was even further off, showing the Standard as a red cross on a white background with no letters or crowns at all).
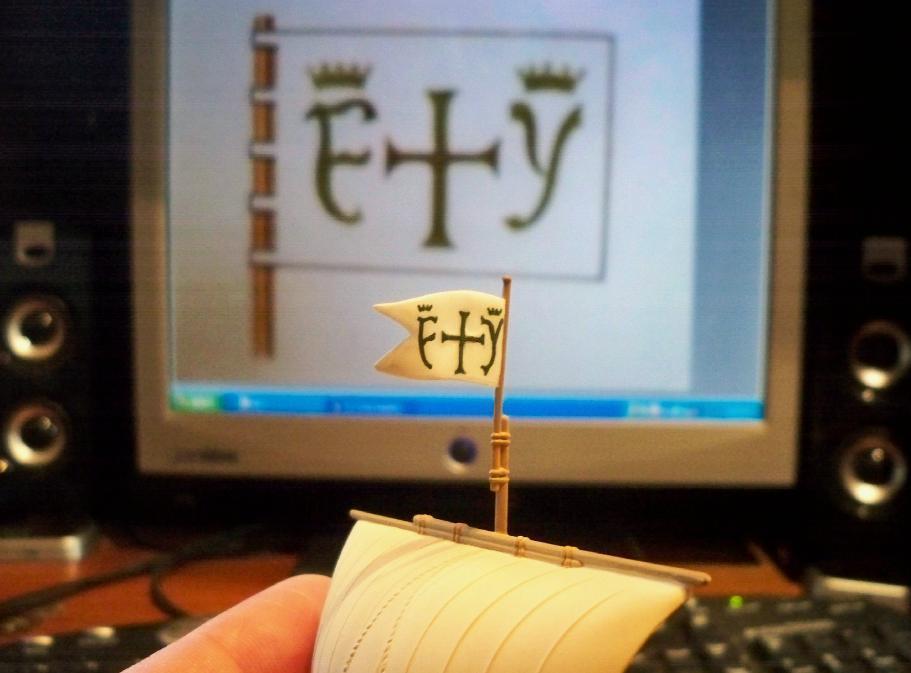
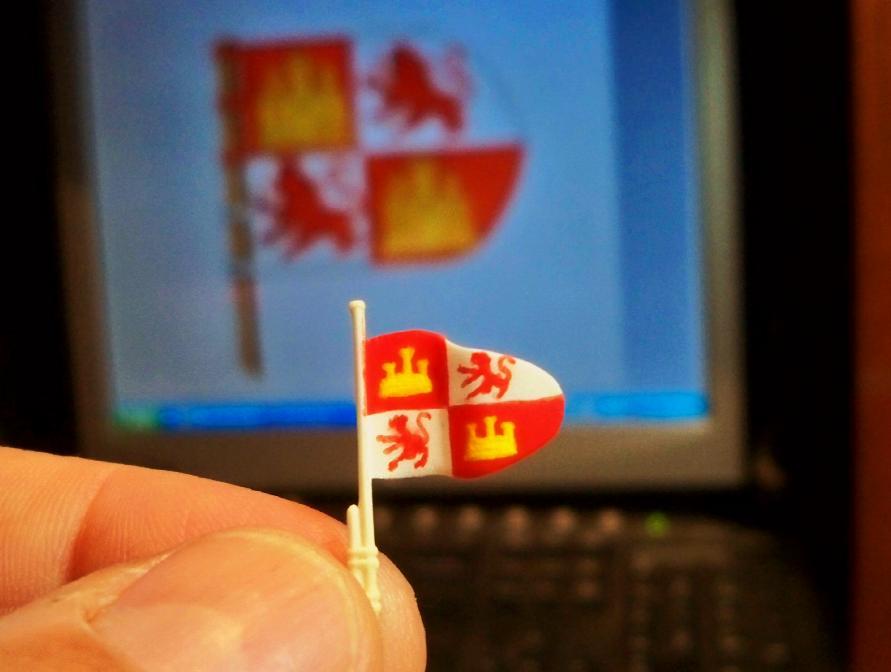
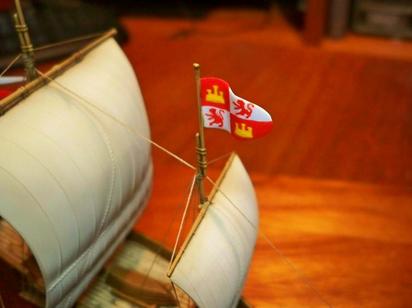
This time I did my homework and found that, unlike much from this time, the colors of the Columbus Expedition Standard are actually well documented. Presented to Columbus by the Queen for the voyage, the Standard flown by the fleet was clearly described in the Admiral’s journal: the background was white, and the letters and crowns were in green. So for the Pinta I did the flag more accurately, following the image from Xavier Pastor’s The Ships of Christopher Columbus (visible on the computer screen in the background).
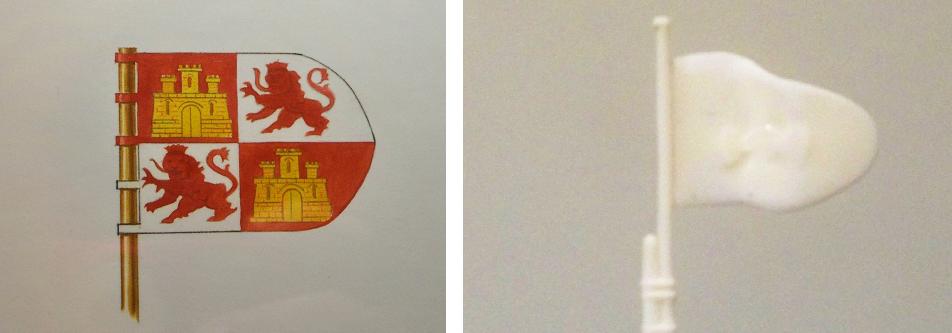
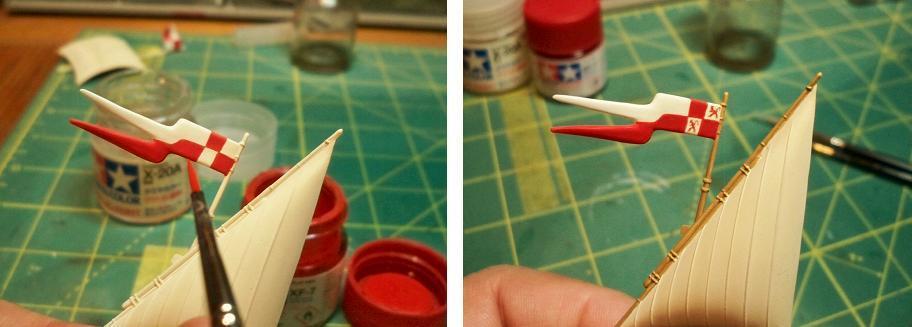
The Royal Standard carried by Columbus’ ships was the Bandera de Castilla y León (flag of Castile and Leon)which consisted of the quartered coats of arms of Castile, represented by a castle, and León, represented by a lion. This was Queen Isabella’s flag.
Compared with the image from Xavier Pastor’s The Ships of Christopher Columbus (Anatomy of the Ship) on the left, the flag as depicted by Pyro was accurate only in shape. I sanded away the incorrect raised maltese cross on the center of the kit part before thinning the edges and giving it a base coat of white. Then I brush applied the red quarters over the white. These would have been perfectly straight on the real flags, but, but since waving flags are not quite flat a little variation from my imperfect hand painting job worked just fine!
Ok, so much for the easy part. Now it was time for the rampant lions in red over the white quarters. These tiny ,complex figures were intimidating to paint – and I had to do eight of them over two flags! Having no real idea how to proceed, I took a few sips of Jack Daniels Tennessee sour mash (to steady the hands, you know), got out my smallest brush, thinned some Tamiya red and just started in. Working slowly and steadily following Pastor’s fine artwork, I eventually came up with a set of lions that I thought looked pretty decent.
They weren’t perfect, but I thought they caught the look well enough. Opinions do vary, however: my eleven year old daughter, looking over my shoulder as I finished, graciously complimented me on the “cool flying monkeys” on my flag.
Oh, well…
Anyway, with the monkeys on the Castilla y León flag somewhat tamed, I moved on to the pennant.
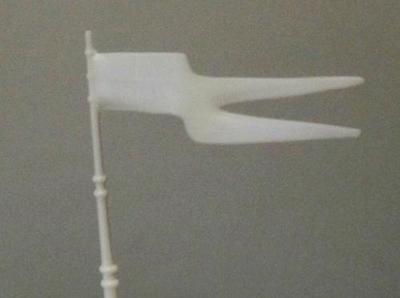
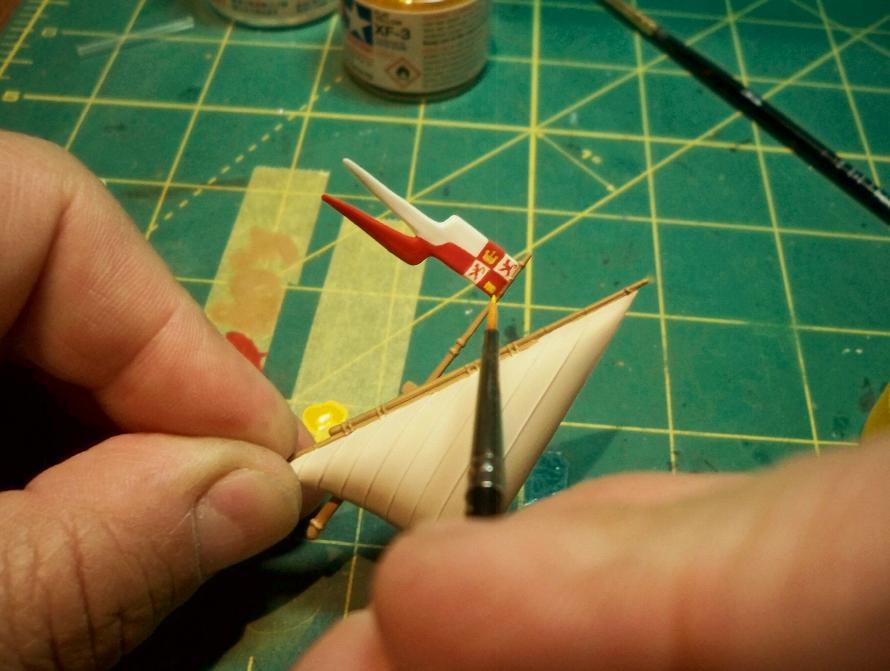
Pyro had depicted the swallow-tailed pennant as waving, which is good, but the thing is also completely flat! Nice try, but YUCK. The part looked so unrealistic I’d considered cutting it off the mast and just going with the two other flags, but in the end I had nothing to lose by trying to fix it with paint…
The flying monkeys (lions) were even more challenging on this smaller flag, but they are harder to see too! The painted pennant still isn’t that great, but the busy pattern adds interest and it does tend to mask the two-dimensionality of the part.
Since I wanted to keep the Pinta a quick build, the rig was a simplified outfit of lines which I hoped would convey a reasonable impression without bogging things down too much.
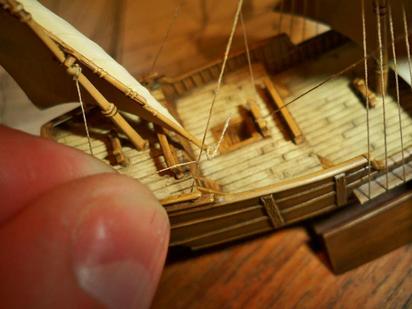
Beginning with the standing rigging(the fixed lines that hold the masts in place), the first task was the shrouds. The kit had come with molded shrouds sporting horizontal ratlines for the mainmast, but they were so heavily molded I just couldn’t bring myself to use them.
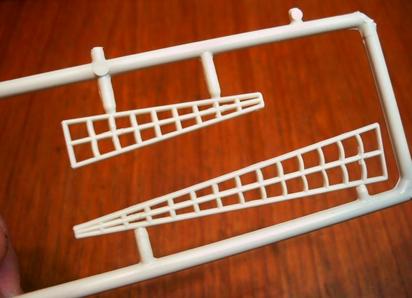
(The pic actually shows the Pyro Niña shrouds, but the Pinta’s were just as thick.)
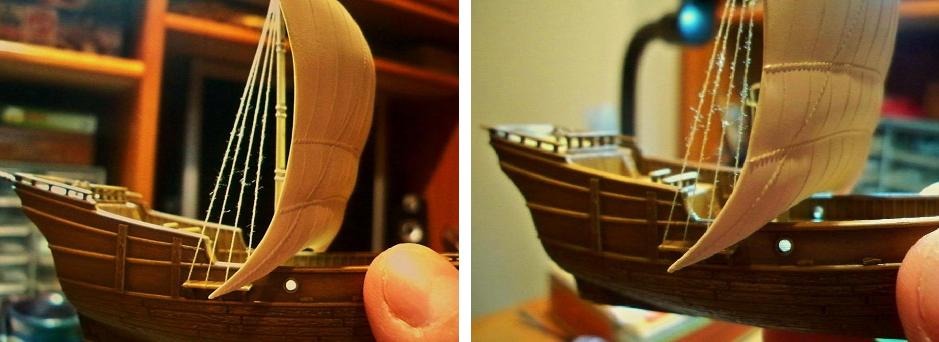
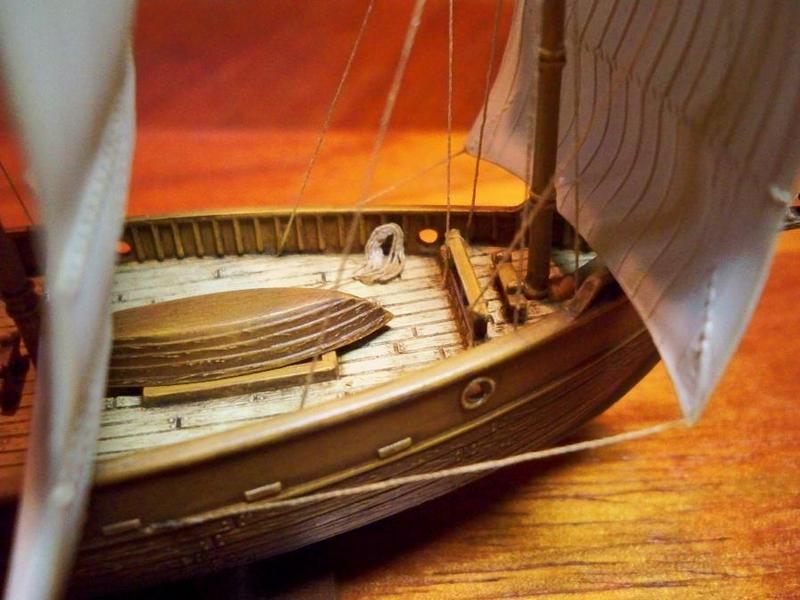
I opted instead for polyester sewing thread which is cheap, tough, and looks just like miniature rope. First, however, I had to determine the exact number of shrouds to install. As with many details about 15th Century caravels, this seems to be open to interpretation. The Pyro kit part had three per side, but the full-sized Columbus Foundation Pinta replica has five per side, and the Corpus Christi Museum of Science and History replica ship has six; I split the difference and went with four. Also, following the Columbus Foundation and Corpus Christi replica ships, I decided to leave out the horizontal ratlines and installed only the vertical shrouds. Apparently with these small ships the sails are adjusted by lowering the yards to deck level rather than having sailors scramble aloft, so there is no need for ratlines.
Assembly was straightforward. Each shroud was first tied to the mast, then the ends were attached to the channel edges on either side below. There should be complex tightening tackle with deadeyes and attachment fittings at the base of each one, but for simplicity I just super glued them in place.

I installed the mainmast shrouds and was happy with them…
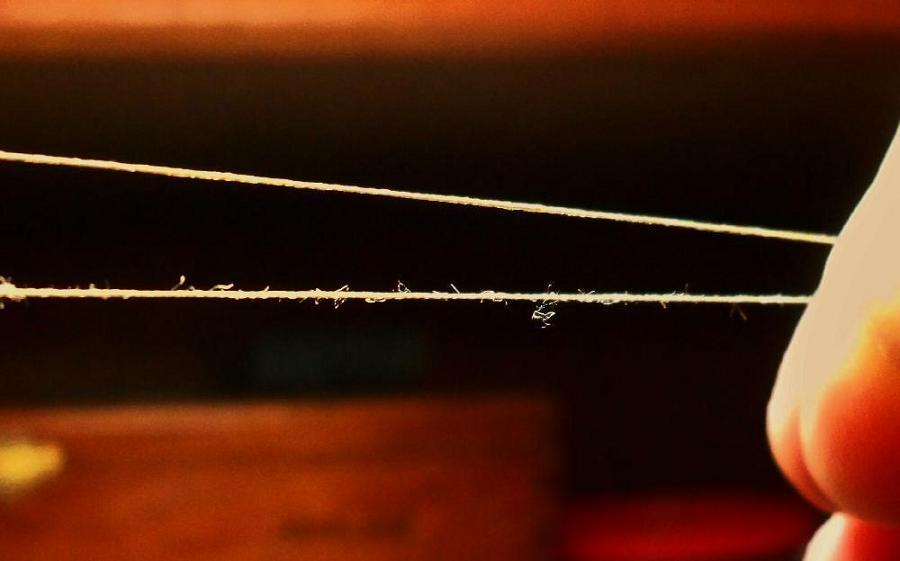
…until I looked more carefully. Seen closely and backlit, the lines were covered in fuzz!
Sewing thread is great for replicating miniature rope because it is essentially made the same way with small fibers twisted together to make a thicker line. Unfortunately, just like real rope, there are always numerous breaks in the small fibers which protrude from the sides of the line. These aren’t conspicuous on full sized rope, but in miniature these little pennants can combine to create an unrealistic fuzz.
I had heard that this can be eliminated by burning the fibers away with a flame passed quickly by the affected lines.
BAD IDEA!
This may work with the cotton threads typically used for sailing ship model rigging, but forgot that I had used highly flammable polyester thread; when I passed the flame by them they instantly ignited and melted!
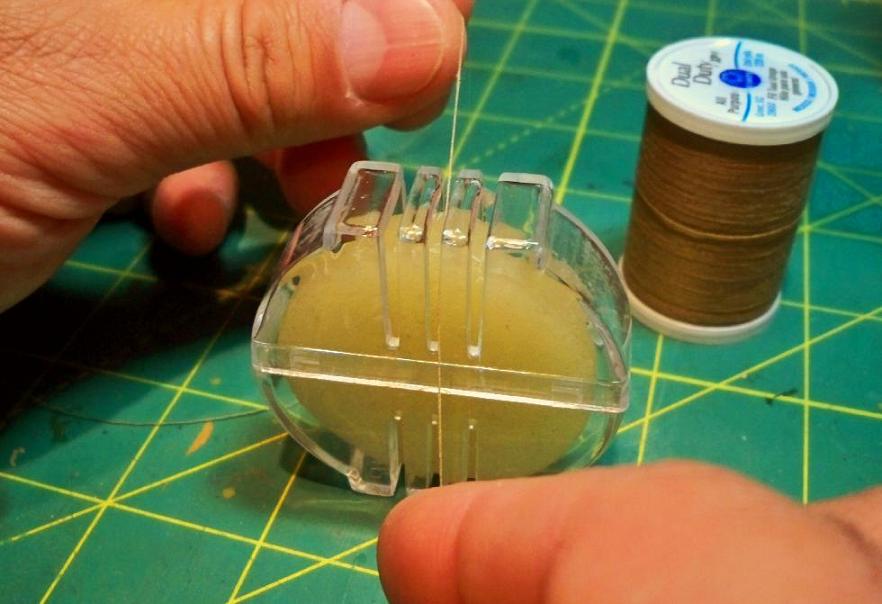
Before replacing the ruined shrouds, I bought some beeswax, tried it out – and what a difference! Just passing the thread through the wax a couple of times smoothed things out remarkably.
Not only did the beeswax take care of the fuzzies, but it also made the thread more supple, easier to straighten, and generally better to work into rigging. This is the first time I’ve used it, but I am already a convert!
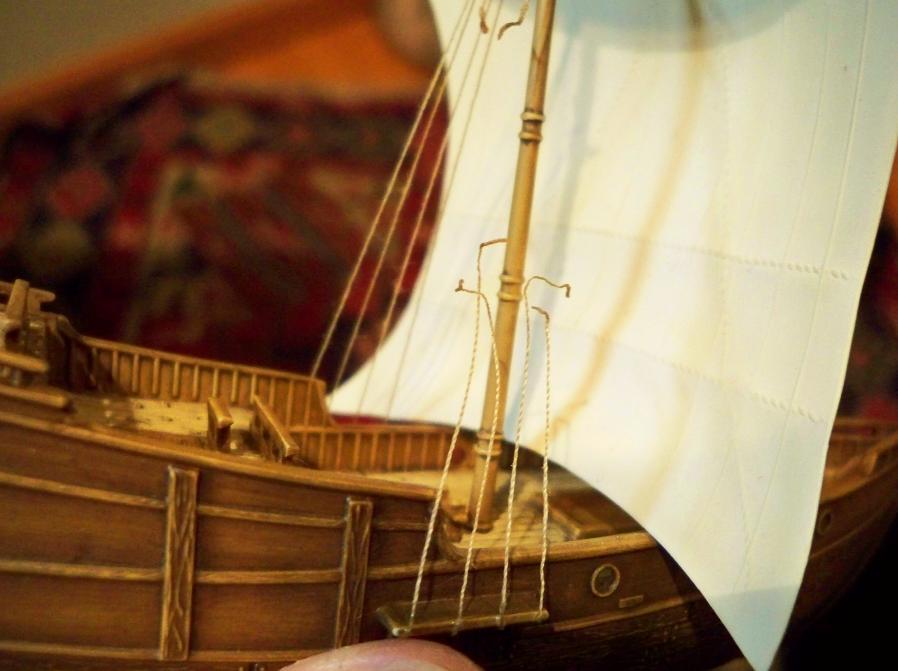
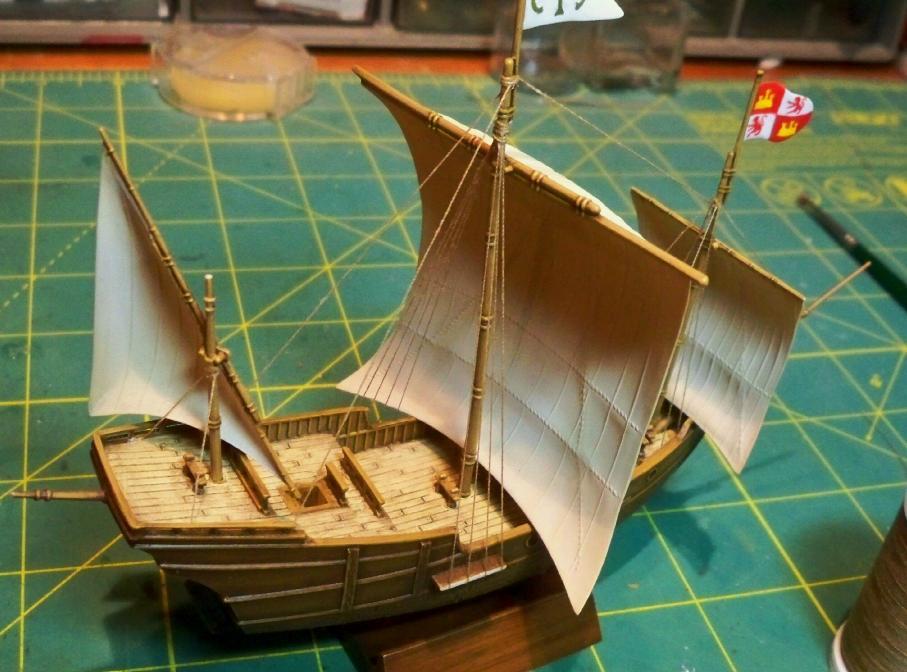
With my newly waxed threads I replaced all eight shrouds on the main mast, added four to the foremast, and two to the mizzen. Forestays now run from the mainmast to the foremast and from the foremast to the bowsprit. Backstays from the main and fore masts anchoring them to the deck finish up my abbreviated standing rig.

The rigging was proceeding nicely, but in my haste to move things along I snagged my finger on the swallowtail banner and snapped it and the top of the mizzen mast off. Doh!
The molded sails and flags are surprisingly life like and animated. I’ve always wondered why most kit manufacturers (including Pyro) abandoned the practice of molding the sails in polystyrene and went instead for those vacuform things, which are harder to use and never seem to look as good.
Having finished with the standing rigging, I am now adding the running rigging (that is, the lines that control the sails). As with the standing rigging, the running lines are not comprehensive but rather consist of a representative sample to present a basically authentic but simplified rig that is balanced with the limited detail of the old Pyro base kit.
To attach these lines Itie simple slip knots on the ends, loop them around the spars and cleats. I keep the knots on the undersides of the spars to make them less visible. Once in place I fix them with super glue. Lastly, I trim off the dangling ends and brush a little Testors Dullcote lacquer over the attachment points to kill the shine from the super glue.
At this point the lifts, braces, and clews are attached to the fore, main, and mizzen sails and to the various cleats near them. Next I’ll reattach the broken mizzen top with its banner and install the tacks and sheets on the fore and main sails.
In the home stretch now!
The Castilla y León swallowtail, which I had snapped off along with the top of the mizzen mast, is now back in place. I still think the two-dimensional pennant looks a little odd up close, but the flags do add some fun splashes of color to the otherwise plain model.
Next came the mainsail sheets – that is, the lines attached to the bottom corners of the mainsail. The kit sails had come with holes here to tie the rigging, but they were way out of scale so I filled them in. Instead, the lines were attached to the sails with dots of super glue. It may look a little strange that the other ends simply attach to the sides of the hull, but on the actual ship they actually passed through small holes called “reeving sheaves” to control points on the main deck inside the cabin aft.

I like learning as I go along on builds – this is the first time I had encountered reeving sheaves. These were used on ships of this era because of the high sterns which, even on small caravels like the Pinta, rose well above the lower level of the sails where the sheet lines were. If these lines had attached to the cleats on the upper stern weather decks they would have had to angle up and then bend sharply down over the tops of the rails. The reeving sheaves simplified things by allowing both the main and foresail sheet lines to be controlled from the main deck level, which was about even with the lower edges of the sails.
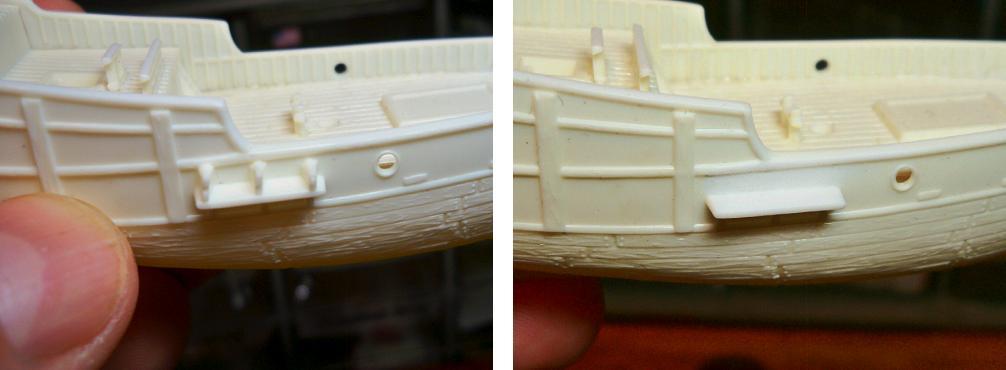
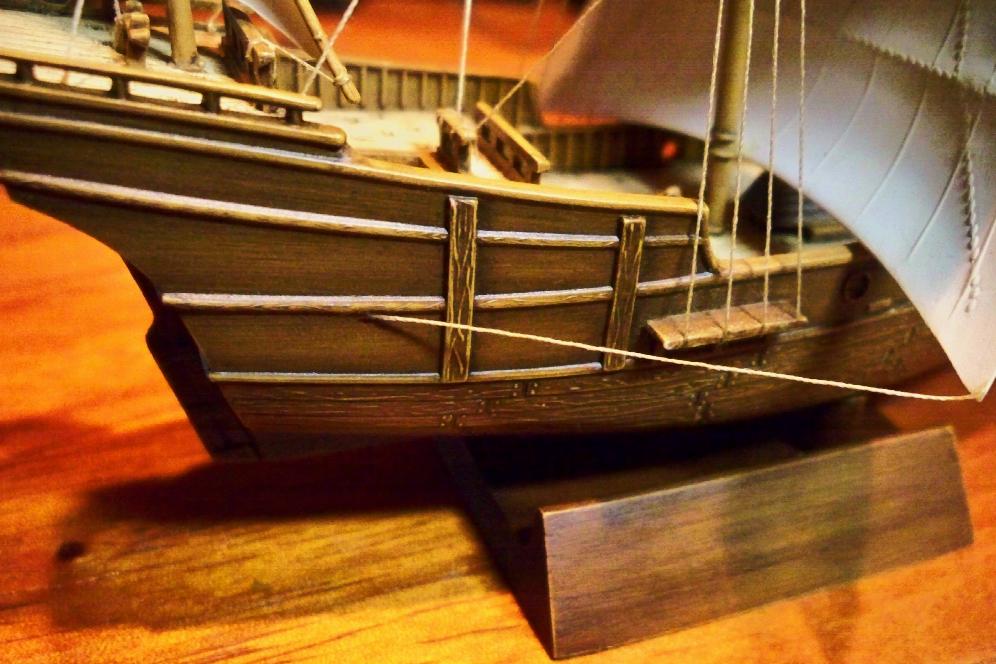
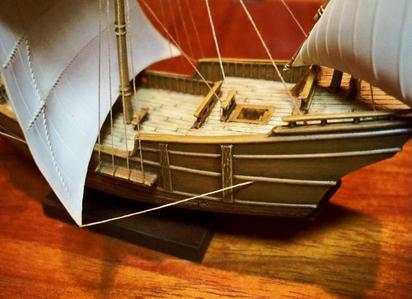
Reviewing pictures of the model after finishing up the rigging, I was annoyed to discover a circular knockout pin mark on the portside gunwale I had missed when assembling the hull.
Impossible to fix now without taking things apart, I decided my best option was to simply hide it:
Carelessly tossed against the gunwale by a sloppy sailor, the errant coil of rope apparently hasn’t yet been discovered by the chief boatswain.
That’s my story and I’m sticking to it!
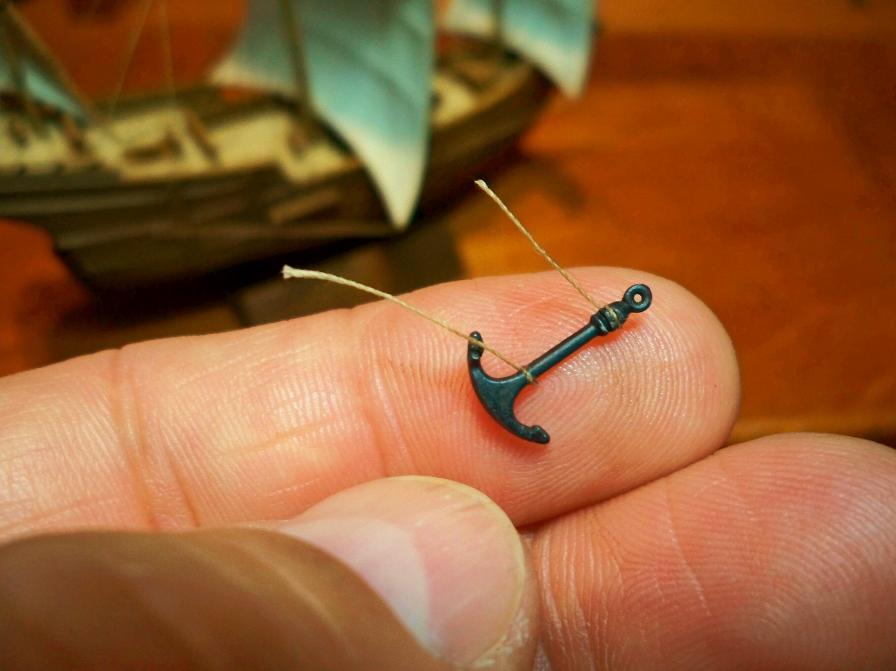
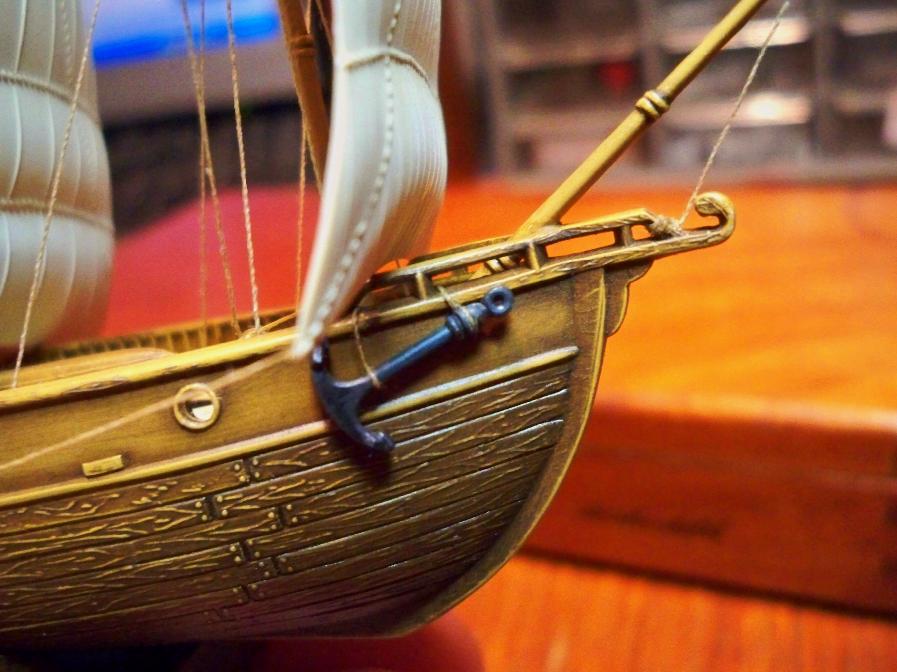
The final detail to go aboard the Pinta was the anchor. The kit was designed to have the anchors glued to small nubs which stick out of the hull, but they looked strange as they didn’t seem to be secured in any way. I added some retaining hawsers to the anchor to show how it was fixed to the hull but otherwise used the part unchanged.
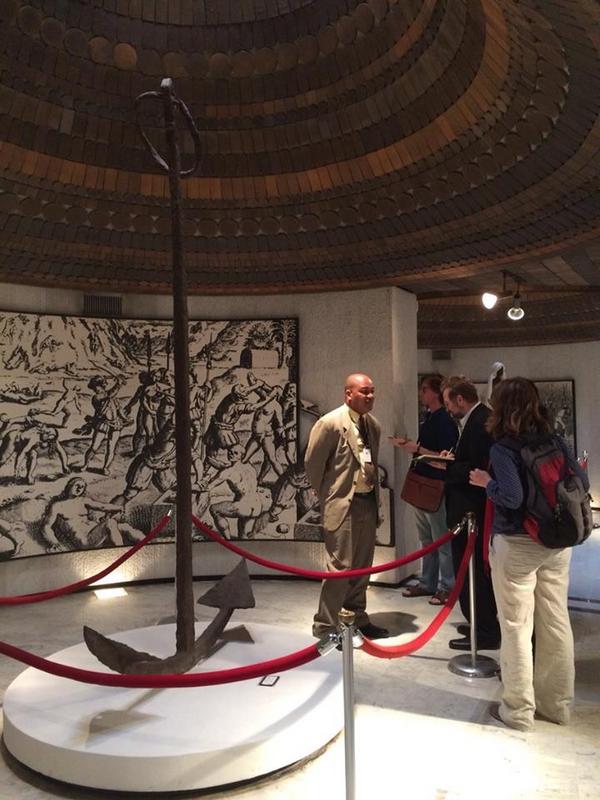
Another surviving anchor is from the so-called Molasses Reef Wreck at the Turks &Caicos Islands near Cuba. When it was discovered in 1976, the salvage team boldly announced that they had found the wreck of Columbus’ Pinta. Although this was never proved, subsequent marine excavation showed that the ship was a three masted caravel of the same period and size as the Pinta, and it probably sank around 1513… so it could actually be her! Whatever the ship’s identity, the recovered anchor is on display at the National Museum at the Turks & Caicos Islands:
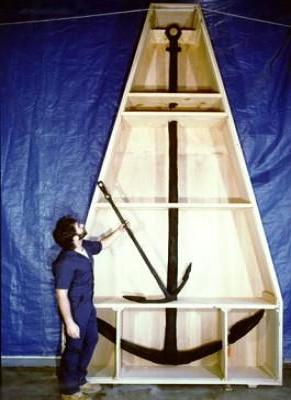
So Pyro’s anchors appear to have been at least generally accurate after all. The kit parts were still way too thick, but since this was an out-of-the-box build I went ahead and used them anyway. Just for the heck of it, I mounted only the starboard anchor. Spanish 15th Century anchors, secured with natural fiber hawsers rather than chains, were frequently lost – so why not?
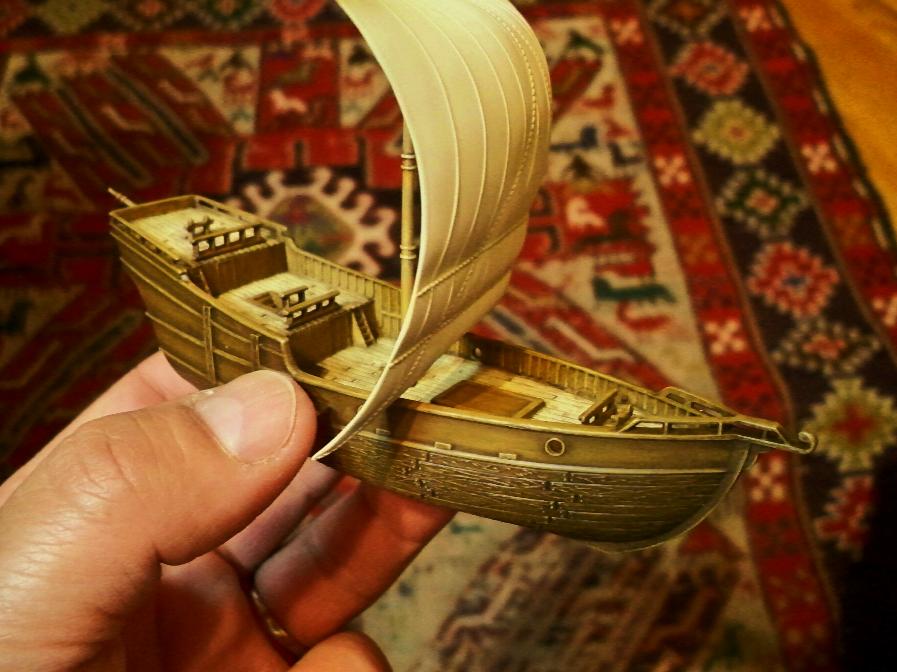
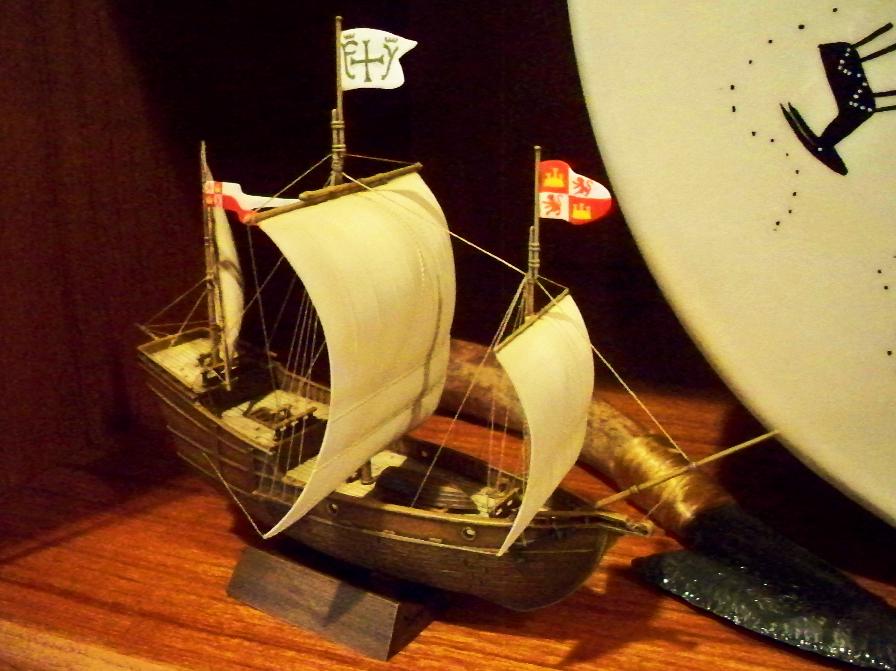
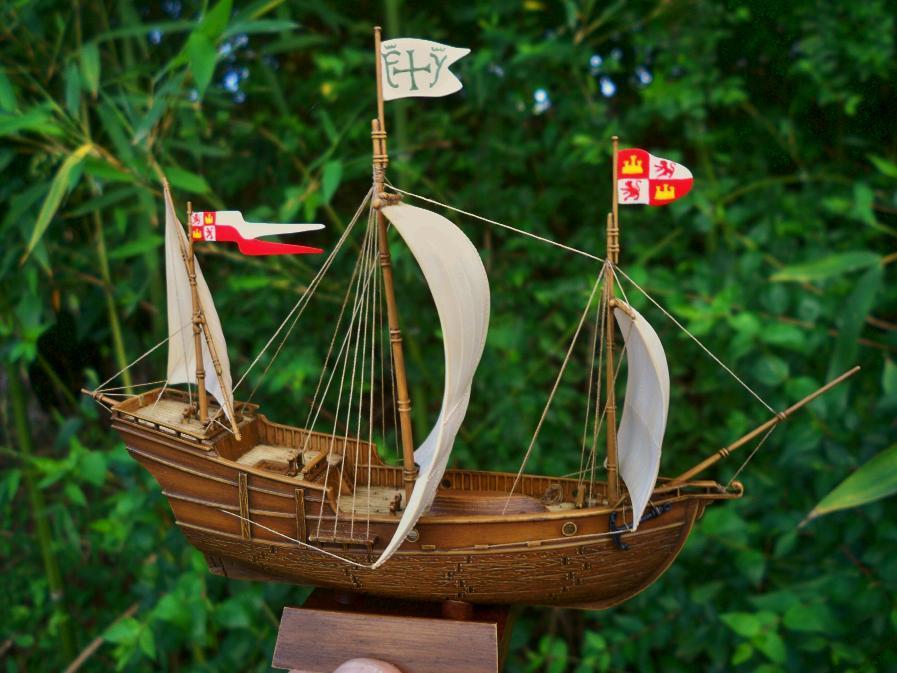
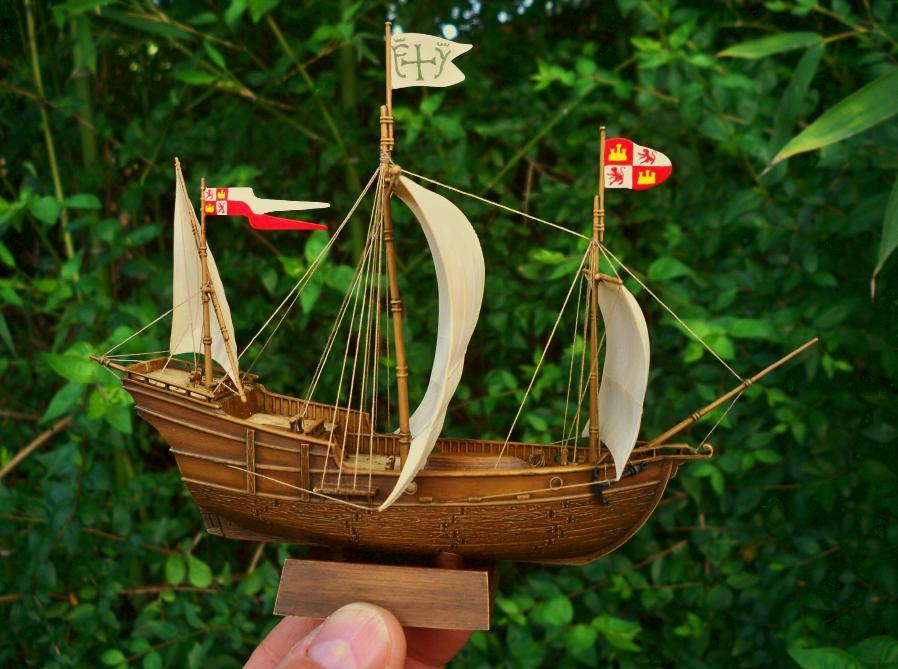
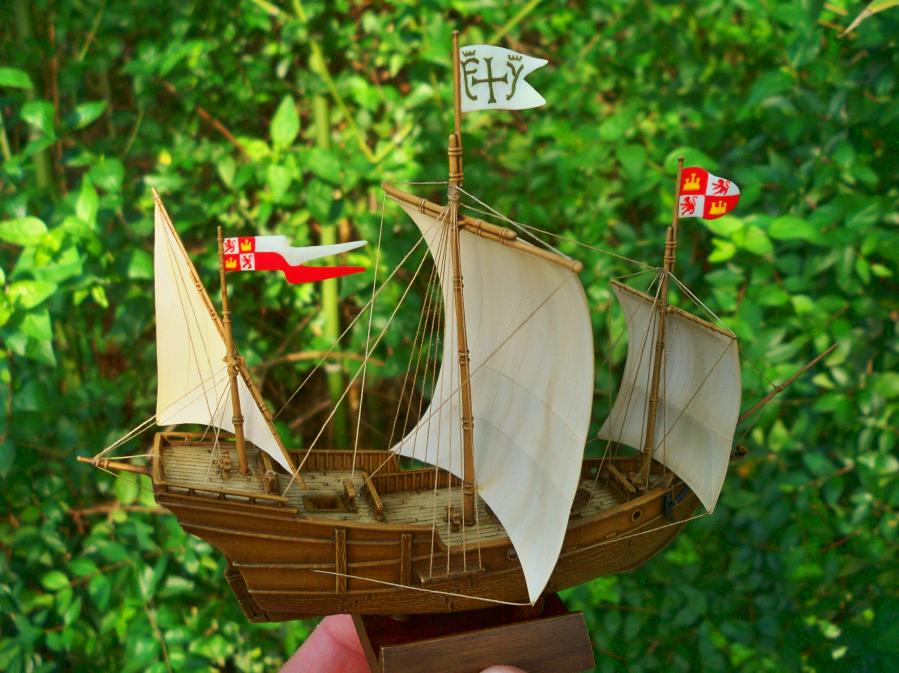
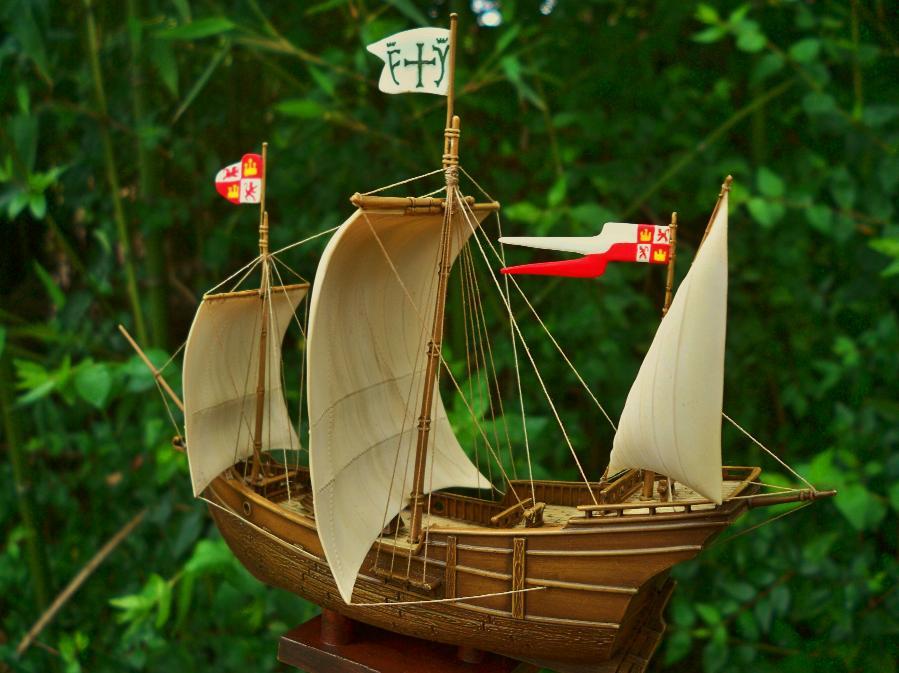
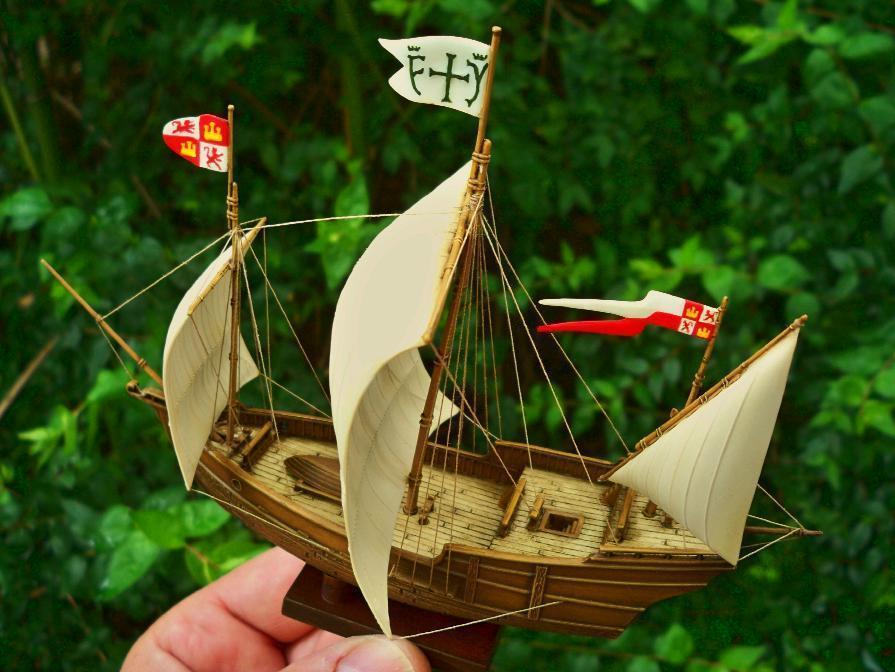
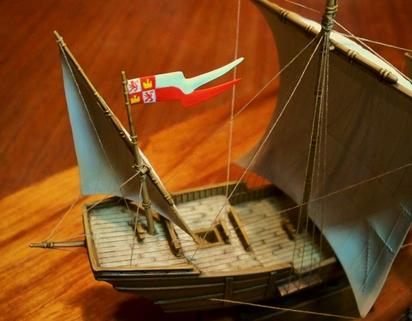
Anchor secured aboard and every inch of sail aloft, La Pinta takes her place alongside her semi-sister Niña!
Tim, it’s been great to watch you build these old models. I’m sorry it’s taking me so long to tell you that. Any more of the Pyros that you build, I look forward to.
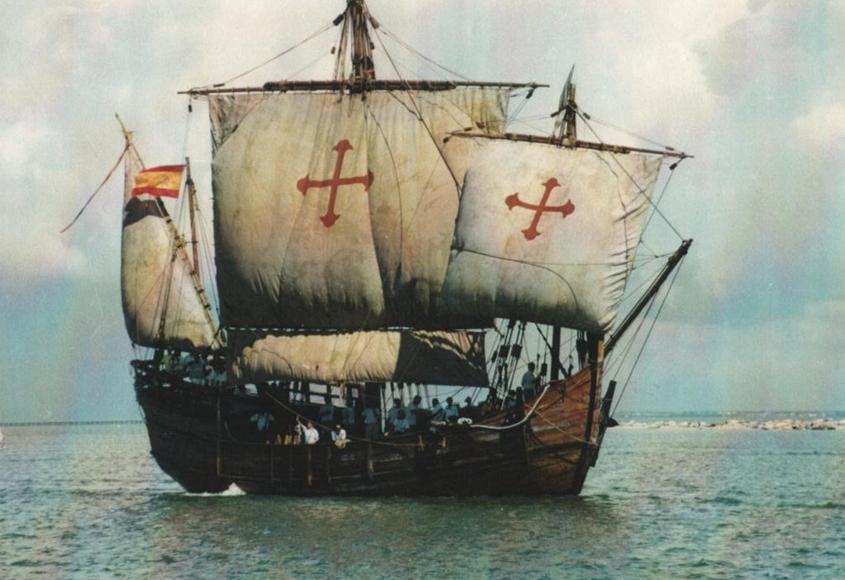
What a neat little model, and from such an old mold! I have a few of Heller’s smaller kits - mostly fishing boats, in 1/144 - 1/160 scale, as well as a 1/75 - 1/72 Pinta. I’ve always wanted to build one, but always get hung up on the rigging!
![]()
![]()
What a neat little model, and from such an old mold! I have a few of Heller’s smaller kits - mostly fishing boats, in 1/144 - 1/160 scale, as well as a 1/75 - 1/72 Pinta. I’ve always wanted to build one, but always get hung up on the rigging!

Leo, you should do these builds! As for the rigging plan for the Pinta, it was relatively straightforward and there are some great reference resources out there. I like Xavier Pastor’s Anatomy of the Ship: The Ships of Christopher Columbus. You need not be put off by the rigging - it is your model, and it can be as simple or elaborate as you like!
Tim, it’s been great to watch you build these old models. I’m sorry it’s taking me so long to tell you that. Any more of the Pyros that you build, I look forward to.
Thanks Fred! The old Pyros are a fun break from the newer, über-detailed kits that look so good but seem to take forever (or at least take me forever) to complete! I do have a few more of these in the stash… a Roman Merchantman, Fijian Outrigger, Gloucester Fisherman… just need to find the time and gumption to get to them! ![]()
Sad to say, there is practically NO hobby shops left in my city (Montreal, Canada!), only a couple of toy stores, or arts+crafts who also happen to have a few models. Shipping on packages that size put them right out of reasonable pricing! ![]()
![]()
![]()
I do have this Heller kit I built several years ago, I think it’s around 1/144, or 1/160:
It came out not bad.
![]()
![]()
Leo, I really like it when model ships are n their element with seascapes - although I don’t usually do this myself. Nice work! ![]()
![]()
Thanks!
![]()
![]()