I’m currently reading Scouts Out and I have crossed the most text parts of the beginning of the book.
And now I came to the photo’s of the next part of the book.
But some questions came on my mind.
How do I get the most out of the photo’s in the book?
Do I only read the descriptions that accompany the photo’s, or do I also take a closer look on the photo’s for a longer period of time?
For example, to memorize it and squeeze every detail out of it for future scale modeling projects?
I’m curious to find out, since all of this is relatively new for me and I still have a lot to learn.
Note I’m noticing that the photo’s and descriptions with them are bothering me for a longer time now. Usually, when I’m reading a magazine or a book. I first read the description that accompanies the picture, then take a small peak or look at the image. Before reading the text further.
I have most of the time used this ‘system’ to read all of my books and magazines and it worked well for me all that time.
I’m wondering if this also goes for the scale modeling reading I do. 
I generally use photos as loose references for diorama ideas. I might try to duplicate the photo or a section of the photo or I may incorporate elements of several photos into one diorama idea.
Cheers,
C.
Interesting question, but one that doesn’t have any precise answer, really.
I’ve used photos for inspiration and motivation. Interesting subjects and scenes offer ideas and suggestions that can lead me to my own project plans.
I use photos as technical references. They show details that are sometimes hard to interpret and mentally visualize if only looking at scale plans and drawings. Photos and drawings can be used together with the information from one complementing the other. Tabulated data on things like dimensions can be used to determine the scales of drawings and the dimensions of objects seen in the photos (with allowances for perspective in the photos).
I use photos as historical references. They can provide the context on locations with details about the vegetation and other features (road signs, architecture, micro-geography, etc.) that place the scene in a unique place. They can provide information about the weather and time of year, providing clues to reason out the “whys” and “hows” of the activities.
Period photos are one of the best ways to see what was actually there at the time as compared to photos of museum or private collection artifacts (which may have been incorrectly restored or which may be incomplete or deteriorated).
The more you study photos and the more you use photos and other reference materials in your builds, the more different uses you will find for them.
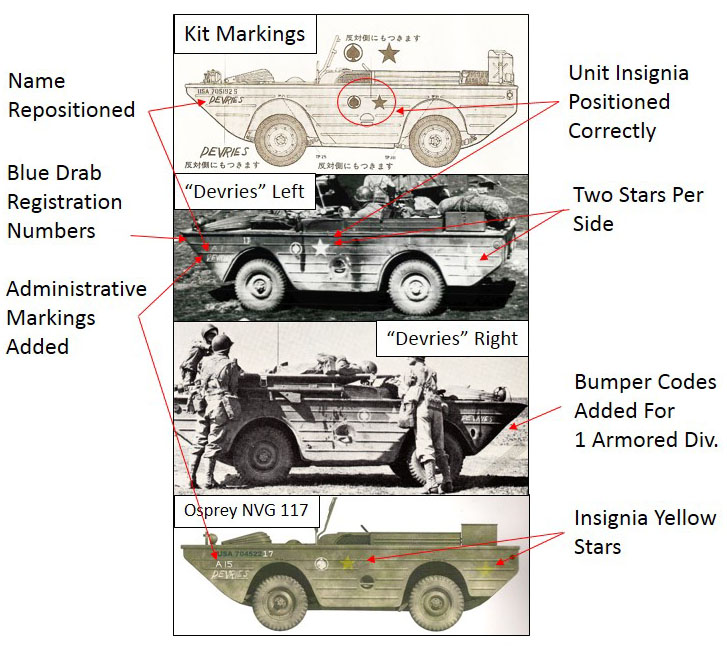
Here’s an example of how I used research photos, the kit’s instructions and a color plate from a reference book to figure out the correct markings for a model Ford GPA amphibious Jeep that I build some years ago.
Here’s a collage of the various reference illustrations, but the actual wartime photos trumped the the kit instructions and the artist’s impression:
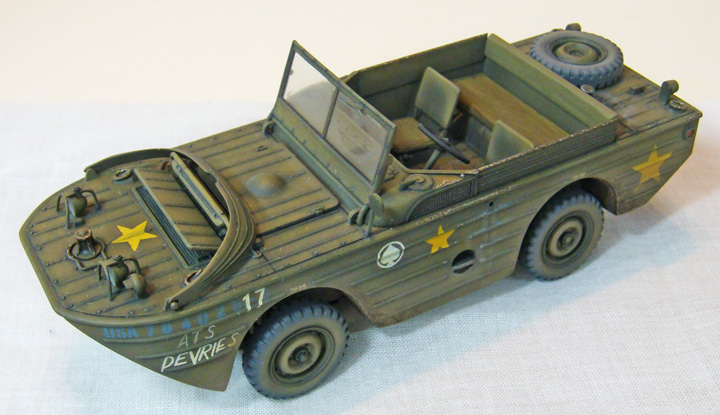
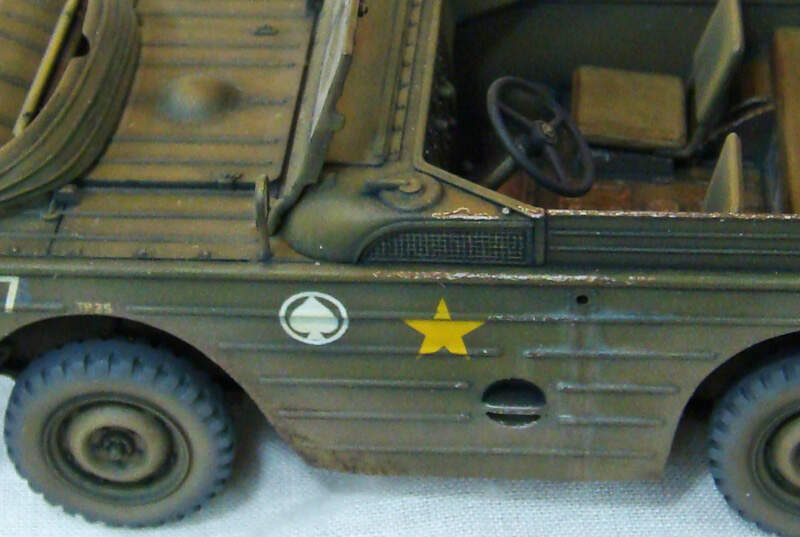
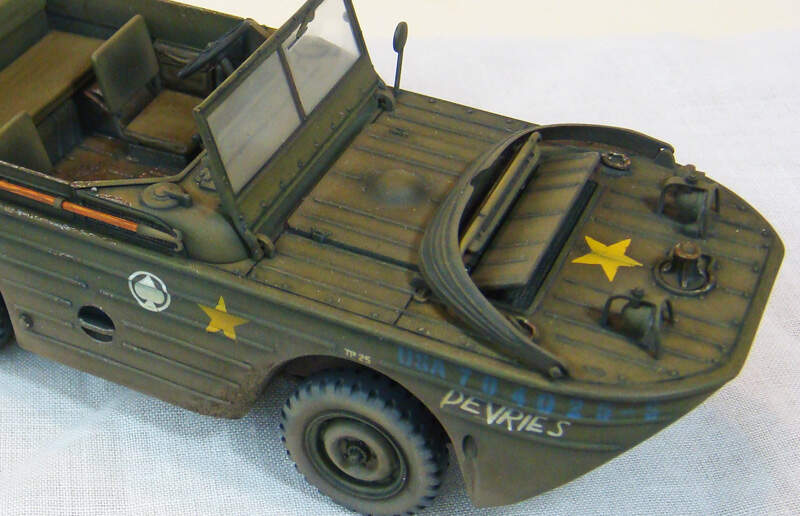
The information from all of the sources was combined and allowed me to put together the correct markings from a mixture of kit and aftermarket decals. Here’s my interpretation of the correct markings:
5 Likes
Ah, it is heavenly to find an almost prefect profile photo of the vehicle you happen to be interested in!
You then need to look for a known measurement in the photo such as the diameter of the tire rim. (not the tire but the rim - never trust the tire diameter!) You can then create a measuring scale based on that single known measurement.
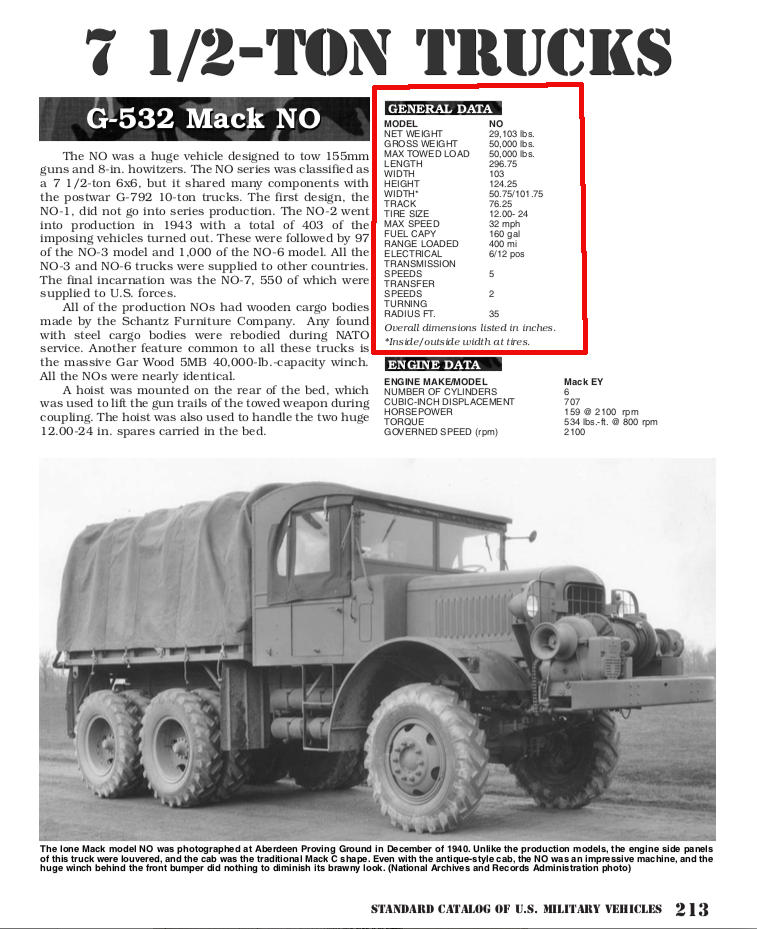
Also books like Doyle’s “Standard Catalogue of US Military Vehicles” can give you basic overall vehicle dimensions. (Also available electronically.)
This is the photo I used to start my Mack NO project:
As I recall, the Mack had 24 inch wheel rims but what you see here in the photo includes the lip around the circumference of the rim so in using this value you have to subtract approximately 3 inches from what you see here to get your scaling measurement of 20 inches. - If you forget to subtract that 3 inches your scale will end up being about 12% too large and your model will then come out 12% too small.*
SdAufKla - I have always admired your recreation of the “Seep”!
Also FYI - I am not following you around the site, stalking you.
This is just the next topic I happened to have fallen upon.
2 Likes
No! This is precisely why you’re using photos! There’s no need to memorize anything when you have the reference at hand.
Human memory is terrible and there’s studies galore to prove it. I’ll look at reference photos a hundred times to confirm the same thing because I don’t trust my brain (and then I’ll screw it up anyway…).
Once upon a time I used photos just for inspiration and read the books because I found the subjects fascinating.
I still read and gawk and collect just for the pleasure of reading but now thanks to this place I’ve been forced to up my modelling game. Rather than always just trusting the kit instructions, my goal is to start building more accurate representations. This is where the walk around photos and detailed accounts become helpful.
Often times books from Osprey and similar publishers are geared towards us glue sniffers. They’ll often have prints and drawings reduced to 1/35 scale for easier cross referencing. The trick there then becomes ensuring your references are actually correct.
1 Like
Sample Page from Doyle’s “Standard Catalog of US Military Vehicles” with basic size specifications.
Artists (and model builders) often work with proportions as much or more than with actual measurements.
Example: you might find that the hood (bonnet) of a vehicle and the cab are the exact same
length = 1 : 1 proportion, and that the loadbox is 3 times as long as the cab. So = 1 : 3 proportion relative to the hood length.
Once you discover a known measurement you will then use these proportions to calculate the actual measurement values of other items in the photo…
The sometimes silly image of an artist holding up his thumb at full arm’s length towards his subject is his way to actually measure his subject and determine proportions using the length of his thumbnail as a unit of measure.
Example: At a certain distance and angle, with his arm fully outstretched, the subject’s pupils are two thumb nails apart, her nose maybe three thumb nails long, and her temples (forehead) are five thumbnails wide. So he must then make these same proportions appear on his canvas when drawing a portrait of that subject.
1 Like
Even perspective photos such as this can still be of help to you in calculating proportions and measurements:
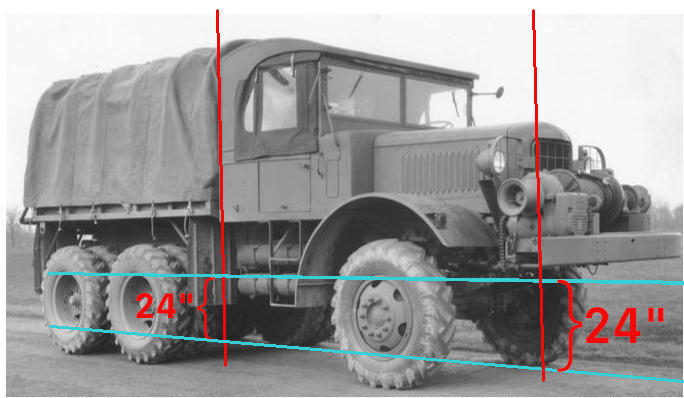
In this photo I have projected (in perspective) the 24 inch wheel rim measurement along the length of the vehicle - as shown by the blue lines.
Any VERTICAL measurement you wish to take along the length of the vehicle (represented by the red lines,) can use the bracketed length as being 24 inches, (along that one vertical red line ONLY.)
(Even using this “system” - and I use that term loosely - it is sometimes only going to get you within one or two inches of the actual measurements. Which is why studying the visual proportions of the vehicle, just as an artist would study the face of his subject, will be more helpful to you than finding an exact number.)
1 Like
Thanks everyone for your replies, this will help me out a lot.
I made the comment earlier to only trust the tire metal RIM size and to never trust the tire (rubber) diameter in a photo:
A good example I found of this was that the early Macks rode on the same rubber tire as that used by the Dragon Wagon Tractor. HOWEVER; the Mack used a narrower metal rim that the DW which pinched the tire bead and caused the same tire to stand TALLER on the Mack than on the DW - BIG DIFFERENCE!
I use the photos to check the accuracy of the model I am building. Did the kit manufacturer forget a part, put it in the wrong place, or do a poor job of molding the part? I then fix what I can. If I am adding more to the kit like all the stuff strapped to the vehicle I look at the photo’s for correct placement and the type of stuff that is attached. Also check for the type of markings and their correct location based on the photo’s. If you are weathering a vehicle, look at the amount of weathering in the photo and replicate that. If I am creating a base to sit the model I look at the photos for an interesting scene to place my model and try to replicate that. Building based on actual photo’s helps create that realistic look. So no memorization of whats in a photo, just try to remember where the photo’s you need can be found.
1 Like
Hey Top:
You sure hit the nail on the head with your statement there!
Is it a game that these model manufactures play? That even on a high quality, expensive model they are still trying to leave out as many details as possible to save money with the hope that we won’t notice or care???
One more example for you of using photos for technical reference. This is part of the study and analysis of the StuG IV “swinging” Shurtzen that I did for my StuG IV Late build back in 2011.
StuG IV Curved Swinging Schurtzen Analysis
Once the key points of the structure were “moved out” over the suspension and then located with reference to the suspension components, working dimensions could be measured from the points on the suspension. The dimensions of the suspension components are known values, so determining the working dimensions for the Schurtzen frame and panels then became a simple math problem.
(I also have to give credit and thanks to Craig Ellis, aka “8wheels-good,” and the author of the “PzKpfW IV at the Front” books along with other related books. He collaborated with me on this project by sharing some of his own original research on the topic.)
The study was done in support of this project:
These details are much better understood today, but a decade ago… Not so much. The key research was done almost exclusively through the use of period photos.
However, with some thought, attention and care, there are a number of ways that you can use photos to divine quite complicated design information, an this is only one of many ways that photographic research can help you with your model building.
1 Like
If you’re lucky enough to use SketchUp AND have a good, non-distorted, 3/4 angle photo, plus at least one critical dimension (overall length for instance), you can draw a 3D model of the subject using Match Photo. With a 3D model you can then 3D print whatever parts you want. That’s highly simplified, but with some intense drawing work, you can do it.
1 Like