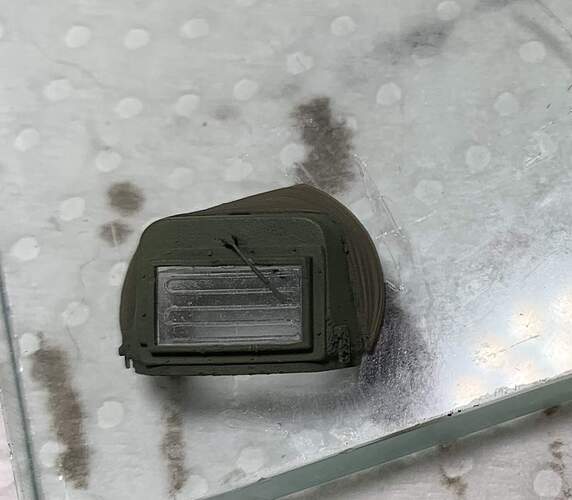
Anyone have a picture of the T-54 drivers rain hood? Specifically for the T-54-3? The “glass” for it on the Miniart kit has some texturing that looks like slat armor, but it doesn’t say if it should be painted or not?
I get the impression of some kind of heating spiral to keep the “glass” free from fog?
Definitely could be. This theory feels more correct. As it snakes. I would expect armor to be rectangular and full width. I wonder if it should be colored black
Not sure about the colour though? Could it be brownish?
Needs a photo of the real thing …
Yeah that’s my feeling too, inspecting it more it’s 100% a coil, but without a photo I have no clue what color it should be, and I haven’t had any luck tracking one down. Most likely due to not searching the right terms
The Miniart kit has been mostly good but has some annoying issues like this. The instructions don’t even have a coil, but the part number matches and it’s the only part that first in the hood so I know it’s not just me having the wrong part
Reminds me that I need some better books on the T-54/T-55. The only illustration I could find online is from the box art of the forthcoming NVA version of the T-55 from mini-art:
No coil on that one either it appears, probably can’t go wrong with brown
Thanks! Those are some good pictures. None of them seem to show the coil in the glass,
That’s a great photo! Thanks a bunch.
I may just leave it clear
So now my question would be: Can you slice off the detail and polish it smooth? Future helps with this and would also fill in that gap around the edges.
But since the clear portion is convex, I also wonder if you could remove the clear portion in its entirety, and replace it using white glue, which actually dries fairly clear. I’m thinking if you clamped the part just right, gravity might lend a hand in giving you that convex shape.
This part is actually fairly flat. If it is convex it is only slightly so. I could definitely remove the detail and polish. What’s the best way to polish clear parts?
Slice off the ribs, then use progressively finer sanding sticks. I find styrofoam from a meat tray works well in the final stages. Then polish with plastic polish. I used to use some stuff I got for my motorcycles face shields, but there’s other polish out there (Novis?) that’s probably the same thing, only more expensive. Hit it with Future after that and it should be good.
You could also consider removing the clear area completely and replacing it with clear styrene sheet.
Polishing will work, takes a sh*t ton of elbow grease though …
Not sure what this means? Is there a metric equivalent? ducks
Yup, or rather sort of.
The constant pi is involved in the conversion, just like in any other motion or action that goes around and around and around.
The most optimistic conversion is pi x one ton or 3.14 tons
if a job gets really repetitive you multiply with 2, 3, 4 et.c until you feel that it roughly matches the preceived level of total and utter boredom. Add 1 every time someone asks you to do it again.
I spent a week of evenings polishing the clear parts on an 1/72 Airfix Catalina, AFTER I managed to fog them with glue after mounting them on the fuselage. They looked really nice afterwards though …
Ill take a crack at it. I don’t have any clear styrene sheet handy unfortunately, might be time to grab some.
Check food packaging or maybe a cracked CD-case or music cassette cases (if you still have some).
The plastic is a bit thick but not worse than the original part.
Happen to have any left over clear bits from some kit where they have almost pre-cut clear parts?
Whats a CD?!
Just kidding, thats a good idea, I should have an old cracked CD case around here somewere


