Tamiya 1/12 Lotus 49

Richard,
Great catch on the missing elbow well. Clark was small so I guess it wasn’t a issue for him but Hill was taller and I’m sure that his elbow rubbing the side of the cockpit shell was an issue.

Looking forward to seeing how you deal with the bottom of the shell. Are you planning any of your magic for the where the driver’s feet go including the 3 pedals?

joel

RDT1953

6m

Some progress - not much bench time for a bit .
I’ve begun to consider this kit as bit of a test mule for some techniques and for working and painting in a large scale . This kit has so many issues that I am loosing enthusiasm but I will soldier on because I have ordered a 1/12 MFH kit and as they are a bit pricey it will be good to learn a bit on a lesser kit .
The MFH kit is the Tipo 158 Alfetta and as it has a lot of aluminum finish on the interior I am trying some things toward that on the Lotus . Reference photos show a bare aluminum tub interior on some present day cars but photos of this car in 1967 seem to indicate the interior was finished in grey . I am going to play the artistic license card and do aluminum to practice for the MFH kit .The seat as supplied by Tamiya is minimal, perhaps because as a motorized kit it would be expected to have a driver figure .
The real car had some padding / upholstery…

… and what the kit gives you…

I taped up the tub and waxed the tape and tried to replicate the real interior with epoxy putty . This is still very much a work in progress…

Here is the new scratch built dash with offset wheel and closer to scale thickness…

… and the bottom in the first stages of dressing off the fixes …

… and the engine block / transaxle underway …


Thanks for looking!

1 Like

Richard,
In many ways the Lotus being a very, very early 1/12 scale kit and motorized too boot, it’s just not what we’ve come to expect from a Tamiya LSK, yet you’ve worked you magic skills and turned that cockpit into a pretty decent replica. And yes, the car in 1967 had a darkish Gray paint finish. Actually, nearly all the cars on the grid had the interior and their frames painted in that color. I’m just amazed at what you created as a seat and cushions. As for the dash, I can’t wait to see you finish it. Are those bezels small rubber O rings?

Still, a MFH multi media kit especially in 1/12 scale is a whole different animal. But I have complete confidence in you that the finished model will be 100% museum quality.

joel

Thanks Joel - the bezels and the switches are the originals which I sawed off kit dash with razor saw.

1 Like

Richard,
Dam, you sure fooled this old timer. Amazing what you can accomplish in 1/12 scale.

joel


RDT1953

2m

Some more progress on the Lotus -
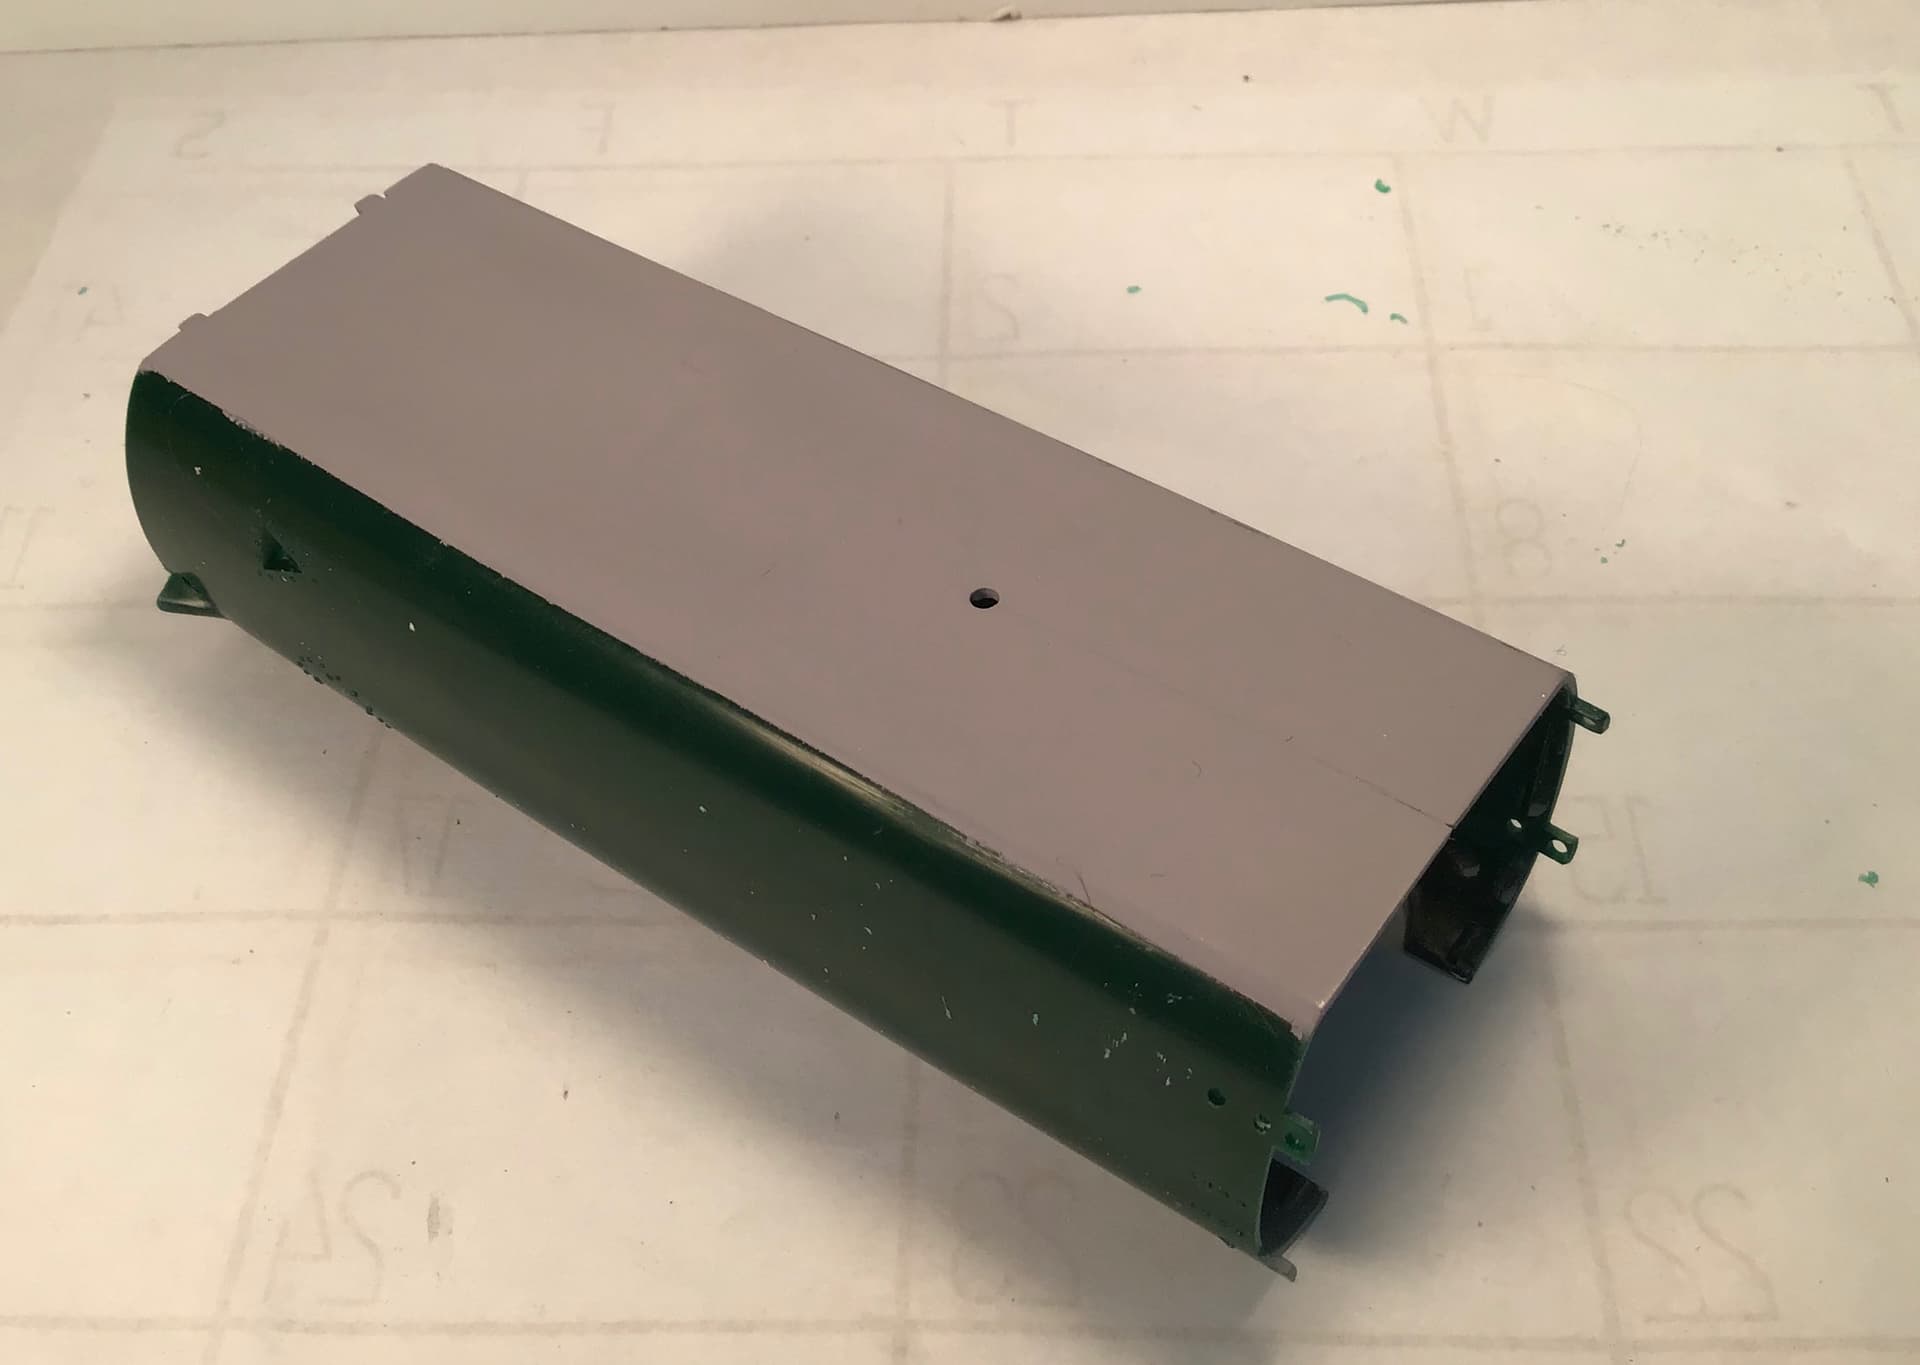
Underside of monocoque dressed off and shot with rattle can high build primer - a little more work to do on some seams but that can be done later…

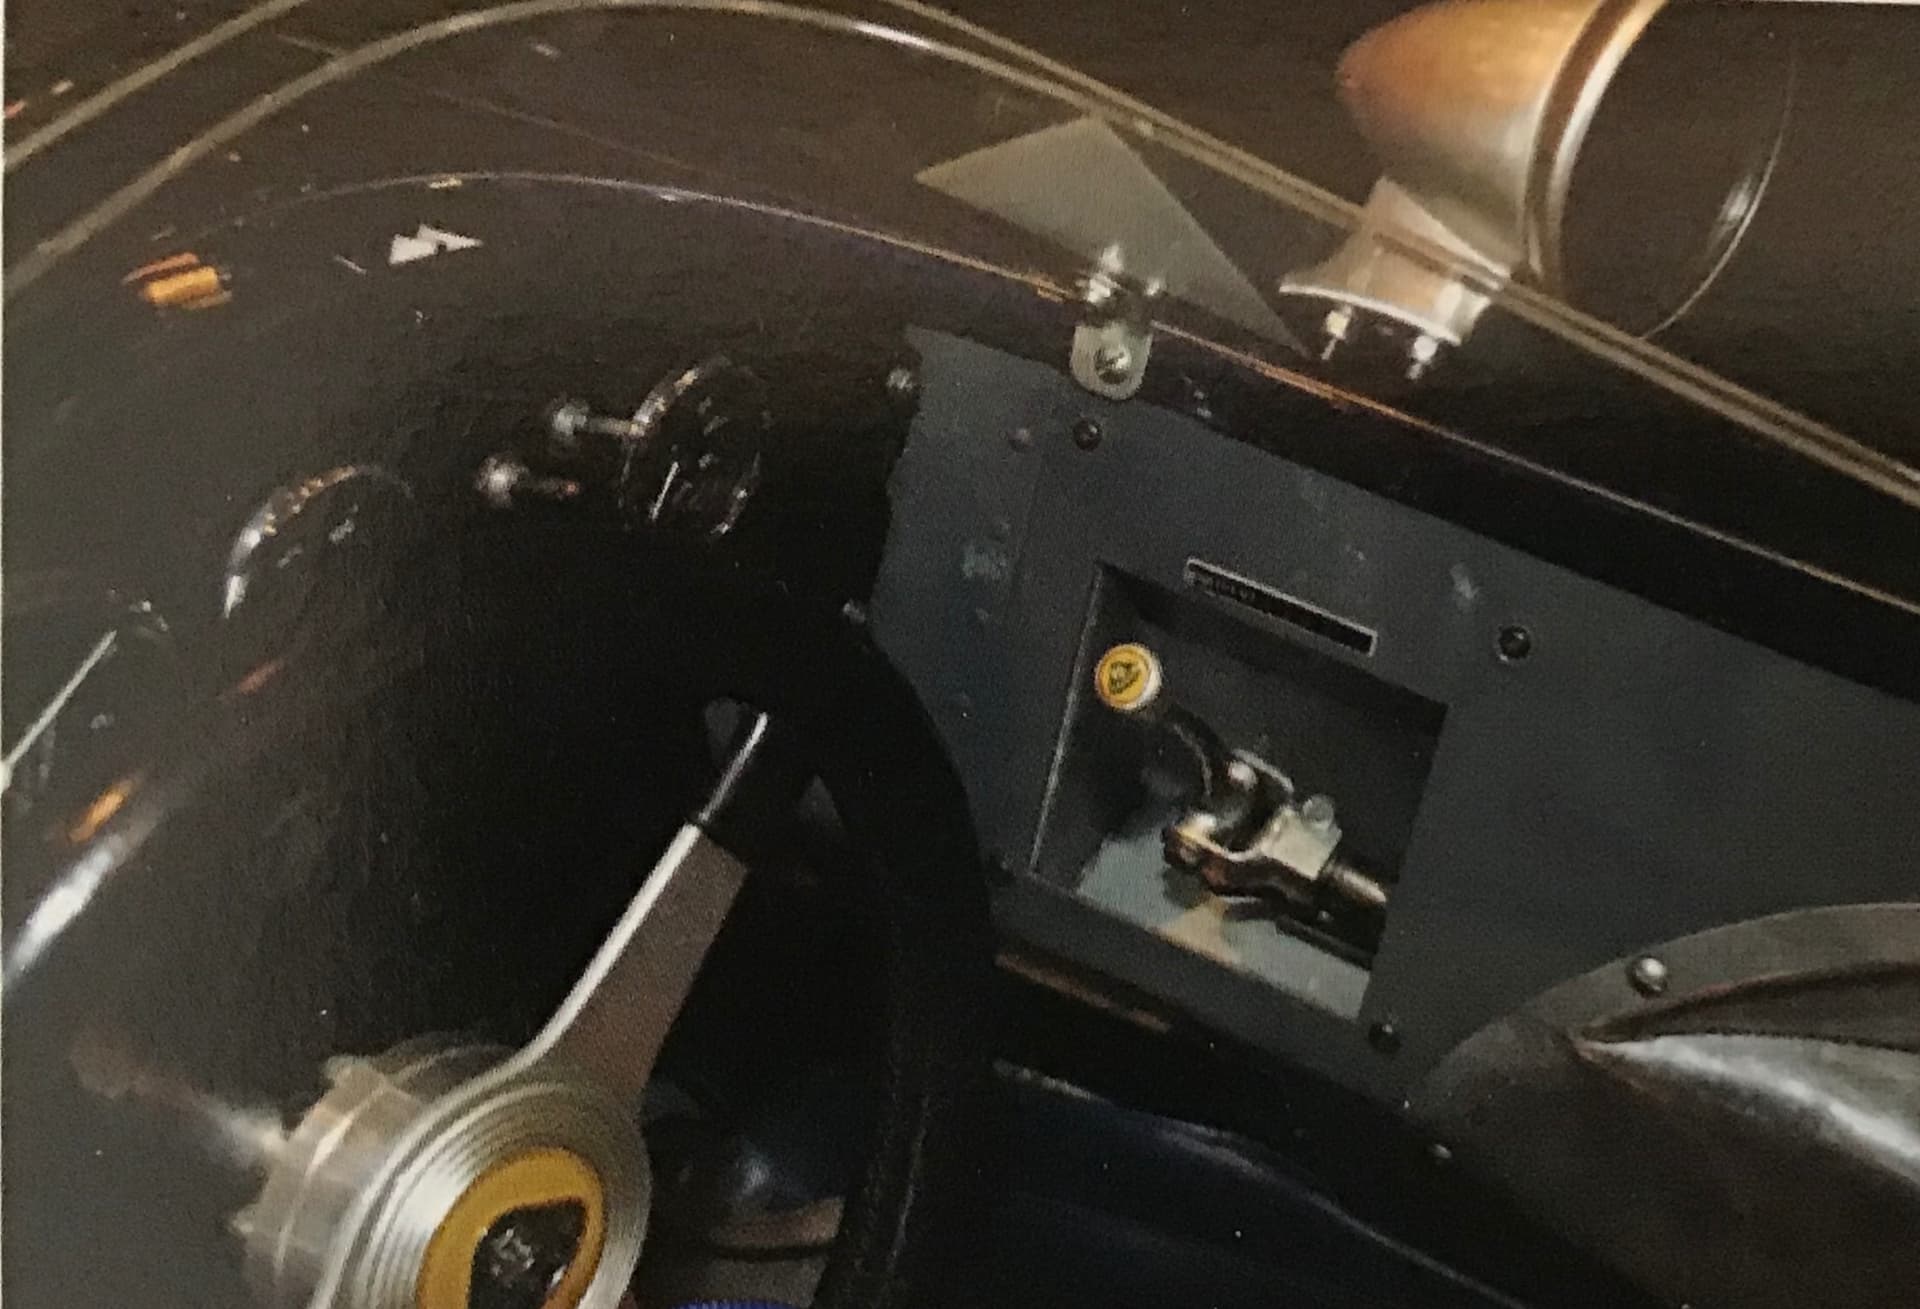
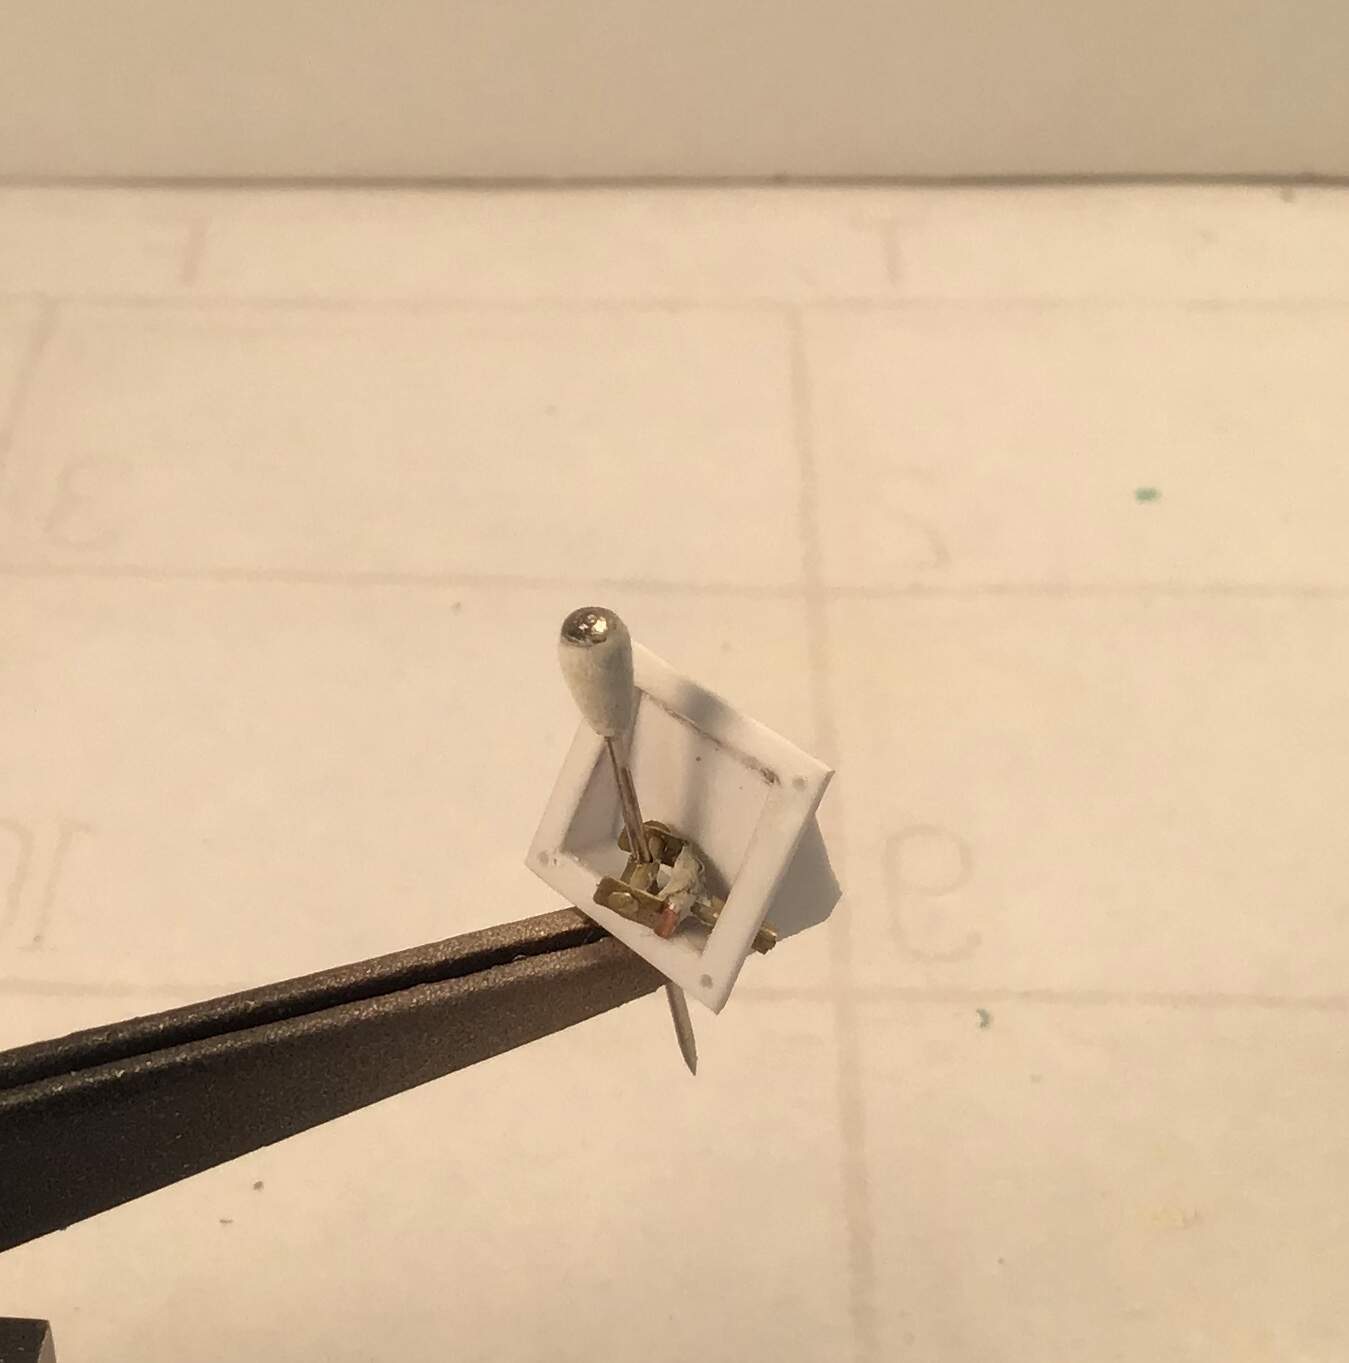
The kit gear lever and it’s well looked nothing like the original so scratch building of lever , well and linkage was needed . Lever is straight pin with knob of epoxy putty.
Linkage made of brass shim , rod and epoxy putty.
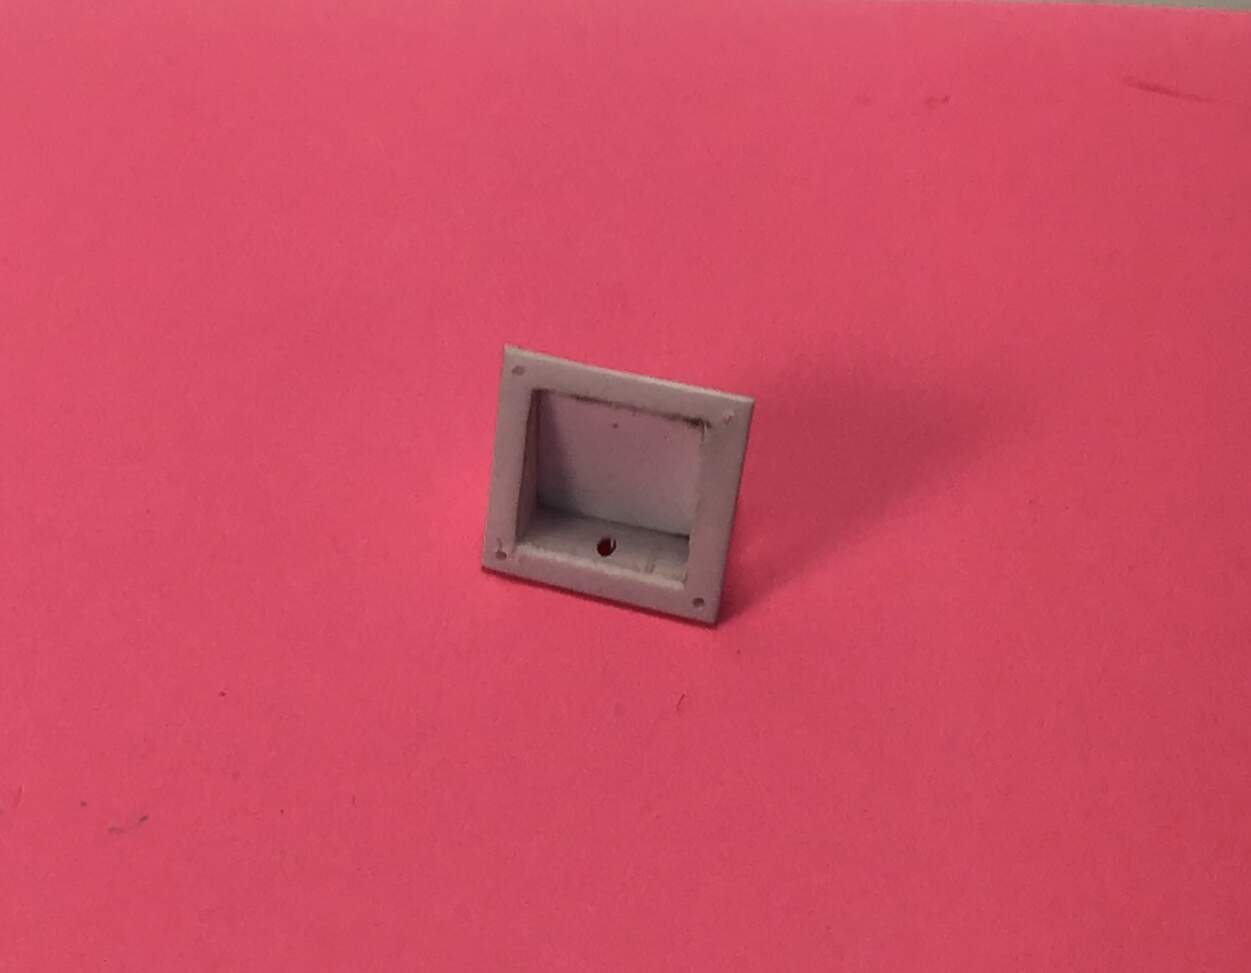
Well is sheet styrene.

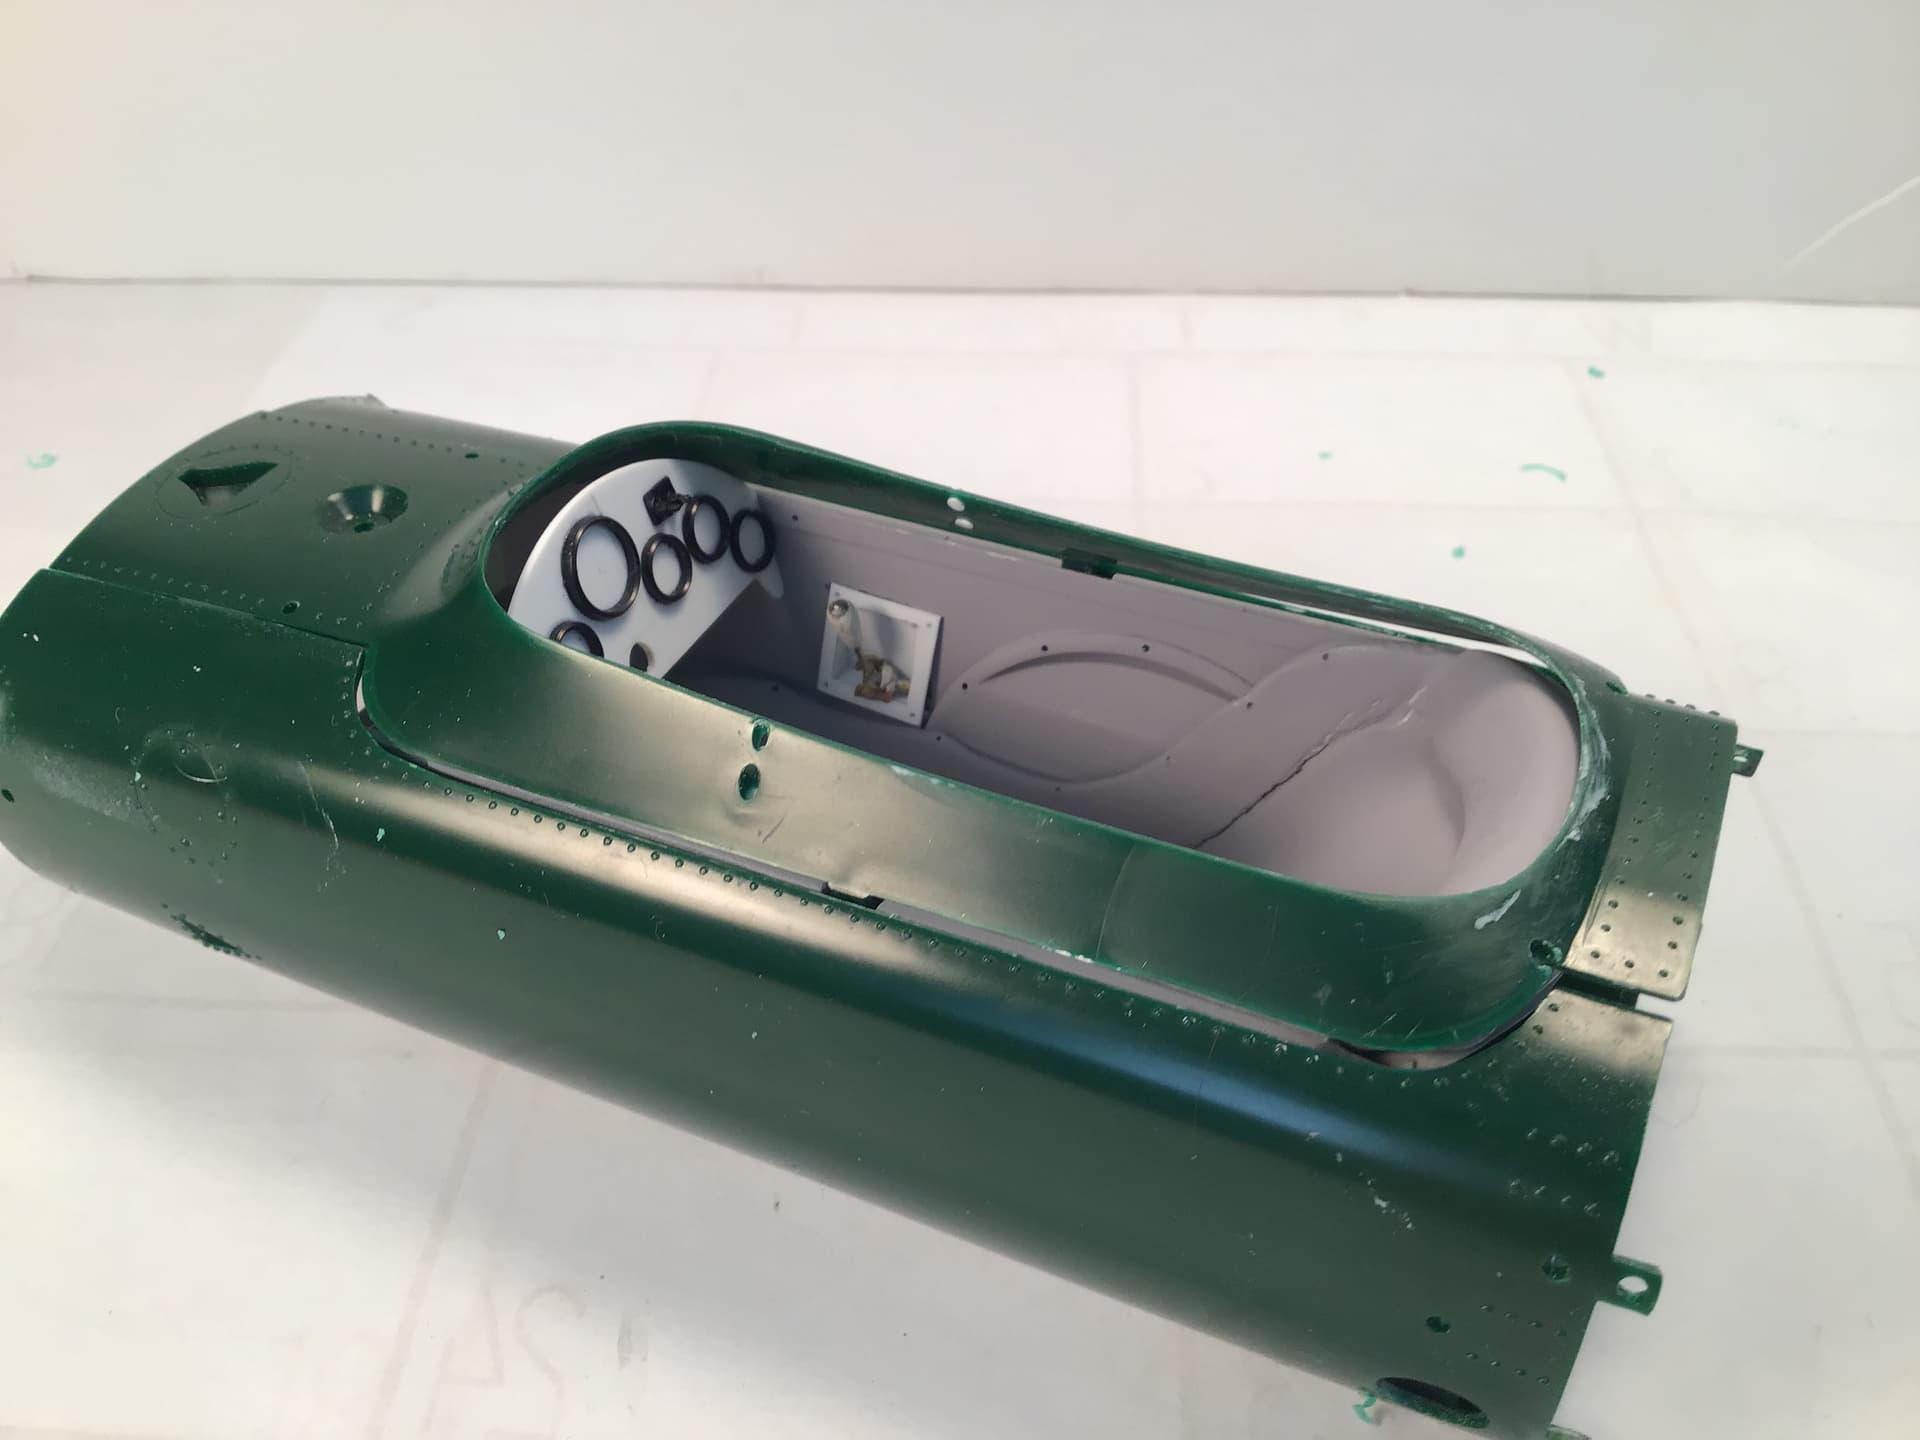
Lenses for instruments made of .010” clear styrene by scribing with needle and circle template then cutting out with scissors.

Interior almost ready for paint.
Thanks for looking !

Richard,
Oh WOW!!
On all the early Ebbro Lotus 1/20 scale kits the shift lever and knob don’t look anything like the real deal either. Your scratch built unit especially the linkage is just amazing. The knob is actually a highly finished wooden knob with the Lotus emblem on it. As a sports car nut, these type of knobs were available as an aftermarket item, so my MGB had one with the MGB logo, and a Nardy wood wheel that cost a mere fortune.
Excellent job on the bottom of the driver’s compartment. I’ve never heard of High Build Primer before. Who makes it as I already have plans for it.

joel

1 Like

RDT1953

5m

Interior largely done - sidewalls painted grey .
Box at bottom of tub under dash done with aluminum foil .
Seat and gear lever well Tamiya semi gloss black .
Dash flat black and bezels/switches picked out with silver permanent marker . Instrument lenses of clear styrene set with Future . Knob on gear lever base color sand yellow - woodgrained with burnt umber oil paint . Lotus emblem on top painted with yellow and green - Future clear coat over all.
I purchased another set of Tamiya rivets as used on my RC 166 motorcycle build and used them on dash , gear lever well , sidewalls and seat .

Now on to stripping chrome and starting suspension.

4 Likes

Richard,
I’m just amazed at the transformation of that lowly Tamiya Lotus 49 interior to what you’ve transformed it into. BTW, the wooden shift knob looks fantastic as does your IP.

joel

1 Like

Thanks Joel - I’m starting to like this model a little more but I am certain there are more pitfalls lurking.

Richard,
Don’t laugh, but I’m actually looking forward to those pit falls, and seeing how a master modeler solves them. So far you’re batting 1.00%, which even the Babe never got close to.

joel

1 Like

RDT1953

1m

Beginning to sort out the issues of the ill fitting coaming .
In addition to the poor fit there is next to no contact area down each side between the monocoque and the coaming , making it difficult to get a strong joint .
Gaps filled with sheet styrene. Going to need Archer resin rivet decals to replace rivet detail after filling and sanding.

@Joel_W
This is the high build primer I am using …

Stripping chrome with stuff I use in my parts washer - it removes some paint finishes as well …

2 Likes

Richard,
From the looks of the picture you sure got the coaming to go from a almost no fit anywhere to looking like it fits like a fine British leather glove.

And thanks for the picture of the primer filler that you used as I can see where it certainly has it’s uses.

joel

1 Like

Richard, the Lotus is looking great. The coaming wasn’t a tight fit from the pictures I have seen so don’t make it seamless. And if you didn’t know, MFH used to sell a 1/12 scale version of the Lotus 49 with a rivet set that went with it. It looks like the rivet set is out of stock which maybe lucky for you since it would have mean a lot of work! :grinning:

cheers
Michael

1 Like

Thanks gents . I will definitely need to re scribe the seams after the putty work . Trying to find a ready mix truck to deliver the several cubic yards of filler that I will need … LOL

Amazing work so far Richard.

I really must try to make those “Glass” lenses, for the gauges.

1 Like


RDT1953

1m

Body work largely done . Cockpit coaming tuned up as best I can - total PITA . Primed and blocked out and rivet detail lost to sanding replaced with Archer resin rivet decals. If anyone needs to do the same I used their O scale (1/48) set # AR88032. Rivet size and spacing matched the kit molded on rivets nearly perfectly.
Nose cone primed and blocked out as well .

Engine nearly complete - I will need to find some clear tube for the fuel lines to replace the ancient stuff that came with the kit as it went hard and brittle . I may try monofilament if I can source the right diameter.

For the benefit of Damian I tried to make the Ford lettering on the cam covers ( of the longest lived and most successful F1 engine in history ) look like the Chevrolet Bow tie but the paint brush would not obey … :grinning_face_with_smiling_eyes:
tee - hee
Cheers - Richard

3 Likes

Richard,
The coaming on the tub looks darn good in the pictures, and the Archer rivets look perfect for 1/12 scale. I really need to check them out as they must have one or two steps down for 1/24 and 1/20 scale rivet detailing.

the 3.0 liter Cosworth looks way better then even Tamiya envisioned it. You really aligned the exhaust manifold perfectly so that the collection pipes should fit like a glove.

As for new fuel lines, I’ve used the smallest size Fly leader line I could find for 1/20 scale and it looked right but it’s solid, so it was a real struggle. But for 1/12 scale is should work perfectly .Try Bass Pro Shops for Fly fishing leaders. they’re cheap and come in several diameters.

joel

1 Like

RDT1953

1

9m

British Racing Green paint on. SMS lacquer is pitched as being ready to spray from the bottle but I couldn’t make it behave and had to thin it nearly 50/50 to get it to lay on nicely.
The Indycal decals also did not fit . Perhaps it was my mistake in assuming they were engineered for the Tamiya kit . The only other 1/12 Lotus 49 kit that I am aware of is the MFH kit and at nearly $800. I can’t imagine there are many people buying aftermarket decals for it , especially since it comes with these markings and it is also apparently sold out . I suspect that the decals are generic and since they are offered in multiple scales they are simply enlarged or reduced as needed and not specific to any kit . If this is the case it is a shame because it would have been far better to have them too long and cut back as needed rather than have unsightly patches which is what I had to do . I will compliment them however in that they are thin , tough and settle down beautifully with Microsol.

Cosworth Ford DFV plumbed and wired. I wound up using Monofilament for the fuel lines to the injectors and leftover black tubing from the RC 166 build for the ignition wires as the 50 year old material in the kit was unusable .
If a 1/12 scale Colin Chapman should appear I may be in for one of his tirades as I don’t know the firing order and consequently the fuel and spark may not be happening in the right place and at the right time .
The tubing from the motorcycle kit was also smaller and more in scale. Tamiya supplies black tubing for the coolant hoses but the line from the rear of the right cylinder bank to the expansion tank was hard pipe on the real car so that was scratch built using a piece of sprue.

4 Likes

Richard,
Excellent progress as I would expect nothing less from you.

I’ve never used SMS paints but it doesn’t surprise me that you needed to thin them 50/50 for air brushing as there’s no consistency from one brand to another. I’d take that any day over the super thin primers most of these paint companies as they’re so thin that they can’t cover any variations in color worth a damn. The only two paint companies I use are Gravity of Spain and Scale Finishes. Their paints are truly ready for the AB, and the colors are dead on. The down side is that I’ve tried their gloss finishes and what they call Super Gloss isn’t what expected. So I’ve moved back to the Tamiya and Mr. Color Clear Lacquers.

As far as the Indy Cal decals being off somewhat, Micheal just scaled up his Tamiya 1/20 decals. For him to make perfect sized decals for every scale model in all the available scales, he’d really need to have the actual model as a test mule, and that’s not realistic for us to expect that especially on a kit nearly 50 years old. I can tell you that even with his decals for the Ebbro kit, I bought both versions: Yellow decals and masks for the Yellow stripes.

I looked as carefully as I could and you did an absolutely fantastic job with the nose cone lip and the duct and what I think is the gas cap recess. The transition from decal to paint is nearly a perfect blend.

joel