Thanks Joel - I will work on the hand print bit 
I get my Alclad and SMS paints from USA Gundam Store in FLA . A little slow on shipping but they do get it to you .
@TonyLyne
Another heads up for you Tony - on my kit the headers are a bit high where they come together for the two into one collectors , forcing the lower A arms up and effecting the car’s stance . I tried bending them down but had no success and wound up filing notches in the headers for the A arms to clear . A bodge to be sure but best I could do at this point . Hopefully you will be able to do better.
1 Like
Richard,
I have delt with them as well. Got my super expensive/professional circle cutter from them. Shipping time was ok.
I really haven’t had time or the concentration needed to work on the Bimmer the last 10 days or so, but now my wife is doing excellent and can actually make, and carry a cup of tea from the kitchen to the den using the walker at the same time. Yet I struggle to do it without spilling any of the tea while just walking.
joel
1 Like
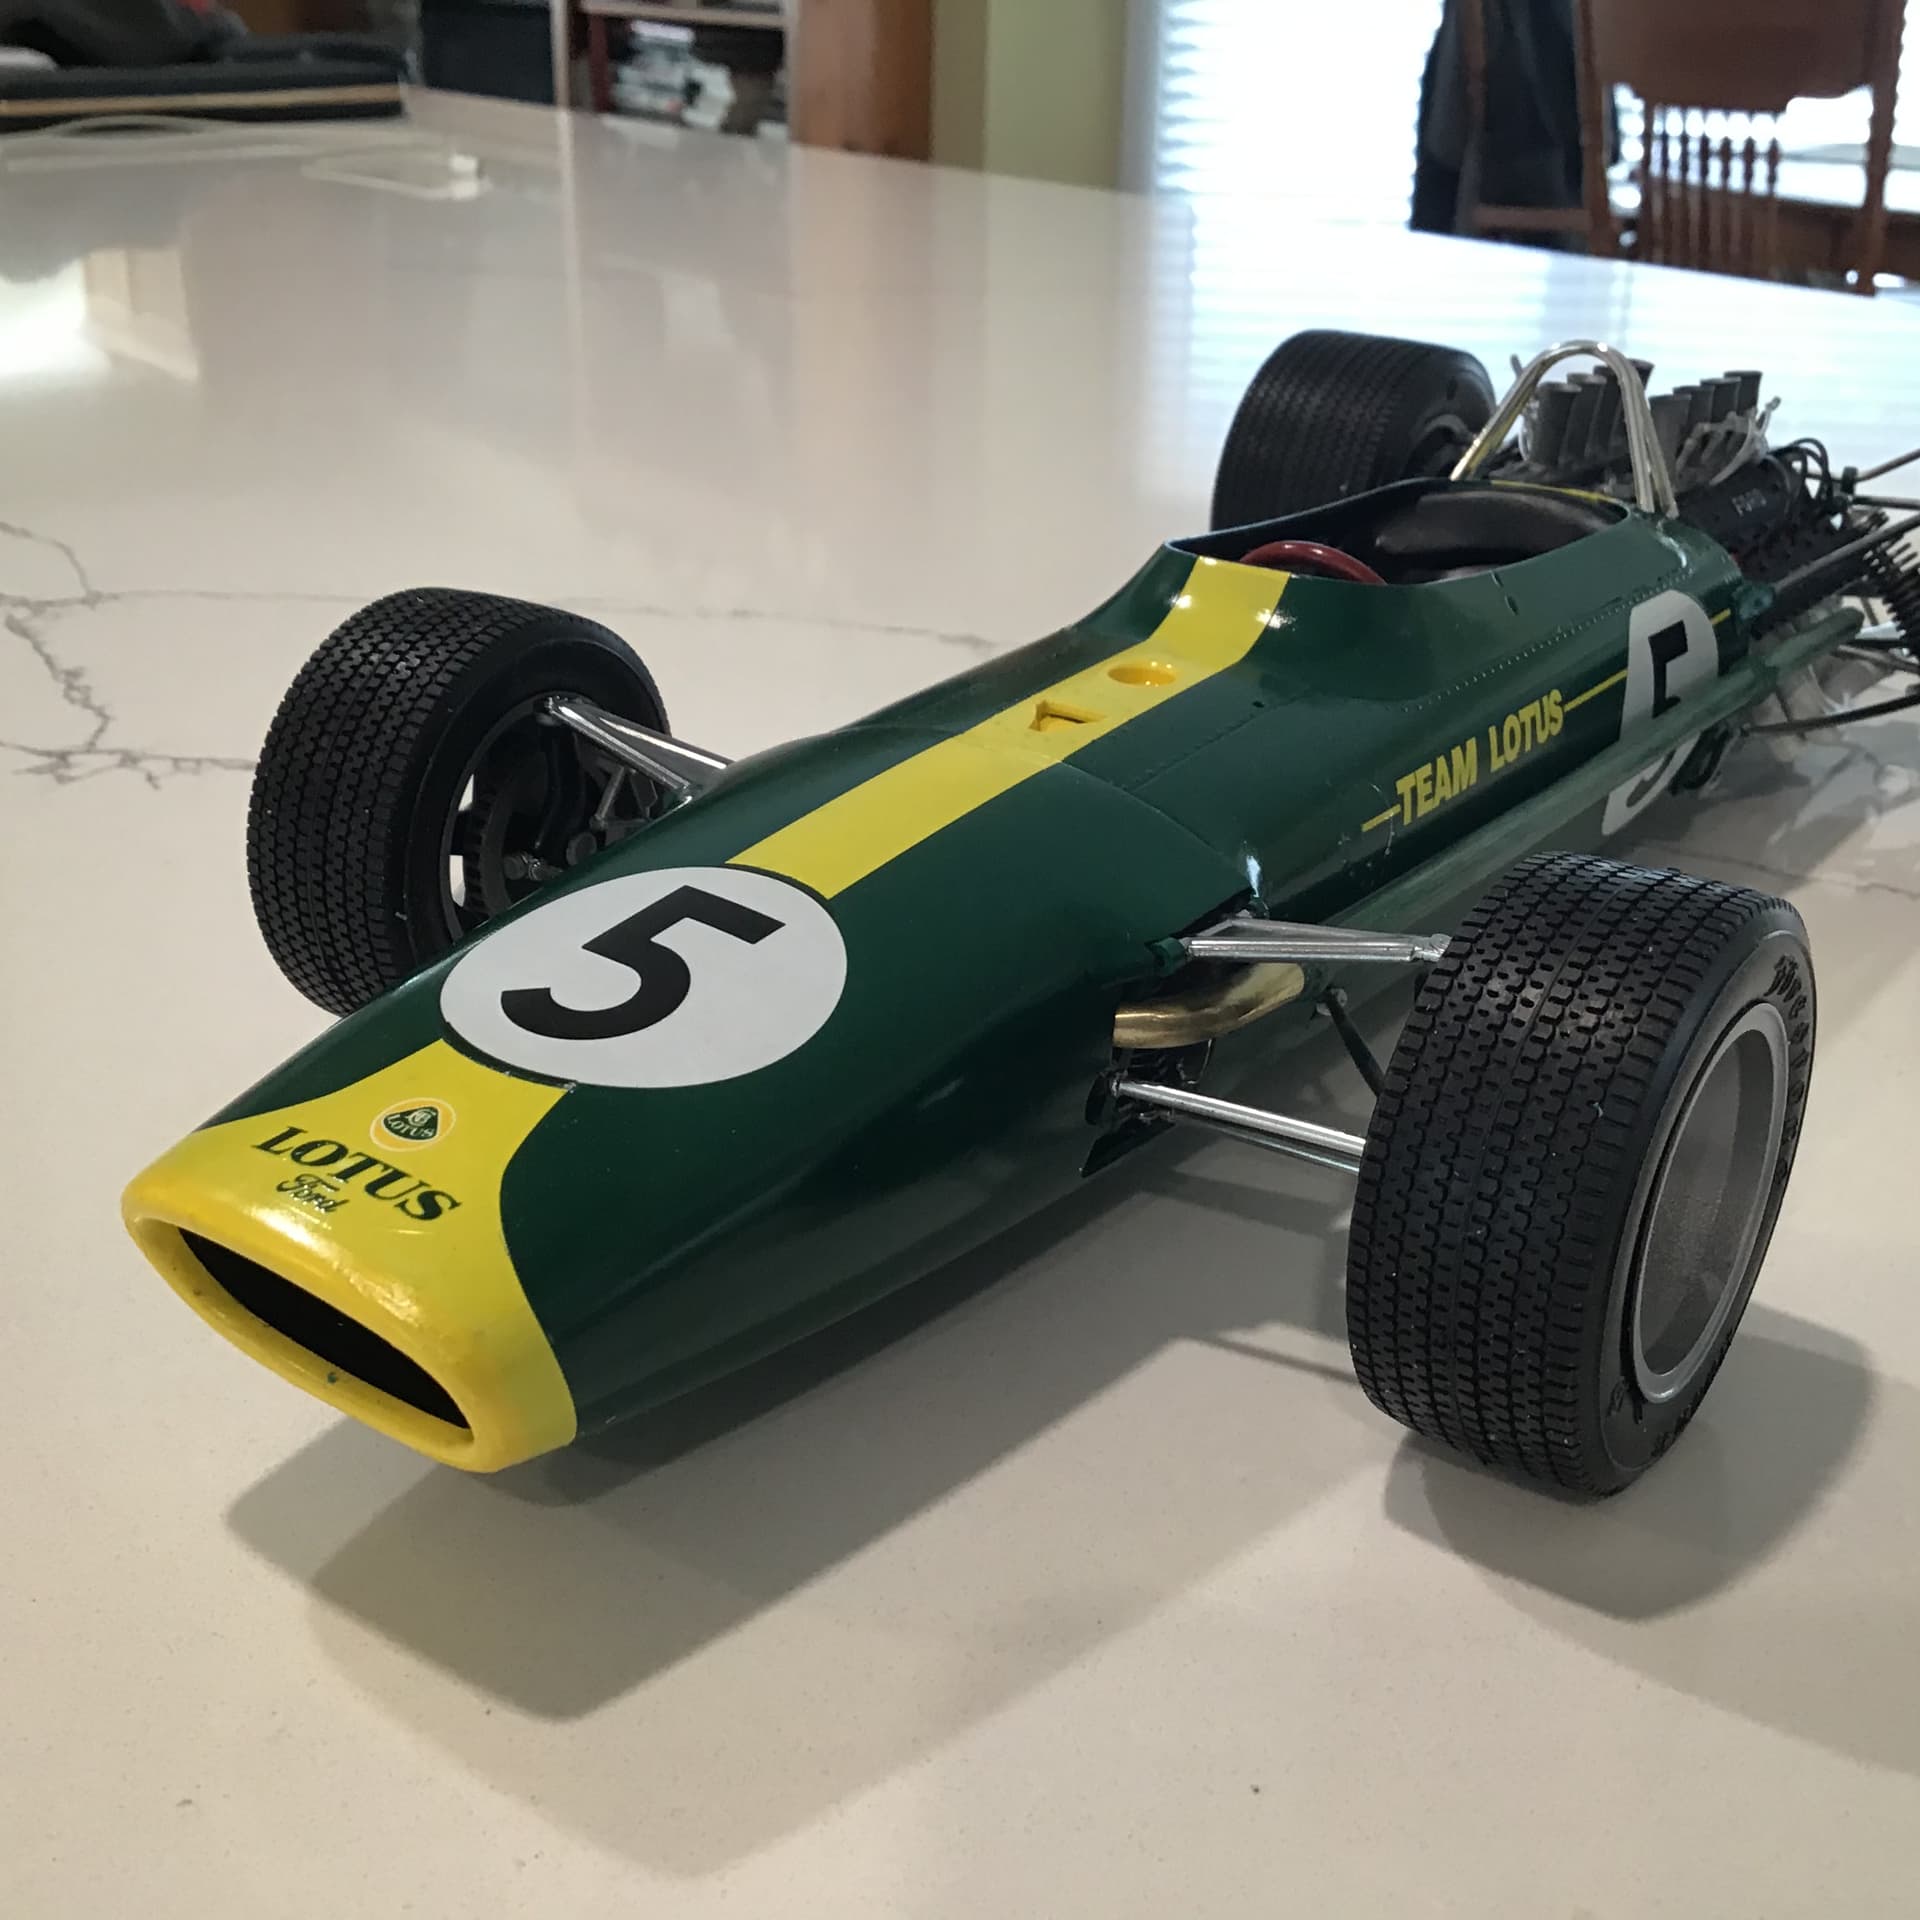
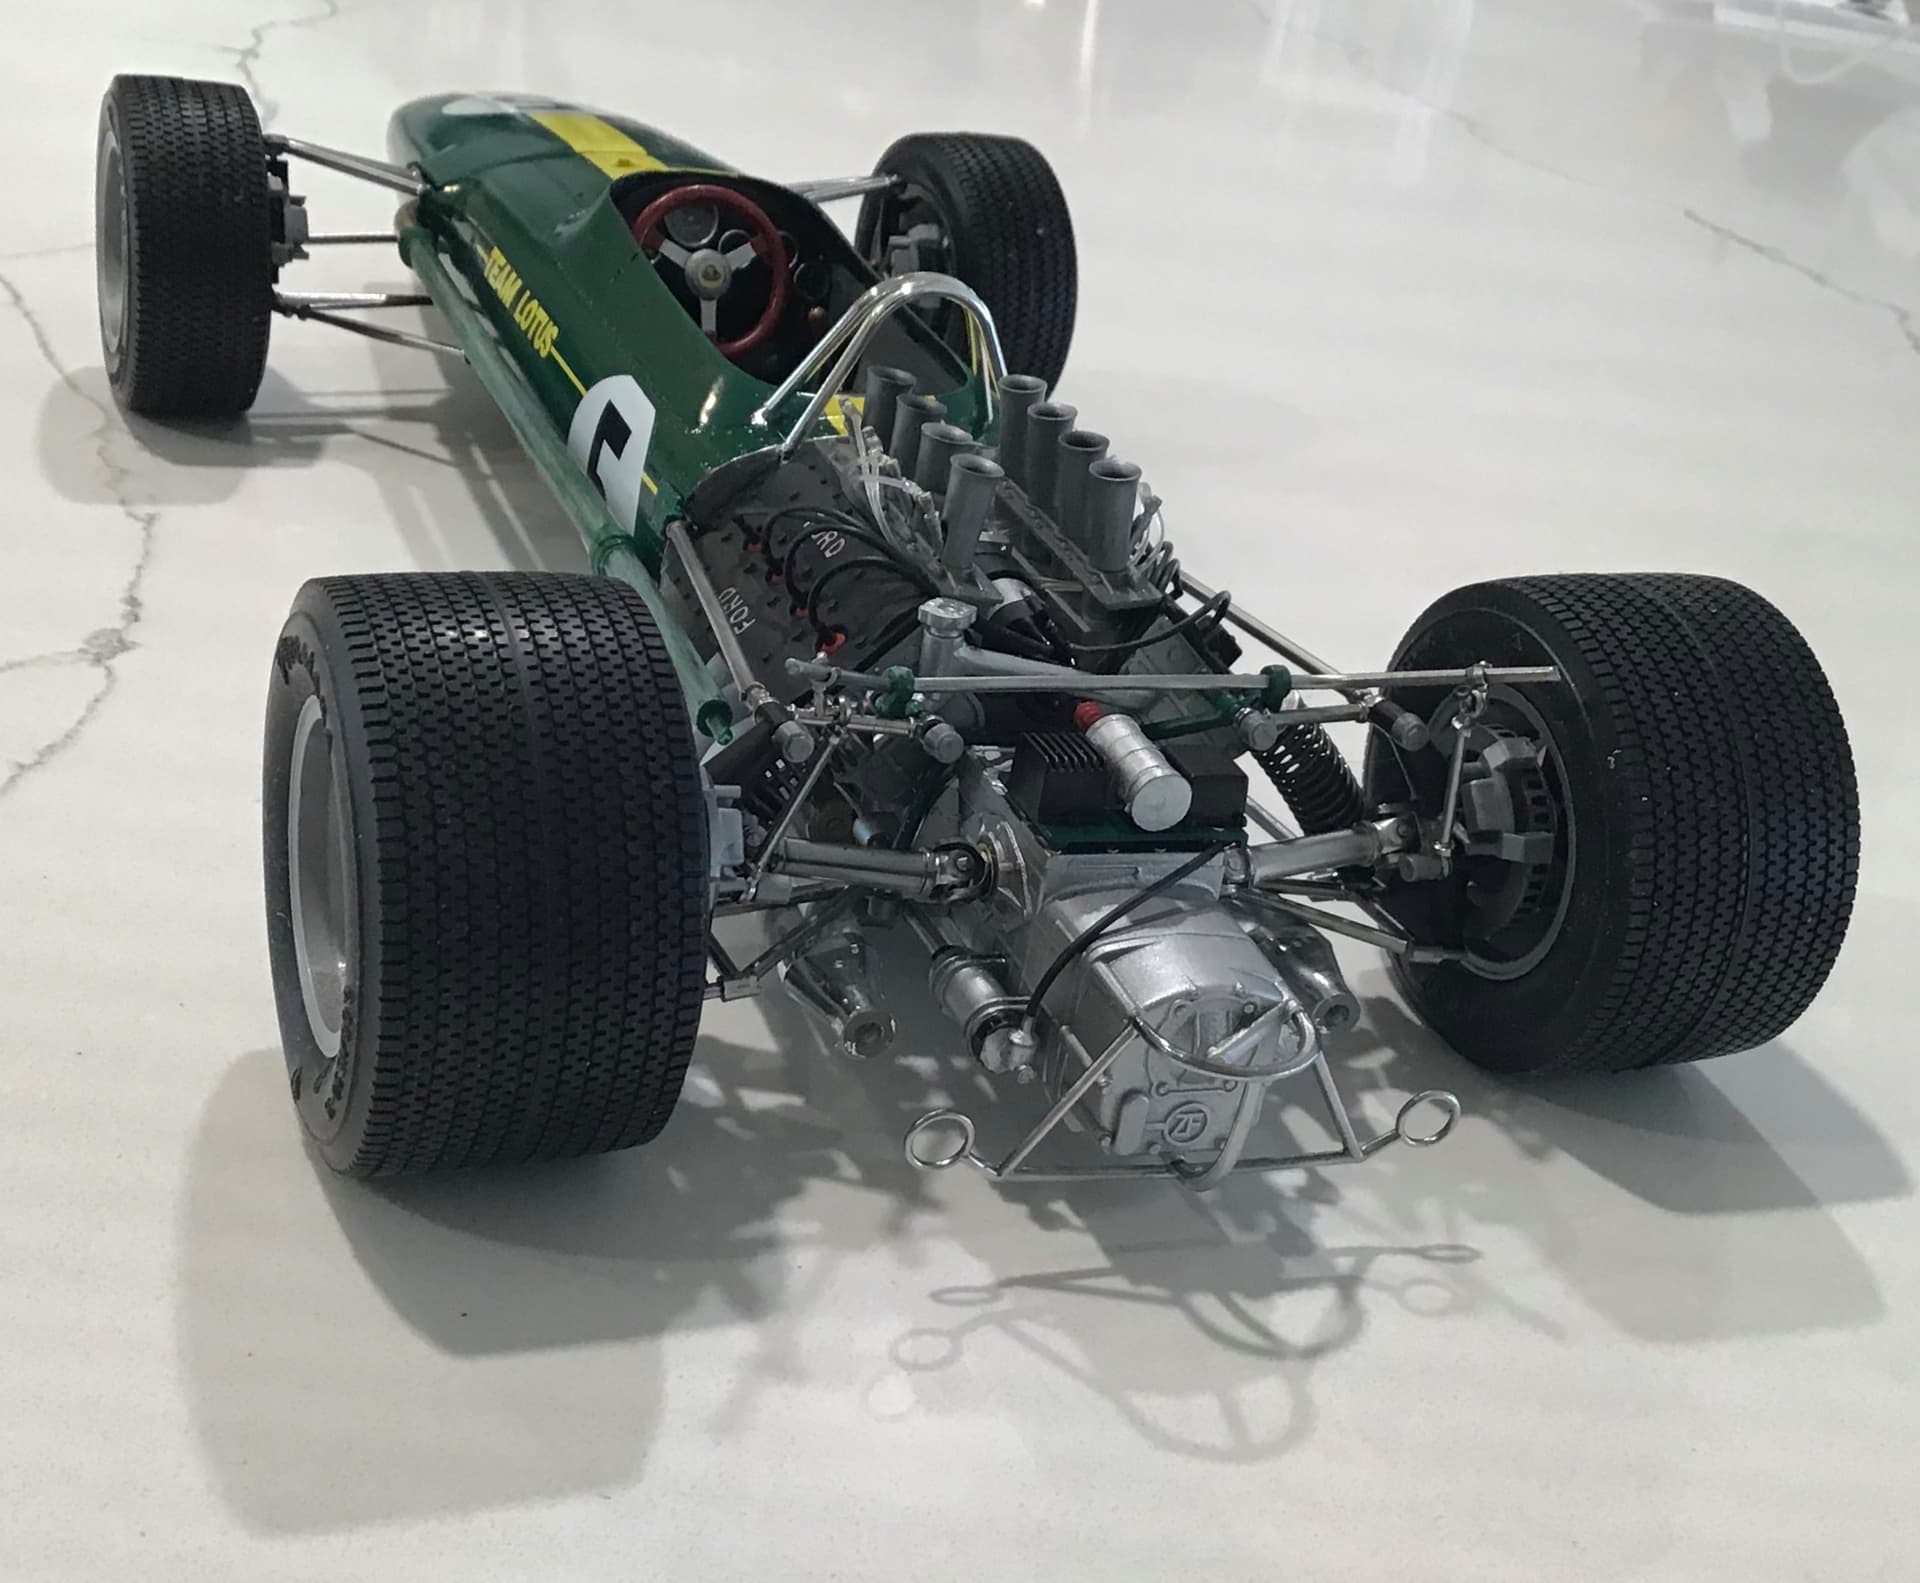
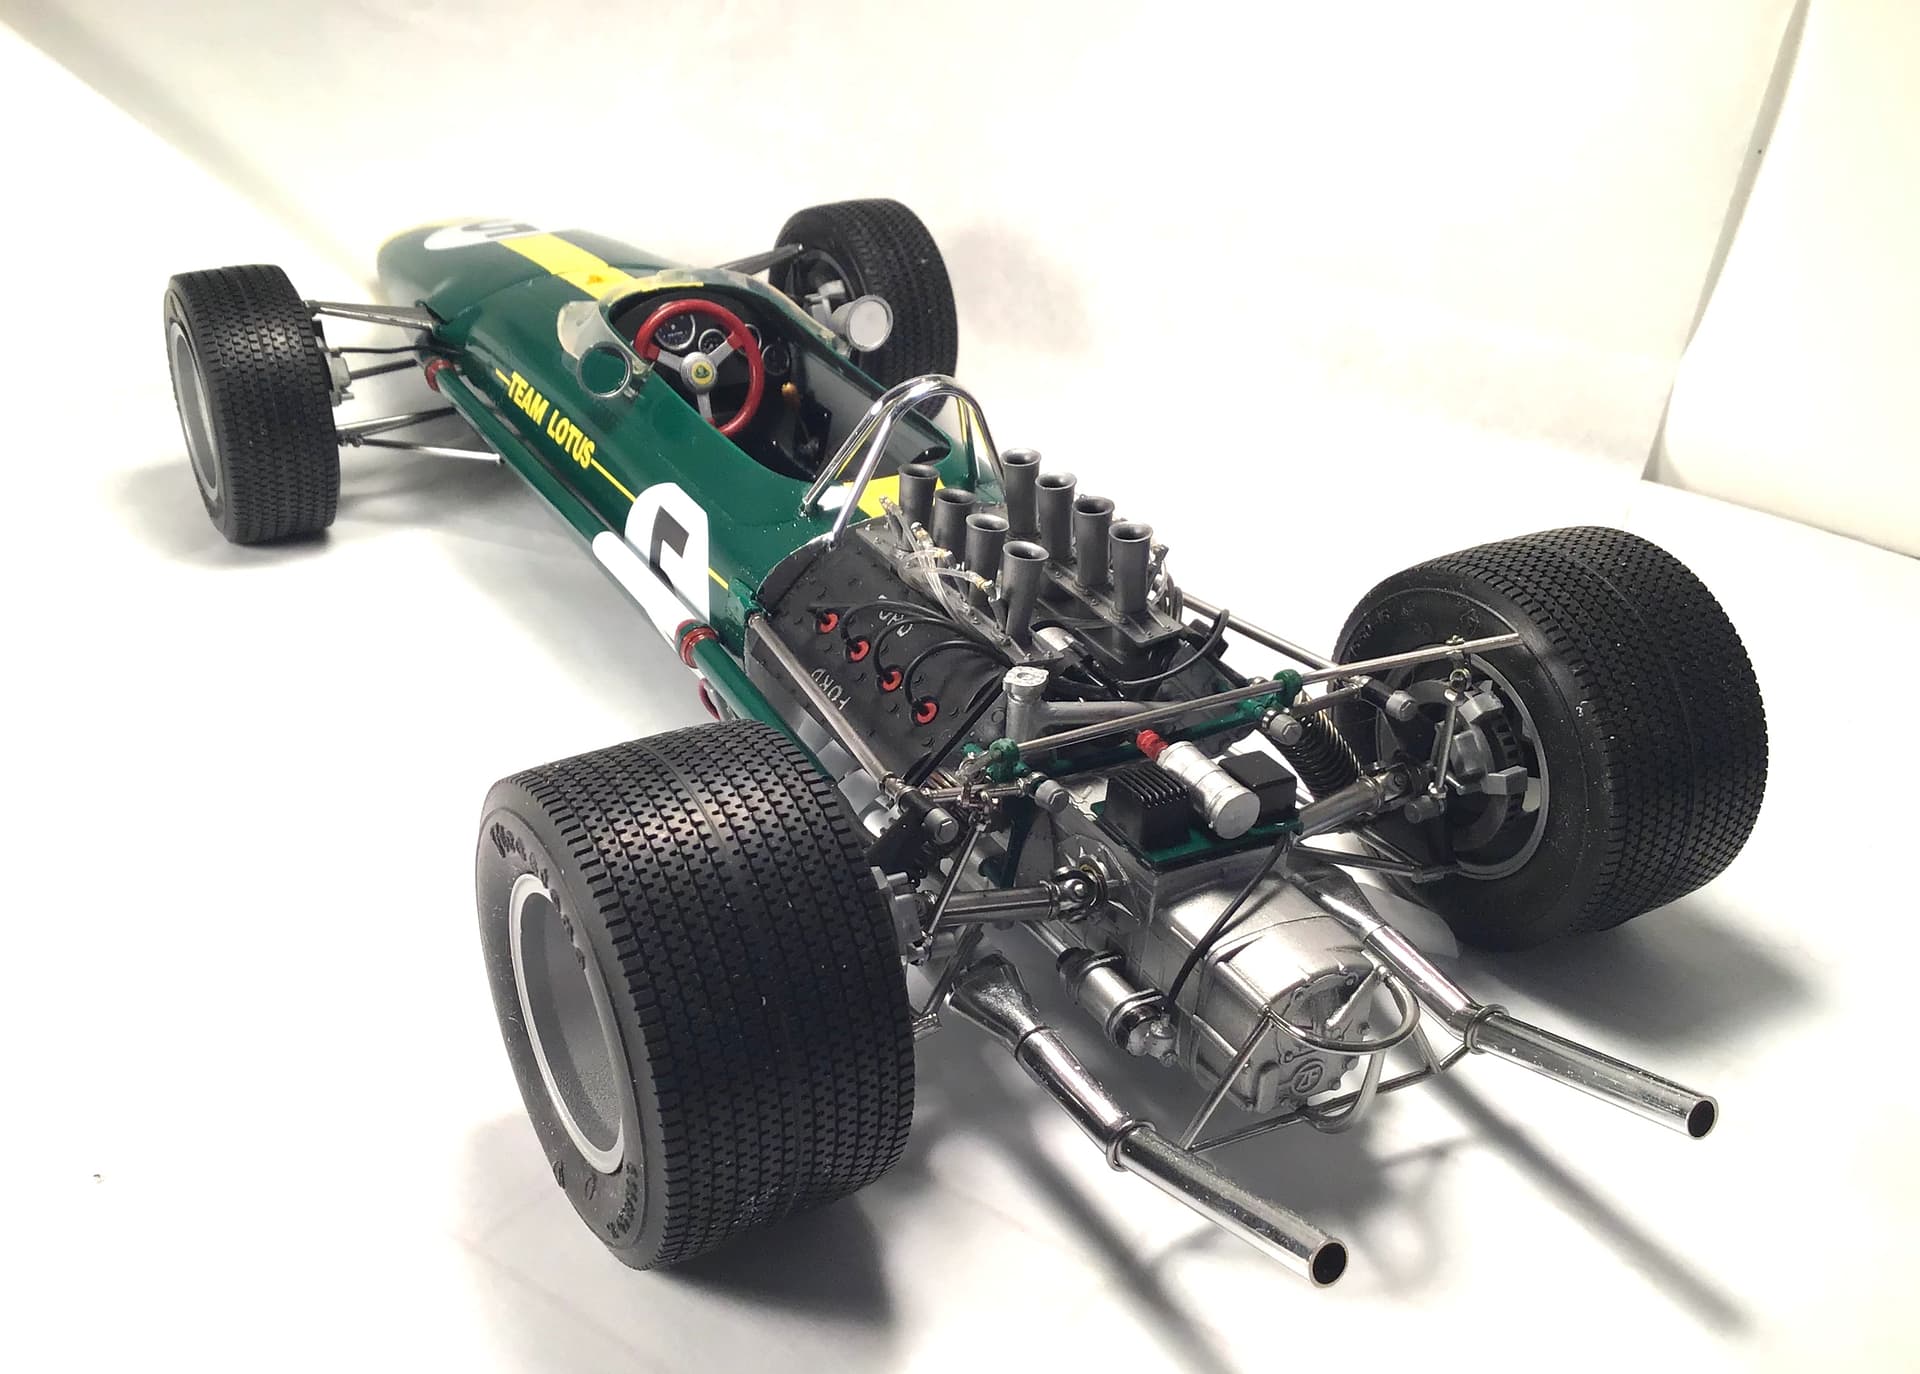
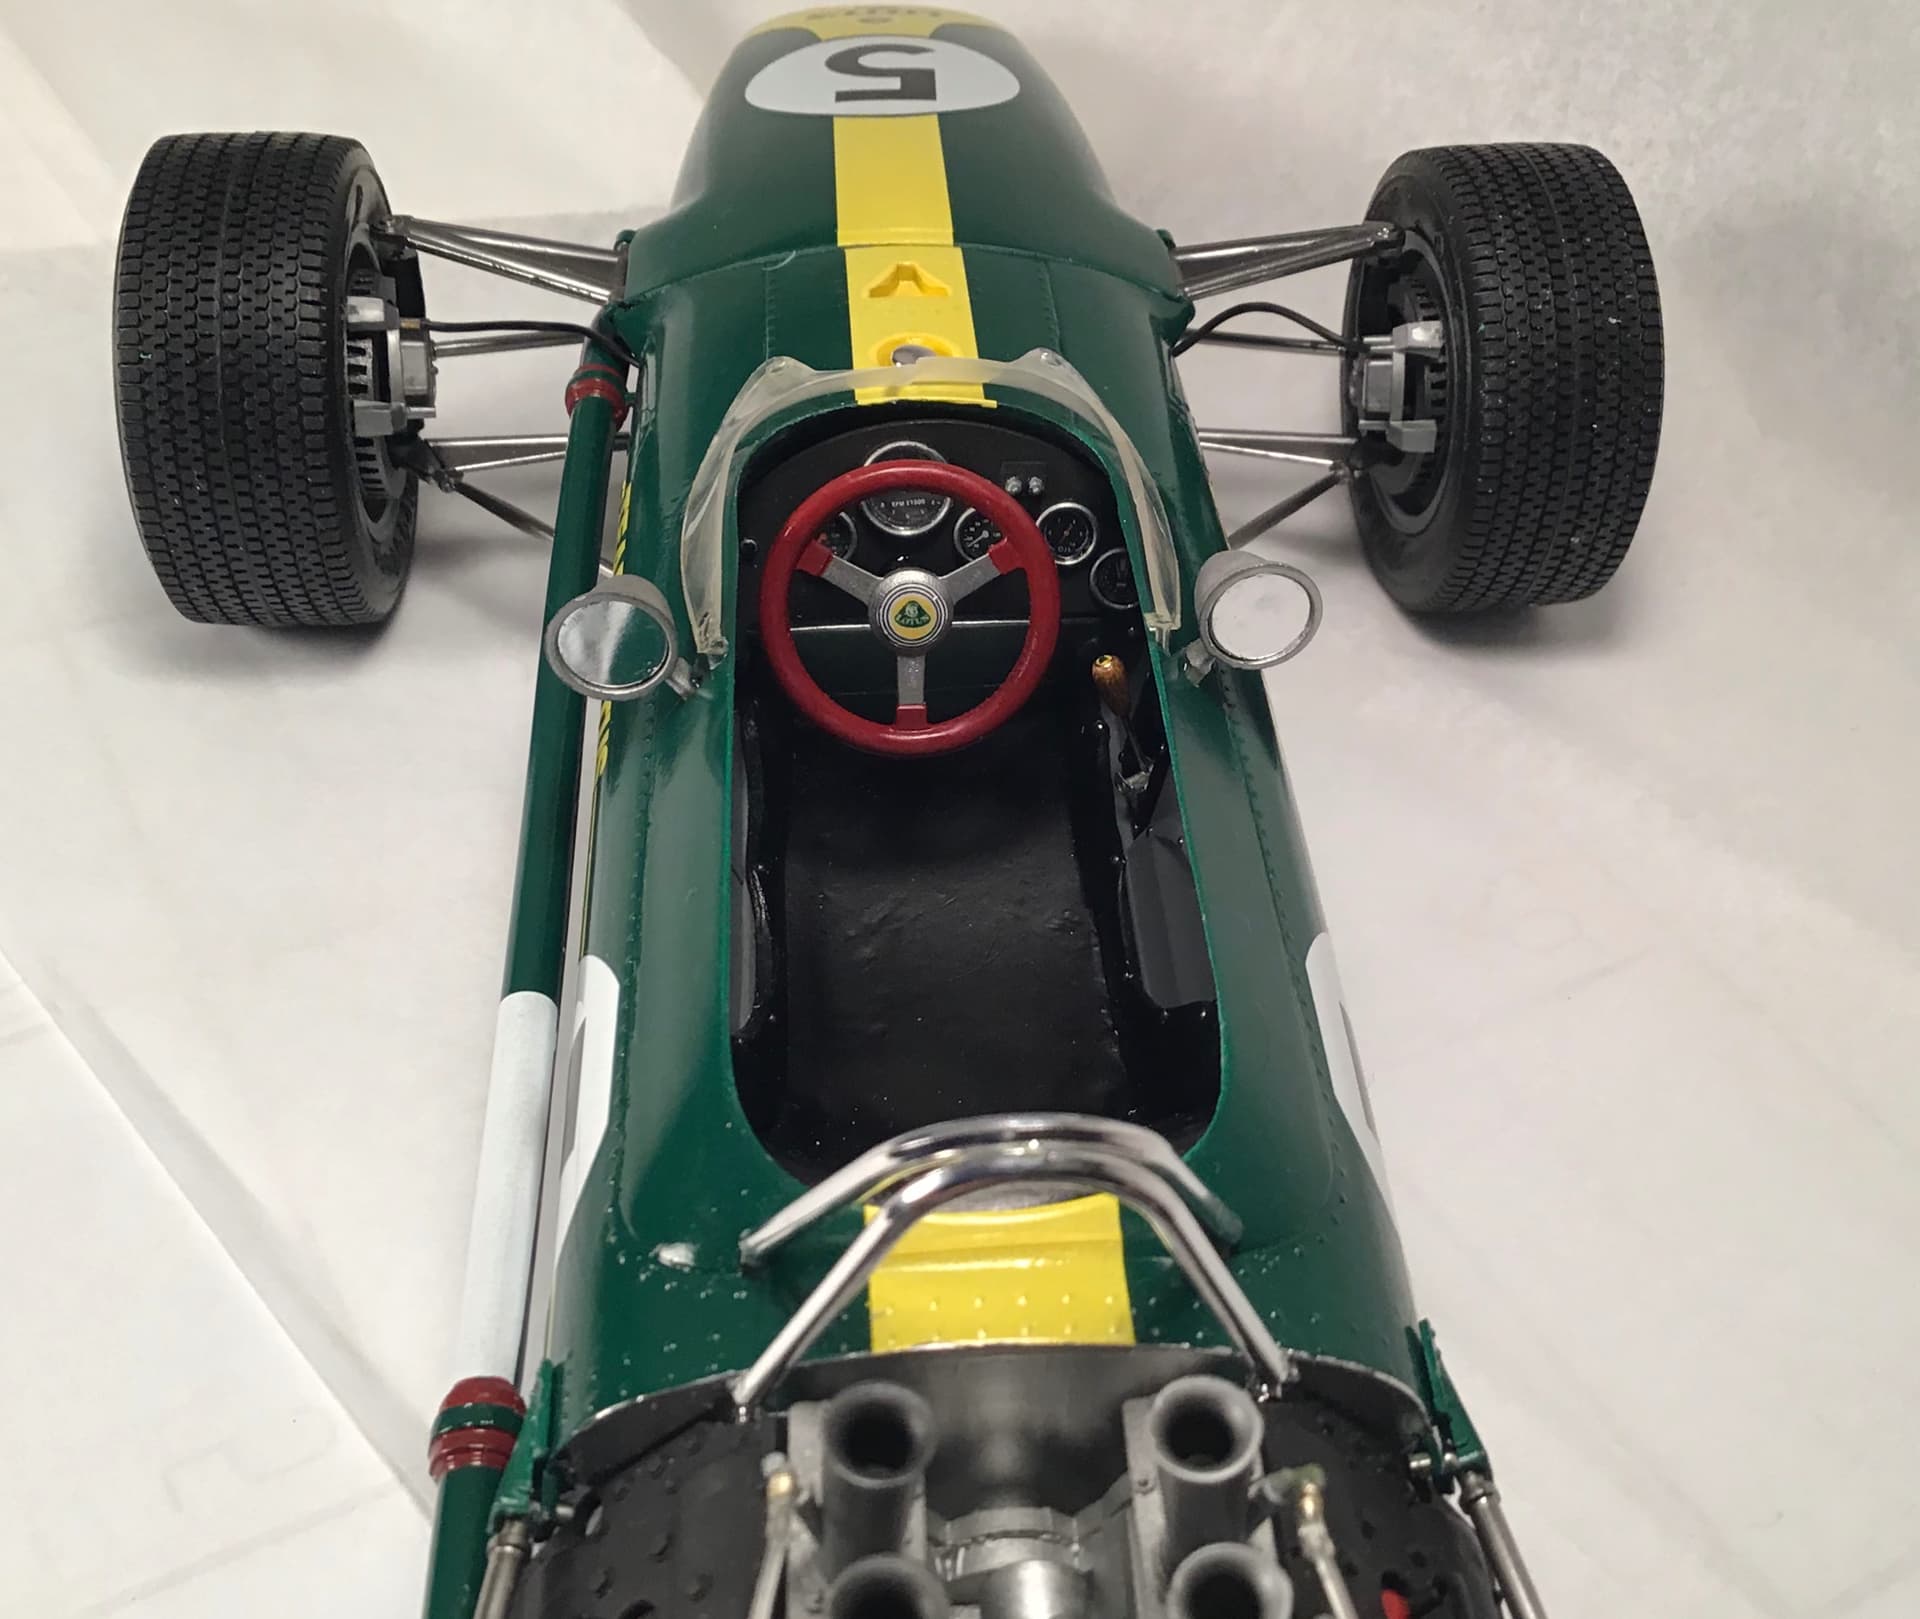
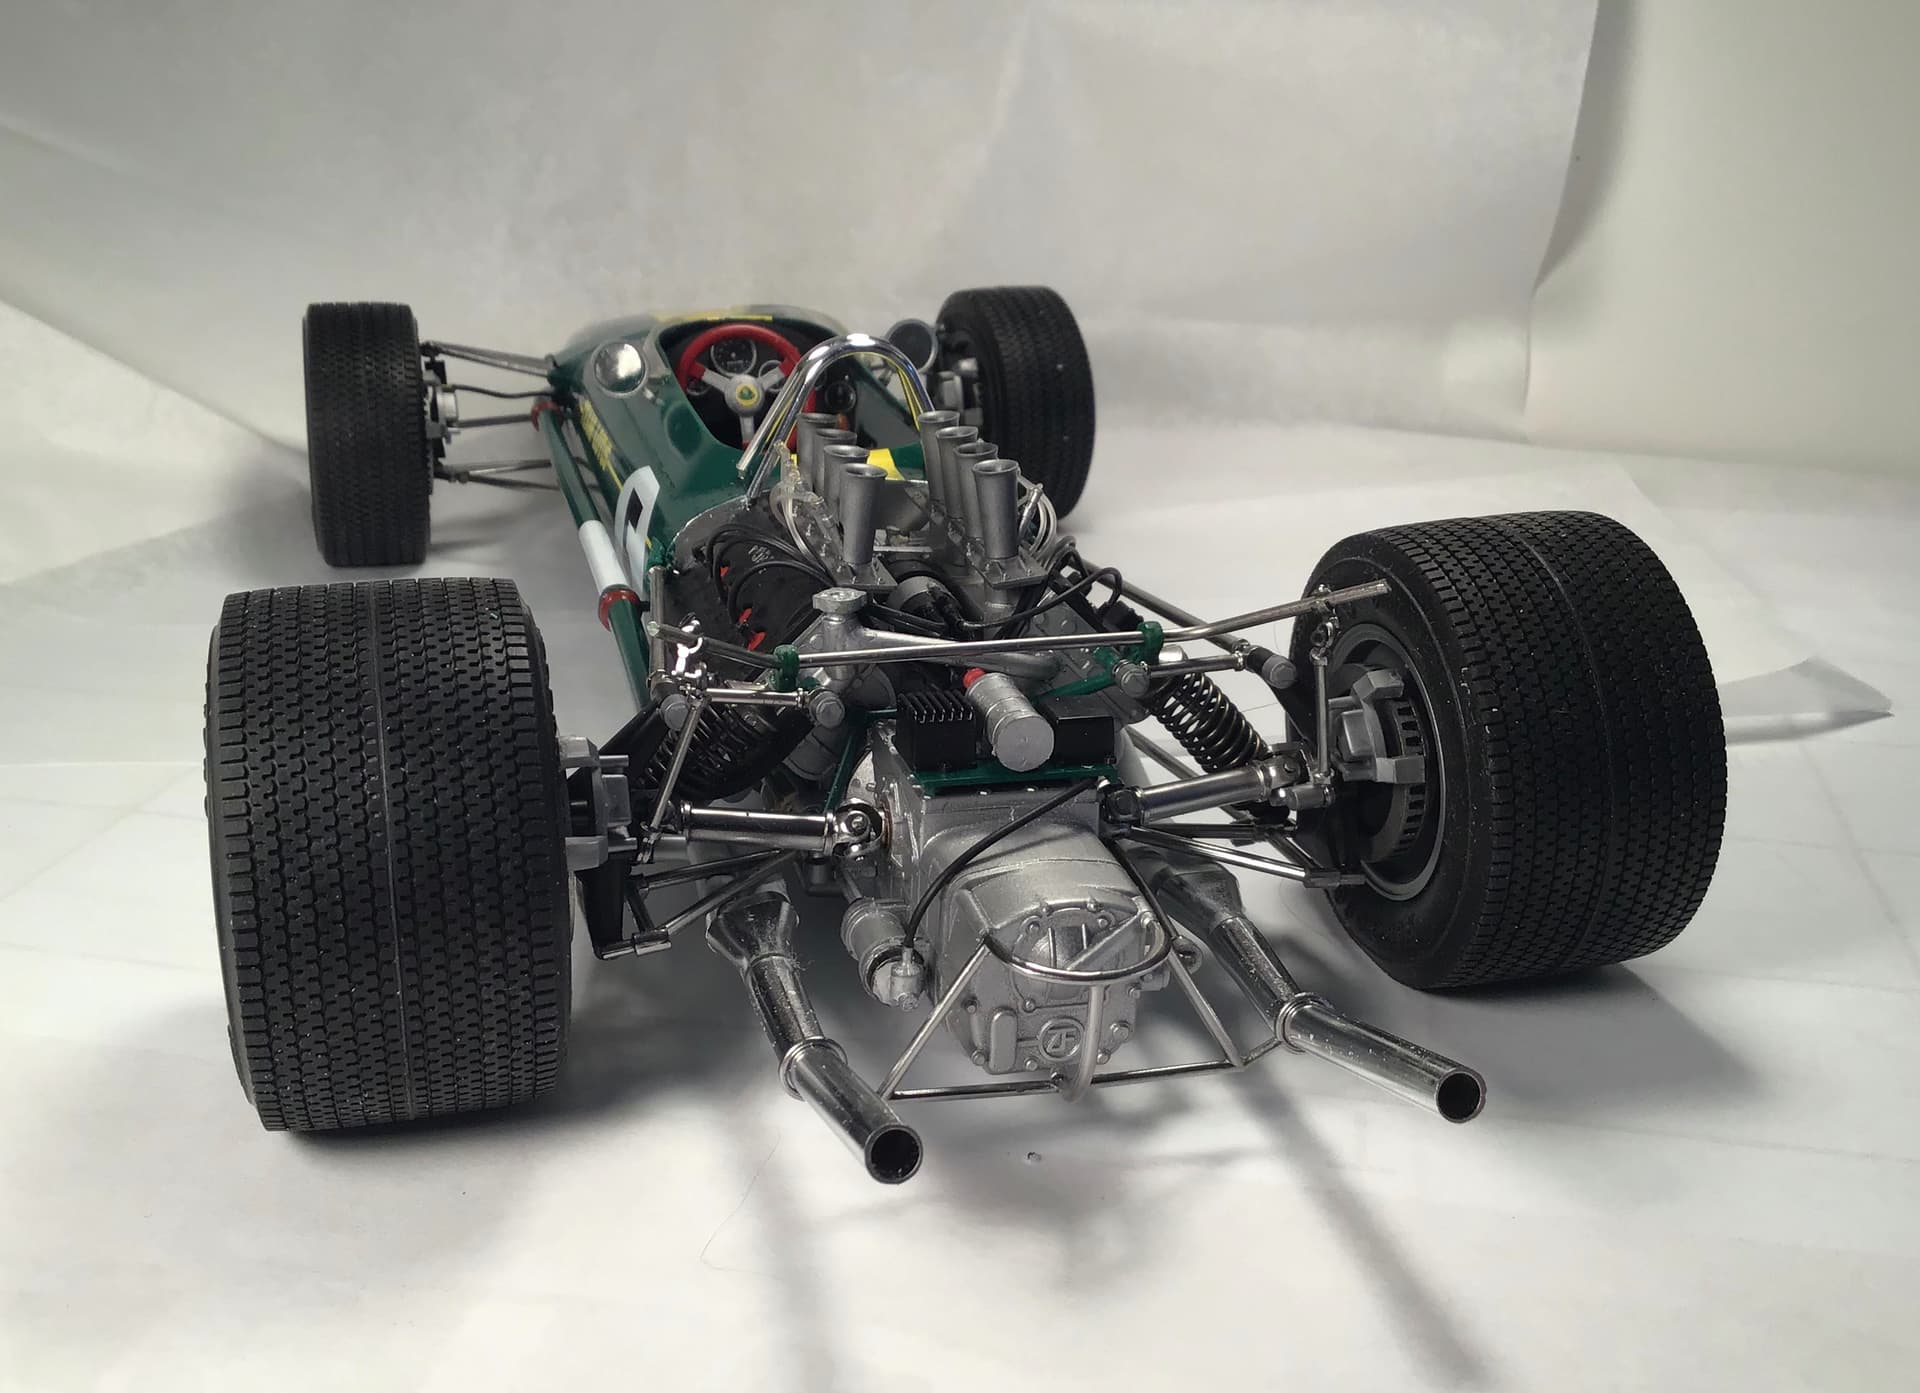
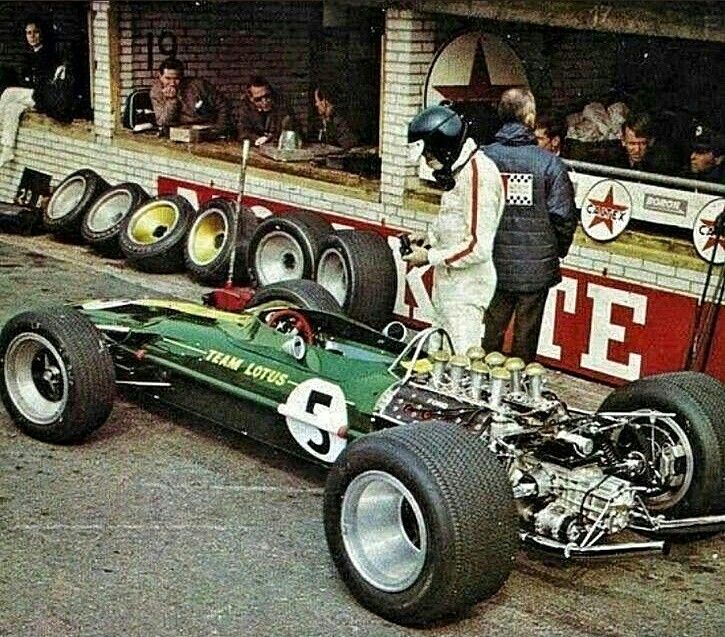
Finish line in sight - coolant pipe down left side needs prime and paint. Tamiya would have rubber hoses at both ends bot the real car had hard pipe elbow at front that led inside nose cone until it got close to radiator. Elbow fabricated out of brass tube .
Tamiya also omitted the two lines from the fuel pump at the bottom rear. Left side of the tub . Brass pins set in pump inlet/outlet and hoses added.
remaining are Talbot mirrors , windscreen, final exhaust.
Thanks for looking! RT
3 Likes
Richard,
I can’t tell you how impressed I am with your build to date. Every correction, adding omissions such as that cooling pipe and filter lines keeps on kicking it up another notch. As for the Talbot mirrors, sure hope you left them as chrome. At least mine were on the MGB, but boy did they vibrate as the mounting bracket just wasn’t up to that task.
joel
1 Like
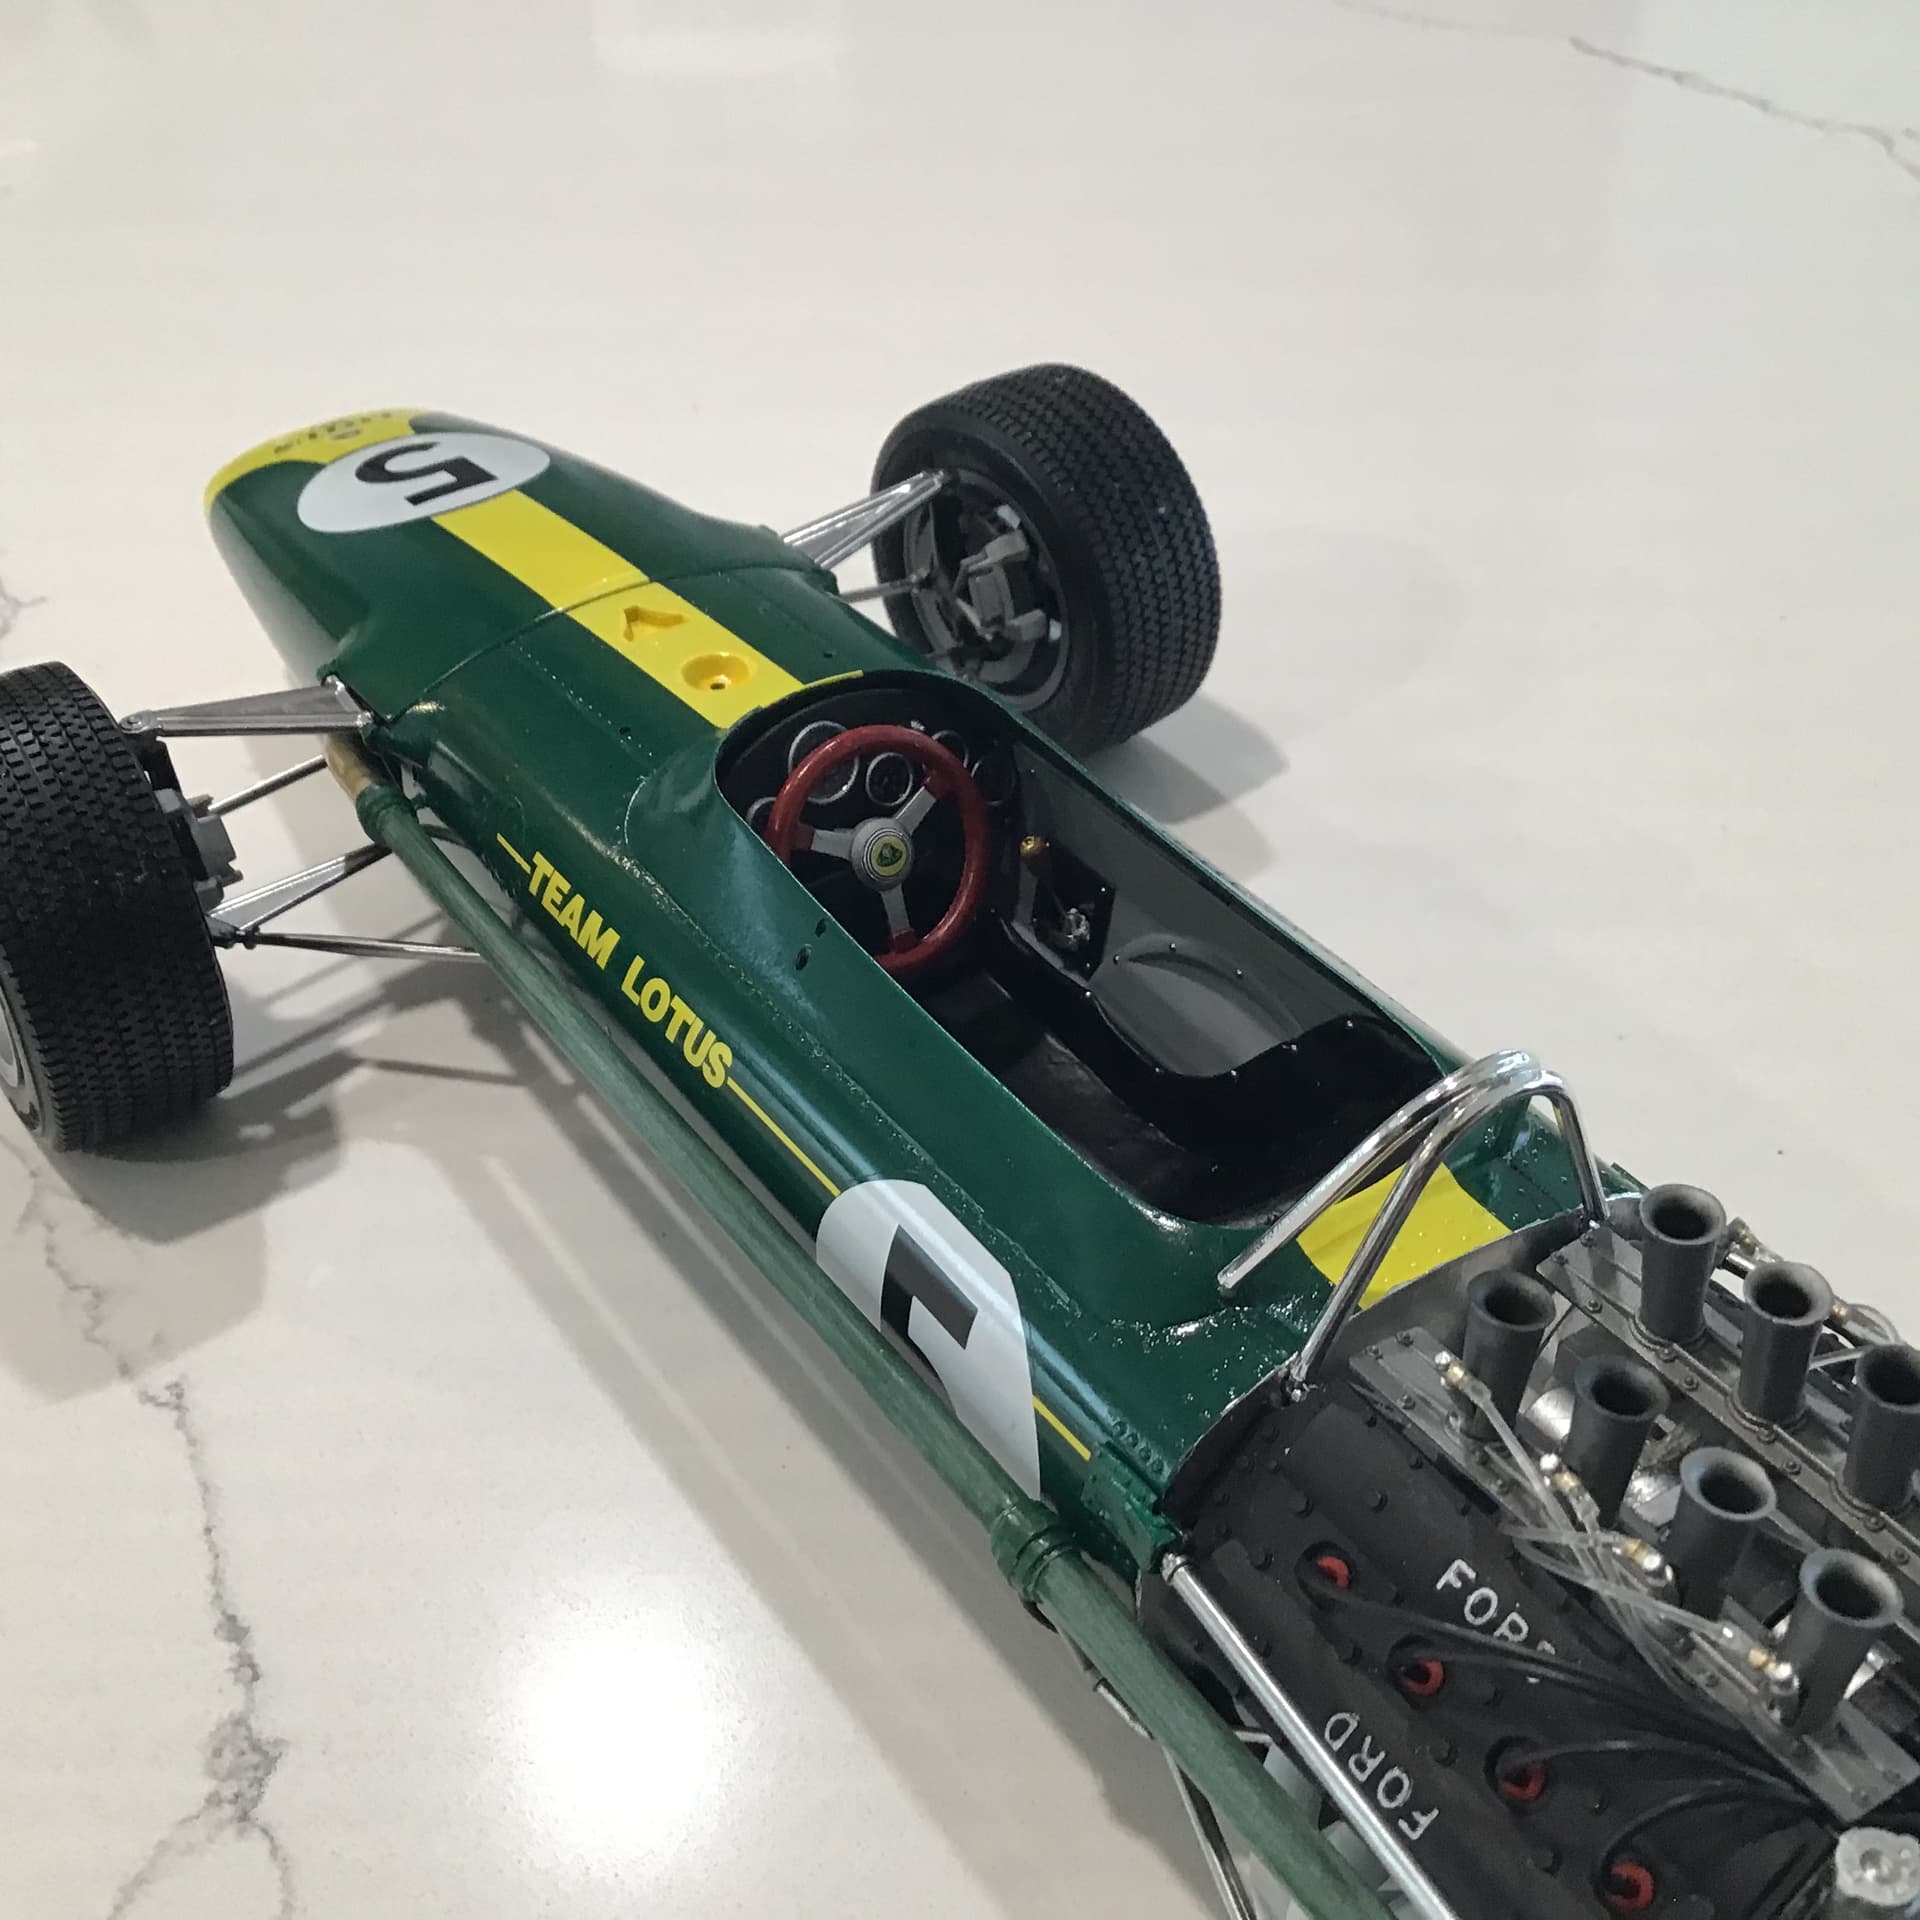
Thanks Joel - I have stripped the mirrors as they have a large flat base which isn’t correct and needs to be cut away . I’ll paint them polished aluminum as photos in the Lotus book show them to be not as shiny as the chrome bits .
Richard,
That’s what I was trying to say, but screwed it up. My Talbots were Chromed as the Talbots were pretty cheaply made.
I’d love to see a picture of that flat spot, as the more I think about it the base was kind of cupped, and the screws went from the inside of the cone through the base and bolted to the body. Here’s an excellent picture of the Lotus 49s Talbots.

That’s how shiny I always kept mine, but that’s just me.
joel
1 Like
Richard great work! I sure don’t know enough about F1 to wire and plumb everything like you did. I am interested to know where you get that degreaser and who makes it? looks like it works well. how long did it take to strip all that chrome?
Joe
@Bomber14 - Thanks Joe - The Model Factory Hiro Lotus 49 book was a huge help with many excellent detail shots . Truth be told I could have taken it much further but I don’t feel the kit was worth the effort.
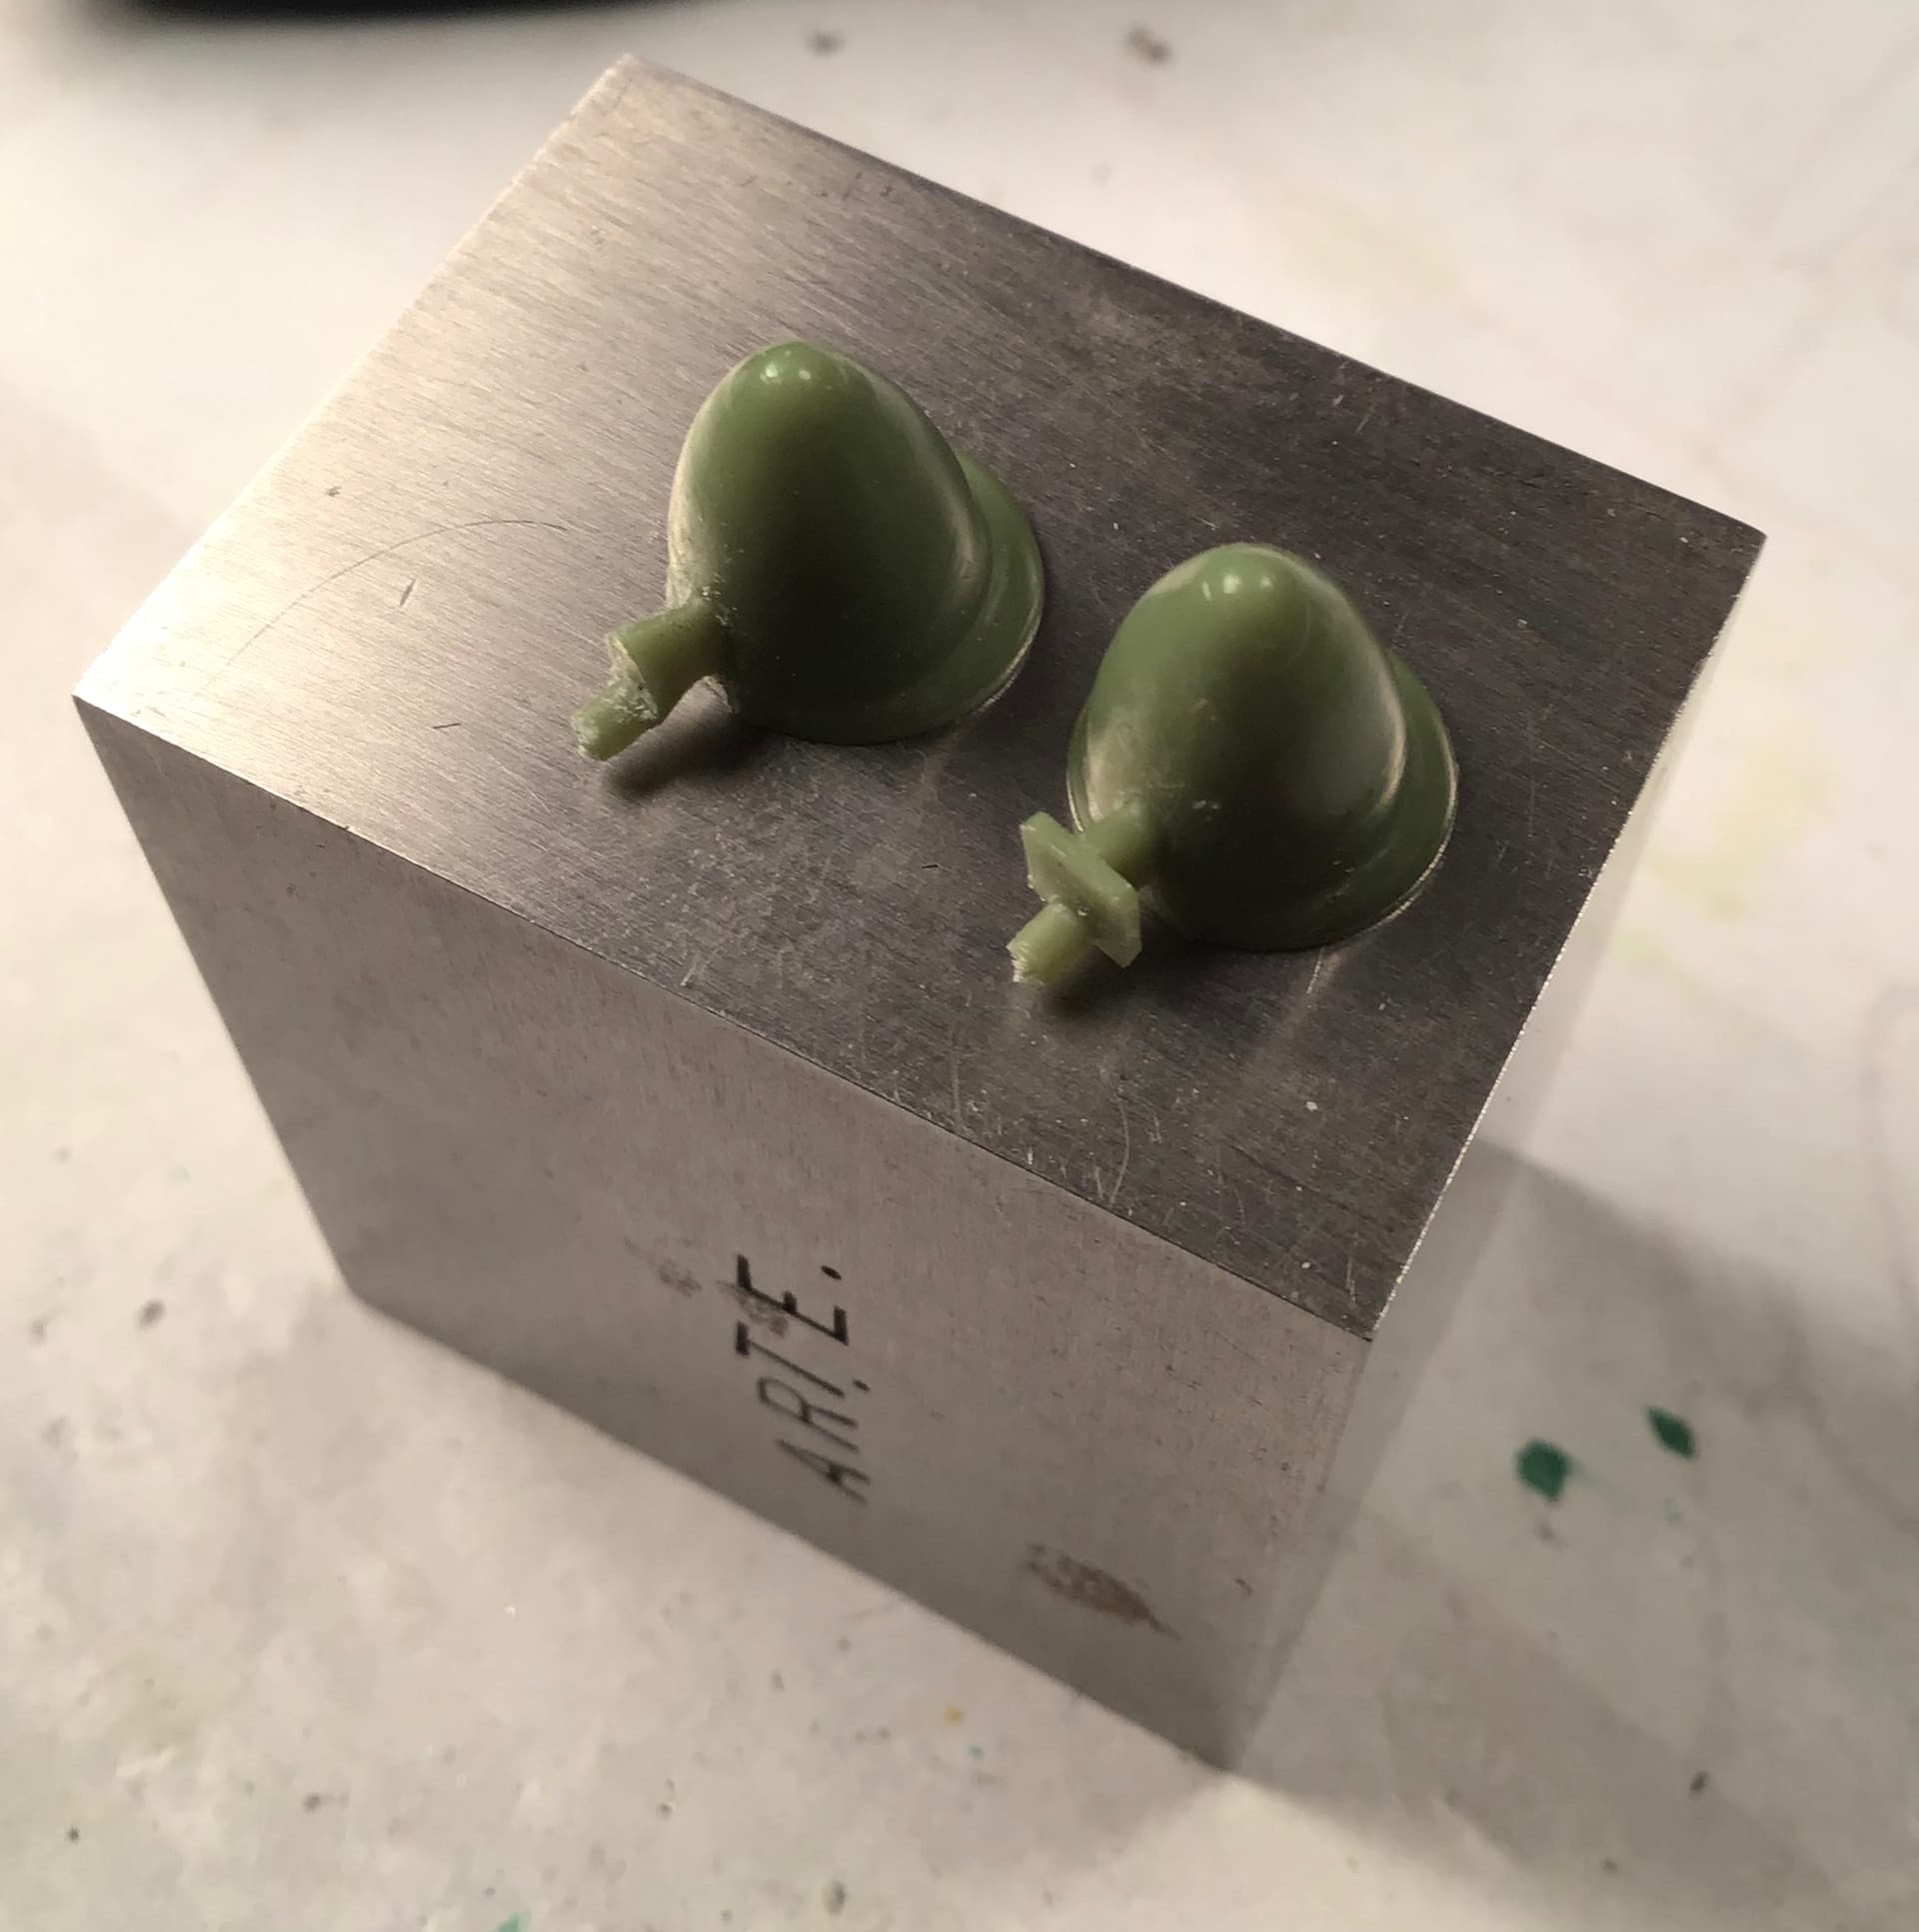
@Joel_W - Here are the kit mirrors - modified one on left - as supplied with square base on right .
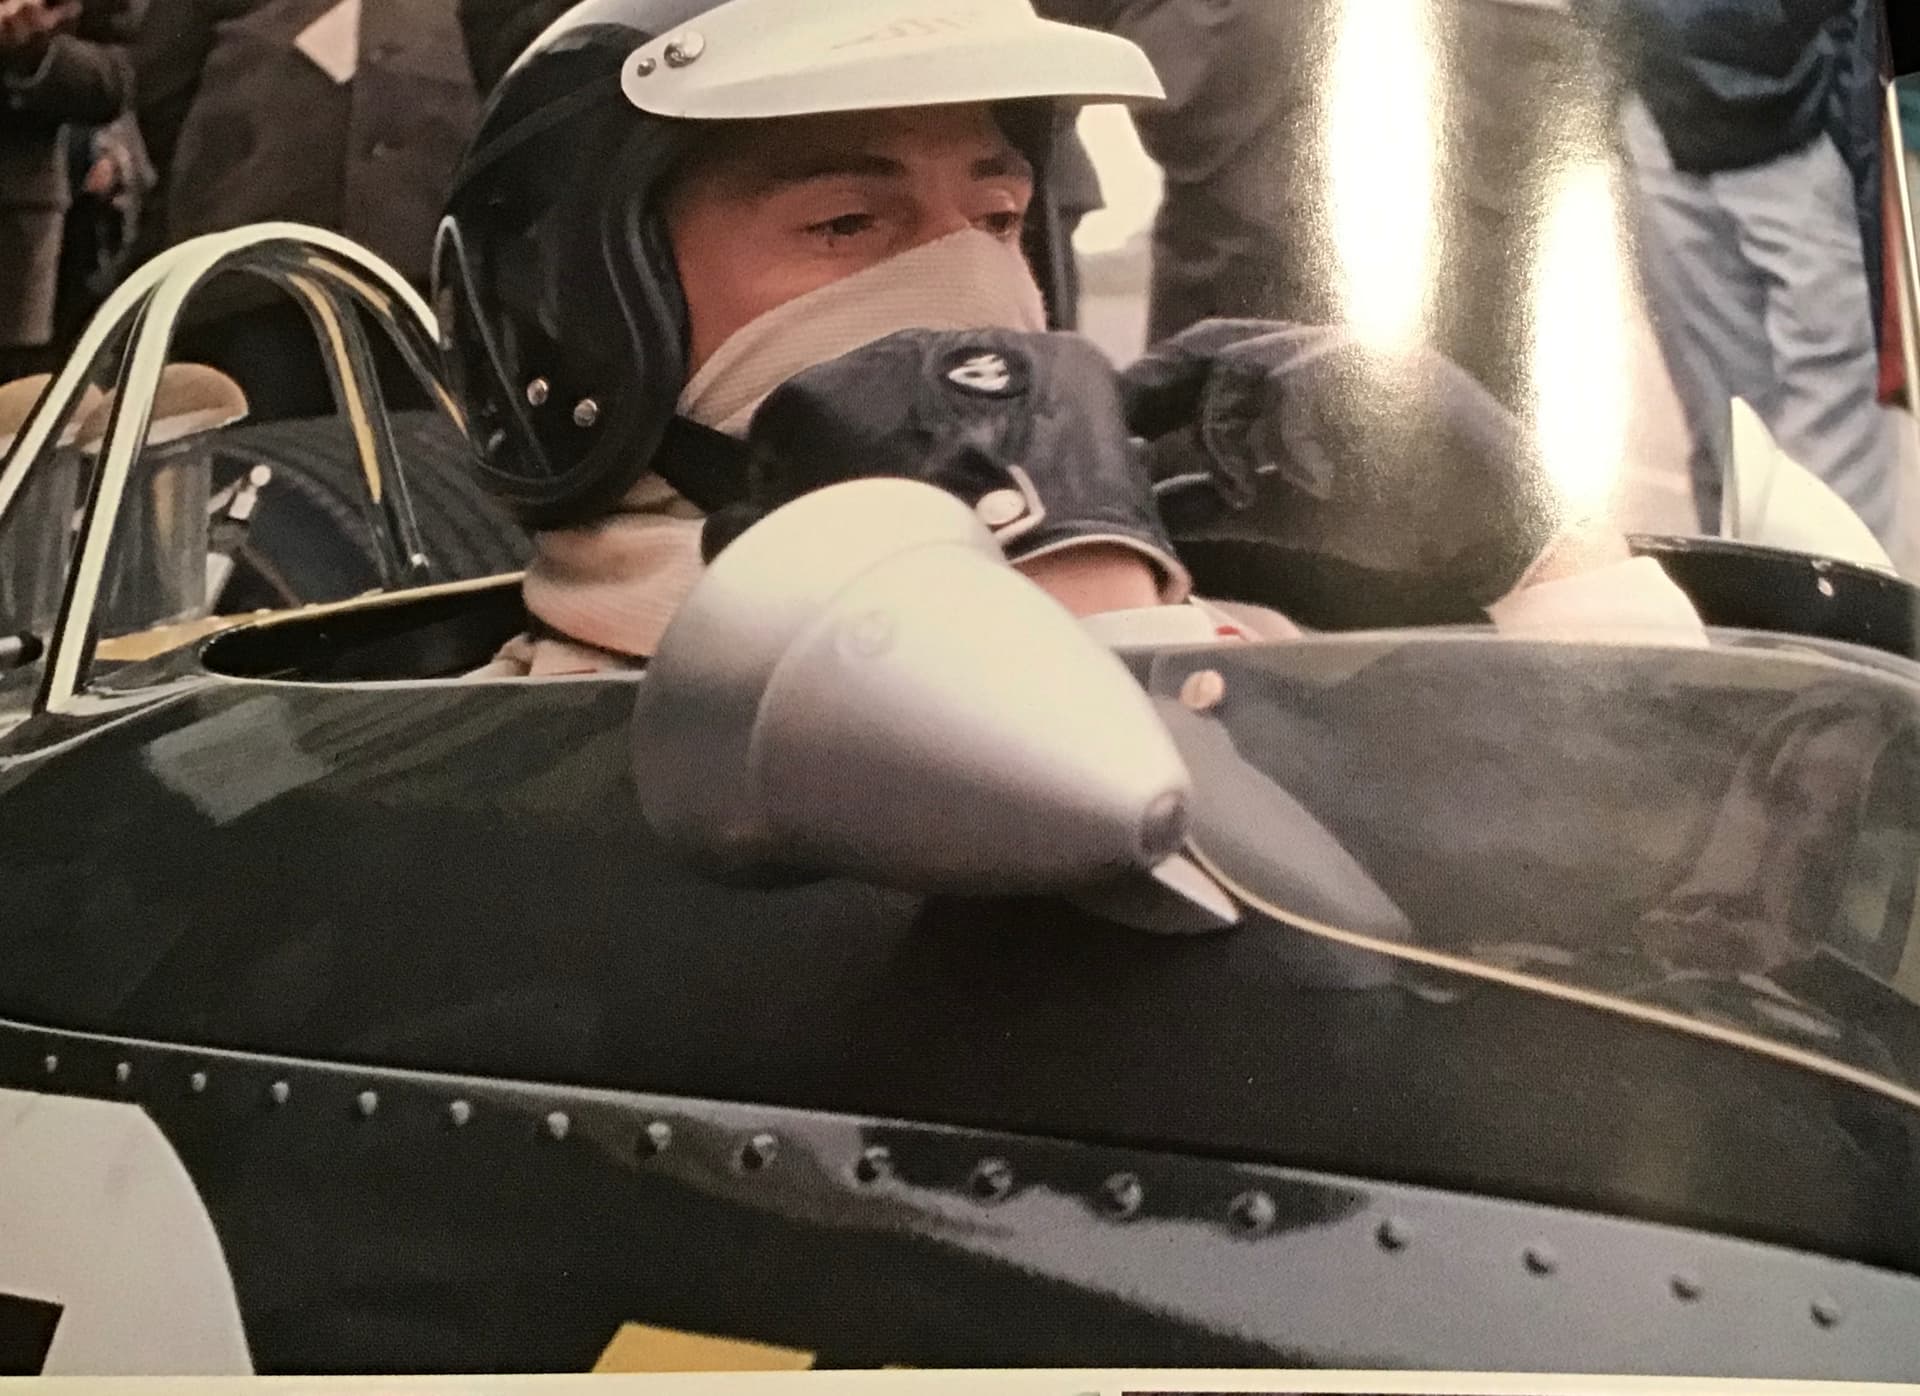
Here is a shot of the car at the Dutch GP - note the airfoil shape mount ( no square base) and the dull finish when compared to the chrome roll bar behind .
1 Like
Richard,
What a great picture. Clark at the 1967 Zandvoort Dutch F1 Grand Prix.
As for the Talbot shown, my guess is that the mechanics just grabbed a set of them off another car in the shop. They’re certainly oxidized. Since this was the 1st GP for the Lotus 49 even those Talbots wouldn’t have had a chance to oxidize like that even in the Salt air of Zandvoort which was literally built on the Sandoons by the sea.
Excellent correction to the completely wrong Tamiya molding.
joel
1 Like
I’m wondering if they are matte finished purposely from a glare perspective.
1 Like
Richard,
Back in the 60s we actually used Black Electrical tape on the top half of our goggles to cut down on glare and any direct sunlight. Worked to a small degree, but it looked pretty neat just the same.
As an anti glare effort I would think that the chrome bezels and the steering wheel would have been of greater concern.
Not sure but looking closely at the bottom of the Talbot in your picture, it actually looks like Rust and or pretty extensive pitting. What do you think?
joel
1 Like
It could be corrosion Joel or it may just be a grainy photo.
I simply just took a shot of the picture in the Lotus book with my I pad.
1 Like
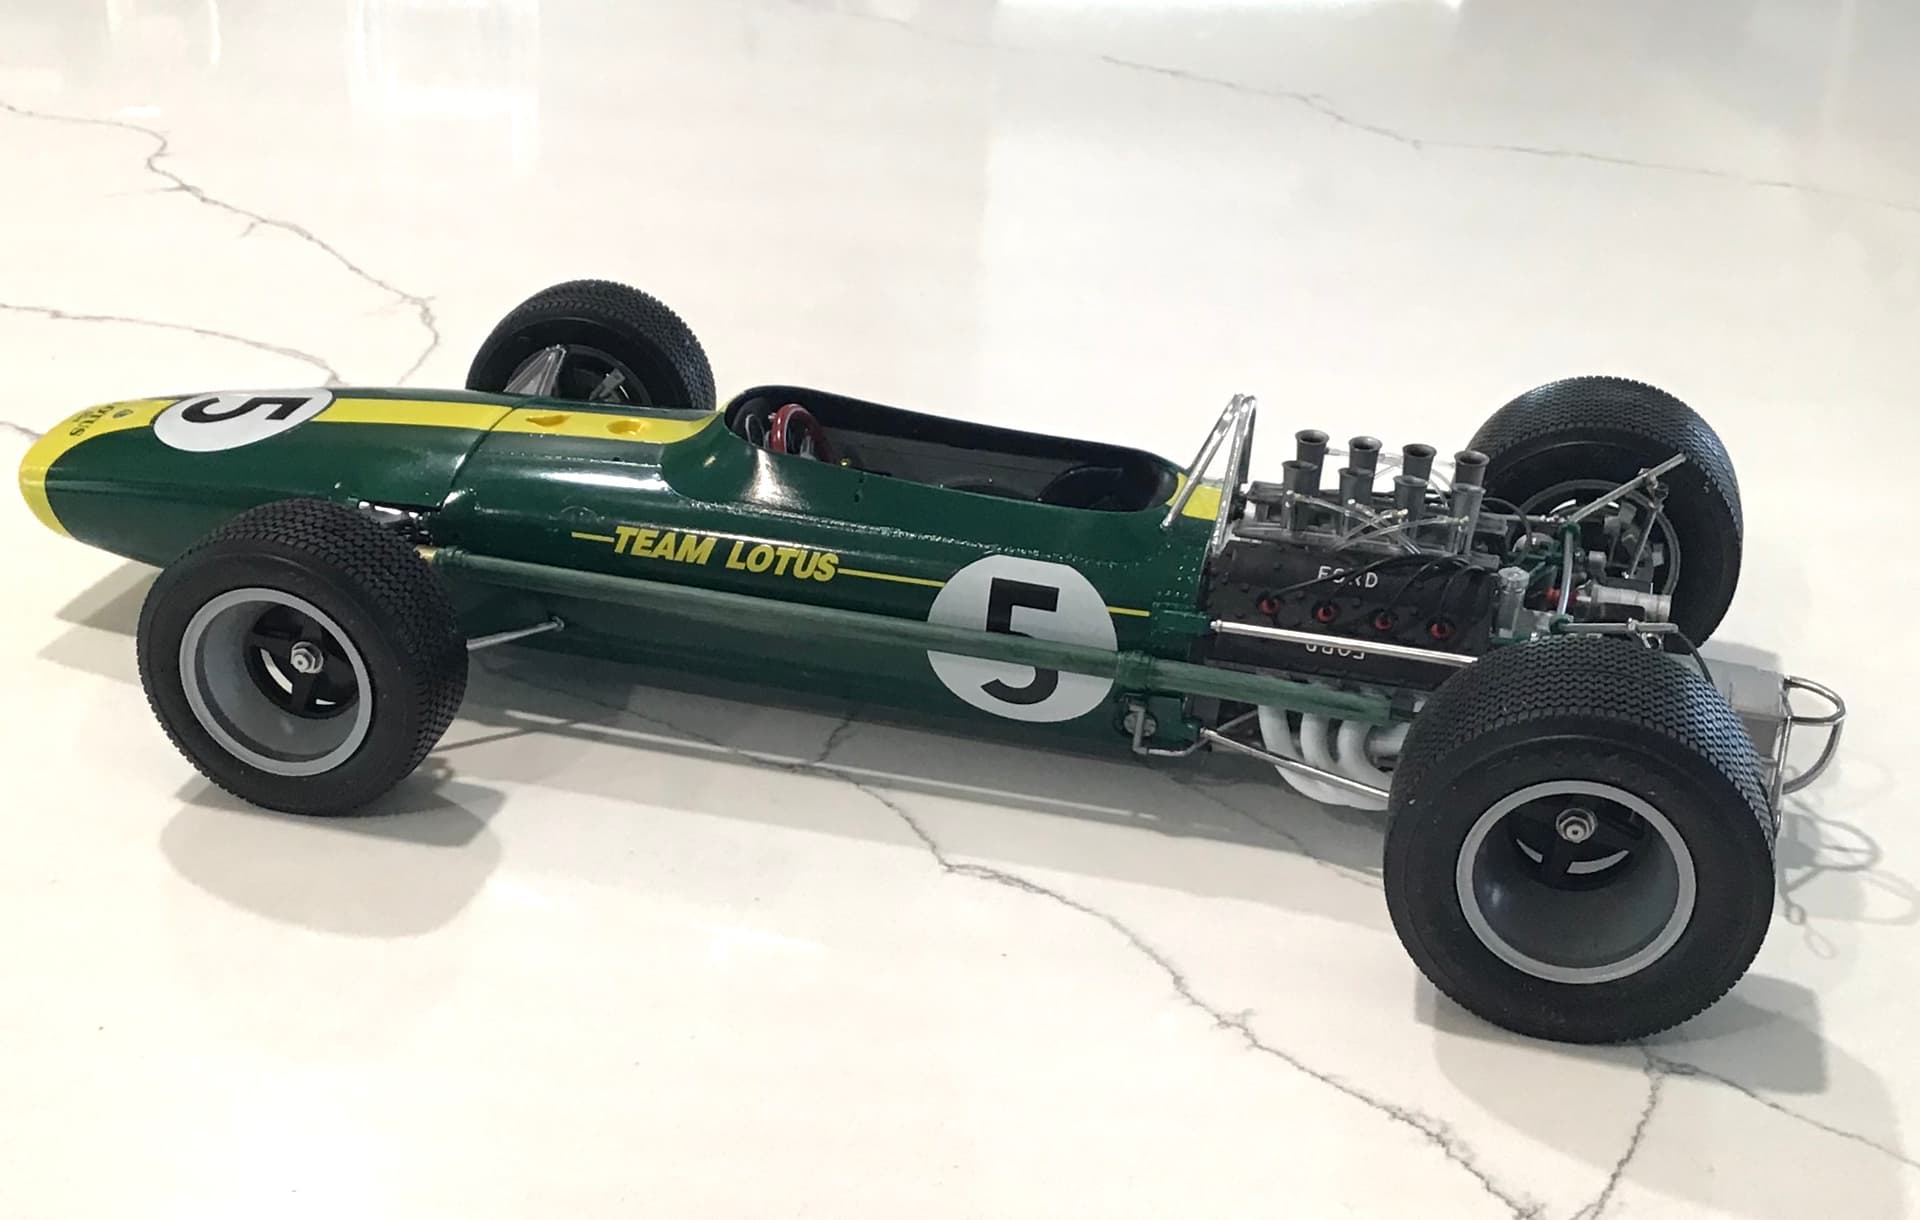
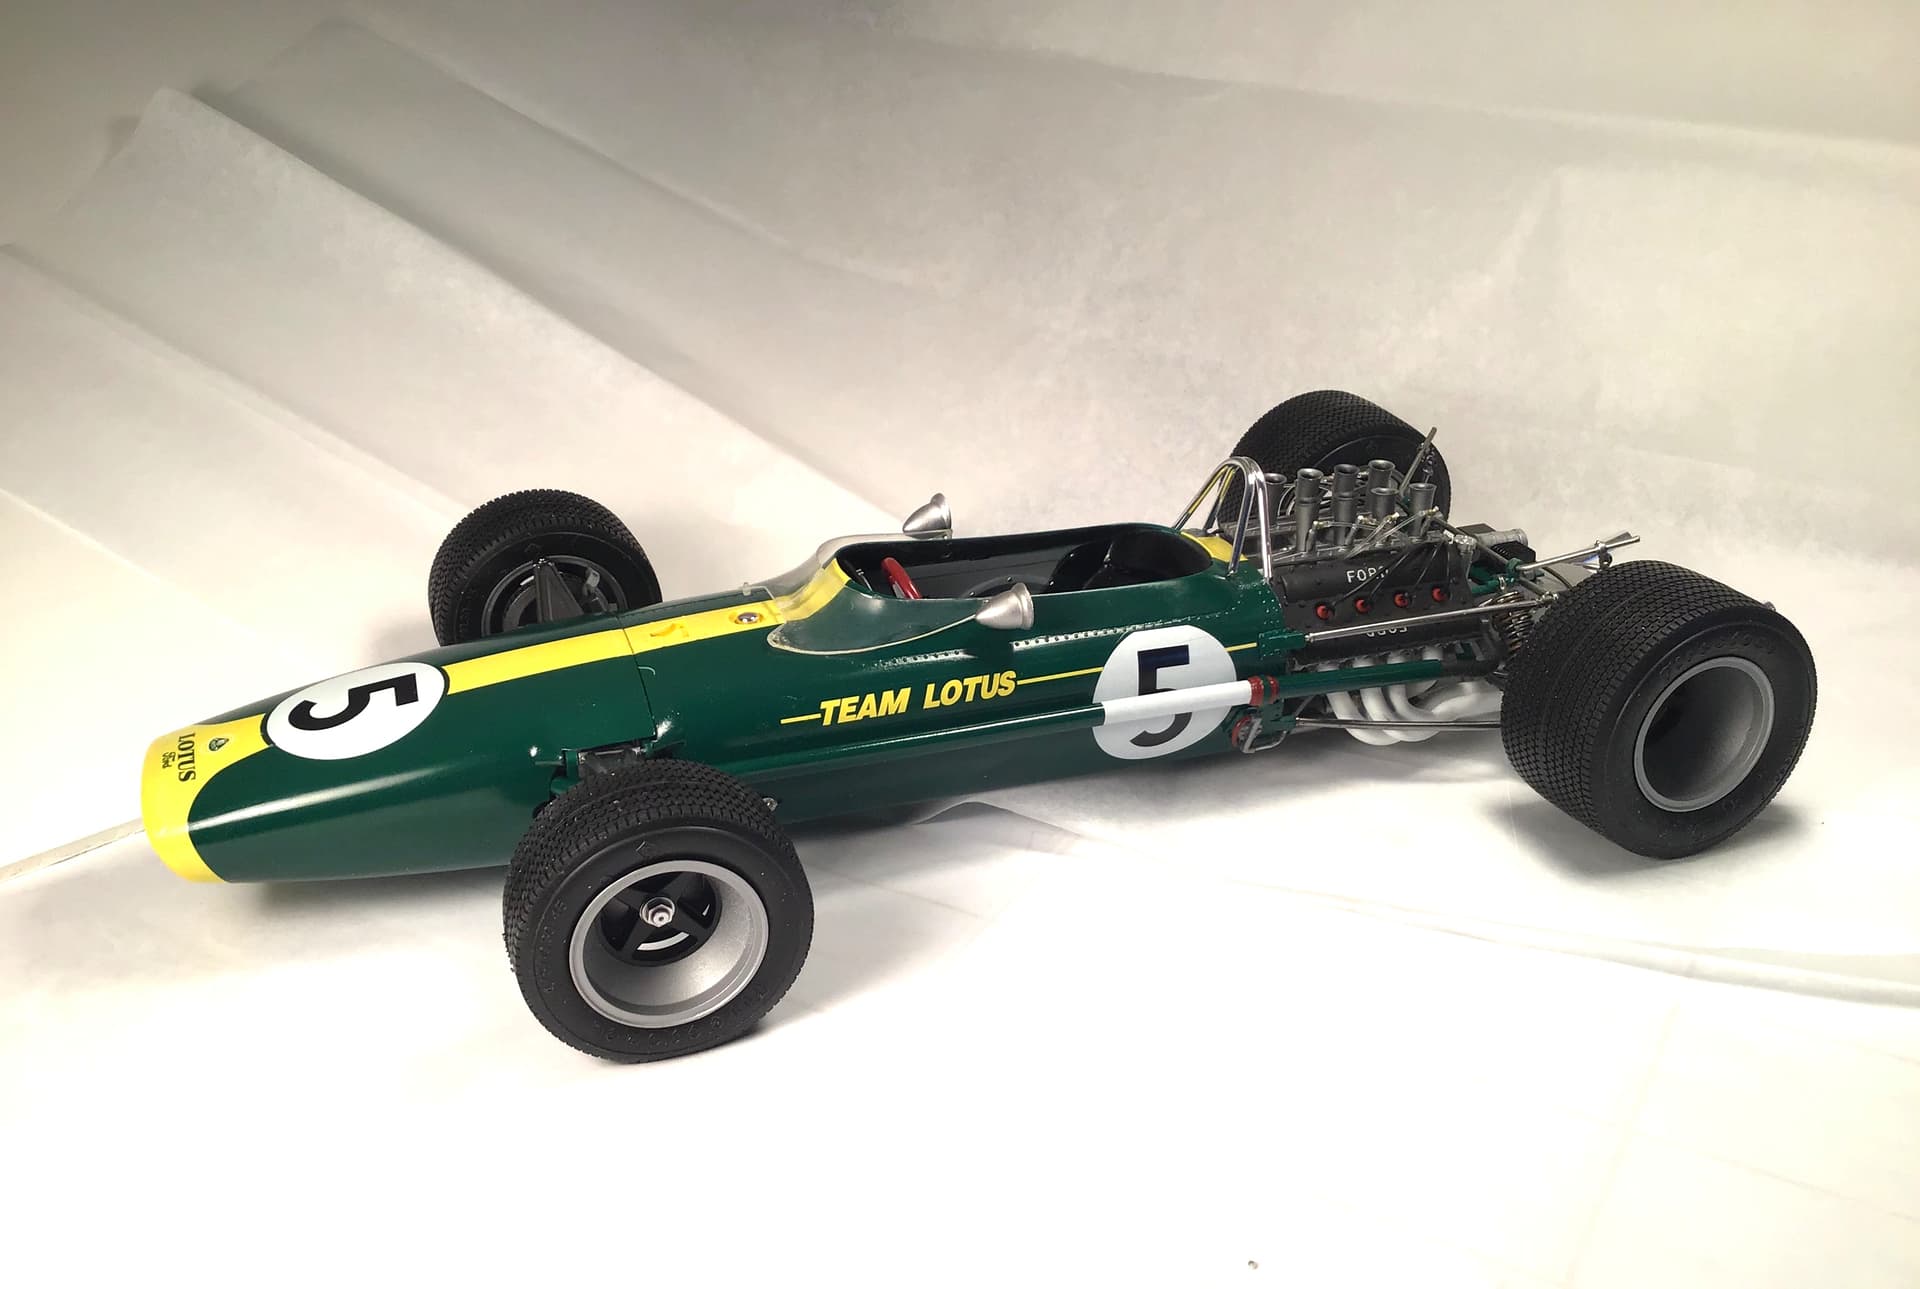
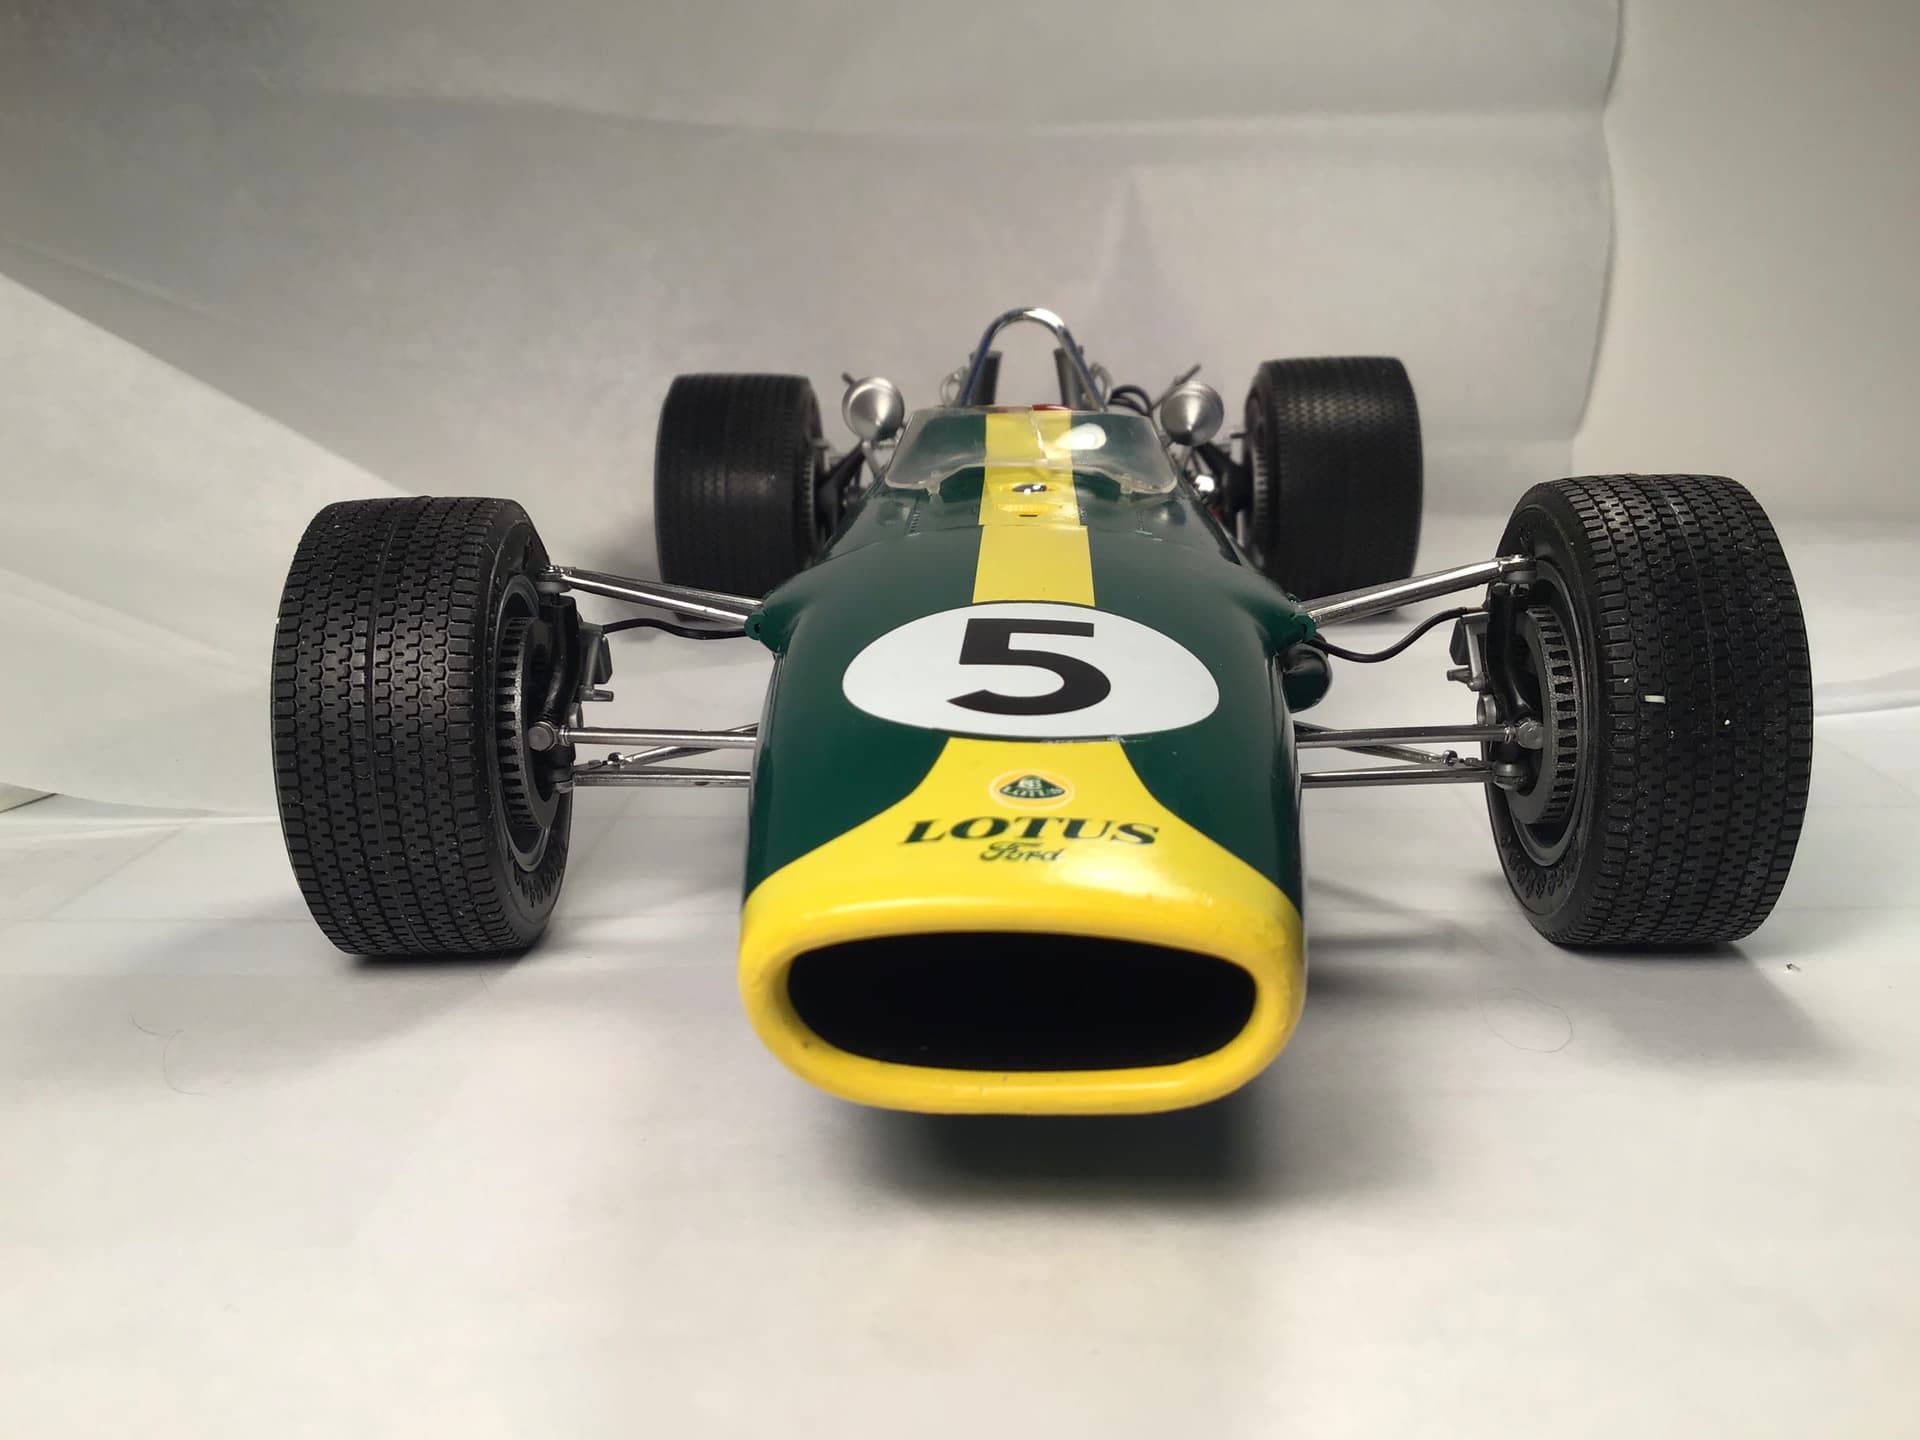
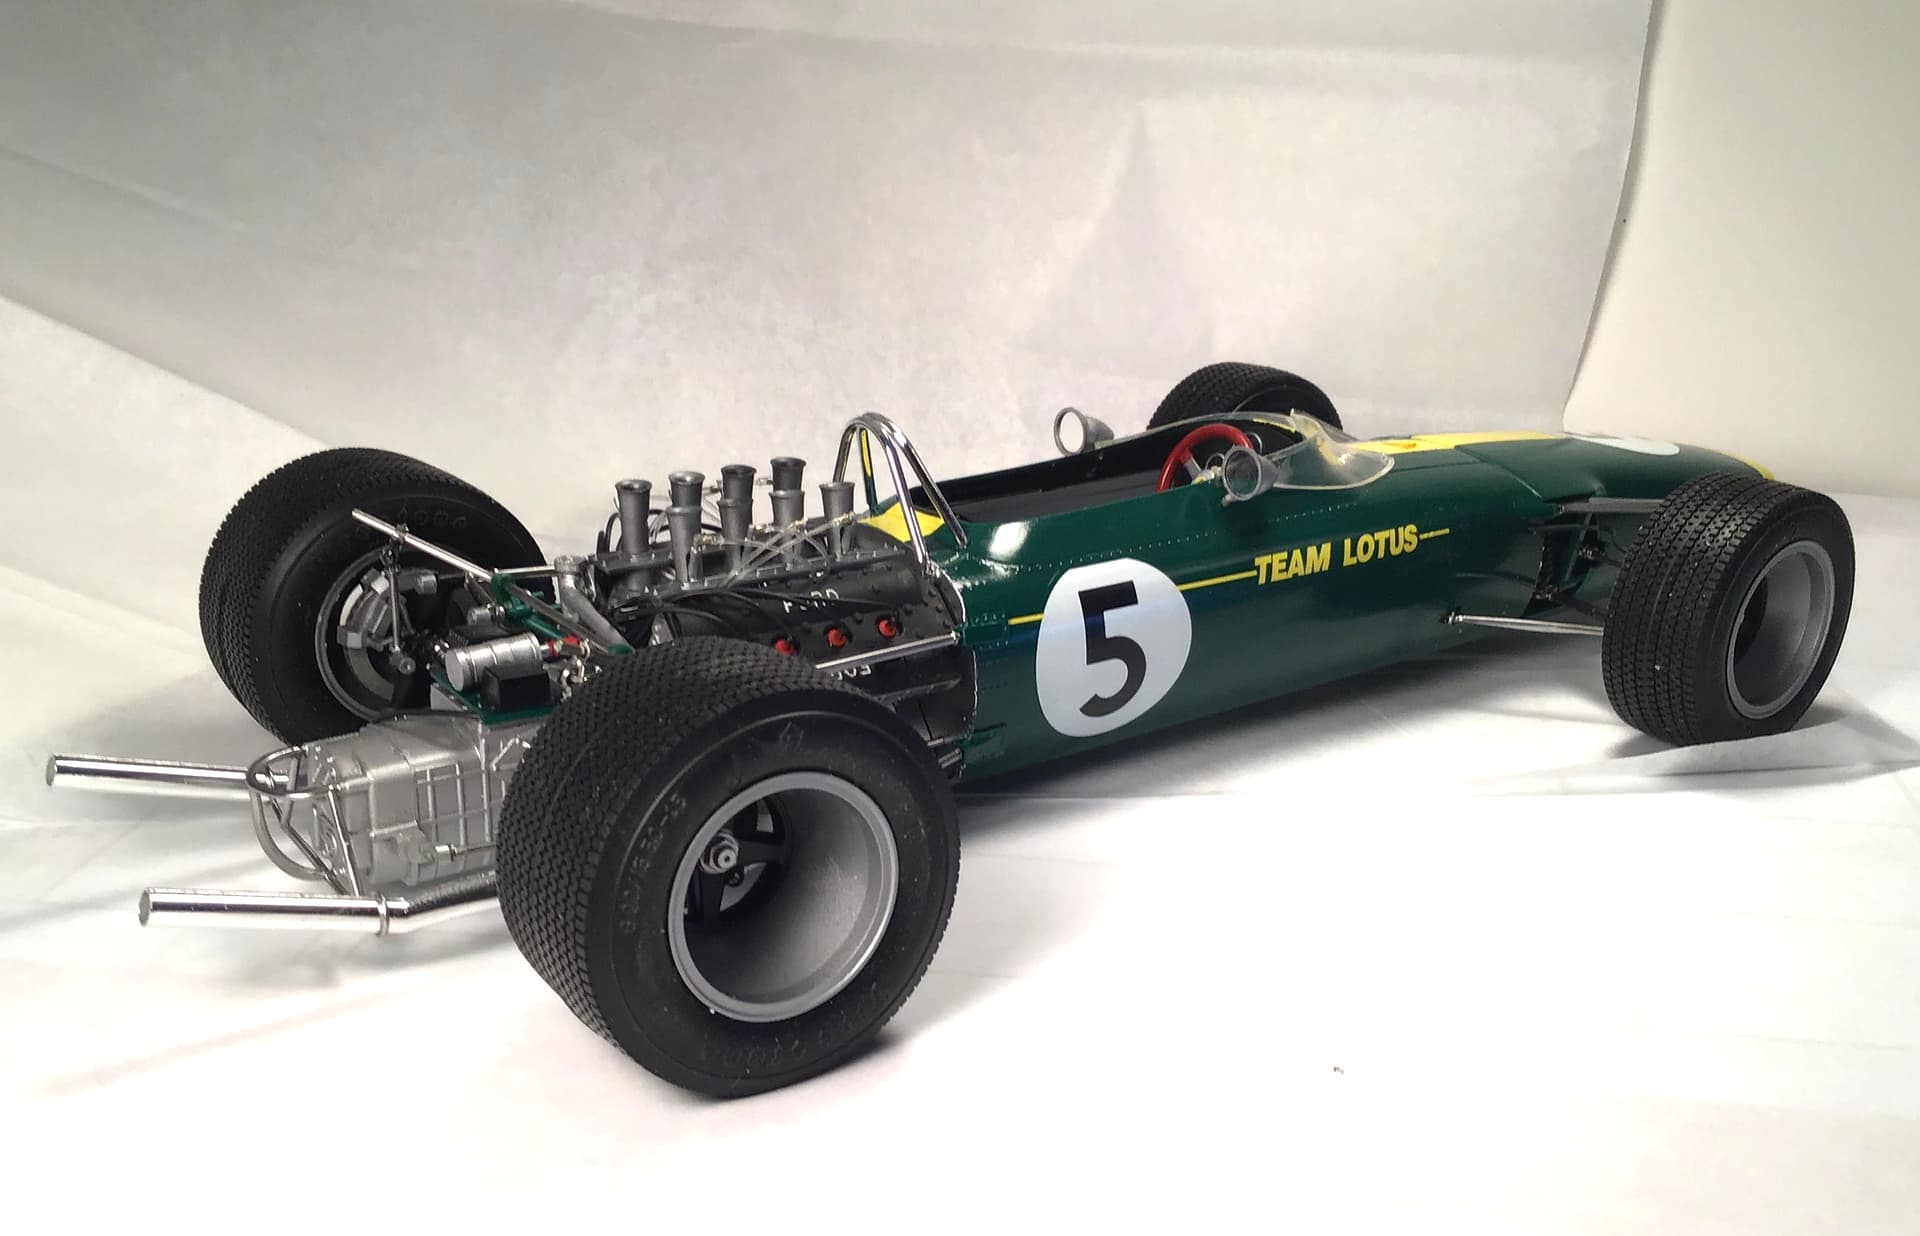
Calling this one done. A struggle all the way.
I could have carried it a bit further - rear brake lines missing - another Tamiya oddity as they included the front lines. The windscreen had a sprue gate smack in the middle of the top edge - I polished it out and then broke it in half - sigh …
All in all I learned some things - mostly painting in big scale and working with SMS & Alclad lacquers so a worthwhile effort in that respect. I guess the biggest obstacle was between my ears - with all it’s faults I just didn’t think the kit was worth all the effort. Some things suffer by comparison and I had just finished Tamiya’s RC 166 kit which was excellent in every way. Perhaps my attitude would have been better if I had done the Lotus first - who knows ? Anyway , here it is .

I tried Indycals, Spotmodel and Hiroboy looking for a set of Joel Willstein handprint decals for the coaming but everyone was sold out - a hot item it seems ![]()
So thanks everyone for the interest and help - now on to the MFH Alfetta!
Cheers- RT
2 Likes
Hi Joe - sorry for the late response.
The stripper is really a degreaser I use in my parts cleaner- manufacturer is as on label . I believe I got it from McMaster-Carr . Smaller stuff only takes an hour or two but big batches like this I leave soaking overnight.
RT
Richard,
1st and foremost, I’m super impressed that you not only had the fortitude, skills, and modeling knowledge to build and complete what many consider Tamiya’s hardest to build 1/12 scale F1 kit being as it was their 1st., and thus a whole new ballgame for them. Considering that the design of the kit/molds was all by craftsmen and not computer, the kit was certainly cutting edge for the time. But being motorized presented a whole different issues that you solved.
The completed model does represent Clark’s winning car for the 1967 Dutch Grand Prix at Zandvoort. Here’s a picture of that car at that track, or so the picture is labeled as such:
I’d say for sure that you modeled this exact car extremely well. Chapman and Clark would be proud of you.
I was super impressed at how you went about detailing the seat correctly, the missing arm rest, and the painting of the nose inside the lip, which is exactly how I still do it.
I was surprised that the Talbots were mounted on the coaming and not clear plexi as that is where the drivers preferred them since it was much easier to glance at them without turning their heads as much. Your attention to detail even extended to correcting the base of the Talbots which were completely wrong as I’ve never seen them with mounting plates in real life which made no sense.
Painting and decaling was once again up to your usual master builder standards (sorry that my decal set is no longer available. I don’t even have a copy to tell the truth  )
)
I’m hoping that with your last two builds, we’ve brought you over to the dark side and into our fold. Any hints as to your next build?
joel
1 Like
Thanks Joel - coming from you those compliments mean a lot . Regarding the mirror mount I think mounting them on the clear plexiglass came later when the windscreen wrapped all the way round to the back of the cockpit.
I have actually begun the MFH Alfetta by straightening some of the white metal parts . I will start a build blog shortly. In the meantime I may do a shorter “ pallet cleansing “ before diving in on the Alfetta full time .
I imagine the Alfetta will be a year or more in the build process.
Cheers - Richard
Richard,
You have to be right about the talbots. I’ll have to go through my Lotus 49 pics for my own build to see, and open my Ebbro Lotus 49 as it does have multiple coamings and clear plexi to match.
I was hoping that you’d say the Alfetta. What a build that’s going to be.
BTW, I’ve actually been able to put in a hour or so most days on the Bimmer as my wife is doing great and my upcoming surgeries aren’t for a few weeks yet.
joel
2 Likes
Great job Richard. It has been educational to watch your changes to this kit. Your attention has been amazing, with the cockpit changes the standout for me.
I did buy a re-pop of this that Tamiya did just a few years ago and I actually haven’t looked at the kit. Not sure I am in any hurry to now.
cheers
Michael
1 Like
Thanks Michael for both the compliments and the help/ moral support for the Alfetta as I begin to get the feel for the new genre.
We are kindred spirits in a way as I am happiest with the cockpit in the Lotus build as well .
What would I do different in hindsight ?
I would have spent more time / effort on the wheel rims . In the MFH book the rims don’t show as shiny as some of the suspension components and as I had done said components in Alclad HighPolish Aluminum I stepped the rims down a tad but I think they would be better with more bling. I should have sanded them out after stripping as there is some chatter in the finish then shot them in gloss black and polished that out , then hit with High Polish Aluminum. I actually almost did this as a correction during the build but my attitude towards the kit got in the way .
Secondly I would have done the nose stripe / intake in paint - trust me , it looks better in the photos than it does in reality.
Lastly I would spend more time rubbing out the paint - color and clear - again the silk purse /sow’s ear thing bothered me .
Cleaning up my work areas - then on to the Alfetta.
Cheers- RT
1 Like
It’s truly a stunning replica. Your acclamation is complete 
1 Like