Testing session airbrush

First of all, thank you all for your reply’s.

This helps me a lot to get more confidence in disassembling my airbrush for regular cleaning.
And to have a try on this myself.
Thanks for providing notes and detailed illustrations based on my photo’s I uploaded earlier.

The first thing I want to say is, that I think that I have to split up the airbrush session and the cleaning procedure into to seperate ‘parts’.
Because it takes me a lot of time to prepare the workspace where I’m going to hold my airbrush session.
It takes me a lot of time setting everything up.
I also have to tidy everything up again.
And usually airbrushing takes up a whole day.
That is why I’m thinking it is necessary to split the various ‘parts’ of this up.

A question I got is: Why is there so much talk about using ‘thinners’ to clean out an airbrush?
Cleaning out an airbrush is done with airbrush cleaner.
Or is there something that I don’t know?

Secondly, how do you test after each cleaning operation of the airbrush if it works properly again?
And how do you determine that?

And what test objects can be used before airbrushing on an actual project itself?
I have heard that on the ‘belly’ or underside of the project can be used to do some testing before working on the actual project.
Because, noone looks at the underside after everything is done.
That’s the case for me, I normally don’t watch the underside.

Anyway…

When I’m able to perform more airbrushing, because I’m not having the testing objects at the moment.
And things like airbrush cleaner and such are almost up.
I will write more here about my experiences here.
You have to use something that will remove all the paint, dried and still wet, from all the surfaces of your airbrush when you clean it. What solution you use depends on what you’ve been spraying and how much paint has managed to accumulate and dry on the various parts and places.

FWIW, I use lacquer thinner to clean my airbrush after spraying everything except water-based acrylic paints. For those, I use glass cleaner followed by lacquer thinner. For me, lacquer thinner (cellulose thinners) works best, and removes ALL different paints. This means that (with the occasional use of glass cleaner), I only have to use a single product for all airbrush cleaning.

However, this is just my preference. Others use different cleaning solutions with, presumably, success. I have never had any real success with proprietary airbrush cleaners, like Iwata / Media or Badger airbrush cleaners. (I have plenty of both left over sitting on the shelf under my painting bench is anyone wants to come over and have them…)

In so far as testing your airbrush after reassembly, what I do is simply add a few drops of - you guessed it - lacquer thinner into the paint cup of my clean and reassembled airbrush and spray it out while moving the trigger forward and backward to observe that the flow volume modulates accordingly. That’s all there is to it. I then know that my airbrush will function correctly the next time I pick it up.

As for test objects for painting, a lot of modelers use plastic spoons to test colors. The curved surface allows the paint to be observed under different and variable angles to judge how different amounts of light effect it.

As for testing as I spray, I simply spray onto a paper towel to assess and adjust my spray patterns and air pressures.

It’s quite easy to “over think” all of this. There’s no substitute for experience, and the only way to gain that is by doing. In the end, you can read and read and watch video after video, but you will not gain a single moment of experience until you start squirting paint, making mistakes and having successes and learning from both.

So, for example, the amount of time that it takes you to set up and prepare to paint, then paint, then clean up and tidy up will get shorter and improve with more practice. Only you can figure out how to make your own painting experience more efficient in your particular circumstances and environment.

Time to stop discussing theory and start painting.

I also do pretty much this, I only use windex to clean (I only spray tamiya paints right now due to lack of a paint booth but I am upgrading that soon). Aside from that I follow what @SdAufKla says exactly. I test pressure and spray pattern on a paper towel I keep close to whatever I am painting. I also find this useful if say the airbrush flow changes or some other problem arises, much better to try removing clogs or dry tip over a paper towel than your model.

Thank you for replying so quickly.

I agree with you that I just have to start painting and get more experience by practicing.
The problem I often face is that I’m running out of materials to quickly, such as airbrush cleaner.
And that my wallet don’t allow to constantly buy new cleaner or other materials I need.

Another issue it time.
I’m most of the time of the week have other things I want to do as well.
And it often is fitting and so for all my things to get them in my schedule for the working weeks.
Although this is more and more changing.
Slowly but surely I get a more solid schedule to do all the things I want to do.
Including scale modeling.

A question I got is, do you use a respirator mask?
Because I have seen a video of Andy’s Hobby headquarters that recommends using an respirator mask when you are airbrushing.
I have looked on the internet some time ago, but I wasn’t able to find it easily.
Maybe I don’t need it, because I’m not airbrushing that much at the moment.
But it could be something for in the future.
As I’m taking my health and safety very seriously.

Another question, how do you see the flow of in your case the lacquer thinner?

Last but not least, I’m a more practically oriented men.
I’m liking to ‘test’ and experience things as I’m doing it.
Actually testing and experiencing as I’m working for example on painting a project.

Indeed enough talk, let’s get prepared and started soon with a new project or so.
To get some valuable experience with everything.

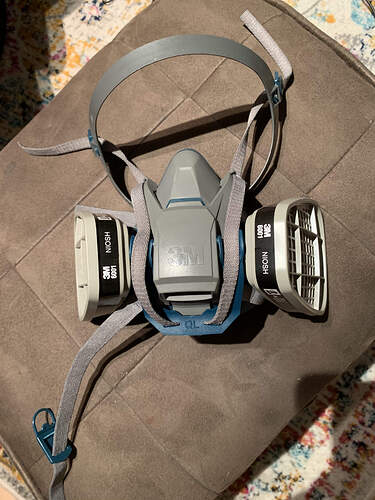
I use a respirator 99% of the time, I don’t have a paint booth so it’s a must. Especially at higher PSI, at high psi I can smell the paint and see fumes being swirled around, I don’t want that in my lungs. Only I time I don’t use it is when I am spraying around 5-10 psi for very fine light work, but even then it’s a good idea. I use this 3M one I got off Amazon with the filters for $60, a little pricey but you only get one set of lungs

3 Likes

If the anti-Covid masks can stop viruses, they should be able to stop paint particles as well - at least,they’re more protection than nothing!

While true, they don’t stop the toxic fumes which are much more the problem here

1 Like

Respirators are a whole 'nuther subject.

Bottom line up front, though, if you’re spraying anything but water-based acrylics, you need filters certified for protection against organic vapors. If you’re just spraying PURE water based acrylics, then a particulate filter is good enough - P95 to P100.

If you’re in the US, then NIOSH (National Institute for Occupational Health & Safety) publishes the standards. If you live somewhere else, I’m sure there are equivalent standards that cover respirators in your own country.

Rules of thumb - If you can smell any odor, then your filter is not good enough, and if you’re not wearing it, it’s not protecting you.

Beyond that, the industrial safety standards for filters that apply to the kind of paint you’re spraying is all that matters.

I use a 3M mask with organic vapor filter cartridges with P100 pre-filters which extend the life of the main filters by keeping them from getting clogged with particulates. These are quite common and easy to find in the US. Your local “big box” home improvement store will carry some version of these for very modest prices. When it comes to the actual masks, the more expensive masks are generally more comfortable to wear for longer periods. However, the filter cartridges are made and sold to standard, so the filter cartridge you buy in Home Despot is the same as the same standard filter cartridge you buy in an industrial supply store.

I should say that I use the P100 pre-filters because I also use my respirator in my big shop for a lot of work other than airbrushing in my model studio. For just airbrushing, the pre-filters are probably over-kill. I also have another of the same 3M masks with just the P-100 filters that I use in my big shop when grinding and sand blasting, but that’s another 'nuther other…

Finally, be aware that the organic filter cartridges have a limited use-life once their removed from their packages. The will absorb contaminants from the air and eventually lose their effectiveness. They have to be replaced regularly. However, you can extend their life by storing them in a large, sealed ZipLock bag. Having said that, though, there are no standards that cover this non-standard storage method, so you take your own changes with how good the filters actually are if you do this. The use-life is written on the package, so read and heed…

Finally - finally (!), you should remove the filter cartridges and wash and air dry your respirator mask from time to time. If you get all sweaty and grubby working, pull you mask off and stick it into a ZipLock bag without air drying it or (better!) taking the cartridges off and washing it, then you’ll regret it when you take it out of the ZipLock bag to wear it again! (Don’t ask… LOL!)

For long term storage, I take the cartridges off my mask, allow them to dry over night and only store those in a sealed bag. The mask gets washed and air dried and just stored with my other PPE.

1 Like

Thanks for the reply on the question I asked about the respirator masks.
I didn’t know that this is a whole new topic of it’s own.
It seems that I need to spend my time doing some homewerk about topics that I want to know.