Yeah, if you want to be picky.
Once the “glass” is gone the frame can be measured to see if the
remaining width is greater than the thickness.
Maybe I should have used fragility/sturdiness instead of thickness.
Sturdy “glass” to be separated from a frame that will be fragile while
sawing and sanding.
1 Like
I do. Details matter, as they say. 
But the good thing about an operation like this, as you sand closer and closer to the edge of the frame, there will be a slight line where the two thicknesses meet. It’s your guide, It usually has a build up of light colored plastic particles, which makes it even easier to see. When the line starts to disappear, you know you’re close. And as I said above, using a wide file like a foam nail file makes it easier to keep most of the work straight, as opposed to a smaller file where you can easily gouge too far into the frame.
2 Likes
Do you have a motor tool? Plunge a metal cutting bit into the center of the glass and grind away most of it, staying clear of the frame, then finish with flat metal files. You can work in the corners if you use a file with a one or two non-cutting safe edges:
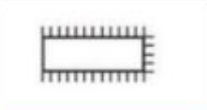
You can’t always find these so I remove the teeth from what I can buy on a bench grinder.
Any sort of cutting inevitably applies significant forces to the part, and this is what causes breakage. A cutting bit also applies forces, but they are very small. The difference is one large force from cutting or a thousand little forces from the bit. It’s the same idea as using a saw to remove delicate parts from the sprue rather than nippers.
KL
1 Like
That’s what the wide foam nail files accomplish. Or if there’s not enough room, I use file with an acute angle. squared files in a corner will inevitably lead to mistakes
1 Like
I use foam files a lot, but I don’t find them stiff enough to give a flat/straight surface to my liking.
KL
1 Like
Work slowly with minimal pressure.
BUT
I would start with a wide and stiff file OR fine sandpaper glued to
a wooden stick tailored to fit the width of the hole or surface I am
working on.
1 Like
Thank you all for your helpful advice. If you happen to have the Heller CCKW 353 in your stash, take a look at its clear windshield frame - it’s so darn flimsy that the kit even supplies another frame from olive drab styrene to back it. But I’ll try and separate the actual frame (hopefully not in too many single parts) from the “glass”. Just don’t expect to hear from me anytime real soon: I’ll have to build up lots of courage first …
1 Like
I have a few and I have even built one.
The windshield was a bit of a challenge …
1 Like
For the second time today I’ll say, I usually don;t toss out advice unless it’s something I’ve done.
But in this case I haven’t messed with that windshield. But if I were to do it, I would absolutly try this:
Cut an opening in some particle board as close to the size of the windshield as possible. A tad larger would be preferable to too small. Then I’d secure part 202 to the particle board with the windsheild portion over the opening, using duct tape or something that’ll keep it secure. It might be helpful to leaves bits of sprue on the part to give more surface area to secure it. Now you have a rigid backing that can keep the piece from flexing and possiby cracking. If the center divider breaks - no big deal. You can replace that. It might even be easier to intentionally cut it out.
3 Likes
I fully agree with your last remark - the central column will have to go and be replaced. If only it weren’t for the rest …
1 Like