1/48 B-17F Build - 303rd BGs Luscious Lady {Continued)

WINDOW WORK

“Windows are the eyes to the soul,” wise men say. Oh, wait, maybe I have that backward and should stick to the prosaic, “On this model, the windows are the eyes to the interior.”

Well, what’s clear is that clear windows are essential in this build and that they should be flush with the exterior of the fuselage, as on the real “Luscious Lady.”

But easier said than done. Let’s look at HG’s work getting there using a vintage Mattel Vacu-form and some extra-special plastic sheet sourced in the Czech Republic. By popular demand, I also include some commentary from the man himself.

Looks like I have a bit of prep work to do on the new poly material.

Note how the original plastic and clamp are perforated into the pins. Get out the new drill.

DSC01264 (Small)

DSC01265 (Small)

Some progress.

1st. There are about 50 holes to drill.

2nd. My master [cockpit roof mold] has to be repolished from the job and more in general.

3rd. The clearity is OMG great!!!

4th. This master needs to be solid and the Vac-form needs a one way airflow. When the suction ring comes up it pushes air back up and cools the plastic plus makes the entire platform tray jump around.

5th. The flat parts may not need any tweaking, we’ll find out.

Good learning here and will carry on improving things for the second trial.

DSC01267 (Small)

DSC01268 (Small)

And a perfect cut out of a roof window!

DSC01271 (Small)

And, after correcting a “rise” in the roof itself

DSC01275_LI (Small)

It fits perfectly

DSC01274 (Small)

At least to my eye.

DSC01273 (Small)

More to follow, of course.

8 Likes

MANUFACTURING ENGINEERING

So, what is that? When I was a thirty-something, brand new corporate lawyer for Curtiss-Wright, whose headquarters in 1981 was the Wood-Ridge, NJ R-3350 engine plant,

65e46be89dfe88e24123bf2cc41b3e08

(Back then, the sign had all the letters!) one of my co-workers was an old-WWII-era employee who told me of his experiences there in the 1940s. He described himself as a “manufacturing engineer,” and when I asked what that was, he explained that such an engineer studied not the design of products, but instead the design of the best way to manufacture them. In other words, the design of “fixtures” and “tooling” to make actual parts fabrication more efficient.

That is what HG is doing in the below, otherwise (to me) unintelligible pictures.

DSC01381 (Small)

DSC01382 (Small)

He purchased that fancy drill to make pristine window openings, but also to add a polishing attachment that will allow him to more efficiently use 4000 grit sandpaper (yes, four thousand, not four hundred) see below photo.

DSC01385 (Small)

to create the clearest possible vacuformed window pieces. He explained that having the drill firmly fixed in his otherwise-too-big vise would allow him to use both hands while holding the vacuformed windows against the polishing surface. That’s what the wood block in the vise is for.

I am told he is still experimenting on techniques, and what’s shown above and below are, essentially, test pieces. The bottom picture he described as a “total failure.”

DSC01383 (Small)

The pieces in the last pic are the molds for the vacuformed pieces,

DSC01384 (Small)

More updates as I get them.

3 Likes

You had me reaching for my Shep Paine 1982 Modelling Tanks etc, p.31 “A toy vacuum-former was sold some years ago by Mattel”…although HG’s looks far more serious than toy-like, but if it is nearly 50 years old that’s awesome it’s still going strong, hope the wiring’s been checked recently. Beautifully rendered plexiglass & much kudos for demonstrating one of model-making’s Dark Arts. I recently DIY’d my own photo-etch which was mildly scary but nothing compared to hand-to-hand combat with an industrial (?) vacu-former. Electricity + heat = prepare to run away at any moment :running_man: :tumbler_glass:

1 Like

It’s an original that saw minor use. I got it off e-Bay and it came in the original packaging with all the retro-toy-mold accouterments and literature. There’s an aftermarket guy who sells upgraded components and additions and I included some of them when I sent it to HG.

It was only after I did that he found a use for it in the build: namely this!

They are still available on e-Bay. I used one in the 80s myself, but found it too much of a bother.

The late Shep Paine. What did Obi-Wan say? “Now there’s a name I have not heard in a very, very long time” or some such.

4 Likes

THE SHAPE OF THINGS TO COME

Click the link if the post heading seems familiar, but I use the title in a literal (not literary!) sense. There is, however, a double pun if you do click it.

Shape_of_things_to_come_dust_jacket
By Source, Fair use, File:Shape of things to come dust jacket.jpg - Wikipedia

Here’s a look at some of H.G.'s refinements of some of the window openings, and the “plexiglass” that is going in them.

DSC01386 (Small)

DSC01389 (Small)

DSC01388 (Small) (1)

I was reminded that, while I had painted the top of the door leading to the ball turret and waist positions, I left the top edge of the door to the bomb bay white!

And here are some of the clear parts.

DSC01390 (Small)

DSC01392 (Small)

H.G. also made the fixture holding the window in the above shot:

Got another tool made to hold and help with polishing. It had to be filed super fine and notched to hold the cut angle on the rim of the window. Sure beats cussin’ over holding the thing and hopin’ it won’t fly off.

To be continued.

6 Likes

A PAUSE THAT REFRESHES

Before continuing with the windows in the nose, HG has been occupied with

making stuff to get stuff together. Made two pairs of tweezers, two jars of clear styrene filler and did hours of polishing and fine sanding. Stuff that has to be done … One big job was washing the wings down! As mentioned some time ago, it’s IPA [Isopropylalkohol] then warm soapy water and scrub and spray with airbrush then fresh water to rinse and spray dry. Nice and clean with gloves only from now on with those parts.

DSC01593 ZZZZZZZZZZZZZZZZZZZZZZZZZZZZZZZZZ (Small)

He continues:

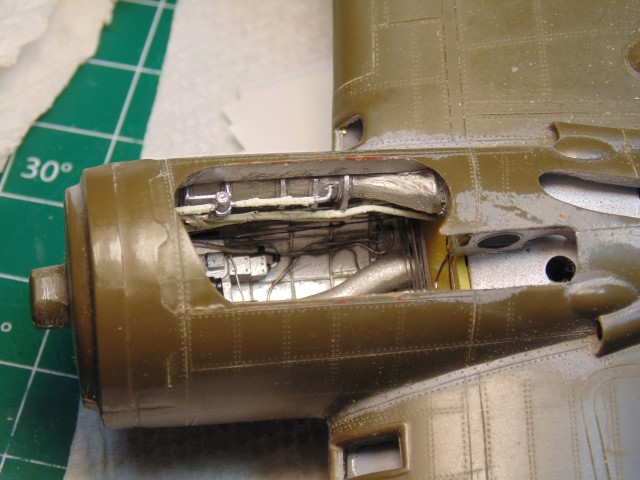
I also added the promised extra pipes in the wheel bays. I may add even more due to the different pictures I have. The two hooked looking ones at the back of each bay are important and done, they are in all the L/R photos.

DSC01591 ZZZZZZZZZZZZZZZZZZZZZZZZZZZZZ (Small)

Finally, HG has made a major effort to get the landing lights in the wing “just right.” He writes me:

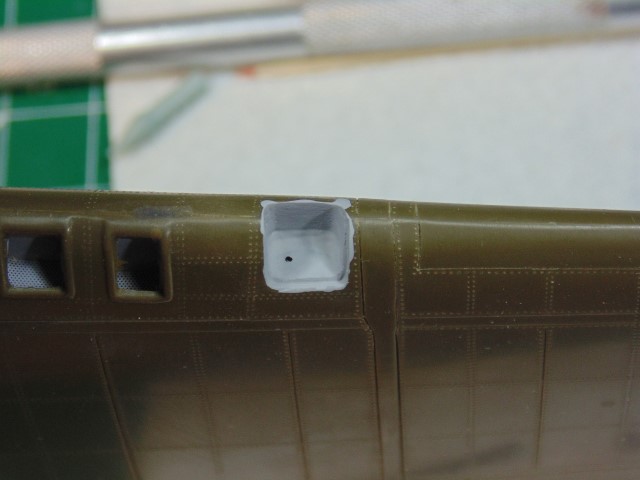
Thought for sure I’d got these landing light covers all worked out, but gosh darn-it! The outer side of the left wing stands proud and there’s a noticeable gap. The red stuff is filler.

DSC01592 ZZZZZZZZZZZZZZZZZZZZZZZZZZZZZZZZZZ (Small)

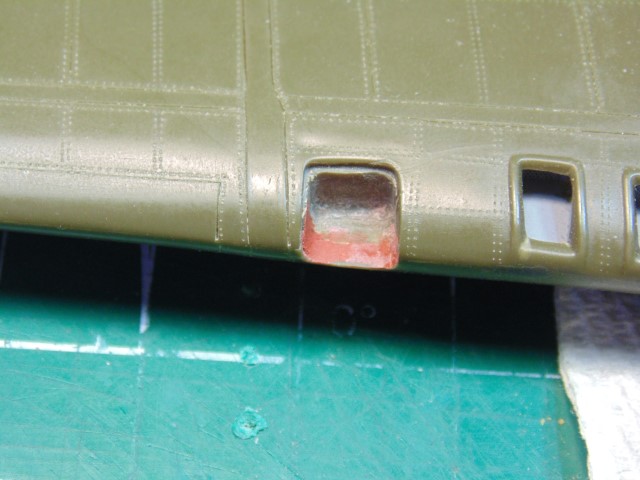
The black blob is plastic filler. Once it dries I’ll sand it to match the clear part so it’s smooth.

DSC01599 ZZZZZZZZZZZZZZZZZZZZZZZZ (Small)

DSC01597 ZZZZZZZZZZZZZZZZZZZZZZZZZZZ (Small)

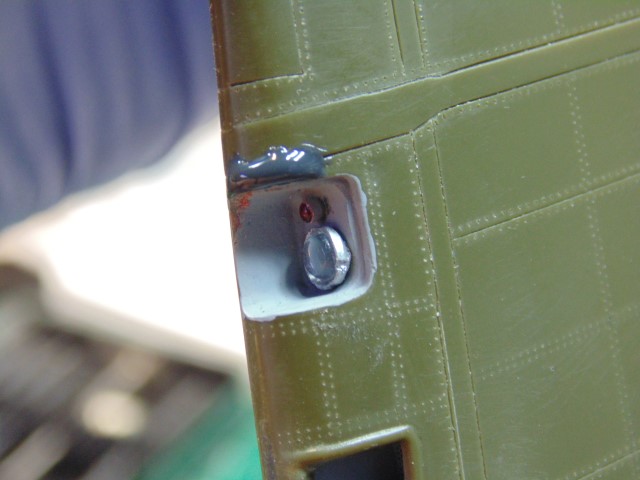
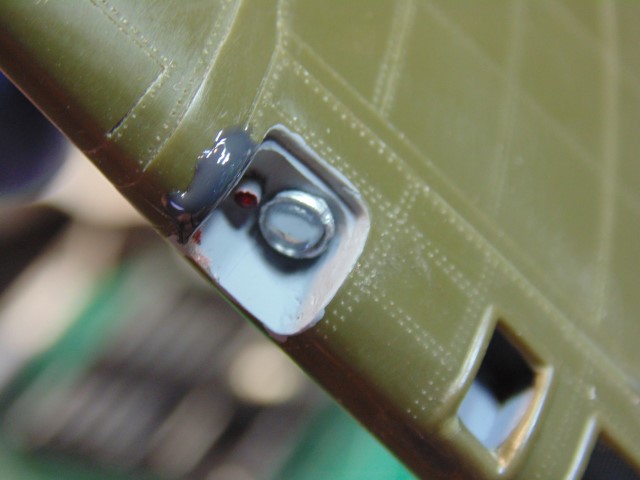
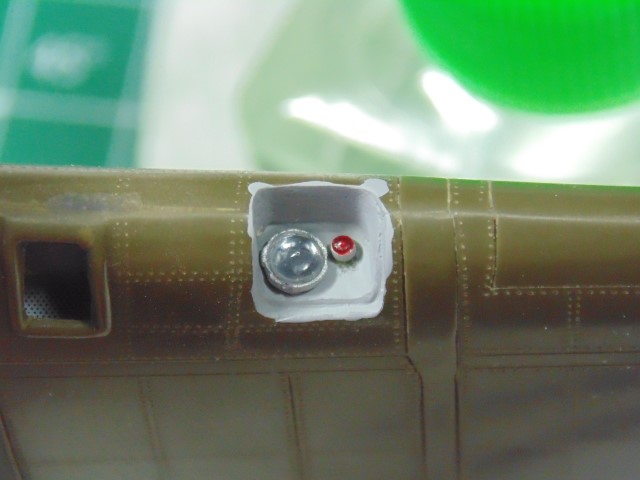
The red light part was shaped, hollowed, painted white then a dab of clear red.

DSC01594 ZZZZZZZZZZZZZZZZZZZZZZZZZZZZZZZ (Small)

The picture with the one black dot is how I know where to drill the hole in the right spot. Just a tiny bit of paint on the location pin and press it down to leave the mark.

DSC01595 ZZZZZZZZZZZZZZZZZZZZZZZZZZZZZ (Small)

Same thing was done with the red light

DSC01596 ZZZZZZZZZZZZZZZZZZZZZZZZZ (Small)

While doing this HG states:

I’ve come up with a way now to get those f-ing windows done thanks to the break from working on another section. Next up is the other landing light and, if all goes without a snaf-foo, priming the wings

.Slowly but surely, it is coming together.

6 Likes

This aircraft is unbelievable by an order of magnitude! This plane needs to be in a museum with a plexiglass cover, and proper lighting! Thank you for sharing, Joel.

2 Likes

Thank you. I am thinking of donating it to The Air Force Museum in Dayton, OH after I’ve gone on to my greater reward, though I have no immediate plans for the latter. When originally conceived (ah, in 1998) I had planned a wooden portable display case as a prop for book signings for the book that inspired this effort. Sourced a bunch of oakwood for it through a friend and fellow modeler, who helped me with the interior. He was also a woodworker but sadly passed away this past year from stomach cancer. Whether I go down to North Carolina where he lived to retrieve the wood remains to be seen. But I do want to create a special case for it, and yeah, proper lighting. Too much work has gone into this for too long to have it collecting dust out in the open, unprotected.

Thanks for looking!

6 Likes

WING LANDING LIGHTS

HG is back at it, picking up where he left off: working on the landing lights in the leading edges of the wings. I will add his commentary to the pictures.

DSC01601 (Small)

First shot is the messy install with PVA glue and paint after the black filler was filed down. It took hours to get it to this point because if I went too far sanding[,] I’d have to add more filler and… well you get the idea.

He continues:

The second to fourth [photos] are what was mentioned regarding the high spot on the lens.

DSC01602 (Small)

1st use a fine filing block (that U-STAR black thing [in the prior post]) to smoothly slice away the bulk,

DSC01603 (Small)

2nd is going through the sanding grits; 600, 800, 1000, 1500, 2500, 3500 and two different white polishers.

DSC01608 (Small)

Next is to cover the lens with latex masking fluid. I really like Mr. Hobby SOL-R. It’s super clean when it comes off. You have to make sure the plastic is cool though. In this case with all the heat from sanding I blasted it with the airbrush for about a minute to make sure it was.

DSC01607 (Small)

Lastly is the masking fluid almost dry. Note the nice mating surface with the clear part and the wing.

HG now moves to the other wing, and comments:

Good thing I checked the location. Who would have thought this side would be offset as well.

0ca52aa0e398804192513ae634755016

DSC01610 (Small)

“Remarkable” is my reaction.

8 Likes

WING LIGHTS AND WINGS!

Blemishes in the port wing landing light lens?

DSC01617 (Small)

See the little dots?

A crack in the glass cover?

DSC01616 (Small)

Look to the center-left.

Yes and no. HG explains.

Yes, there’s some dust in there. Darn micro holes. Was spotless when I began, oh well. Will wait until it’s completely dry at midnight then put the air to it.

No cracks, just a gap. pumped some air in it and the dust settled someplace else.

So, good to go to the next big step – Final priming of the wings, port

DSC01619 (Small)

DSC01620 (Small)

and starboard

DSC01622 (Small)

DSC01621 (Small)

I call this a clear milestone.

6 Likes

Paint ! Paint ! Yes !

1 Like

Beautiful craftsmanship all the way. This’ll show my lack of specialisation in aircraft builds, throwing it all together & then spraying mainly so the joints don’t need touching up. Is there an argument for painting the wings before attaching to the fuselage? :tumbler_glass:

1 Like

I think there is, and HG told me he was tempted, but it would require having in advance the precise colors one wants to use ready to go, and in a build of this magnitude, I think it’s a distracting extra set of “moving parts” in something already quite complex. If it was me dictating the sequence of work, I would probably want to get much more of the fuselage buttoned up and the fuselage primed before considering whether to separately paint that in the final colors, then the wings, and then attach them.

But at that point it probably makes sense to glue them all together, no?

Color continuity is going to be important in this one, because we’ve done research on staining patterns from exhausts and engine oil over the wing surfaces, and before that there’s going to be some fairly subtle weathering of the underlying base paints, so I think it makes more sense to glue the wings on and deal with a whole object.

If you look at the first entry in the blog, in the archive section, where I was “the builder,” you’ll see that I described myself as “an advanced journeyman” after four decades in the hobby. Ever since taking over the build, HG has been punching way above my weight, and it shows.

I’m very grateful to have his expertise at work here!

3 Likes

Hmmm interesting. Yeah I’d never thought much about painting wings (& tail) as effectively sub-assemblies before, but this made me think & even more now that you mention exhaust streaks – easier to clamp a wing than the whole aircraft to do that? But yes, I guess colour continuity does trump all in the end.

With my most recent aircraft effort – Hasegawa’s 1:32 Stuka Kanonvogel - masking the green/dark green geometric camouflage seamlessly across wings to fuselage was easier to do in one piece, although in theory I could have done it in pieces. My overriding concerns were on the one hand uneven coverage (there’s a tendency - for me anyway - to overspray the jointed areas), but on the other hand imperfections in the joints needing potentially ugly touch-ups.

(Edit – how amusing, this post was rejected by System as abusive - I can guess why, my final sentence had said that compared to this build, I must be a [the opposite of advanced] journeyman. Hilarious, I was black-flagged for downplaying my own skills) :tumbler_glass:

1 Like

I reviewed the whole post and I was totally unable to find anything offensive about the second version.
Nothing whatsoever.
Schtoopid filter …

Just out of curiosity: What was the original word/expression in front of journeyman ?
If you type it with a blank between each letter the filter doesn’t trigger

Edit:
r e t a r d e d ??? gimme a break … just use ‘extremely slow learner’ instead :rofl:

1 Like

:rofl: Haha no Robin, I slept on it & overnight the ol’ subconscious came up with the true answer when I woke up - look at the fifth word from the end of the first paragraph of my original text. Methinks I’d better not pass any further comment on that or there really will be trouble! Thank you anyway for intervening, hopefully my spotless record is back - and maybe could you remove my “Gee…” post? :rofl: :tumbler_glass:

1 Like

:rofl: :rofl: :rofl: :rofl:
That would be hilarious but my 50 cents are still on the developmentally challenged journeyman :wink:

2 Likes

TWO MONTHS!

No, we didn’t go away. Life, including a record-breaking heatwave for H.G. in Alberta with no air conditioning, interfered with progress to be sure. But the fuselage window work has an “end in sight” look that I am sure you will see below.

The sheer magnitude of what H.G. is accomplishing here also accounts for the time. Except for the large cheek windows, which get their own treatment, each window has been vacuformed and custom-fitted to its fuselage opening.

H.G. is doing this both on the window openings

DSC01631 (Small)

and on the windows themselves

DSC01700 (Small) (1)

to ensure perfect dimensions.

I won’t say that the above glass work is “perfect” because he is painstakingly evaluating each step

and making refinements as he goes,

DSC01698 (Small) (1)

even if this means taking out windows

DSC01817 (Small)

and restarting

DSC01818 (Small)

In this view, you can see that the front window on the nose roof is “standing proud” (and yes, I see the paper wedge in the rear)

DSC01819 (Small)

but the point is that once installed in the proper openings the windows get their own detail work using tools like these:

DSC01628 (Small)

I never even knew sanding sticks with some of those grits existed!

H.G. has also done some remarkable work on the cheek guns and brackets.

The cardboard gun brackets that my late friend Art made will now serve as templates for hand-cut brass brackets

DSC01233 (Small)

and the fit of the cheek guns

DSC01236 (Small)

with the windows is also looking good.

DSC01235 (Small)

DSC01234 (Small)

What comes next will be repositioning the pitot tubes per Karl’s suggestion, and then doing the glasswork for the pilots’ compartment, including open windows on each pilot’s side.

After that, I believe H.G will put primer on the completed fuselage, and maybe complete the nose including the plexiglass front piece. But I leave the order of construction up to him.

The time is coming for the wings to get attached, so we will relatively soon be in “final construction” territory.

So, stick around.

10 Likes

We will all be here …

3 Likes

CLOSING SOME WINDOWS, AND OPENING OTHERS.

HG has made substantial progress on the windows for the fuselage. I can let the pictures do most of the talking, but there will be a few comments.

Here you can see almost finished installations in the nose.

DSC01882 (Small)

DSC01883 (Small)

DSC01888 (Small)

In the bottom picture, you will see the planned relocation of the pitot tube above the indentation in the Revell kit.

This is per Karl’s suggestion ages ago for some of the old-timers on this blog.

I am now moving to some remarkable work on the tail gunner’s glass enclosure.

DSC01884 (Small)

DSC01887 (Small)

DSC01885 (Small)

If memory serves, HG told me that it has been reshaped and re-scribed in certain areas for a more accurate look, prepainted and as you can see, covered with green liquid masking material.

I save the best for last: the cockpit windows.

Before:

DSC01891 (Small)

and After.

DSC01895 (Small)

On the other side too!

DSC01892 (Small)

Those following the blog from early on will recall my failed attempts, and those of my late friend Art, to achieve something like this. We couldn’t do it.

And here are the windows themselves!

DSC01902 (Small)

We can decide later how far back each window should slide.

DSC01896 (Small)

DSC01900 (Small)

An extraordinary feat, IMHO.

DSC01899 (Small)

DSC01901 (Small)

I “can’t wait” to see how HG cleans up the seam between the clear window piece and the cockpit roof.

There is a final surprise HG plans for the cockpit roof and window assembly, which I will save till later.

After this there is the nose cone with the .50 cal. to install, but not before HG reinstalls all the stuff taken out of the nose compartment itself to do the window work and clean things up.

Then the fuselage will be ready for priming and it will be on to the wings and the beginning of the final assembly–if not final detailing!

Dare I say that the beginning of the end is in sight?

11 Likes