So fellow petrol heads, how do you get that nice smooth paint scheme on your autos.
My first attempt ended up with it being a nice orange peel effect, which wasn’t what I was actually after, and my second attempt was a little better, but there was still parts of the car that had it.
So what’s your technique to getting that perfect finish?
Andy 
I have yet to get a good finish but what our club guys do. Buff and clean the plastic, primer and sand, mist coats of paint and sand between the coats. Use novas car wax to the finish.
HTH and hope to learn more.
1 Like
@betheyn, hi Andy. You just asked the million dollar question! You’ll likely hear from friends here of several methods for getting a nice, mirror like finish.
I’ll take a shot at answering both questions.
For painting autos, I start with a Tamyia rattle can primer (for armor, I always use Vallejo), as you can get a really clean surface for your base coat - to clarify, no highs or lows in tone, and it seems to go down uniformly. If you get a little bump or unexplained nugget, you can usually sand them down without digging through the primer. This is a real advantage over the Vallejo primer, which is not intended to be sanded, but if you’re careful you can buff out with mirco mesh and very fine grit sand paper - again be careful if you try this.
As for orange peel - I don’t have a scientific answer (like PSI, levelers etc), instead, I’ve found practice via air brush Valejo or rattle can Tamiya goes a long way. Smooth, even spray, building up the color. I usually put down two or three separate coats, with light sanding/rubbing along the way to knock down irregularities, like orange peel, between coats/layers. If you don’t catch the problem early, it can be pain to fix once you have many coats down.
Once the paint is down, I shoot two layers of Alclad Aqua Gloss II clear coat - which is water based. If need be, I’ll sand or buff irregularities out with each layer. A weird thing about Aqua Gloss is it works best if you put down a wet coat - it looks awful at first - I hate doing it. It goes down as a milky, blue layer - but be patient - it dries clear and pretty hard. If you see any pooling, you can sop some of the excess up with a paper towel - just dip the small corner of the paper in, and it will pick up the excess.
Deciding how to sand or polish these layers seems to be based on experience, I use Meguiars PlastX polish. Sometimes a very light polishing of the second layer just to get a shine, then a bit more aggressively with later coats.
It’s important to look for troubles along the way - if you see orange peel in the clear coat, it won’t go away with layers - you need to carefully sand them down, followed by a light polish. After two clear coats, I’ll add decals, then two or three more layers of clear. And a final overall polish with the Meguiars.
What a headache!! 
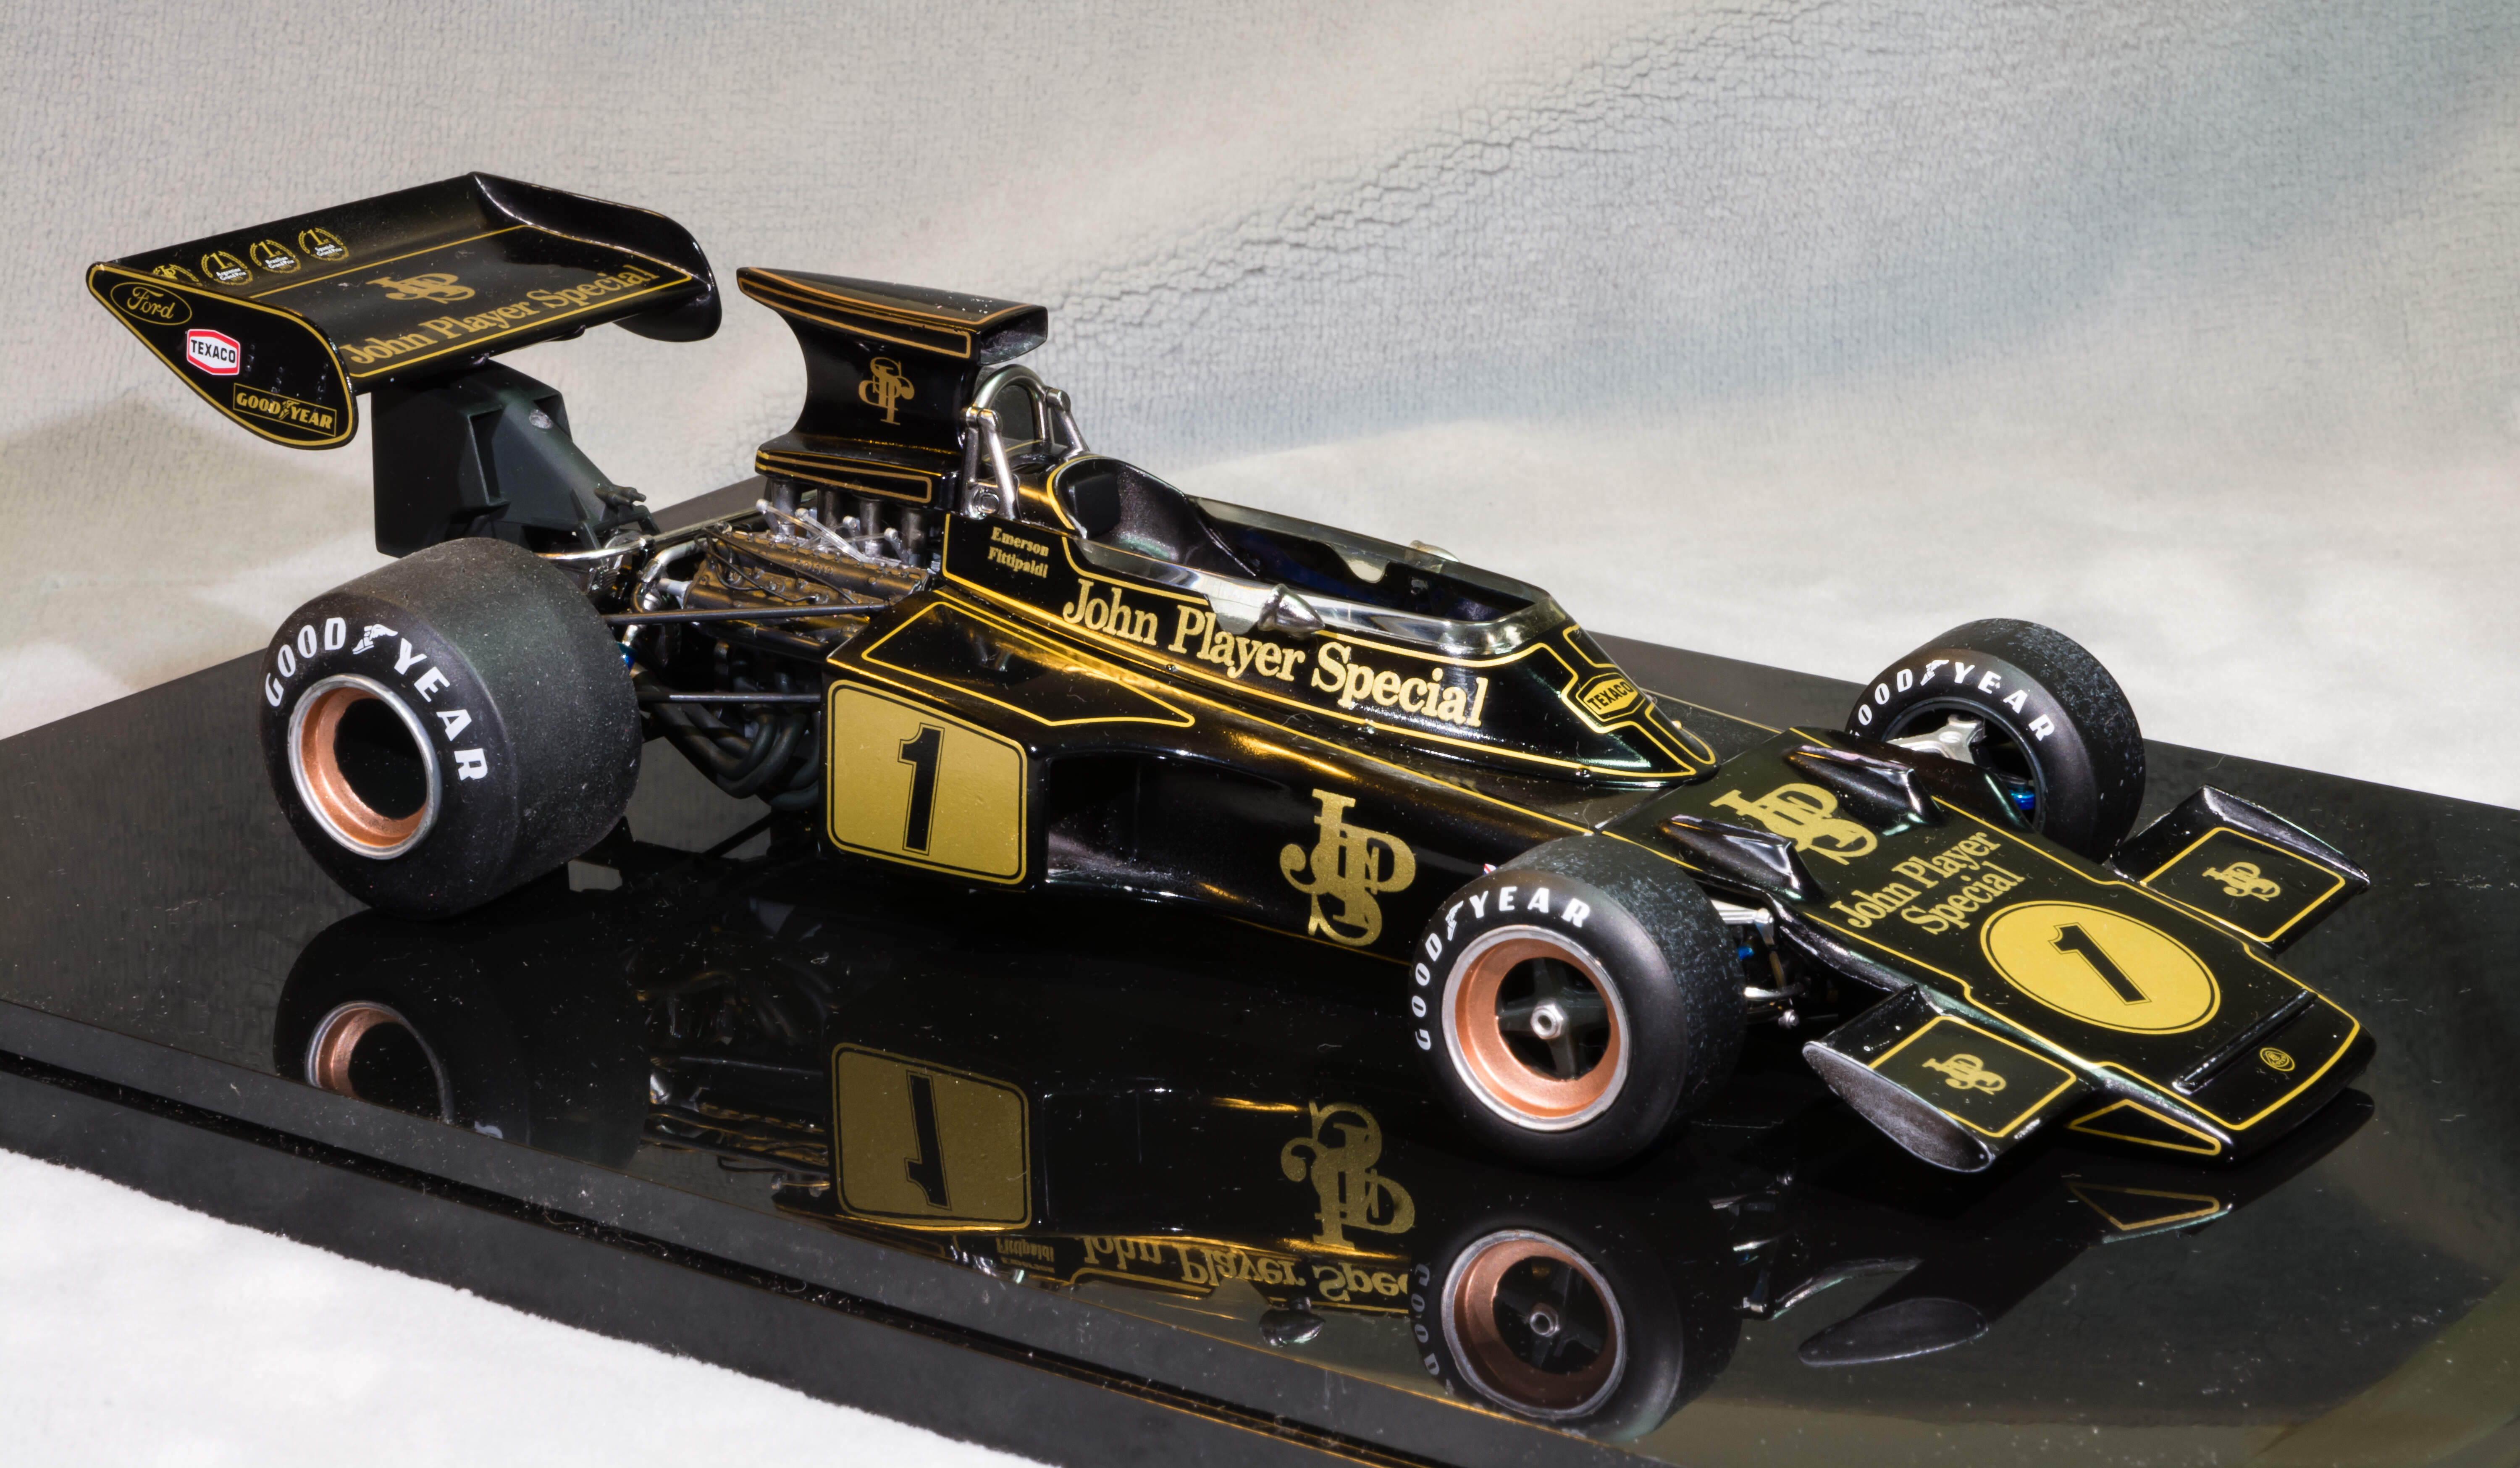
Once you’ve done it a few times, it doesn’t seem that complicated - here are some examples:

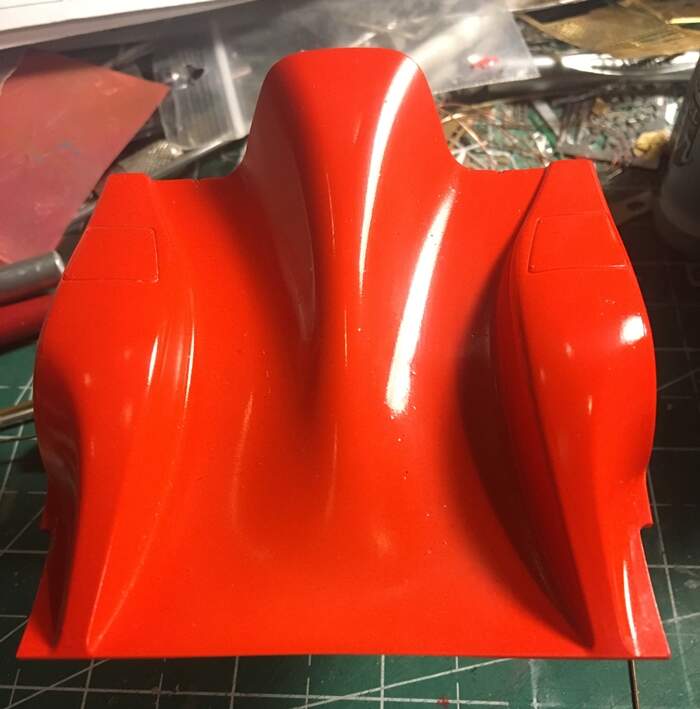
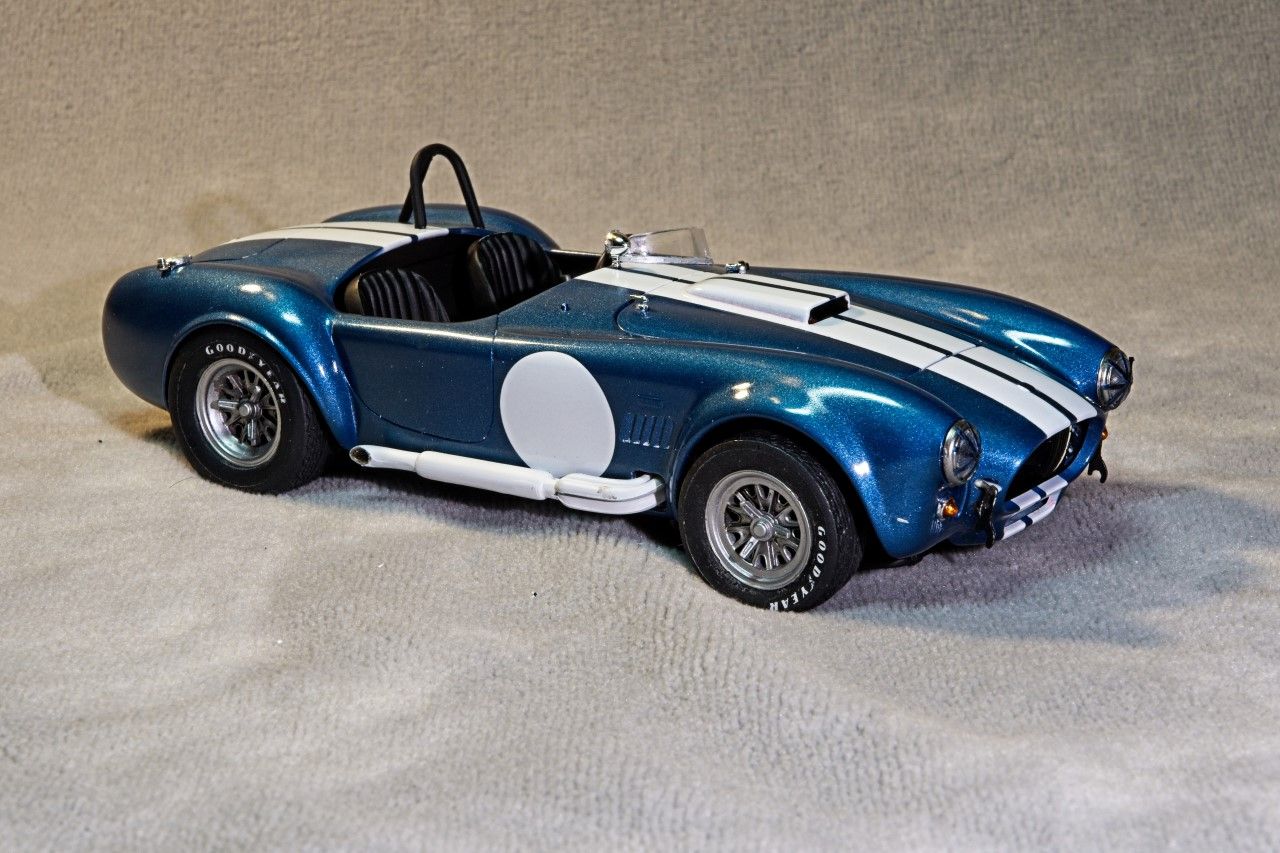
This 917 is done using Vallejo Model Air Ferrari Red as a base, and so is this Toyota :
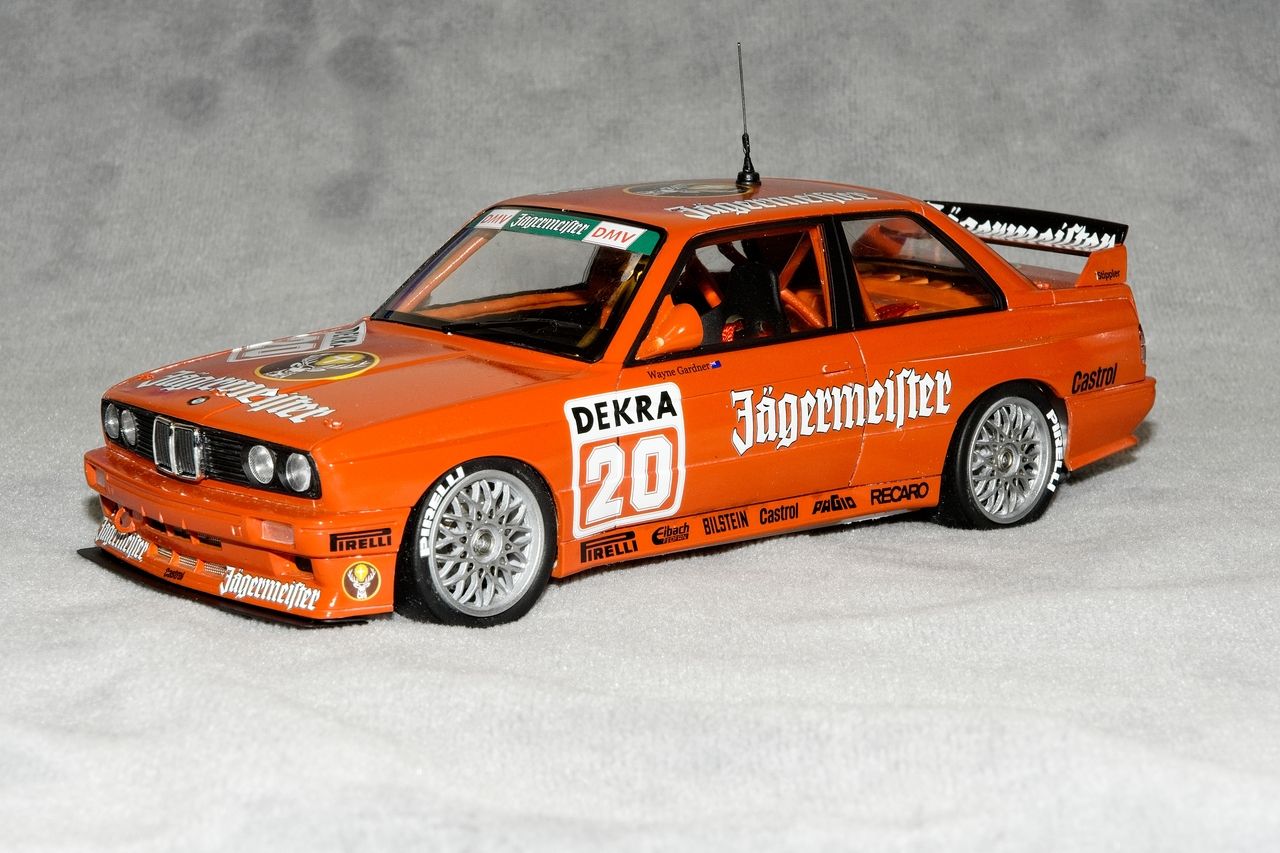
While this Peterbilt is using Tamiya rattle can Red (don’t remember which?)
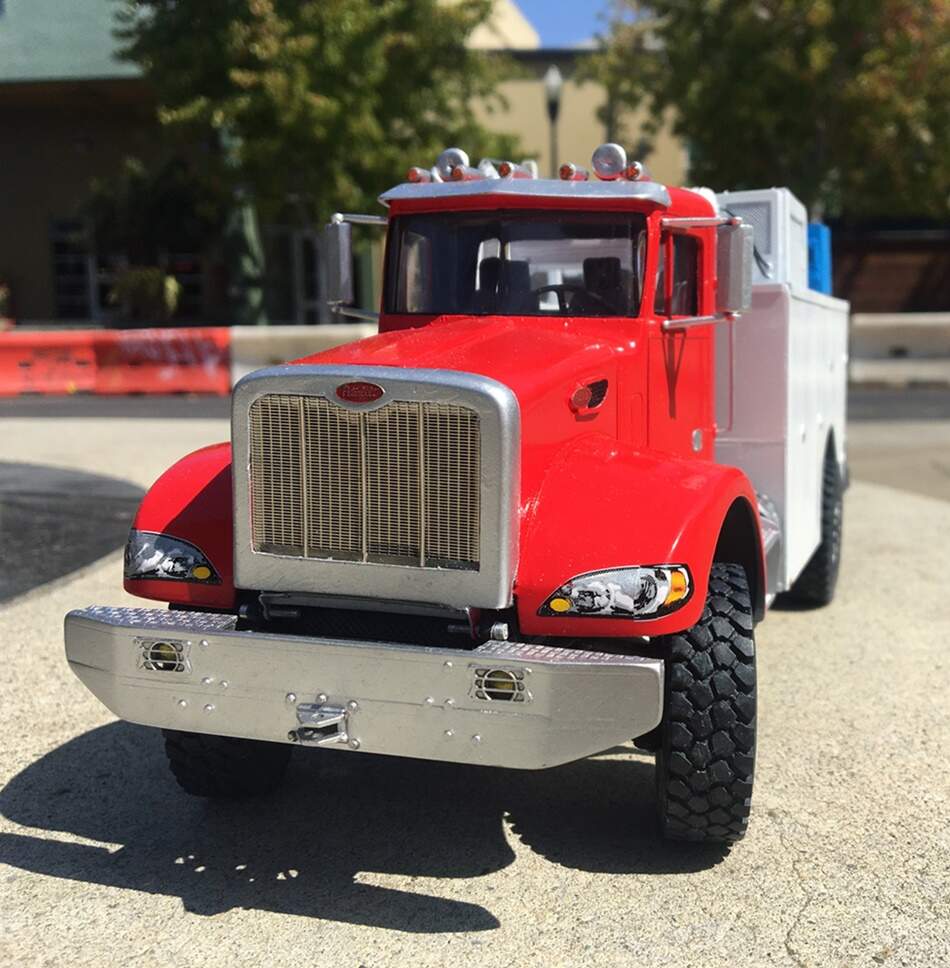
The chrome on this is Vallejo Metal Color, which I think is a great product.
Ok sorry if this went on and on - maybe some of it will be useful to you!
Cheers
Nick
4 Likes
Excellent and helpful replies guys.
Lets hope my next car comes out better.
Andy
1 Like
I use Tamiya, Army painter and Citadel spray can primers; Mr.Hobby primers, for airbrush.
Once the primer is dry, I inspect for dust, hair or other imperfections. If the primer isn’t completely smooth I give it a light rub down, with a fine sand paper.
I use airbrush as well as rattle cans, for top coats(Color and clear coat) I always build up, spraying 3-4 light coats, before going “wild” with a wet coat. I always inspect for impurities, prior to adding another coat. The light coats are the easy part, the wet coat is the “dangerous” one, which can give the dreaded orange peel.
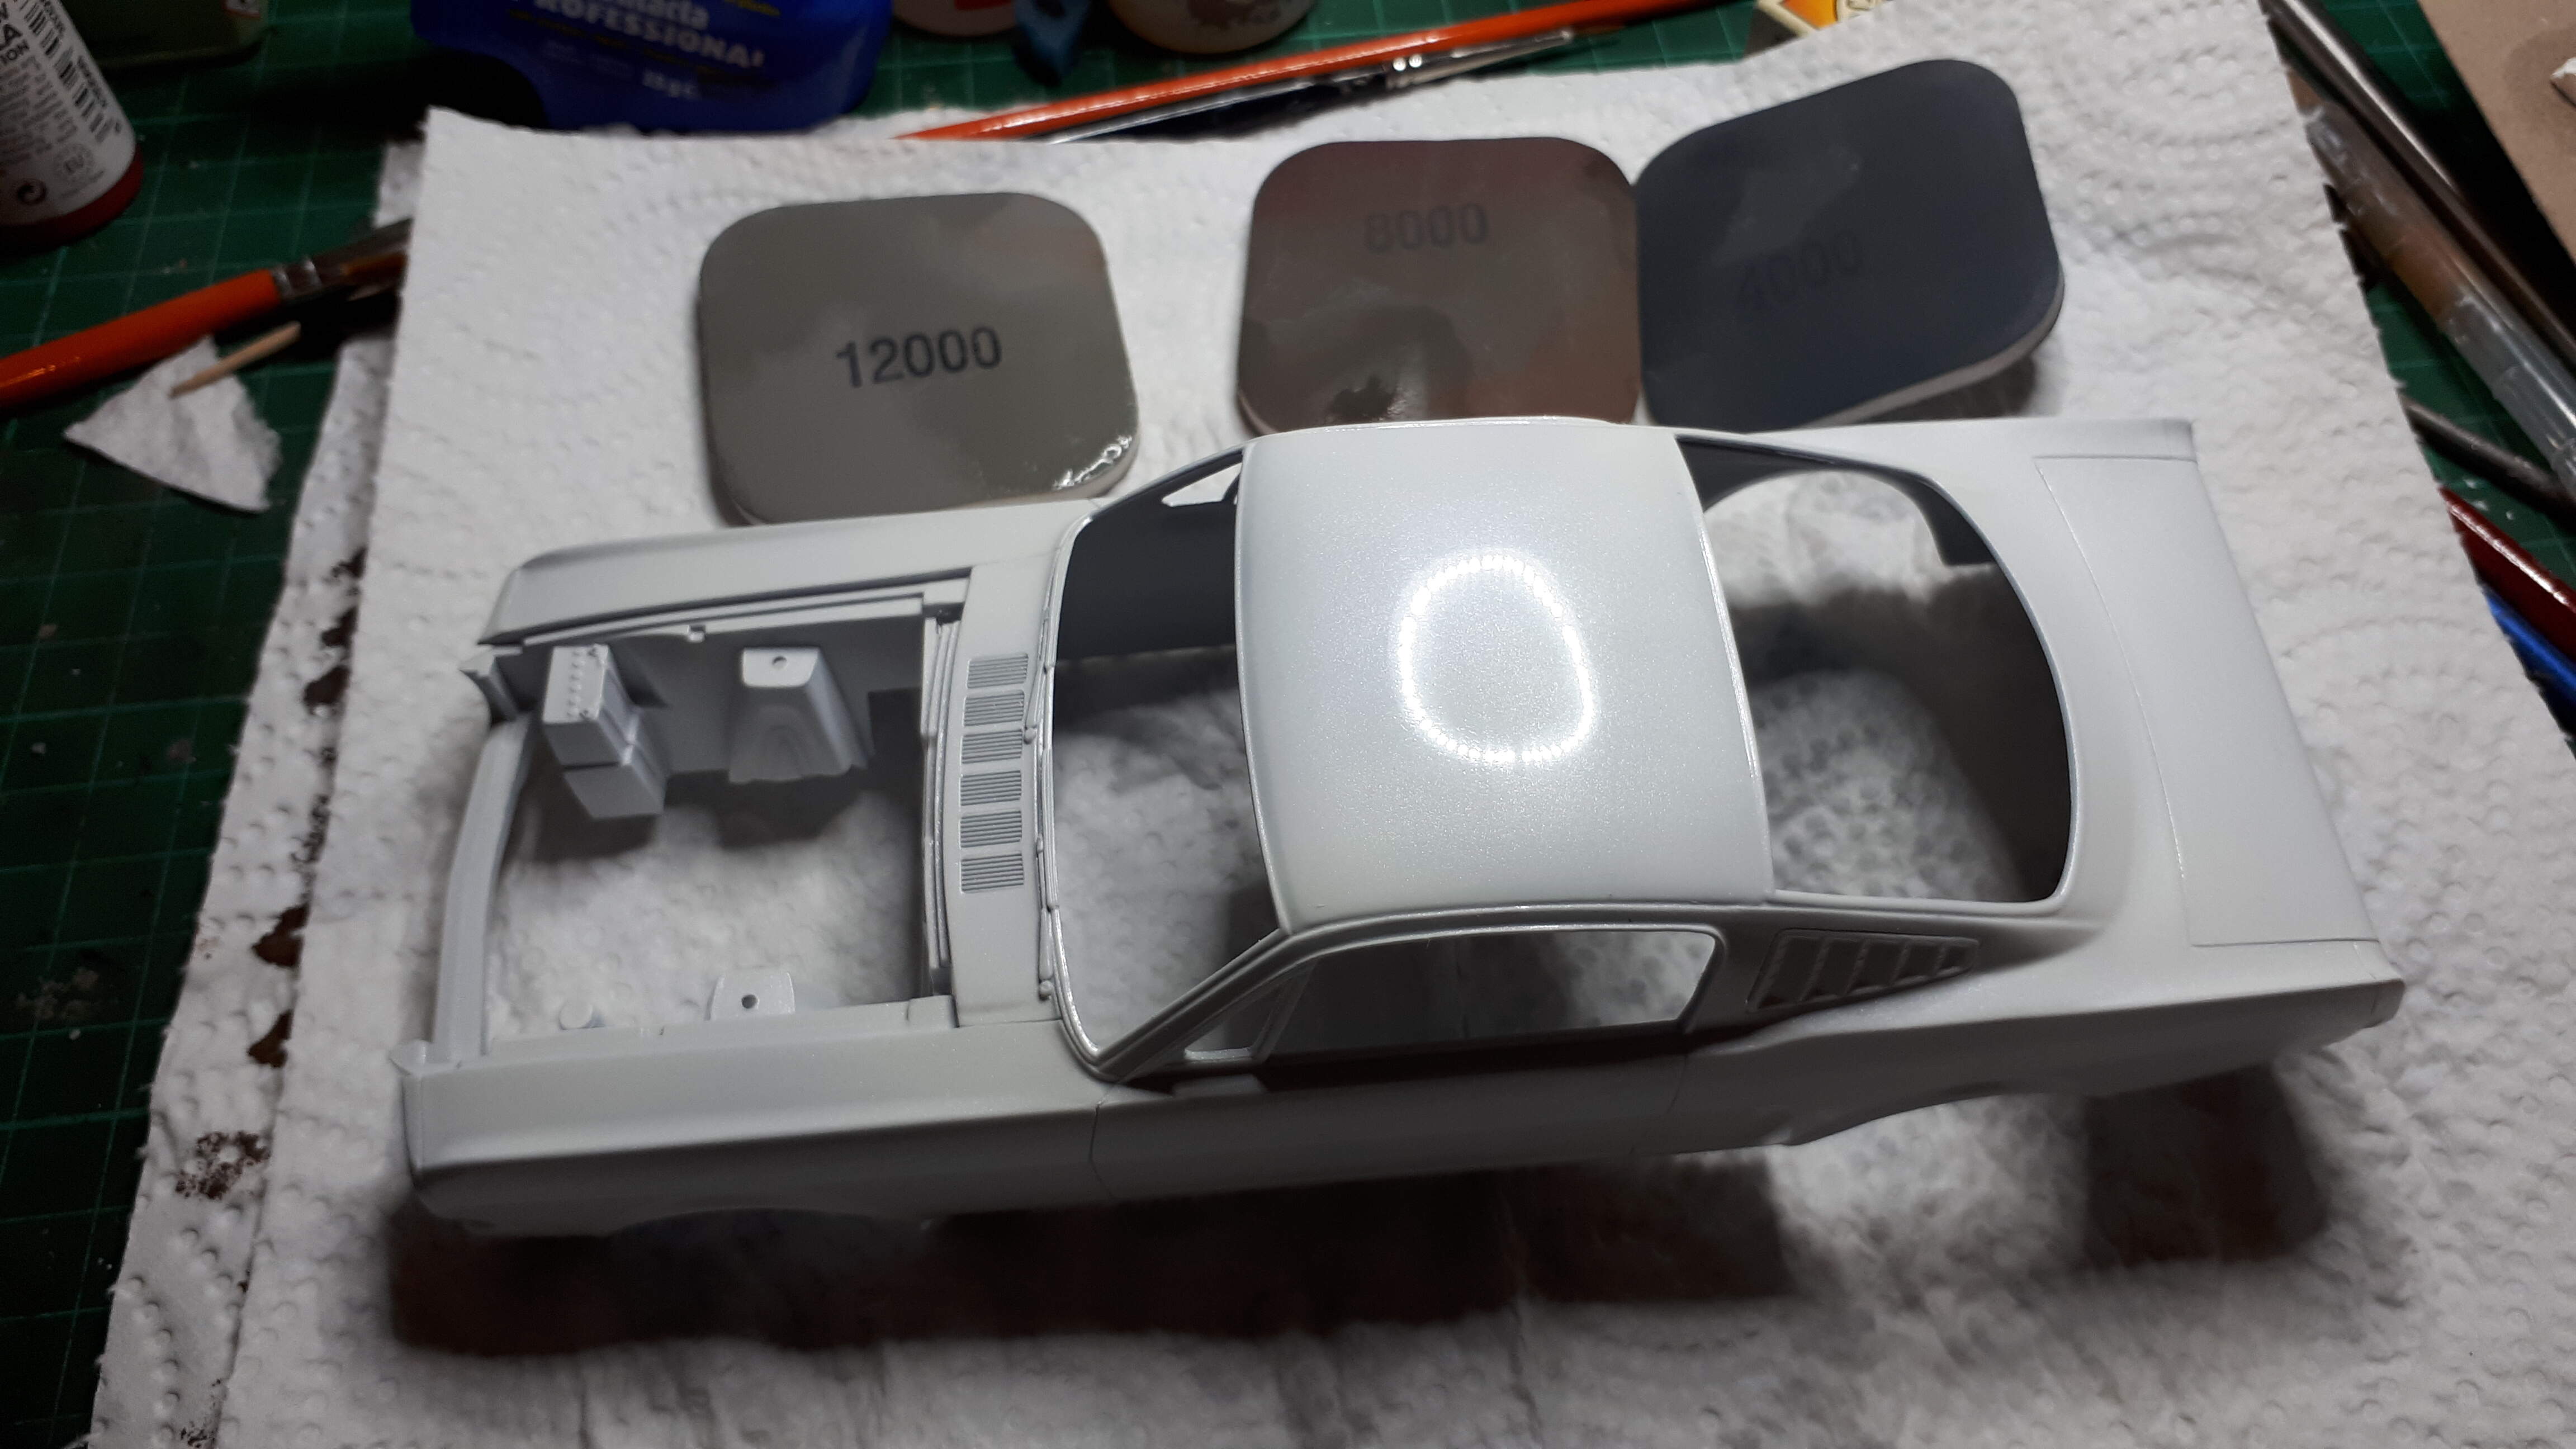
For polishing I mainly use Meguiars scratch X or wet sanding with polishing pads, depending on how “rough” the surface is. If it is a fairly smooth paint job, I only use Scratch X, but in case of orange peel, I start out with a 4000 grain polishing pad, then progress to either Scratch X or finer pads(8000, then 12000) Once done I use Meguiars wax.
The only paint I have ever used, that didn’t need polishing was Tamiya’s racing white lacquer paint(Airbrushed) That color went down so smooth and glossy, like I have never seen before. Unfortunately, for car guy’s, Tamiya’s range of colors are not that exciting .
This one I started out with polishing pad(400 grain) then Scratch X
This one polishing pads only(4000, 8000 & 12000) Not quite done yet, though.
3 Likes
Andy,
Getting a glossy, silk like finish on a car model is truly the 64 million dollar question. Each of us that had some degree of success has a somewhat different approach, and I’m no different.
I’ve tried more methods and procedures then I care to admit, and failed with nearly all of them. The key for me was to find a system/procedure that works for me, that I’m comfortable with, and I can duplicate time and time again.
What I settled on is Paul’s procedures from international scale modeler. His methods just seem to work for me.
The key to any gloss color paint job is prep work.
Body surface is smooth, consistent with no sink or molding marks. Putty smoothed, blended, and sealed. I prep my plastic shells for primer with a light rubbing of a Tamiya 1,000 grit sponge only because i bought it. Most guys I follow use plain jane 600 so that the primer has something to grip.
Primer to me isn’t paint, and I don’t treat it that way. I use either Tamiya or Mr. Finisher’s 1500 primer sealers cut 1:1 with Mr. Color’s self leveling #400 thinner. I air brush it on @ 14psi in light even coats. To much paint and to high of a psi results in Orange peel or otherwise known as Lizard skin.
24 hrs later I wet sand it with Tamiya #3000 sponge.
Color coats are either Gravity, Zero, or Scale Finishes auto lacquers straight from the bottles as they’re already thinned. Again, light, even coats. I’m not trying to get a glossy surface, just a smooth as silk surface to decal on over gloss coat on.
Once the decals are on and cured, I use Mr. Color’s C46 gloss clear coat thinned 1:1 with #400 lacquer thinner. Two light tack coats, 2 or 3 wet coats. That’s the really hard part. to little paint with to little psi and you can’t get a wet coat. To much paint and or at to high a psi and you end up with more Orange Peel. Again, I go with light rather then super heavy coats. Let dry a min of 4-5 days. then comes the rubbing out with 4,000 through 12,000, then Gravity’s polishing system. Sounds harder then it is. But it’s the exact opposite of how we painted military models.
Honestly, I still do have the rare screw up to major issue. And the current Lola build is now a perfect example. I switched primers, and it just didn’t go down smoothly, consistently, and constantly clogged my AB. I wet sanded, polished, and thought that I saved it, but the color coats proved just how wrong I was. I need to completely strip all the painted parts and start over. Unfortunately, my mojo level for this build has hit rock bottom, so I’ll work on stripping all the parts slowly, then work the build back into this years build schedule. In the meantime I’m going to start another kit that I’ve been really looking forward to.
joel
3 Likes
Nice one guys, all very helpful and informative.
I think I need some different grades of sandpaper and polishing sticks for starters.
I shall try the Tamiya’s primer, I normally use Humbrol primer out of a spray can.
Andy
Andy, one trick that hasn’t been mentioned here, that I have found really helpful, is to spray an almost-wet coat of neat MLT immediately after the final colour coat. I just tip out the last of the paint from the airbrush cup back into the jar, then fill the cup with MLT and almost hose it on. If you get it done quickly, before the surface gets a chance to flash off, it helps the top layer settle down really smooth.
I’ve done it with SMS, MRP and Zero lacquer paints and with Tamiya enamels.
Beyond that, I agree with all of the other comments here, base prep and primer as smooth as possible.
Grab yourself some plastic spoons and get playing!
Cheers, D
Probably a dumb question but what is MLT?
Its not a dumb question, as I don’t know either  .
.
Andy
1 Like
Cool, I thought it might be one of those standard products that you automotive guys use that the rest don’t usually, like future for armor guys.
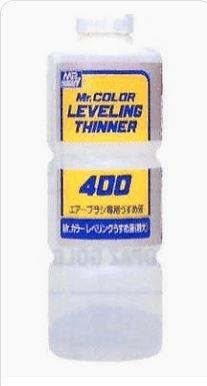
Mr Levelling Thinner 
You could also use Tamiya retarder lacquer thinner.
2 Likes
Thanks D.
That is definitely something I would have to practice with before committing to a model.
Andy
1 Like
Guys,
the full name of the product is Mr. Color Leveling Thinner . the 400 represents the size of 400ml. You need to make sure that you buy/order the Leveling type as it also comes with the same name minus the word: Leveling.
I only buy the 400ml size as I go through the stuff pretty fast.
I can attest to the fact that as far as I’m concerned it’s by far the best of the best lacquer based thinner including Tamiya’s yellow cap. I know that Tamiya now makes a leveling thinner as well, but it’s still not available here in the states.
Joel
2 Likes
I believe that it is a technique that 1:1 auto finishing painters use as well, each coat has a higher % of thinner until the final coat is almost neat. I use it on every auto build now, on the final clear gloss coat as well. I’m still far from getting the perfect glass finish I’m after, but this has helped a lot.
Cheers, D
I shall have to get some of that thinners and try this out, Its very intriguing. Then buy a kit that needs a glass finish .
Thanks for all your input guys, very helpful.
Andy
D,
I’ve also started to increase the percentage of Thinner in my Gloss clear coat but only for the last coat. I do go a little heavy on the thinner so that it’s more of a 25/75 mix since I start with a 50/50 mix. Really does make quite a difference. Add in the self leveling properties, and even I haven’t screwed it up as yet.
joel
Andy,
Be fore warned, that once you try it, you’ll be hooked for life. Well, that is until the Tamiya self leveling thinner becomes available as I hear it’s virtually the samething.
joel
Well its out of stock on Hiroboy atm, so as soon as its back in stock I will order some.
Better buy some spoons to try it on as well.
Andy