O-rings can be sensitive to stronger solvents/thinners.
I have no idea about the chemical composition of Tamiya Airbrush cleaner …
How do you clean your airbrushes?
One of mine developed a sticky valve and it was caused by small amounts of paint leaking backwards through the airbrush body and into the air valve. It took quite some time before it became a problem and a good cleaning of the valve solved it.
Paasche Talon: There should be an air channel in the lower part of the airbrush body. Presumably in the 6 o’clock position if you look at the front of the body from the “business end”.
Mig Aircobra: Similar design to the Talon
Iwata Eclipse: Similar design to the Talon
Paint getting into this air channel could end up in the air valve.
Paint getting back into the “tube” that the needle moves in could reach the trigger area and then down into the top of the air valve.
Always pull the needle out forwards when cleaning.
Insert the needle from the rear after cleaning.
If you use solvents (liquids) to clean the body make sure that the liquid flows forward from the trigger area to the front of the body.
It is well known that Tamiya airbrush cleaner can be used instead of their extra thin glue and works the same, so I guess it’s pretty strong stuff… If it happens with all your airbrushes, I understand this may be the reason. Clean thoroughly with water right after Tamiya cleaner may solve the problem. Or use another cleaner.
I use Tamiya and MLT and clean my airbrush out with ammonia window cleaner followed by IPA or Mead cleaner to prevent any pitting from the ammonia on the chrome.
I do use Tamiya airbrush cleaner to glue parts, the formula is about 1% different then Tamiya extra thin. Depending on the o ring properties it may or may not impact those.
I do have some sticking on my Iwata but their lube helps to sort that out.
I would recommend NOT using ammonia, even if you then flush the airbrush with isopropyl alcohol or anything else. (Though if you do use it, flushing with any aqueous solvent (water) will help.) Ammonia is an extremely aggressive chemical, very bad for everything in the airbrush with the possible exception of Teflon™ seals. This is the reason it’s such an effective cleaner. Flushing with water is better than flushing with alcohol, because water and ammonia have a molecular affinity, both being polar molecules. Alcohols are generally non-polar, and not as effective.
Use 90% isopropyl alcohol to clean alcohol solvent paints like Tamiya. I’m not familiar with Mr. Hobby Aqueous, so I don’t know if alcohol is an appropriate cleaner for it.
For cleaning my airbrushes (2 Iwata’s, and 1 Chinese brand) I use Tamiya cleaner because I only airbrush with Tamiya paints - works great! Lubrication is a different story. I starting using the lubricant that came with the Iwata’s, but after a period the lubricant thickened up and gummed up the needle and trigger necessitating stripping down and flushing with cleaner when I wanted to use it. I have since started to use Badger “Needlejuice”. It’s working great now every time.
I’m having issues with my Badger Patriot brush. I’ve been trying to spray Vallejo wash 1/4 ratio with a drop of their flow improver but the brush leaks around the first screw on fitting and the spray is really weird, going off to the side and up in a jet stream.
I’ve cleaned the front end out completely including the small holes around where the nozzle fits in and tightened the thread having lubed everything.
Same results with different size needles so I’m left guessing.
@RB101 - I only spray Tamiya Acrylics and for each session I use car windscreen washer fluid to clean the brush. (The blue stuff, in gallon jugs - especially the winter mix as it has alcohol in it and is far cheaper than Tamiya X-20A thinner!) I rinse the cup with water, blow that through, then load up with windscreen fluid and blow through, then strip it down and use twists of paper towel to get all the liquids out. It’s gentle on the O-rings! And as Robin said, always pull the needle out from the front! (Back it off a quarter-inch before removing the nozzle, then push it forward until you can grip it with fingers. The point is to avoid pulling paint backwards through the system.)
@Denimo - sounds like you still have a clog somewhere up front. Try taking off the nozzle and blowing something hot like Badger Airbrush Cleaner through it, and through the colour cup too. You’d be amazed at the gunk it will remove! Just don’t squirt it back into the O-rings and trigger area. My Badger Krome has a separate cap that holds the nozzle in - it too gets a squirt if I’m doing a big clean. Bear in mind I’ve never had any luck shooting Vallejo - it always tends to gunk up no matter what I do. And if it’s leaking air around the nozzle cap then you need to check the threads and make sure it’s all clean and smooth to get a good airtight seal - I’ve had that happen and went nuts until I soaked the cap and front of the AB body to truly clean out that joint even though it already looked clean to the naked eye.
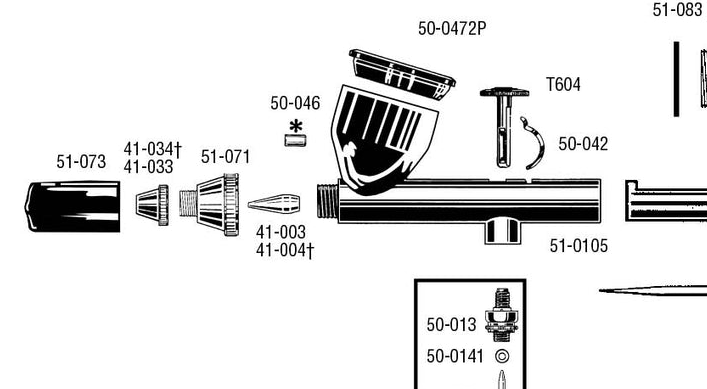
Leakage around “the first screw on fitting”. Some gunk in the threads joining 51-071 to the airbrush body
Weird spray pattern. 41-003 / 41-004 isn’t seated correctly, possibly caused by issue nr 1 and/or some gunk in the opening for the nozzle in part 41-034/41-033.
Since you have the same issues with different size needles (I presume that changing needle size also requires changing nozzle and 41-034 / 41-033) I would guess that the trouble is issue nr 1, possibly some gunk at the front end of the airbrush body.
I’m guessing based on the parts diagram, I haven’t disassembled this type of airbrush. The last time I saw one was something like 25 years ago …
Is the weird spray always in the same direction or does it change when you take it apart and put it back together again?
How does it spray water? Same issues?
The other thing that can cause odd spray is a bent needle tip, or a damaged front end of the nozzle (part 41-003/4 in the above diagram). You need to be extra careful not to bend the pointy end of the needle, and not to jam it too hard into the nozzle because that can deform the opening and even crack it.
Discovered that I’d been using fine and medium needles in the Patriot with the original fine nozzle. The nozzle is flared around the tip from my misuse.
I’ve fitted another Badger nozzle and needle from a 155 Anthem, all good.
But, as soon as I screw the end cap on, the pressure drops down and then off. Something’s still wrong, I’ve cleaned both end caps and ordered a medium nozzle and needle set plus two m needles and nozzles as spares.
Any ideas as I’m stuck with a NeoEco until this is resolved.
Where does the pressure drop off / disappear?
At the very front very where paint spray would/should be coming out?
Are the nozzles exactly identical in shape/size?
If that other nozzle is longer or larger on the outside it might sea. the opening in part/parts 41-034 / 41-033 or make the opening too restricted.