Biplanes and Other Rigged Aircraft

Hi Richard, I missed your question on colouring the ez line. I don’t think you can though not that i have tried. When I was weathering the engine I got some oil paint on one of the bracing wires and it just sagged the whole line. I will keep this in mind for future as a possibility for ez line which is quite useless for sagged wires. I tried a few times in my ship building day to get sagged aerials with ez-line but it never looked right, so oils may be an option.

cheers
Michael

Hi Everyone,

There is certainly some interesting builds going on here!

When I first saw the proposed group build/campaign, I was pretty excited. A look through the stash found plenty of candidates, however, with the Great War campaign in play, I wanted something a little different. For those who know, I have a thing for aircraft of the interwar and first half of WWII. I also, for some reason, have an affection for early IJN aircraft. I happened to be looking on Ebay to see how inflation has affected the hobby when I noticed an interesting plane from a company I’d not heard of before. Take all of that, with a price that fit the budget, and my candidate for this campaign appeared in a short period of time. This was still months before the start of this campaign, so after reading the instructions, a little research and anticipation the kit went on the self to wait for the go date. Typical of building style, when the gun went off, I was overloaded and couldn’t get this one started. Now that the bench has cleared, it’s time to go!

I chose ABK Models Nakajima A2N2 Navy Type 90-II Carrier-Based Fighter (kit # 4004).

The A2N was Nakajima’s answer to the call for a Carrier-based fighter, for the IJN’s first carriers. It would appear that Nakajima leaned heavily on the design work of the Boeing Model 69 and 100, both of which had been imported to Japan in the 1920’s. Upon meeting the criteria of the IJN, the agile A2N was accepted and went into production in 1930. Between 1930 to 1935 a total of 106 planes were delivered, between 1932 to 1937 they served aboard the carriers Hosho, Kaga, Akagi and Ryujo. The A2N saw limited action during the Sino-Japanese War in 1937, though found itself being replaced by the A5N “Claude” soon after. It had a relatively short service life, though was very influential to the gaining of the IJN’s fighter pilots experience for carrier operations. Making it a historically significant aircraft.

ABK Models (formally, A.B.&K) has been around since 2013 per Scalemates. So, I was a bit hesitant at first, though a visual using my Mk I optics showed it to look pretty good. Additionally, how could one refuse? I didn’t.

The ABK kit comes with 63 parts,1 clear, 2 resin exhausts and all are finely molded.

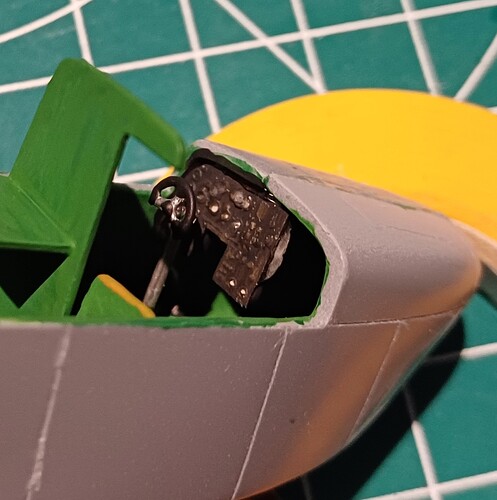
The interior is quite simple and built up nicely. I must admit there’s very little information out there, so, I went with the instructions. Atoke blue was the call for the interior, and I did some dry brushing to help things along. In the end one can’t see a thing. Hmmmphh,

Salified, it was time to close the fuselage, this was the first hiccup. The floorboard is a bit too wide, so, doing sanding strokes with 320 grit at 5 times per side, remedied the problem in short order.

With the fuselage closed up, the lower wings went on. These fit great on the topside, though there is a bit of a gap on the underside.

A final go over to check for seams and it’ll be off for a two tone aluminum paint job!

Till next time, be safe, wash your hands with soap and water, and above all have fun!

8 Likes

Interesting looking build John and great background.
I have a rigged interwar kit that I would like to build, maybe once I get the monoplane off the desk, so looking forward to how you do the aluminium paintjob. Were these planes part metal/part canvas?

cheers
Michael

I’ll be following along with interest . I have this kit in the stash .
Cheers
Richard

Hey Michael,

Yes, there was metal and canvas. Given the times, the metal looked shinney and the canvas was doped, so it looked like flat aluminum.

Robbie,

Thanks for following. Your build of the Hayabusa was most impressive, though I’m not one to include pilots, unless they are flying! I hope you enjoy.

Till next time!

I too love the interwar period and have a particular interest in Japanese subjects. I had to order one of these as soon as I finished your post about it. Watching your build will be most helpful.

Paul

1 Like

Finally getting this one into something that looks like a plane… lots of testing where a part might fit… sanding it until it fits… and sanding soft plastic isn’t the nicest thing to do… and masking that canopy isn’t my favorite part of a build either…

4 Likes

That Sea Otter is starting to look great. The resin parts are a real aid to making it sharp. I had to go back and look at the start to remember its in 1/72, pretty small for the nice detail the kit has.

Paul

1 Like

Who makes the engine and from whom did you get it?

I am thinking about entering this aircraft… Not having built a biplane in 40 years, please give me some how too’s on rigging.

4 Likes

Here you go Top, from one of my club members giving a class at a club meeting.

1 Like

Slowly moving forward…

6 Likes

And then it was time for the rigging… first time doing this, after struggling a while with wird I got some 0,3 mm metal rods, cut them into pieces and superglued them inbetween the wing supports.

These planes were used onboard the Dutch carrier HMS Karel Doorman, they were search and rescue planes, alsofor crews that missed the landing deck. I found pictures that show these planes would land on the water next to rhe carrier and were taken onboard with a crane…

3591_seaotter_in_hijskraan

Unfortunately no clear picture of how the hoisting cable was attached so I just made something up on top of the engine.

So now everything is in place and time for primer and then some colour.

6 Likes

That looks great, looking forward to seeing it painted.

1 Like

I haven’t been very good about taking pictures along the way but we have made progress.
The fuselage is sealed up, primed and painted. The nose is painted gloss aluminium with lines painted flat aluminium for contrast. Undercarriage in place.

The nose job was fiddly and slow going and I am not sure why they did this early in the war.

The elephant nose exhaust I think needs some more staining with some dark patches. The underwing radiators also need a dark wash to bring out some of the detail.

I have also been working on the wings and tail plane to try and achieve a translucent look without success so far but I will keep working away on that. A few more ideas to try.

cheers
Michael

8 Likes

After the white primer a layer of XF4… will be followed by a layer of X8 Lemon Yellow

5 Likes

And Tamiya X8 Lemon Yellow…

5 Likes

Nearly done…

Just the propellor and some panellining…

7 Likes

Looks great in yellow, a really nice build.
cheers
Michael

1 Like

Thanks!

Did some panel lining, added the prop, some lights… calling this one done. Wouldn’t reccomend getting this kit unless you really want this model in 1/72…
This kit represents the Sea Otter as it was used by the Dutch Navy onboard the HMS Karel Doorman and some of these were stationed ashore.

Thanks for the nice campagne, good luck to everyone who is still building!

13 Likes