From what I have researched people have said don’t get the cheapest ones around as you may be disappointed with results and it could permanently put you off so I went for the “value” one of what is meant to be a quality manufacturer.
Anyway, delivery in a couple of days and I am off next week to play!
Harder and Steenbeck airbrushes have softer and thinner external chrome than Iwata airbrushes so be careful where you lay them down, especially not on concrete (like the laundry sink tub) or a hard rough surface as the exterior might dent and get pitted.
I kind of learned that the hard way…
Other than that, they are great airbrushes and easier to clean than Iwatas.
Thank you, admittedly I’m aiming to be using it on a more forgiving work surface
What are people’s views on keeping the “working” parts in water as seen a few YouTube posts suggesting that’s the way of keeping them clog free / clean?
Air supply is via a Royal Max TC-80T mini piston compressor with 3 litre tank (to quote from buyer).
Most probably gone over the top for first purchase but as originally said advice seems to be to go for semi decent stuff to ensure I can’t blame the tools!
I found the website, Model Paint Solutions to be very helpful with improving my airbrush skills and handling of paints and solvents. He is also a dealer in HS airbrushes and responds quickly to email requests for information and guidance.
You’ll be happy and glad that you’ve taken this step. If you haven’t already budgeted for it, be sure to match your new AB with a reliable source for compressed air (with adjustable pressure and a filter/water-trap).
My best basic advice is:
Learn to thin (reduce) your paints properly. Until you KNOW differently, use the paint manufacturer’s proprietary thinners. Save the expedients for later when you’re up to conducting “science fair experiments.”
Learn the proper trigger control for your double-action AB - always start the air (push down on the trigger), then open up the paint flow (pull back on the trigger), close the paint flow (push the trigger forward), then stop the air (lift your finger up on the trigger). Down - Back - Forward - Up.
Learn how to properly disassemble, clean and reassemble your AB. Clean your AB after every use and don’t be fooled into believing that all that’s needed to keep it clean and working is to shoot a bowl full of thinner through it. This will get you through a color switch during a painting session, but once you’re done for the day - clean your AB.
Don’t be discouraged. There is a learning curve that you must master, so mistakes and errors will happen. Pay attention to these and try to analyze them logically. Paint viscosity, air pressure, paint flow, distance from the surface, temperature and humidity are all variables that impact the use of an AB. They all have to be balanced against each other, so the solution to most problems can be found in one or more them. With some experience, you’ll be able to trouble-shoot the vast majority of your problems if you take a logical approach and look at each variable with an eye towards how each is influenced by and reacts to the others.
After a while, you’ll “crack the code” but you’ll need to be deliberate about at first. The more attention you pay to what’s going on, the flatter you’re learning curve will be.
As usual, SdAufKla his comments are right to the point!
No way!!! That may only help when you use water based acrylic and even then that water is going to become poluted and you will find that fungies will grow in that water after some time.
The same for storing the airbrush with a solvent in the cup. This may eat the seals of the airbrush.
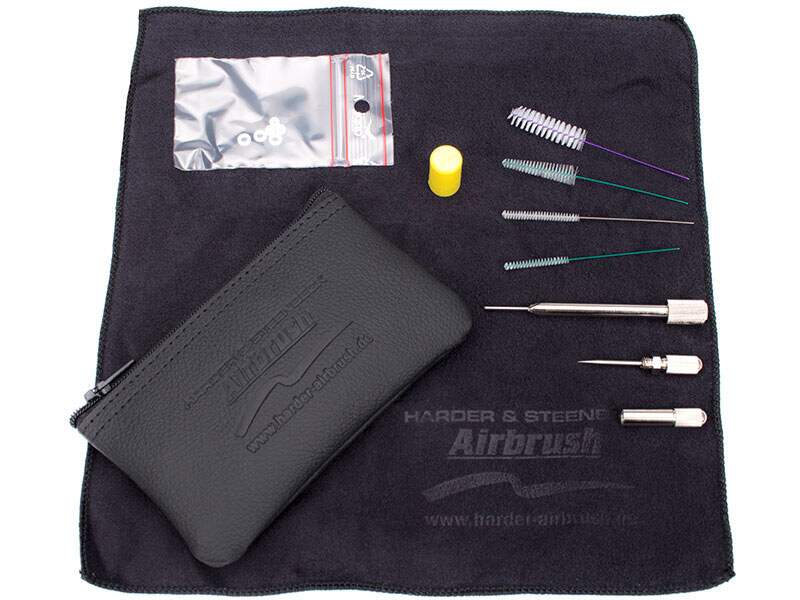
My advice is to buy the correct H&S cleaning set for the model airbrush you have
and to softly disassemble and clean the airbrush every time you intend to put it away for a longer time (so not in between different colors, a good rince should do it for that)
Good advice: do not wurm those brushes through the nozzle as that will be the end of it. You can use the brushes to clean the less fragile parts though.
Be aware; needle and nozzle are THE MOST IMPORTANT parts of the airbrush, and are very fragile. Ticking the needle sharp side against a hard surface can be enough to have a sligth bend leading to the paint going in all directions at the next use.
Cleaning before putting the airbrush aside is a 5 minutes operation (with some practice) and will guarantee that it functions as new each time you want to use it.
Point is as well to be well organised. I have a small bottle of white spirit (very cheap cleaning solvent and also useful to thin enamels), a similar bottle of water, and the right thinner for each brand of paint I use nicely in a row on my workbench.
I mainly use Humbrol and have learnt not to experiment with each paint brand that comes on the market. Being familiar with somethign avoids disaster.
I have found useful to store the airbrush assembled but with the needle loose and slightly retracted. In case of a less-than-perfect cleaning, the tip will not get stuck with the nozzle.