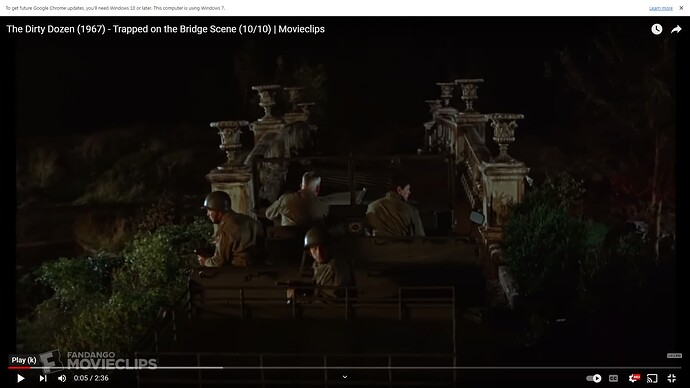
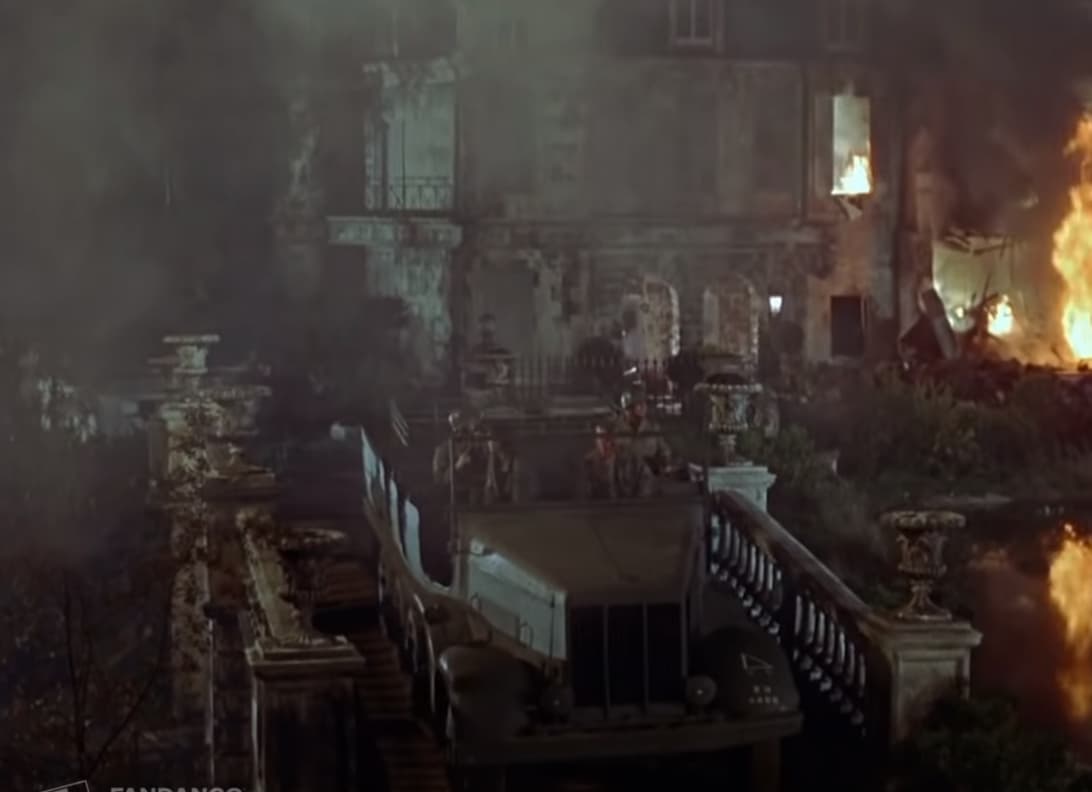
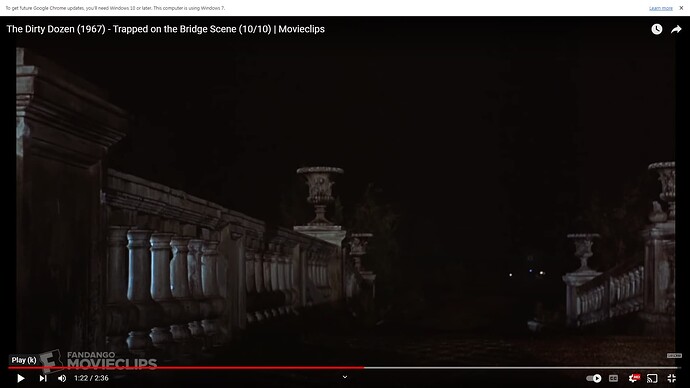
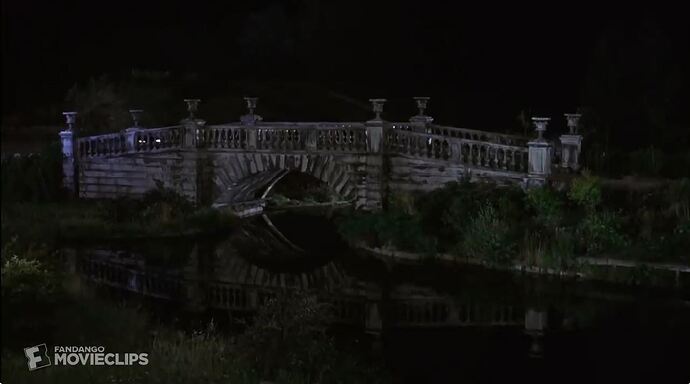
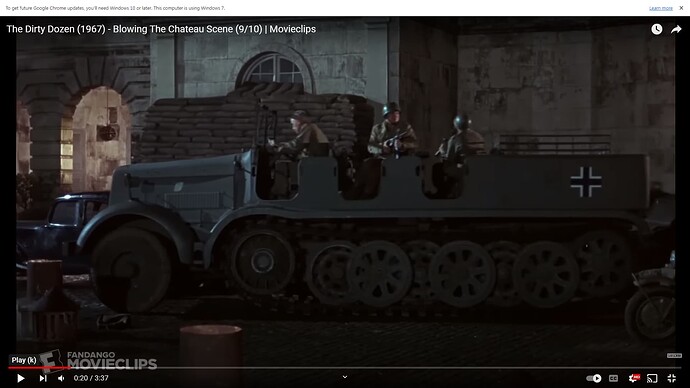
I have an idea for a diorama but which entails making the bridge from the movie Dirty Dozen.It would be challenging and the largest project I have started , just wanted some pointers from more of you veteran builders.How would you do it?
Are you talking about about using an existing pre-built bridge and modifying it to your needs ?
or totally scratch building it ?
Its really a case of scouring through the Dio manufacturers or companies that make those niche bits and finding what best suits your needs.
Cant remember from the film if its a bridge over a dry river or moat or one with water ? would you add water if it was ? Thats another consideration for the water effect … It will involve a lot of planning from the get go … nice project though.
John has many good points, planning which is what you doing now is very important. Water or not to water is an important decision.
Getting lots of photos to review. It’s awhile since I have seen the movie but I thought it has stairs off to one side.
Next is too start scaling out the dimensions you are going to use. I would be tempted to build the structure in paper or thin foam board at a craft store to start checking those numbers and seeing if it’s starting to “look right”. Easy to change now than later.
Once I have all the above worked out, then it is the materials to use and it might be multiple types in the same area but things like cork, resin, plaster, DAS clay, sheet styrene.
Some can be built in stages and then combined in the end. Bridge Abutments, bridge, stairs.
Great sounding project, look forward to seeing the progress. ![]()
Yeah. I would search all the diorama manufacturers (maybe Google “1/35 scale bridges”) until you find this bridge or something really close. I’m sure it’s out there. Then search for flower pots. You’ll find ones like that from the European diorama manufacturers. Then plan out your terrain, brush, and water. It’s all commercially available and easy to use. This wouldn’t be a hard project at all.
this sounds like an interesting project. And a hard one too. Curious to see on if you decide to move forward.
The BattleScale Collectica Show
I go along with my learned friends above, but first this looks like a great idea provided you’ve got the stamina - take it from someone who took 4 years to finish my outsize Operation Anthropoid dio (see Dioramas forum) there’s some things you need to crystalise;
- Will it be interesting enough? Will everyone get what’s happening whether they’ve seen the movie or not? Will it look too static – if they’re stuck on the bridge, how to make them look desperate rather than just taking a break? If replicating the movie scene exactly the final photography should be night-time, how to make that work so that all the architectural work isn’t lost in shadow? How good are my photography skills?
If you can answer all that in the positive, or are willing to learn on the job, then…
-
Consider working space, storage space, display space - so the maximum dimensions of the base need to be established. Maybe make it in two halves and/or modules. I’d suggest building the half-track first – partly because it has to look good enough being the star of the show (otherwise what’s the point?) and partly to use its exact 1:35 (presumed scale) dimensions to map out the base, that will dictate how big the whole thing needs to be. Which should then indicate how much masonry work needs building and how much you might be able to cheat with backdrops, either painted or blown-up photos of similar-looking buildings…taken at night.
-
Build a miniature scale mock-up of card/balsa/polystyrene foam as Ryan suggested and then look at the sight-lines – if a photo is taken from x position, what needs to be in the background? It’s a common problem that essential shots turn out to be marred by one’s work-room door or window in the background. Maybe the night-time scene makes that less of a risk (?)
-
As for the dio’s components, there’s a strong argument for 3D printing particularly for the bridge parts if you’re going for an exact replica. If that’s not your forte there are several guys here who could help you work that out. The buildings should be fairly “easy” to build, I’d recommend thick balsa cross-membered frames faced with foam covered in plaster or bricks/stone blocks. Depending on what you use for the actual base, lightness of materials throughout is important when it comes to lifting & carrying. If there’s going to be water, again there are experts here to advise.
Don’t panic Ronald, the more daunting it might seem the more reason to go for it - around here we rejoice at success, and commiserate/help fix failure. I’m already admiring your concept ![]()
great points. The night time scene with some lighting would be awesome and also cover up a lot of small details you may skip over. still a huge load of work in any case.
The BattleScale Collectica Show
Mockup and test your composition using simple cardboard models on another piece of cardboard or poster board. If you already know the major scale model subject(s) once you have that completed well enough (while still in-progress), put it into your mockup. Use the underlying posterboard to mark out the locations and orientations of the major components and to determine the overall size of the diorama or vignette. Be brutal with eliminating excess and un-needed space.
Be willing to do several mockup evolutions, and also be willing to discard any that are not what you really want. Don’t just settle on something simply because you think you have “invested” too much time and effort in it. That’s why you want to keep the mockup process simple - like sketching out the composition.
At the same time, collect reference photos of your bridge and through the mockup process, use the main model subject(s) to determine the dimensions of the model bridge by comparing those scale model subjects and the bridge in the photos.
Develop a set of dimensioned drawings of your bridge model and refine your mockup “model” bridge. Use simple cardboard plan and side elevation views taken from your own drawings taped together. Photocopy your drawing and just cut out the views and spray glue them to the cardboard. Cut these out with scissors and tape them together. Don’t fall into the trap of creating some detailed and complicated mockup model. Overall size and general shape are all that’s important here. Once your satisfied with the mockup and are confident that the bridge is the correct overall scale size, then you can quite easily scratch build it.
The basic bridge structure is very simple and can be made from a number of materials using different techniques (thin plywood core with sheet plastic scabbed on the sides and top, etc.). Check our dollhouse details for the railing balusters and planters. Alternatively, you could model masters of those and cast them in resin or design them in CAD and 3D print them.
Challenge yourself and be willing to lean some new modeling methods and techniques, and you’ll find that doing this is probably not as hard as you might think.
As always, I’m blown away how helpful you guys are and the crazy amount of advice that I will surely use in my planning and execution. This is happening, far too many projects have I put off and not executed do to various reasons. I didn’t even think about the dollhouse angle of suitable supplies. I’ve already done some online searches for the bridge ornaments, and nothing looks right, I did not search the various Dio companies for bridges or flowerpots. [Johnnych01], my intention is from scratch with water. But if i see something real close that might change my mind.
I don’t recall seeing stairs, but I will investigate
I thought that is where they set up one of the .30 cal positions after guard shack and two of the dirty guys died but I could be misremembering.
It was this position I was thinking about which seems close but might not connected to the bridge.
I always focus on telling the story. What’s happening and why? Then fit the structure to the story.
I self-limit the base to 30cm, so as not to overload the viewer and focus their view to the important aspects. This also prevents me from building some epic with dozens of figures. And it will fit on a normal shelf.
Finding the railing posts and vaces will be a challenge. Get creative in your search for those components. Search craft, jewelry beading and toy stores.
Consider Lego building blocks, at least for the basic structure. They may also have those railing
And I assume you’ve checked the list of filming locations on IMDB. Then Google maps. You may be able to find that real bridge. (It may not have been a movie set)
Good luck
Ralph
The entire castle was a giant set, 240 feet across and 50 feet high, built on the backlot of the MGM-British Studios in Borehamwood, Hertfordshire.
https://movie-locations.com/movies/d/Dirty-Dozen.php
H.P.
what do you mean by find it?
Spot it in street view. But apparently it was just a set - not a real building
What color do you think this is? I know they are probably trying to represent Panzer Gray just like in Battle of the bulge , but its way off , seems lighter and more greenish yellowish
No, it’s definitely Dunkelgrau, it’s just the lighting that gives it a greenish cast.
Oh no - “correct Dunkelgrau” alert! I can see this spinning off… ![]()
If it had been painted in a prototypically close match to Panzer gray, it would have been so dark that in the night scene that it would have looked black.
Consider also, that when the film was made - 1967 - the popular cultural trope or visual light motif used for all WWII German army vehicles was to universally paint them gray - any shade of gray. Gray = German. That’s how you know the “bad guys” from the “good guys.” Bad cowboys wear black hats, and Nazi Germans drive gray vehicles.
Try to find a German tank in a comic book from that time that was depicted in any color other than “generic” gray… Hogan’s Heroes? All vehicles in gray, of course. The only pop culture reference that I can think of that didn’t use solid-gray for all the WWII German vehicles is Rat Patrol.
Lighting director: “Paint it gray… No, no, lighter gray. That’s too dark. It won’t look right on camera…”
