Brownwater Navy ASPB Ambushed - Keep Her Afloat!

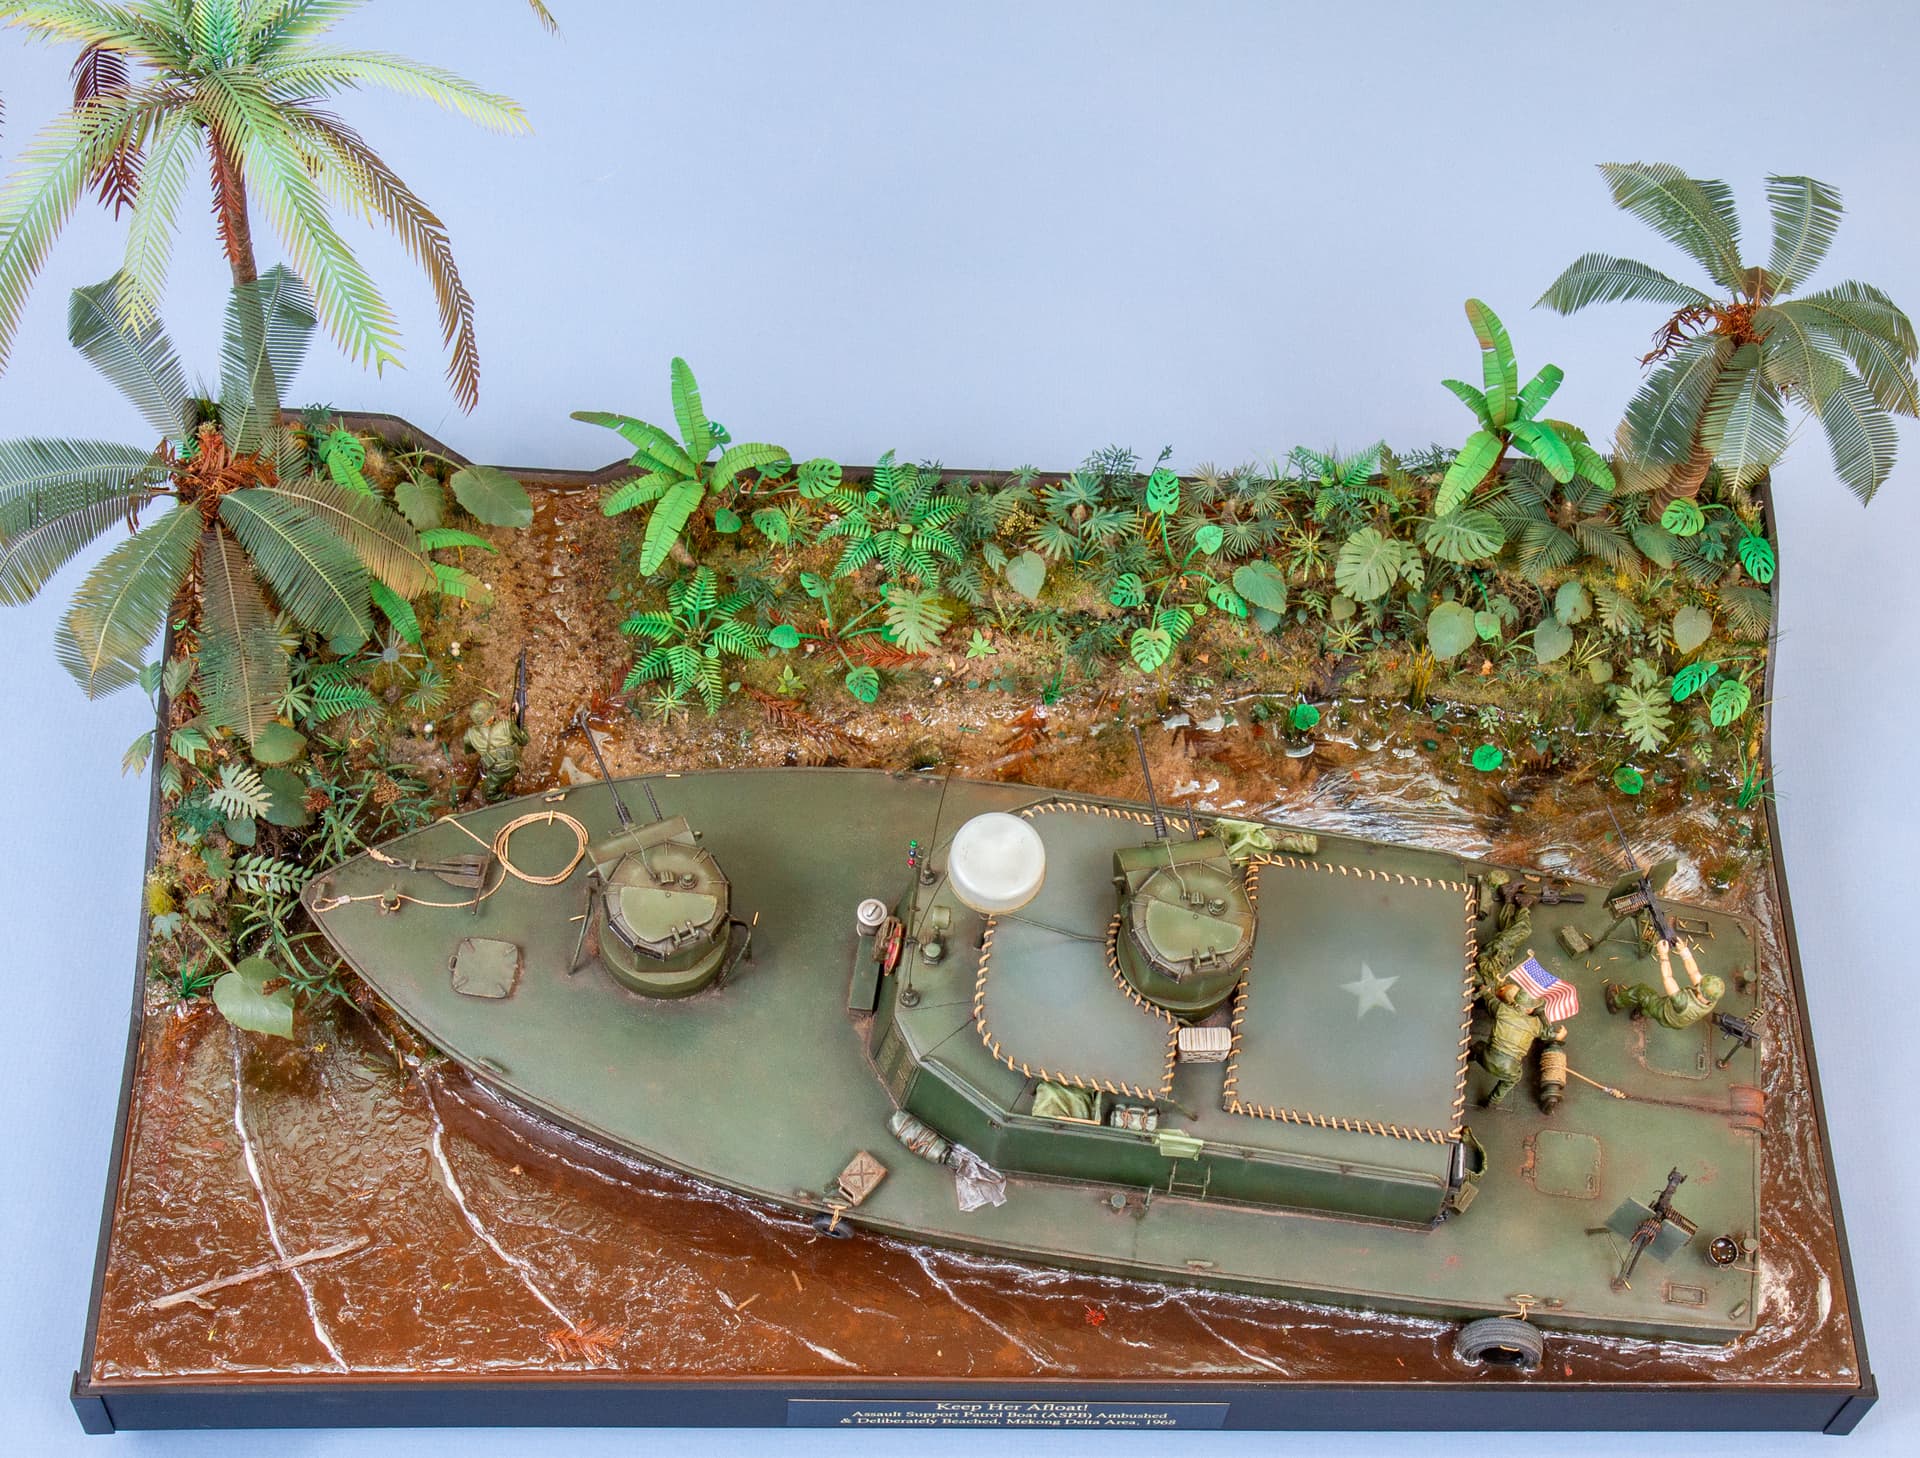
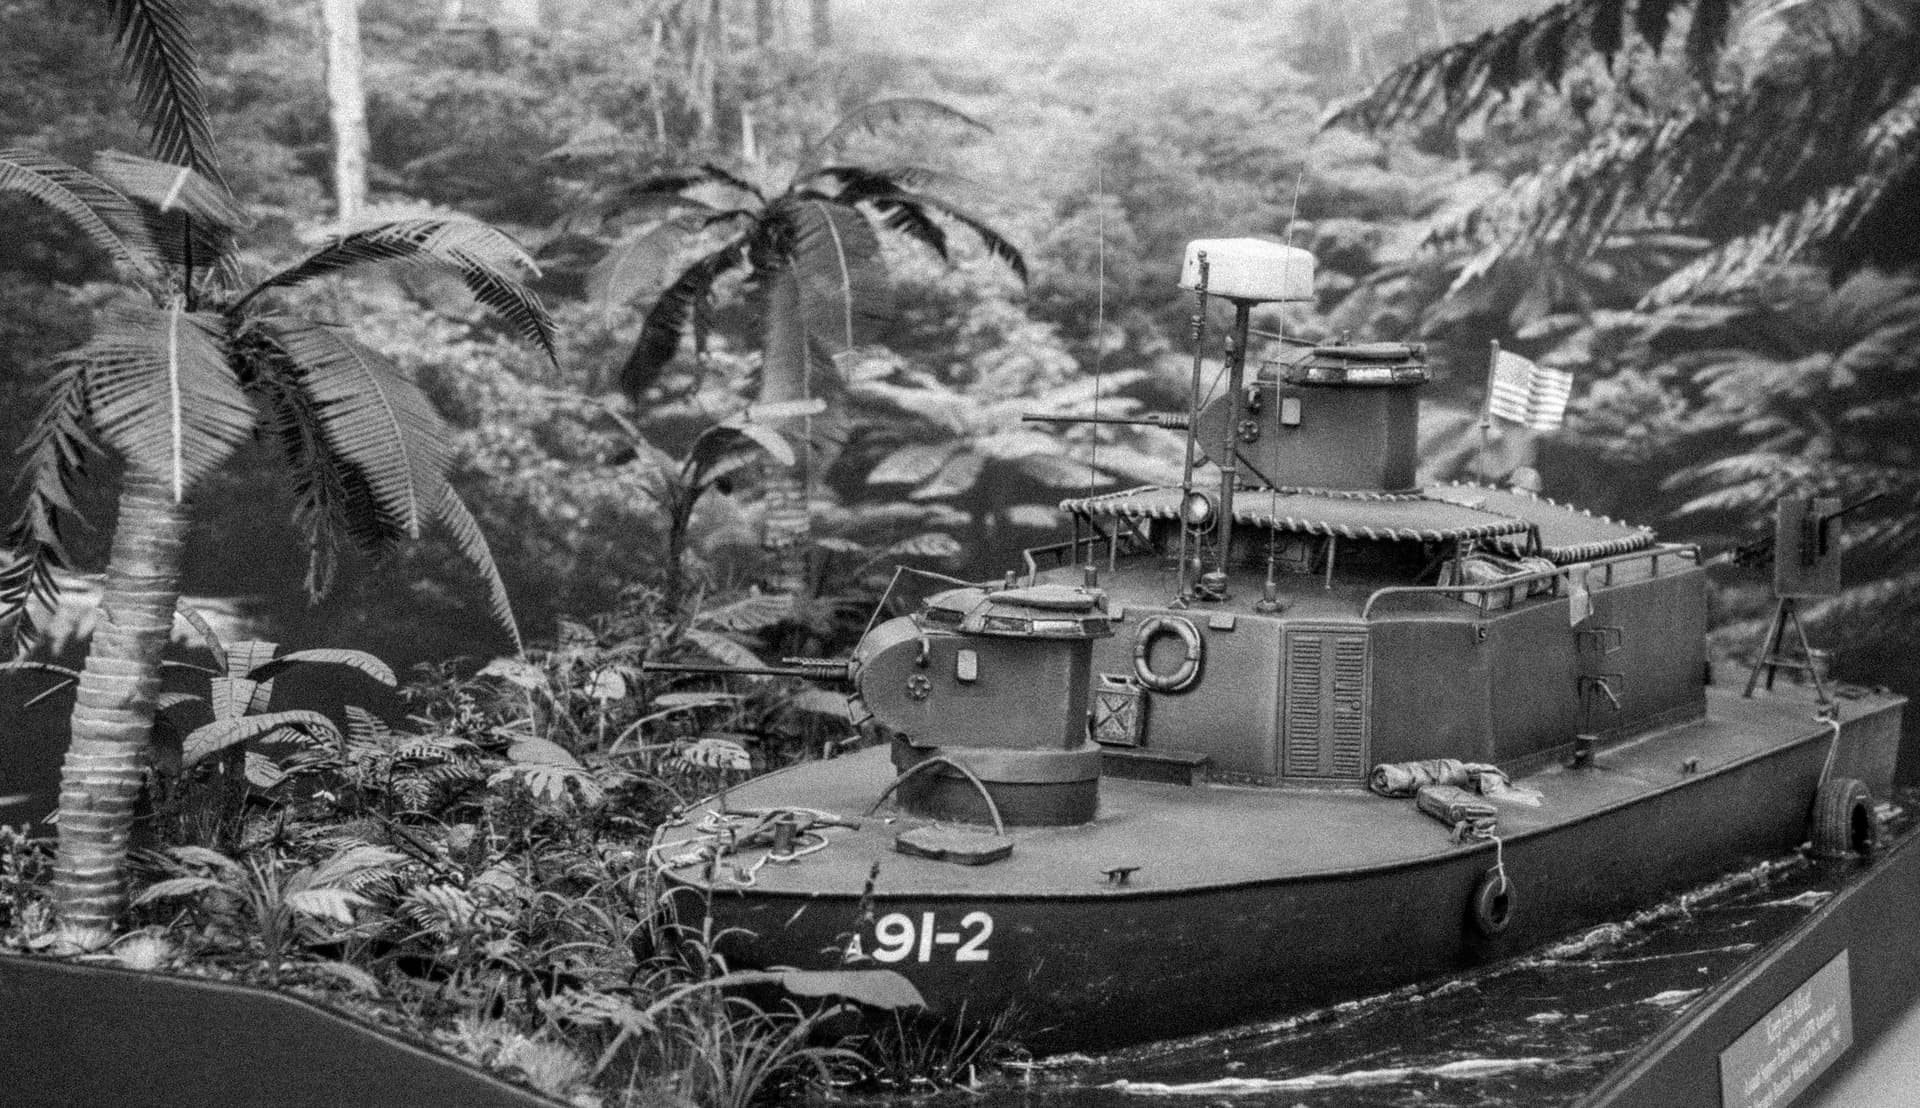
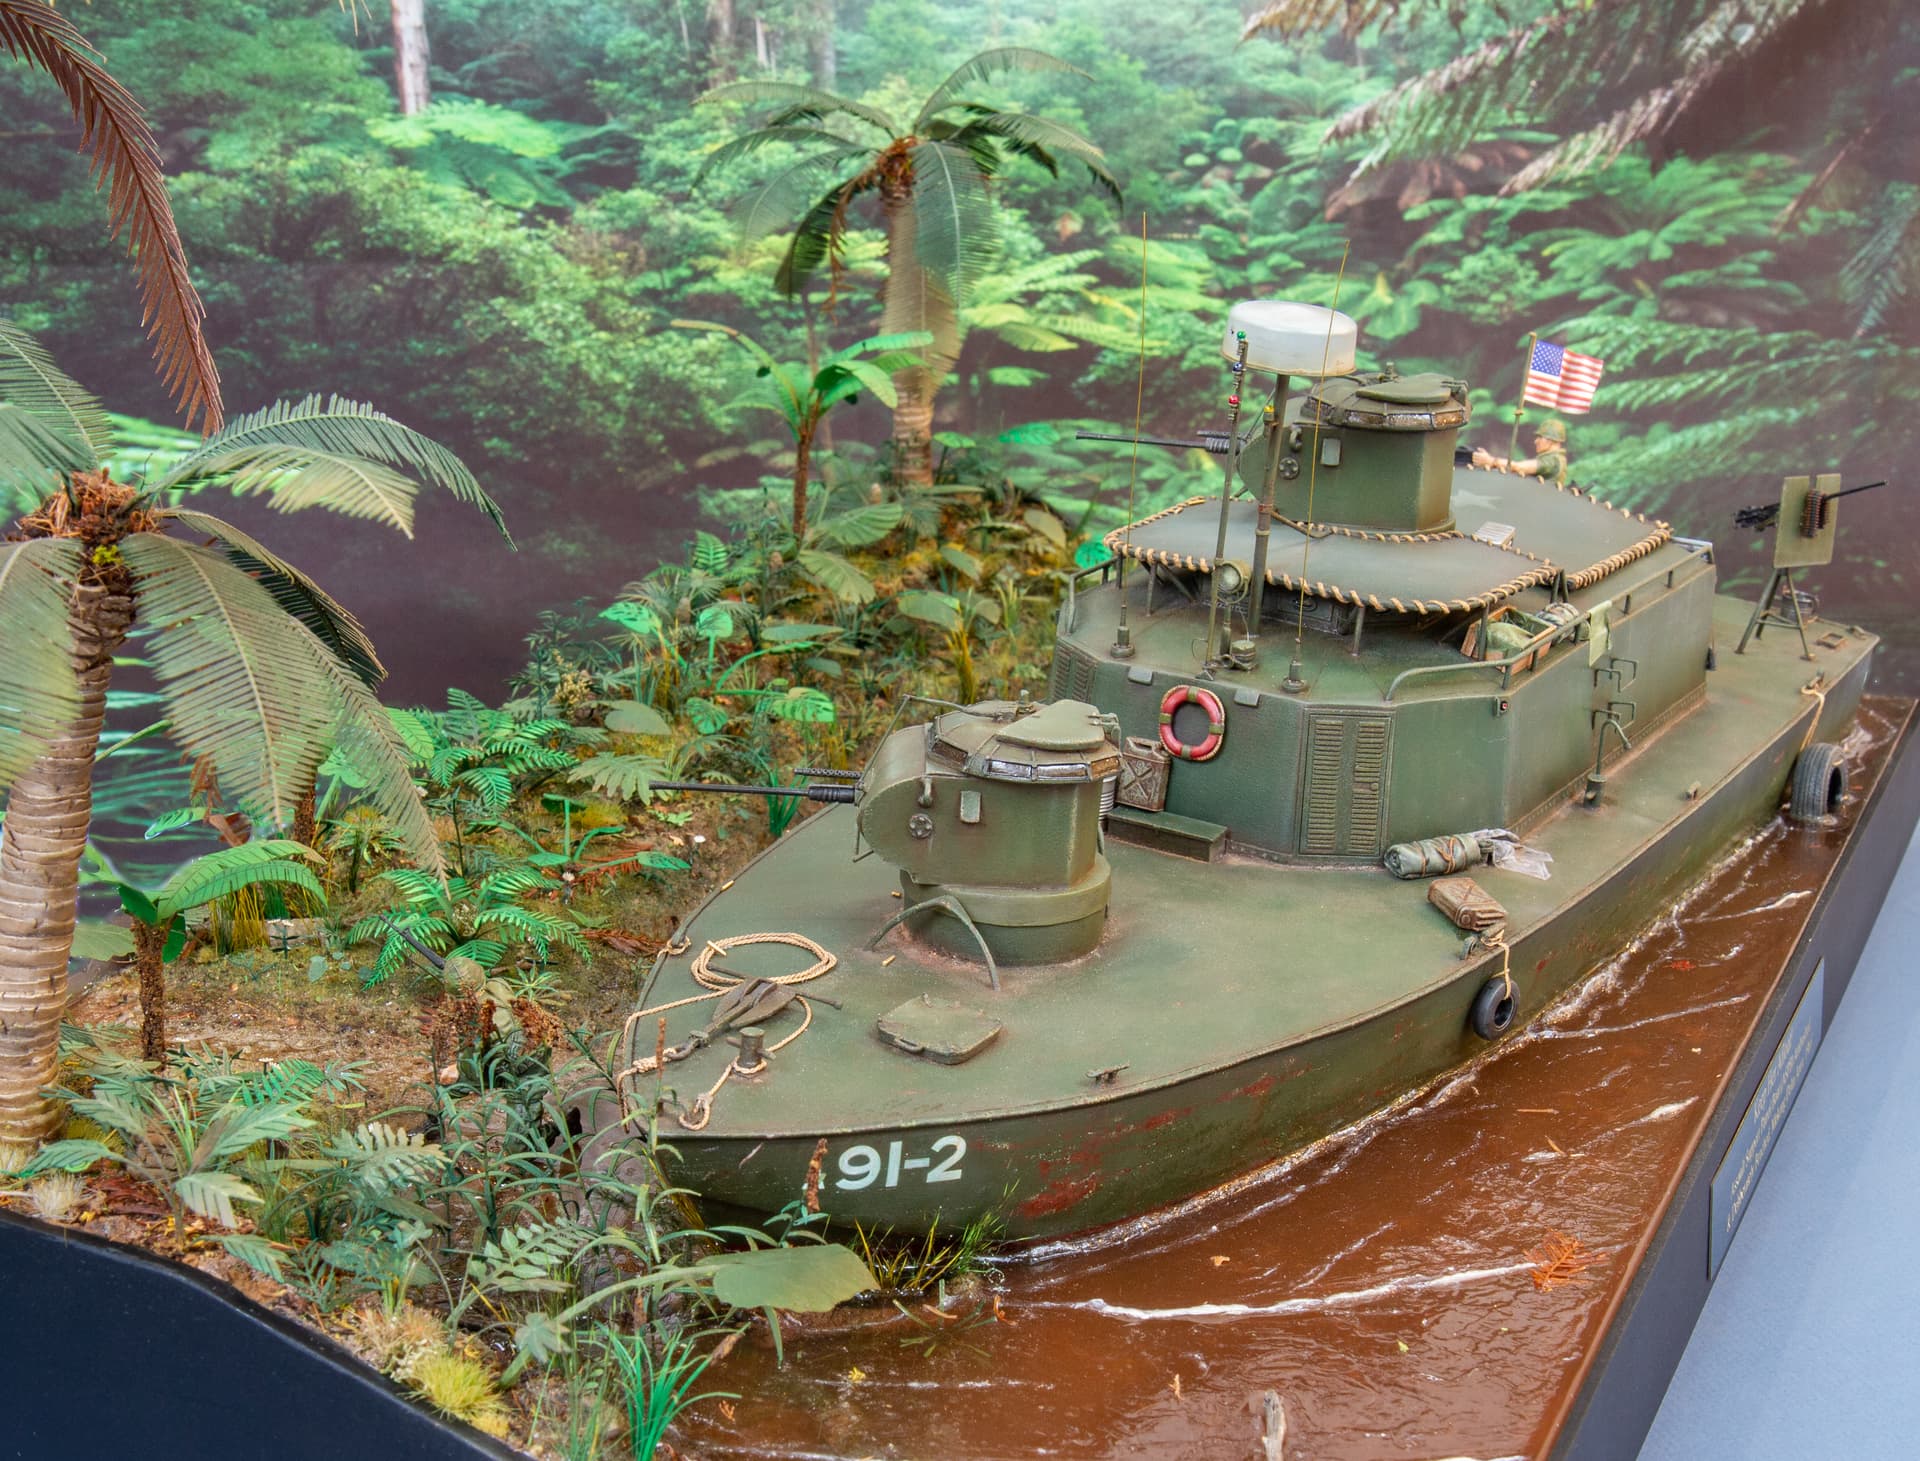
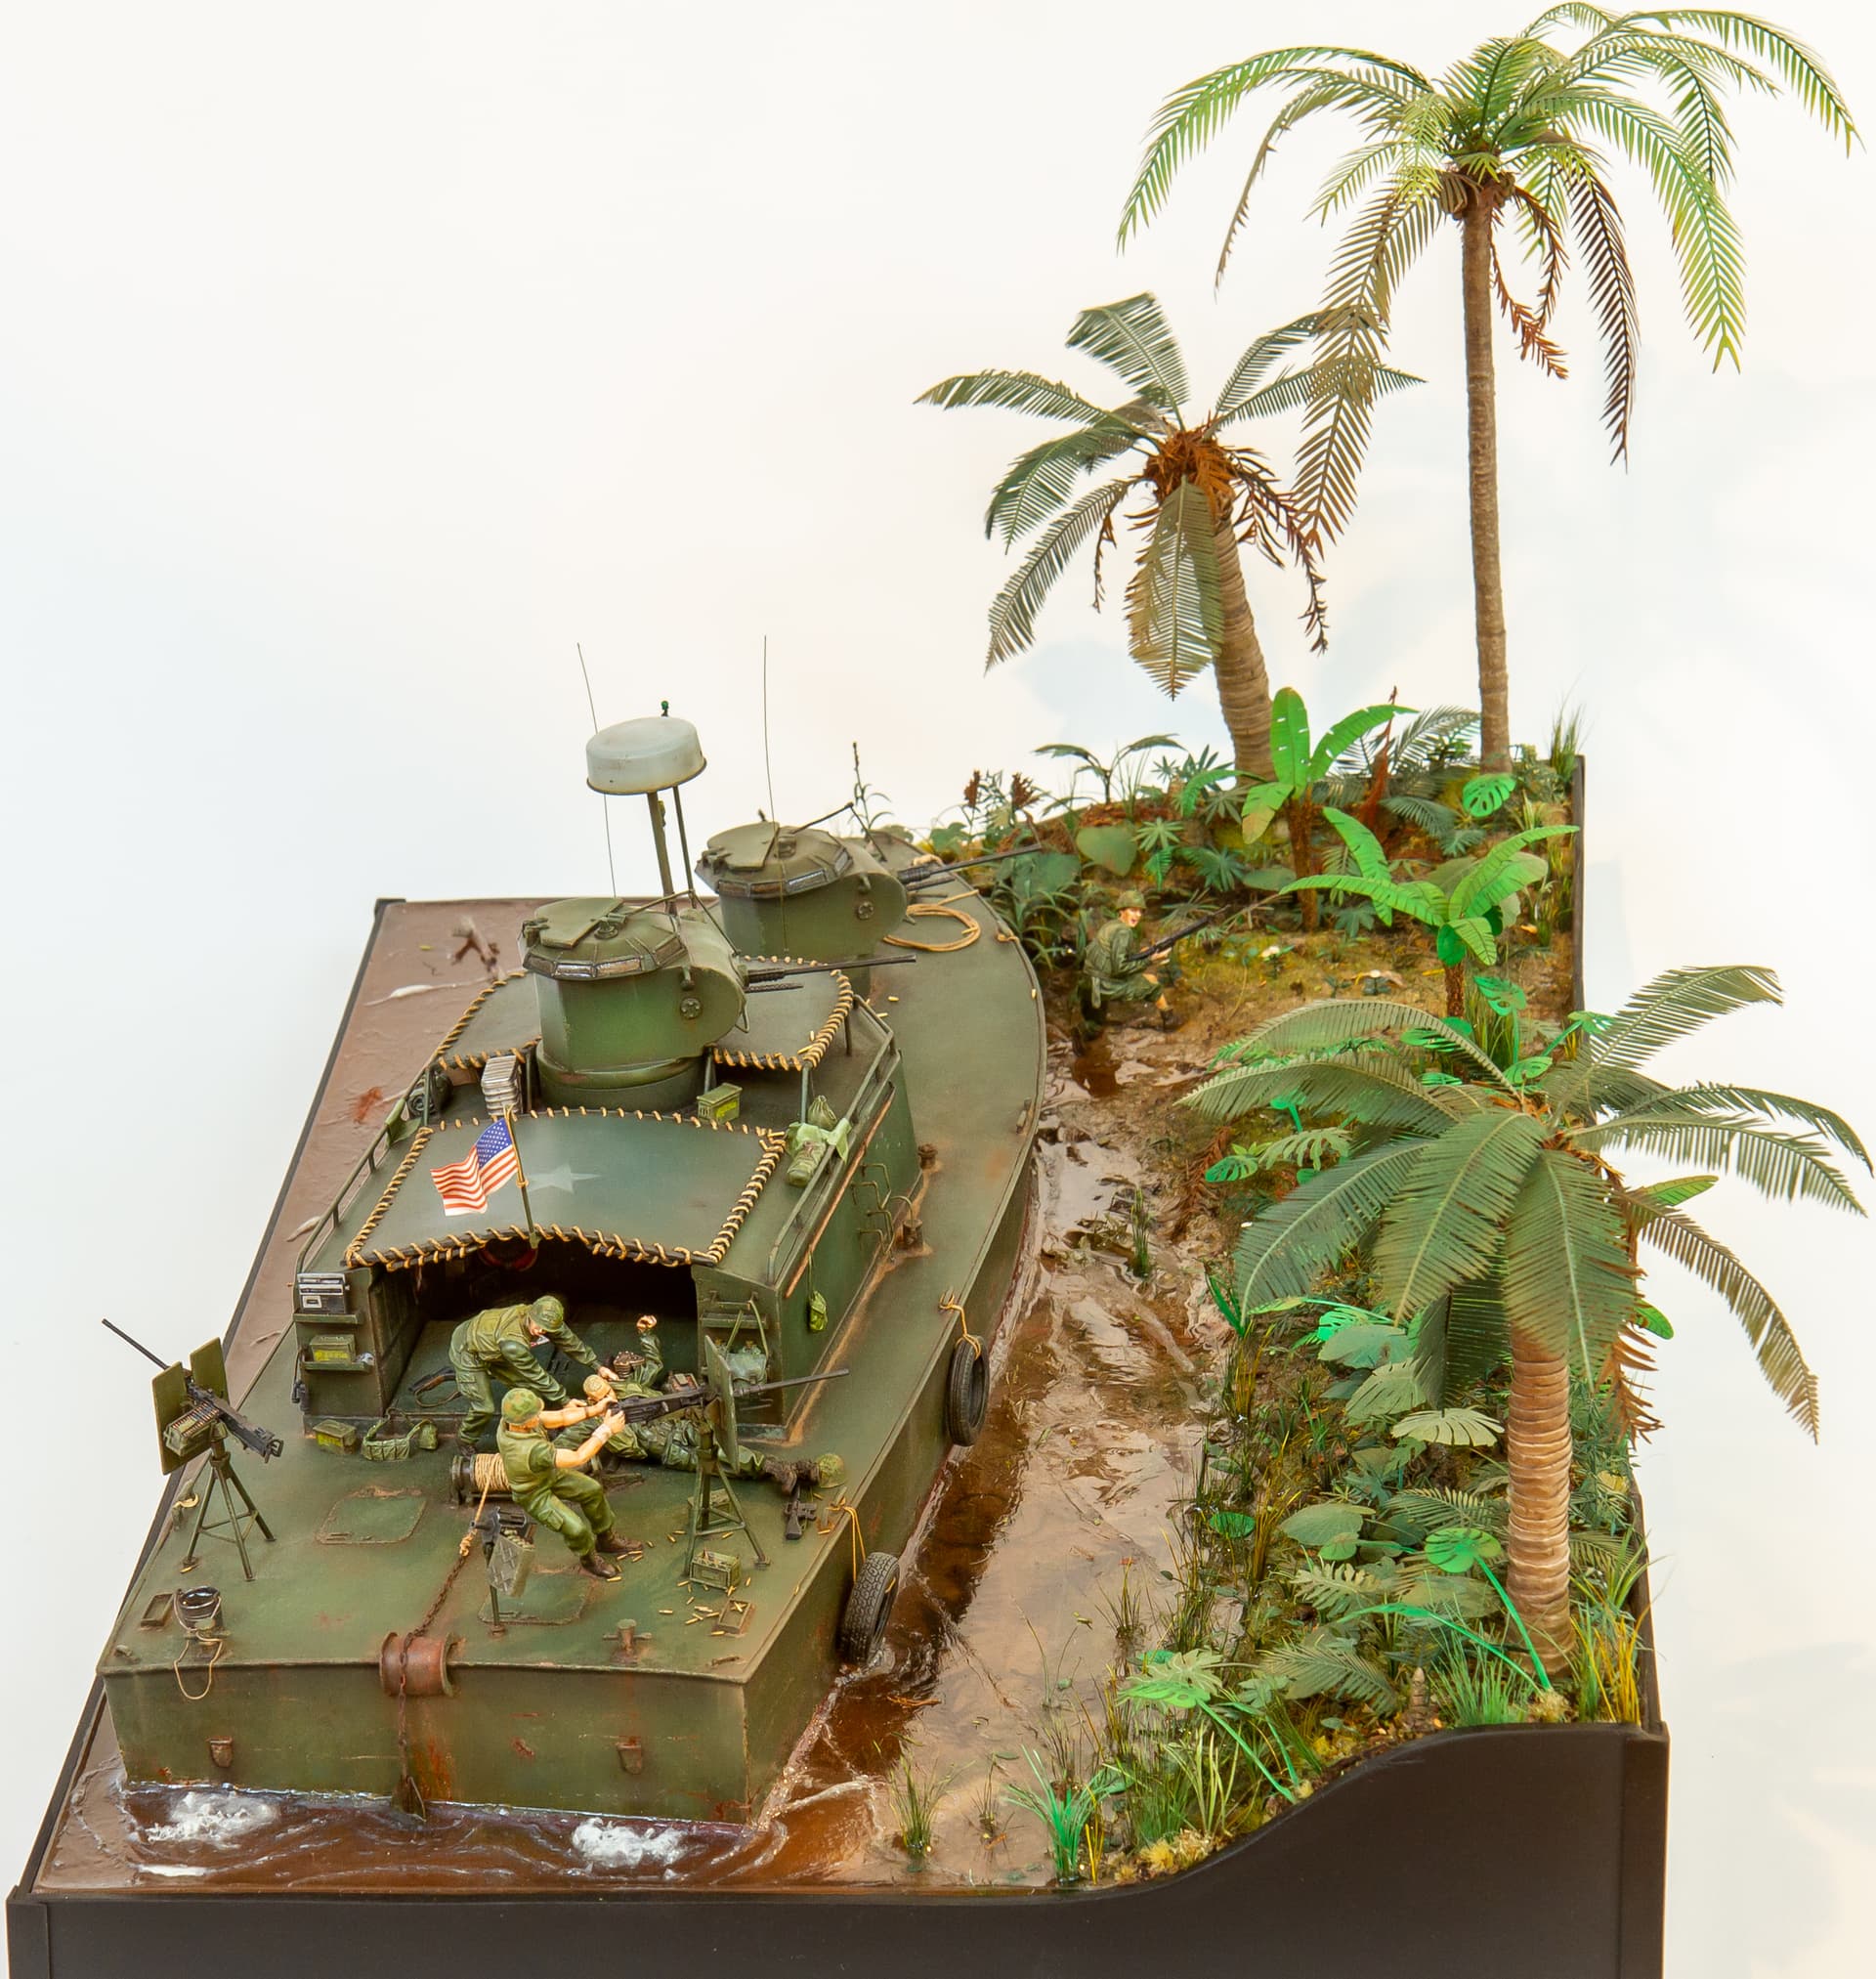
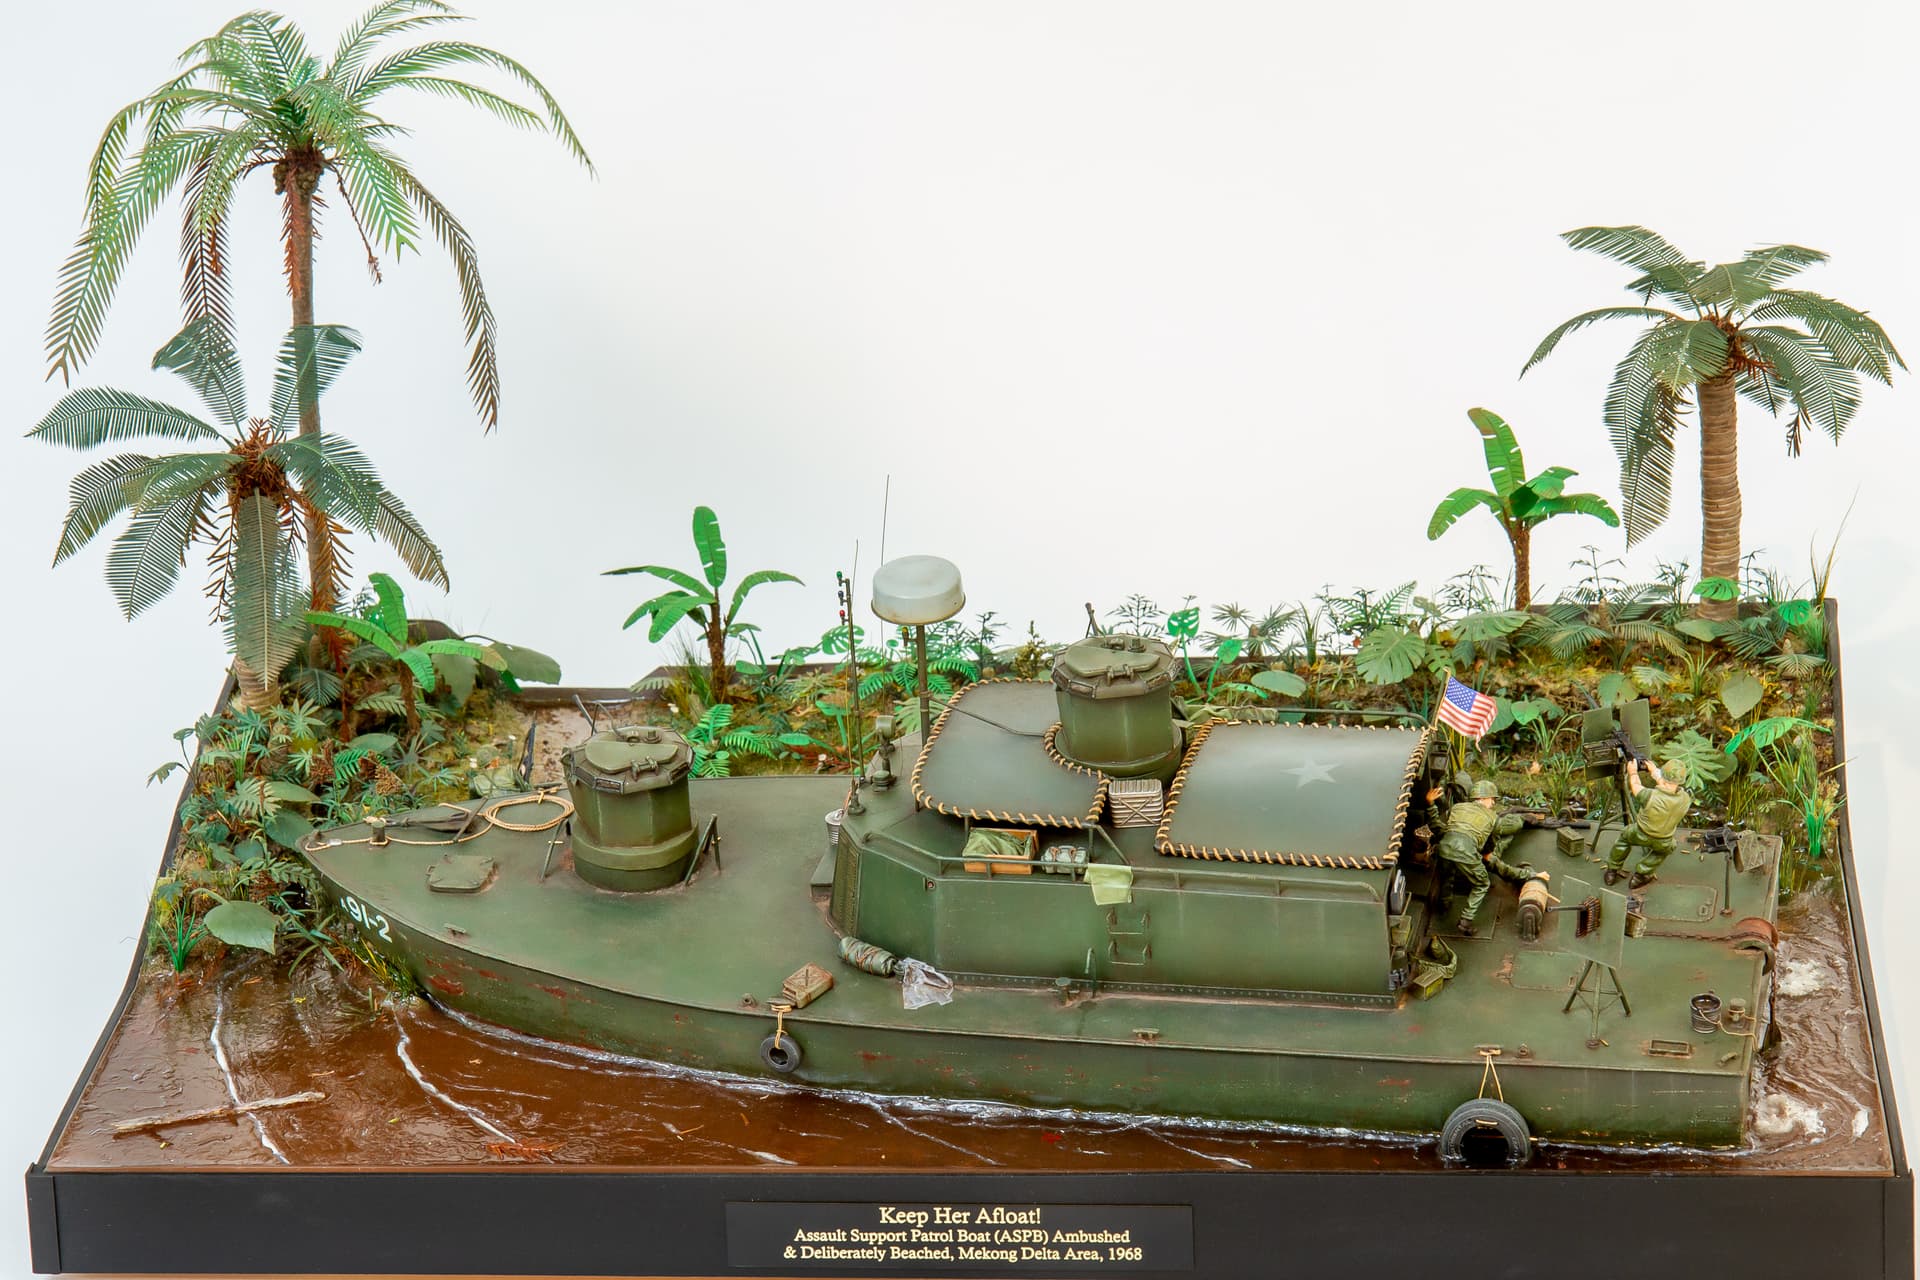
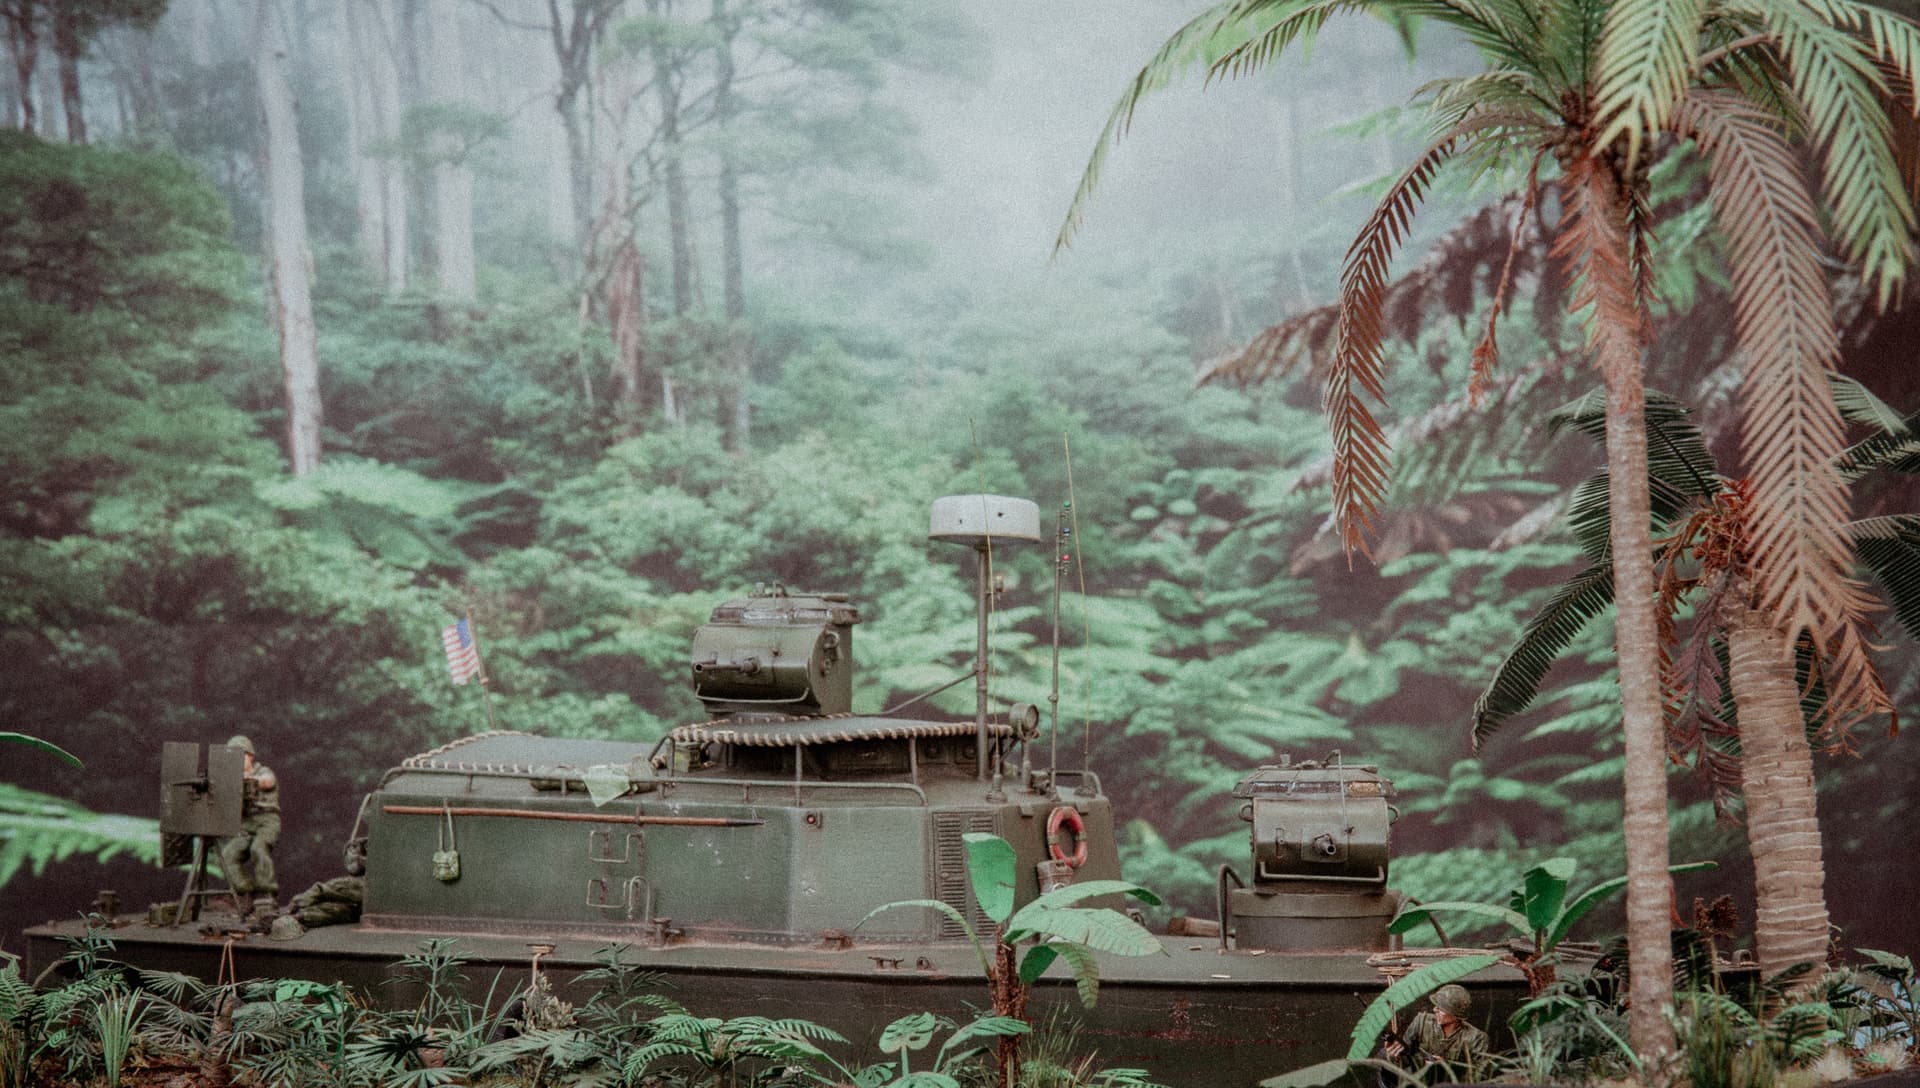
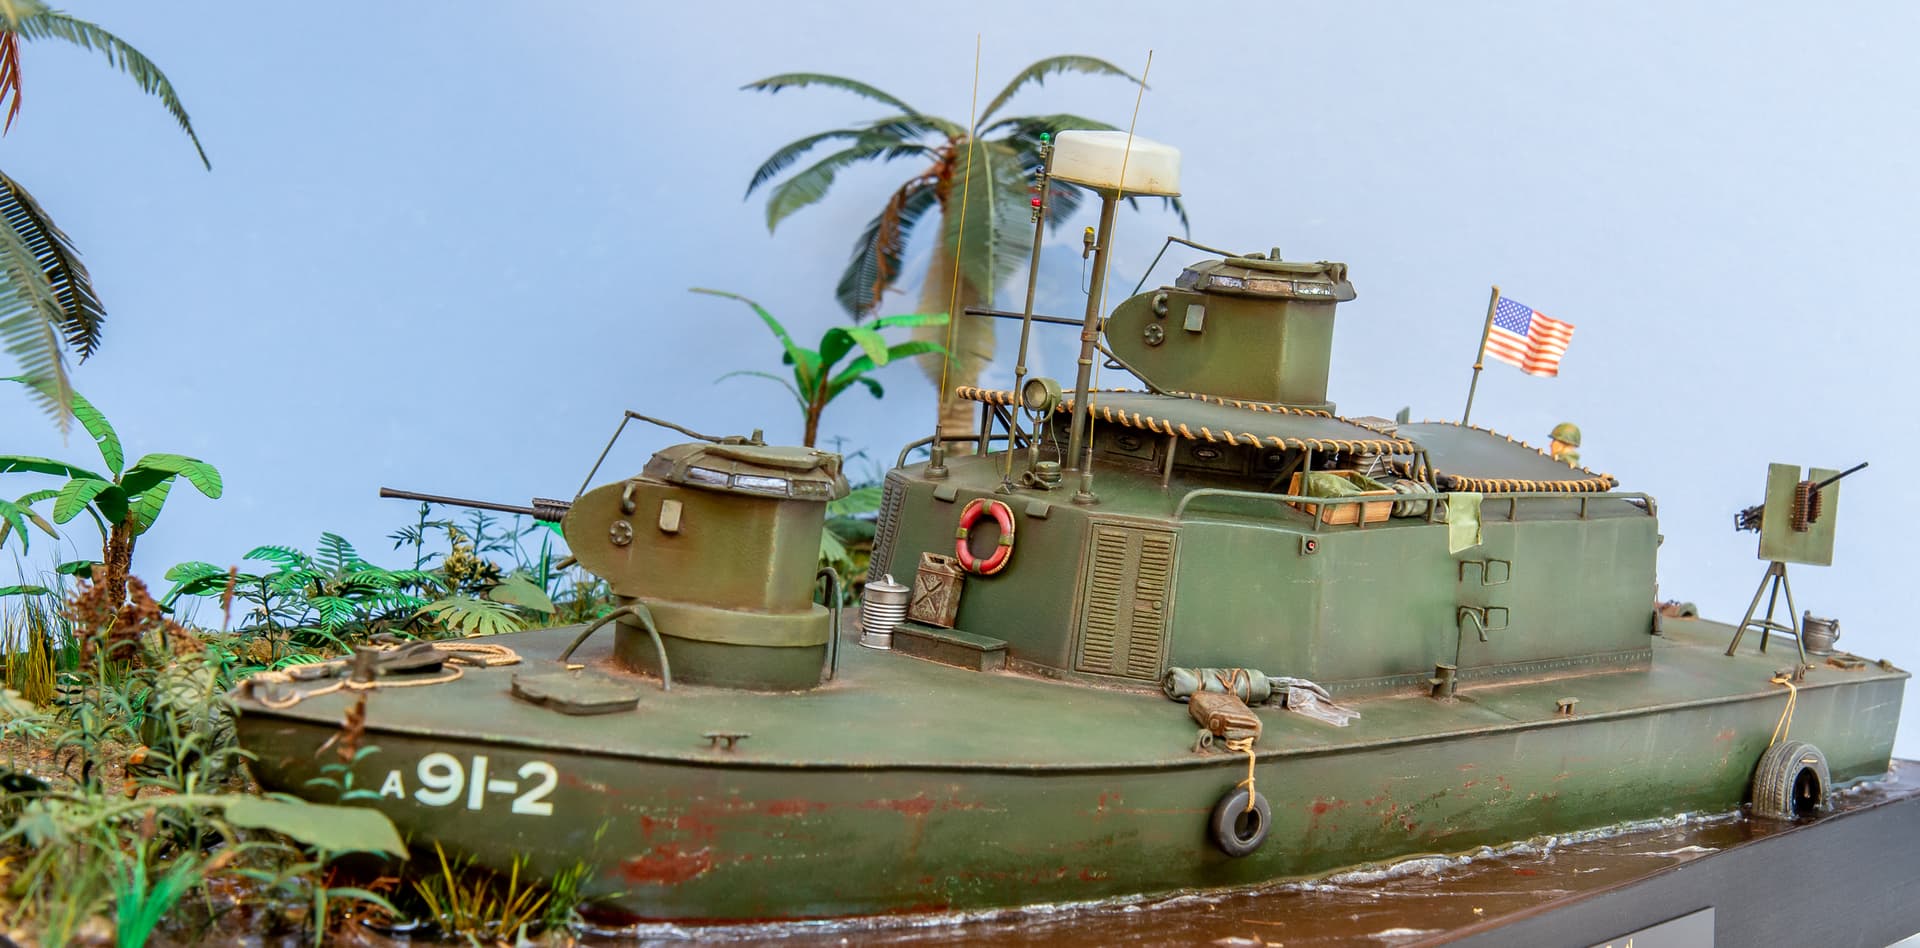
I just completed a nearly 2 year project of a Brownwater Navy Assault Support Patrol Boat (ASPB) in Vietnam, Mekong Delta area in 1968. I hope I am putting this in the right category as this boat is basically a floating AFV, is in 1/35th scale, and was built similar to an AFV diorama scene :slight_smile:. Anyway, I have a few pics to share of the completed project, as well as some older WIP images that I may add in a separate post.

To decide on finish, layout, and environment, I found a couple of good resources from both the internet ((www.browaternavy.com, www.history.navy.mil/content/history/museums/nmusn.html, and www.revervet.com, as well as U. S. Small Combatants, including PT-Boats, Subchasers, and the Brown-Water Navy by Norman Friedman. The internet sites actually listed some vets that contributed to the sites due to their past experience on the ASPB. I decided to email a few with inquiries to learn more of their story and equipment. I was lucky that Samuel Crawford responded, who is actually the author of his own book called Brown Water, Getting There is Half the Fun (https://www.amazon.com/Brownwater-Getting-There-Half-Fun/dp/1401054633) . After I explained to Sam what I was working on, he was kind enough to share his experience as well as personal photos. I am looking forward to sending this link for Sam to see for himself!

Due to their steel construction and armor, the boats (also called Alpha Boats) would also perform minesweeping in advance of river assault squadrons and serve as a blocking and interception force in the waterways around the area of operation. The ASPBs were known as delta destroyers because of their speed and firepower. In retrospect, the speed was almost irrelevant, as formations were only as fast as their slowest components, the 6-knot armored troop carriers (ATC). The first ASPB (Program 4) arrived at Vung Tau on September 20, 1967. Fifty program 5 ASPBs, which this subject is modeled after, were delivered to Vietnam after January 1968. The ASPBs first saw action on 28 September 1967 during Operation Coronado V when they were used as minesweepers for an assault on An Dinh village, the “birthplace” of the Viet Cong (Friedman, 1987). The following list includes some of the actions that the ASPBs were involved in that heavily influenced this build (National Museum of the U.S. Navy):

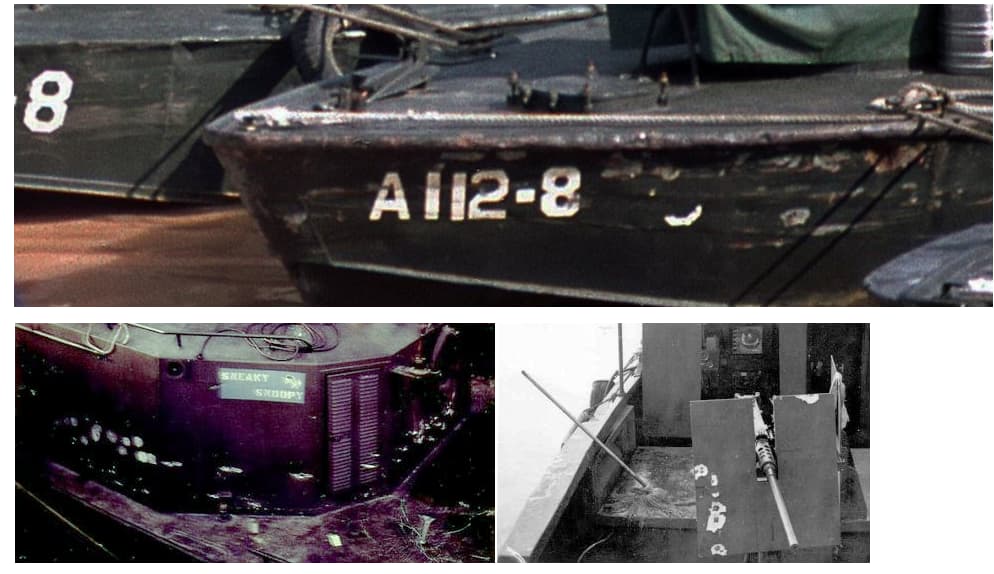
  • On March 1, 1968, A-112-8 and M-112-1 were hit by several B40 rockets in the Can Tho River while covering the salvage of A-112-4, which sunk on February 27. A-112-8 took a direct B40 hit in her engine cover and had to be towed back. A-112-4 was recovered and towed to Can Tho on March 4.

  • On March 14, 1968, A-92-7 sank on the Sam Giang River after a rocket hit it directly on the stern below the waterline. Salvage was not feasible, so the boat was stripped and destroyed in place by an explosive ordnance disposal team.

  • Eleven river assault craft were damaged on April 4 1968. A-92-1 and A-92-4, which suffered the most, were hit by a total of six RPG-7s. These were direct hits on .50-caliber mounts. In the same action, M-92-2 was hit by a heat round that penetrated the opening between the 20mm and .50-caliber mounts, killing the captain and coxswain. During this same engagement an ATC took an RPG-7 round through its bow ramp, which severed the ramp winch cable and wounded thirty army personnel in the well deck. Another ATC was hit near the waterline by an RPG-7. It triggered on bar armor, penetrated the bulkhead, and created a shrapnel effect in the empty well deck.

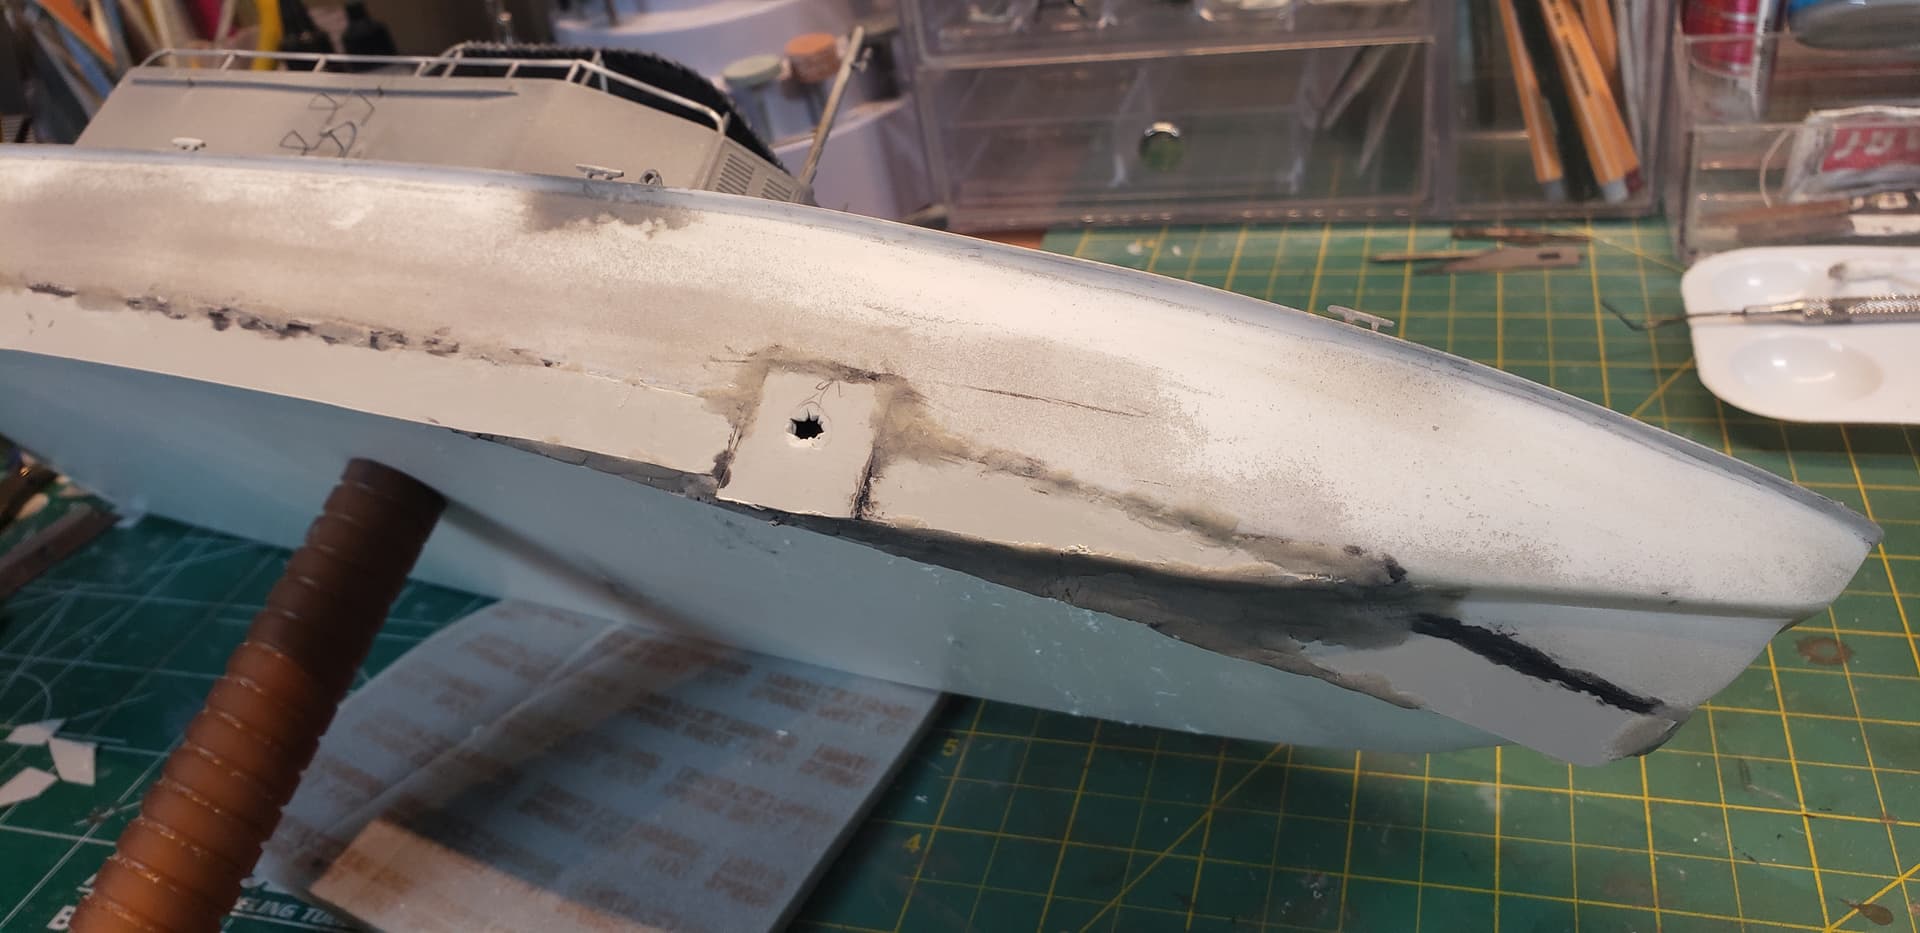
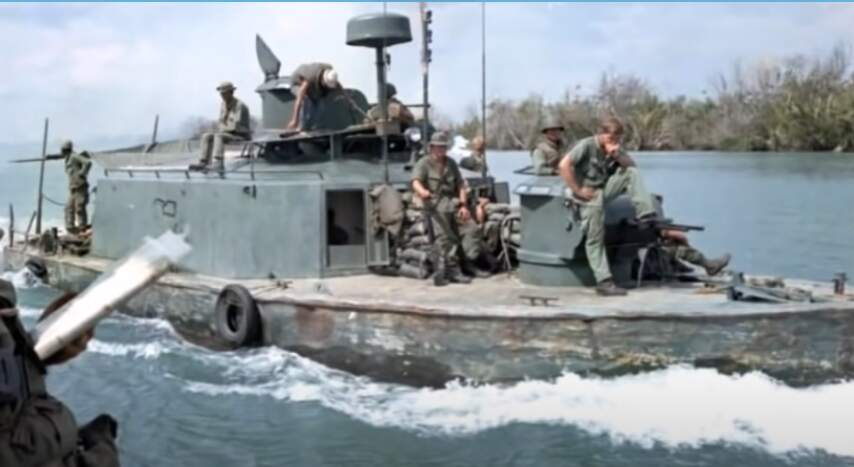
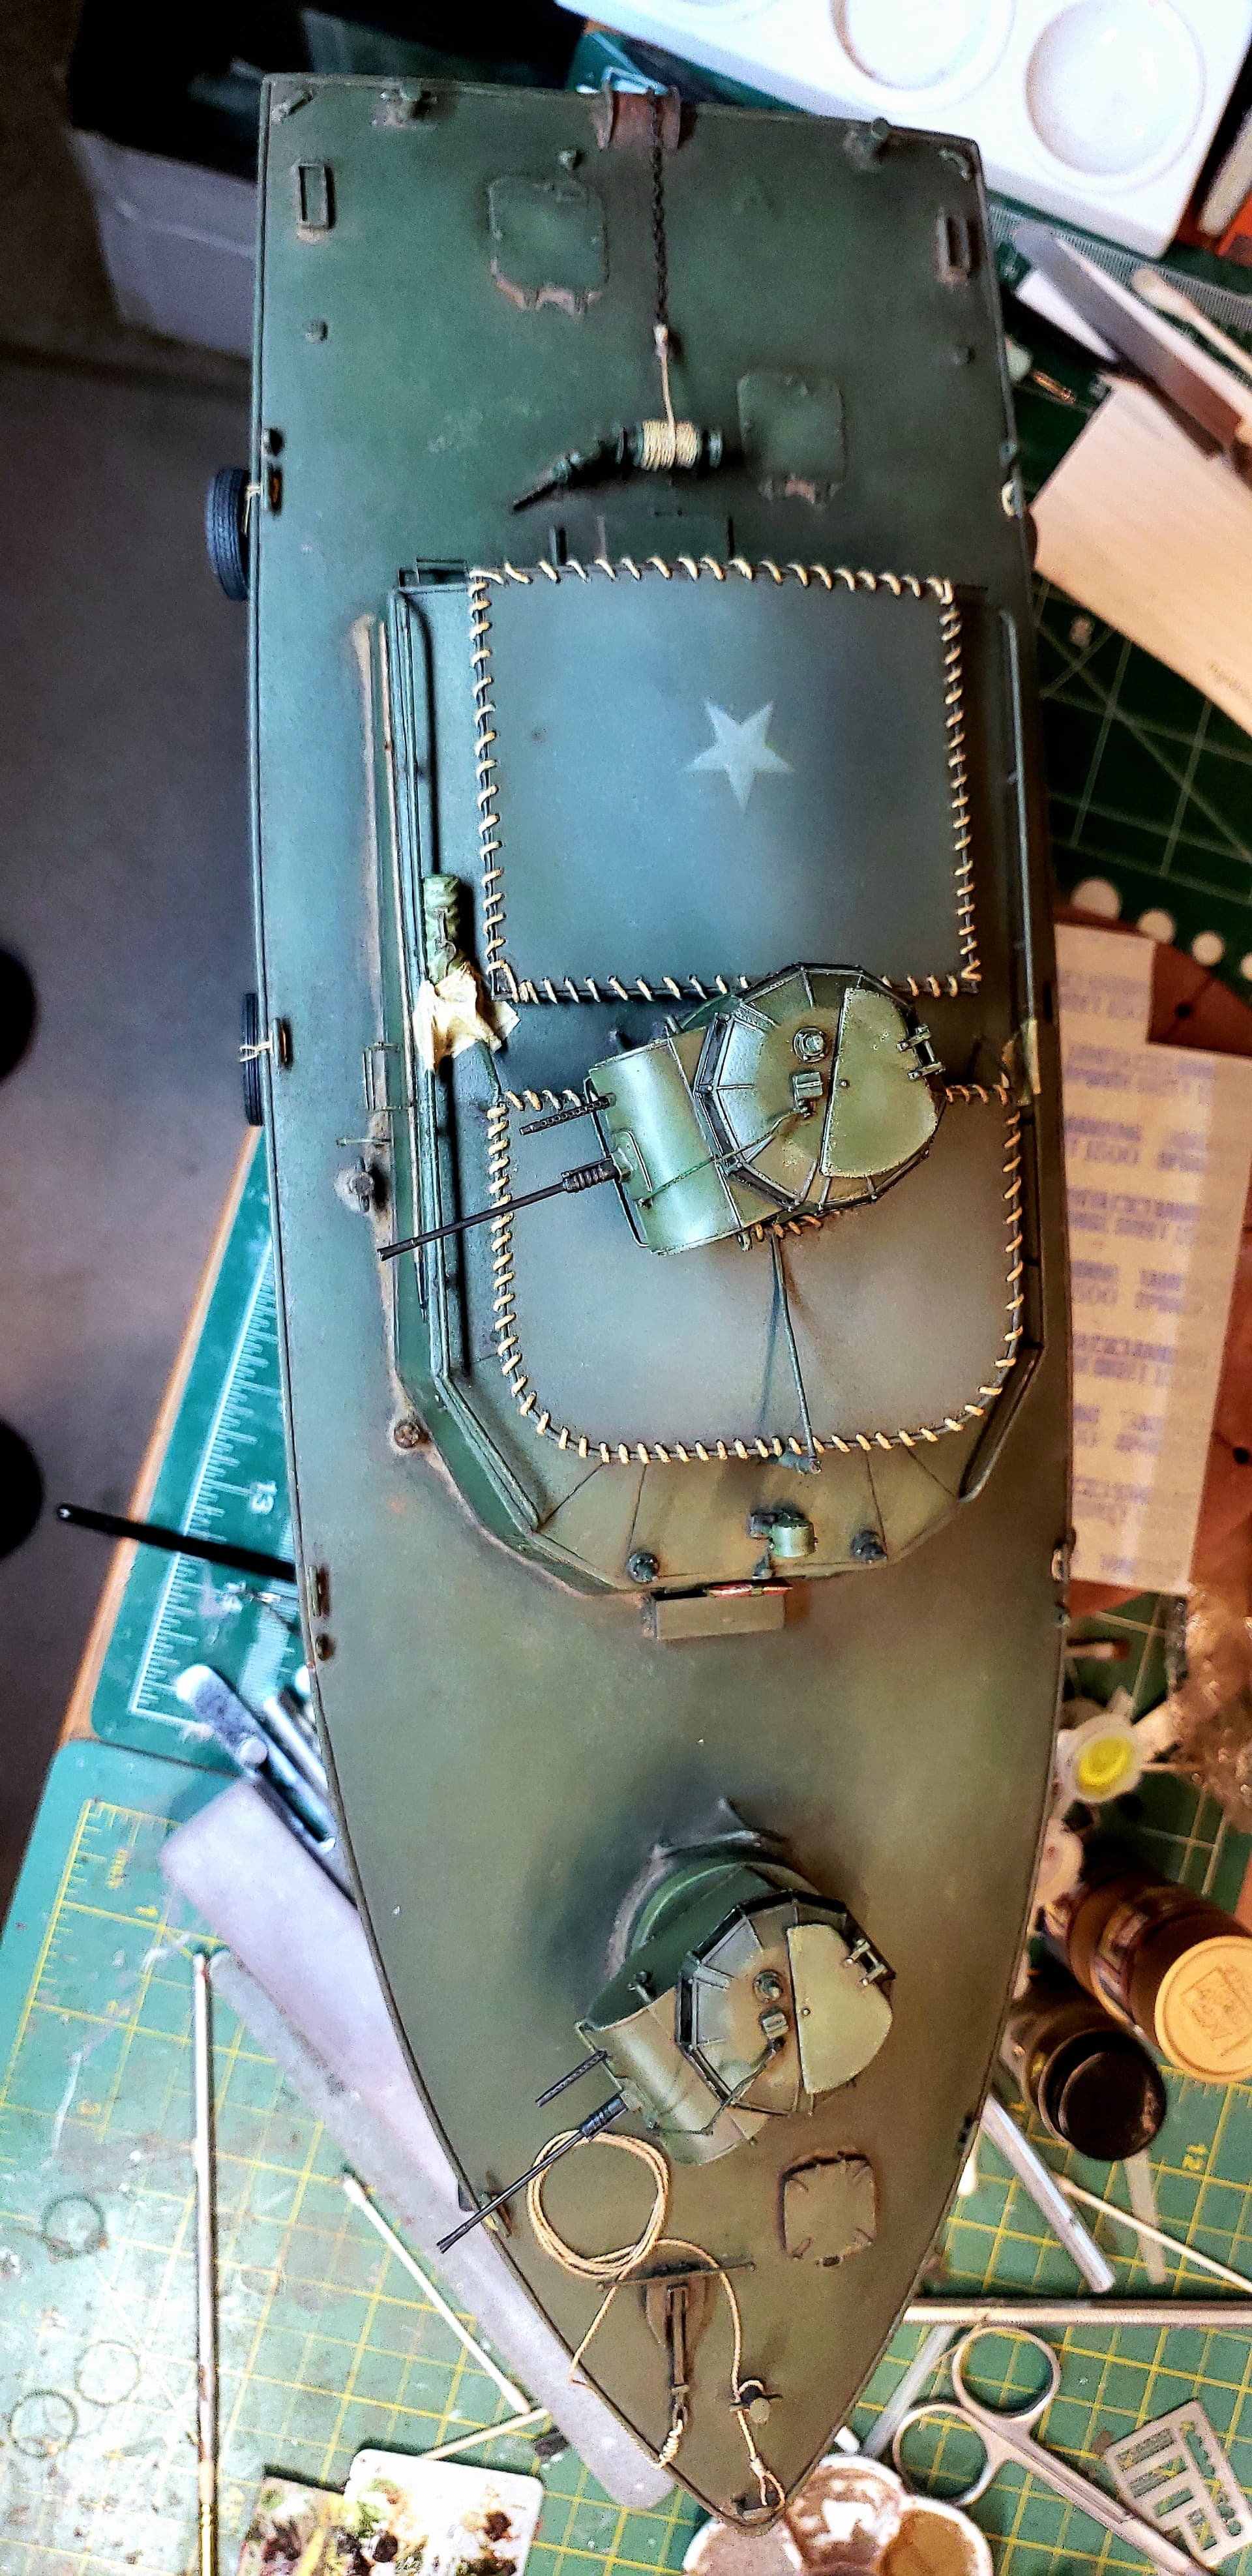
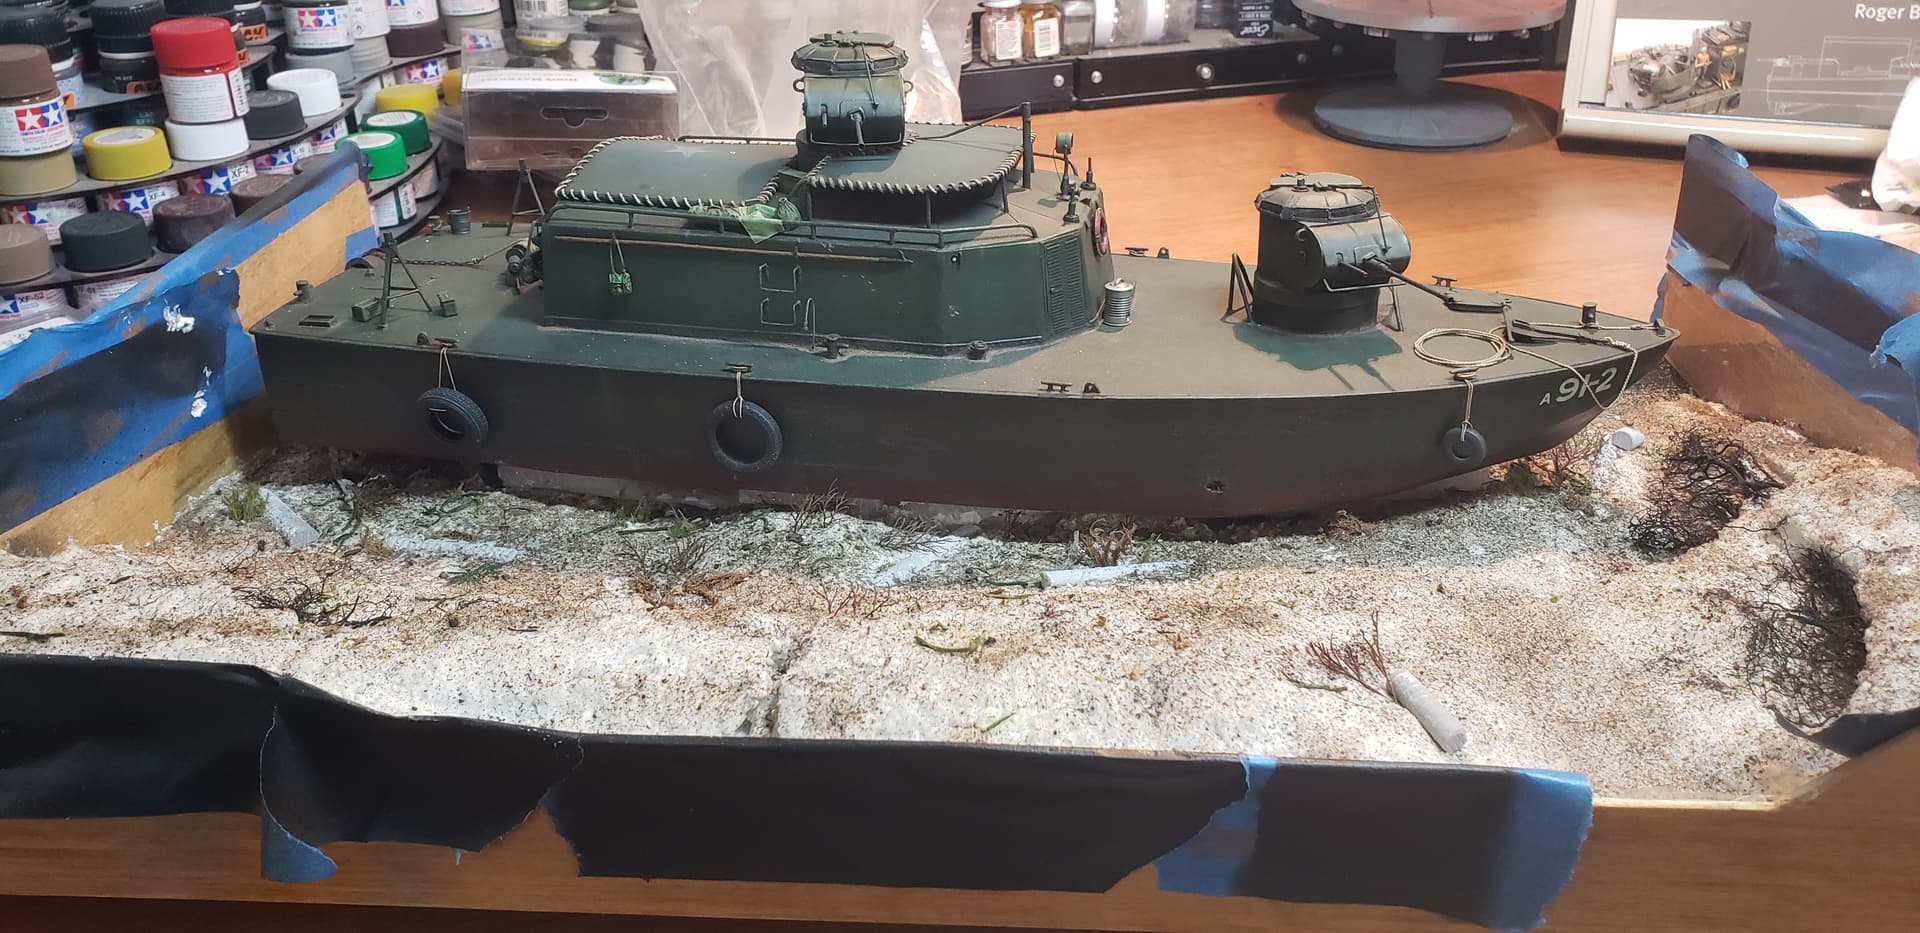
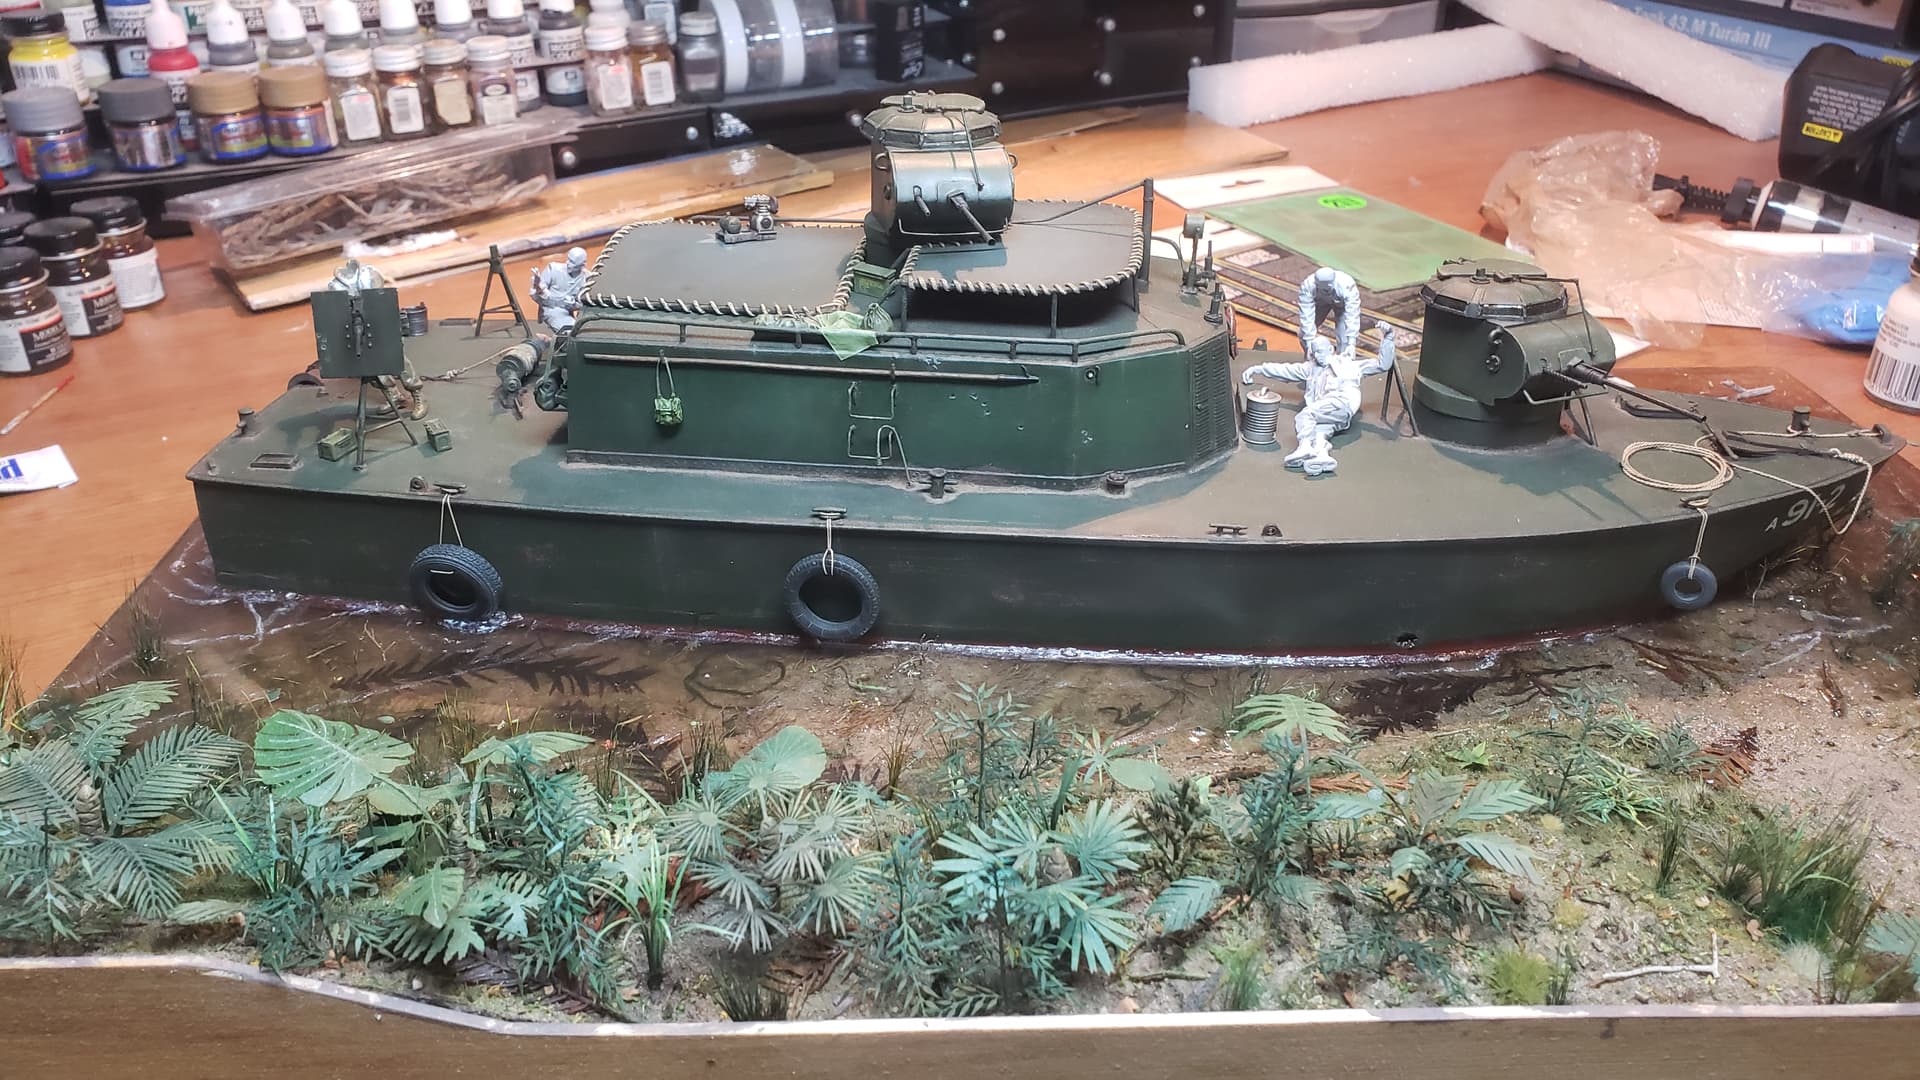
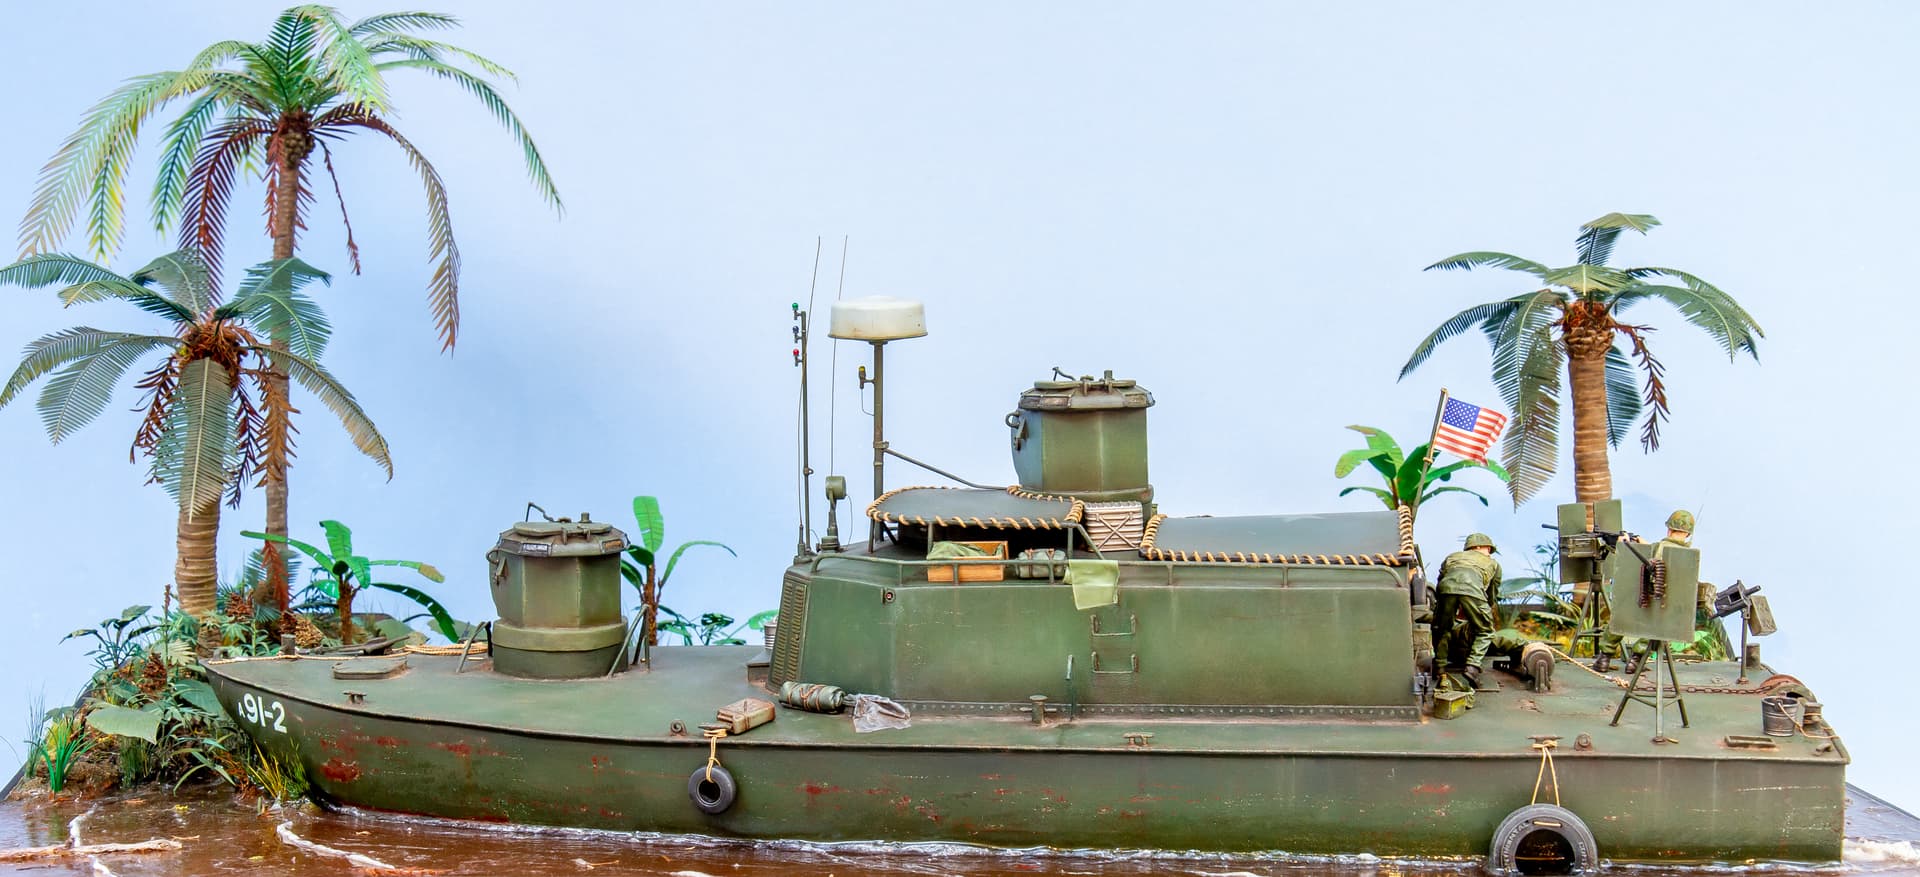
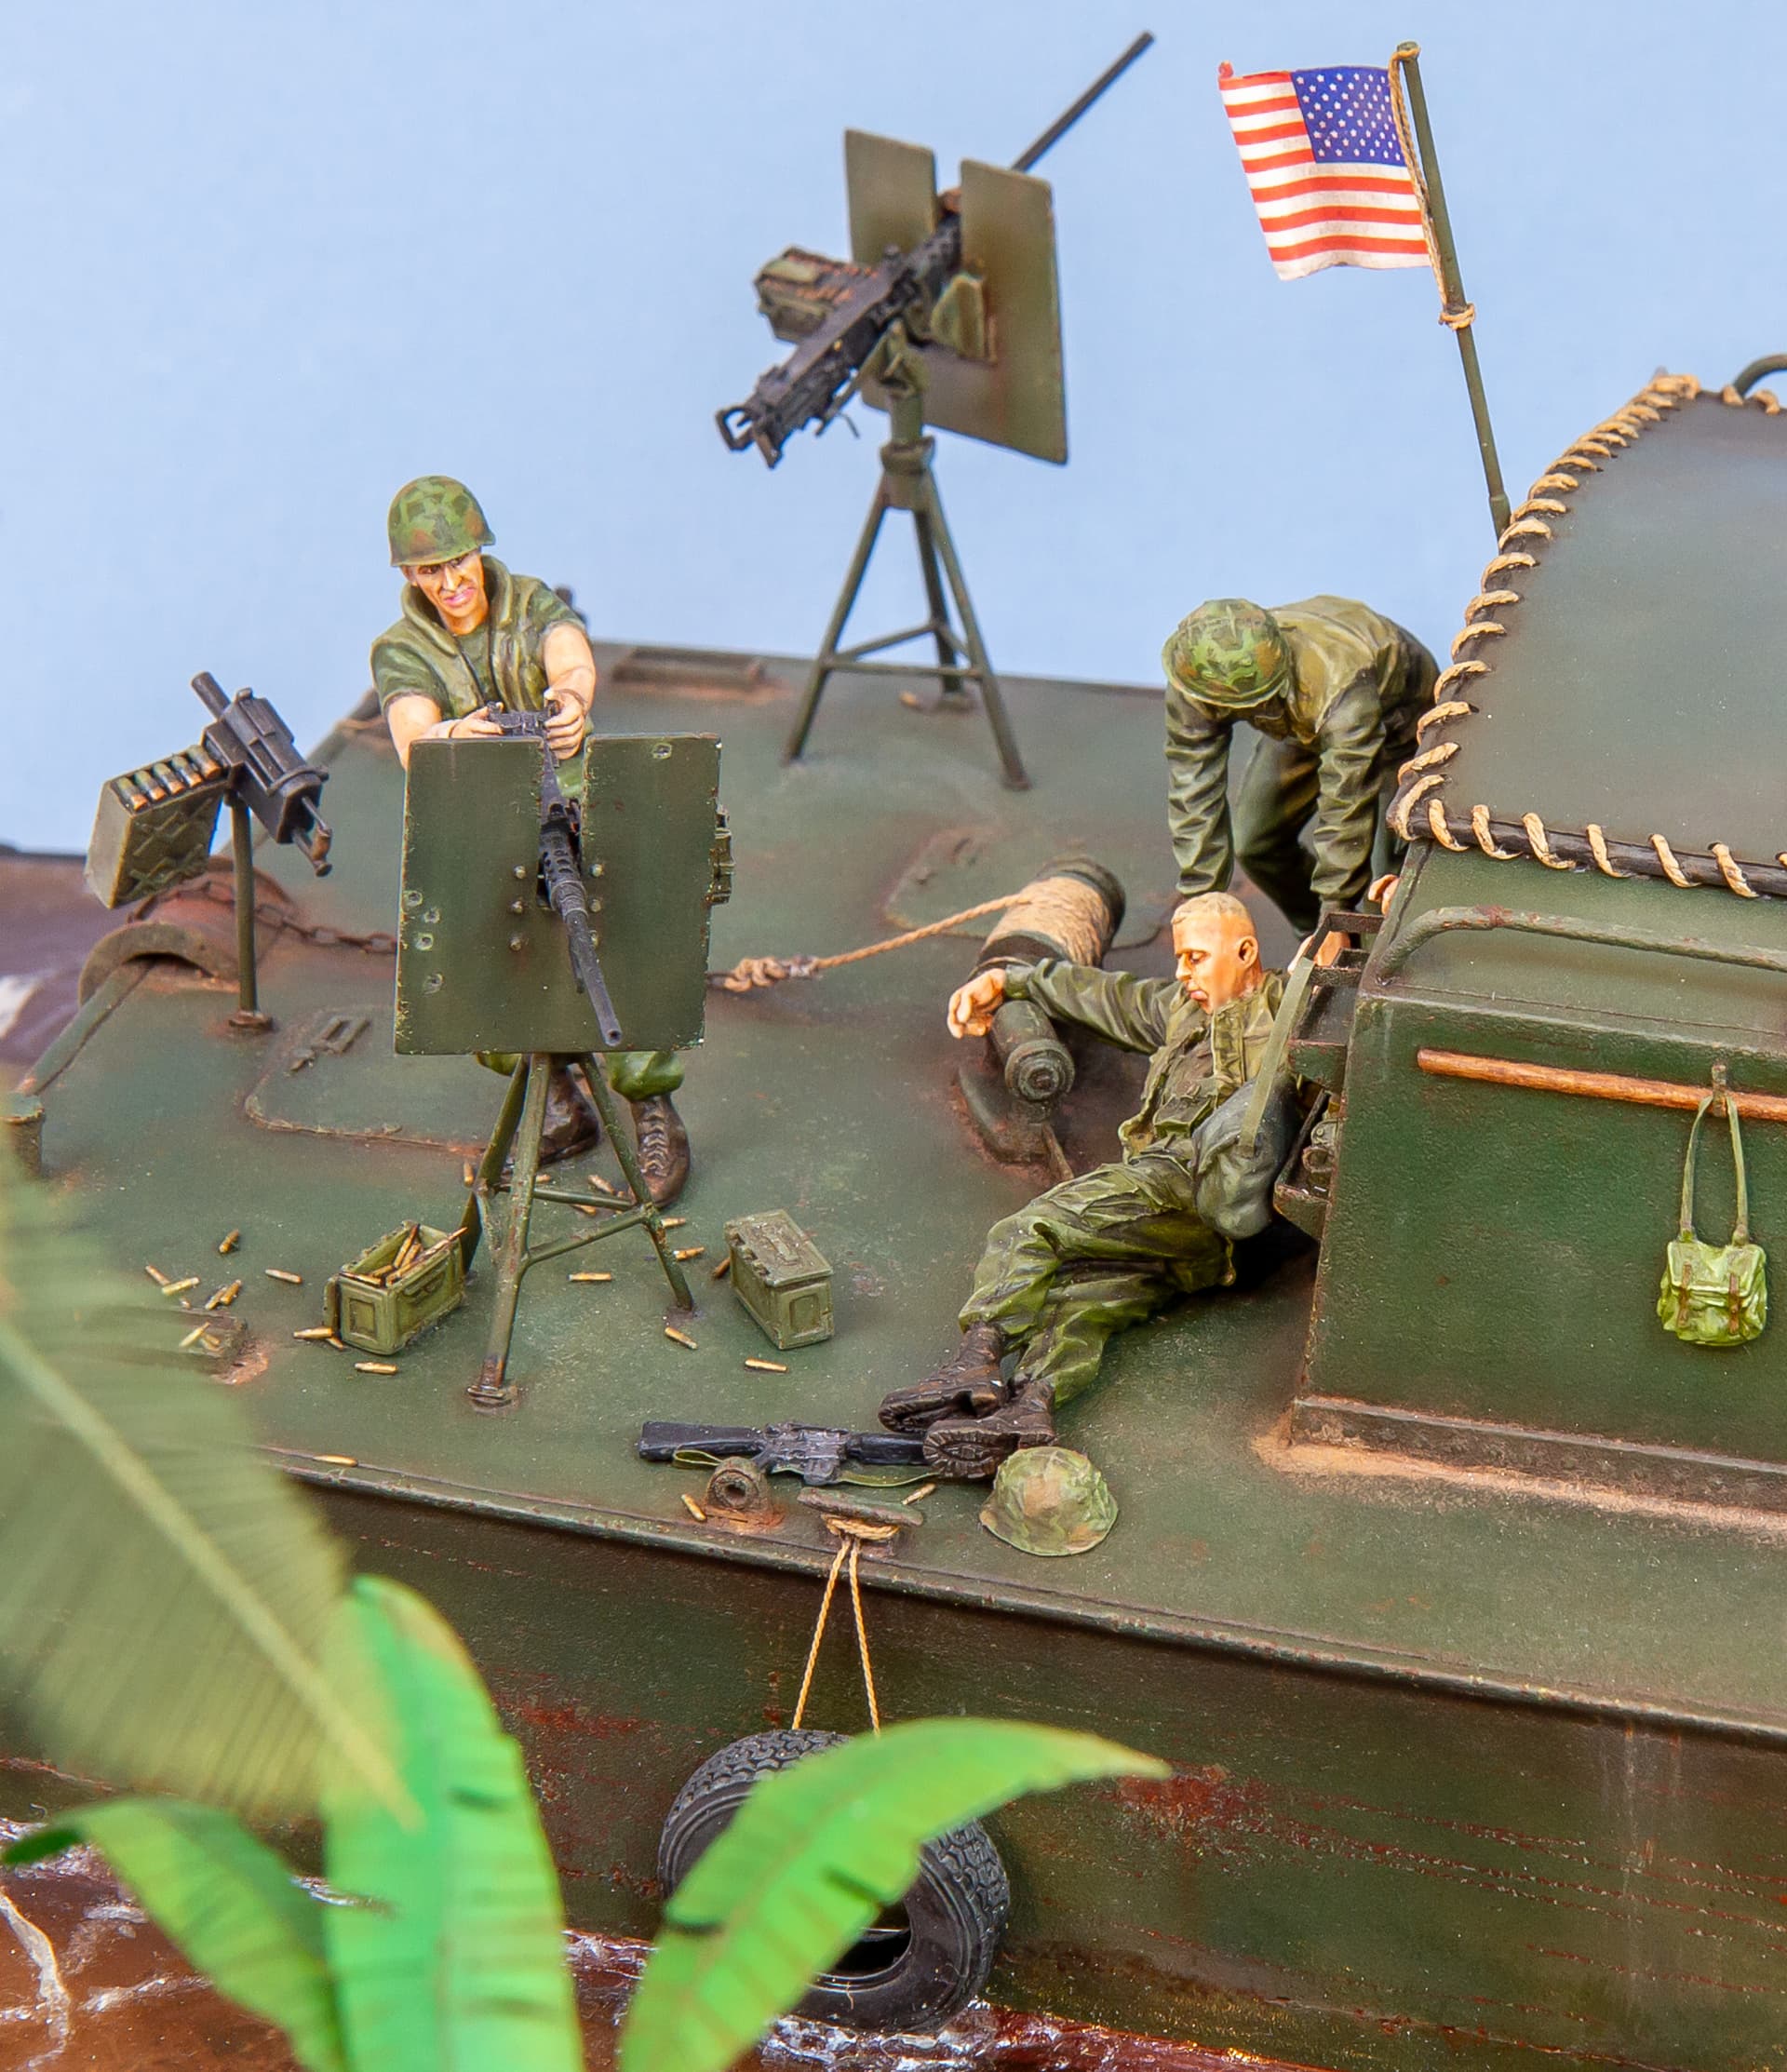
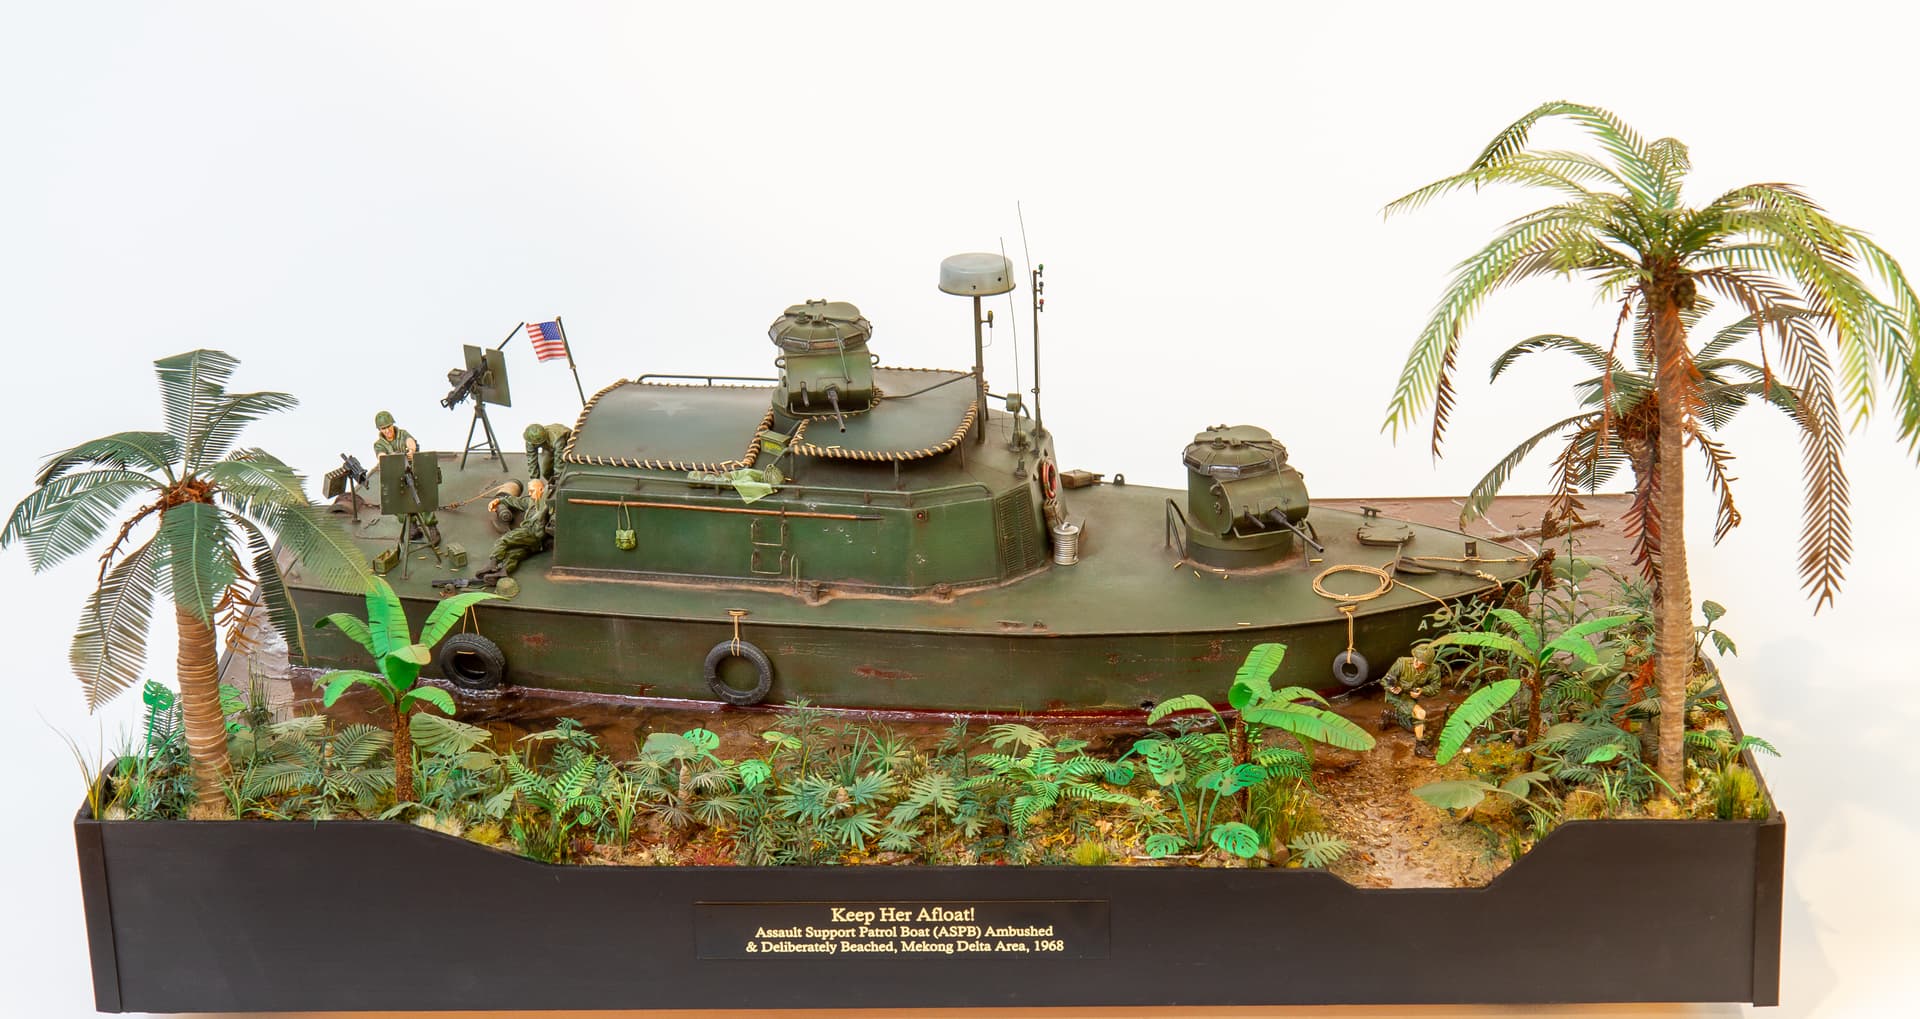
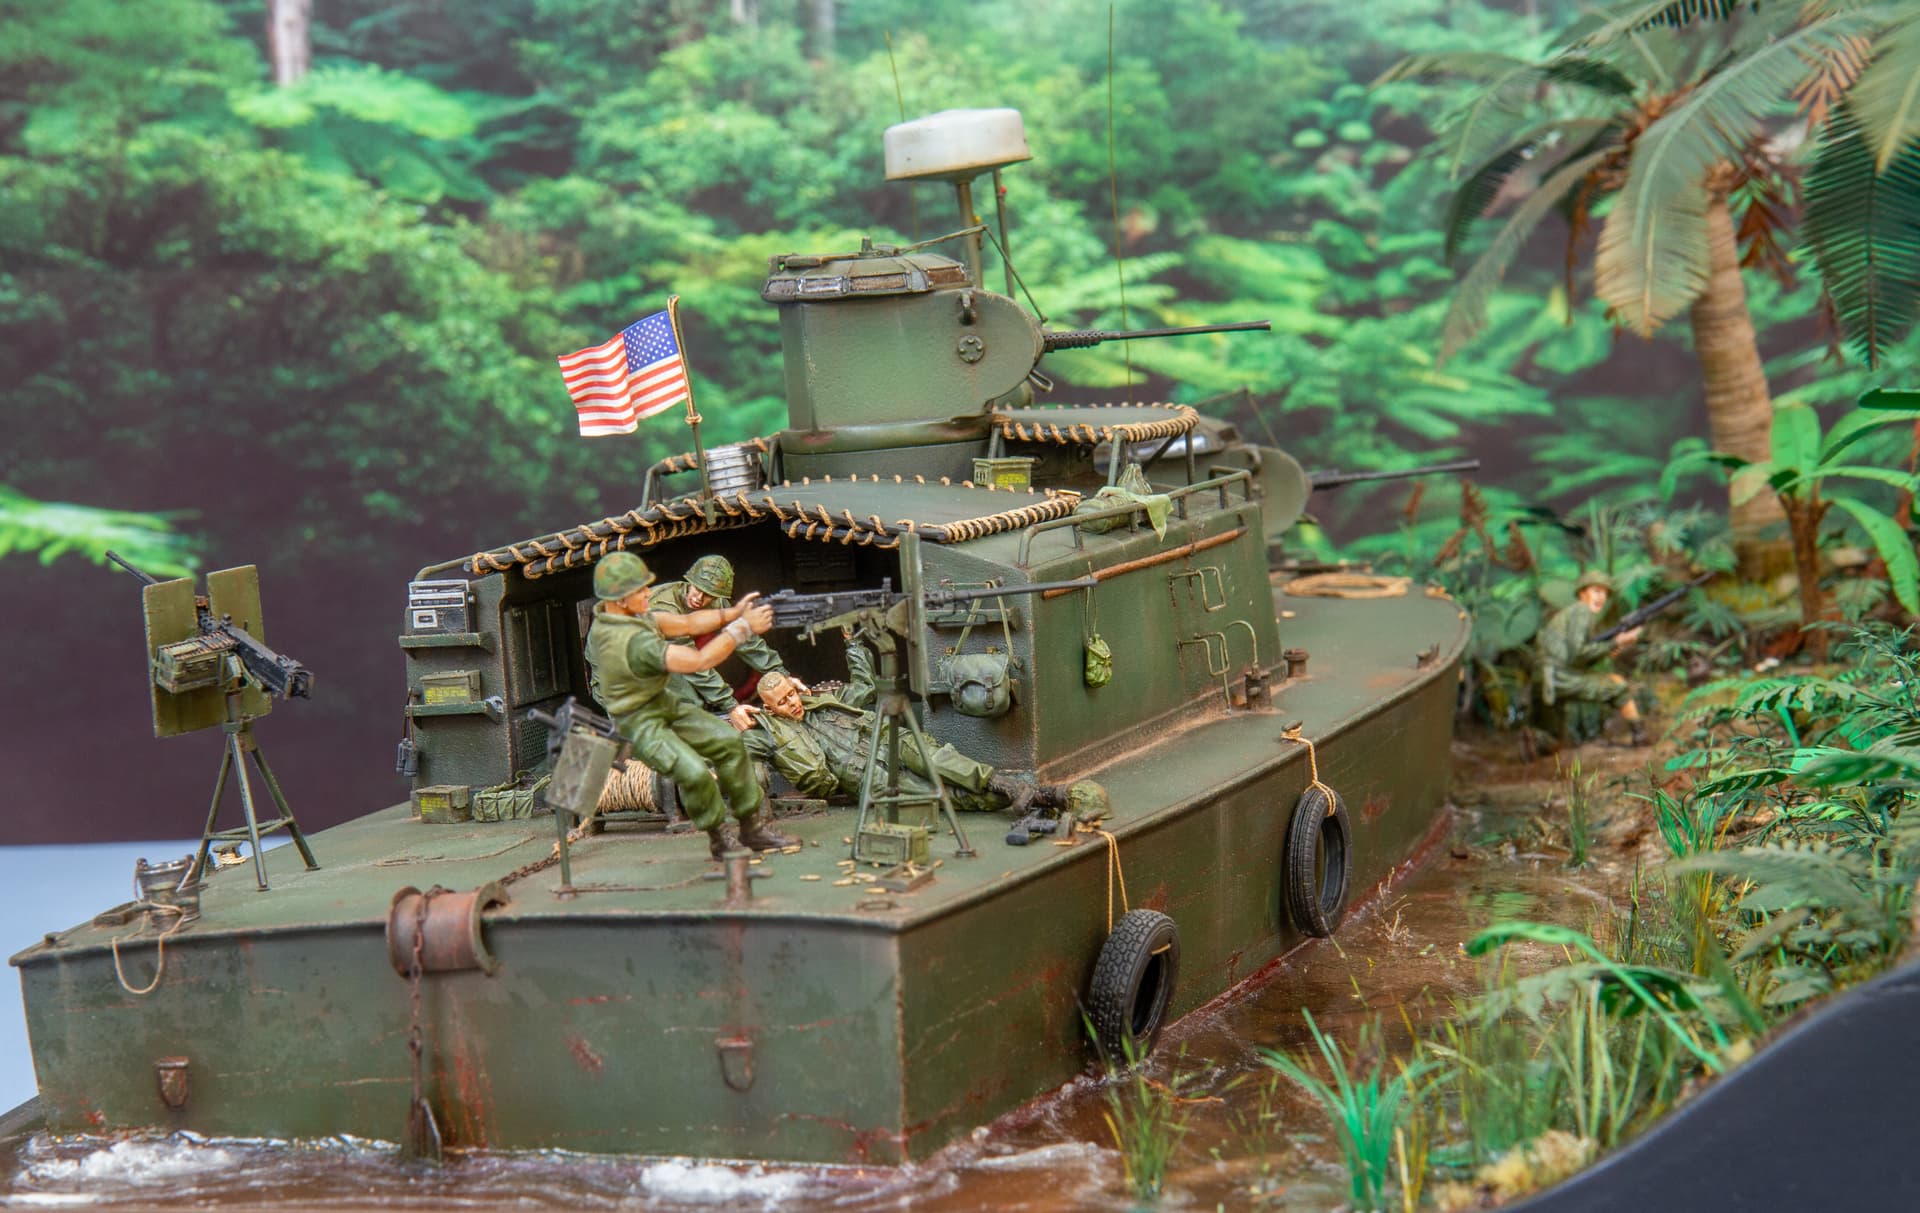
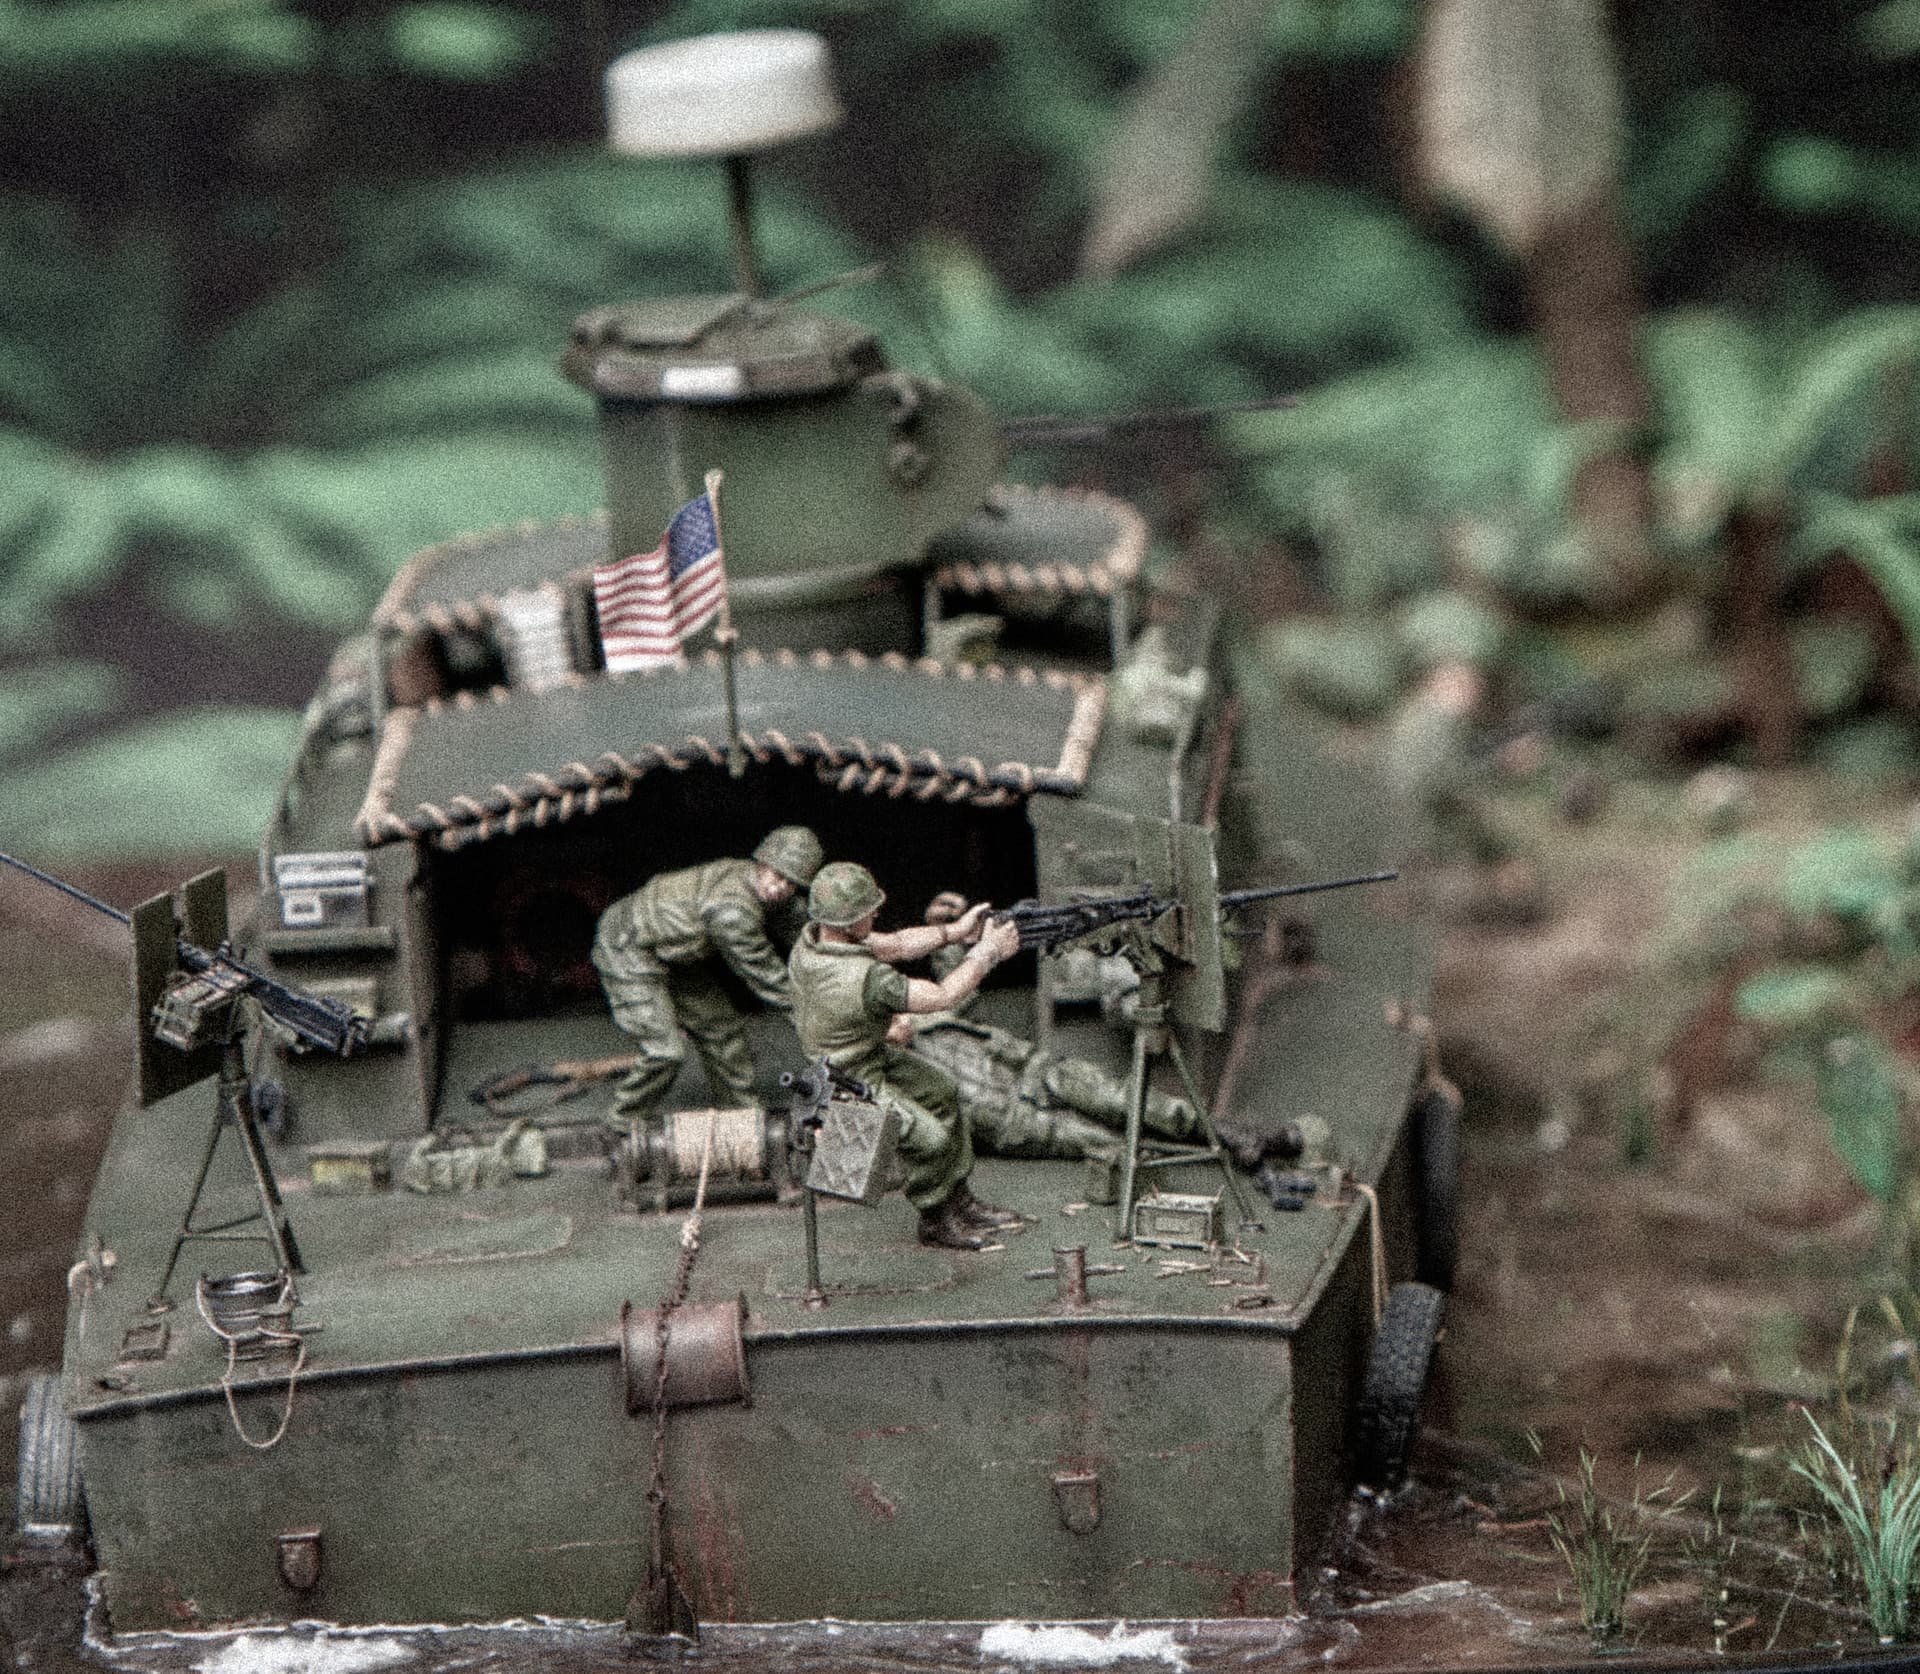
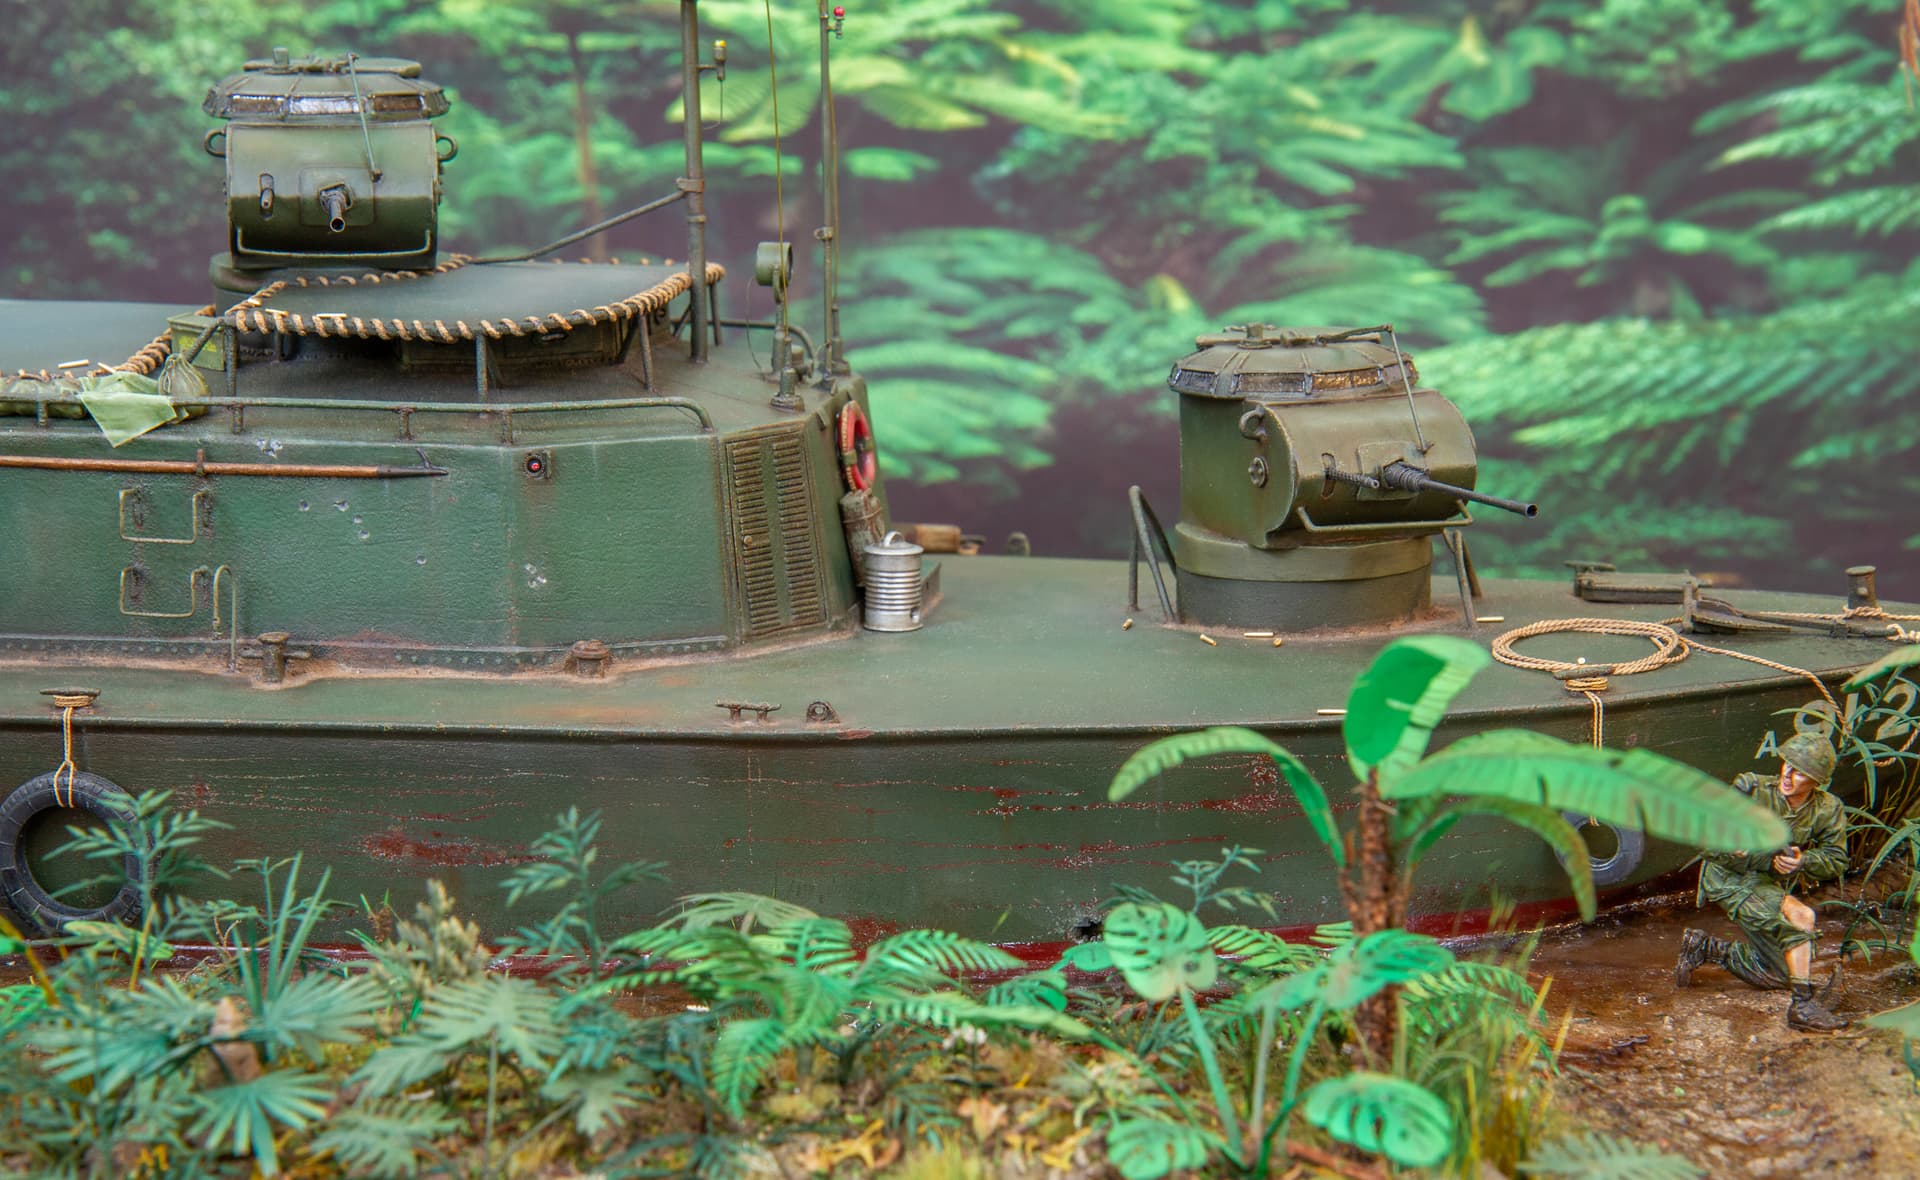
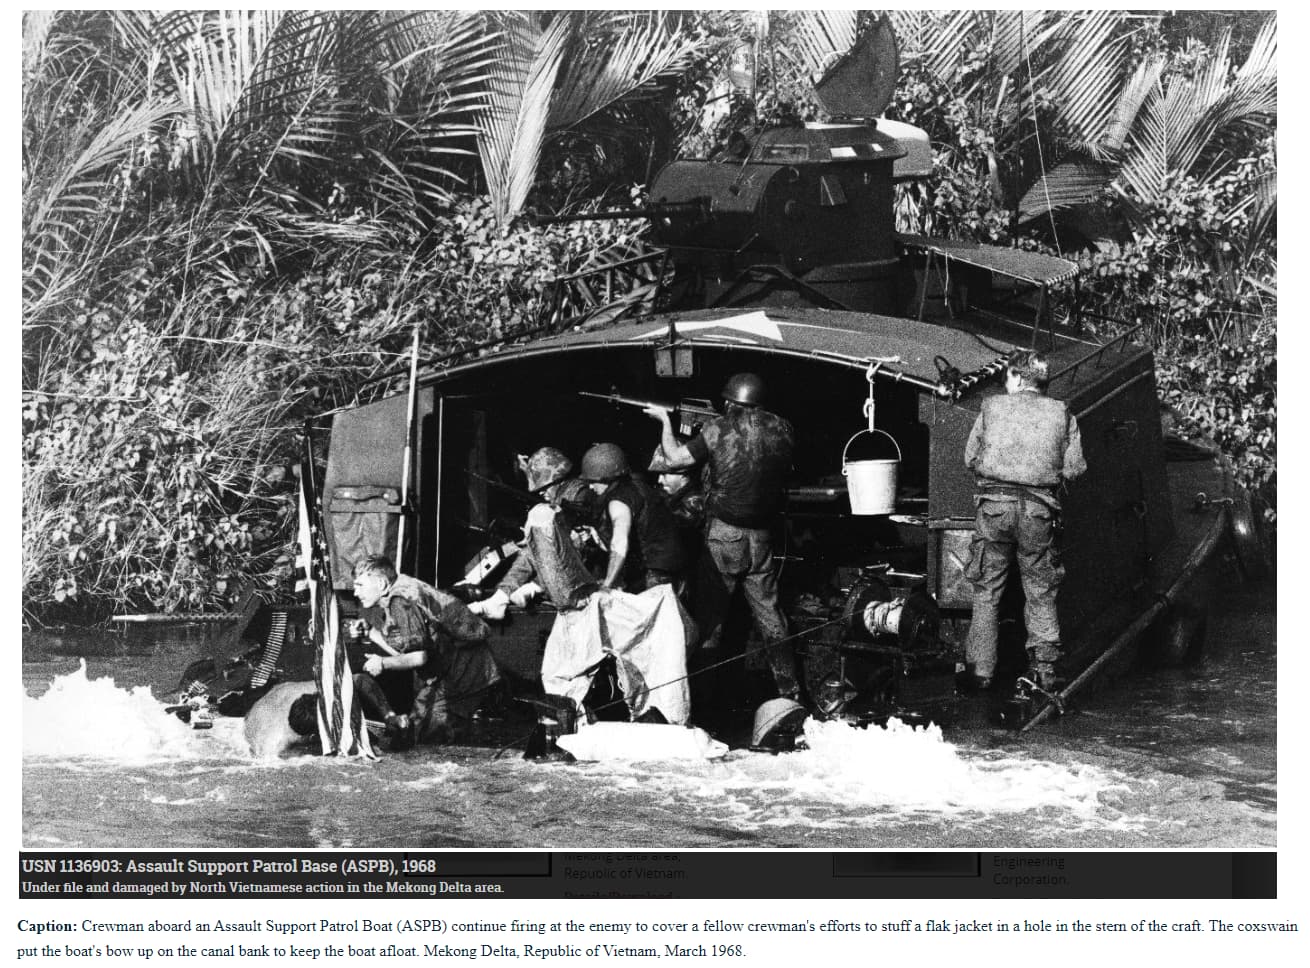
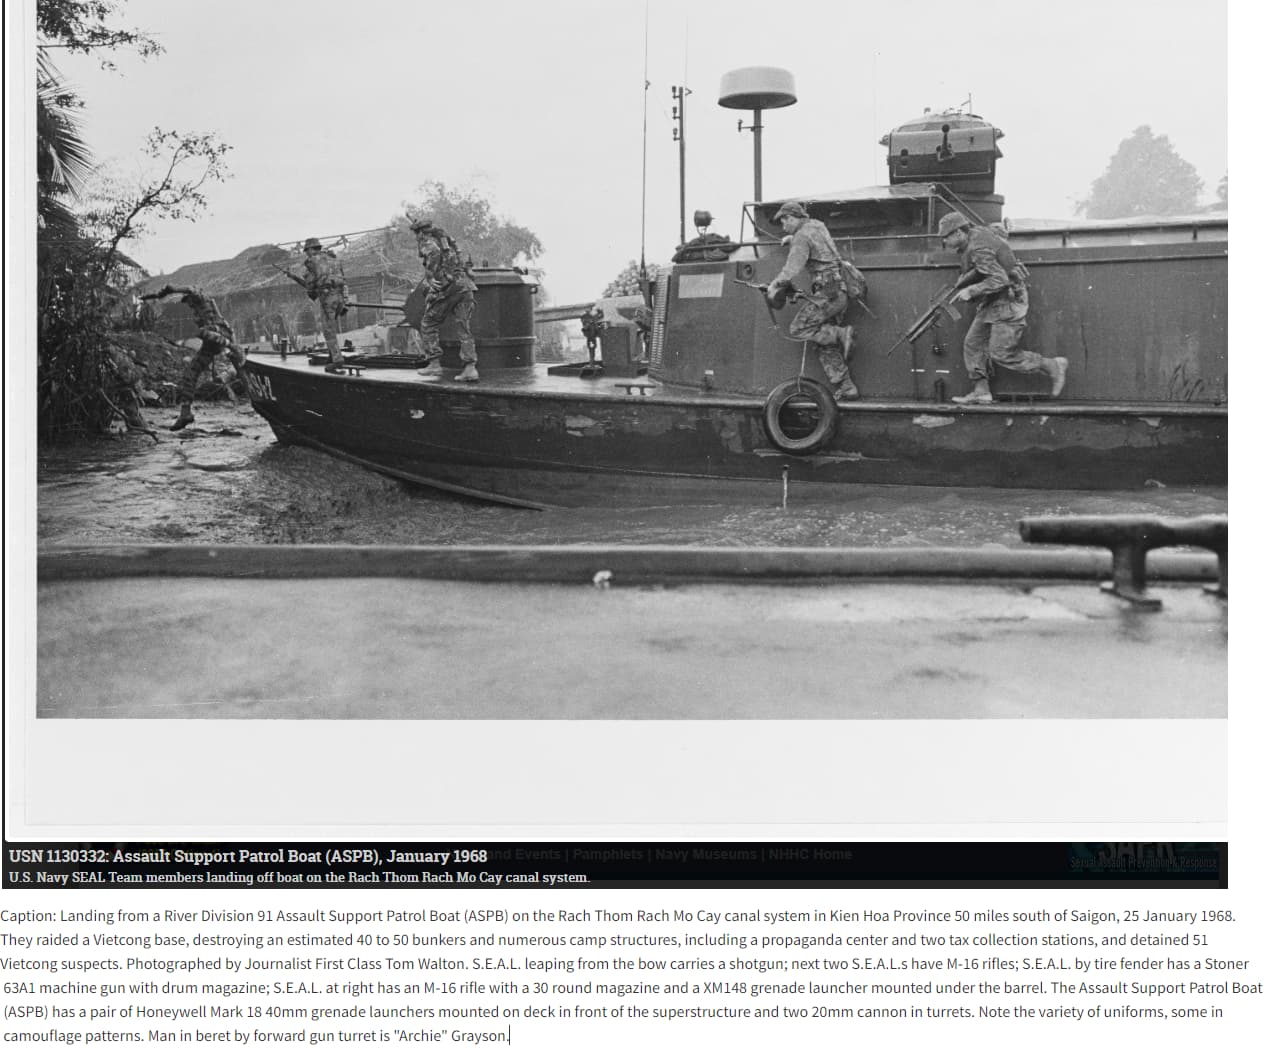
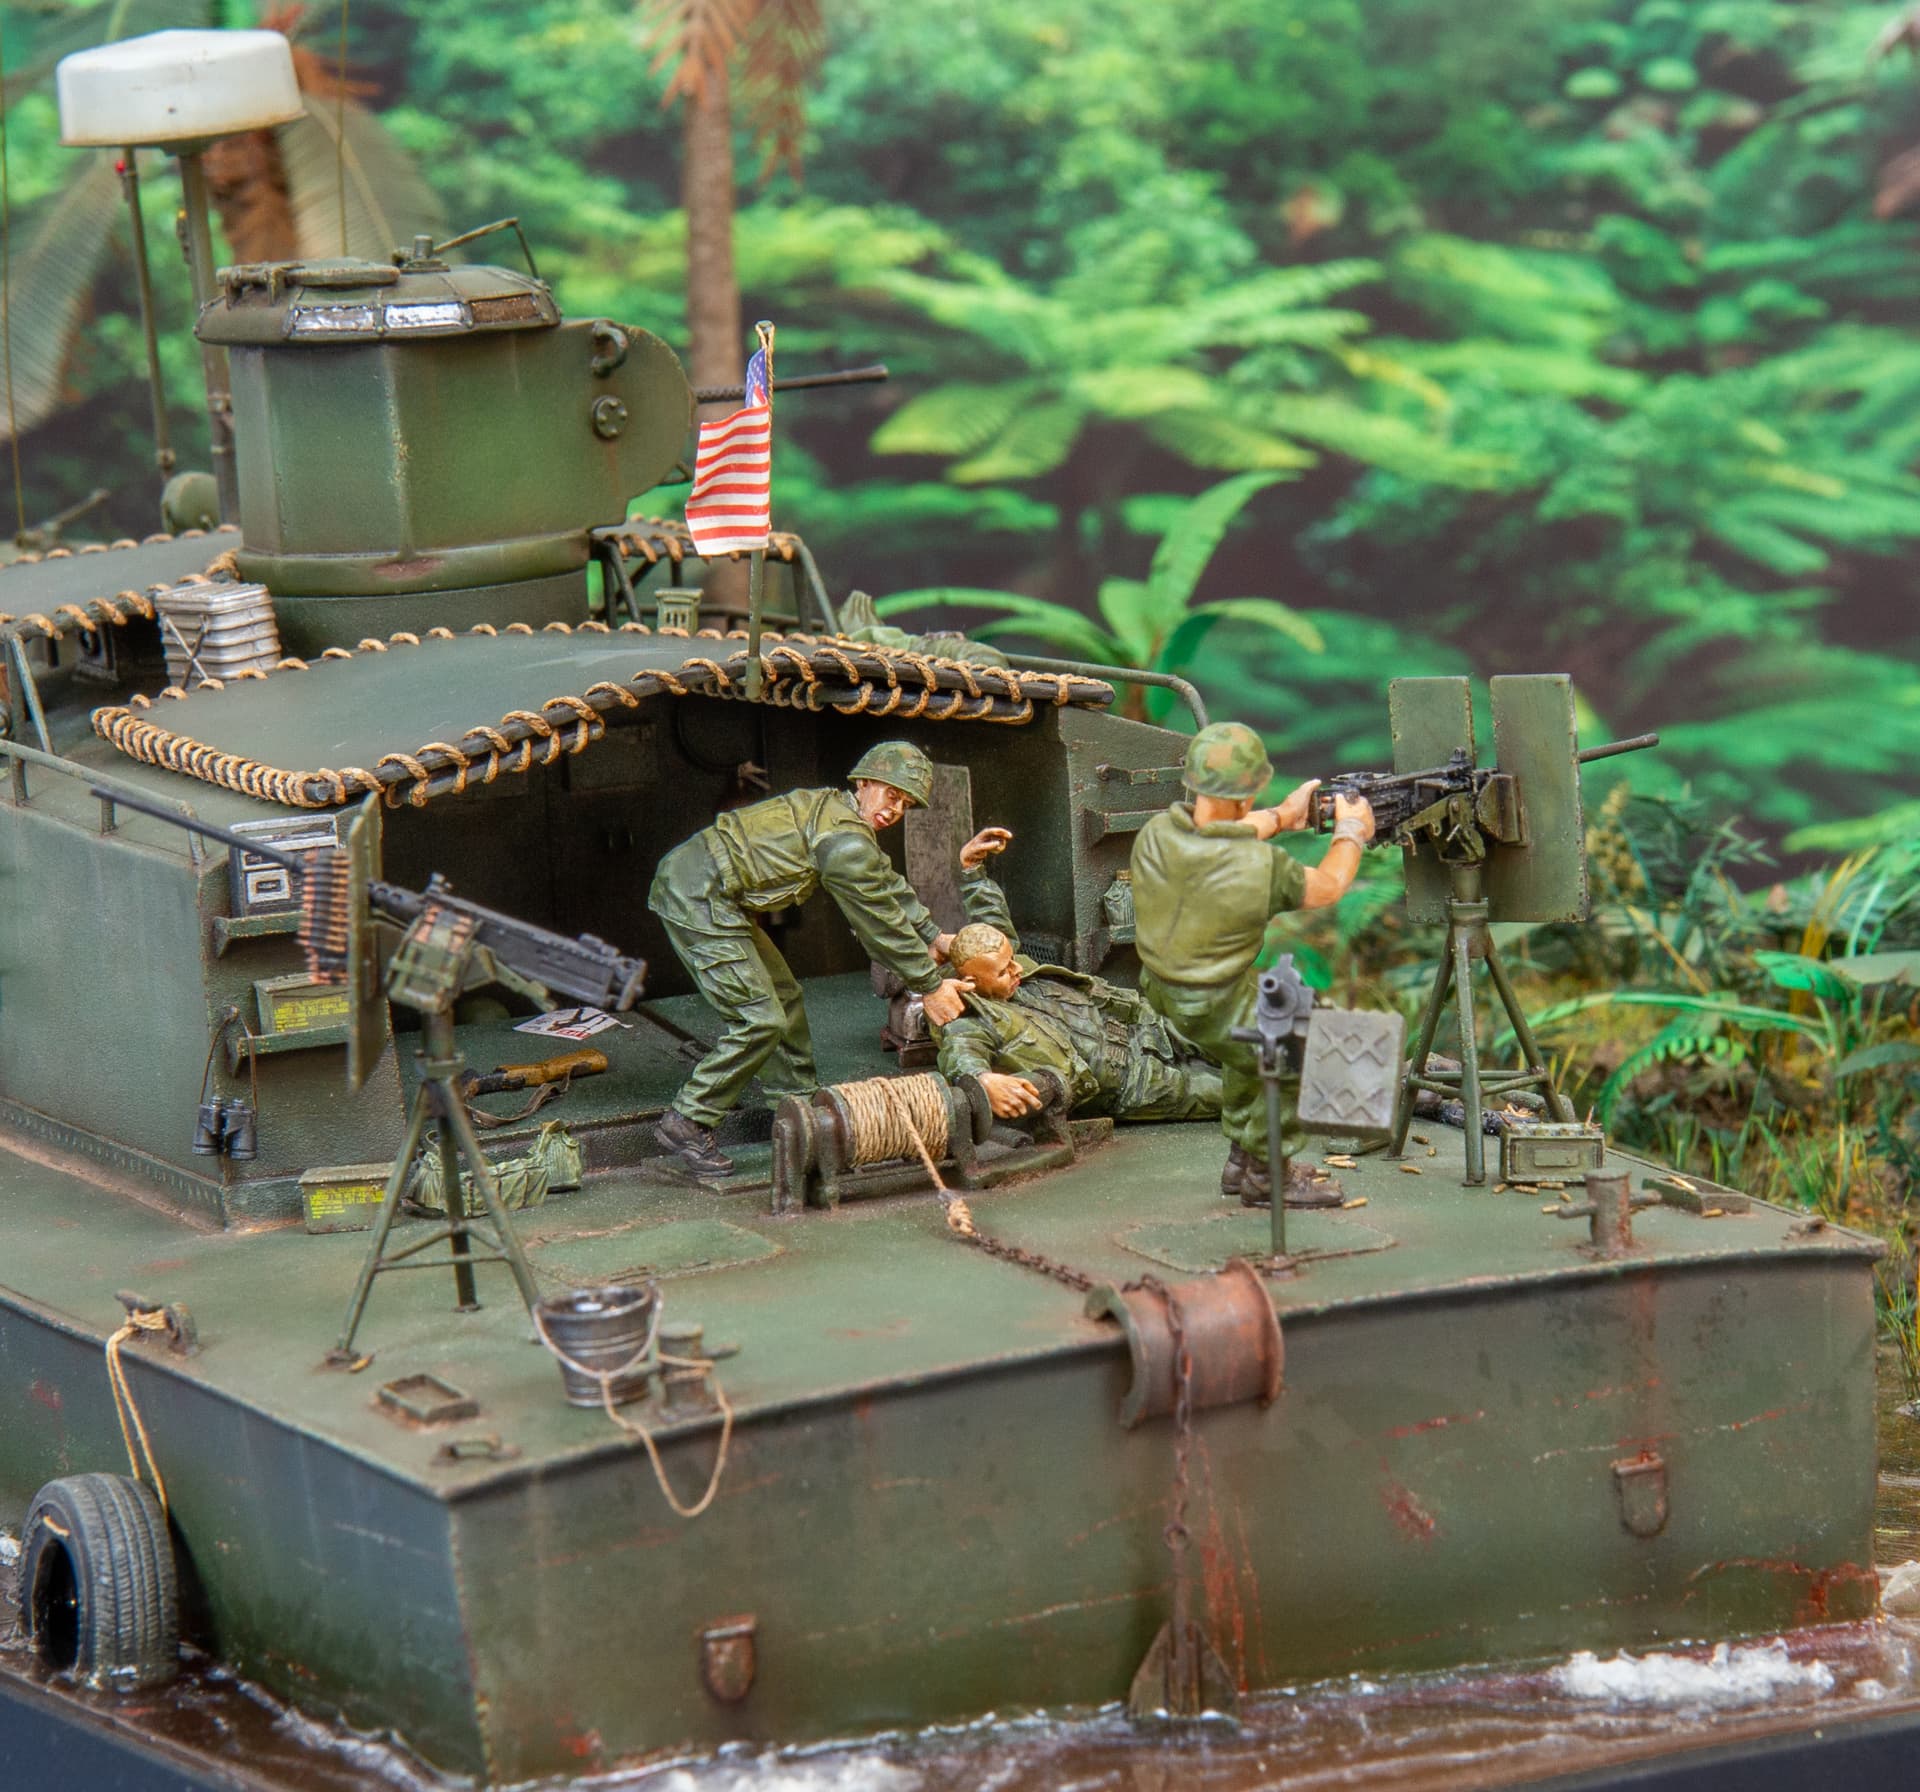
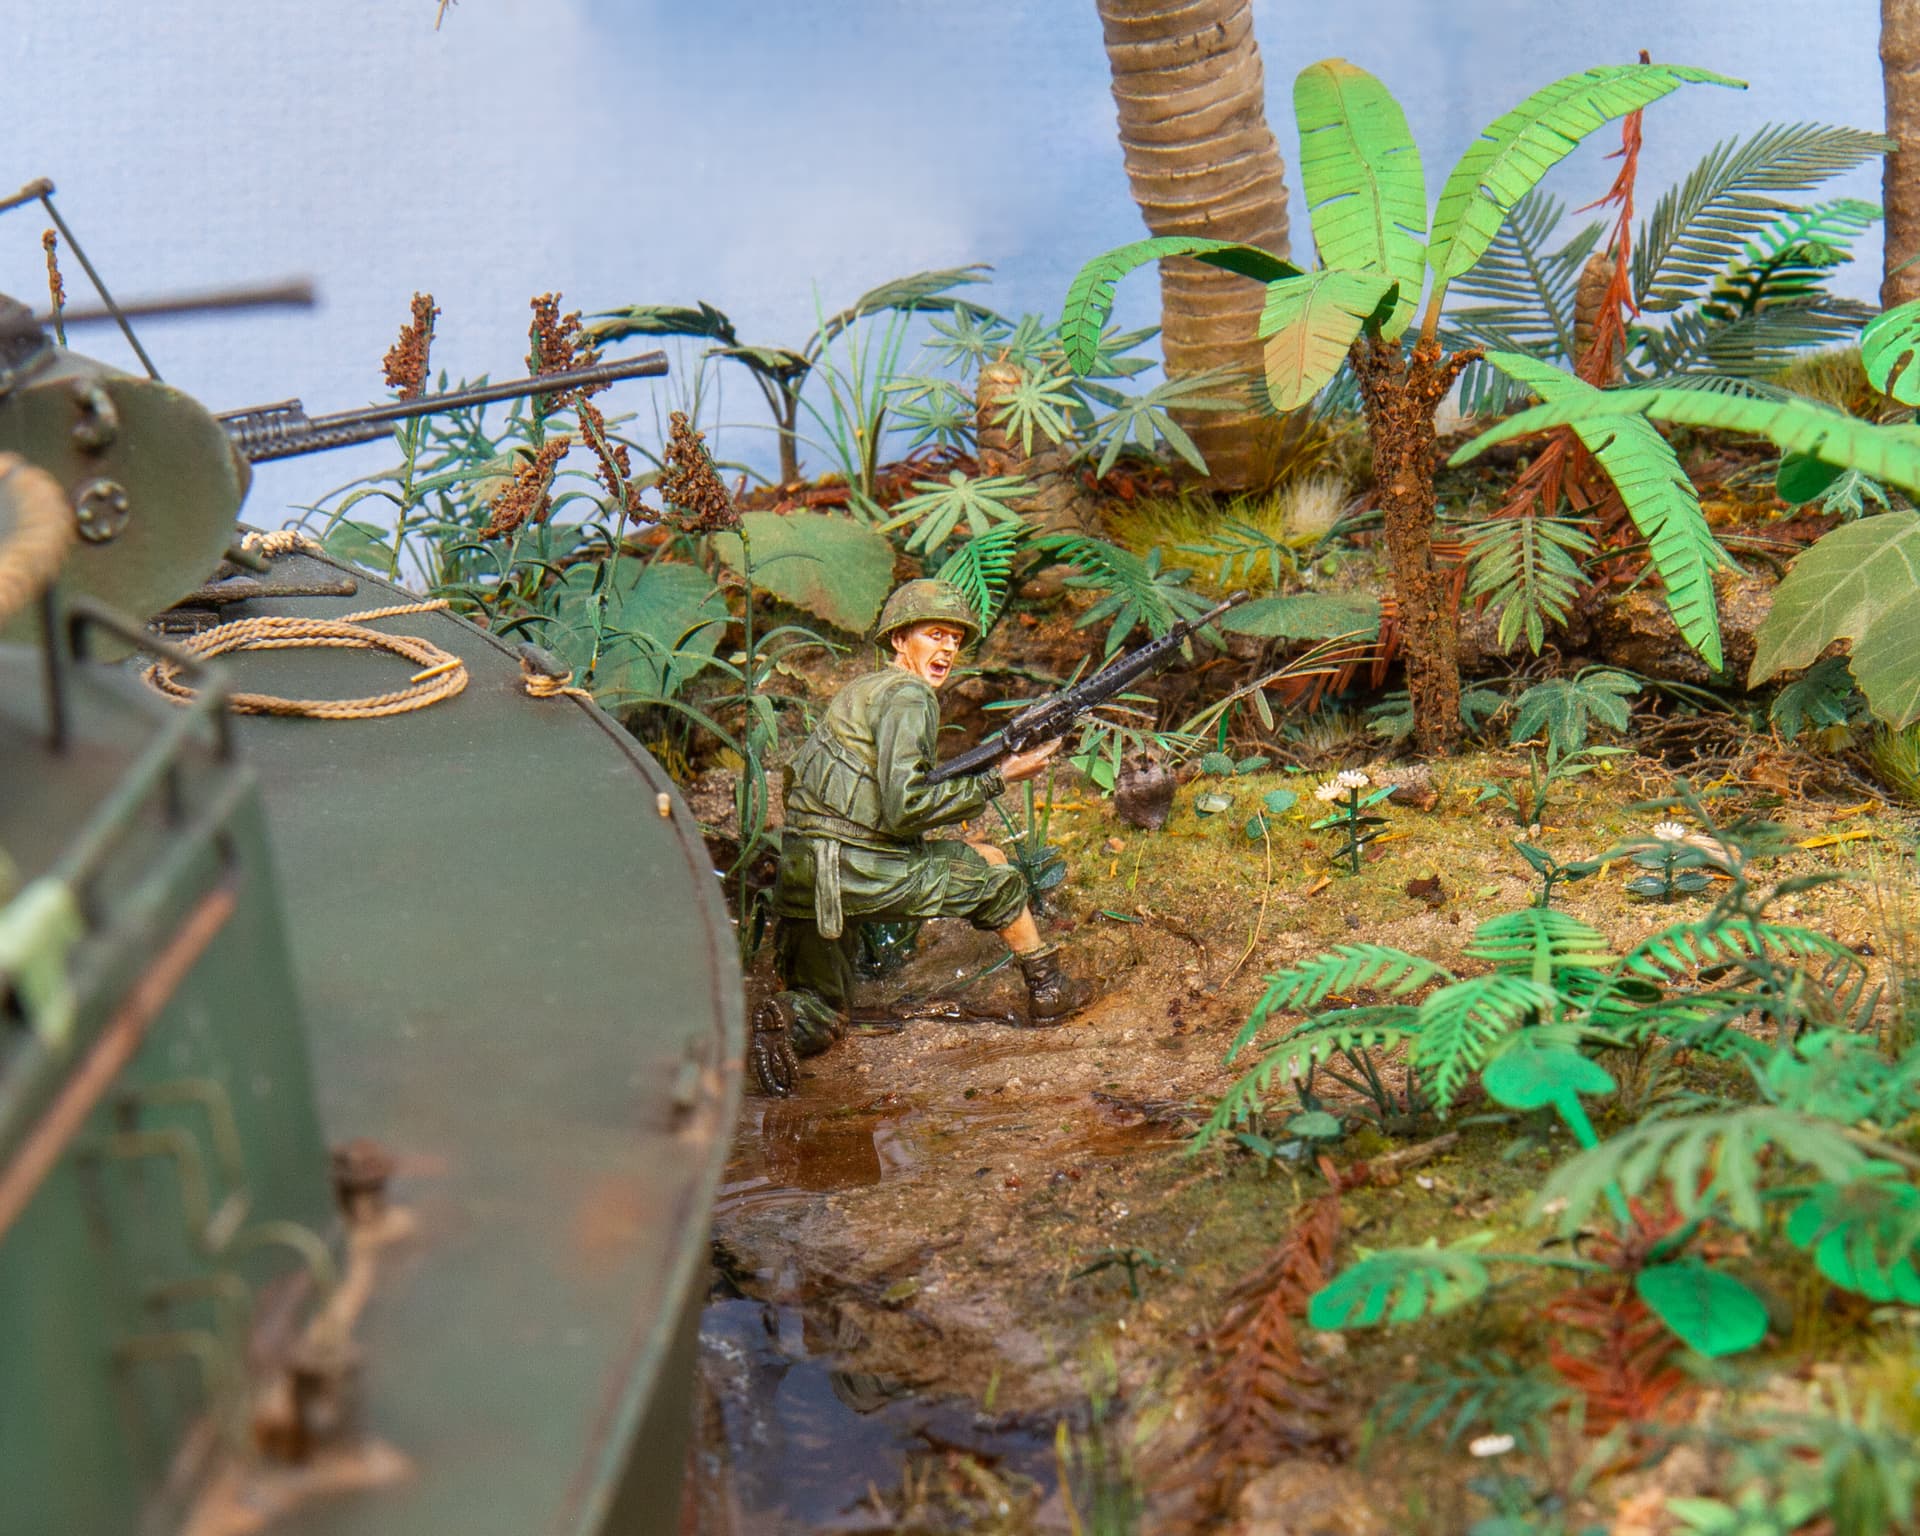
This scene depicts a ASPB Boat assigned to patrol the Mekong Delta area in 1968 during a Mobile Riverine Force search and destroy mission. During these missions it was common that other troops (such as SEALS, Marines, or Army Regulars) ride along for support or near shore missions. Like some of the encounters listed above, I wanted to depict a rocket attack on the hull of the ship near the waterline, which temporarily caused the crew to beach in order to asses the damage, fight off remaining attackers, and/or possible repair it enough to get on their way. A similar event actually happened, as shown in the scene below where a crew member lodged his flak jacket into a hole in the stern, all while under heavy fire (images are from website of National Museum of the U.S. Navy).

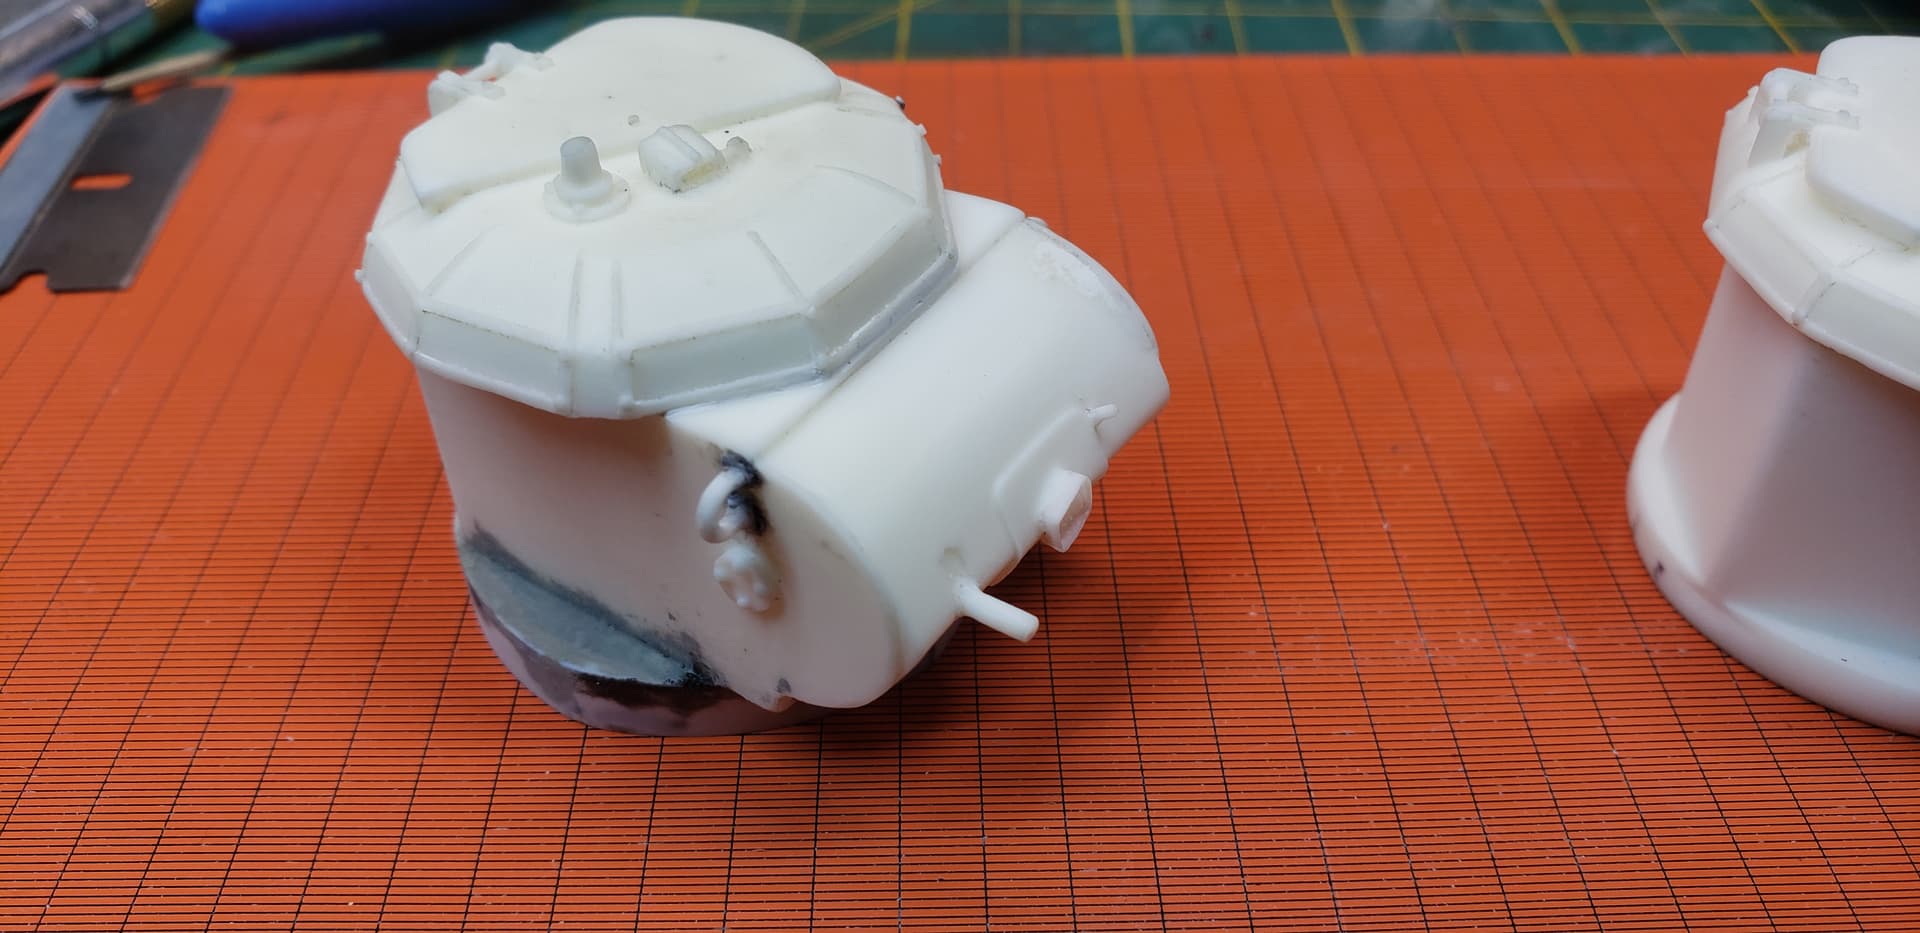
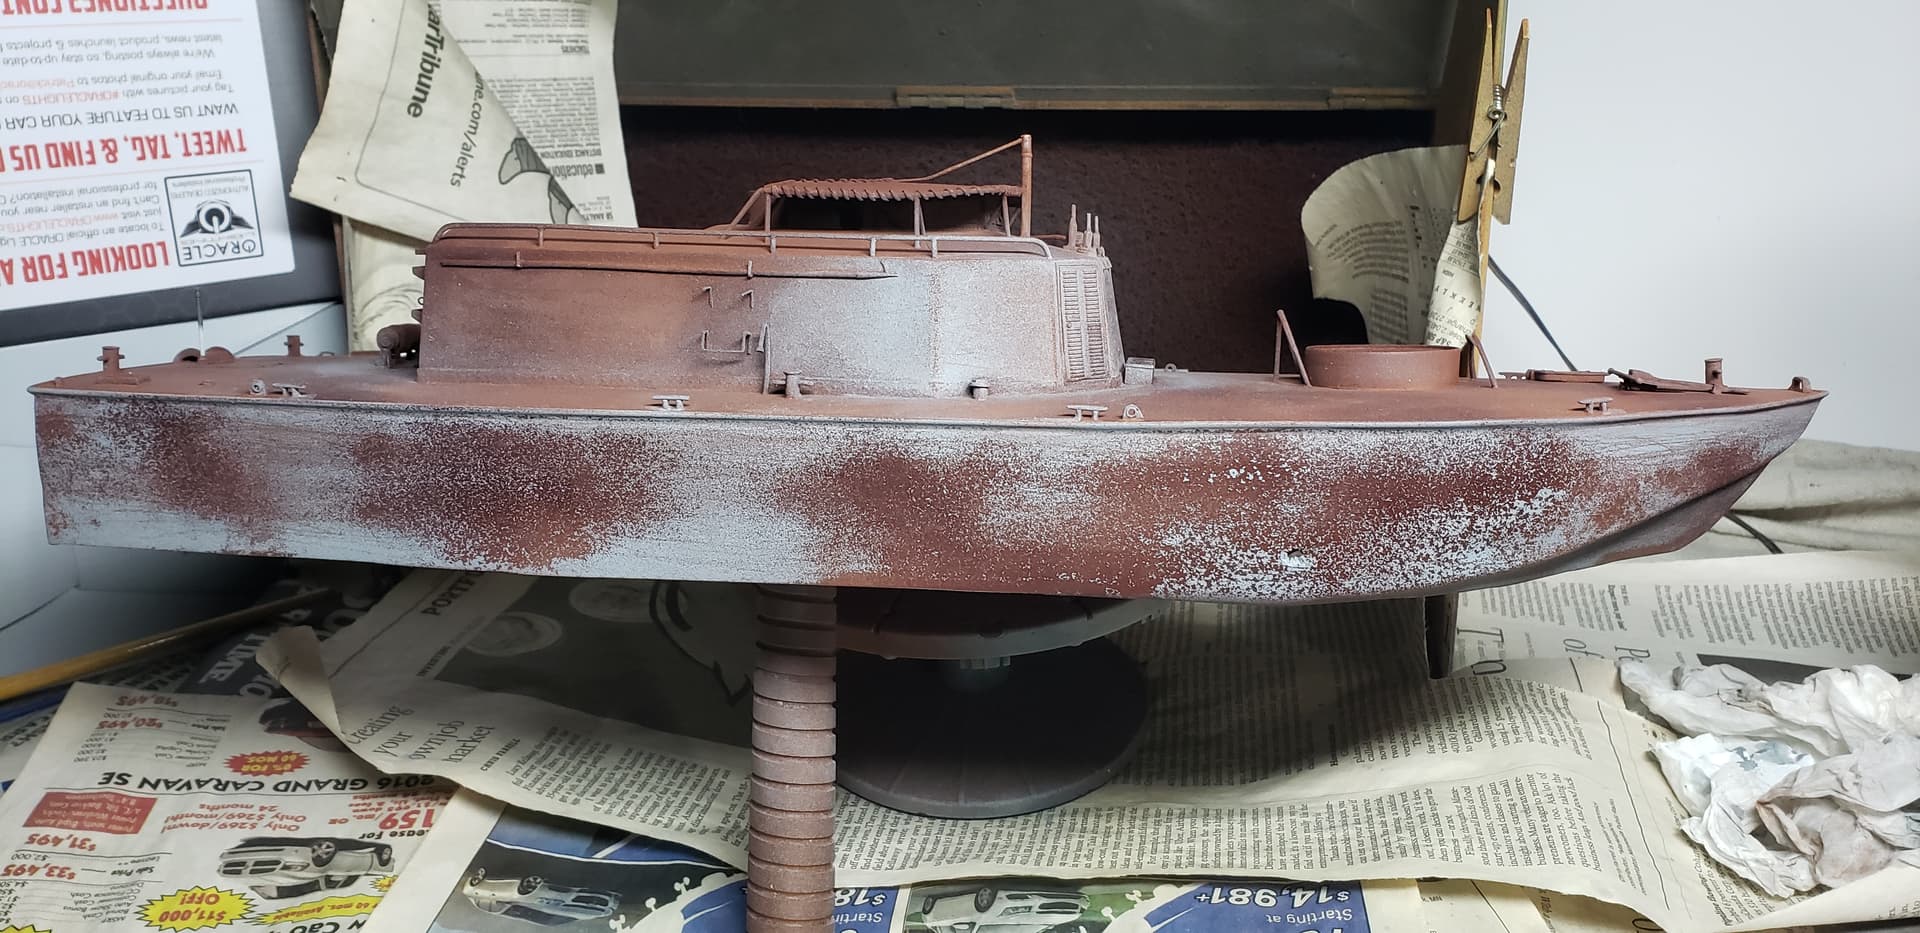
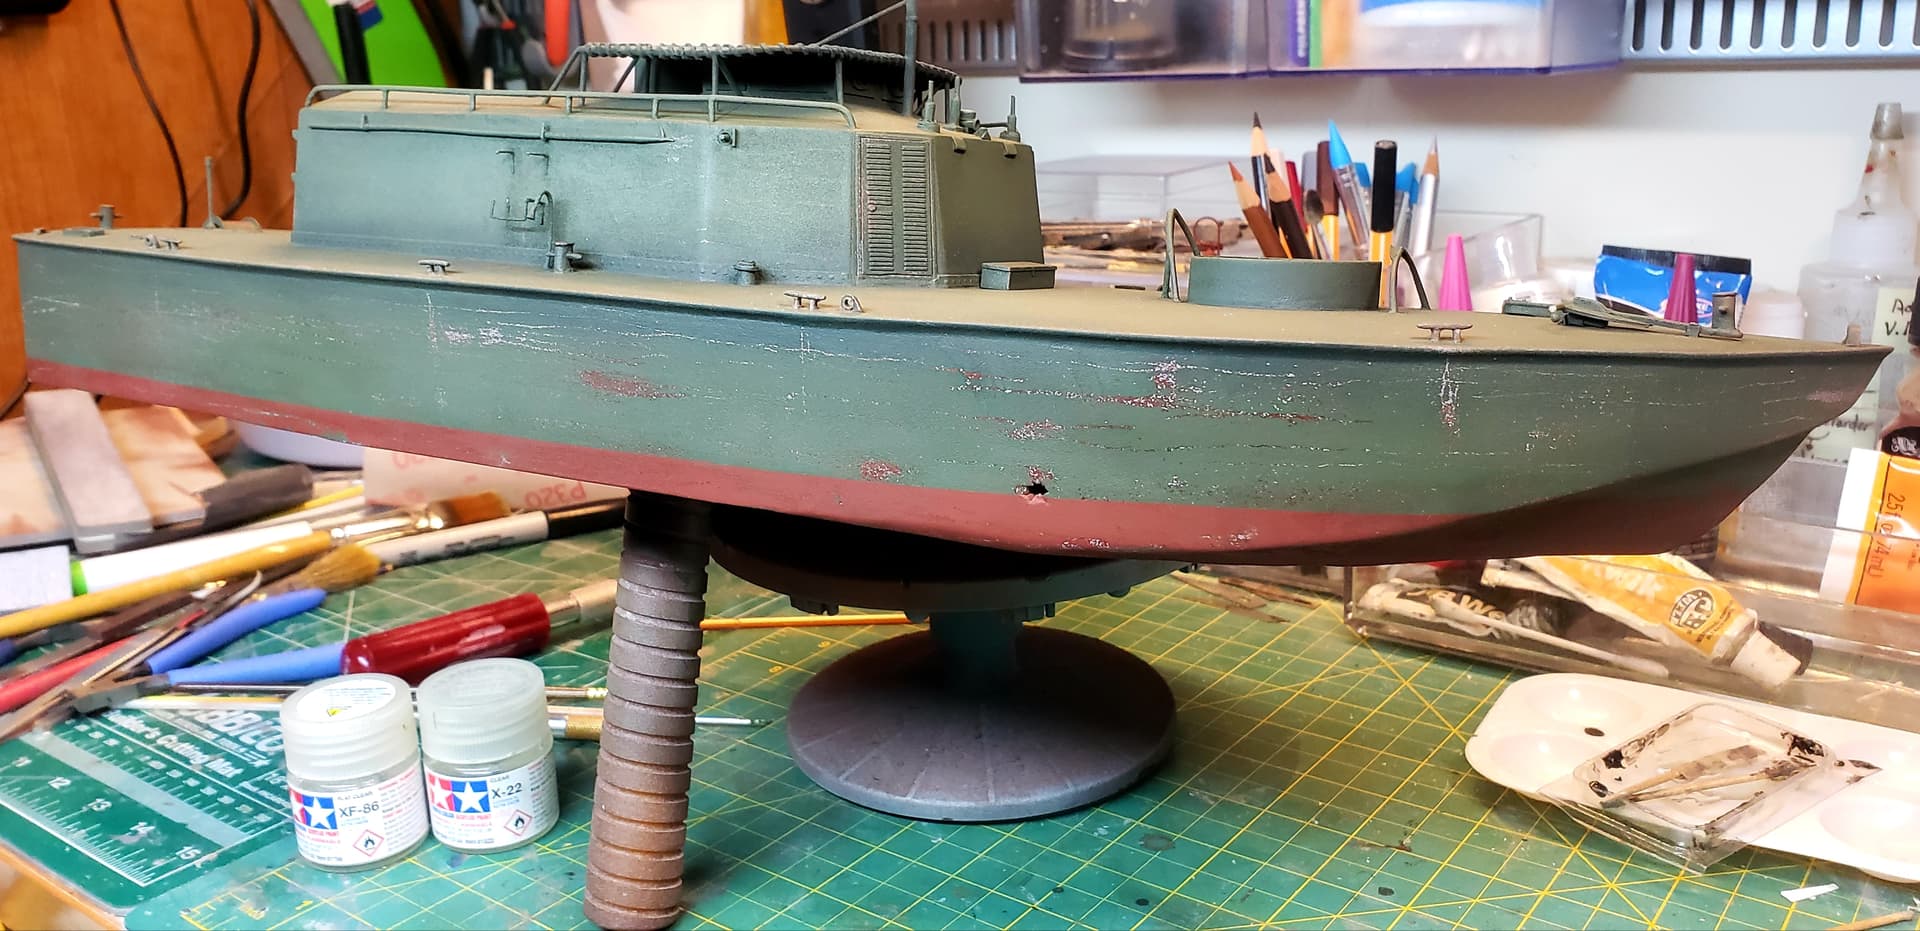
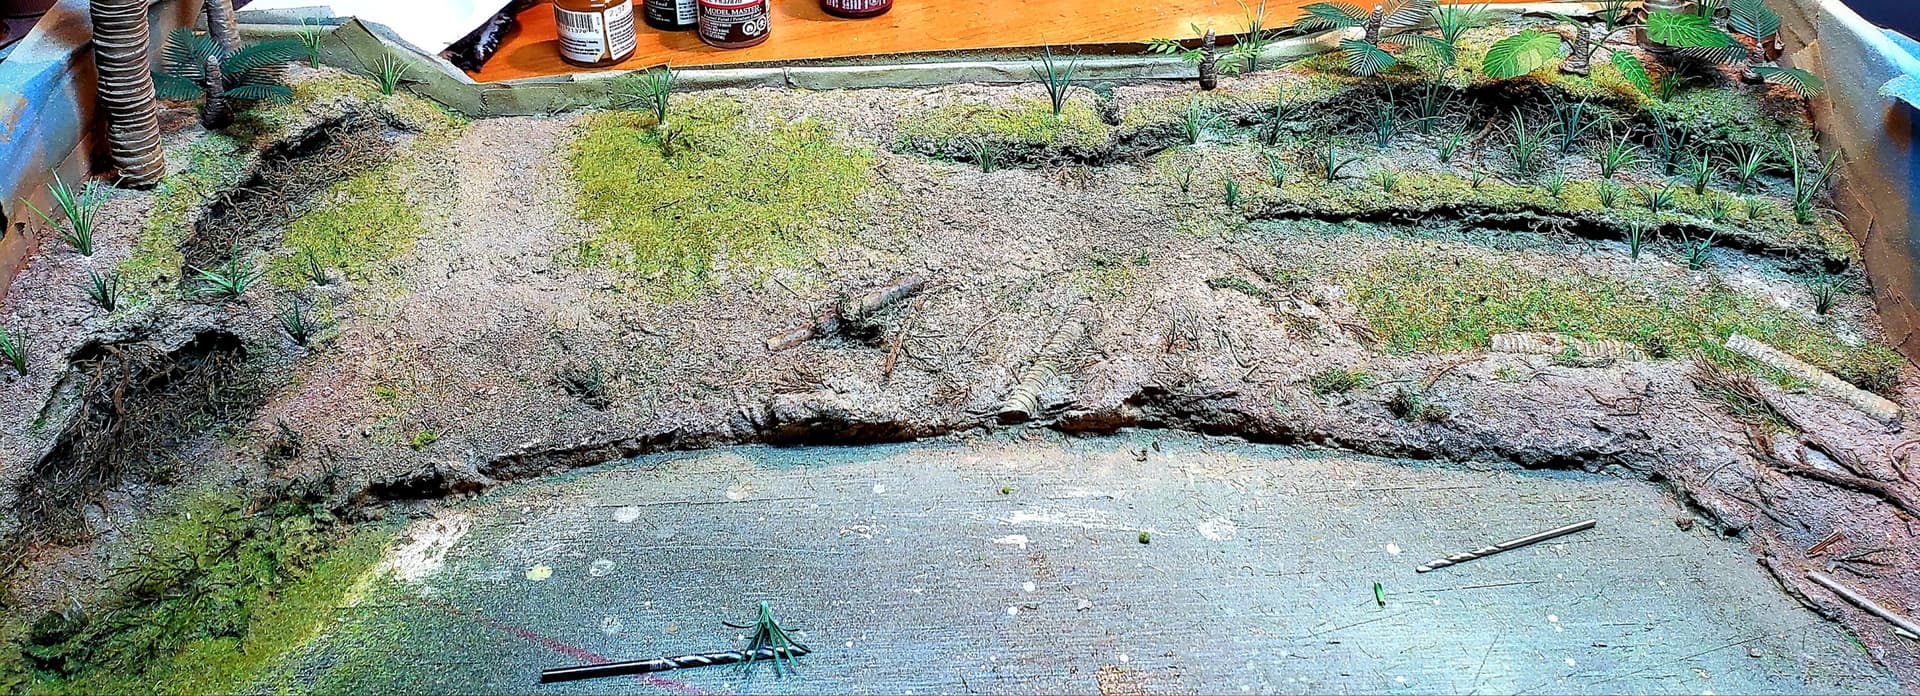
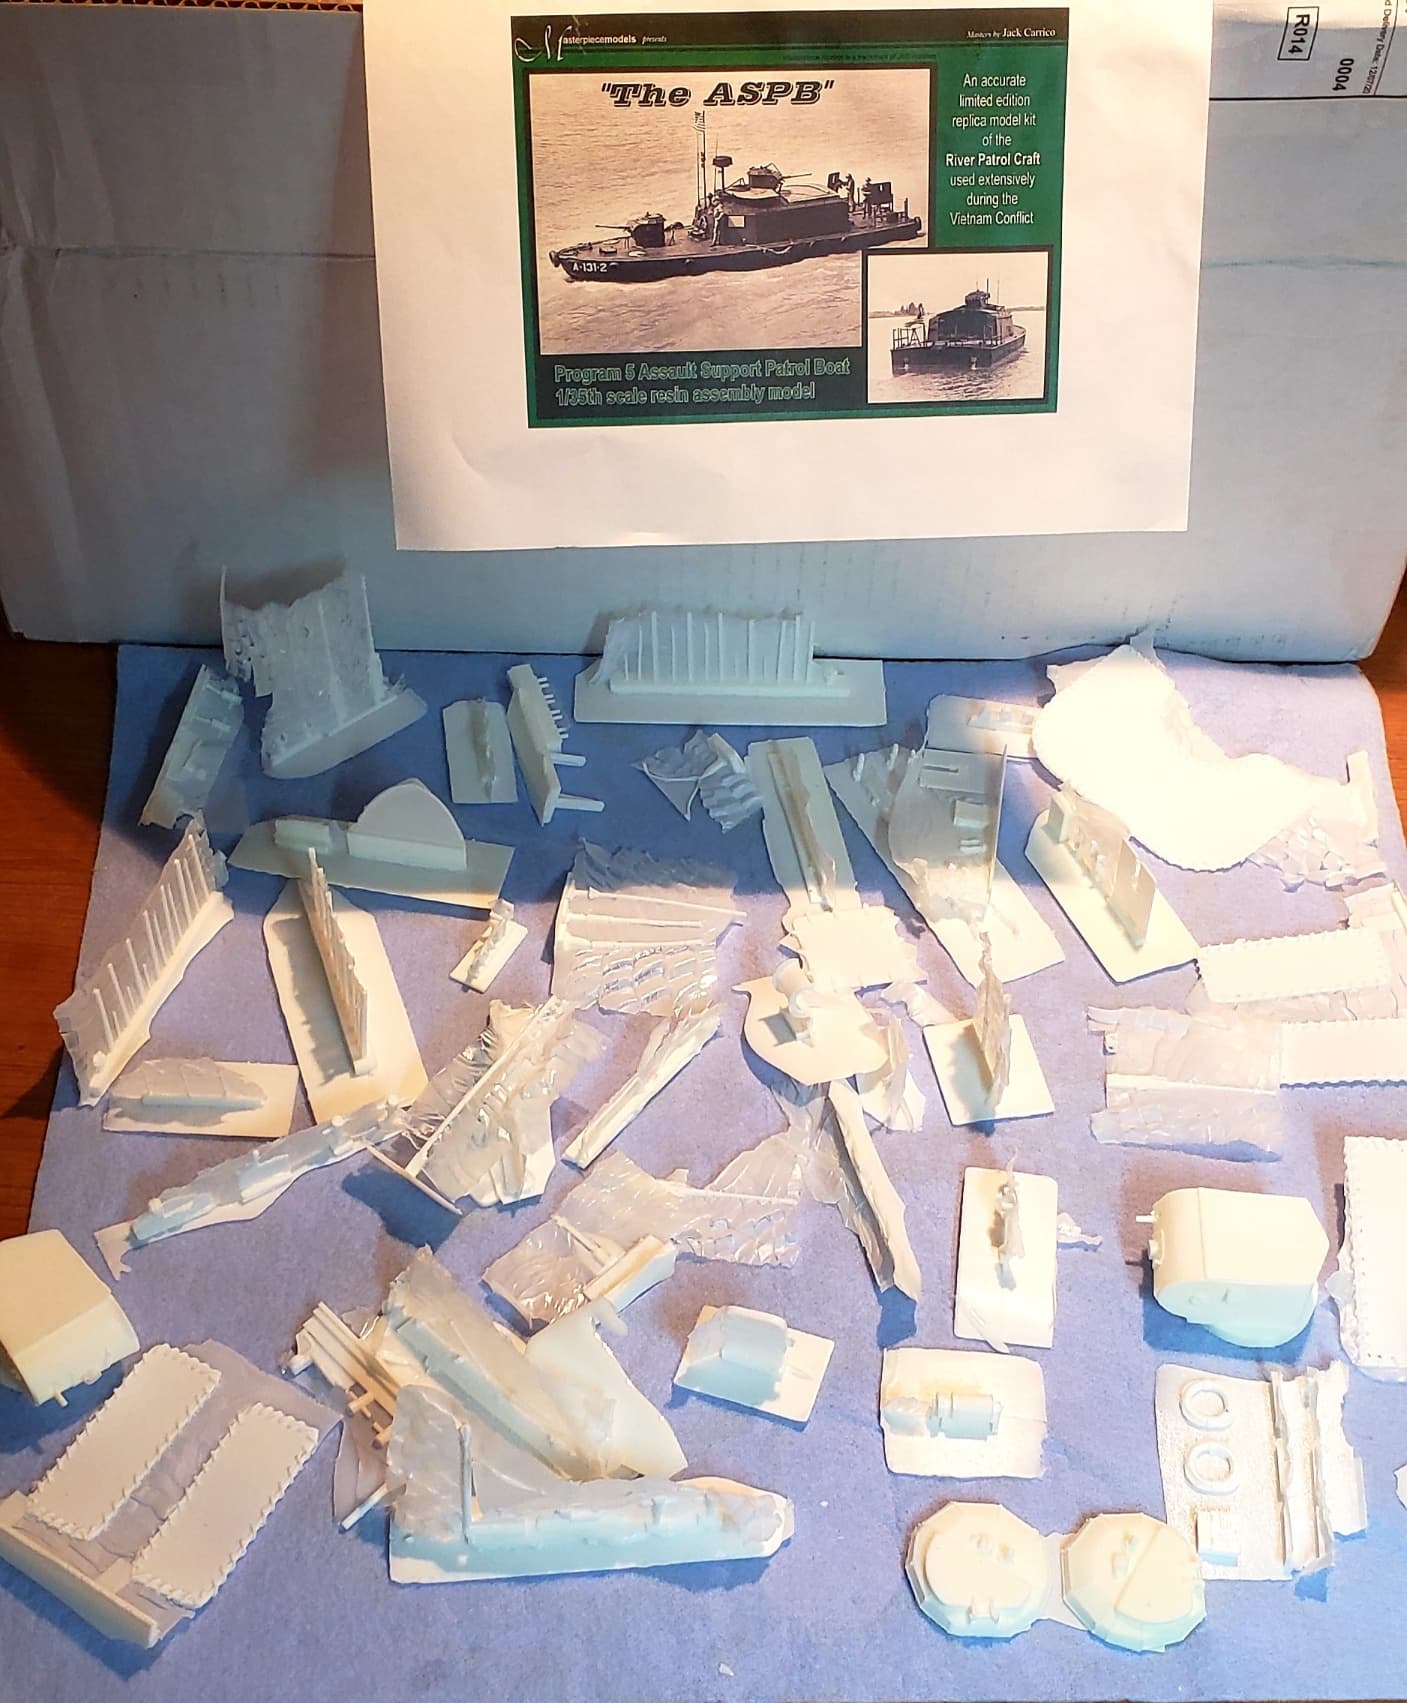
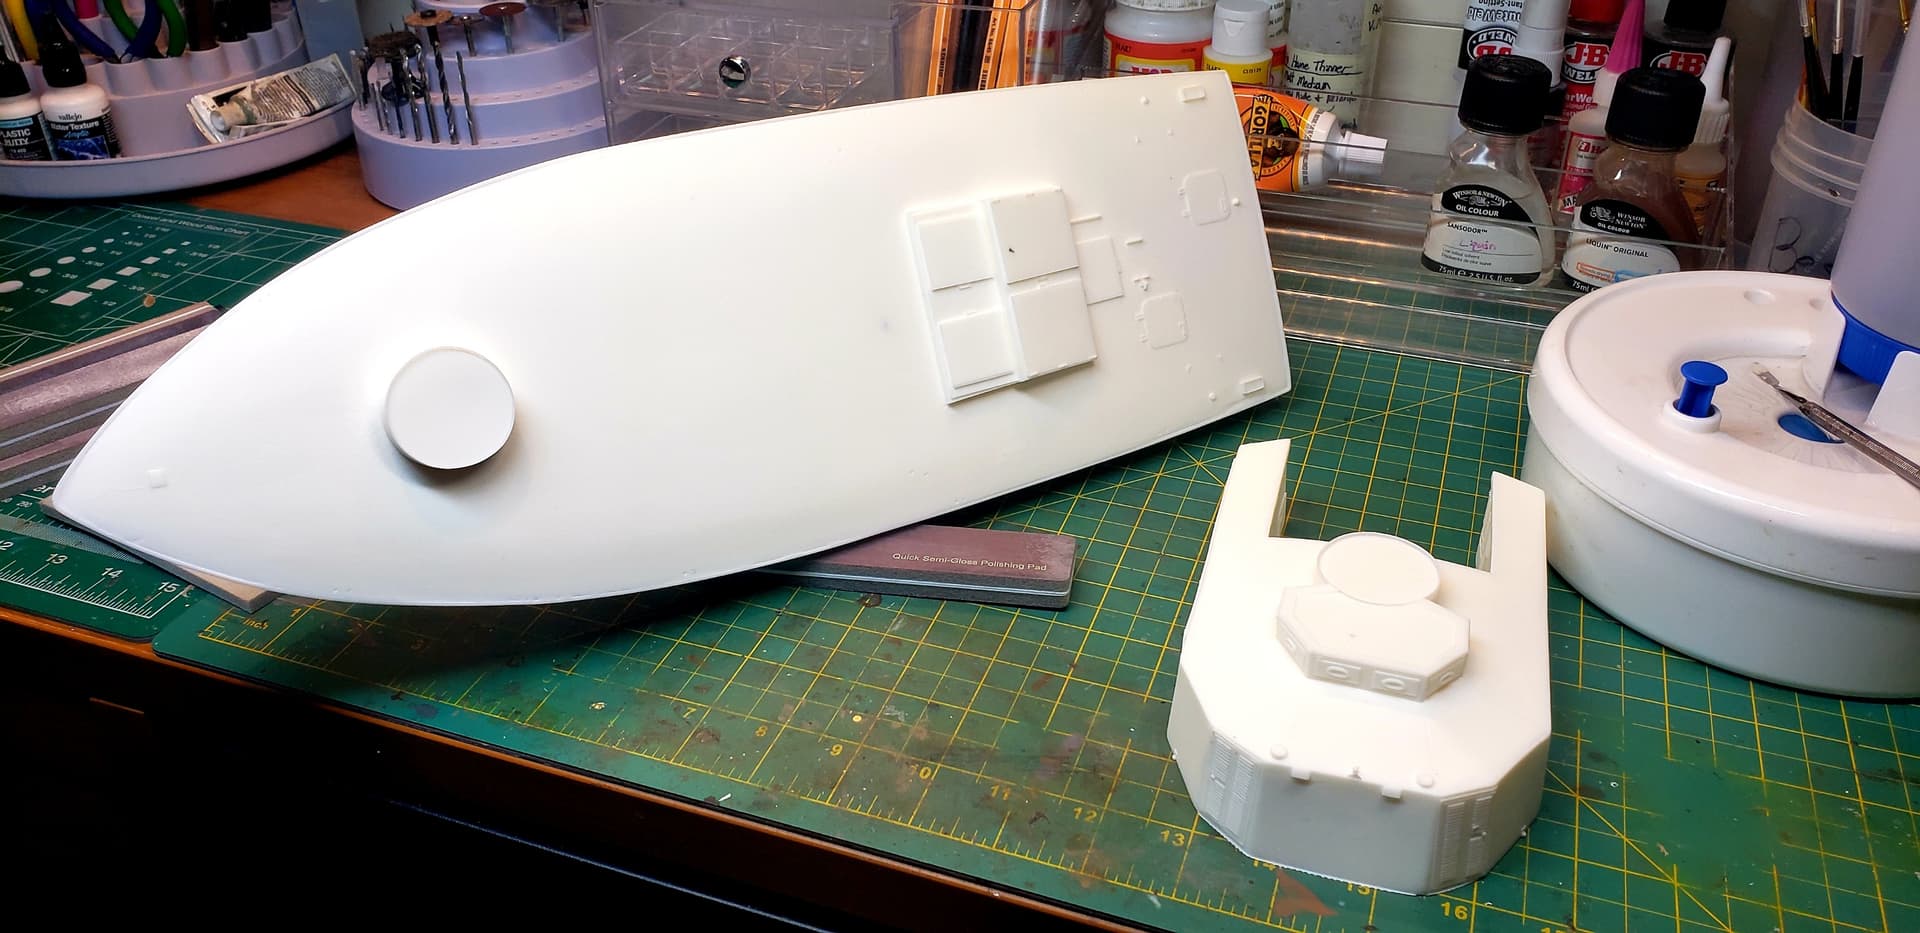
The kit is a 1/35th scale resin kit by Masterpiece Models (SKU: MMVN007). I was excited to try this kit since I primary build 1/35th scale armor and knew there were a lot of accessories in this scale I could add to produce the scene I was after. But at 1/35th scale, this was a big kit and it was my first full resin model so I had my work cut out for me. The two largest pieces, hull and superstructure were fine, albeit required a lot of sanding to smooth out. However, this is only a waterline model which was going to require heavy modding in order to add battle damage and extend the hull since a large area would be visible through the semi-opaque resin water. (more on that later). The main items in the kit that needed correcting were gun barrels, handrails, antennas, etc. as the ones in the kit were warped and had a lot of rolling imperfections that could not be sanded free. I am not sure if the molds were aging when this kit was produced but needless to say, it needed a lot of work. I ended up replacing most of the railing, pipes, ladders etc using either Plastruct tubing or metal wire. Gun barrels were replaced with aftermarket sources (listed below). Finally, I broke down and purchased Tamiya’ s PBR “PIPPER” kit for many of its parts such as figures, tires, flag, antennas, containers, etc. It was a wealth of extra accessories that fit well with this larger Brownwater subject. In summary, the extra kits used to complete the scene included:

  • Tamiya PBR 31Mk.II “PIPPER”
  • Live Resin LRE-25246 M2HB Browning 0.50 with ammo boxes
  • 30 caliber and 20 mm metal barrels (forgot source)
  • Bravo 6 USMC Figures: F6-35028 and B6-35036

I will post some WIP pics in another post. I have other pics if interested as well.

40 Likes

Very nice. It came out looking great.

2 Likes

Thanks, BTW, not fully sold on the jungle backdrop as in some scenes it appears to be in scale, others not so much. Once you look at the images on the computer that is more obvious. But… it was real cheap to add as it was simply one of those aquarium backdrops for $5. I figured I could use it for future projects as well.

3 Likes

Awesome!!!

2 Likes

For kit construction, one big item requiring correction was one of the turrets had a base that was to small to fit over the deck mount on the boat. According to photos, the turret base should overlap the deck mount where it rotates. To correct this I had to carefully add very thin Styrene along the bottom edge of the turret to recreate the larger diameter circular base. I used 2 part epoxy resin (JB Weld) to hold this in place, which also served as filler. Matter of fact, I am a big fan of using 5 minute JB Weld for almost all of the resin to resin construction, and then even the longer 24 setting JB Weld formula for large sections overnight. I have had bad experience with superglue later getting knocked loose and I prefer the longer setting times of the epoxy resin to make sure alignment is good.

The next big item to tackle was the modification to the starboard side hull. Because I wanted to depict the ASPB beached on the bank, this part of the waterline only hull needed to be extended since it will visible; along with imitate battle damage from a rocket attack. Part of the solid resin hull had to be cut away in order to make room for the impact area. I used several references to try to duplicate the curvature of the front starboard hull and added lots of filler to help recreate the delicate curves. A dremel tool helped tremendously with the latter. Actual impact of the rocket was scribed using a sharp X-acto know on styrene of similar scale thickness to the hull using similar techniques as with armor subjects. Matter of fact, I treated this entire build like a floating tank since I do not have a lot of experience with model ship building.

After studying color photographs of ASPBs in action, I used the hairspray method to duplicate the numerous scratches and dings that revealed a gray to rust colored surface beneath the Marine Green (FS 14052) paint scheme. The Marine Green itself was “eyed in” using a mixture of Tamiya acrylics airbrushed; using lighter shades on upper surfaces to represent fading. The canvas top was painted using the same base color mixed with a grayer shade to separate it from the main color. Tamiya clear smoke, red, or blue was used over a silver base for all glass surfaces, including the turret vision blocks. Weathering was done mostly using oils for washes and then later for oil paint rendering similar to Rinaldi and Adam Wilder’s techniques. I later went back and added a heavy wash of enamels mixed with pigment for dirt/debris in the recess and corners of the top deck since most pics showed these boats can get very dirty.

The base itself is plywood, built up with Styrofoam for the river banks covered with celluclay for the shore and visible parts of the river bed. I made a few washed out cavities and filled them with real plant roots to represent undercuts of the jungle floor. I embedded the still wet celluclay using a mixture of medium to fine sand and vegetative debris with some areas even getting static grass; this was done both on the land and what would be the river bottom to represent living and dead vegetation visible through the clear resin. This was painted with various earth colors and given a darker wash with a lighter dry brush.

The ASPB was glued down permanently at an angle with 2 part epoxy putty to represent beaching onto the bank; of course the model was further sealed when pouring the 2 part risen water (used Wealike Deep Pour and Casting). I did this in several layers using a temporary wood border on the three edges where there was no celluclay. I added the glossy packing tape to the back of the wood ediging, which later helped when separating the wood border from the dried resin. Each resin layer was tinted using enamel paints, with opaque shades near the bottom and becoming less and less opaque closer to the surface. This ensured the deeper areas on the port side of the hull would cover the waterline only hull, while the shallower layers wouls still show details on the starboard side, including the river bottom (plants and debris). The top resin layer also received a thin coat of Gloss Modge Podge, sometimes blown in one direction to represent moving water downstream. Thicker layers of Modge Podge were built up to portray the wake of the ship and other splashes. The wake from the propellers was duplicated by using cotton pulled apart in a realistic fashion in the final couple of layers of resin and then built up more using Modge Podge. The larger waves and wake were painted an off-white color using oil paints for a white cap effect. I also added AK Wet Affects Fluid along the hull and top of the deck to represent wet surfaces/splashed water.

This was my first jungle scene and I have to say, the vegetation was one of the most challenging thing in terms of time and strive for reality. I ended up trying small packs form several brands since it is hard to tell which one would truly look the way I wanted it to. Thus, I made a few notes about each one in order for me to remember for my next “Jungle” scene… so thought I might as well share here (italics is the brand and ranked somewhat in order to the best/easiest to make realistic):

  • Fredericus-Rex Greenline: Paper is rather thick and will need to add your own paint to make realistic.
  • Kamizukuri: Have to be fully painted (start off white) but look real and are easy to pull from paper sprue. Kits are very inclusive with wire, etc but directions are in Japanese. With extra work these can look very real.
  • AK: Has good vein indentions and base color is ok but added my own color to make more realistic. Thin paper so more realistic than most for thinner plants. However, not very good instructions for different plant types (one set for all).
  • J’s Work: Thin like AK with good Pre-painting. Out of the box, these are the most realistic of the above but includes repetitive patterns so best to add your on tones. Good directions but their resin trunks had some major seems to sand away which can remove detail.
  • JoeFix: Very similar to “J’s Work” but slightly more realistic.
  • Green Stuff World Paper Plants: Kind of like Fredericus with it’s thicker paper but on the plus side it has very realistic veins and paper is strong enough where they do not need wire (another big plus). To take advantage of the indentions for veins, etc. you do need to paint them and give them a darker wash. In a way, these were the most well rounded of the bunch.

As it was probably obvious in my notes above, I did feel the need to paint all plants regardless of how they look out of the package. I normally used an airbrush to do so while still on their paper sprue, both front and back. I kept the base colors a green hue by ranging a mixture of Tamiya Black Green (X-27) with Green (X-5) (depending on the type). I then added lighter greens along the edge of the leaves, with additional highlights of even lighter yellowish green along the outer edges, especially the tips using Dark Yellow (XF-60). On the palms, I even added Tamiya Hull Red to Brown on select leaves to represent distressed foliage. Some even got a coating of diluted Tamiya Clear Orange. Finally, some of these leafs got some extra treatment with either dry brushing yellow shades along their edge or using brown pigments to represent leaf damage or distress. The most painstaking thing about the plants was actually gluing the leaves onto metal wire or to each other. I used a combination of superglue, JB Weld epoxy (yes I know overkill) and white glues). It really all depended on the application on which worked out the best. One thing I find aggravating about super glues is that the are so much more delicate. I found myself doing a lot more repair work on anything I used superglue on (hence why I sometimes just settle for the 5 min JB Weld).


The above cracked soil along the small stream was from a product called Distress Crackle Paint that I picked up on Amazon.

For the figures, I knew I wanted to depict a scene of being under attack so searched for the right figures until I discovered this Bravo 6 set. Knowing that Marines and other troops often traveled with the crew, this made it even easier to select. I also paid attention in photographs and my email correspondence to the vets concerning what the gear and equipment troops and crew would wear while on these vessels. In conclusion, it was a hodge podge of uniforms, different flak jackets, etc. Thus, the three marine figures were pretty much built stock since Bravo 6 makes some great resin figures in realistic poses. The main thing I had to change was the removal of the extra gear modelled into them. Most of that would only be present while on foot in the jungle and not riding a ASPB. However, I took the libety to assume they wold grab some items whjile bine under attack. The figure on the 50 cal mount was taken form the Tamiya PBR set, which has a similar mount. However, I replaced his head with a resin one from my parts box and heavily modified his arms and hands to make him better fit the grip (hint he is wearing a bandage for a reason :). A base color for the uniforms and skin were hand painted using Vallejo. However, dark and light shading and the various skin tones were created using oils.


Was still trying to “figure” out final layout of the scene. Those figures gave lots of possibilities even for a small area.

A few final pics.

20 Likes

That is superb and a real winner. It is just great to keep looking at to find new bits and keep drawing your eye here, there and everywhere. The finish is just about perfect, and water effects really finish it off.
You are selling yourself short with that photo backdrop…I think it looks just right and blends in great giving it all real depth …top work and time well spent :+1::+1:

4 Likes

Awesome work!

2 Likes

Incredible attention to details and lots of eye-catching action. Great job!

Would adding some cotton puffs to the barrel ends signal the guns firing and add to more realism?

2 Likes

That is an absolute show-stopper of a piece. You can see from your research just how faithful you’ve been in your depiction. The figures are posed just right to create that ‘in action’ look and the backdrop of the jungle fauna is impressive- I’m sure it took a while to do! I think the various bits of plants and leaves under the surface of the water is a really authentic touch.

2 Likes

Incredibly awesome build !!!
More than appropriate for the Diorama form .
Very , very , very cool !!!

2 Likes

Upon going back and perusing this once again , when I first saw the first two pics , first time around , I thought you built all that background jungle only to find out it’s a fish tank background , brilliant !!!

2 Likes

That is an exceptional bit of dio work for sure. From top to bottom.
J

1 Like

Very, very nice!

A real pleasure to look at. Have had to go back and re-look at all the photos several times to try to take in all in.

3 Likes

that’s an absolutely amazing build and a true labour of love. it’s the first time i have seen that kit being built and i have seen it on ebay and often thought about commiting financial suicide but i never plucked up the courage, although I do have the large hovercraft that they also produce.

Klaus

2 Likes

Thank you sir! That means a lot coming from you! :wink:

2 Likes

Yes, this kit was a gift from my wife for Christmas 3 years ago, so obviously I didn’t get much else from her! But if you do get it, it will need to be a labor of love. Although it pushed me to my abilities so I did gain a lot tackling it.

3 Likes

A fantastic build! Looks amazing and a truly impressive work! :heart_eyes:

2 Likes

Amazing work!!!

And amazing explanation also. Top work!

2 Likes

Fantastic work and a great report too.

2 Likes

Outstanding job!

2 Likes