I’m thinking now after looking at it more that these 3D marks add to the look of this off beat tank.
3 Likes
Absolutely.
It looks as if the outer shell has been welded from curved strips.
I also agree about the turret texture, 3D nerds will likely identify its origin but for the rest of us it raises speculation about its actual construction that only adds to the wow factor. So glad you didn’t sand it ![]()
1 Like
Ah Tim, if only you knew! It wasn’t down to any modelling intuition, but sheer idleness - I just couldn’t be bothered to sand it all down. Mind you, if didn’t become apparent until I glossed it all - prior to that the primer and matt coat didn’t show much of the striation in any case; funny how the gloss did. Perhaps it’ll disappear under a matt coat once I’ve finished faffing around?
I’m not too fussed if it doesn’t - as you identify it’ll add to the somewhat unique appearance of the beast. I hope the silvered decals do too. Sigh
3 Likes

Spot on!
2 Likes
Hence the title of the movie.
1 Like
And now combined with the vehicle itself; a few blemishes but matted down. Time for an application of Tamiya Buff methinks!


14 Likes
Looking very nice Brian, be nice to see it in a couple of weeks for real!
Oh just seen this, hope it doesn’t spoil your day?
5 Likes
God no; the more iterations the better I feel. A great subject for What-If modellers that’s for sure.
3 Likes
The figures have required a bit more work than I envisaged, but I’ve also succumbed lately to that sort of “dead” feeling, when one sits down, looks at the bench, and the effort required to tackle anything is just too much.
Anyway, a refresh on the figures; the Commander (the one on the left) is the one that’s really stalling me at the moment:

4 Likes
If you’ve almost lost interest, I empathise! It’s take me far too long but here we are. With such an unusual design I thought a backstory was required, not least as I’m portraying it as a What-If.
If you can’t face my woffle - and I get that - I really do, then scroll down as you see fit.
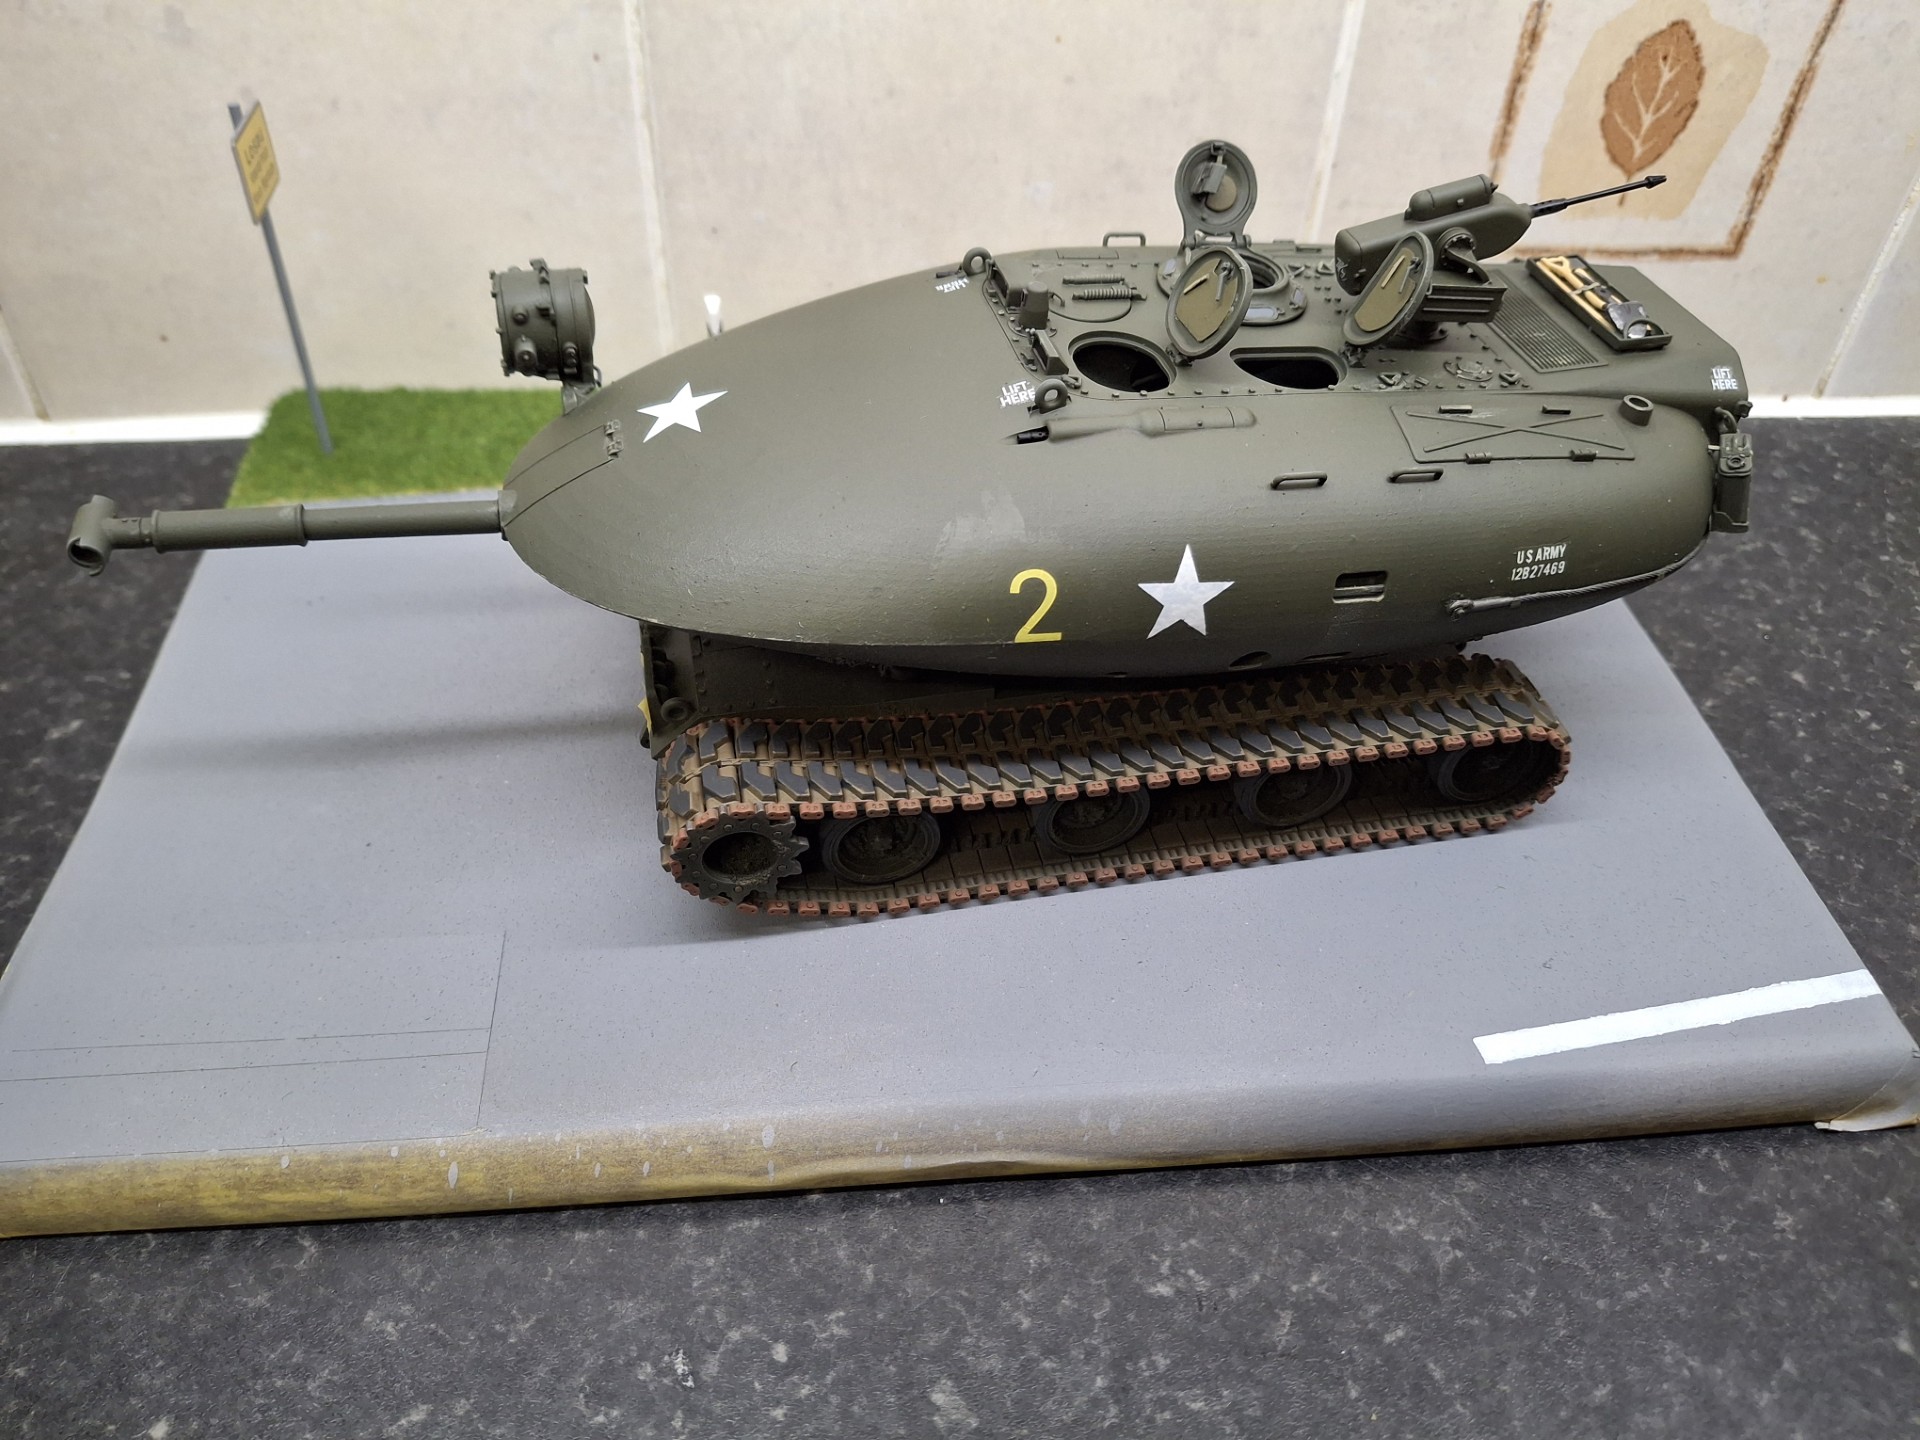
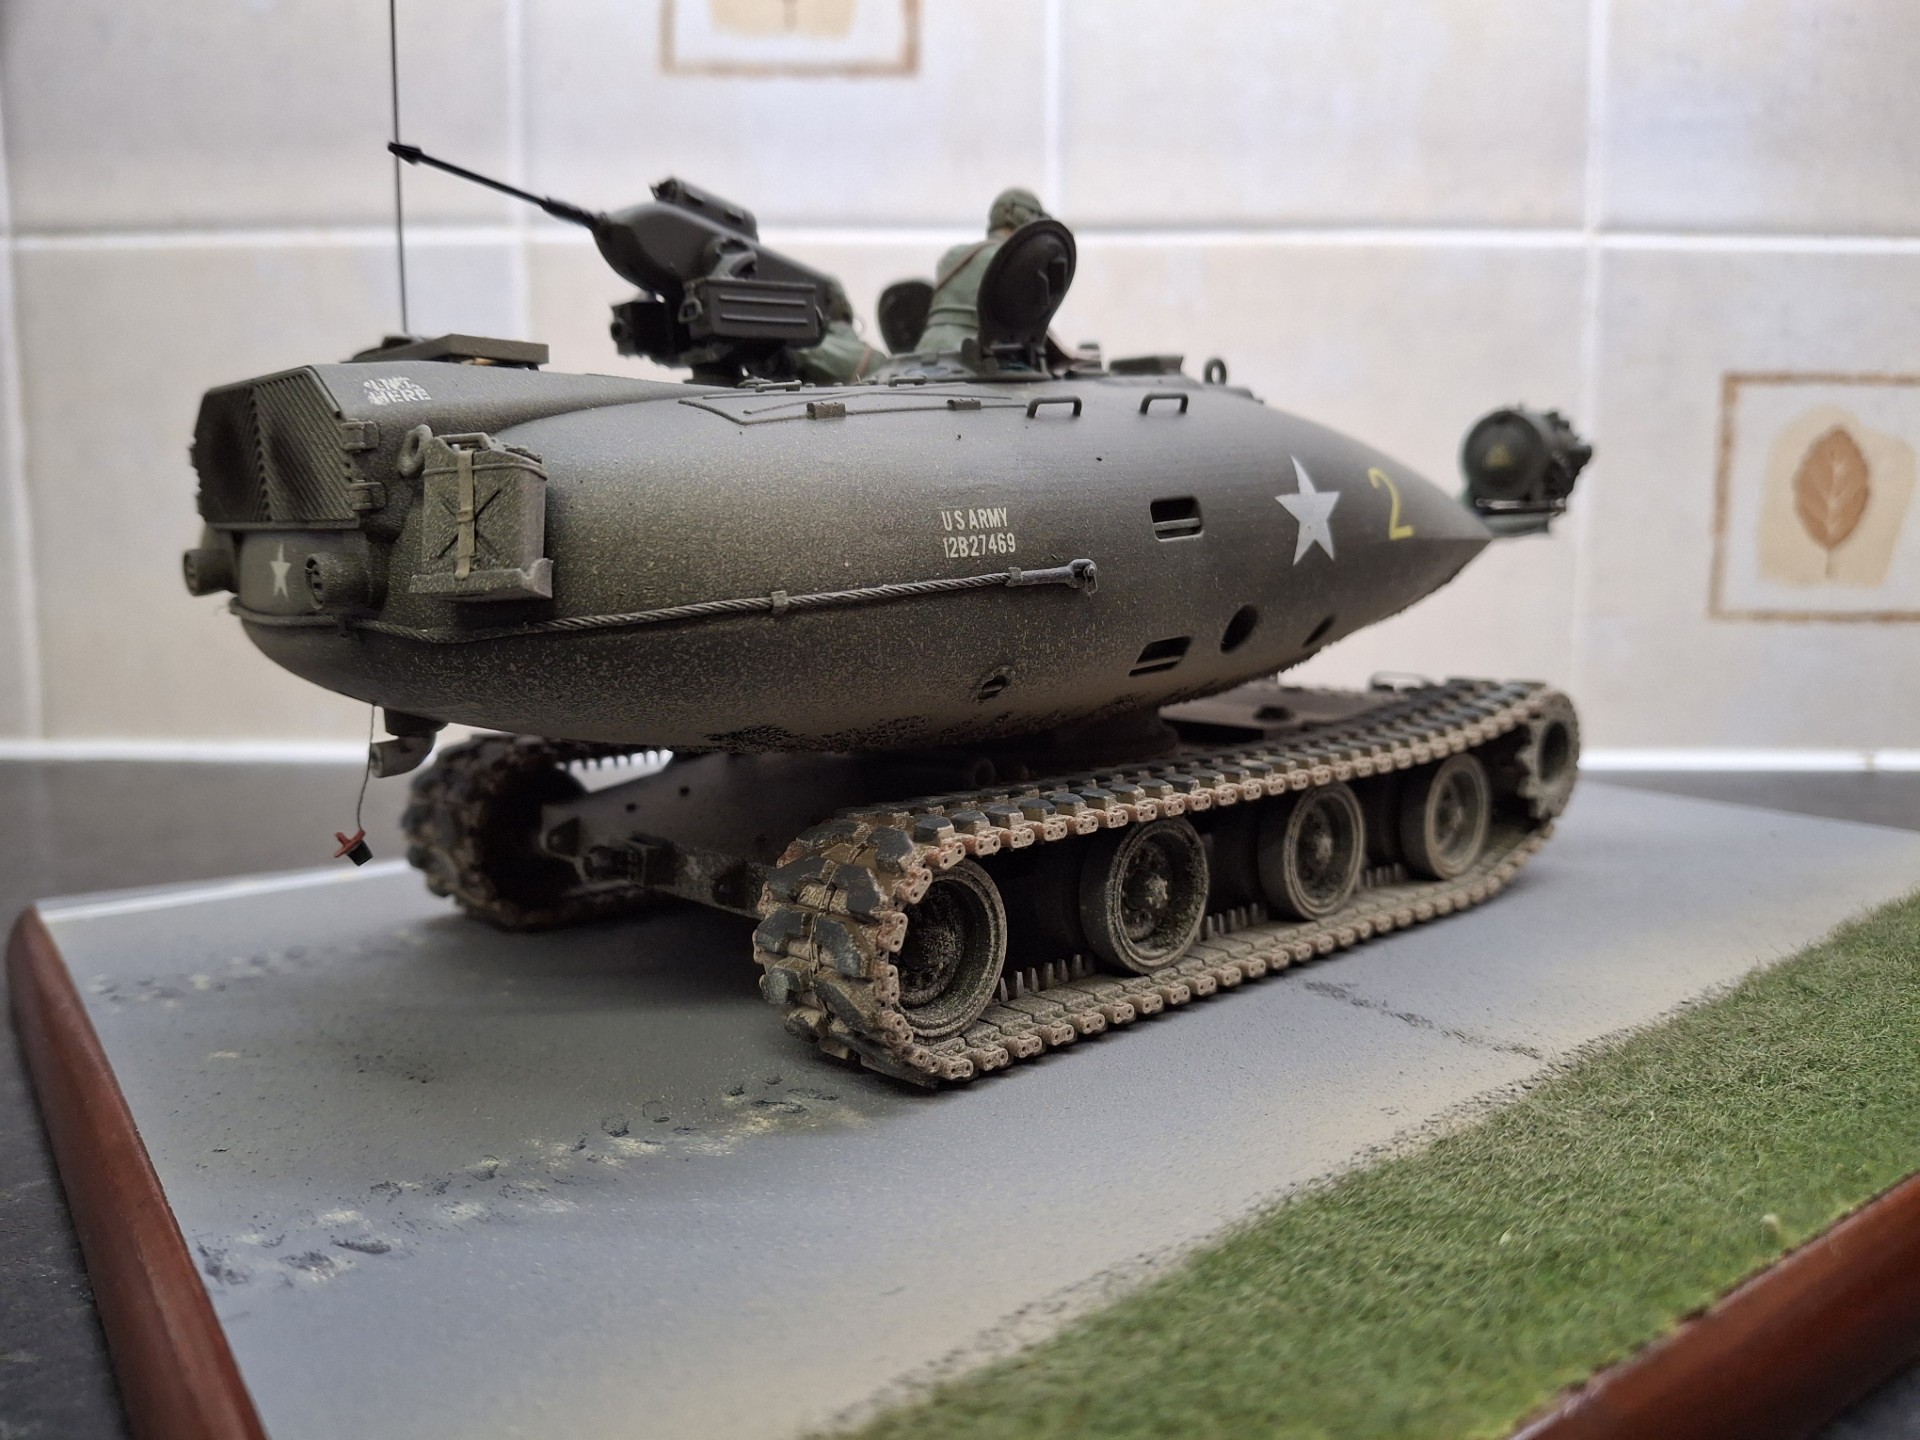
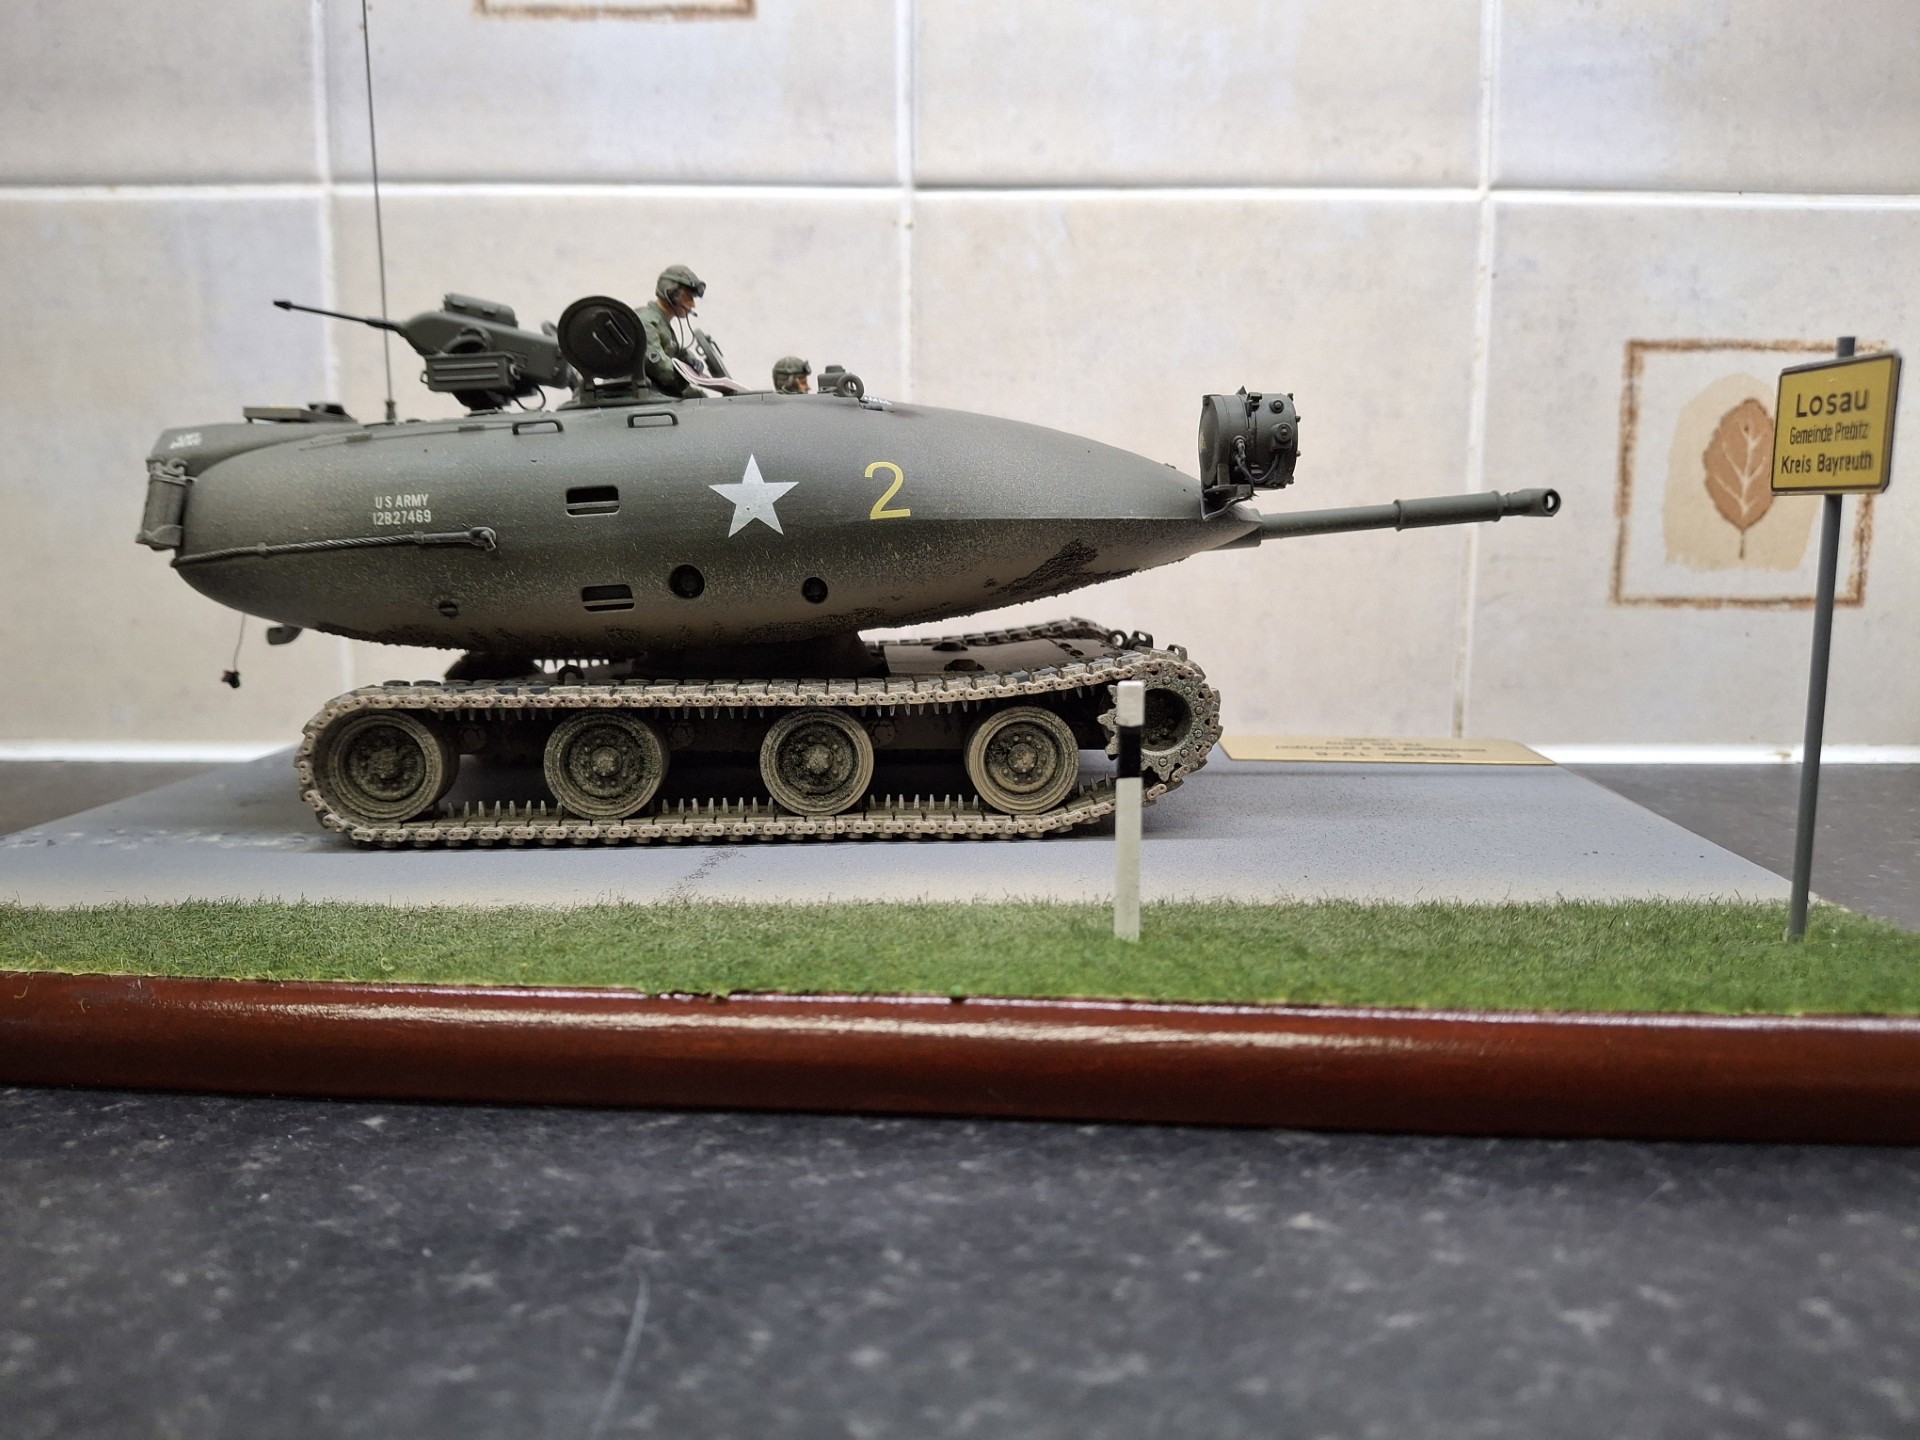
Despite its startling appearance, not least to the more traditionally-minded senior US Army officers, the Chrysler TV-8 project was authorised to proceed to the prototype stage, so from 1956 onward Chrysler beavered away. Some 5 prototypes were produced and thoroughly and rigorously tested in the continental USA, but in the autumn of 1958 it was decided that the vehicles should be tested in their future and likely area of operations, West Germany. One prototype had been written off due to an engine fire in 1957, but Chrysler, against the clock, managed to manufacture both a replacement vehicle and an additional 3 tanks.
Nearly 2 years of detailed testing had revealed a number of technical flaws; while the electric power units performed well, the smoothbore gun was deemed a failure and by the time of the German trials the gun was the standard 90mm as fitted to M48s.The more exotic planned power units had also failed to come to fruition (including the version planned to use nuclear fuel pellets) and throughout the tests a Chrysler V8 engine had been used.
The 8 tanks were transported to West Germany within the auspices of Operation Petulant Almond (thanks Doug – “Damraska”!) in August 1958, but in a rare occurrence at the time, were flown there by a fleet of C-124 Globemasters rather than by sea as was the norm for AFVs. This was to test the air-portability of the tank as the turrets and chassis could be broken down into separate components to facilitate just such transportation. The tanks were moved to barracks under conditions of great secrecy, moving only at night yet under heavy escort, and carefully hidden from view when undergoing training and testing. However, in the spring of 1959, the vehicles were designated to be used in Exercise Blue Eagle, a large scale NATO exercise taking place not far from the East German and Czech borders. Whilst this would be considered as provocative, at the time the Cold War mood music endorsed this, not least as a flag-waving gesture; it was also considered that if the tanks were seen by Hostile Intelligence Services, then so be it. USAREUR was keen to show that they possessed cutting edge technology and were not afraid to deploy it.
Accordingly, the tanks dispersed from barracks during the exercise work-up period and their somewhat radical appearance became widely recognised amongst the German population, who referred to them as either Käfer (beetles) or Kakelaken (cockroaches).
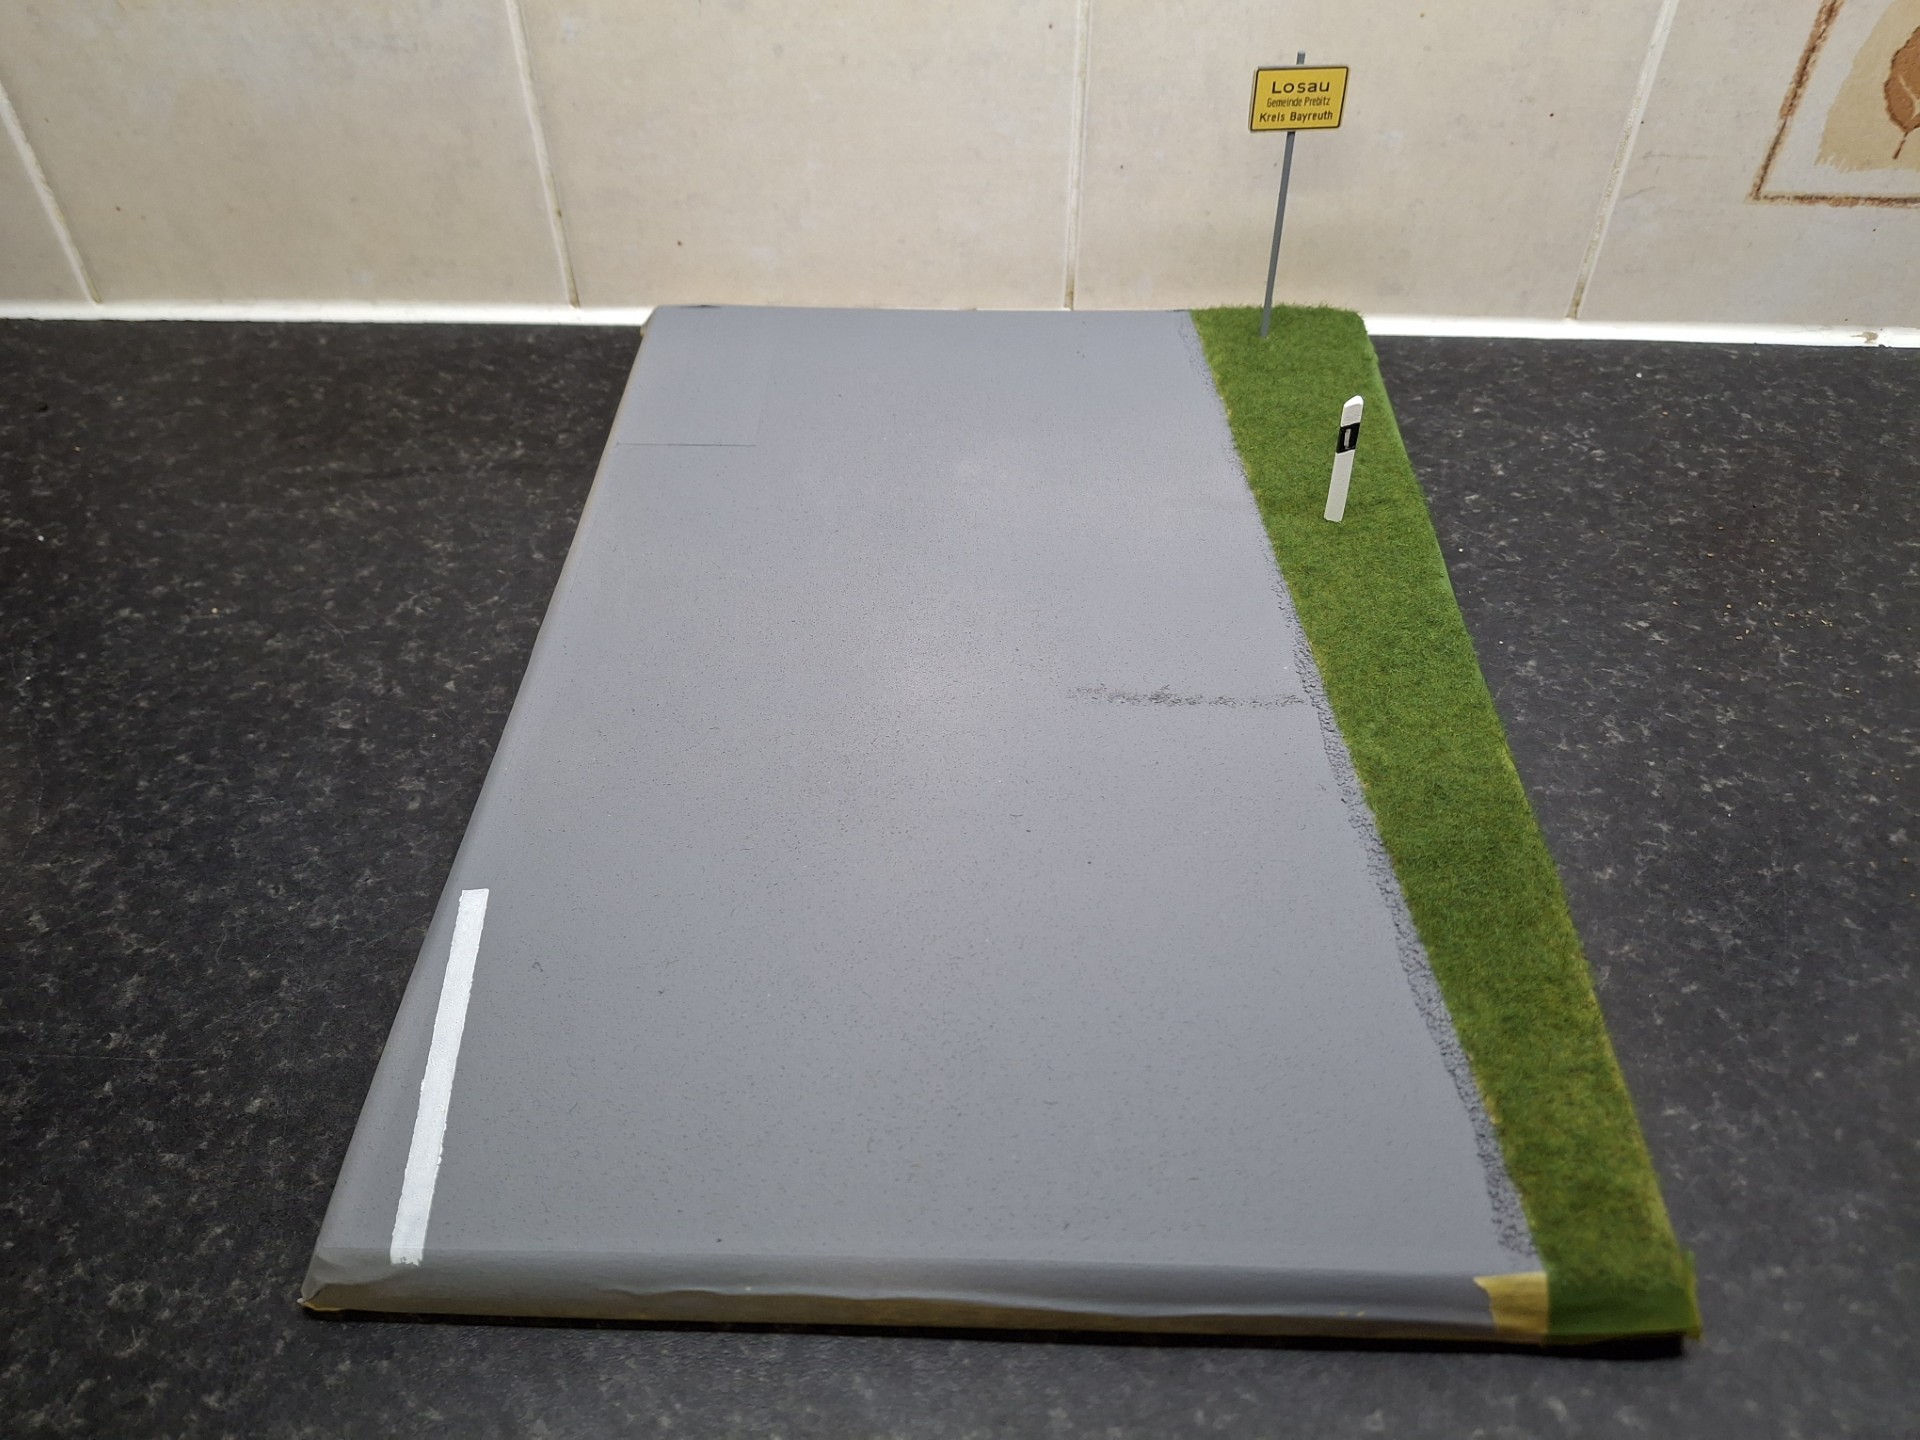
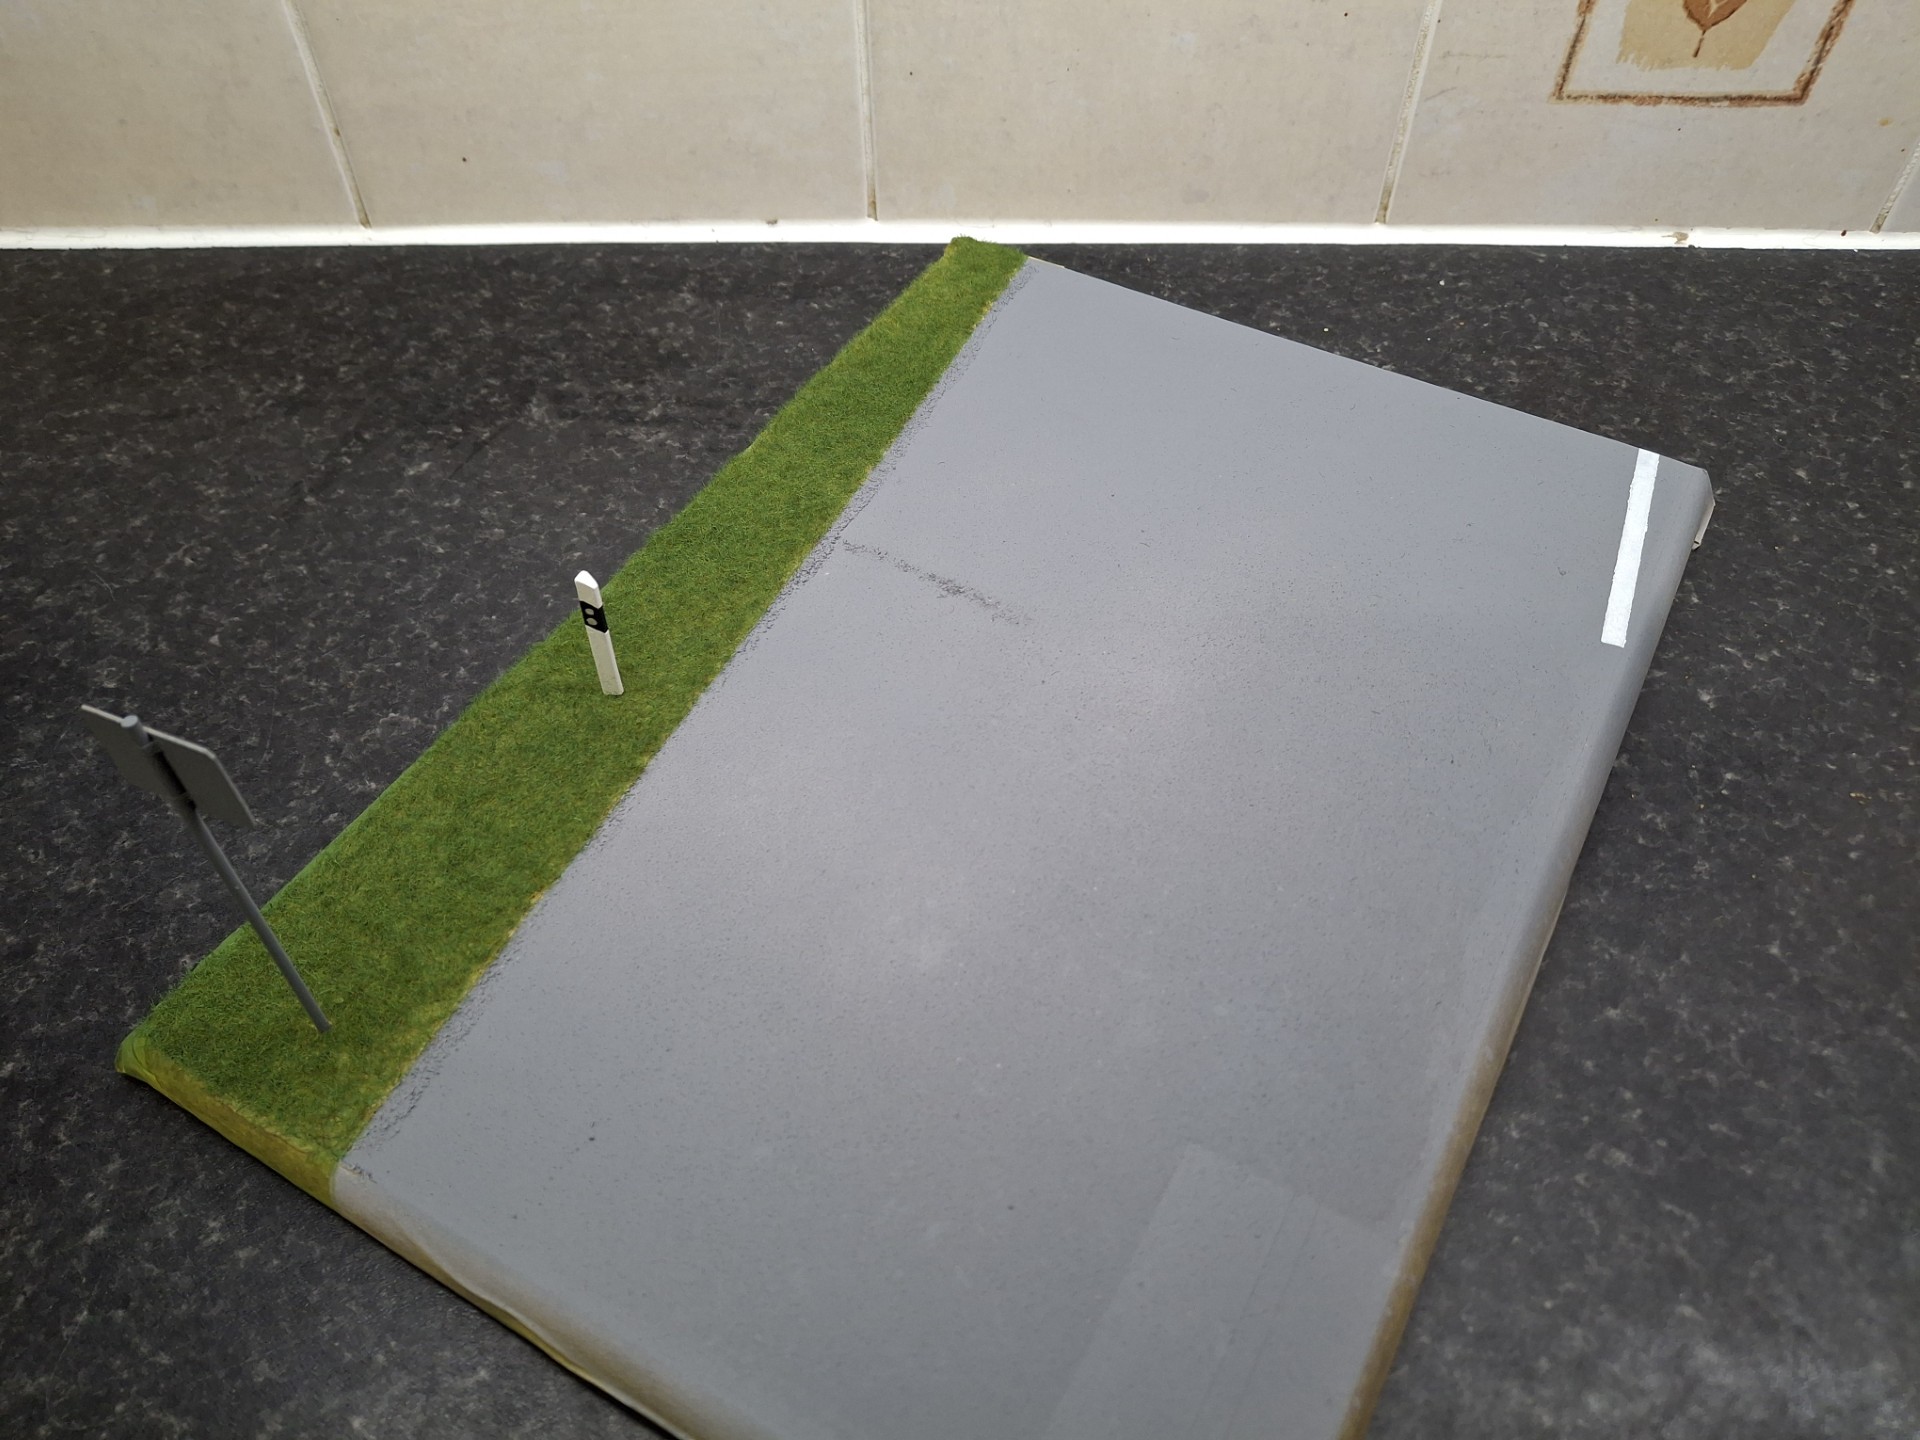
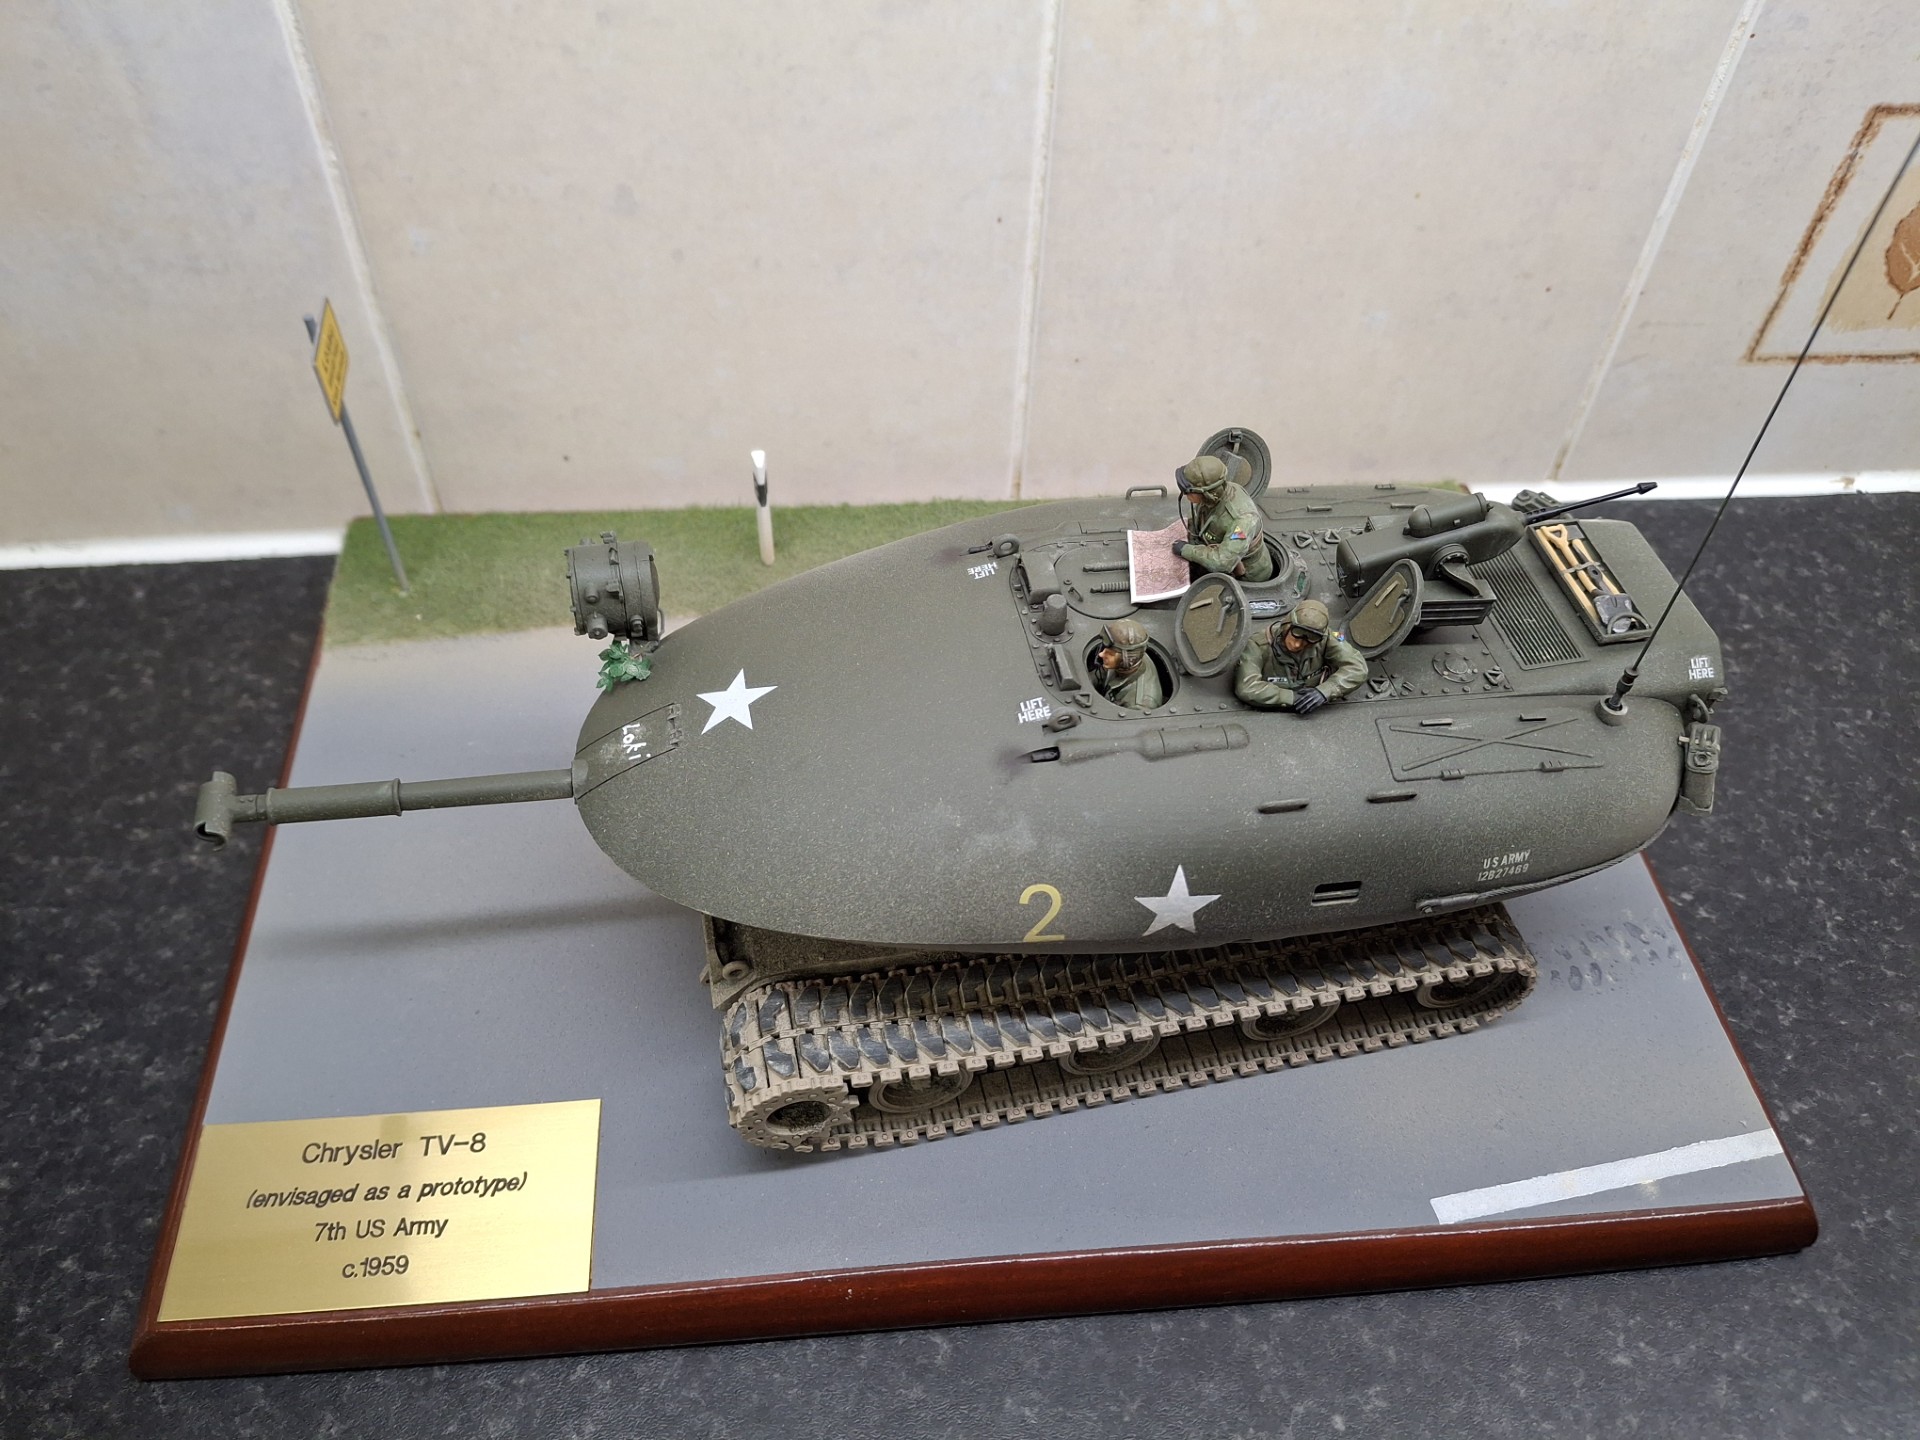
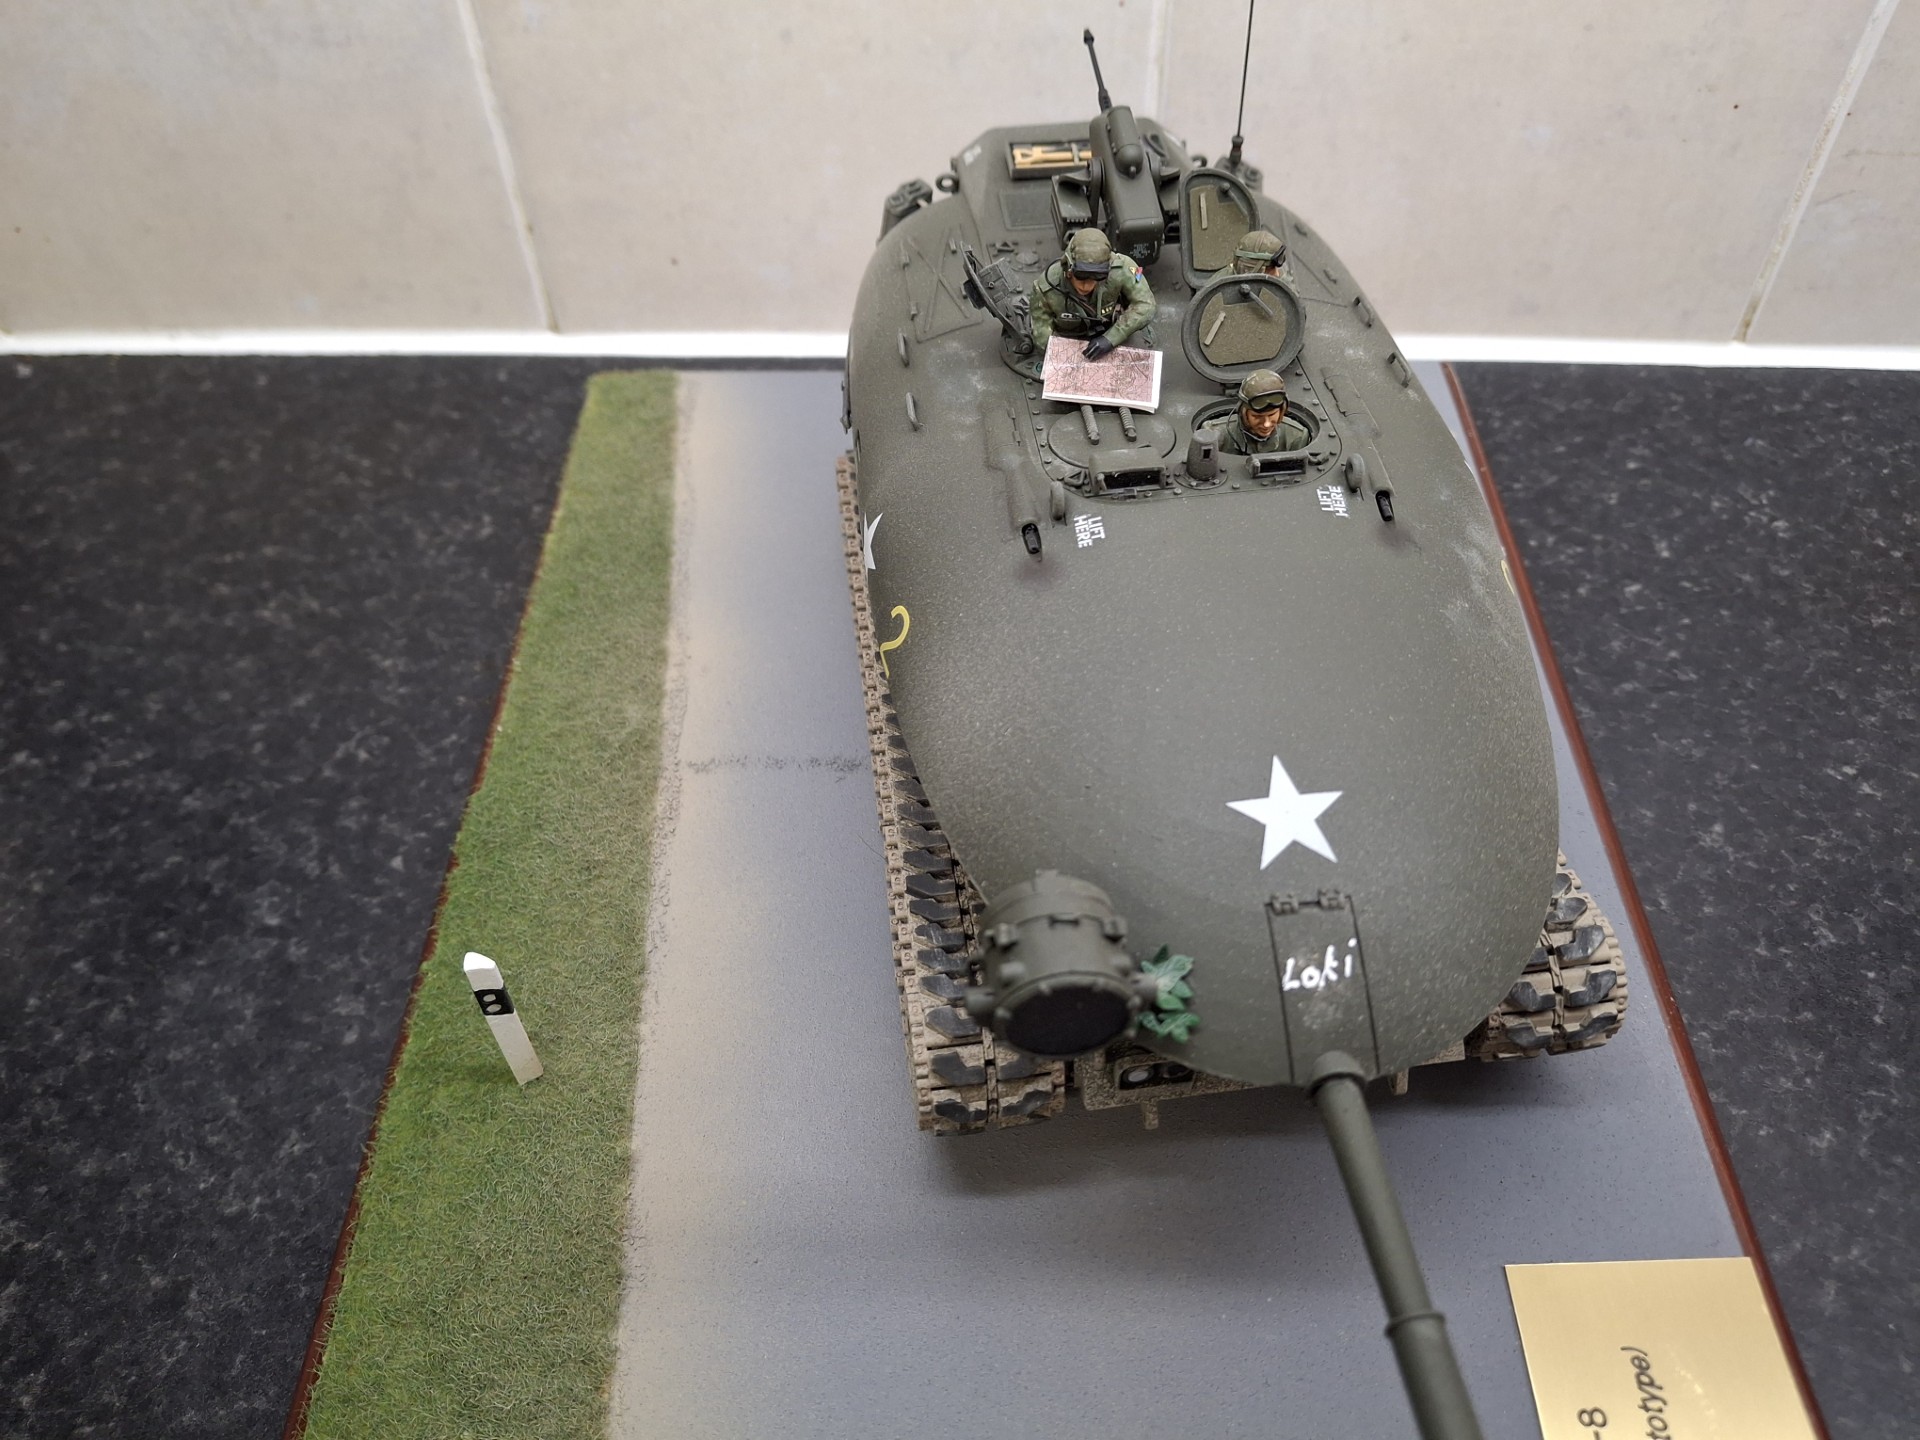
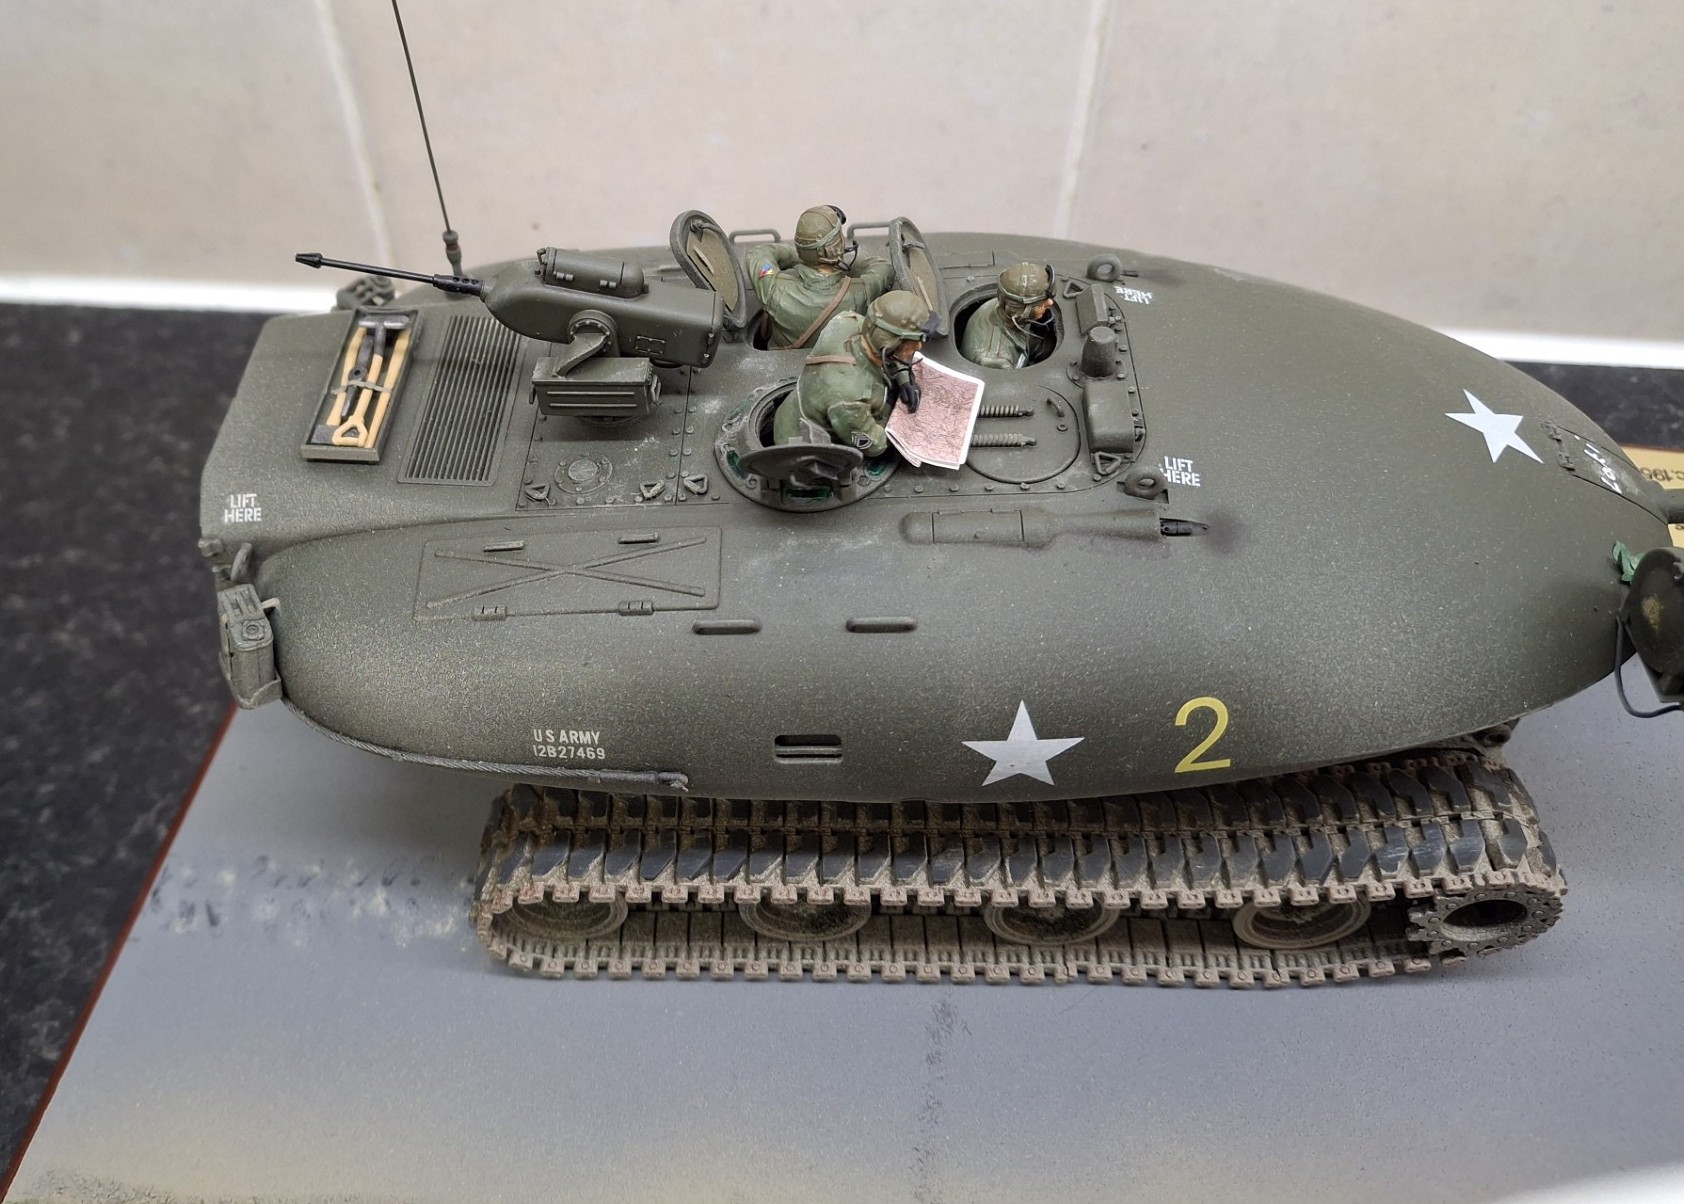
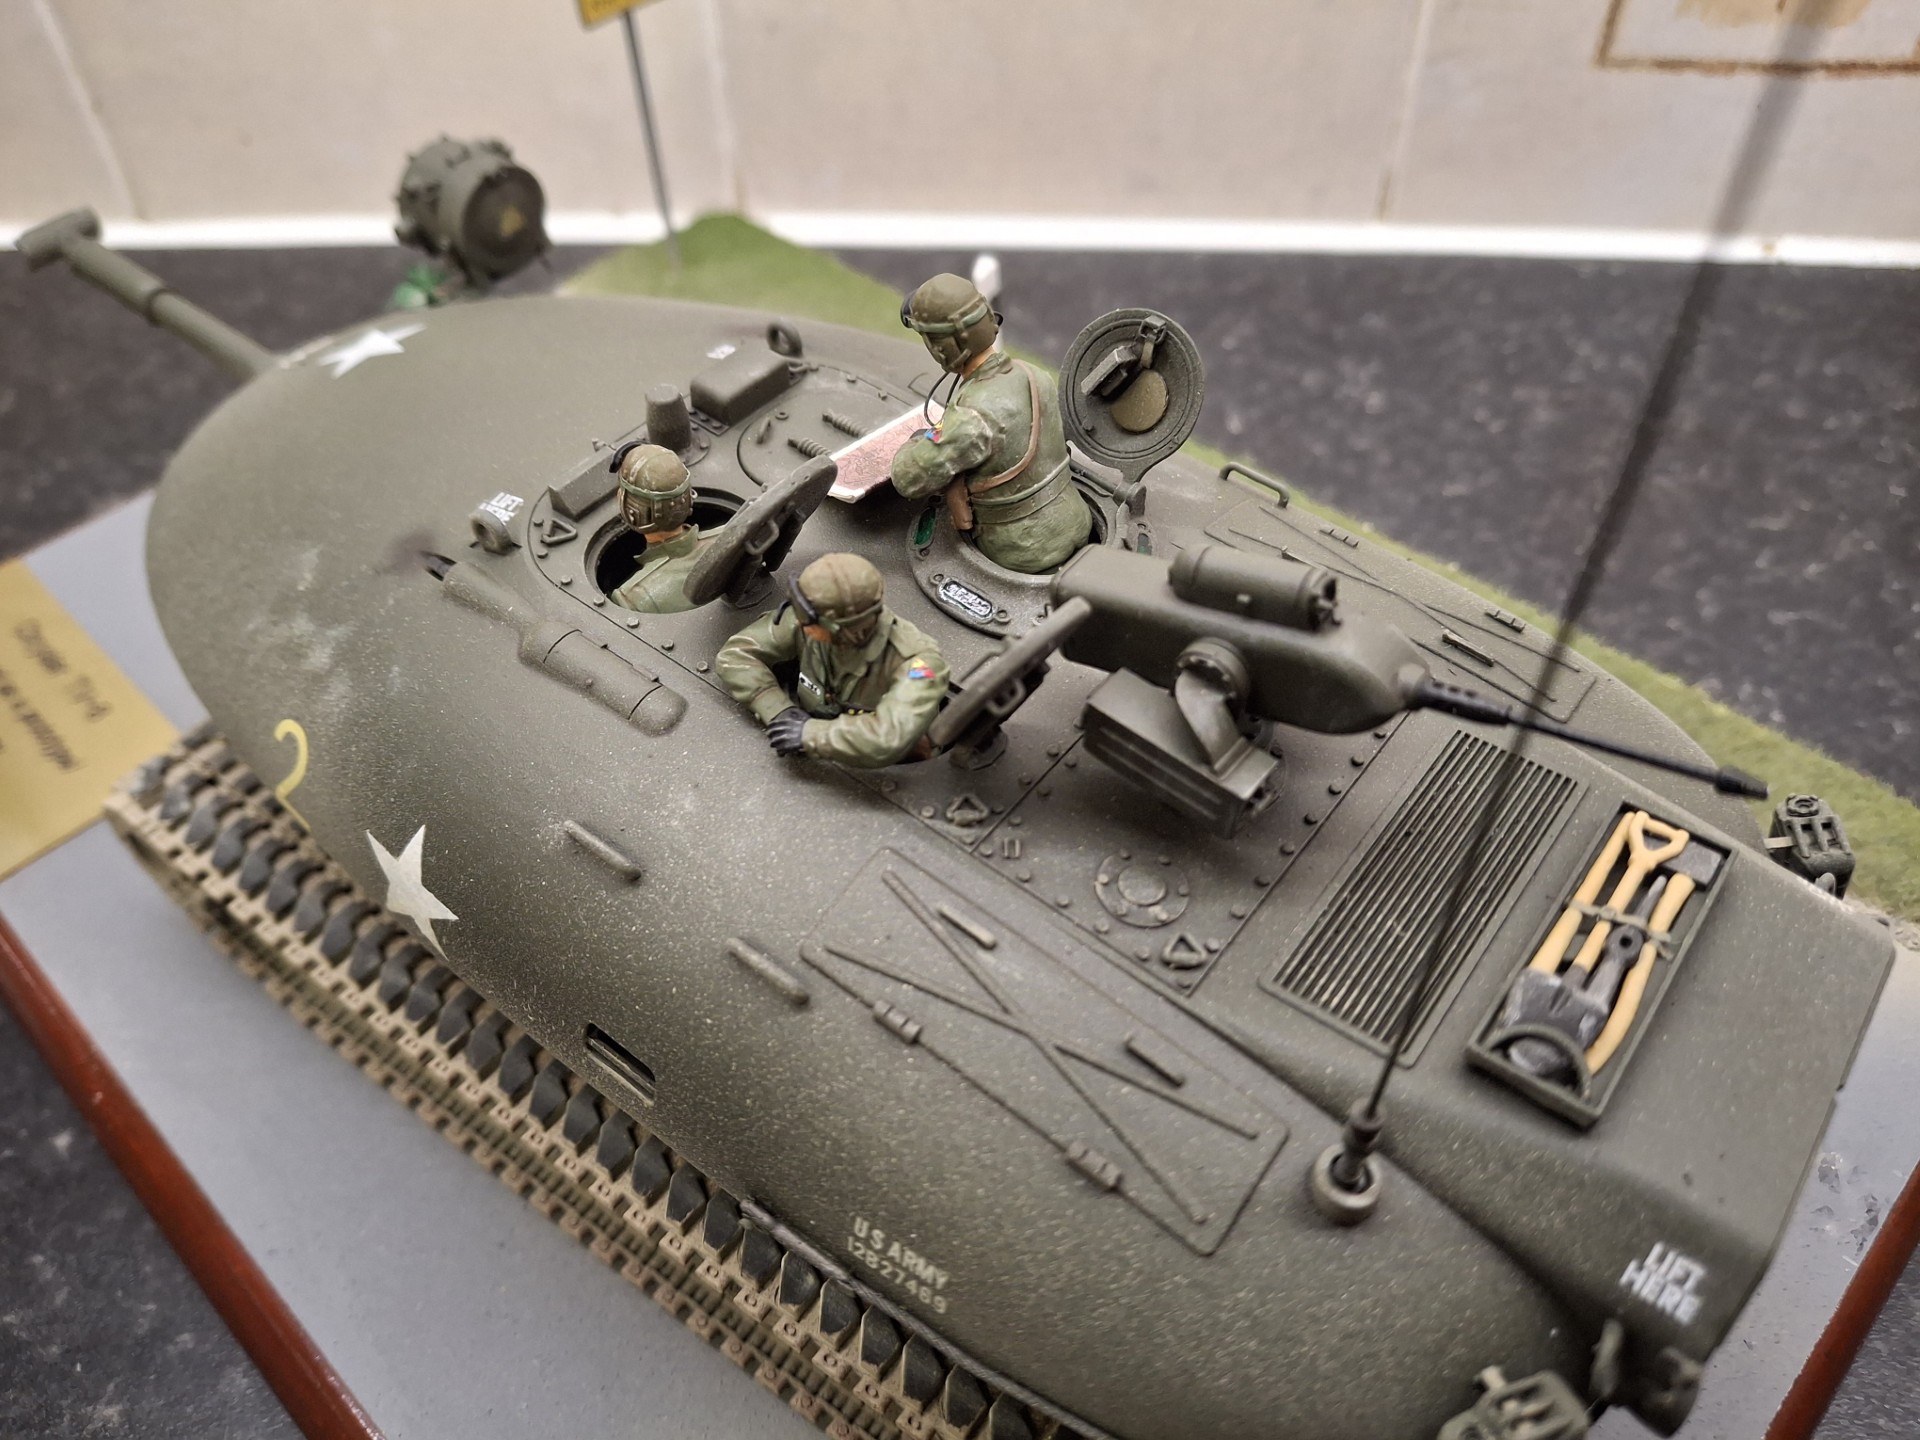
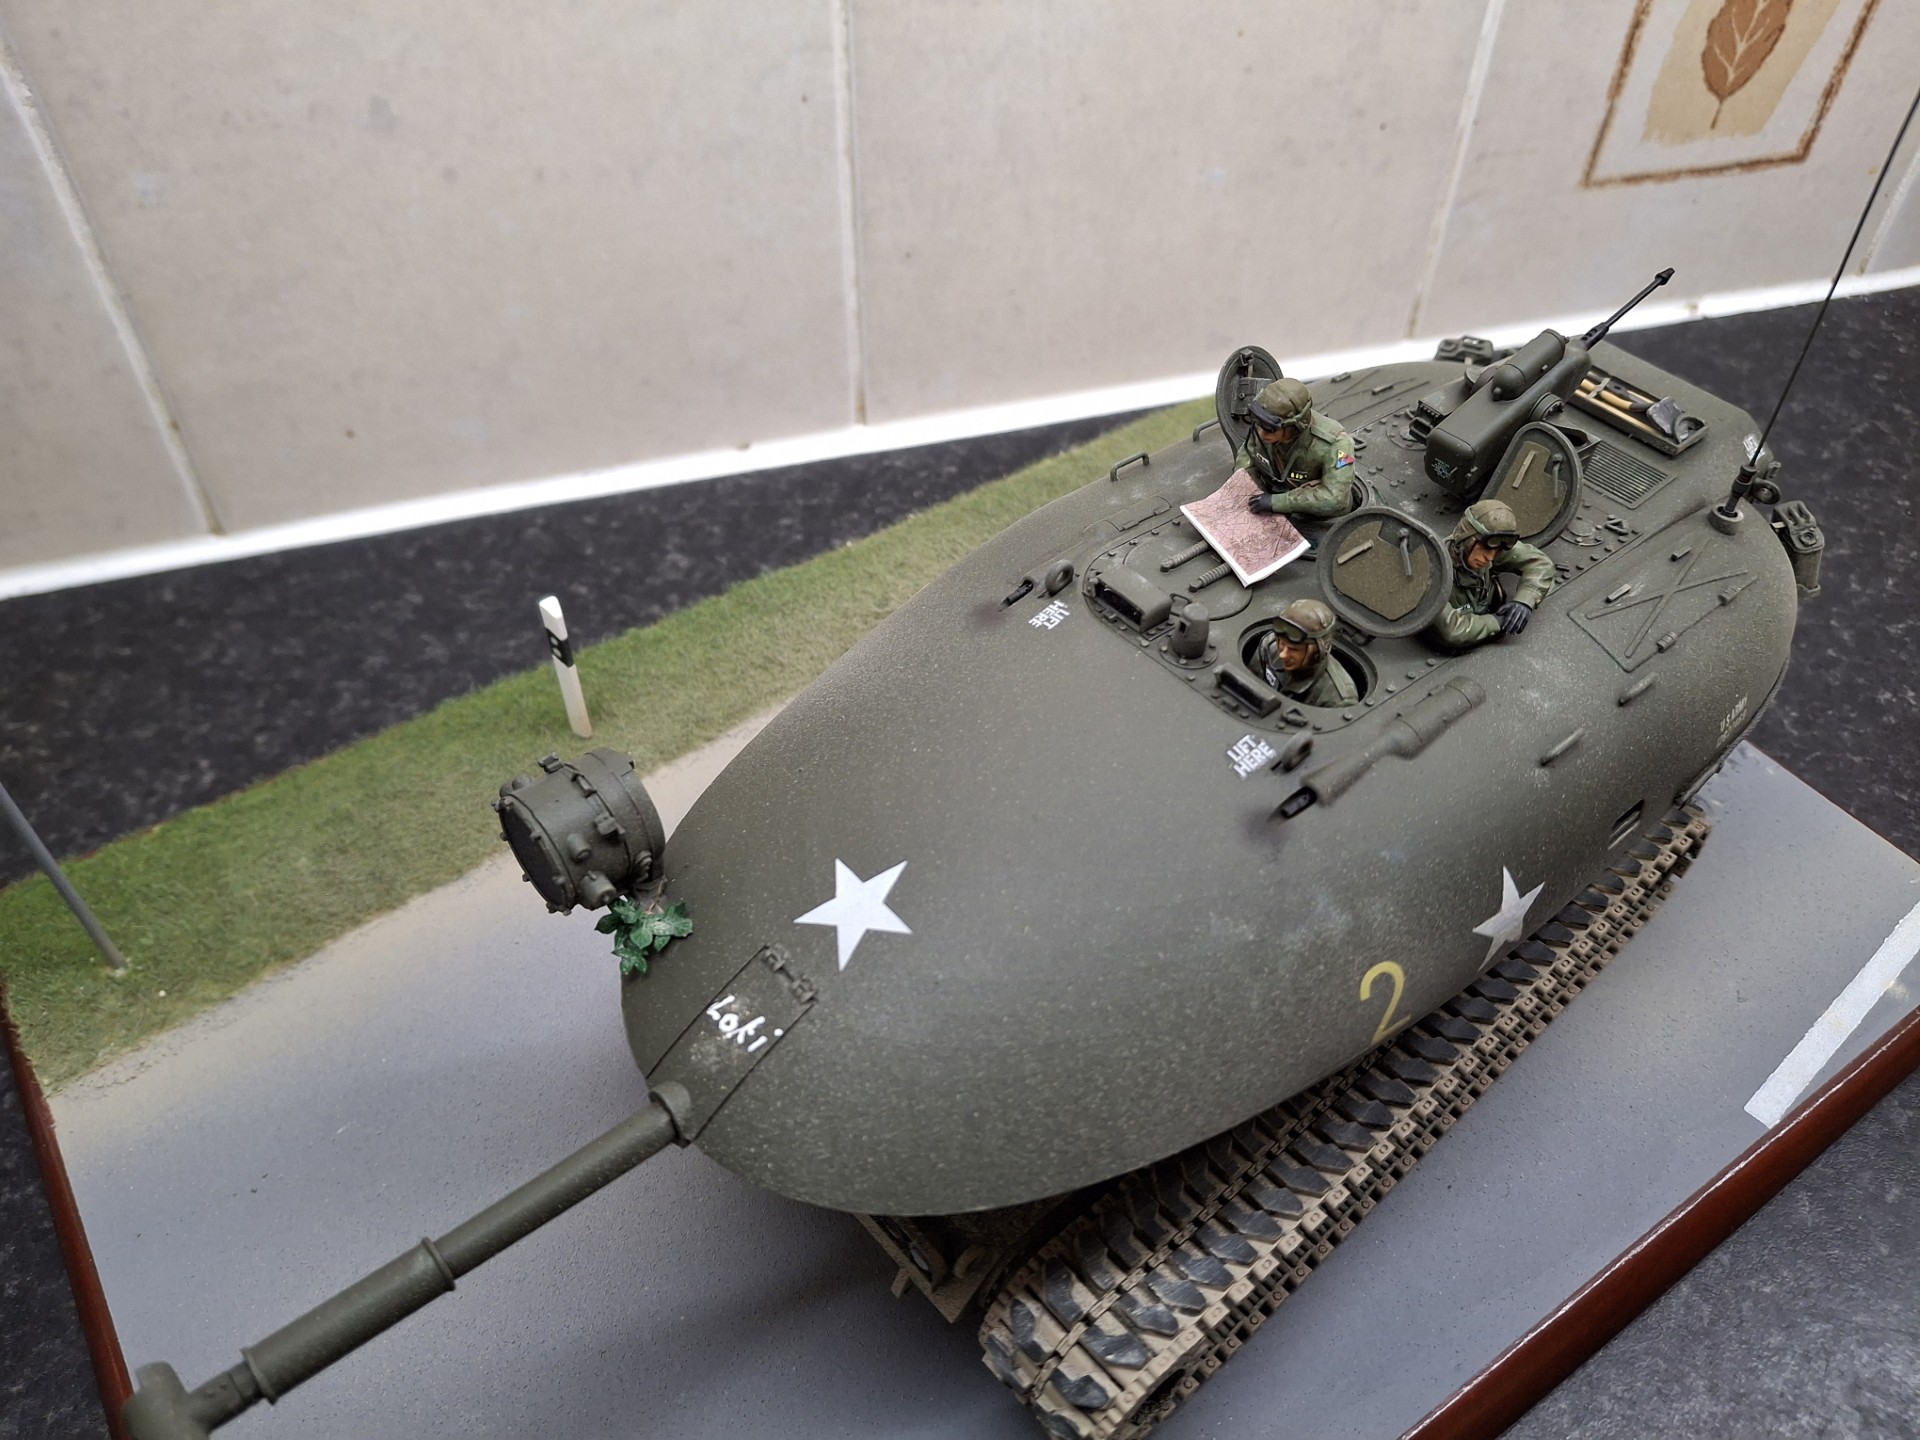
The model depicts one of these innovative tanks on a road march during the work-up period. Having transited cross-country, with no trackguards, the tank soon gets filthy. It is about to enter a small German village. Three crew members are visible, with the Driver straining to control the vehicle from his elevated position and the distorted view he has – despite the TV camera fitted to the chassis front; the Commander of course, is there to guide him. The Gunner has been told to close his hatch as otherwise it gets in the way of the Commander’s view when he needs to see out, as in this case. The Gunner won’t mind too much as he can catch up on some sleep, always at a premium. The Loader is happily viewing the countryside, content to take in the fresh air. The remote MG, a .50 M85 has been elevated and traversed to the rear so he can view as much as he likes. If the village contains some smart looking German girls then so much the better, and Army life becomes just that little bit more tolerable.
The vehicle commander, a SNCO, had previously served in Norway, on the NATO exercise, Northern Strike in 1952, where he met his wife, a local girl. Over the years, he had assimilated a certain interest in Norwegian history including the Norse mythologies; with such an unusual tank, which would clearly cause no small mischief on the forthcoming manoeuvres, he nick-named his tank “Loki”, and this is hand-painted on the turret front.
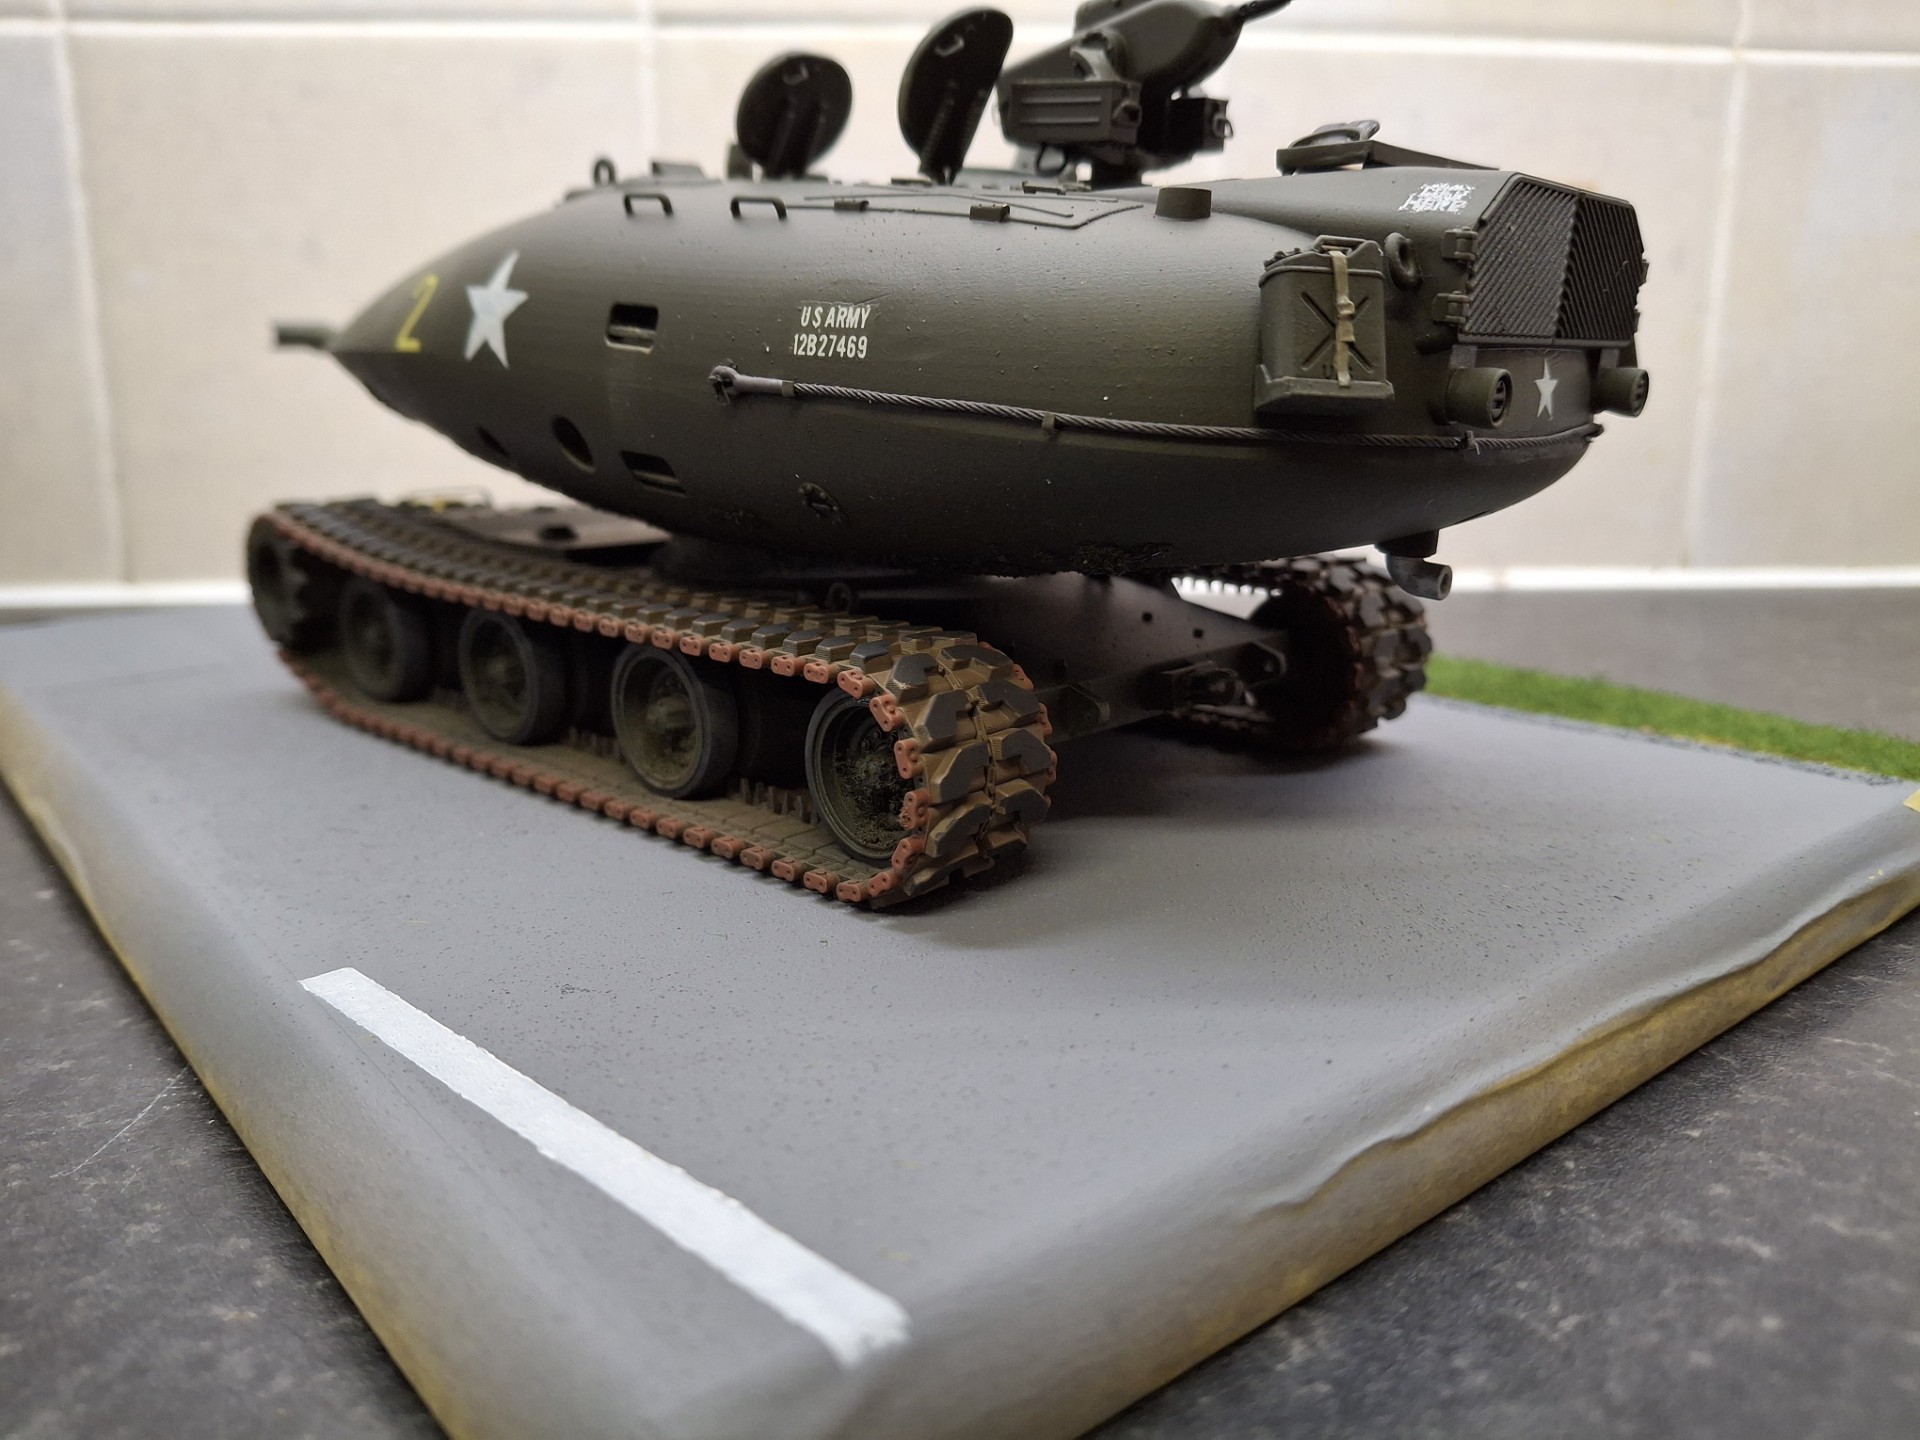
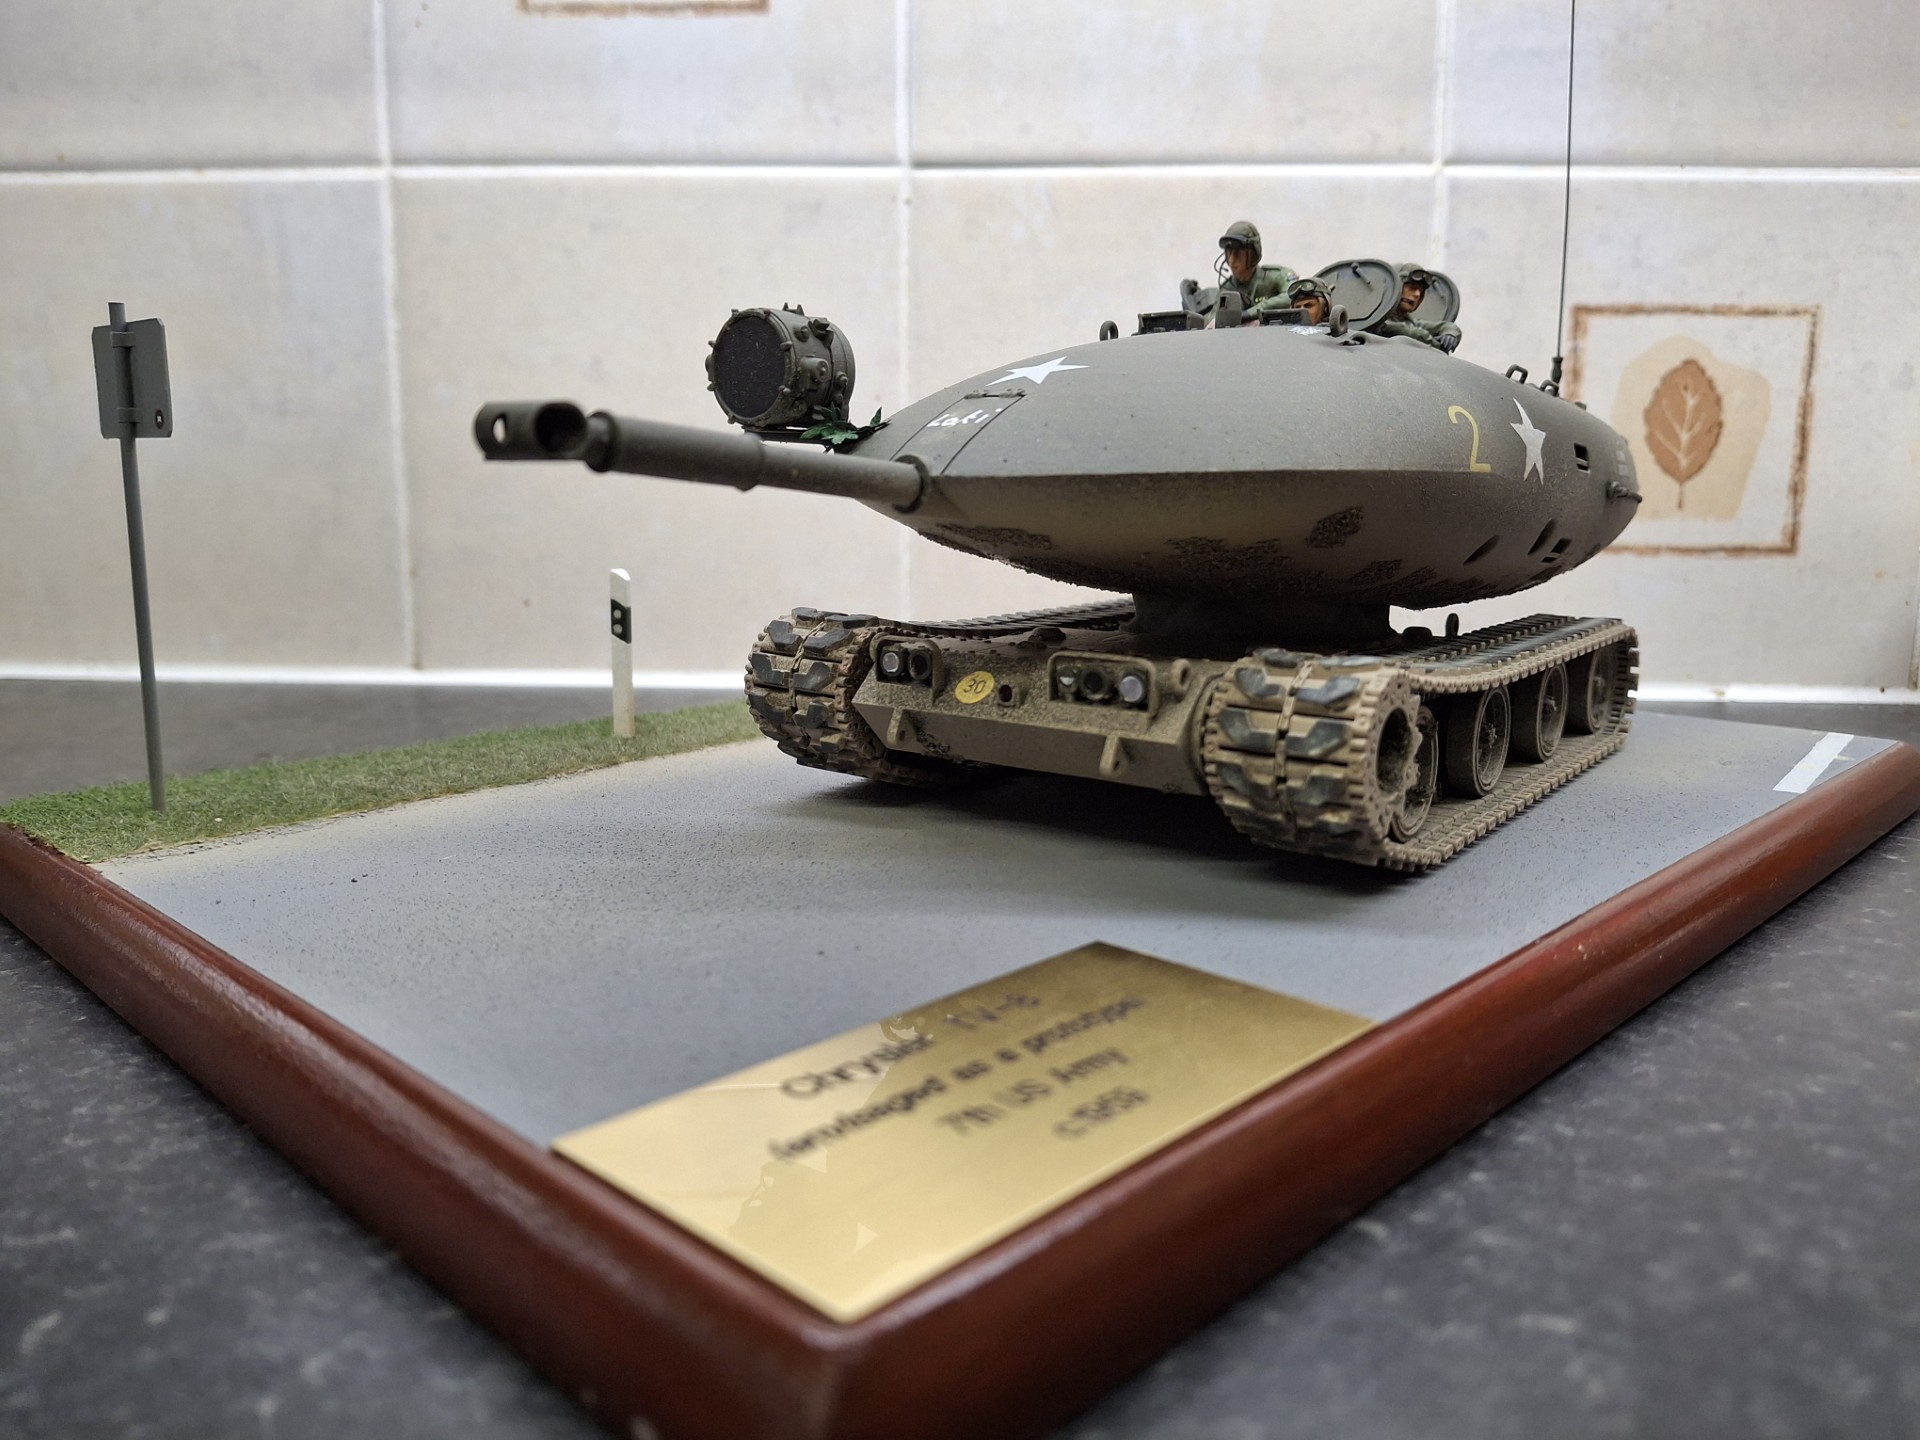
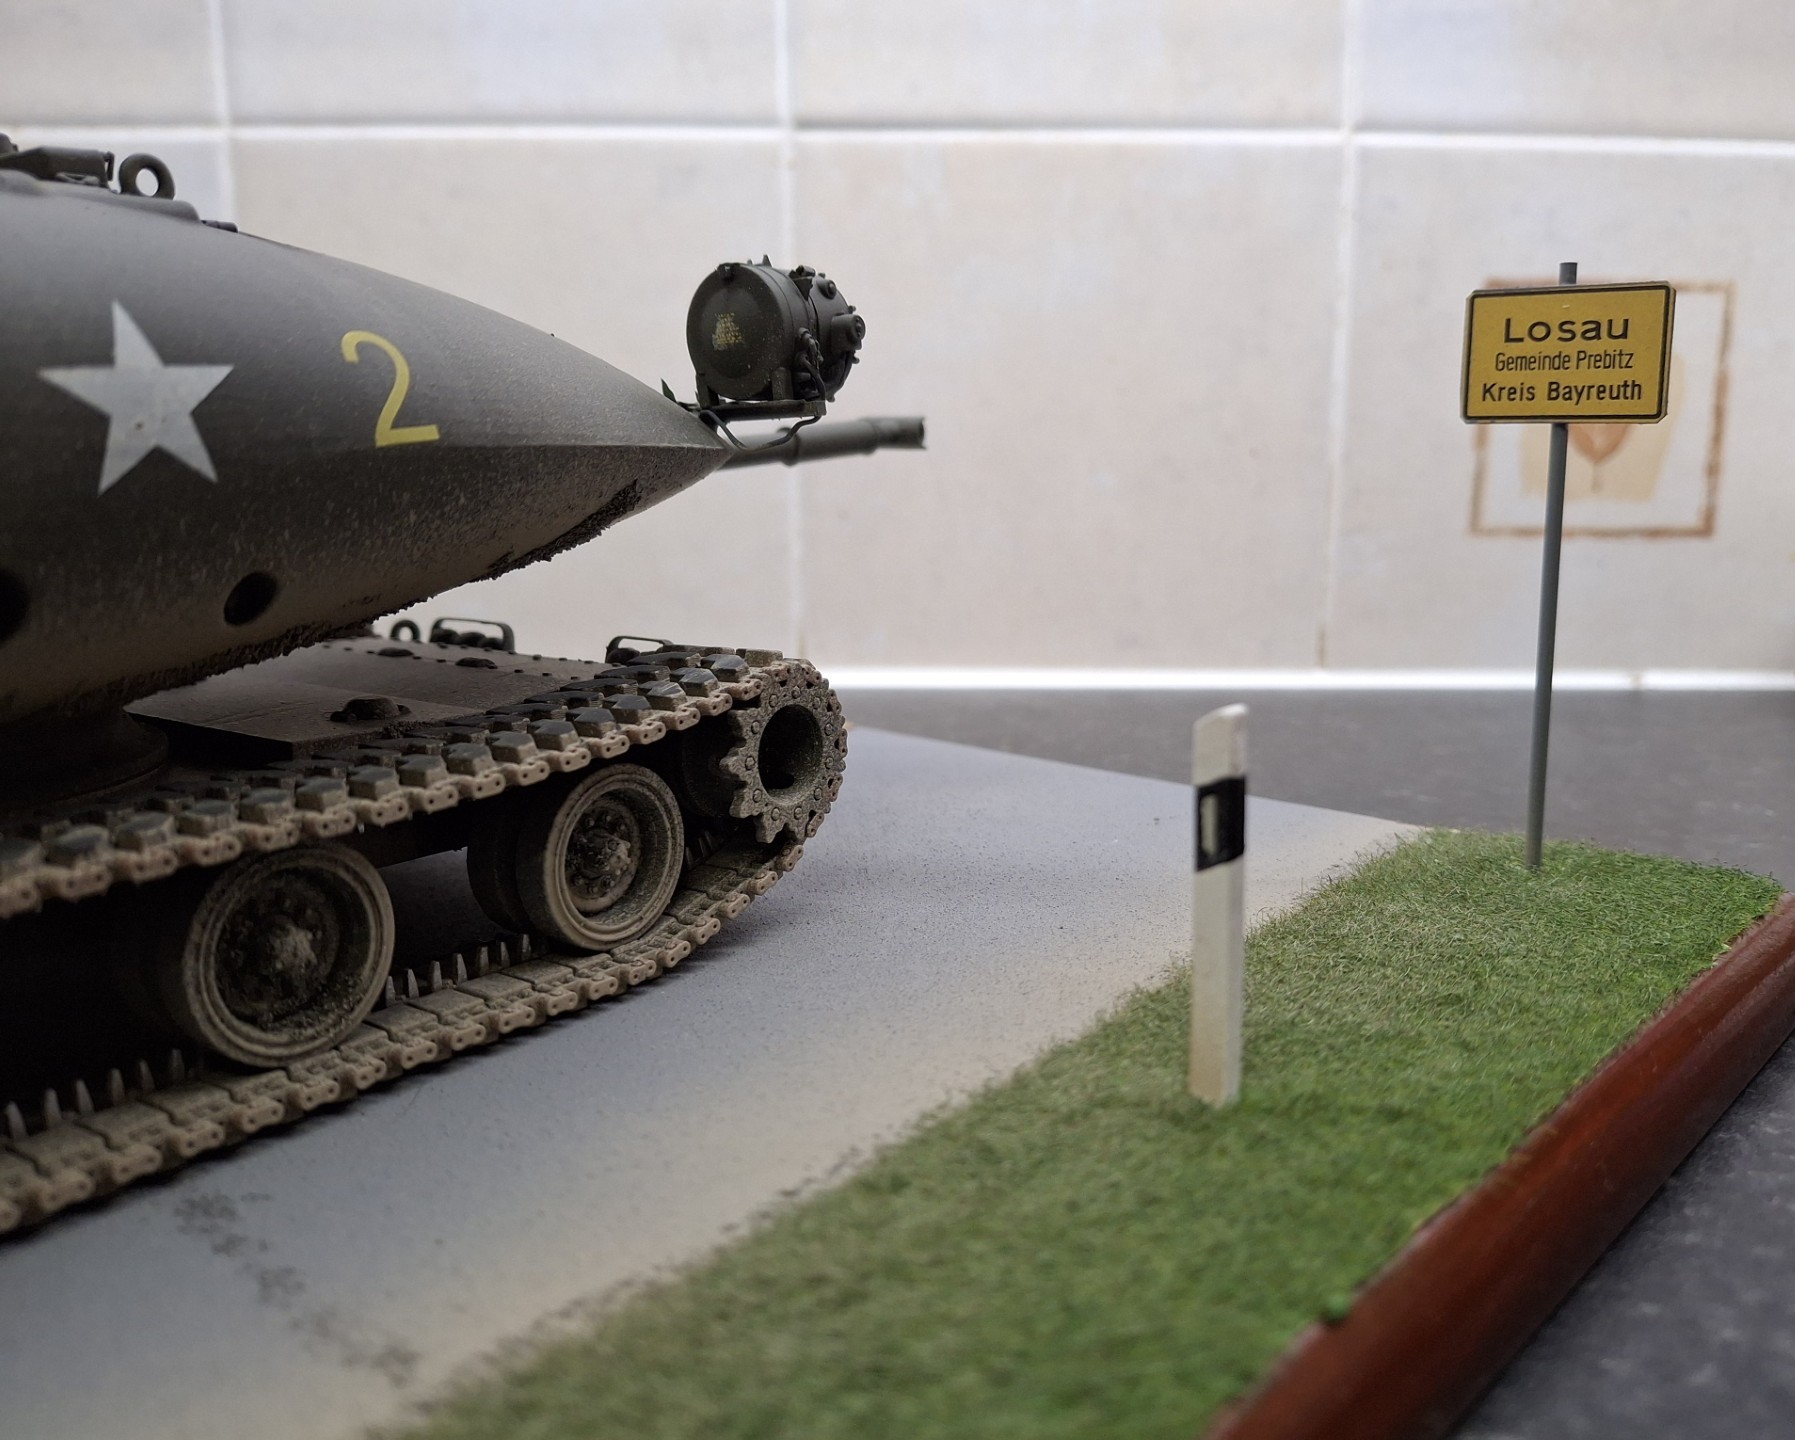
The tank obviously displays the large white stars, but I baulked at devising accurate – or even semi-accurate unit designations on the chassis, and took the coward’s way out and obscured most with mud and dust as an excuse. To be honest, given that the chassis component of this vehicle was so likely to be covered in filth, I imagine that any such numbers would be on the lower turret. However, I chose not to get bogged down in wrestling with designations. I’ve added large yellow numbers, used to identify the individual tanks within the unit’s organisation for the exercise duration. The stars and serial number came from a variety of spares; I also added a plug/cover for the water jet, which is shown dangling loose.
I did add a bridge classification plate upping the stated weight to 30. I also added some instructions-type decals on the HMG and some stencilling near the water-jet exhaust – the latter taken from a Tamiya M113 kit.
Modifications from the kit: I replaced all machine guns with brass versions; as I’ve mentioned before I feel the kit gun barrel for the HMG is too large. I used an Aber replacement - and assumed from the kit version that it was meant to be an M85 - so that was what I chose. I chose to show the .30s coaxial – turret top – showing, or rather just the barrel ends.
The kit will have you emplace two pericopes or possibly TV cameras each side of the remote MG; I envisaged that this didn’t work too well during the trials in the US so plated them over. There is one to the front between the Driver and Gunner’s sights, and I left that in position thinking it could be portrayed as a back-up sight for the Gunner.
I relocated the pioneer tool rack from the top of the chassis, thinking that trials would show up how filthy they would get so thought the turret rear would be a better place. I installed a tow rope around the turret. It’s a bit too taught but getting a droop here and there was beyond my increasingly-aged fingers.
One thing to note is that the instructions would have you fit handles to the external side of the hatches; I believe this is wrong – the handle should be on the inside. Academic perhaps unless you’re displaying a crew. I did add both liners and straps to the inside of the hatches, and a grab handle to the outside, from lead wire.
I added 2 x jerricans to the turret rear; these came from an Academy set I think with scratched holders. I was thinking of adding a stowage rack, but then thought that with all that space between the internal turret within the overall shell, that personal kit could/would be stowed within. I admit this was a bit of an excuse but also didn’t wish to detract too much from the overall shape. I still tried to be as logical as I could.
I drilled out the kit antenna mount and inserted a length of brass rod, which I normally use for antennae on my models.
The most noticeable addition perhaps, was the installation of a Crouse-Hinds searchlight; at the time NATO recognised that the Soviet were deploying AFV searchlights (with an Infra-red capability) as a matter of course, and this was far from the norm on NATO AFVs. Accordingly, I reasoned that on such an important exercise and with a brand new concept of vehicle, that such a light might be fitted. As it doesn’t have to elevate with the gun – as the whole turret oscillates – I could manufacture a simplified mounting plate. Whilst I have an Accurate Armour one somewhere in the stash I couldn’t locate it, so plundered my Dragon M46. I’ve located it at the front of the turret as that way, any extraneous light – when used - bleeding off into the Gunner’s sight is minimised (I admit that technically I don’t quite know what I’m talking about but it seemed logical).
The crew figures were a mix of Dragon WW2 US Tank Crew and their LAH at Kursk figure sets modified with card, lead foil and Magi Sculp to try and replicate the M51 Combat jacket, personal equipment and the comms set-up. I used Hornet Heads, with the ventilation holes filled in to reflect a later design. The boom mike came from fuse wire wrapped around a knife blade with the mike itself represented by just a blob of Mr Dissolved Putty. Other cabling was also from fuse wire
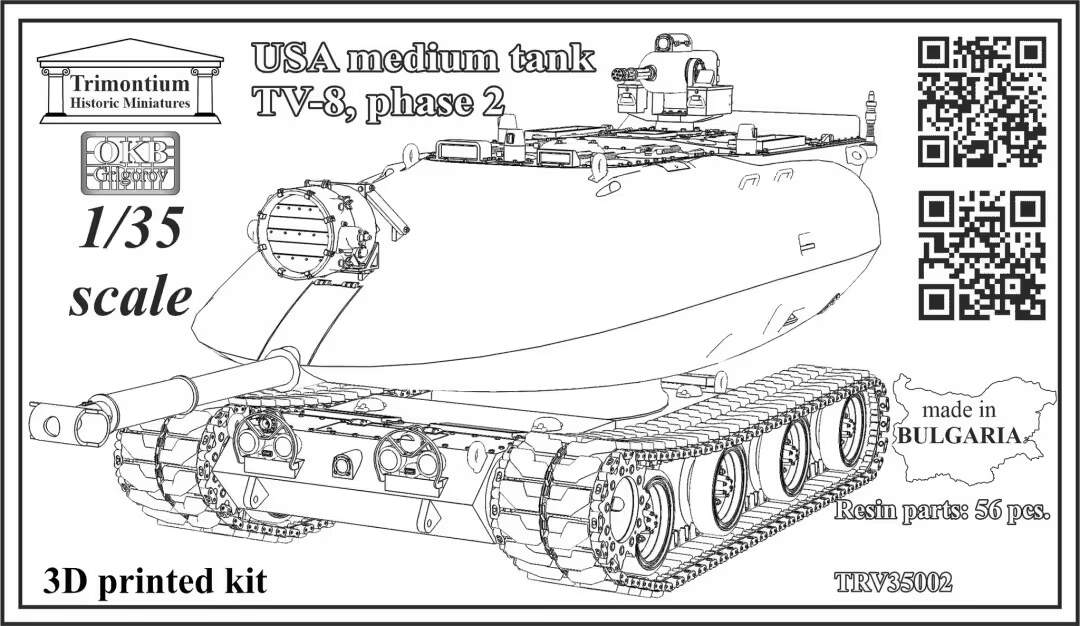
To sum up: a great kit which I never thought we would see – not that I was ever looking for one – experimental tanks not normally being within my (self-imposed) remit; very easy to build given the thought that’s gone into it. Hats off to OKB Grigorov/Trimontium Miniatures, they have surpassed themselves. Not cheap, but an extremely well-produced kit. I greatly enjoyed the exercise of deciding what might just go where, had such a strange vehicle ever been produced. I could also go off at a tangent and produce another – perhaps a Bundeswehr version, or say, later versions fielding a 105mm gun, perhaps with a later-pattern searchlight and crew in bonedome helmets, M60A2 commander’s cupola centred at the rear say, or the 20mm cannon assembly from the M114 – colour schemes such as MASSTER and even MERDC – but where oh where would it end? That said, this particular What-If build was fun.
The build was straightforward; the challenge was trying to depict it as normal, so trundling along a German road should, should do the trick.
Over to you folks – then a reversion to something more prosaic perhaps(!)


18 Likes
Very nice, cleaner than I expected from your write up.
Was this pre ‘blinky’ regs?
Mal
1 Like
Thanks Mal; yup, must be. I’ve set it in 1959 and can find nothing pictorially for that era showing any.
2 Likes
What are blinky regs?
1 Like
The German traffic ordinances confirming that flashing amber warning lights must be used on large military vehicles.
5 Likes
Beautiful job Brian. The most unusual piece of armor I’ve ever seen. The figures look excellent as well and the base as well; reminds me of the German roads I once traveled when I was stationed there. Outstanding!
1 Like
Great job, and you should cast and sell those figures!
1 Like
Missed these - outstanding
1 Like