Confusing decal instructions

I am building Tamiya Stug IV and I am at the decal phase. Normally this is a breeze but the instructions on this old kit aren’t super helpful.

I can’t find much info for the assault gun brigade markings, to figure out if they even existed. Second I can’t seem to find reference photos with the Unit marking and so called “tactics” marking on the front fenders. Am I better off jsut using the numbers and balkenkreuz for the decals and not using anything else?

The assault gun markings are all correct as are the other unit markings. In fact, some of the German assault gun units and infantry divisions had quite elaborate and colorful markings.

The independent assault gun brigades were corps-level assets that were generally divided up to provide individual companies to the infantry divisions in that corps. These StuG attachments often served alongside “their” infantry division for long periods. However, as they were corps-level assets, they could be shifted from one division to another, as the situation called for, or multiple assault gun companies could be attached to the same division to “weight” the corps’ main effort. Re-tasking to other corps or armies within the theater was also common enough.

However, there were other assault gun companies that were organic to certain divisions, especially the mechanized or Panzergrandier divisions. These were in addition to the tank destroyer (Panzerjeager) companies and also different from Stugs that were issued to Panzer battalions and companies as substitutes for tanks (in both Panzergrandier and Panzer divisions).

This being one of Tamiya’s older kits, they’re not providing marking instructions for any specific vehicle supported by references (which is more common now) but rather a “generic” set of markings that are all generally correct, leaving it up to the modeler to come up with a “type” example or to use his own research for a specific vehicle.

The StuG IV was issued pretty much as a substitute for the StuG III in just about every one of the kinds of units that could have received the StuG III. They tended to be concentrated into single units of one type or the other, at least at the company level and lower, probably for maintenance and logistics. However, the StuG IV was a '43 and later vehicle type, so all of the late-war, increasingly confusing exceptions to all the rules of unit organization on the German side apply.

Cheers! I always appreciate your detailed responses!! What I gather from this is I can use any of the decals I like from the Assault gun bridages/ divisional markings?

1 Like

That’s pretty much it… However, only one of the unit markings is correct for any one vehicle. That is, there wouldn’t be a combination of one of these brigade markings ALONG with one of the supplied divisional markings.

The divisional markings are all for units that would have had the StuG as an organic piece of equipment (not attached).

The brigade marked vehicles probably wouldn’t have ever carried both their independent brigade insignia AND the insignia of the division they were attached to, in any case. Although it’s hard to say “never.”

Still, if this did happen, the division concerned would almost certainly be a regular infantry division and not one of the armored / mech-infantry divisions supplied on the decal sheet with this kit.

I am planning on using this vehicle displayed with Panzergrenadiers riding on it. Based on the info provided I am thinking a divisional insignia may be more appropriate?

Here’s an allocation list someone did for the Stug IV and might help you decide on a unit that will be appropriate:

2 Likes

Another question. It has been a while since I’ve decaled something and this probably sounds like a dumb question but if I recall correctly.

  1. Gloss coat (future) and let cure
  2. Decals with microsol and microset
  3. Gloss coat to seal

Do I need to gloss the whole model or just where the decals will go? If I need to gloss the whole thing, does future airbrush well?

You could just gloss where you want the decals, but I find it can sometimes alter the underlying paint in relation to the matching paint you didn’t gloss. If it was an airplane model, I would gloss the entire thing but for armor I might just gloss the entire panel the decal goes on so the surface stays uniform and later weathering will be consistent.

As for decals, if you are just hitting the spots, then I only wait until the gloss is touch-dry. If I’ve coated an airplane I give it at least 24 hours.

Then your decals and preferred setting solution.

Then certainly seal them once they’ve set to your liking.

I personally didn’t like spraying it because it was harder to clean up than most of my paints; I brush paint it now. It self-levels as long as you don’t go nuts and pour it on like Hershey’s Syrup or something.

1 Like

Awesome thanks! I am planning on spraying a very thin coat of buff to tone down the camo contrast and blend the paint job.

I was wondering if this should be done before or after decals. I’m thinking after so the paint and markings are both faded, but worry it will turn white decals brownish/tan. Any thoughts?

1 Like

I use hand brushed filters to blend my camo and have never done the buff spray (I have watched Andy of Andy’s Hobby HQ use that a lot), but I would think the markings would be discolored by whatever dust or dirt was on the vehicle anyway. With the filters on top of the gloss coat I can thin them down a bit to get the excess off the decals if the filters makes them look too dark; I feel the hand brush allows more control.

I also must admit I spray my own Balkenkreuz when practical, so decals aren’t a big issue to me.

I like the idea of brush filters too but it may be hard to on this one since I have diy zimmerit and I am not sure how well it will hold up to brush over.

I could probably spray most of the decals for this one too. Only one of the Balkenkreuz is in a spot that would be tough to each by airbrush

I agree with all of the advice you’ve got about how to apply the decals and also for applying glazes. I generally apply decals before doing a lot of weathering so that the effects of time, climate and dirt are also shown in the markings.

I prefer the airbrushed glaze technique, myself, but I also use a lot of other weathering / finishing techniques together with that. All that’s really important is how the effects combine to create the final result. The path to get there is not so critical. There’s a logic to the sequence that you might use, so consider how each layer or effect builds on the earlier layers and how the overall finish is arrived at.

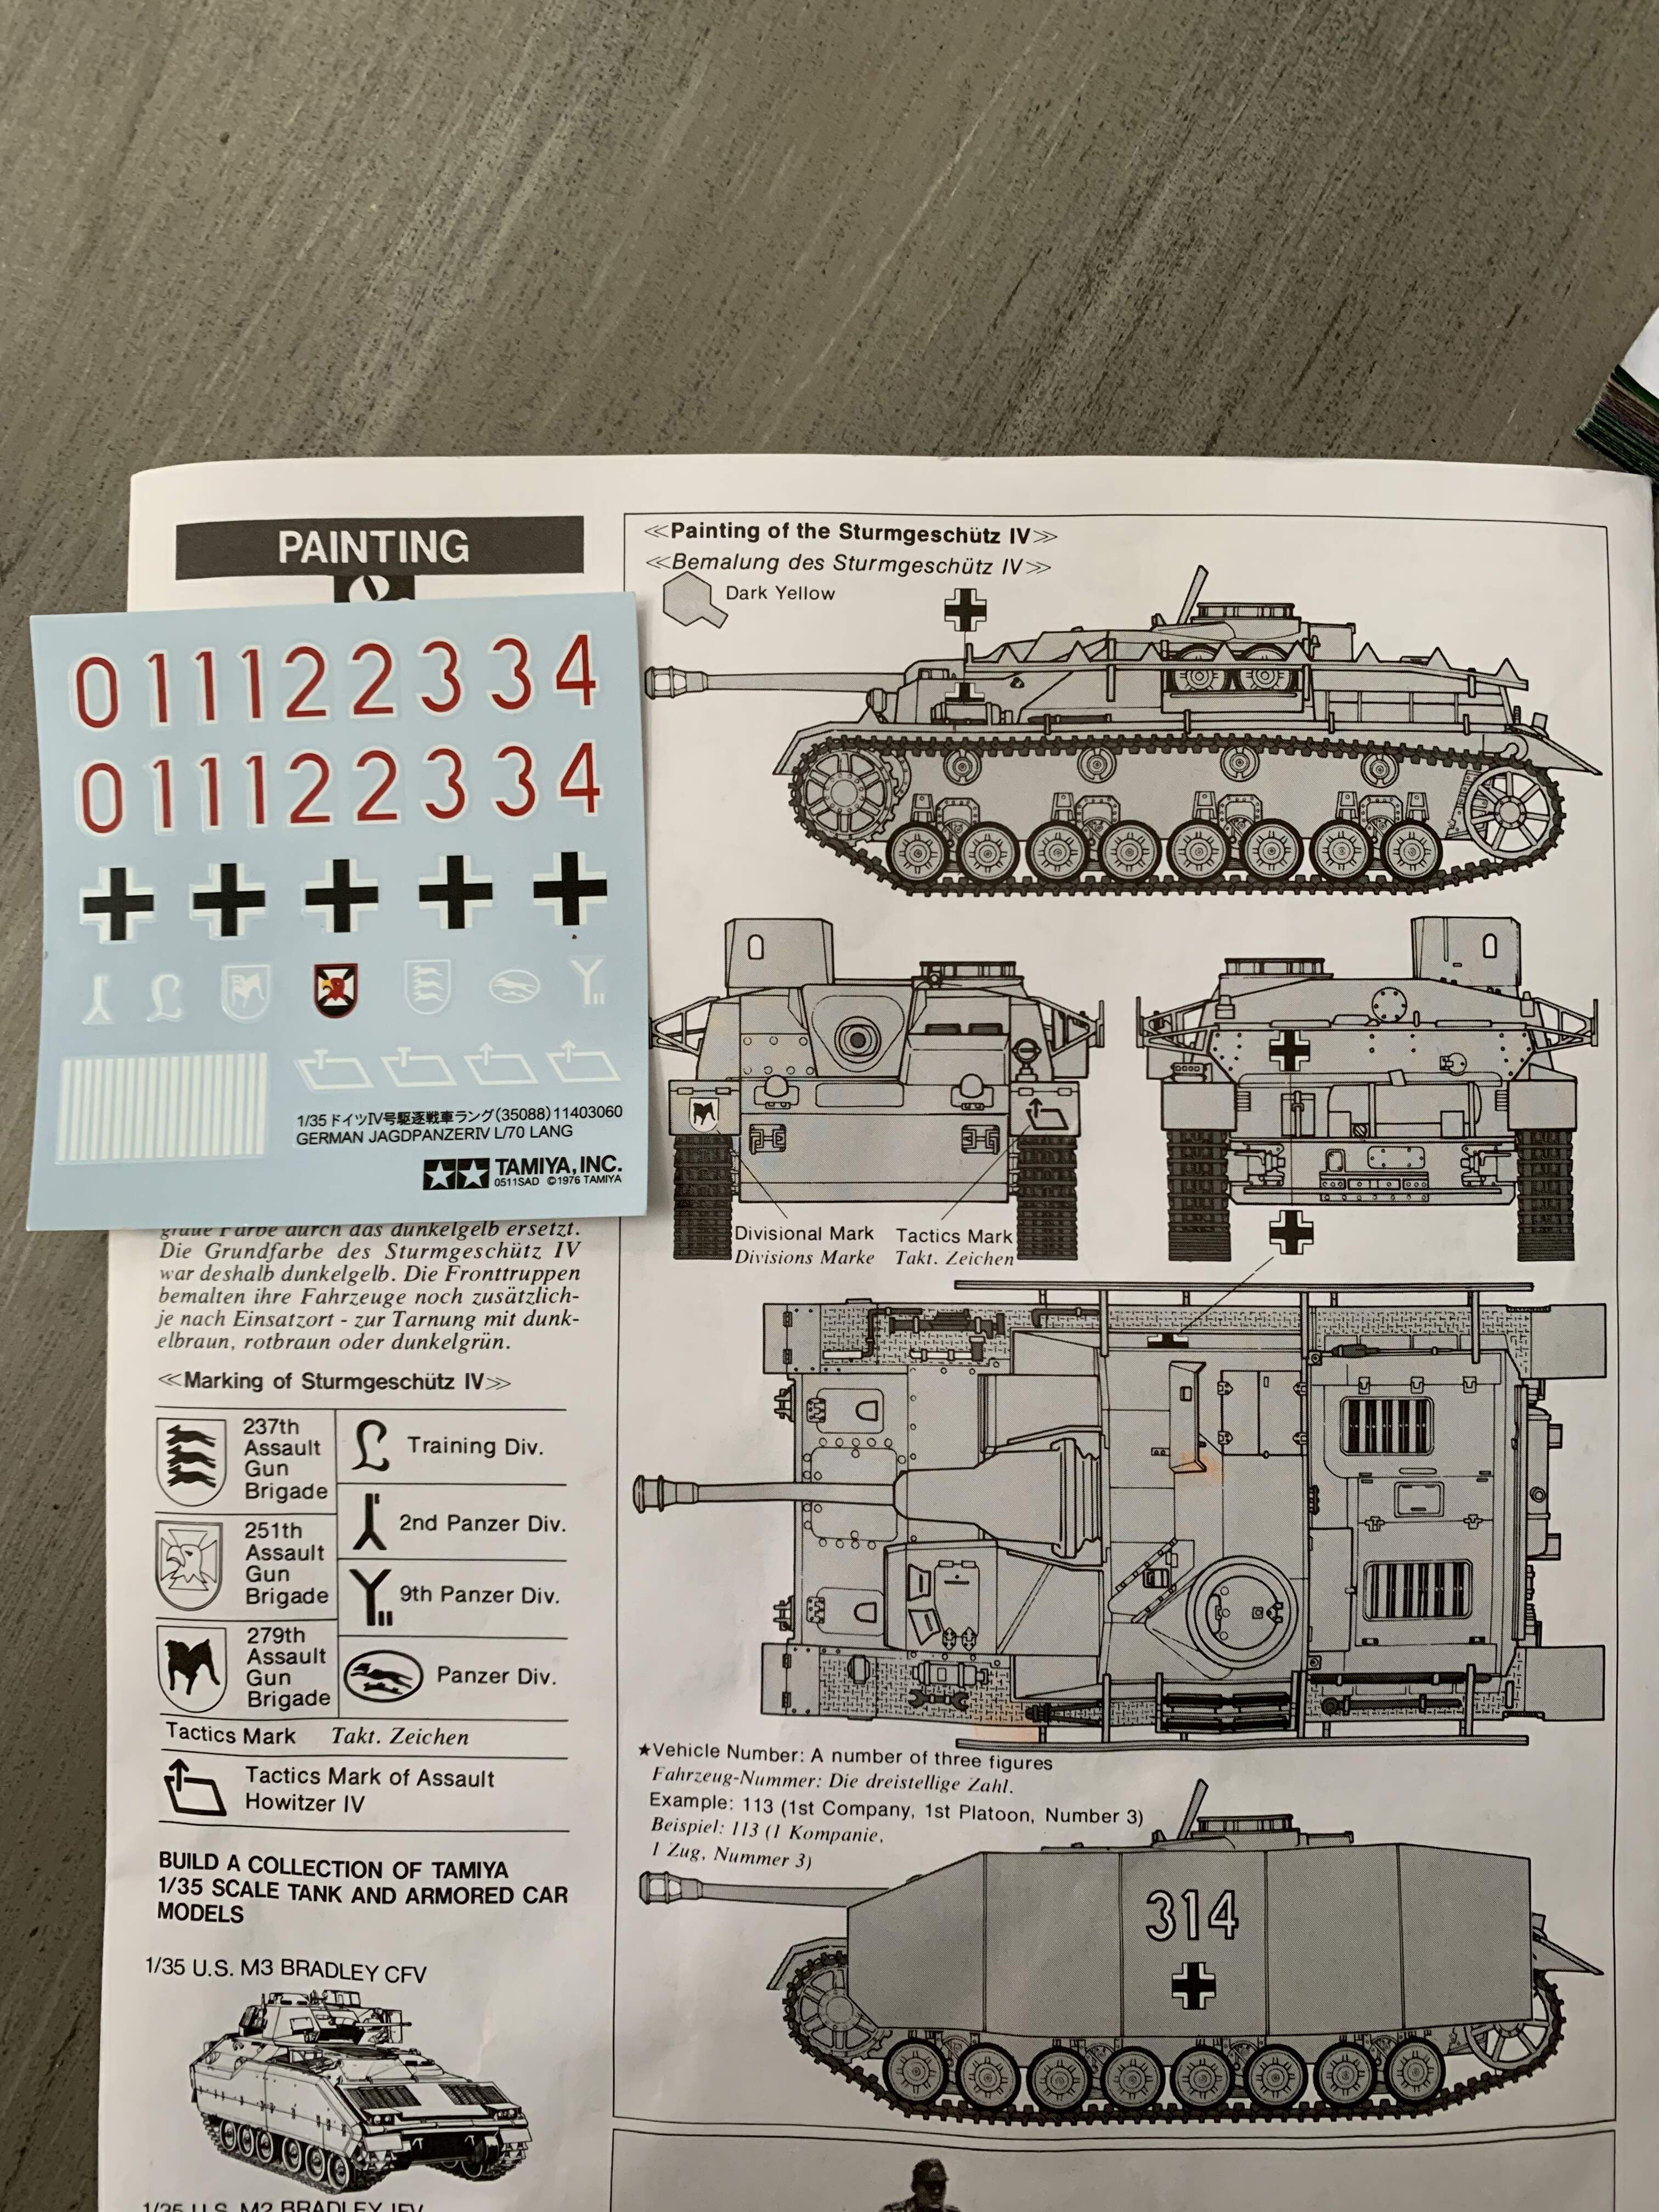
Your observation about wanting the glaze (either air or hand brushed) over the markings to help “blend” then in to the overall finish is a good example of this logic in action.

In regard to your question about the suitability of the divisional unit marking with your “tank riders,” the only visual difference between Panzergrandiers and regular infantry would be the color of the Waffenfarbe “branch of service color”) used on some of their insignia - shoulder board piping and collar Litzen (collar “tabs”). Panzergrenadiers would use a “grass” green (also variously described in references as lime green or yellow-green) and regular infantry would use white.

By the time the StuG IV was being fielded, almost all German army soldiers would be wearing uniforms with the later Einheits (“universal”) insignia, so collar Litzen wouldn’t have the Waffenfarbe lights. This would leave the only branch colors on the piping on their shoulder boards.

Of course, troops that have been serving longer might also be wearing older uniforms which might then have earlier versions of the insignia already on them. So, mixtures of older uniform variations with newer (but only up to the date of your model) are realistically possible.

So, as a practical matter, the only difference between making your tank riders Panzergranadier vs. regular infantry would be how you paint their insignia (or which insignia decals you use, if you go that route). Thus, the use of the independent assault gun brigade or divisional insignia sort of depends on how you paint the tank riders than anything else. Of course, that beings up the related matter of the uniforms of the StuG crew which also showed branch of service variations.

A StuG issued to a Panzer regiment as a substitute for a tank would likely be crewed by Panzer troops who would be wearing insignia with pink Waffenfarbe insignia piping.

A StuG issued to an assault gun unit, either in a independent assault gun brigade or in an organic divisional assault gun company would likely be wearing a mix of Waffenfarbe. Drivers were generally trained in schools operated by the Panzer branch, but loaders, gunners and commanders were generally recruited and trained by the artillery branch (since the assault gun was an artillery branch weapon first and foremost). Those crew members would be wearing red piping.

Of course, there all all sorts of exceptions, so, for example, assault guns issued to and manned by troops in the LW or SS would have entirely different uniforms. A soldier who might have started off as a driver in an assault gun brigade could have been promoted and given the position as a StuG commander, so he could be wearing pink Panzer waffenfarbe while most of his peers are wearing artillery red, etc., etc., etc…

2 Likes

I’ve noticed some Stug IV had a balkenkreuz near the drivers hatch and some has it near the road wheel bin. Does anyone know the significance of one placement vs the other or was it unit specific?