Designing figures

Hi all!

Although I have seen numerous 3d printers at work, and even help sell them at work, I have yet to actually get into it. I hope to change that this winter, as I would like to pick up a resin printer.

Thing is, my main interest in using such a printer would be to make figures. Mainly 1:35 and 1:32, as I want to make Canadian vehicles with unique Canadian figures. For example, I want to build Italeri’s 1:32 F-104G (as a CF-104, of course), and I think it would be quite neat to have a figure posed in the cockpit as such:

It would add a bit of a unique quality to the aircraft, but the problem I’m encountering right now is that there is no AM for such a figure. Ergo, I want to learn how to use CAD programs to design a model for a figure that I could then print.

So I guess I’m appealing to you 3d printing experts to give me some guidance as to how I can start to learn the requisite skills to make something like a model of a person. Are there specific programs I need? Any good tutorials on Youtube? Any advice at all would be greatly appreciated!

Regards,

Dennis

1 Like

Maybe talk to Hubert @ http://reedoak.com/.

He is doing what your trying to do.

You can use Blender to make the basic form of your figures. I don’t know about all the small details though.
If you want I can write and send you a whole tutorial on how to make a person in it.
( I had an entire semester learning how to make a person. :disappointed:)

1 Like

Thanks guys! @Panzer_modeler , I’ll take you up on your offer, and @Tank_1812 , thanks for the link!

Well, pretty much this is how I have done it.

Pt.1

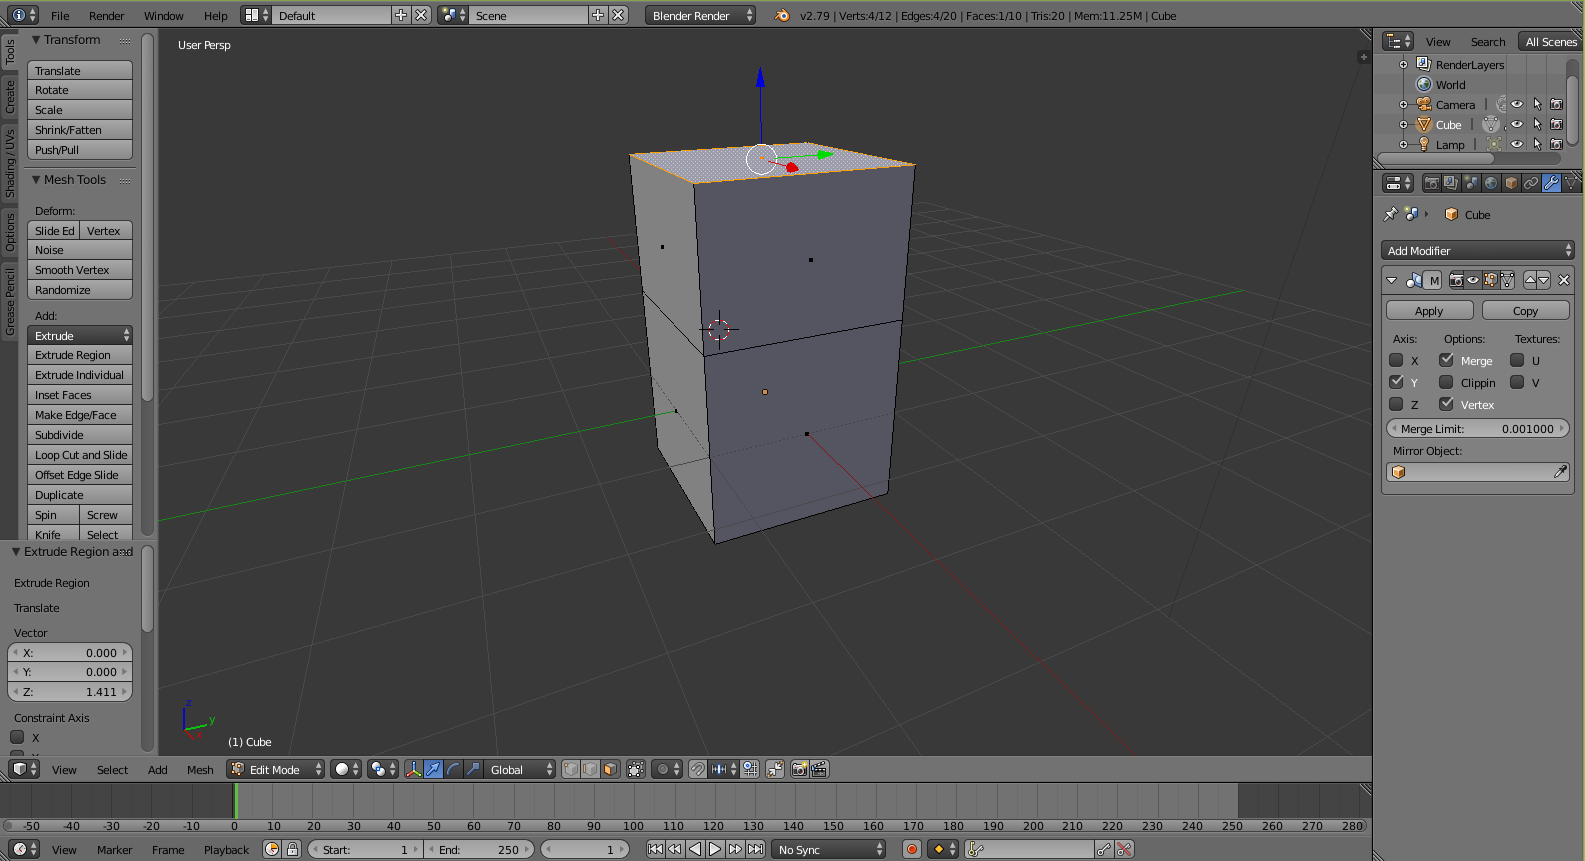
First, start adding a little more definition to our cube by creating the beginnings of the torso, then the arms and legs, and finally the head. These will still look extremely crude but will form the basis off of which we can further craft the final character model. The first thing you’ll need to do is make sure you are in edit mode, then select the very top polygon by right clicking on it. Then, press the E key, which will activate the extrude function. Now, simply by moving the mouse up and down, you should see a new section pull upwards from the mesh, in the direction that the selected polygon is pointing.

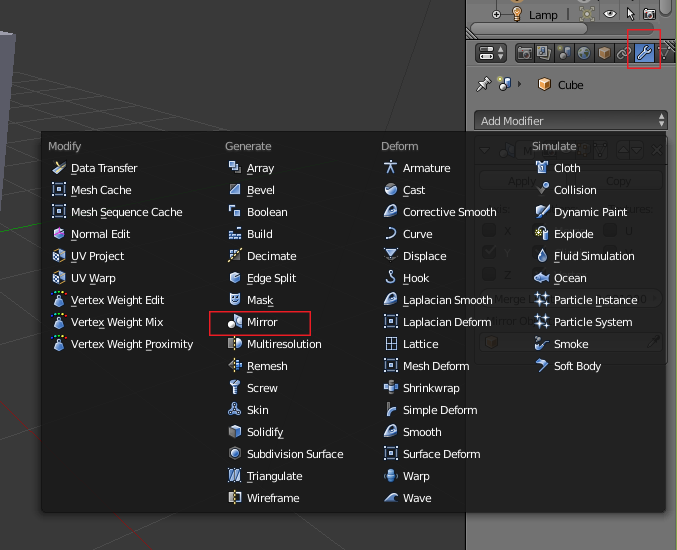
The new generated geometry, represented by polygons, edges, and vertices, can be moved around to create different shapes. This is still a very primitive shape, however, and we will need to continue blocking it out with more extrusions before we have anything really useful from a character design perspective. One massive timesaver in this process is to use mirroring. In Blender, the tool that does this is called Mirror modifier. To add it to your model, press Tab to come out of Edit mode and back into Object mode. Next, in the properties window, click into the modifiers context, and select Add Modifier>Generate>Mirror.

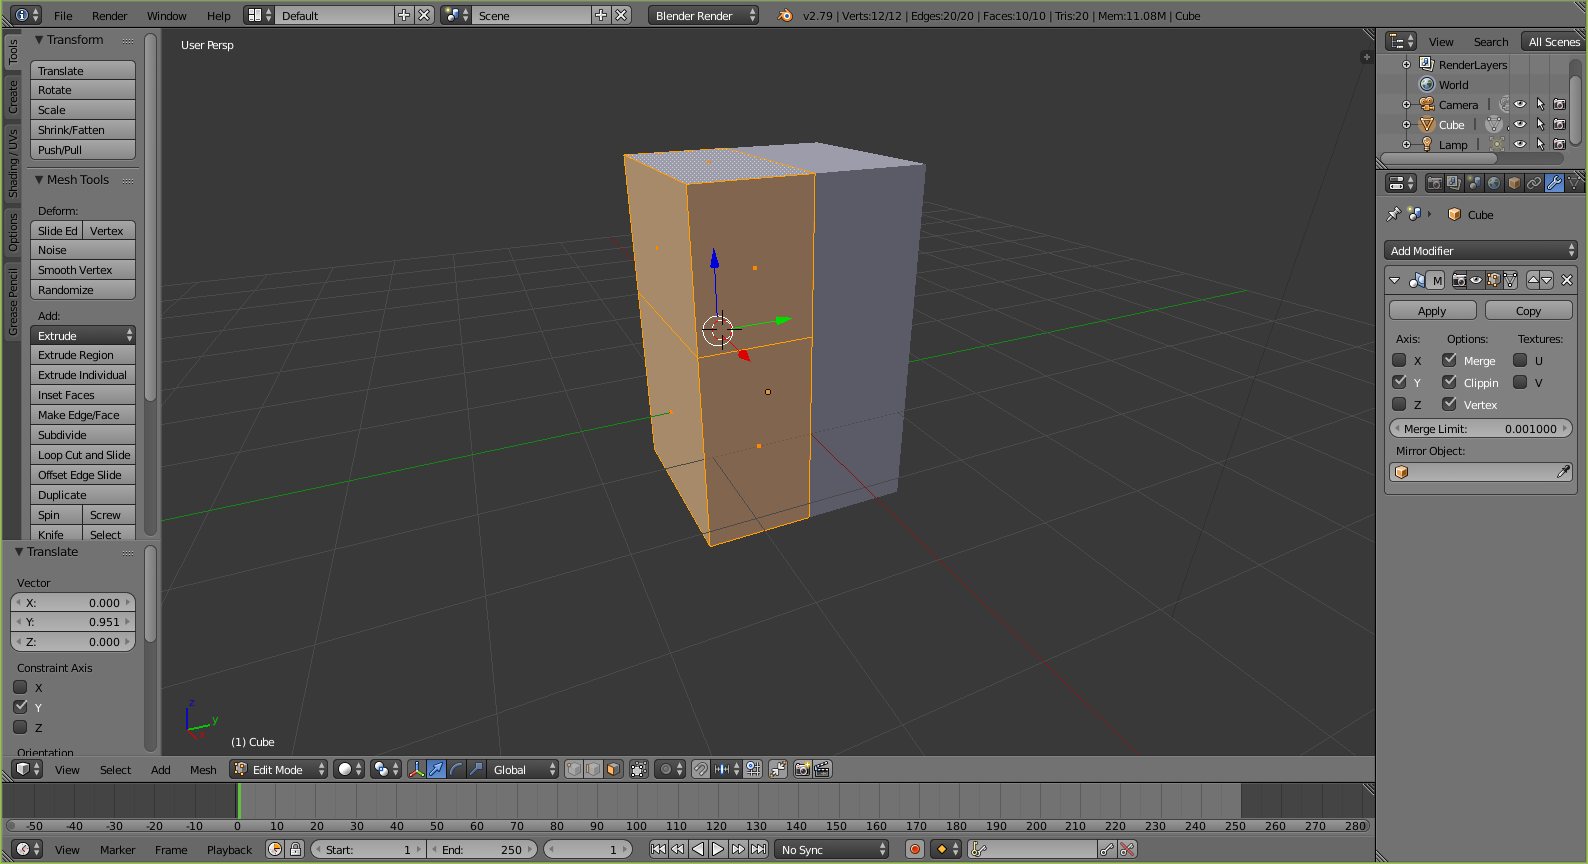
You will see the modifier appear in the stack, on the properties window. Under axis, you will want to mirror on y, but the default is set to x, so uncheck beside x, and check beside y to switch. Also, check Merge and Clipping, so that the two sides of the model merge at the center and don’t pull away from each other as you edit the model. Finally, press Tab to go back into edit mode. Press the A key to select all of the mesh, then press G to activate the move tool, and Y to isolate movement to the y axis only. Finally, move the mesh away from the center. You should see the two sides of the mirrored box clearly now, and merged perfectly at the center.

Now whenever you add something on the left, it will automatically match on the right. To see this in action, let’s extrude a new section of polygons on the top of the model for the neck. Select the top polygon by itself, and press E to extrude, then pull it up with the mouse, and left click to complete the operation. Next, press S, then drag the mouse down to shrink it.

Blender screenshot showing later stages of the mirroring technique while using extrude function.

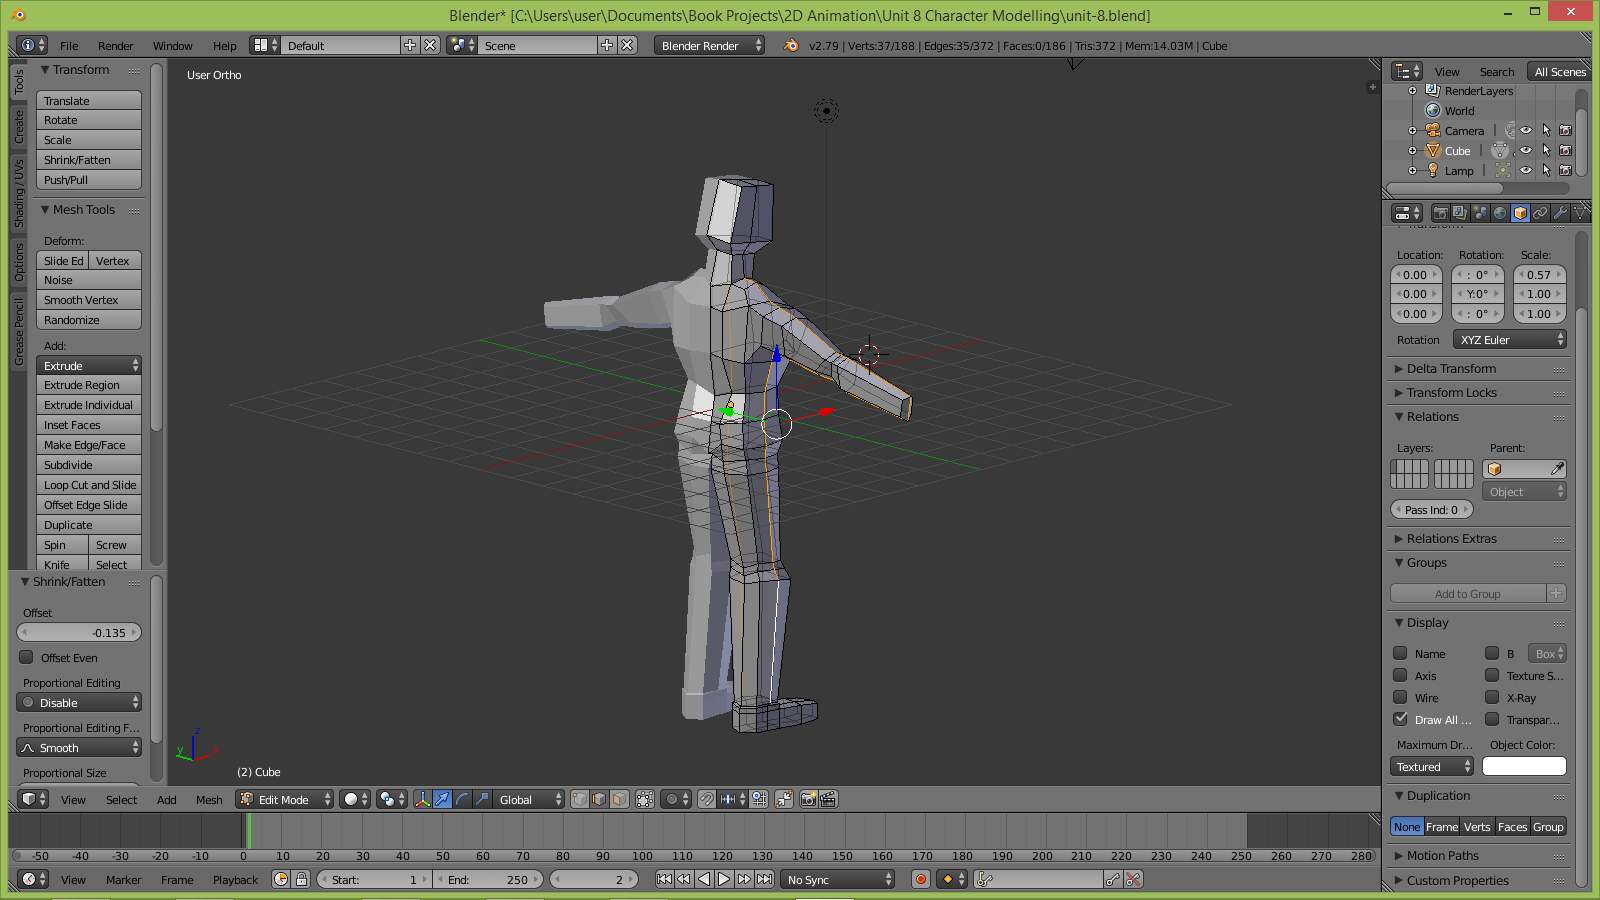
As you can see, all changes made on the left side are mirrored on the right, which is extremely useful when modeling a symmetrical object, such as the base mesh for a character. Let’s continue to block out the basic shape now by creating the shoulders and arms. Select the upper left polygon, and extrude out and scale down a new section for the shoulder. Press R, then X to rotate the polygon slightly around the z axis.

Blender screenshot showing the blocking of a basic shape and creating shoulders and arms.

Now extrude out the arms by pressing E and dragging the mouse to the left. Scale it down slightly to create a taper by pressing S and dragging down the mouse a little bit. What you should now see are two arm-like extrusions coming out of the shoulder areas of your model.

Blender screenshot of a side view of the torso with the arms extruded.

Next, select the edge at the bottom of the model, and pull it down slightly to prepare for working on the hips and legs. Now select the bottom polygon, extrude it slightly, then scale in a bit to prepare a base for the hip area.

Blender screenshot showing the object’s arms fully extruded and identifying where to extrude legs from the waist.

Now you’ll want to extrude out the legs. Make them roughly the same length as the rest of the body. When you have extruded them, keep the bottom polygon selected, and then press S to turn on the scale tool, Z to isolate scaling to only the z axis, which is vertical in Blender. Then, press 0 on the keyboard to effectively flatten the polygon on the z axis. What you end up with will look kind of like a pair of flared pants.

Blender screenshot showing the object/body with fully extruded arms and legs.

It is important to consider where you place your edge rings. This is because edge flow will affect how well a 3D mesh deforms when rigged and with animated bones. For example, looking at the model right now, it is easy to say that it is not yet ready for proper, bipedal animation. Since the legs and arms just look like sticks, there’s nowhere for them to bend. To correct that, we will add some edge loops around where the knees and elbows should be, as well as the hips and shoulders. We can add edge loops by pressing Ctrl + R and clicking on the appropriate place on the model. After clicking once, you have the option of sliding the edge along the adjacent geometry of the model. Clicking a second time will apply the operation.

Blender screenshot identifying where to add a ring and create a curvilinear form, with a specific focus on the neck area.

Now you have the basic geometry required to effectively deform the mesh of your character model at the joints. However, things are still looking very flat on the front, but you want something a bit more organic looking, so you add another ring to allow us to create a more curvilinear form, this time running up the model, from the leg to the neck.

Blender screenshot identifying where to add a ring and create a curvilinear form, with a specific focus on the waist area.

Now it’s starting to take on some kind of an underlying structure, though it’s still pretty robotic looking. Now add in the basic structures for the neck and head. Zoom in on the top of the model, select the innermost upper polygon, then extrude it up to create the base for the neck.

Blender screenshot showing the extrusion of the neck and head from the top of the object/body.

Now, switch to Sculpt Mode and select the Grab brush from the brush options menu. This will allow you to click and drag vertices around.

Blender screenshot showing the brush tool menu and various options.

Keep nudging vertices around until the model takes on a slightly softer, more proportioned appearance. As much as possible, you want to eliminate unnatural looking, flat surfaces. Now, extrude the structure of the head out from the top of the neck by selecting the uppermost polygon and using the extrude tool as before. Scale it out a little then extrude it again, until you have a structure that is roughly filling the area of a human head.

Blender screenshot showing the extrusion of the head with a focus on the top of the head.

The stomach looks a bit tubular though, so add an additional edge loop around it. You can do this by working in Edit Mode and pressing Ctrl + R to activate the edge loop tool. Then, click on one of the edges around the circumference of the torso, and click a second time to confirm the operation. By pressing the S key and dragging the mouse toward the area of interest. You can scale it in a little to make the torso area look slightly more defined and curvilinear.

Blender screenshot showing a more defined and curvilinear torso area on the object/body.

The two key areas left for us to work on are the feet and hands. To simplify the task, we’ll just do what a lot of artists and 3D modelers do to save time and reduce polygon counts,boots and mitten hands. (if your printing a detailed figure you may not want to do this) Boots, ordinary sneakers, or shoes are relatively simple in structure and thus take few polygons to create. Start by going to the bottom of the model and slightly extrude down the two downward-facing polygons at the very base of the leg where the ankle would be. Next, scale them out a little bit, so that there is a lip where the boot meets the leg.

Blender screenshot showing the creation and extrusion of the object/body’s boots.

Now extrude down until the height looks about right for the height of the top part of the character’s boots or shoes. Extrude a second time to create the main body of the boots.

Blender screenshot showing the continued extrusion of the object/body’s boots with a focus on the ankle area.

You will need to turn off back-face culling so that you can select polygons at the back of the model at the same time that you select them at the front. Back-face culling in computer graphics is a tool that makes the backside of your 3D object transparent. To do this, click on the icon on the 3D view footer which looks like an opaque polygon over a translucent one.

Blender screenshot of the 3D view footer with a focus on the back-face culling icon.

Now, select the front two polygons on the lower section of the base of the boot, and extrude them forward two times. Scale down the end two polygons after doing this to create a bit of a curved appearance. Once you’ve done that, select all of the polygons in the foot by using the box selection tool (you can access this by pressing the B key and then left clicking and dragging a box selection around the appropriate area). Scale the foot down slightly by pressing S to active scale, then dragging the mouse away from the point of interest a little bit. You’ll also want to press R to activate the rotation tool. Press Z to isolate rotation to only around the z axis, and rotate the foot out slightly.

Blender screenshot of the lower half of the object/body showing the creation and rotation of the foot.

The waist area still lacks definition, so let’s add in an edge loop with CTRL + R, and scale it out a tiny bit to give the character a waistline. When you do this, take a look at the back of the character, where the buttocks would be. You will notice that the character is currently has no ass.

Blender screenshot showing the mid-section of the object/body with a specific focus on the waistline.

Go into vertex selection mode by pressing Ctrl + Tab and selecting Vertex from the menu that appears. Then select the vertices around the buttocks and rearrange them until the same more closely resembles insert your funny word here.

Blender screenshot showing a rear view of the object/body with a focus on rearranging the buttocks area of the object/body.

Pt. 2 (Im nearly done dont worry :rofl:)

Before we move onto the hands, however, we’ll need to add an entire edge loop around the character, running up its side. This edge loop will also help to make the sides of the character look less boxy, and more curvilinear, which is what we want. Orbit your view so that you have a clear picture of the side of the model, then use Ctrl + R as before to add an edge loop in the aforementioned area.

Now deselect the edges in the head, as well as on the boots. Press Alt + S to use the scale tool to scale out the remaining edges to give the sides of the character a more curved appearance.

This action gives the entire model a more organic appearance. The head is still looking like a box, you can correct that somewhat by adding in a new loop around the circumference of the head — press Ctrl + R, then Alt + S to scale them out slightly.

Blender screenshot showing a close-up of the upper backside of the object/body with a focus on the right side.

After you’ve done this, move some of the vertices around a bit just to give the head a softer appearance overall. You may also move some vertices around on the body and limbs to further refine the shape of your model, and try adding some edge loops onto the legs and arms so that you have extra geometry to further define the shape of these elements of the character model.
Blender screenshot focused on the right side of the object/body covered with vertices and focusing on the right foot.

All we have left is to add the hands. However, before we do so, let’s select the vertices in the arm and twist them somewhat so that the hand will be pointing down more than straight forward, as it would be in the current setup. This will also make rigging, skinning, animation, and resultant deformation work more fluently. The end result should be that the topology running down the length of the arm gradually twists forward.

Blender screenshot showing a close-up of the vertices covering the right side of the object/body.

Notice that, running from the shoulder to the wrist, there is a gradual twist in the edge flow, until the wrist is almost facing down (though not completely). Select the end two polygons, where the wrist would be, and extrude these out to roughly where the thumb would begin and scale them up slightly.

Blender screenshot showing an extreme close-up of the vertices covering the upper right side of the object/body.

While working with the hand, which is twisted in a way that does not align with the global x, y, and z axis, you may find it helpful to switch from Global coordinates to Normal coordinates, using the Transformation Orientation menu in the 3D view footer.

Blender screenshot showing a close-up of the vertices covering the mid-section on the right side of the object/body, with a focus on the hand area.

Extrude this section again, three times, and rotate each time around the y axis by pressing R to active the rotate tool, then Y to isolate rotation to the y axis. Also scale down slightly each time. This will create the mitten section which accounts for the four fingers, from the index finger to the pinky.

Blender screenshot showing the vertices covering the right side of the object/body, with a focus on extruding the hand.

Next, at the beginning of the section of polygons that represent the hand, create a base for the thumb by selecting the mostly forward-facing polygon that borders the wrist. Extrude and then scale down this polygon.

Blender screenshot showing the vertices covering the right side of the object/body, with a focus on the right wrist.

Now you need to move the back two edges so that the base points in the right direction for you to extrude the thumb out. This will mean that you are pulling them out from the hand a little and forward towards the fingers. This will be easier to accomplish if you hide the rest of the model, so you can just focus in on the hand itself. To do so, select all of the faces on the hand, either by pressing B to use a box selection or by pressing C to use a brush selection. If you use the brush selection method, you will have to press Enter to finish the operation before you move on to another operation. Once you have the correct area selected, press Shift + H to hide the unselected geometry — you should now only see the two hands floating in mid-air. To show only the hand you are working on, go to your modifier stack and turn off visibility for the mirror modifier.

Blender screenshot showing the manipulation and extrusion of the right hand with the rest of the object/body hidden.

Now you have a much less cluttered view of the area of interest. This ability to hide geometry, then show it again later, makes it much easier to focus in on small areas of a model. This is especially true as the model grows in complexity and sophistication. Now press the period key on the numpad to zoom right in on the hand.

Blender screenshot showing a close-up of the manipulation of the hand with a focus on the proposed thumb area and the rest of the object/body hidden.

Now its way easier to focus in on the thumb, select sub object elements, and edit them without getting confused by all the other geometry in the background or accidentally selecting the wrong thing. It may also be beneficial at this point to turn back-face culling back on again, so you don’t accidentally select edges at the back of the hand, behind where you’re working.

Blender screenshot showing a close-up of the manipulation of the hand with back-face culling turned on and the rest of the object/body hidden.

To begin constructing the structure of the thumb section of the model, select the two edges at the back of the thumb and pull them forward as mentioned earlier. Note that you will have to switch to edge select mode to do this, which you can do by pressing Ctrl + Tab and selecting Edges from the list of mesh selection modes. You may also find it beneficial to switch to top view by pressing 7 on the numpad, since this view will make it easier to move the edges to the correct position by using the G key to activate the move, or grab tool.

Blender screenshot showing the building-out of the thumb using scaling to create the appropriate shape.

Now build out the rest of the thumb, using extrusion, scaling, and rotation as before, to create the appropriate shape. You may also need to nudge a few vertices around to create the optimal shape.

Blender screenshot showing the lengthening of the thumb and the lengthening of the wrist with the rest of the object/body still hidden.

Finally, press Alt + H to unhide everything, and turn visibility back on for the mirror modifier so that you can see the complete 3D model which you have just created.

Blender screenshot showing the entire object/body with a focus on the right side covered with vertices.

And there you have it!
While it is quite generic, this is a fairly typical, low poly base mesh for a modern 3D character. Low poly is a graphics term for a polygon mesh with a low number of polygons. Your model is ready to be detailed by a digital sculptor in a program such as Zbrush or Mudbox.
Hope this helps dude!