Am attempting my first diorama. MiniArt’s Diorama W/Ruined Church #(36030).
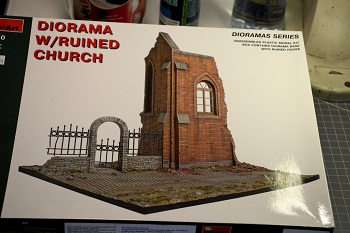
Am attempting my first diorama. MiniArt’s Diorama W/Ruined Church #(36030).
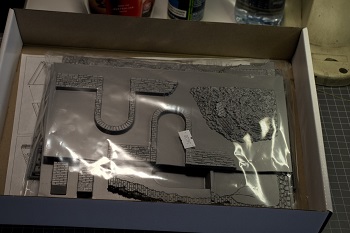
Will keep an eye on this Stephen, its one I have thought about using in a dio as well. Would be nice to see what all the sheets look like if the parts haven’t already been cut out ? Do you intend to have any vehicles on it ?
And welcome to the forums and showing us this build 
I almost bought this the other day so I second Johnny’s comment. I’m keen to see this built up.
MiniArt did a lot of buildings and bases that I find quite useful and easy to build. A couple of tips:
Welcome aboard Stephen. Look forward to seeing your spin on the church.
Found this video for the set that shows most of the steps Carlos was pointing out.
")
Hope that helps.
Just in addition to what Carlos said here in his final point- I took a slightly different but similar approach in that I found putting a piece of thin plastic card between the two halves of vac formed parts makes it much sturdier. Basically, once you have cut out the part just lay it flat on a piece of thin plastic card and draw the outline. Then cut it out (if you have a scriber tool you can just use the vac formed part as a cutting guide and it will match nicely) and glue it onto the piece- that way both halves join up a little neater and stronger.
I have heard some people using Carlos’s method and adding blocks of material to fill some of the interior space to help with support.
I found building dioramas becomes thier own hobby in itself. I hope you enjoy the build and looking forward to seeing it!
Hi All
Thank you for the encouragement and advice. I look forward to sharing the build with you.
I have also joined the Tank Destroyer Campaign and hope to be able to couple the two together. 
Cheers
Stephen
I built this one a few months back. I had to use an aftermarket fence instead of the kit provided fence.
Looks good. Did you have problems with the kit’s fence?
No, I accidentally tore it when I was cutting it out, so I decided to go with the aftermarket.
I really want to improve the roof and weather the fence a bit more. Maybe add some flowers along the church wall behind the fence.
I haven’t started cutting mine out so I will be careful. The replacement looks great and I will be interested in seeing what you do with the flowers as I have been thinking about adding plants and foliage at some point. 
Also worth considering, when you’ve joined the 2 half’s of the wall stipple on some texture paste e. g. AK acrylic surface textures, this wil will give a grainy look to the exposed and broken brickwork and also help hide the seam.
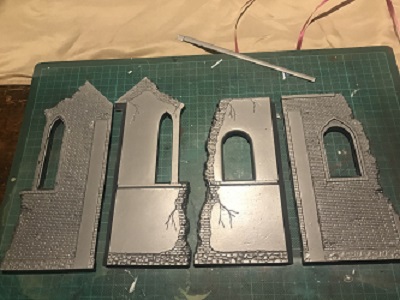
Hi all
Progress as been slow, as it usually is with me, but I have finally cut the church walls out.