Actually two parts…
I’m doing my Eduard/Arma Hobby Hurricanes wheels up. The landing gear door doesn’t fit the opening so I need to fabricate a new landing gear door. The part that doesn’t fit is the arm that attaches to the door - the angle isn’t right.
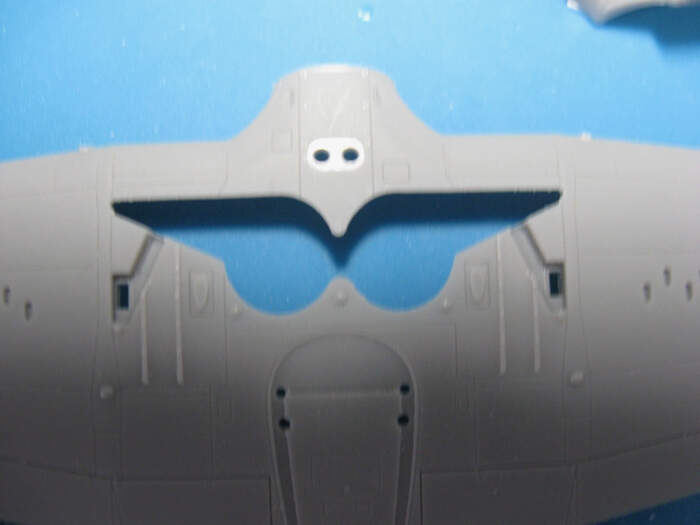
Here is the bottom of the wing:
The main part of the door is off just a little and I can sand that, but I’d rather make a single part. I can trace a line for the part of the door in the pic above that is open all the way through, but I’m not sure how to trace the other part. I’m wondering about making a mold.
Any thoughts about how best to make a mould that I could use to cut plastic? or something else?
And I may have several of these I want to do this for eventually, so being able to reproduce it might be handy.
I welcome all input…
1 Like
If you have calipers it might be easier to take the measurements and draw it out.
Making a mould from a corrected part, or rather two moulds from two corrected parts since I assume that both parts are slightly off, and then casting copies is likey more work than creating a routine for how to correct the parts. Parts from a mould usually require some post-processing before they can used.
I would use a razor saw to cut off the “leg”, add a plastic wedge to the end to adjust the angle and glue the leg back to the “lid”. With the wheel wells closed ther shouldn’t be any load on the repositioned leg.
Phil, if I understand you correctly, you want to some how get a template to cut out a new part?
Try taping a piece of thin paper across the area and gently rub a soft pencil over the area like you do to make a rubbing. The pencil will catch the edge and make the marking darker to outline the cut outs on the kit.
3 Likes
Peter,
I tried that but it didn’t turn out so well, but I didn’t do it exactly the way you said, so I will try again.
Robin,
Yes, I think once I have the part that fits, I’d like to make a mold to make copies. I was wondering if I could make a mold to begin with, but perhaps i should make the part and make the mold then.
Boehml,
I started out using calipers but was a little distressed about getting the angles correct. I’ve been thinking about it more and could do that. I will try the tracing again, and then go back to the caliper work.
Thanks everyone. I hope I have some time to work on this in the next few days. I will report back.
1 Like
Put a very thin layer of oil around the edges of the opening. Shape a blob of Milliput roughly the same shape but larger than the opening. Press it into the opening, let it cure, remove.(The oil helps this) Perfect form. Lots of directions you can go from there.
3 Likes
Phil, how did you proceed?
Update?
Although I’ve received a lot of good advice here, I’ve focused so far on my own method, which I call the procrastination method. I’ll post something more about that soon…
4 Likes
Excellent method!
The best part is that it never produces a confirmed failure …
1 Like
I bought a kit at Hobby Lobby to make resin parts. It gives the silicon to make a mold and then the two part resin. I made a box using Lego bricks, poured the mold maker in then pressed in a bunch of accumulated storage from my 1/35 accumulated parts. You let all dry, remove the originals and you have a mold to use. Now yours would require a bit of a different approach, I’d use the method above using milliput to make a mold of the opening, let that cure and once removed use that w the mold making compound. Once it’s cured you should be able mix, pour, cure and repeat as much as you need too. Essentially the millput is making the negative impression so your mold will be just deep enough, pour a base layer in some sort of box (like I mentioned I did mine out of LEGO, lay in your milliput master and add some more mold liquid until you have built it up to the desired depth.
1 Like