That is a brilliant solution to the vents! They look great.
2 Likes
Ditto!
1 Like
wow, what a great extensive build you have going on here. Amazing attention to detail, and impressive extra-detailing and scratchbuilding skills you are showing here. Very cool!
1 Like

That is a brilliant solution to the vents! They look great.
Ditto!

wow, what a great extensive build you have going on here. Amazing attention to detail, and impressive extra-detailing and scratchbuilding skills you are showing here. Very cool!
Martin, Mark, and Wouter, thanks!

The basic shapes are mostly good, but many of the small parts in this 1970s-era kit are problematic due to mold misalignment and flash. Fortunately, the capstan is one of the better ones.

The associated bollard, though, didn’t come out so well. It wasn’t badly designed, but mold misalignment makes it out of round and difficult to fix convincingly.

Also, the real fitting (seen here on the Fuyutzuki) was sharper, and the “horns” were finer and curved up at the ends.


Rather than trying to fix up the kit part, I made a new one from plastic rod with a punched disc top; the horns were made from a bit of brass rod passed through the plastic with the tips pinched with pliers and bent upward.
9 Likes
Tim,
that’s fantastic! The way you extend your dedication and love for detail to so often neglected parts, and your solutions for it, just awesome!
Cheers
Jan
1 Like

Tim,
that’s fantastic! The way you extend your dedication and love for detail to so often neglected parts, and your solutions for it, just awesome!Cheers
Jan
Thanks Jan! Among the smaller (but not neglected ![]() ) kit parts are the two cowl vents for the foredeck.
) kit parts are the two cowl vents for the foredeck.

They suffer from this kit’s usual mold misalignment and flash, but I was able to clean them up. I also opened up the solid, flat faces with a round Dremel burr twisted by hand.
10 Likes
Very nice update again. It’s these changes which really make a model stand out. The amount of work going into updating/cleaning up these part is quite extensive, but well worth the effort.
1 Like
Very nice update again. It’s these changes which really make a model stand out. The amount of work going into updating/cleaning up these part is quite extensive, but well worth the effort.
Thanks Wouter. That’s the thing about these older kits - they usually get the basic shapes right, but you really have to work with the details!


Both the Miyuki-Kai and Kagero Publications reference drawings show what appear to be plate joins on the foredeck.
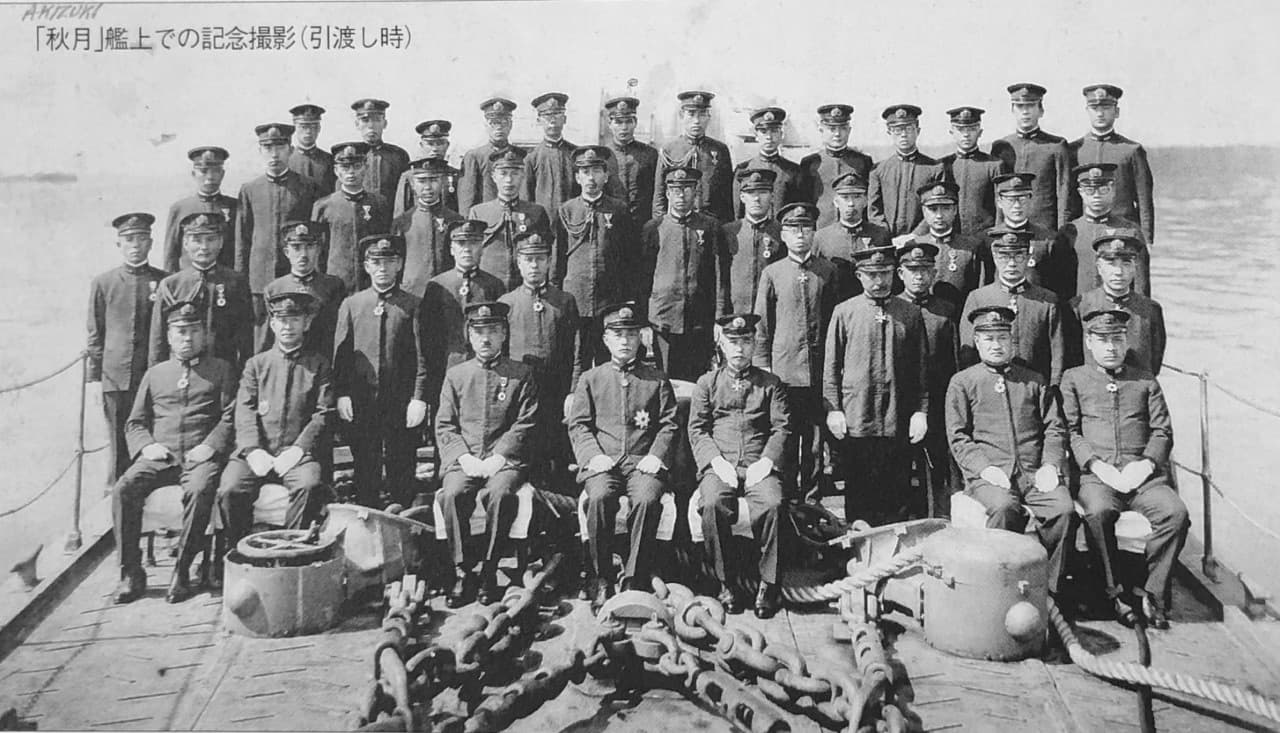
There aren’t many surviving close-up photographs of this area, but this one of Akizuki’s rather grim looking officers is useful.

Seen next to the herringbone non-slip surface of the steel deck, the weld joins (if that is what they were) appear to have been covered with long, flat cap strips.

The kit shows the herringbone non-slip surface all right, but there is no representation of the joins. My first thought was to replicate them with Tamiya tape; I began with a simple experiment using thin strips to test the material and to help me visualize the pattern.

The tape didn’t turn out to be suitable, but I also had on hand a set of Archer raised panel lines (intended to create panel lines on aircraft models). These were similar to the raised rivets I had used previously on the gun and torpedo mounts and on the funnel. Not really decals as such, they consist of raised resin strips bonded to clear decal film.


I applied them beginning with the fore-and-aft running lines followed by the short lateral connections.


They went on all right, but the rough surface of the non-slip pattern is going to be a problem as the thick, rigid resin prevents the decal film from fully conforming to the surface. I’ll hit it again with Solvaset (a fairly aggressive decal setting solution) and see how it goes…
12 Likes
I would say Solvaset is more than a little aggressive, it make that decal conform to your will. Mark
1 Like
I would say Solvaset is more than a little aggressive, it make that decal conform to your will. Mark
Mark, I agree with you about Solvaset, but *&^$#@!, it didn’t work this time! It melted the underlying clear decal film all right, but the black resin lines on top remained unaffected.
The lines stay in place, but only just. Even a light touch with my finger will dislodge them. Maybe I can glue them somehow? I hesitate to use plastic cement as that lovely surrounding tread pattern is pretty delicate… perhaps secure them with an overcoat of paint? I’ll have to think about this.
2 Likes
Impressive detailing,Tim!
You can try handbrushing some varnish along the raised resin lines, unthinned or slightly thinned.I’ve done this succsesfully on several ocasions,
Cheers,
Angel
2 Likes
Definitely great work, Tim! And sad to hear your plan with the plating joins didn’t work out, I hope Angel’s idea can work…
Those tread patterns are really delicate and it would be sad to impact them.
Cheers
Jan
2 Likes

Impressive detailing,Tim!You can try handbrushing some varnish along the raised resin lines, unthinned or slightly thinned.I’ve done this succsesfully on several ocasions,
Cheers,
Angel
Definitely great work, Tim! And sad to hear your plan with the plating joins didn’t work out, I hope Angel’s idea can work…
Those tread patterns are really delicate and it would be sad to impact them.Cheers
Jan
Angel and Jan, thanks!
This extreme close-up shows the problem:

After the Solvaset dried I went over the resin with Model Master liquid cement which bonded the lines pretty well to the tops of the raised herringbone non-slip detail, but they actually sit atop the non-slip with gaps over the deck. They are now attached securely enough if I avoid touching them, so I’ll probably just follow Angel’s advice and fill in the gaps with varnish or paint and call it a day.
7 Likes
Hey Tim
I’ve faced this problem with naughty decals before, and my go to is hitting it with a coat of enamel paint, thinned with enamel thinners and applied with airbrush to avoid physical contact with the decal. Usually it would be clear coat that I’d use, as decals go on at the end of the build, so I’d want them to be visible. The lack of pigment in the clear coat would also help keep the layer of paint suitably thin to reveal the details…
Maybe try it on a piece of scrap first? ![]()
2 Likes
forgot to mention, that I use enamel paint for clear coating the decals with enamel thinners, Tim, cos it goes on “hot” and has a similar effect to a decal solvent ![]()
As always though, test first ![]()
1 Like

Hey Tim
I’ve faced this problem with naughty decals before, and my go to is hitting it with a coat of enamel paint, thinned with enamel thinners and applied with airbrush to avoid physical contact with the decal. Usually it would be clear coat that I’d use, as decals go on at the end of the build, so I’d want them to be visible. The lack of pigment in the clear coat would also help keep the layer of paint suitably thin to reveal the details…Maybe try it on a piece of scrap first?
Thanks Russ. I like enamels, so I think I’ll do as you suggest. I’ll probably take Angel’s suggestion too and go over the resin lines with some finely brushed-on, slightly thinned enamel before the overspraying.
Meanwhile…

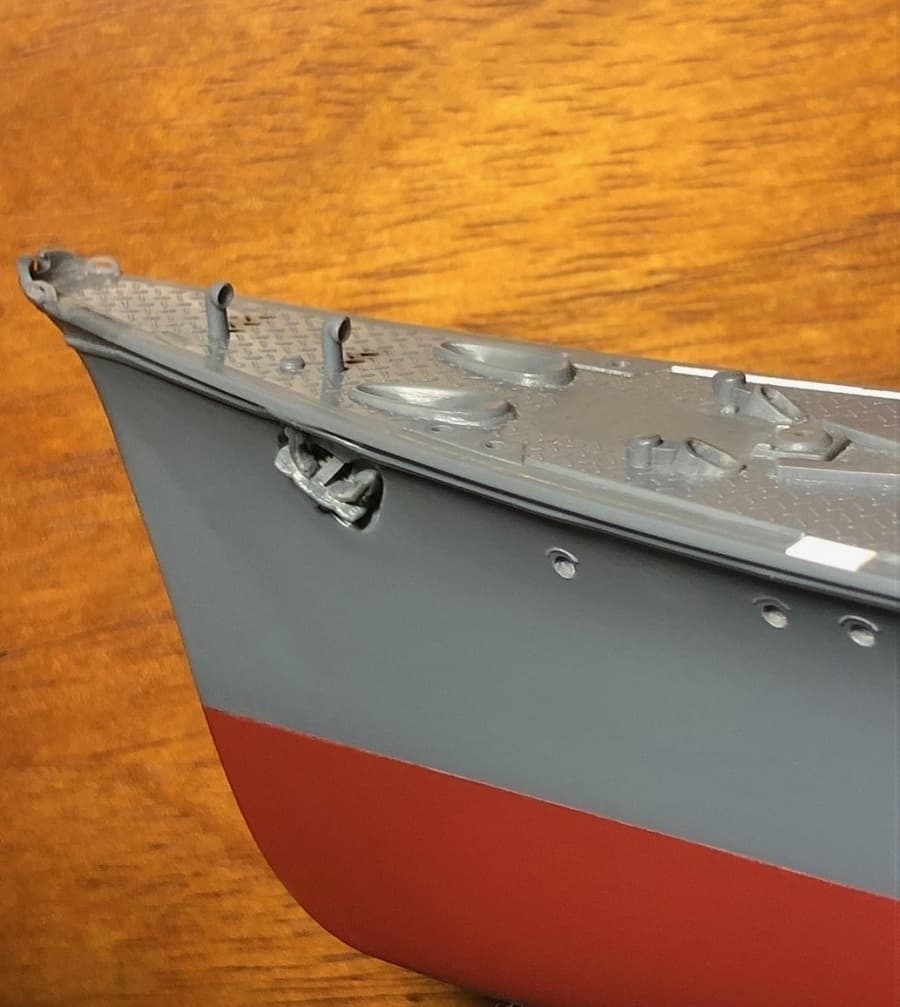
I made anchor shanks from .020 X .040 inch plastic strip with .023 inch discs cut from .010 inch stock to form the cable attachment shackles.

Fitted into the hawse holes, the shanks will eventually be fitted with shackle rings and attached to the chains.


The anchor chains test fitted here are gorgeous resin parts from YX Model. I had originally planned to use metal link chain, but these are soooooo much better.
I’m fast becoming a fan of 3D printed parts! ![]()
11 Likes
Now THAT’S an anchor chain. ![]()
2 Likes
That anchor chain sure looks good!
2 Likes
Hehe the same happens with me. As I first saw this chains life in my hands I trashbinned the (poorly) blackened metal toy chains ![]()
![]()
2 Likes
Using my finest paintbrush, I reinforced the resin joint lines with Model Master Gunship Gray enamel. After just touching the sides of each line with the brush, capillary action drew the paint into the gaps and filled them nicely.

They remain fragile, but the final airbrushed paint coat to come should fix them more securely.
12 Likes