Brian I see you have figures on your base. What kit are they ? And how about the ammo and crates? Looks great btw
I think by banging on about cam nets I hijacked my own thread! I think it was Johnnych01 who mentioned once when I was apologising for woffling on too much, that it was just such “woffle” that made the site interesting(!) However, I’m not too sure that my memories re camouflage nets adds that much value to the sum of military history.
It certainly helped some of us remember our own history! And maybe let some others in on what working with those damn nets was like!
Ken
1 Like
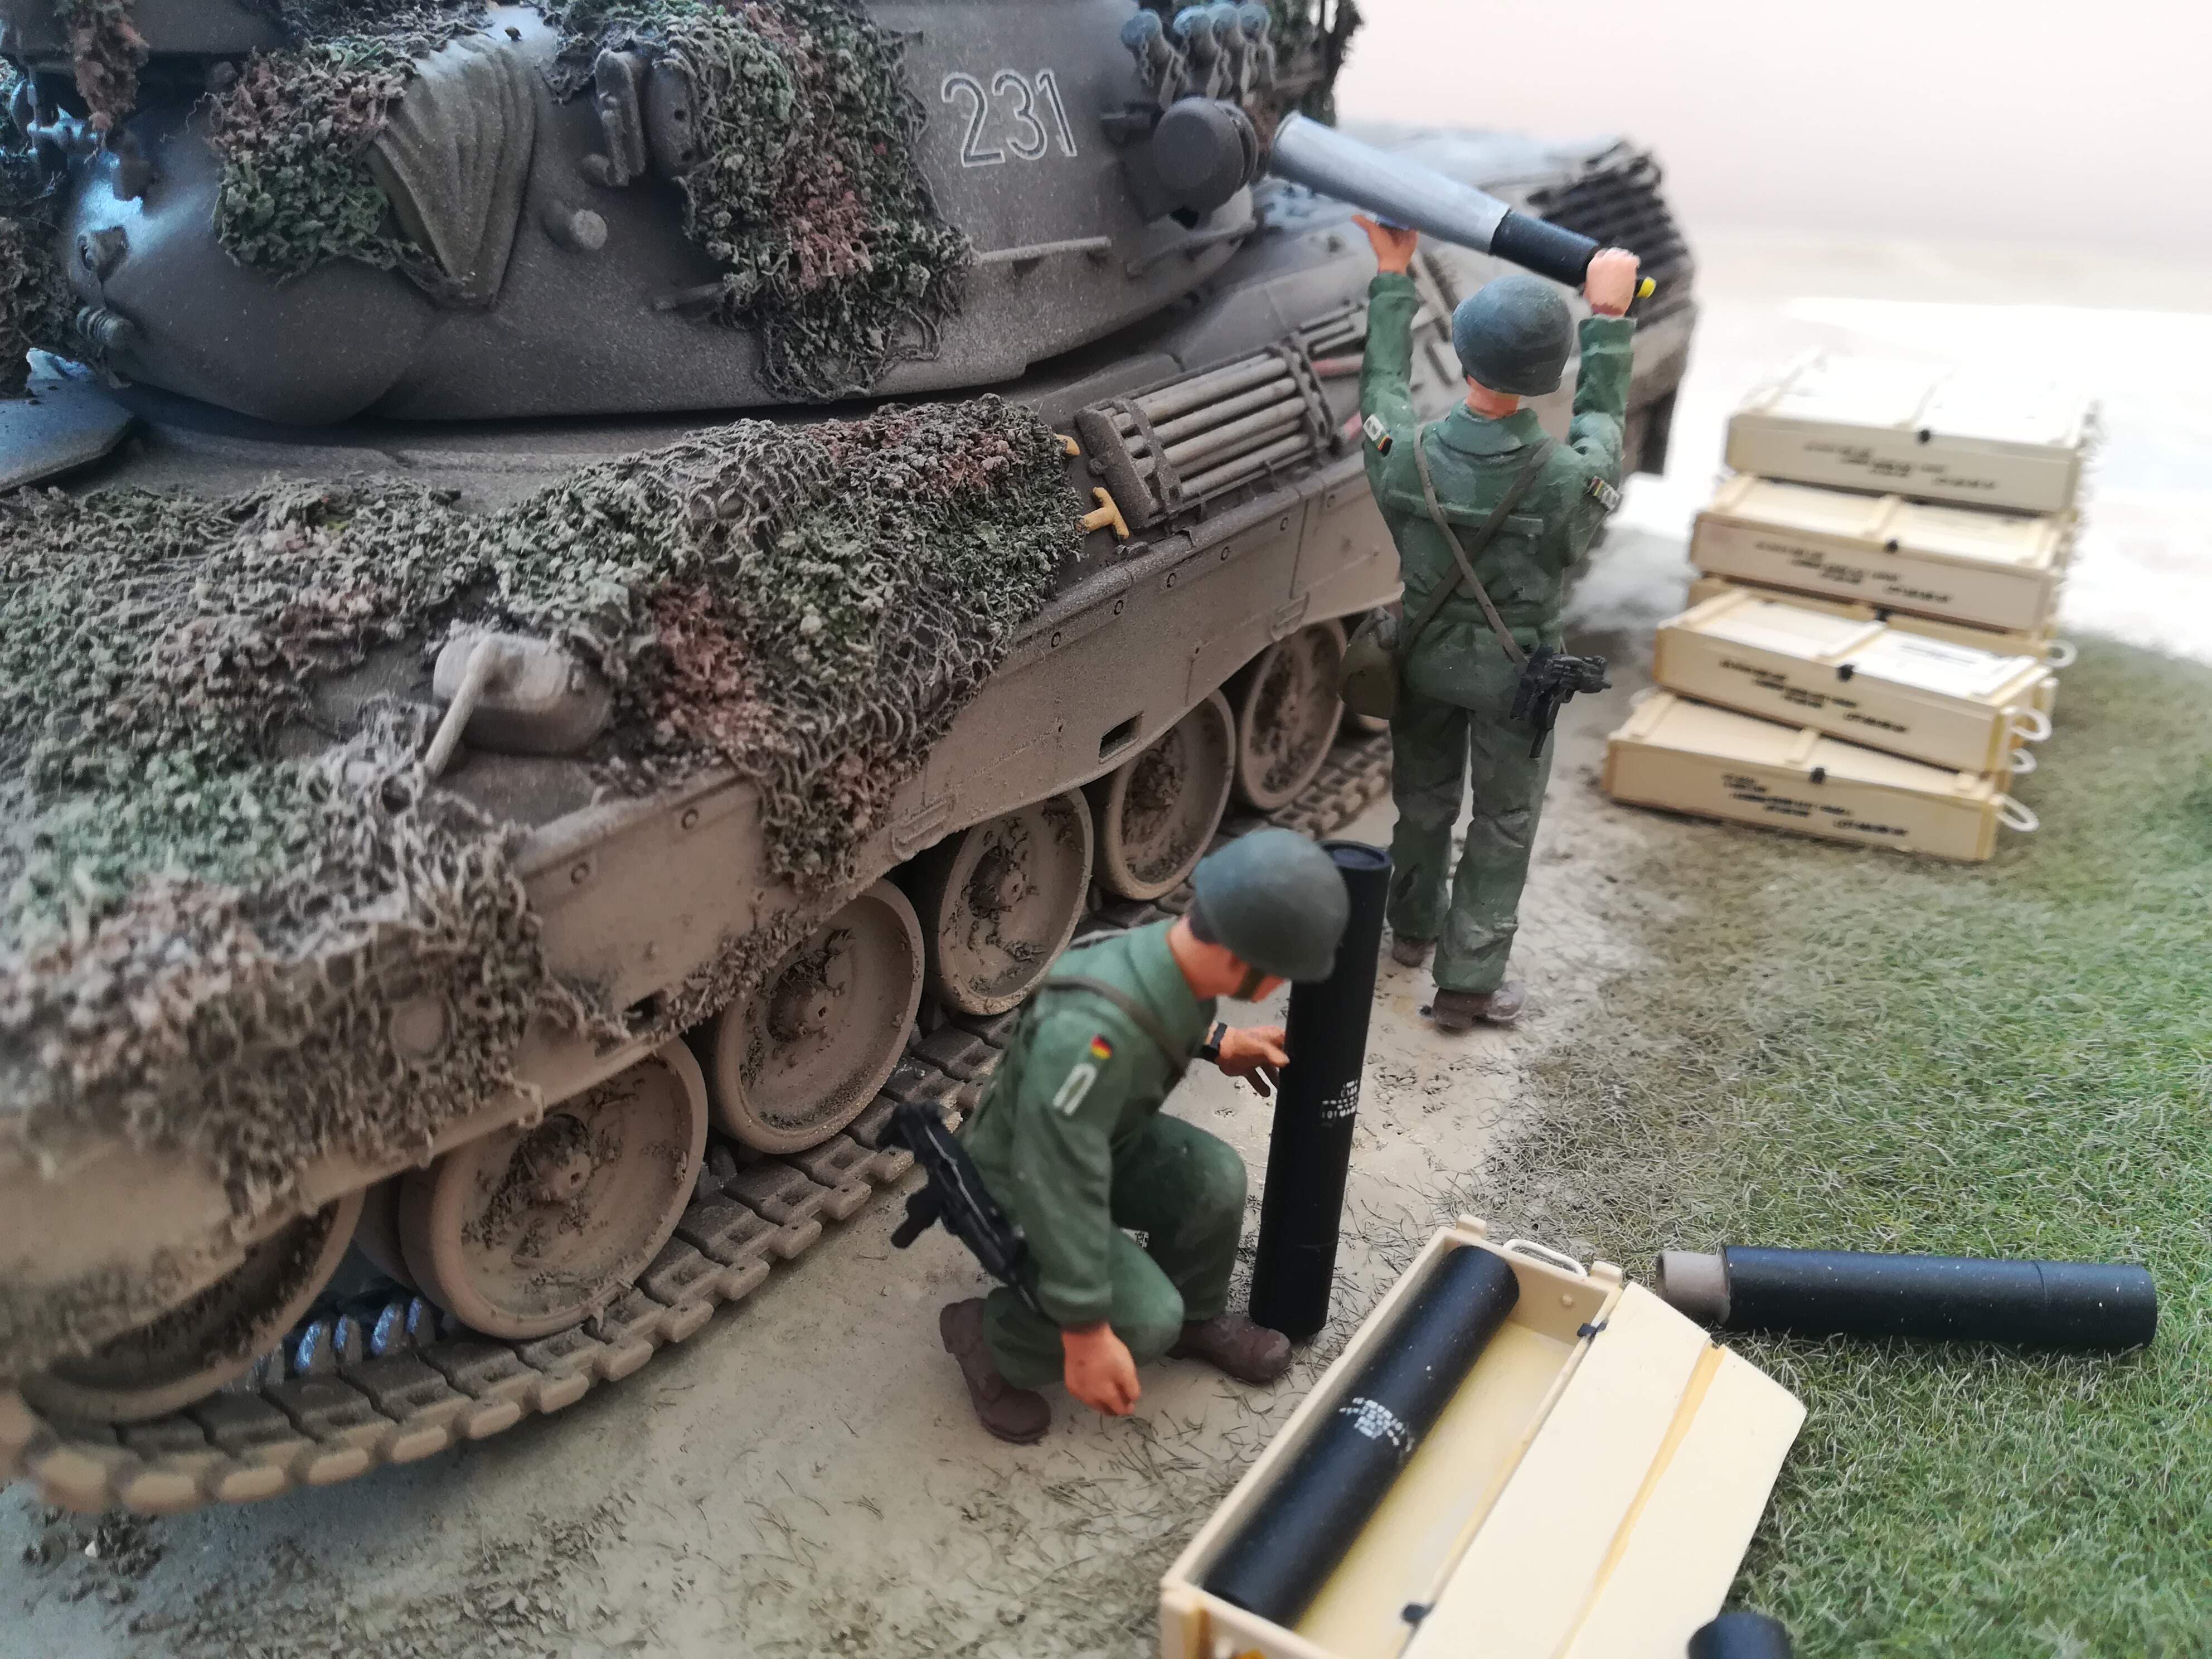
Richard, I used figures from Dolp Zinnminiaturen/Modellbau; they have an extensive Bundeswehr range which are very useful. They also stock Y-Modelle models which cover those Bundeswehr equipments which no one else seems to do. The figures are cast in white metal which can be a bit of a learning curve when modifying, but mostly they’re pretty good. For this scenario I used a specific ammunition loading figure passing the round into the turret, and a kneeling mechanic figure to depict the unpacking and prep of the ammo.
As I explained at the beginning of this project (long, long ago sadly) I wanted to portray a tactical situation whereby the tank would be “bombing up” for real, or as real as it might get; I realise that given the short time the Bundeswehr had to train its largely conscript Army back in the 70s (when this is set) that such an activity is unlikely to have happened even on the most rigorous of exercises, but perhaps it might, so that is where I’m coming from. To this end, as it’s all deadly serious, the crew are helmeted, armed with their personal wepaons and are carrying their respirator haversacks.
This meant I had to modify the figures a tad and first off I went for Hornet Heads; that is not to impugn the Dolp figures but Hornet are really superb in my opinion; I can hardly paint them well enough to do them justice but they almost paint themselves (I’m afraid I cant manage eyeballs but I do, just about, get an effect). I modified the heads so that they would take a US-type helmet and utilised the quite small ones that come in the older Tamiya M113 set, not least as the Bw helmet seemed to be merely a smaller version of the old US one. Chinstraps were from tape. I added straps and slings for the respirator cases and Uzi SMGs from lead foil. I made the respirator cases out of Milliput and used plastic tube to represent the folded over seal of the case. Not 100% accurate but managed an effect. A small piece of card replicated the buckle. Another tiny piece was used to add the user’s name label on the front of the strap. The mechanic figure had to have his uniform modified to represent the Panzerkombi and I achieved this by adding details like the pocket zips from stretched sprue; the basic figure was in overalls anyway so it wasn’t too difficult. Rank tabs were added to the sleeves from plastic card; the pen pocket was also from sprue. I use Mr Dissolved Putty to blend this sort of detail together as well as using it to smooth out seams and joints.
The Uzis were modified from the Italeri modern weapons set using plastic strip. They took a bit of positioning to ensure that gravity prevailed and that they were hanging correctly.
I am still working on the Commander figure - another Dolp base - but have added a Valkyrie head I seemed to have spare from somewhere; So far I’ve added a belt (as he’s carrying a pistol and holster) and have used different arms from the Dolp ones, so again, rank tabs are added from card. I hope to have him re-inserting his map into a mapcase after refolding it given the fast moving nature of the exercise/battle; we’ll see if I can manage it.
The ammunition is all from the fairly old Tamiya Military Miniatures MM-141 “Modern US Accessory Set” and I’d amassed several of these for just this project. Sadly, some of the decals were beyond use and on the ends of some of the ammo crates I had to hand paint the yellow warning diamond and try and add lettering/markings using a fine felt pen - when I finish all this please do not look too closely! Other mods were adding rope handles to all the ammo boxes using lead wire. I added plastic tube extensions to the packing tubes to help represent the opened effect and drilled out some of the caps.
Not shown yet - as I haven’t prepared them - are a half dozen or so MG3 ammo boxes; I must just add that this model in no way depicts a full ammo load.
Well Ken, I suppose if such memories help somewhere along the line in setting things in context then perhaps that is of some value - particularly I hope, for those who haven’t lugged the bloody things or lashed them to a vehicle at 0330 hrs in the pouring rain etc etc, let alone become so tangled in them that a knife was the only answer(!).
Yea, and then just for fun add a roll of concertina wire to the mix!
Ken
Wow you did a lot of work on those figures and a great job! I’d like to see more photos of them when you are done. Figures are my second love after armor of course. They add scale and so much interest to any vehicle. Again great job on the Leopard and the rest as well!
Yeah, our HQ complexes (Corps, Div, Bde) were surrounded by at least a double fence of what we referred to as “Dannert” wire - which eventually became the razor-wire type. Apart from Corps - which was huge in the field - the fences were erected by a dedicated Defence Platoon, normally hailing from the Pioneer Corps; the SOP was to weave some white mine tape into the wire so that at night - when light security was paramount - one could still find, with any luck the entrance. Sadly, all too often they seemed to forget. Couple this oversight with a dense, dark German forest, a tired soldier, in NBC suit, helmet, webbing, personal weapon etc and probabaly no torch, and the results could be dire - and painful(!)
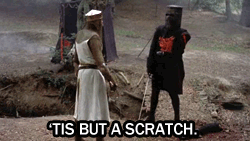
How the hell did we survive all that?
It’s just a flesh wound.
2 Likes
Nothing but a scratch lol… Those were the days …
3 Likes
Well, at long last here it is; I’ve done nearly everything I wanted to do and have just about obtained the effect I wanted - I think. There are some shortcomings on the model which have been discussed above; there were even more on the build! I am aware that there’s still a few things I haven’t got quite right such as the tow cables (discussed earlier – just too weedy-looking), and the plugs on the mantlet really needed to be longer by roughly one more link, which is a pity but I just got it wrong. I feel the cam net is about right but you can judge that. Anyway, the 2 figures doing the loading are converted from Dolp as described a few posts ago; they are wearing their steel helmets and carrying their personal weapons (Uzi SMGs) and respirators as I wanted to emphasise the realistic aspect of an exercise where ammo replenishment is taking place tactically. I have also included MG ammo but must emphasise that the model does not reflect a full ammo load.
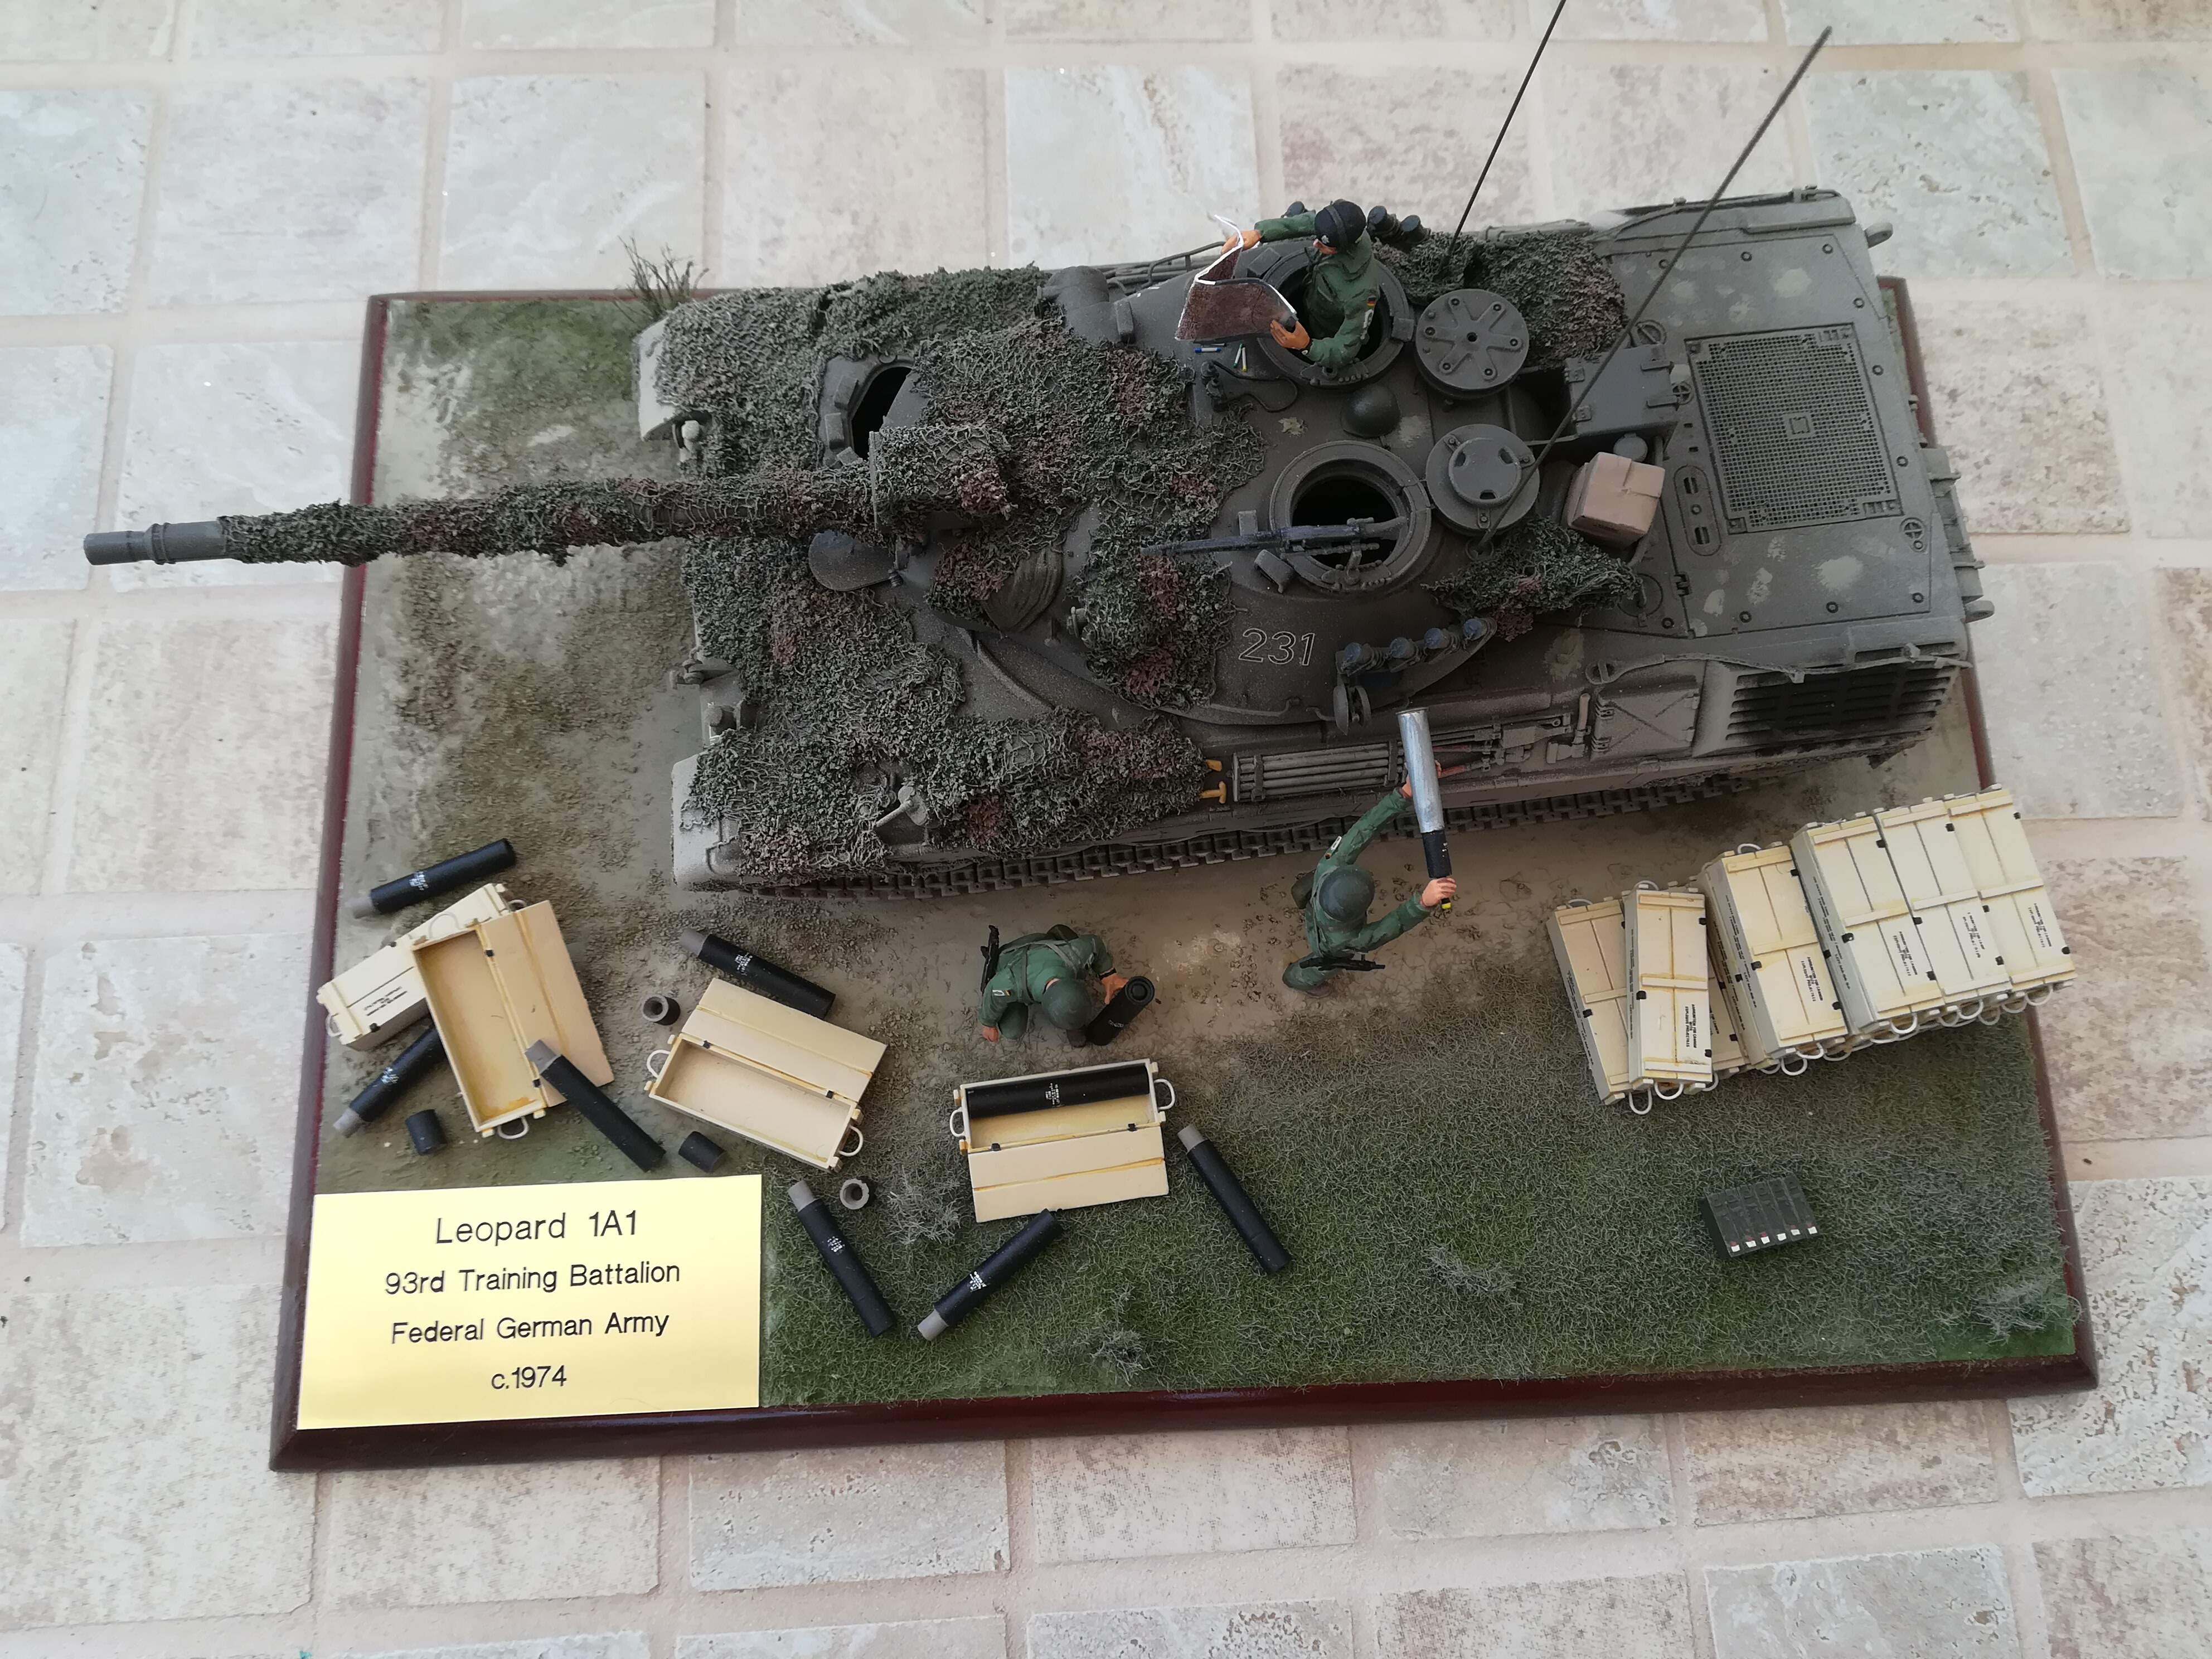
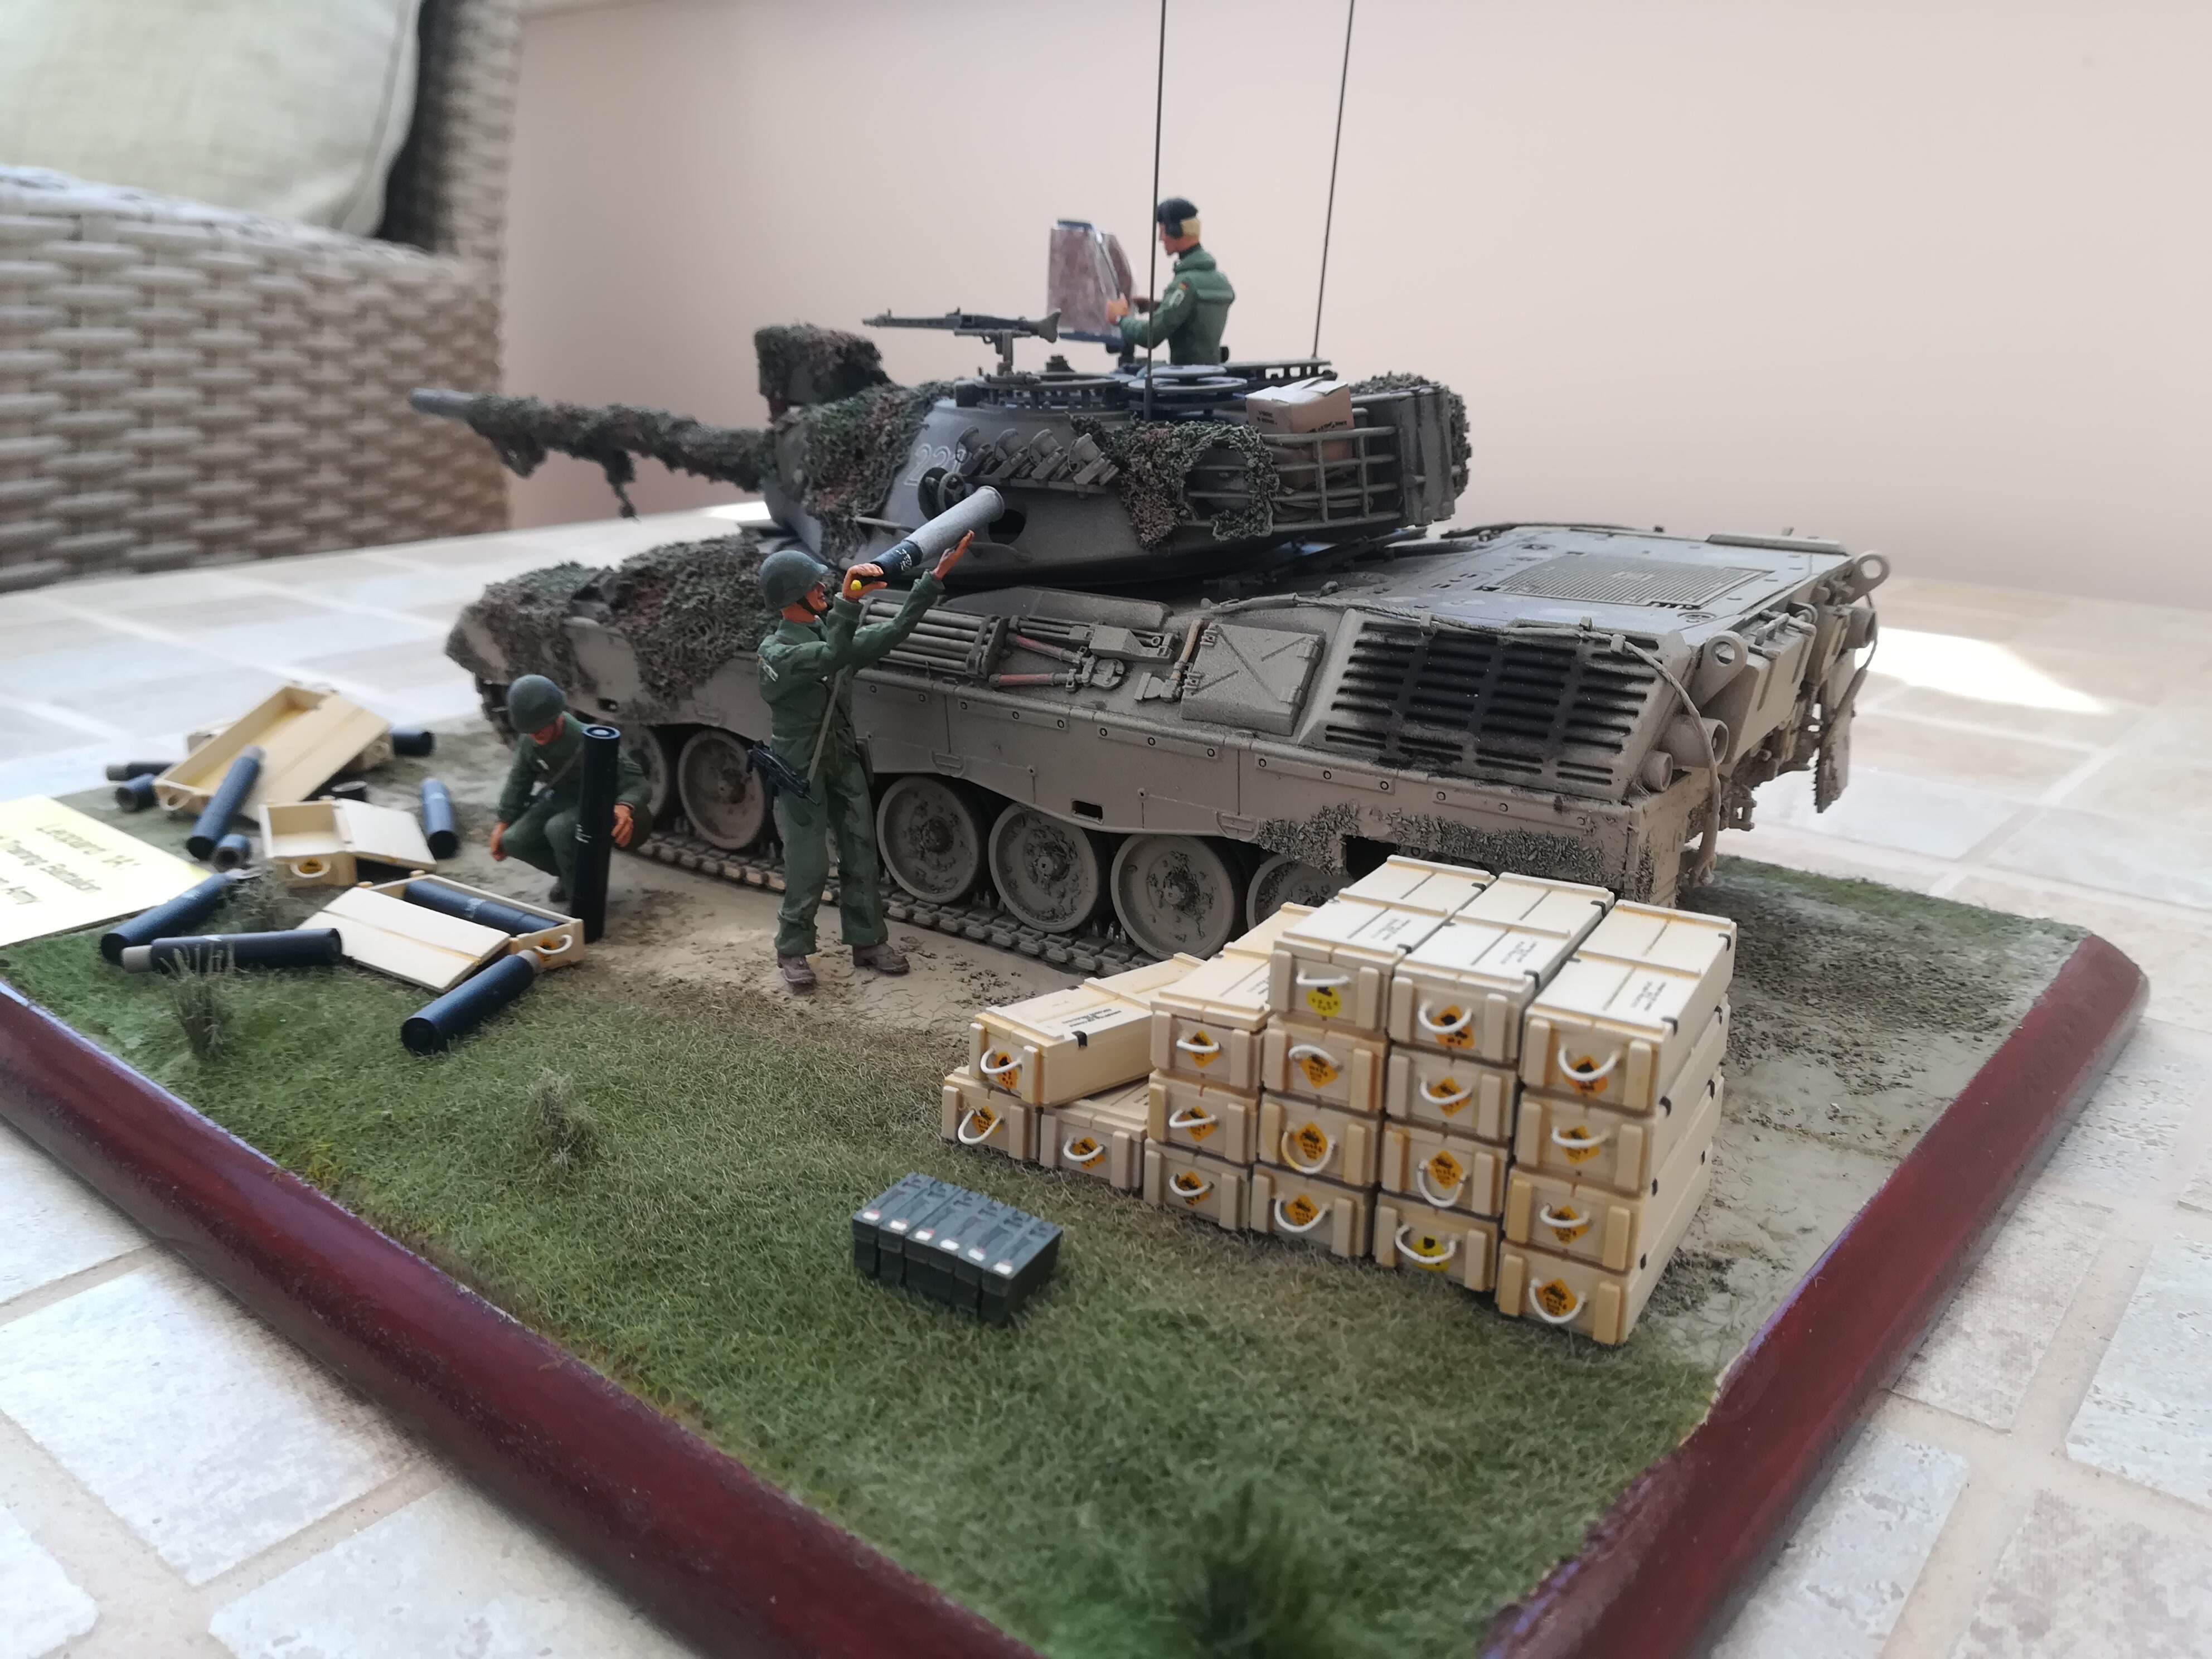
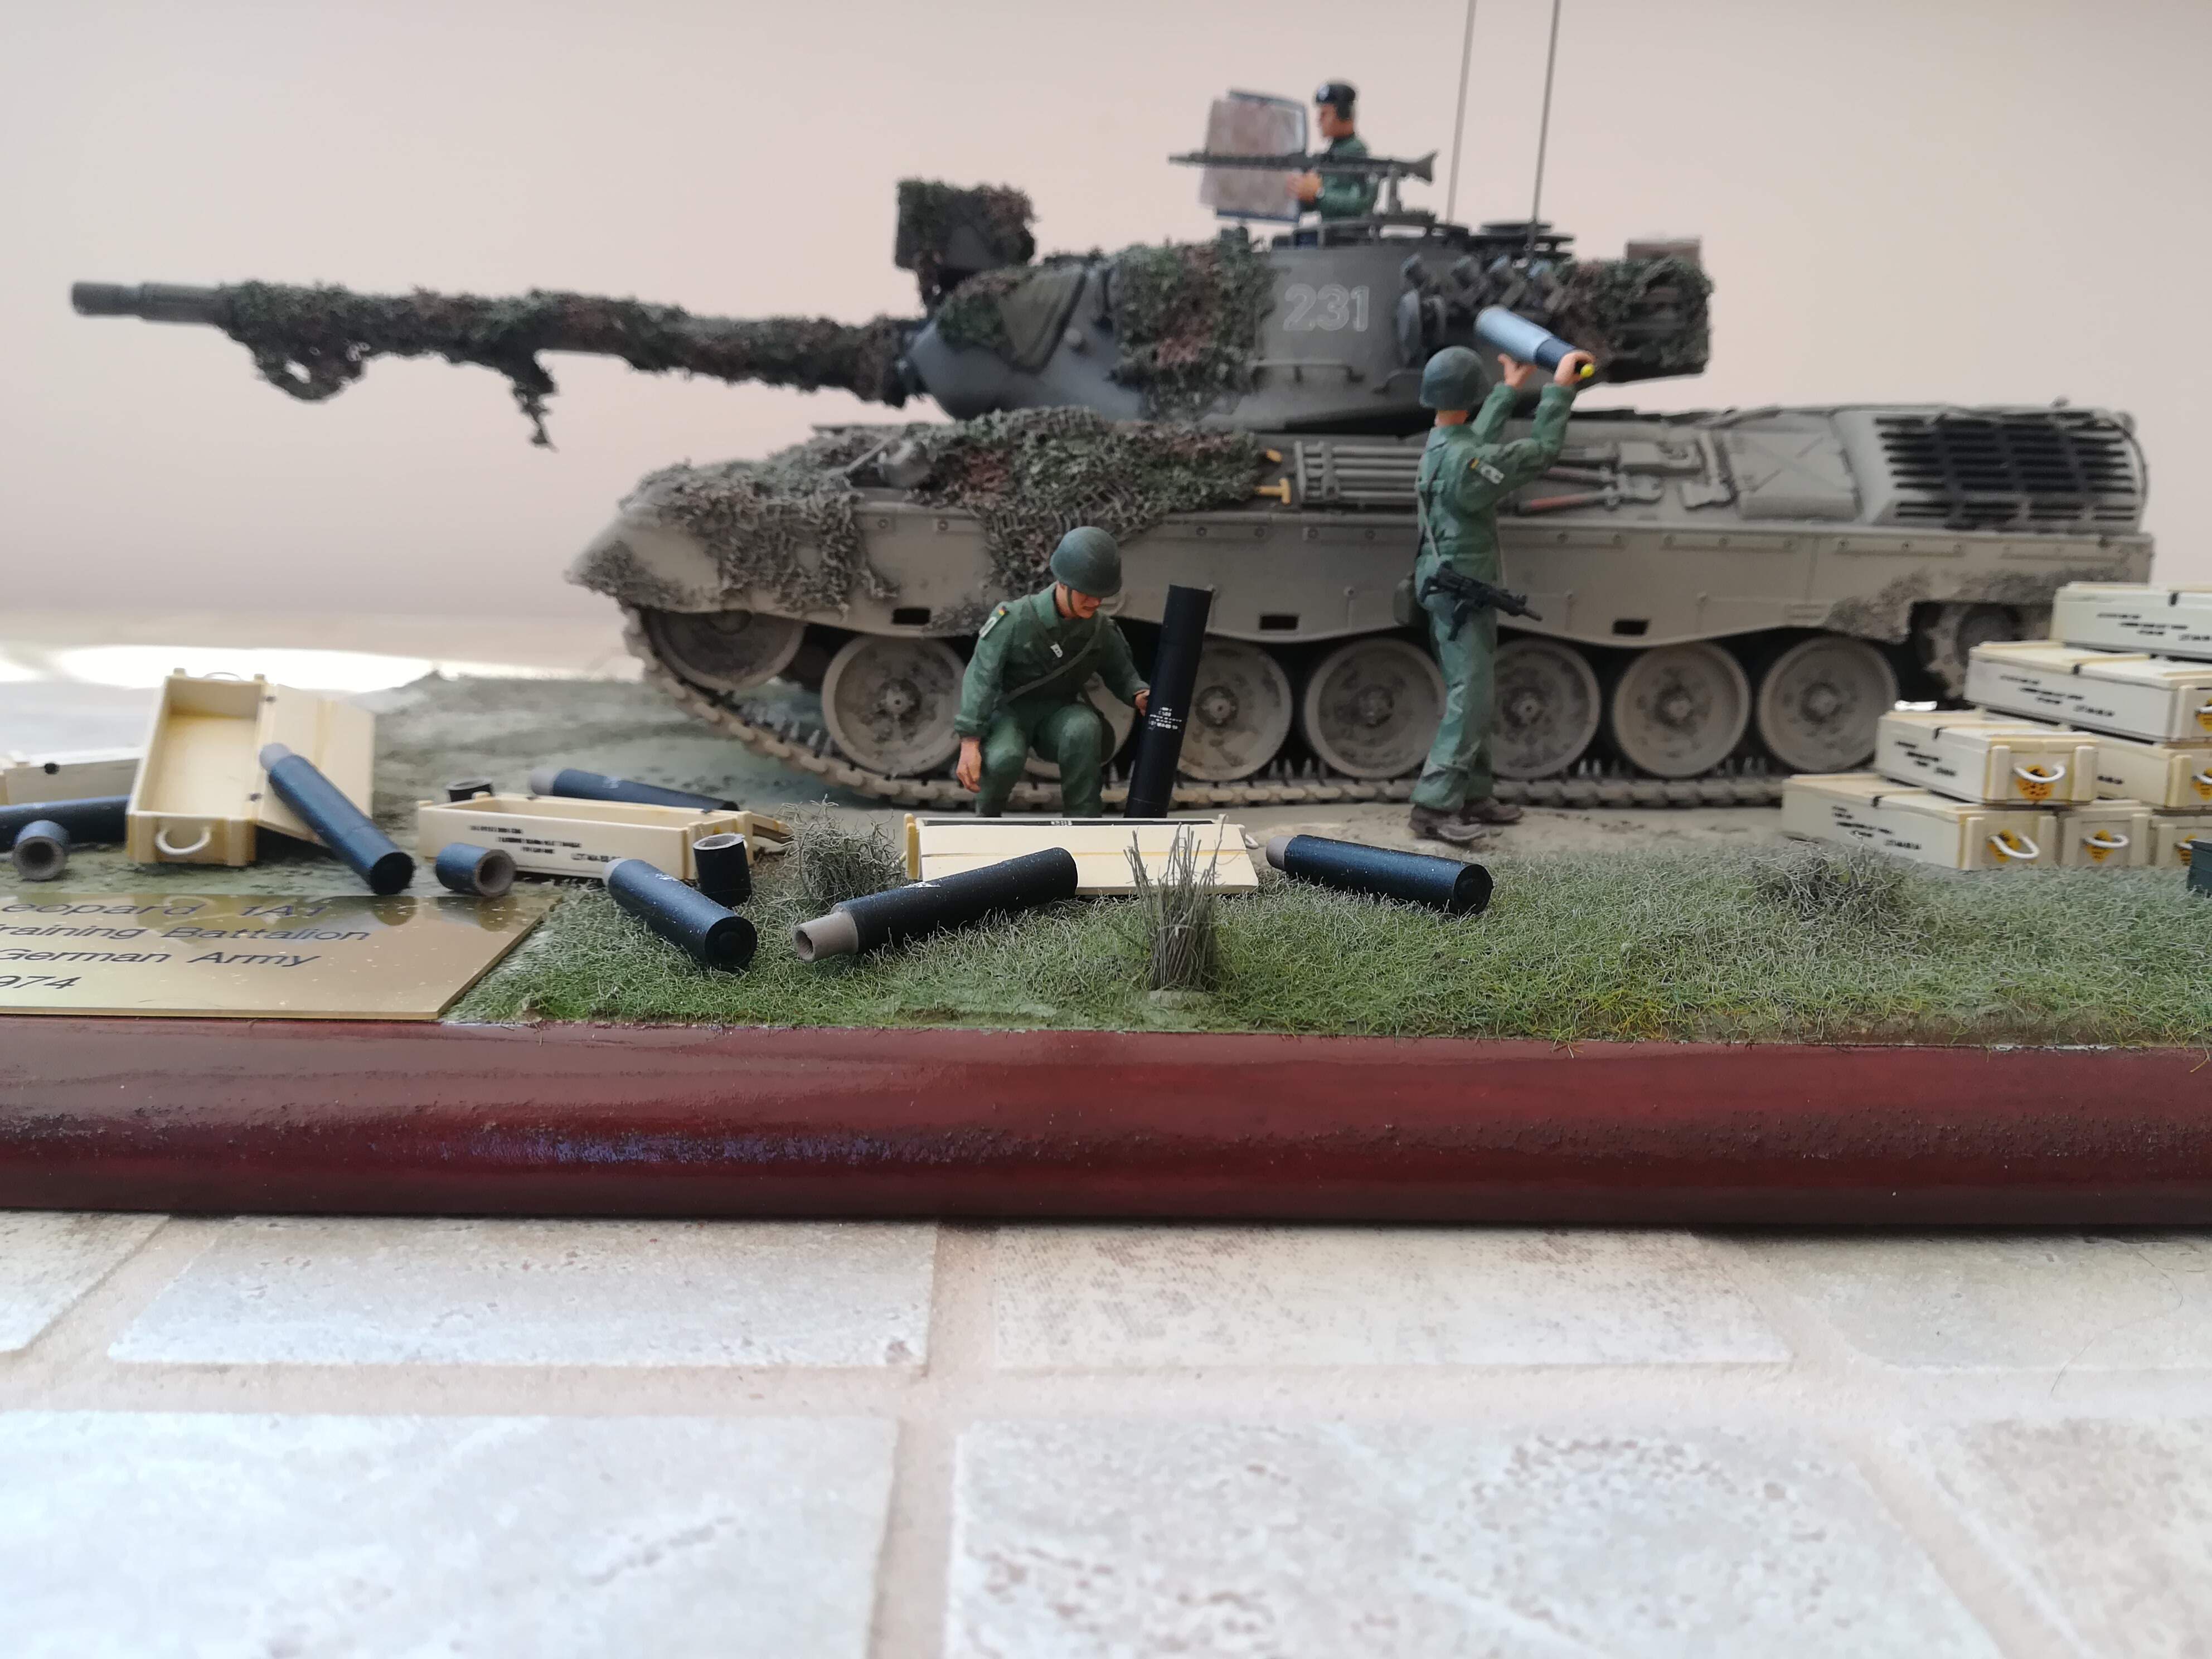

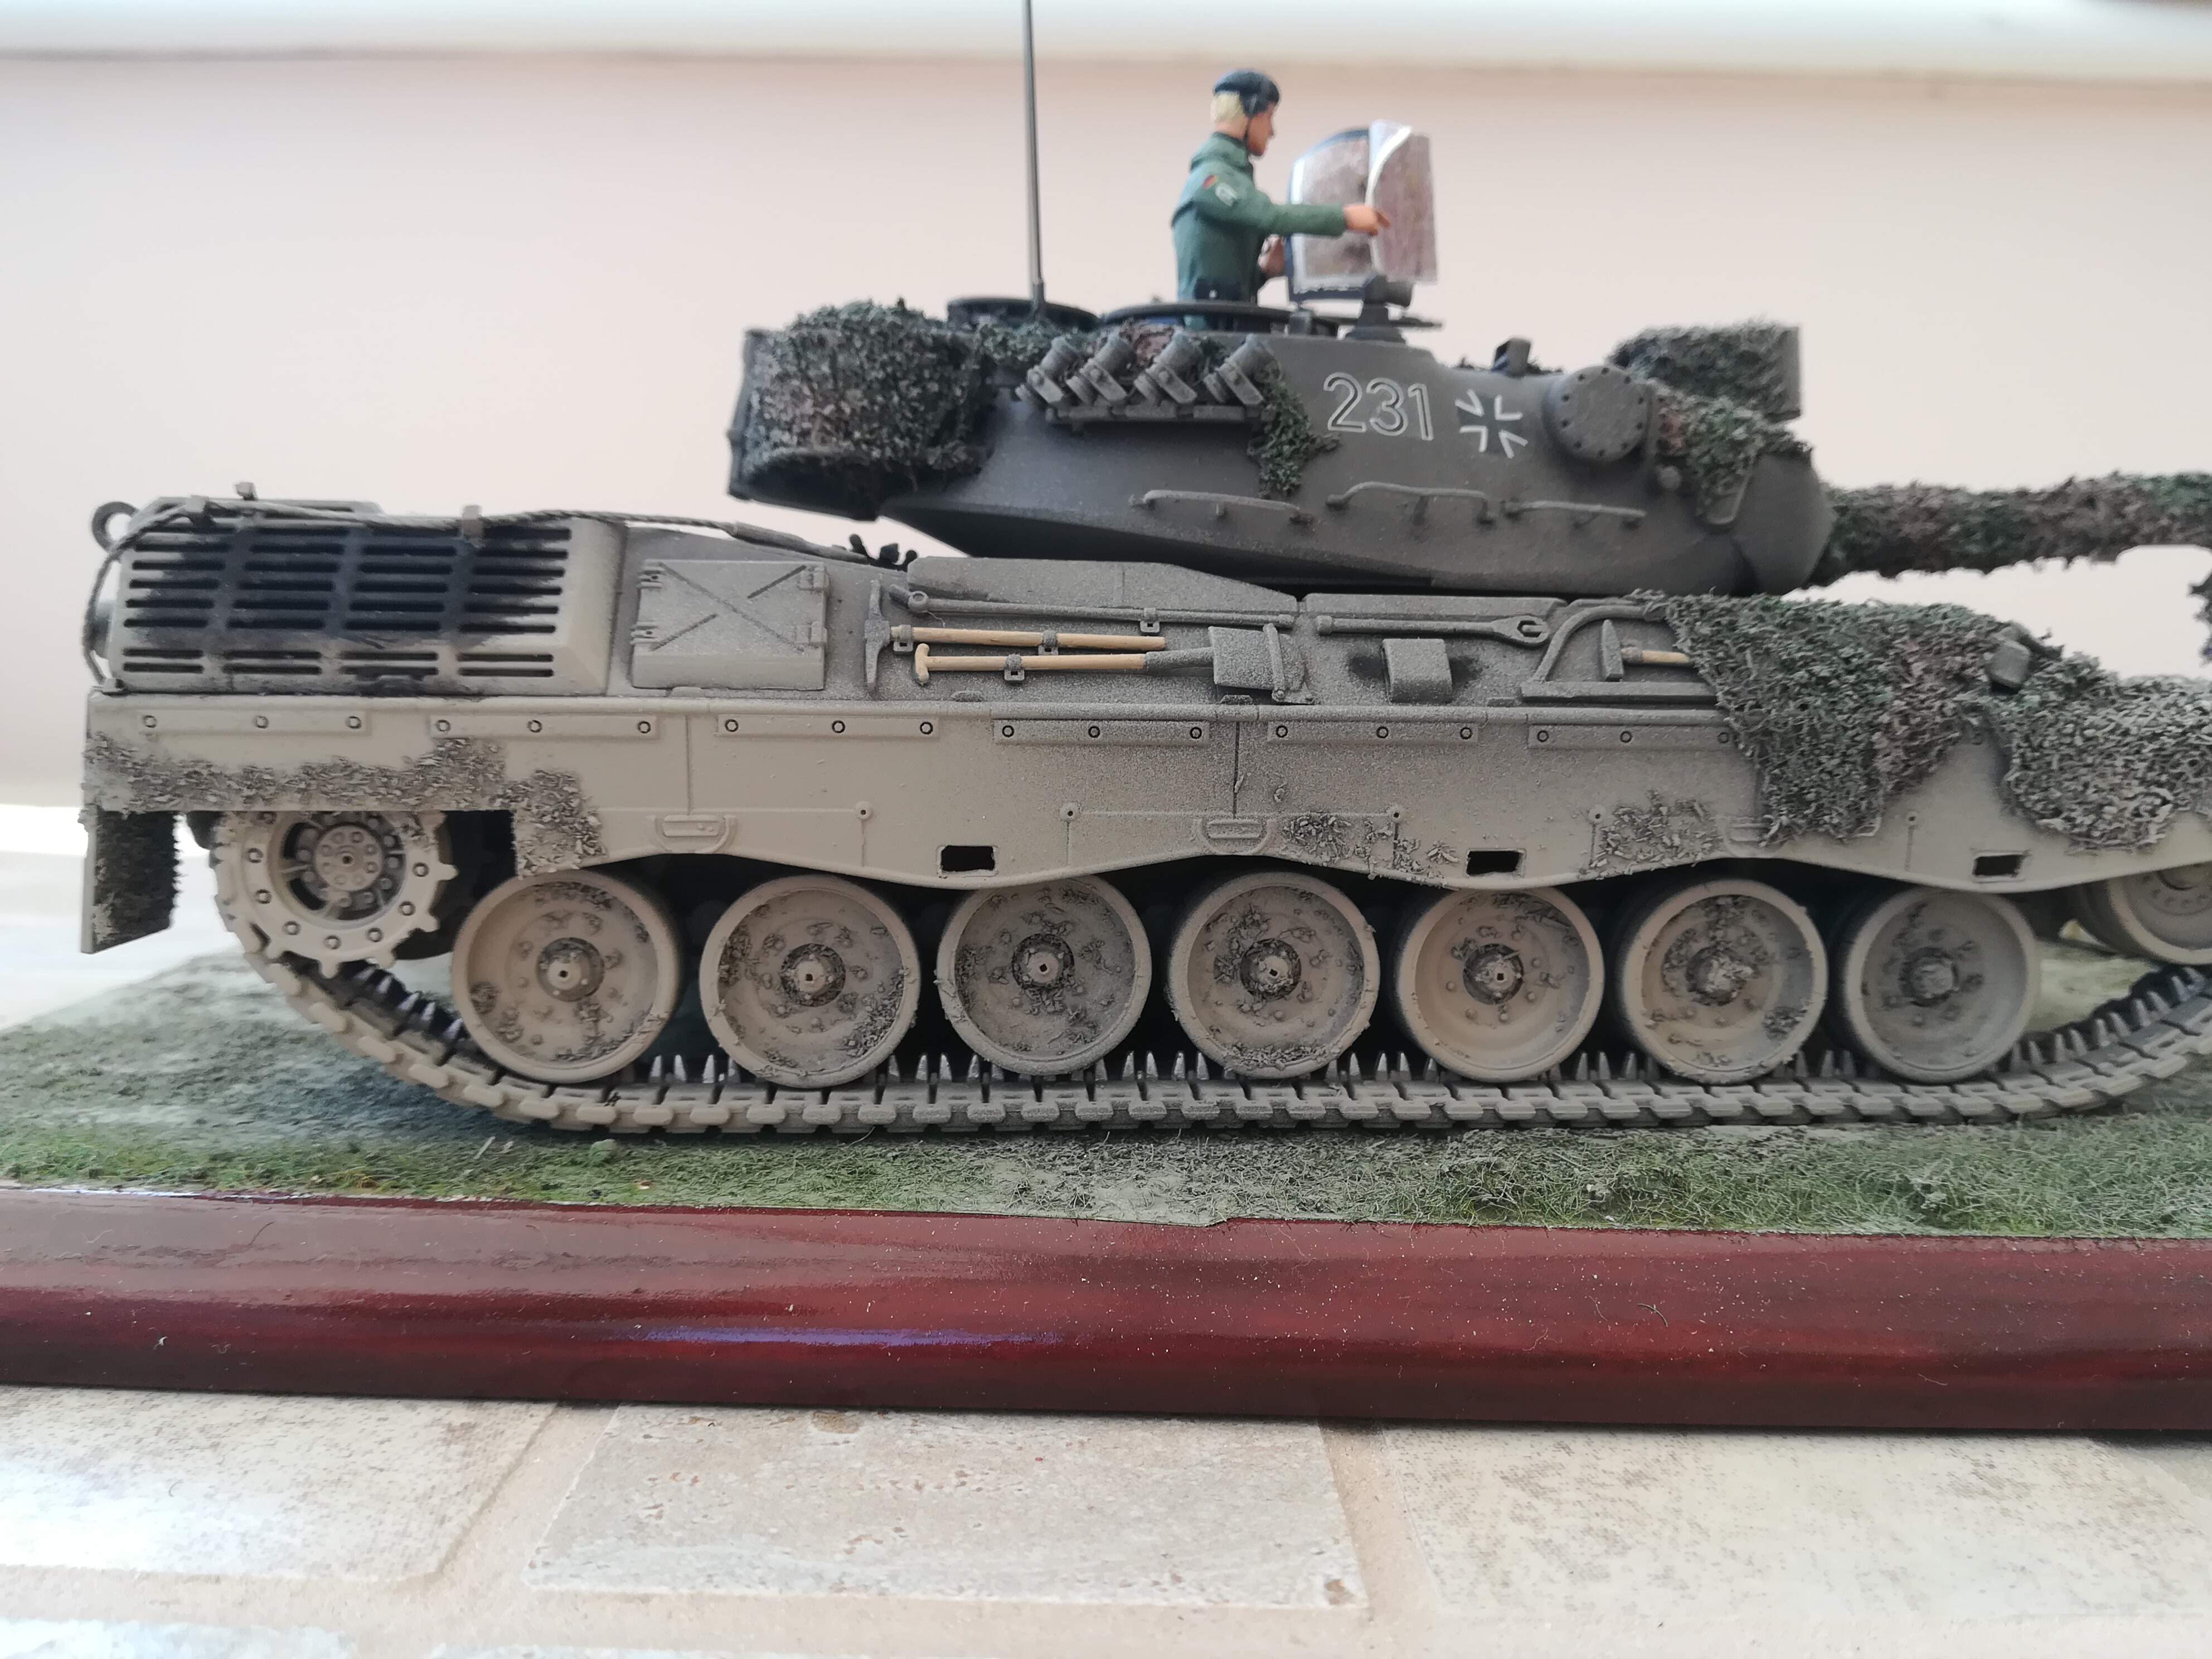
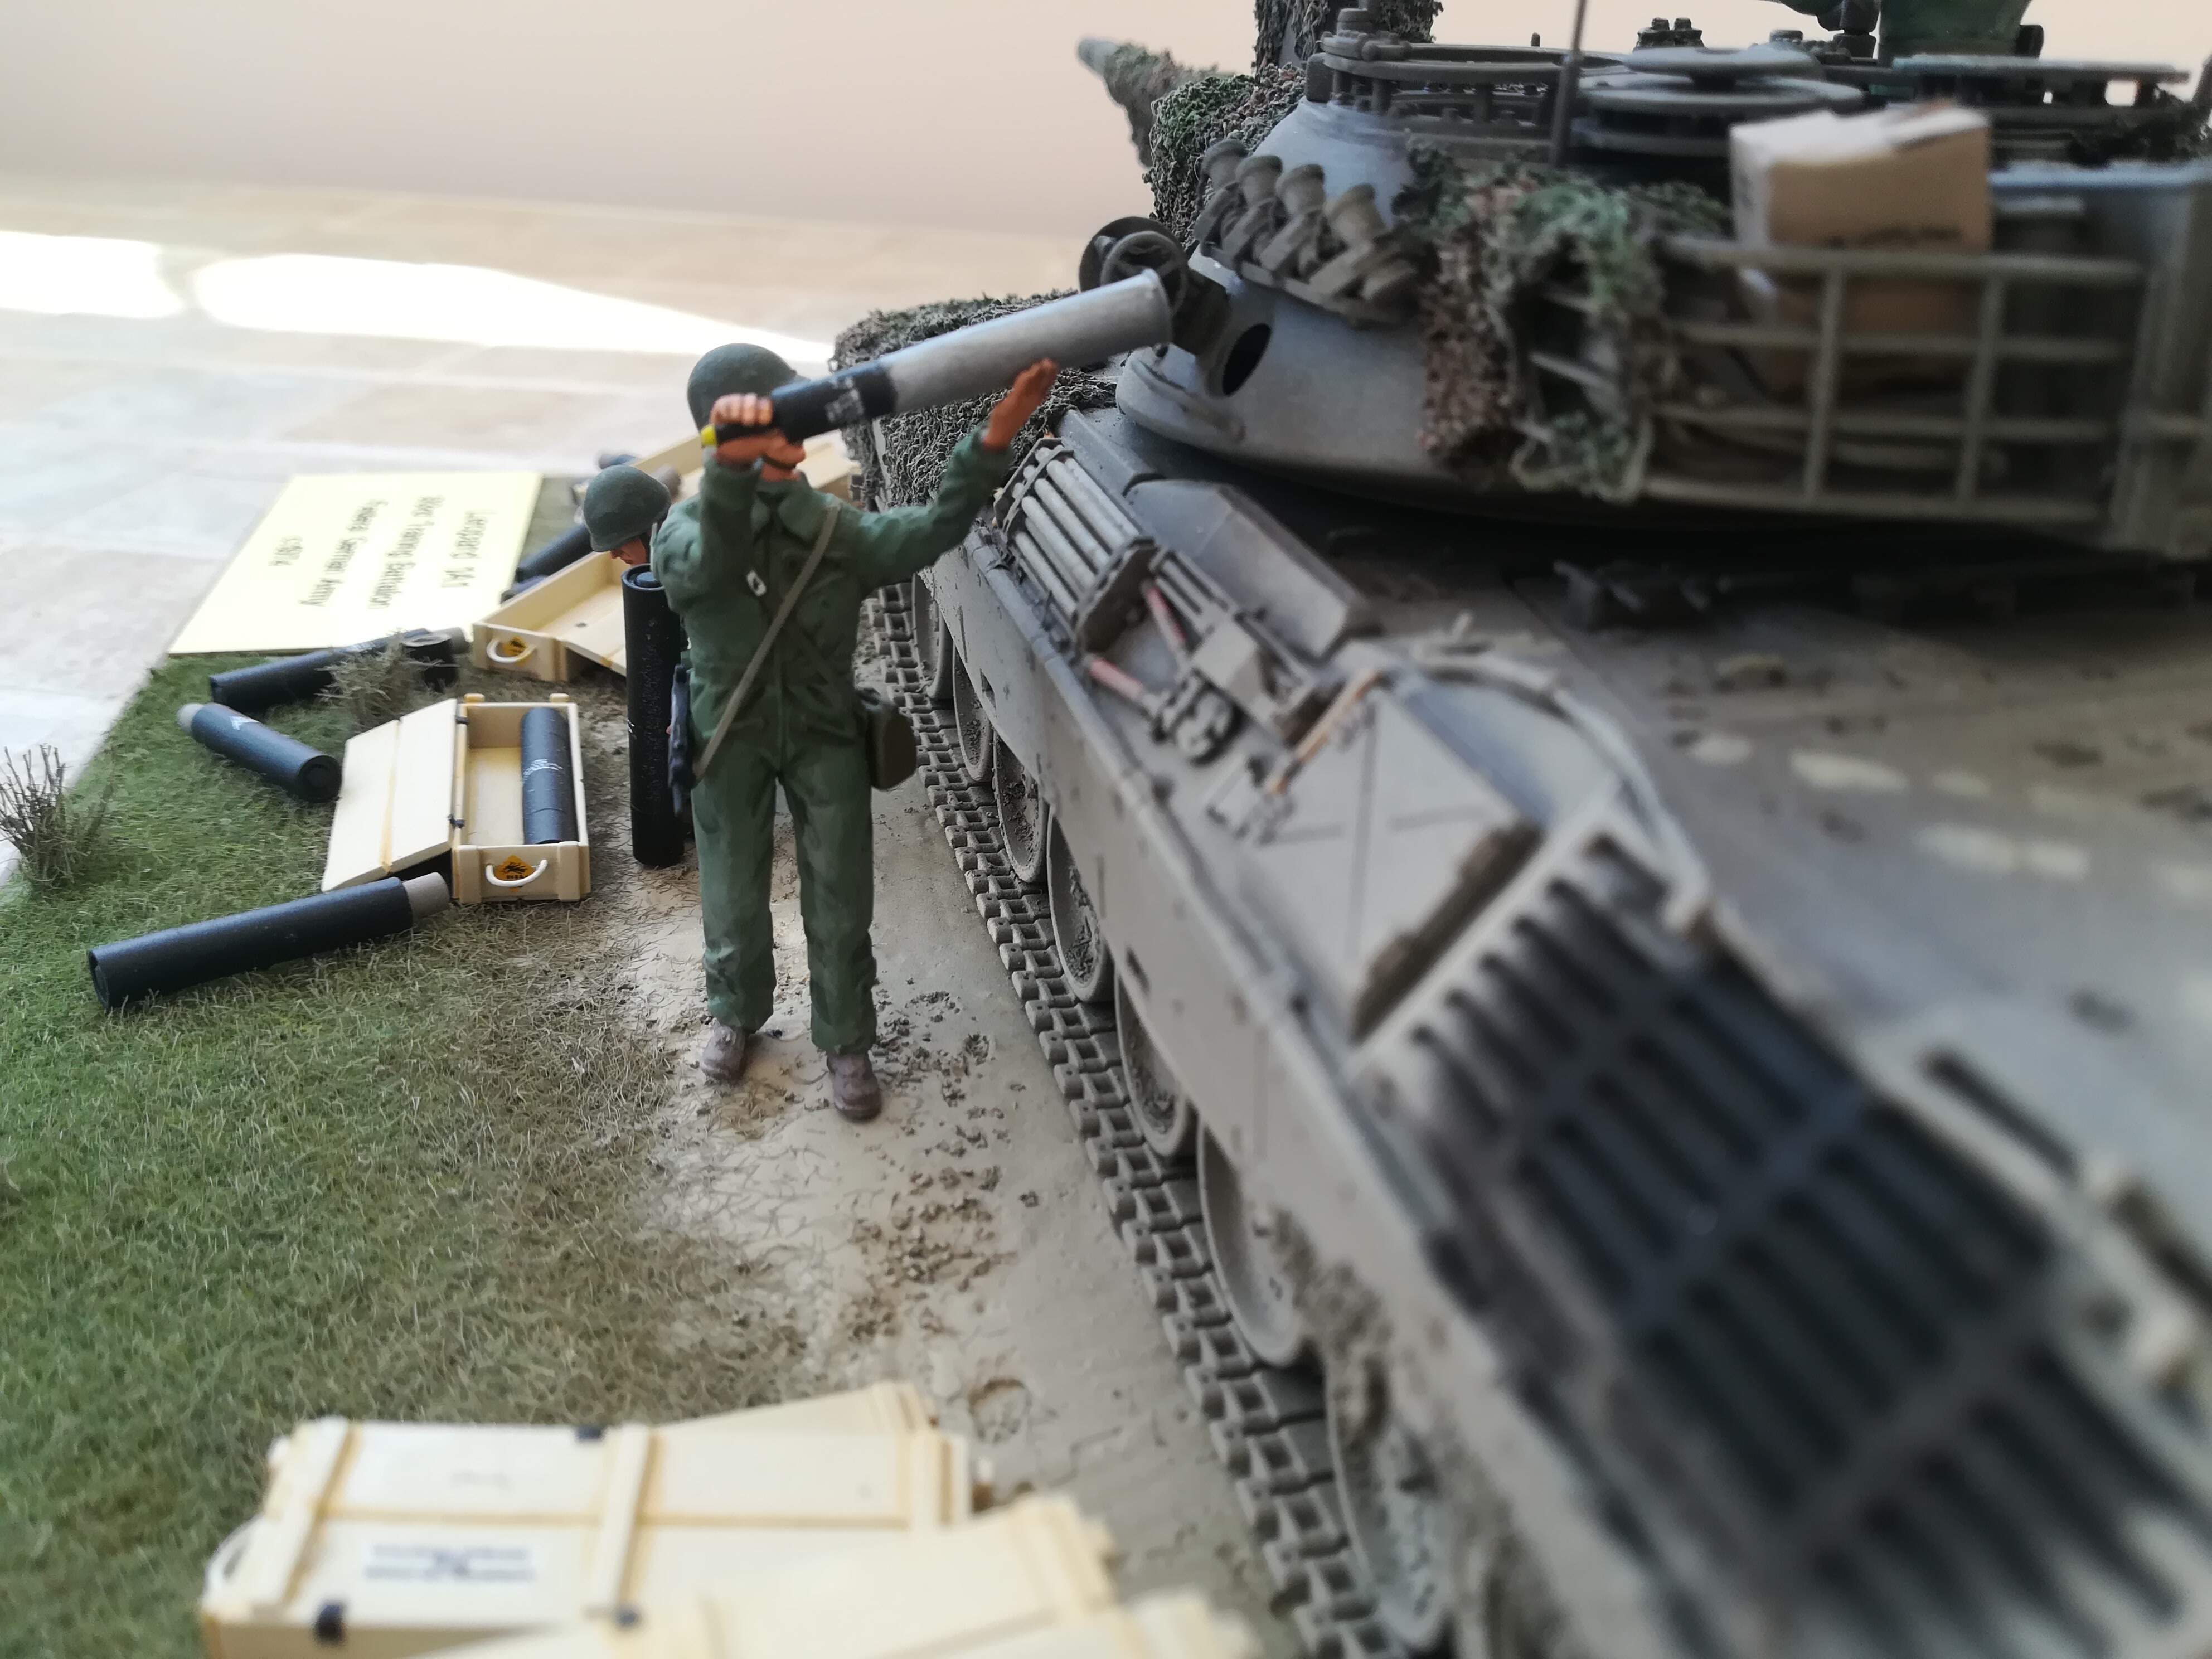
The Commander figure is also from Dolp; he is shown wrestling with his map, having had to refold it all due to the fast-moving tempo of the exercise and is trying to insert it back into its map case. His Lumocolor pens are on the turret top ready for the inevitable re-marking of the map. He still has his headset on as he’s likely to be summoned to Company (Squadron in UK parlance) HQ shortly for an Orders Group; his binoculars and helmet are also nearby; I envisaged his respirator case is still within the vehicle. I believe the weapons mix of a Leopard crew was all with Uzis less the Commander who was armed with a P1 pistol. The remaining member of the 4-man crew is of course the Loader/Operator who is within the turret receiving the ammunition. I did not model him.


Even after stowing the ammo the crew will still have a myriad of tasks to undertake such as weapon cleaning, checking fluid levels, fuel replen, tracks inspection and so on; only then will they tackle the rations (cardboard box) that have temporarily been lodged in the turret stowage rack.
8 Likes
Great job! I love the collection of marker pens on the turret roof…
1 Like
Aha! Seems like only t’other day I was wondering about this one and wham! Superb job & the netting looks perfect. I don’t know why I should be surprised they packed Uzis but I am. And surely the very last task was putting the marker pens in the top pocket…in clockwise spectrum order… 

Really good looking scene!!  And lovely nets!!
I do hope that you put the Staedler marking on the pens 
With all the other details that you added, it would be only natural.
Great job on this scene! Bravo!
Chaps, thank you all very much for your comments; it seems like I’ll be remembered for the pens more than much else! (only kidding)
This project took far longer than it should have but sometimes that’s the nature of the (modelling) beast.
Thanks again.
Smashing work Brian, very authentic looking scene…I am going to have start a few practice attempts at cam nets now… That one on the Leo just jumps out as brilliant !!
Thanks John, and to all of those who contributed especially with the details re ammo boxes for the MGs, and the scenario possibilities - I am very grateful.
For the cam nets John, steady as she goes - a bit of practice first then go for it; oh, and make sure you drink some tea(!)
1 Like
Brian, all I can say is well done and, what’s next?