Possibly a cool design 
I’ll hold off on praise/criticism until I have had the opportunity to try this type of packaging 
If its any help, I have just used a few of these on my F4 in the Phantom campaign. Lids go back on nice and secure once opened. They simply twist off to get into them and they come with a paper seal which just needs slicing through, however, a good twist would probably do just as good.
I airbrushed the stone grey and thinned it with a lesser amount of water and it gave a good even covering. I dont have a great airbrush, so I expect a more expensive one would give even better results. I brushed the other couple of colours and they went on very nice with a very small amount of thinning. They seem ok, and I will getting some more of the range when I need them.
2 Likes
Those are some great looking builds of various European “animals”! Please keep them coming!
1 Like
Olivier,
Sorry I am a bit late on parade to this topic; in a way Tamiya do already make a decent colour for Gelboliv: try their XF-51 Khaki Drab.
I feel Revell 46 Gelboliv is too dark for 1:35 - although I have used it in the past for my Bundeswehr collection. I am now a firm convert to the Tamiya paint. As I say, try it - I don’t feel you will be disappointed - although as always, colour perception is subjective.
Brian
Thanks a lot for the info Brian.
Olivier
Thanks for stepping in, Carlos, and welcome to my thread! Right now I’m working on a little doggie …
Brian, Gelboliv is Revell 42 (RAL 6014), Revell 46 is so called “NATO Oliv” (RAL 7013 Brown Grey). Have a look at the Leopard 1BE in my first posting.
Yes - you’re right; I’ve confused myself - I meant Revell 42.
The MAN 5 ton, spent a good while in the back of one last year and then quote some time in cab earlier this year. It definitely is rather capable offroad too.
Anyway, very nice build, made me want to build one as it is so similar.
1 Like
Thanks for your comment, Karl! Yes, I know that the Eesti Kaitsevägi has got some of our MAN 5 to gl. I always enjoyed driving the “Fünftonner” in the last 3 years of my service and have fond memories of it. Where our tanks went, I went too. Drove something like 13.000 km with it plus roughly 7.000 in smaller cars, mainly VW Iltis. So I was on the road nearly every day …
This kit is not in the 2020 program of Revell. Just wait a while or look at Ebay/Amazon or go for the much more expensive Hobbyboss kit.
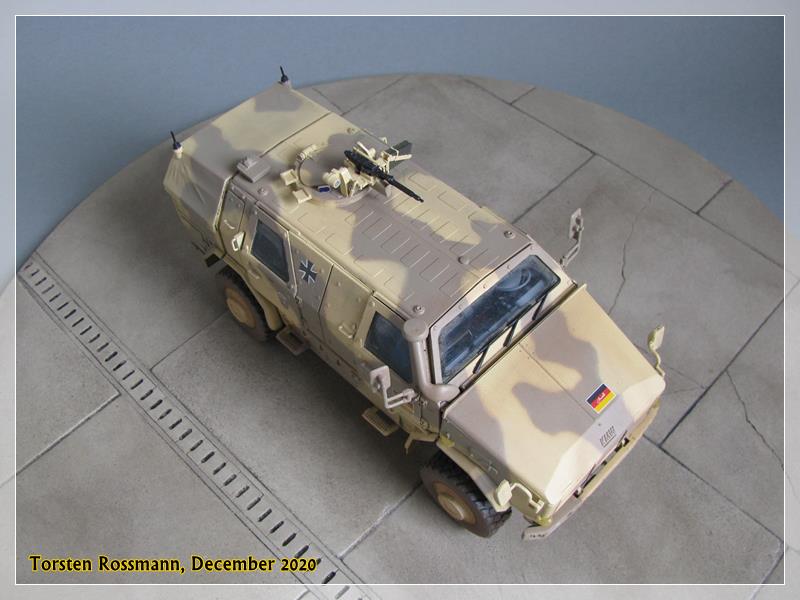
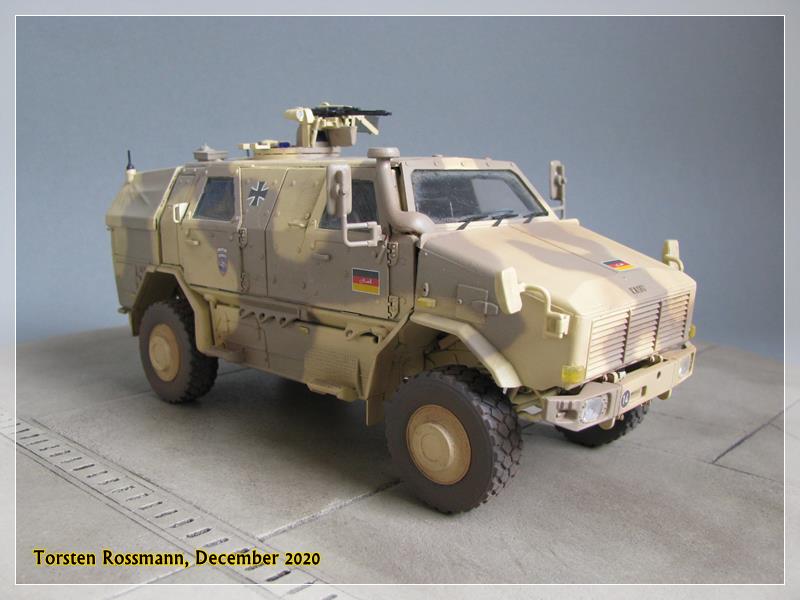
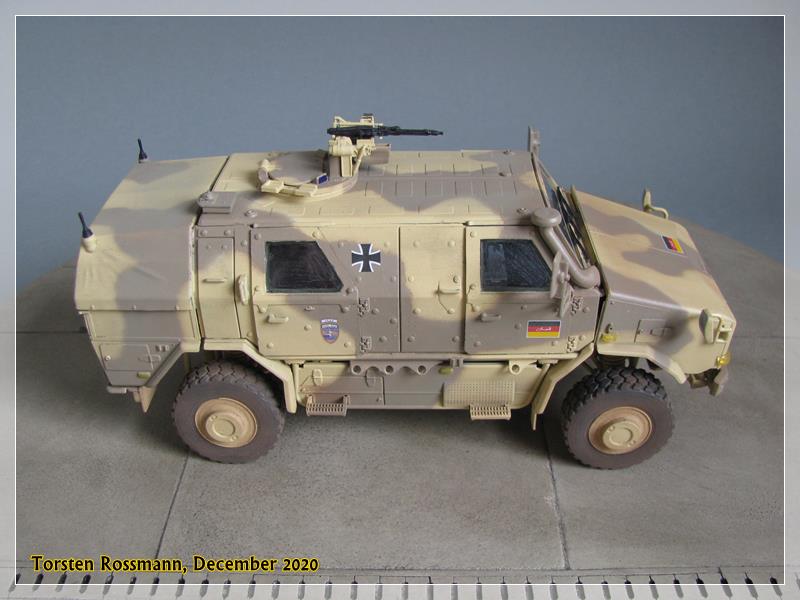
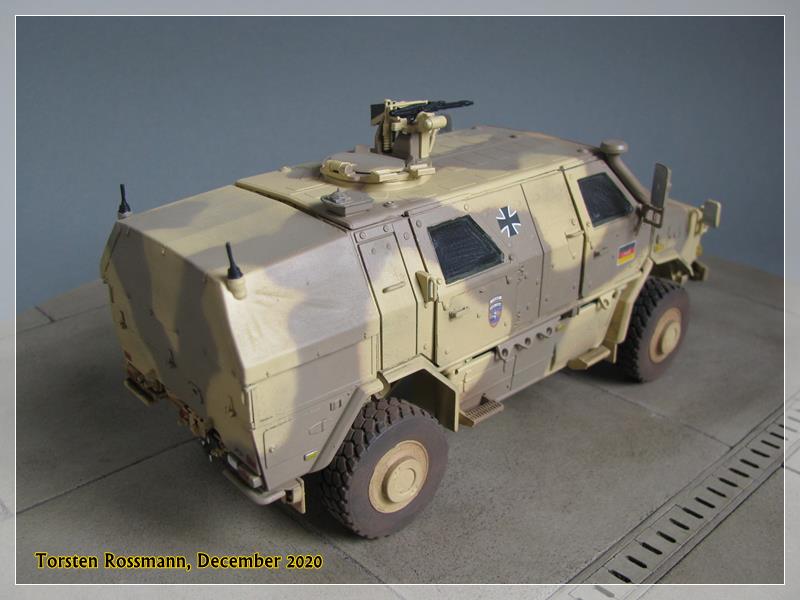
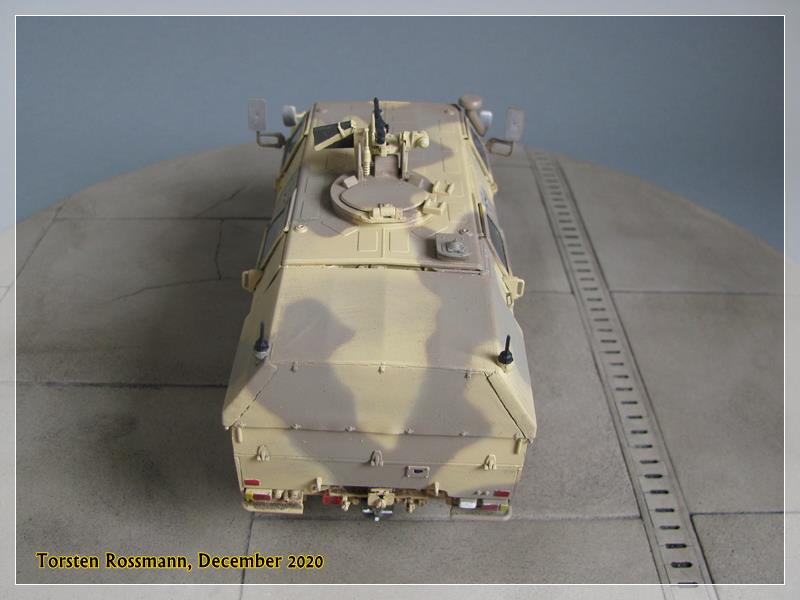
While I’m busy posting progress of my builds on Aeroscale I nearly forgot to show you my last build from 2020, the AFT Dingo 2 GE A2 PatSi from Revell Germany in 1/35 which I have finished in the last days of December …

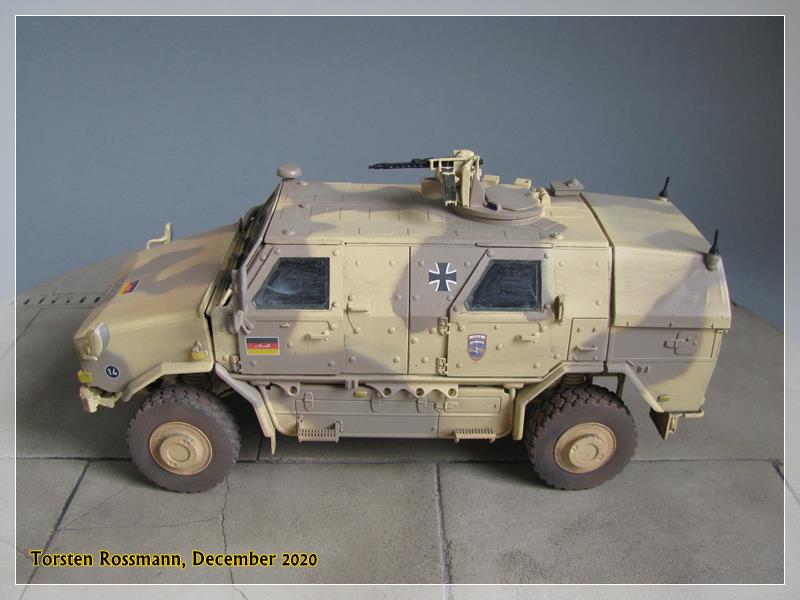
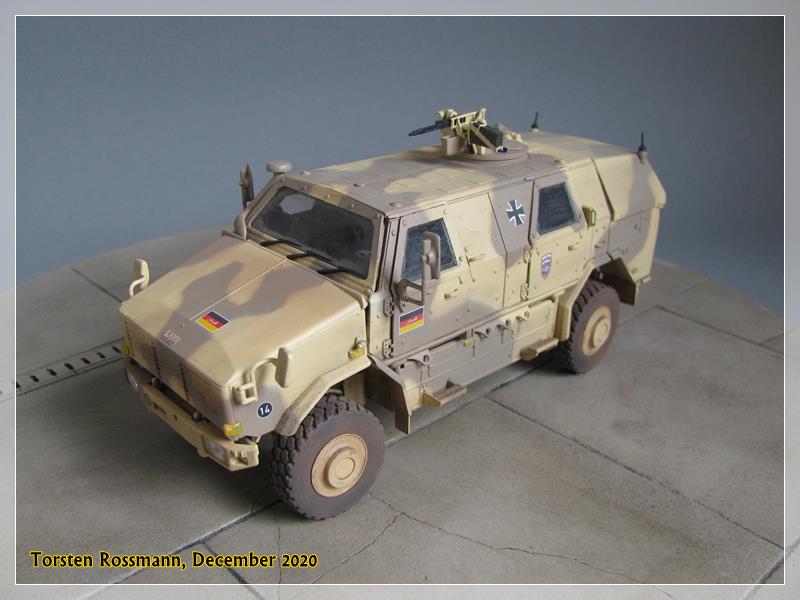
… the Allschutz Transport Fahrzeug Dingo 2 is in use for the German Bundeswehr since 2005 and is the successor of the ATF Dingo 1 which first was introduced in 2000. It is based on the chassis of the Unimog U 5000 and is powered by a Daimer Benz OM 924 diesel engine with 222 hp. Nearly 600 Dingo 2 of many different versions are in use of the Bundeswehr at the moment, 149 of them are the A2 PatSi, which is the most numrous version. It is equipped with a Type 1530 mechanical overhead weapon station with a MG 3, calibre 7,62 mm. The Dingo 2 has outstanding anti-mine protection and the cell protects the crew also against 7,62 mm ammunition. The ATF Dingo 2 is widely used by the GECON ISAF in Afghanistan since 2006. Until 2010 the Bundeswehr has lost five Dingo 2 in Afghanistan. Other user of the Dingo 2 are the armed forces of Austria, Belguim, Czech Republic, Luxemburg and Norway so far …

… I have built an ATF Dingo 2 GE A2 PatSi of the Schutzkompanie PRT Kunduz GECON ISAF in February 2011 …
… Revell Germany came out with this kit in 2013. It is my first Dingo and I had some problems building it. In some steps the instruction leads to misunderstanding but I also made my own mistakes. Most of the problems came up with the chassis suspension. Some of you may have followed my build blog and remember my faults. But after I left that steps behind it all went easier. Meanwhile Revell came out with two more versions of the Dingo which I also have and I hope to avoid the mistakes I made here on my future builds …

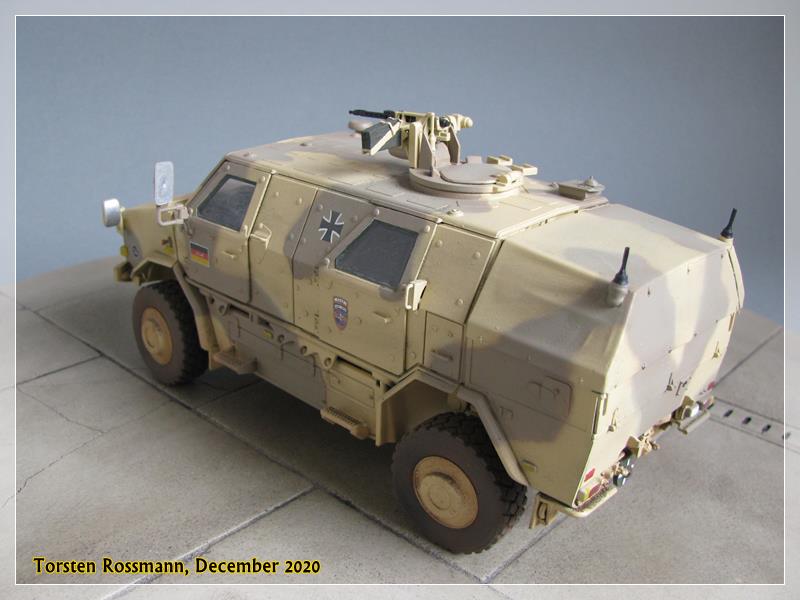
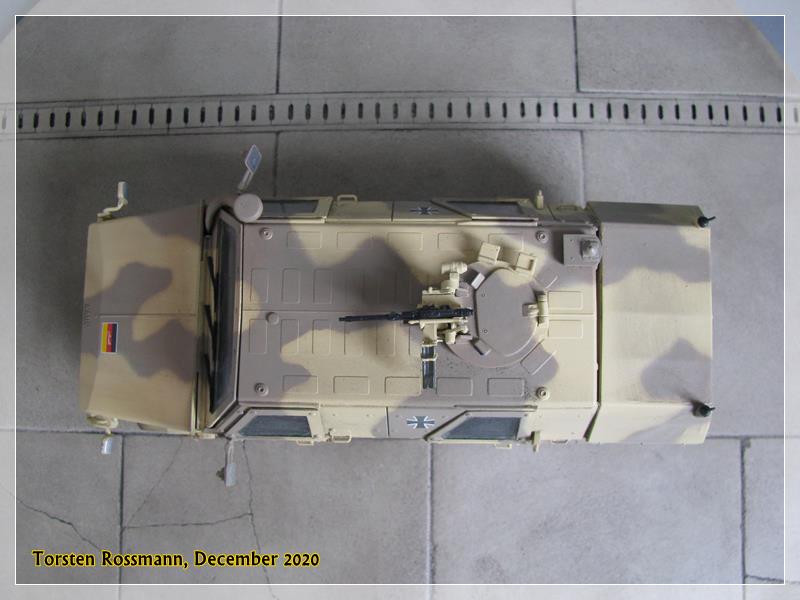
… Revell offers 4 decal and painting options for this kit (3 x Bundeswehr, 1 x Czech Army) and I went for this two-tone option. I have used Revell 314 Beige and Vallejo 71246 Sandbrown for the camo. All decals are taken from the kit. Finally I have used some brown pastel chalks to give my Dingo a slight dusty look.
Thanks for stepping in and having a look. Hope you’ve enjoyed walking around my new Dingo.
Happy modelling!
Torsten 
6 Likes
That’s a good looking build Torsten. Well done sir! 
1 Like
Thanks for looking, Carlos! I’m quite happy with the overall look of my Dingo after all the troubles with the chassis. Hope not to make the same mistakes on my other Dingos, though they are not in the plans for this year.
Torsten 
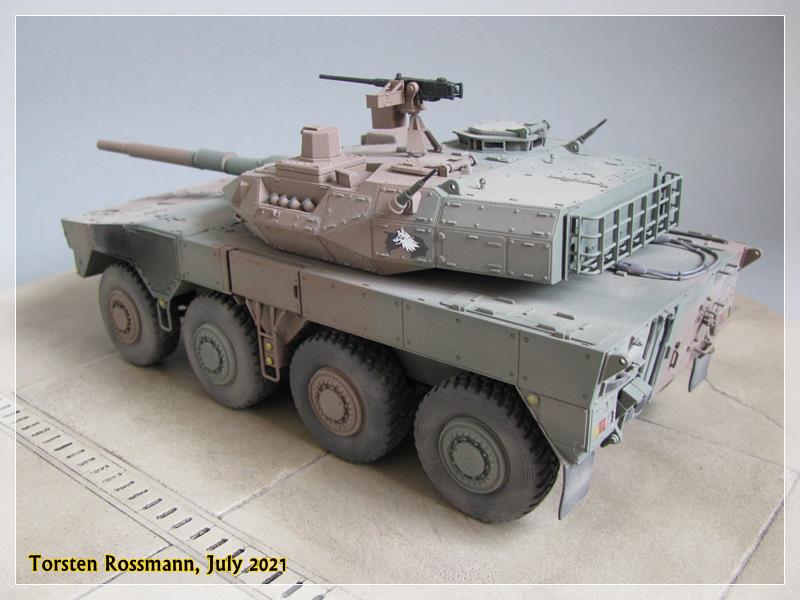
Already finished in May I had not made good photos earlier than this month, so today I would like to present you my latest armored vehicle, the new Mobile Combat Vehicle Type 16 of the JGSDF from Tamiya in 1/35 … 
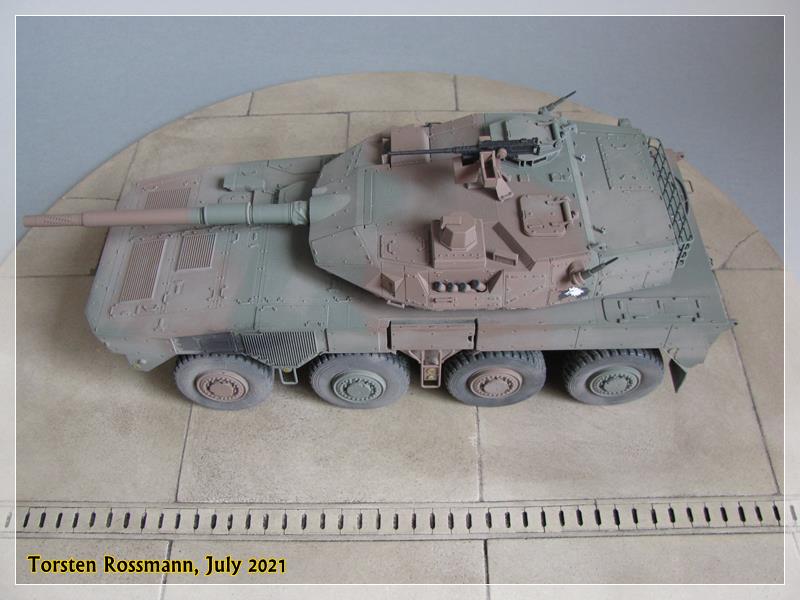
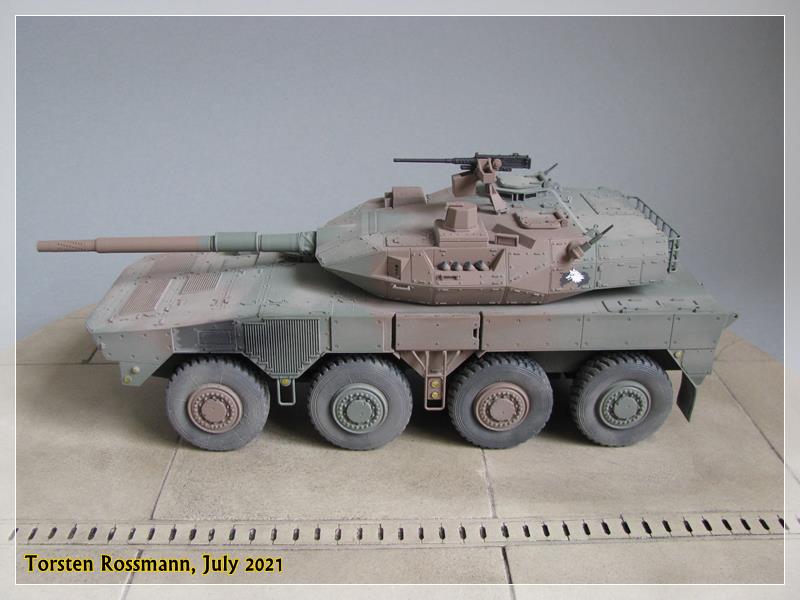
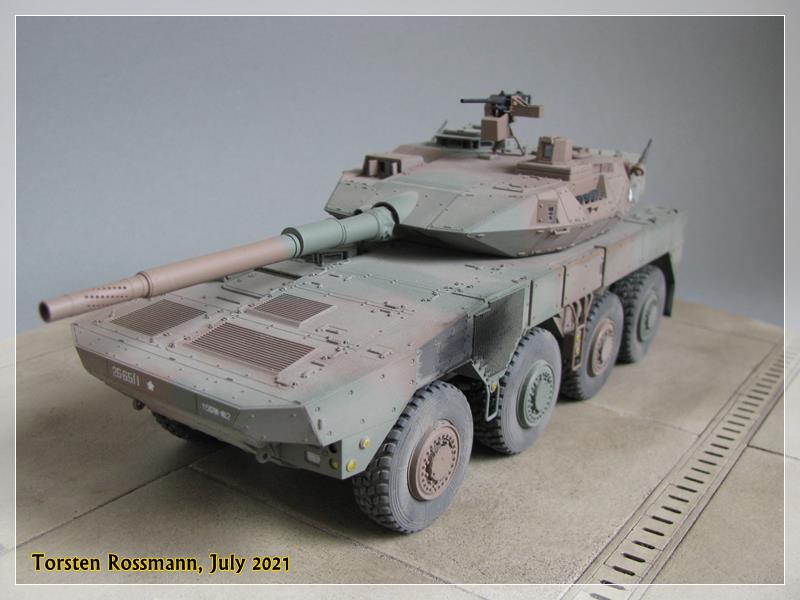
… development of this new 8-wheel tank started early this century and the first prototype was made in 2013, first trials started in 2014. The first serial model was handed over to the JGSDF in 2016. Three companies are producing it, Mitsubishi Heavy Industry produces the chassis, Japan Steel Works the turett and Mitsubishi Electronic the fire control system. Main weapon of the MCV is a L/52 gun, caliber 105 mm. The tank has a weight of 26 tons and is powered by a 4-cylinder turbo diesel engine with 570 hp, which gives the vehicle a maximum speed of 100 km/h. The engine is placed in the front left part of the chassis. The MCV Type 16 is based on Hokkaido, Honshu and Shikoku and will equip the Rapid Deployment Regiments and Fuji Tank School. So far it is planned to buy 134 vehicles …
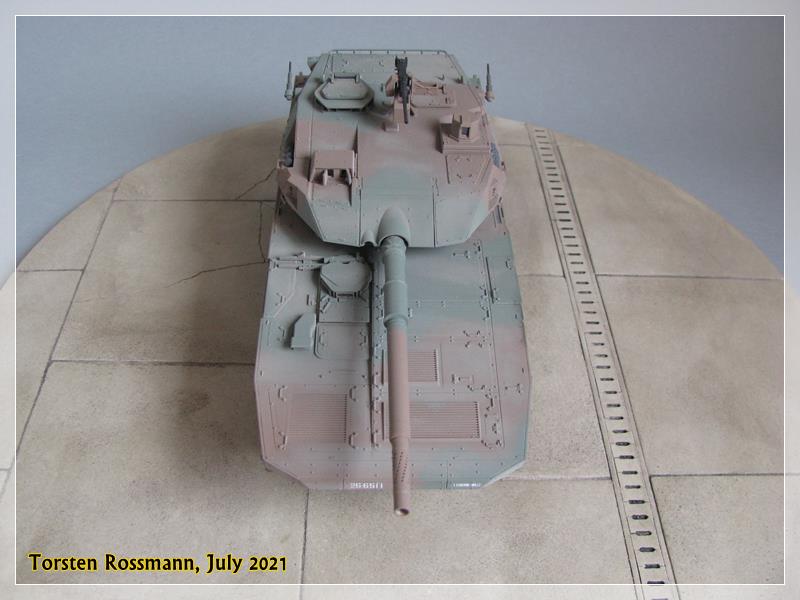


… I have built a tank of the 15. Rapid Deployment Regiment, based on Shikoku in 2018 …
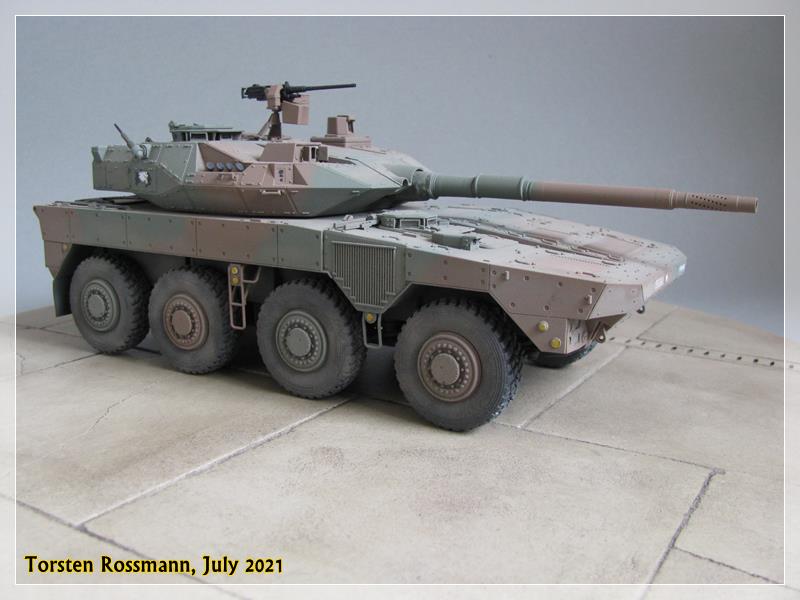
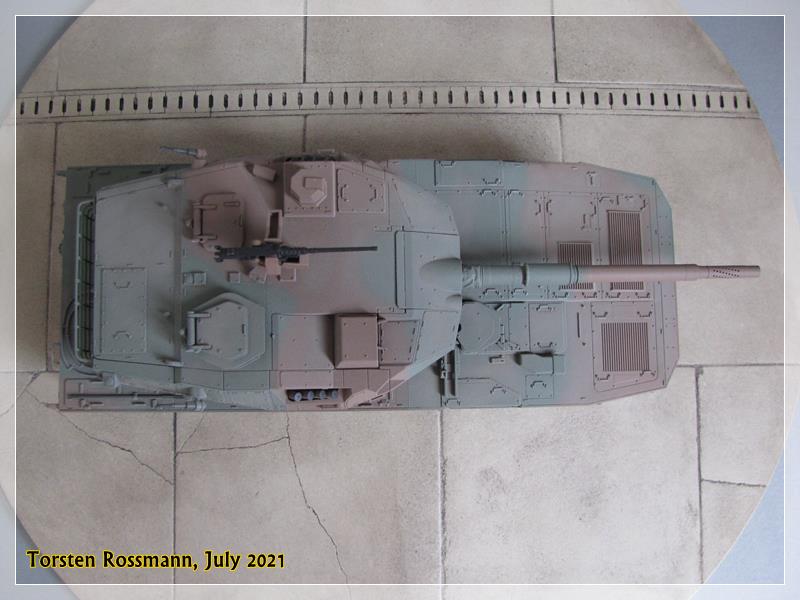
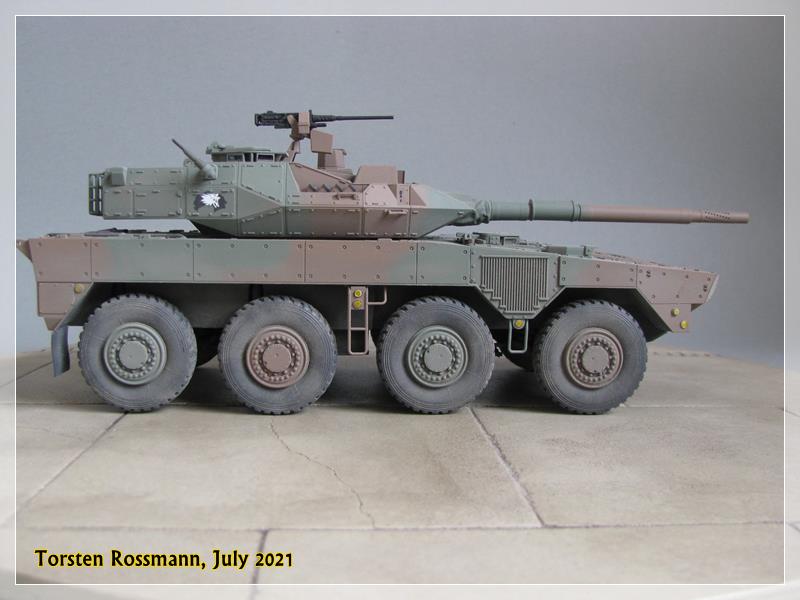
… Tamiya came out with this kit in 2018 and I bought it in 2019. The kit is of typical high detailed Tamiya quality and goes together very easy. The suspension consists of many parts and the two front axles are movable like on the original. The only negative criticism I have to make is the gun included in the kit. The kit includes masks for the muzzle with which you can drill holes in the gun. At least I tried to but they were not in the correct line. So I ordered the aluminium made gun from Tamiya Germany, which cost me another 18 Euros. But it was worth the extra money. On the other hand, why does Tamiya not include the aluminium gun in the kit? That would save the model builder quite a lot of hassle …
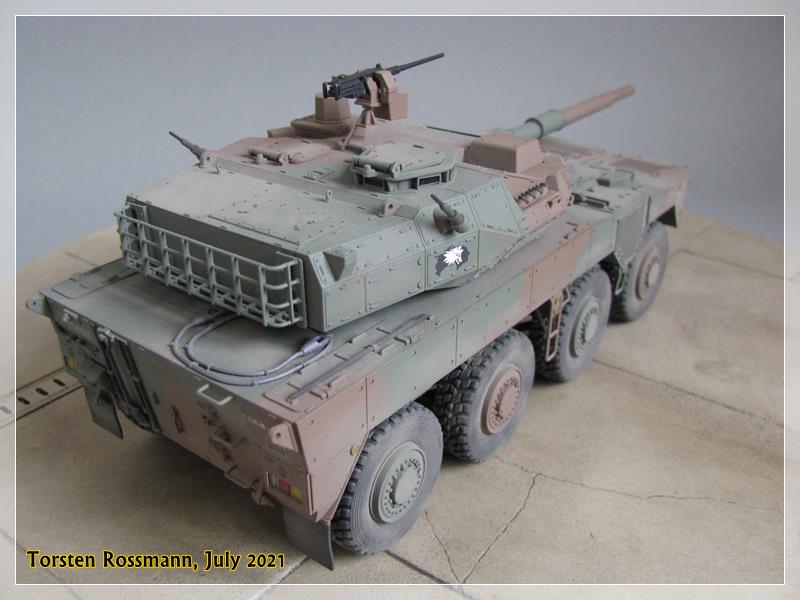
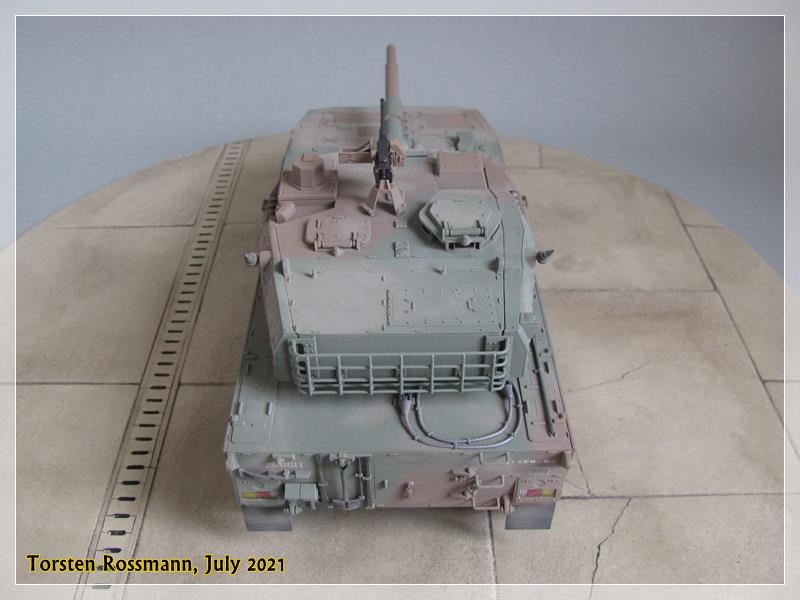
… for painting I have used the suggested Tamiya paints XF-72 JGSDF Brown and XF-73 JGSDF Dark Green for hull and turett, plus XF-62 Olive Drab for the suspension area. Final coating was made with XF-86 Flat Clear. I had forgotten how flat that Flat Clear is! I would say dead flat …
 This should not be used with aircraft models! Finally I added some brown, green and grey pastel chalks to give my new MCV Type 16 a slightly dusty look …
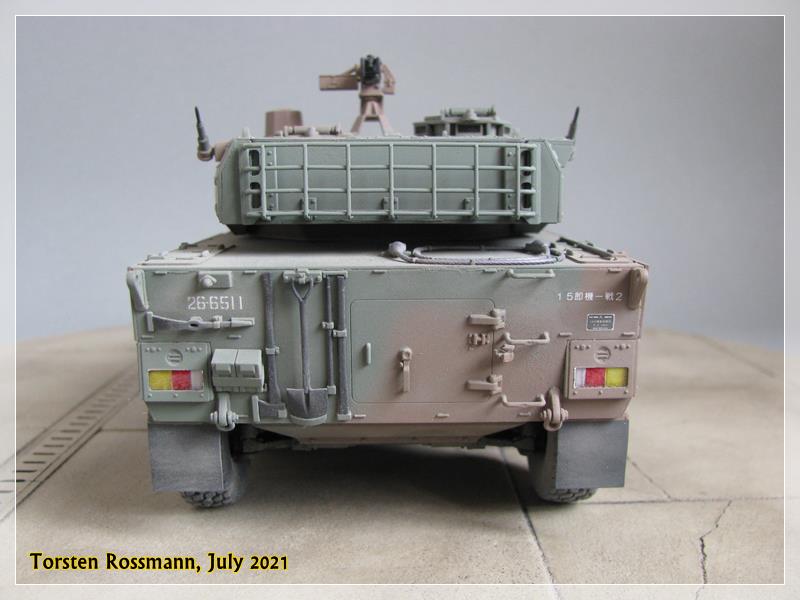
… this kit goes together very easy and is really fun to build. The only extra you should consider is to buy the aluminium gun. Highly recommended kit!
I say “domo arigato!” for walking around my new armored vehicle and I hope you have enjoyed looking at the photos.
Happy modelling!
Torsten
4 Likes
Hi Torsten,
It is a nice and impressive collection of BW related subject. No doubt, you have great assembly/building skills. I also like the subtle weathering you do (personally cannot imagine heavy worn vehicles in active service in a modern european army, although some exceptions could show up) but as a comment: you could probably do some pin wash around the small details (eg hinges). The dust you apply “dulls down” the look and (to my eyes!!!) the result is extra flattened. I would enhance the details to show up (through) the dust, resulting a nice optical contrast, too.
But that is to a personal taste.
Keep building and posting fhese vehicles, I learnt very interesting things here and highly appreciate that you also “open-up” and let us know your personal connection.
Bravo!
Tamás
1 Like
Thanks for your kind words, Tamás! Great to see you here!
When it comes to weathering I’m pretty bad, I guess. Maybe you know that there’s no weathering at all on my aircraft models but I think on my armored builds there should be at least a bit. I always think I do too much. Maybe the MCV looks extra flat with the dust because of that super dead flat clear Tamiya coating. I think it’s not only the first time I used it but also the last time …
You’re right, vehicles of a modern army usually don’t have a heavy worn look. They are simply too expensive to let them rotten in active service. I can remember that we did always look after our trucks to have them in good condition. Also when we were out in the training area our trucks were really dirty and muddy so before we returned to our barracks we always paid the Panzerwaschanlage (tank wash) at the entrance of the training area a visit. In 2019 I found some photos of our old Panzerwaschanlage Wendisch Evern in the internet. The tank wash is no longer in use as the barracks are closed now for over 25 years … 


I guess the photos were made in the late 1990’s or early 2000’s years …
I have just started to build a Spitfire Mk. II from Eduard but afterwards my plan goes for more Bundeswehr stuff …
Torsten
2 Likes
Where were you stationed Torsten ?
1 Like
Torsten I really like your armor builds and the finish is very good. I like the subtle dusting you have given them. I especially like the camo job on the dingo!
1 Like
Torsten,
I’m just getting caught up in here. You’ve got some stunning builds. I particularly like your K9. I was tempted to paint mine up in Finnish colours but I didn’t have the paints and my boxing only came with Korean marking. So I took the easy route out. I commend your attention to detail with that masking!
Really looking forward to seeing more in the future!
1 Like
Thanks for your kind feedback, guys!
John, my barracks were in Lüneburg, south of Hamburg. During my time in the 1980’s there were about 5000 soldiers stationed in 3 barracks in Lüneburg. My unit was the 4./PzBtl 83 (with Leopard 2A4) and later the 1./PzBtl 83. The battalion was disbanded in 1992, less than 3 year after I left …
Richard, yes, the camo on the Dingo came out really nice, though I had problems building it. Glad you like it!
Don, I bought the Academy kit of the K9 with only finnish markings. I certainly have a soft spot for everything about the Finnish Maavoimat and Ilmavoimat. So it was no question for me to get this kit. My model looks like the tanks were shown to public in summer 2017. They were bought from a surplus of the ROK Army. Meanwhile the Finns have “upgraded” their K9’s.
In 2019 I made a build blog in the old Armorama Forum. Just checked it, the blog is still there but the photos are all gone. So if you like to know something about the masking or painting, just let me know. I have all photos on my computer. For painting I used Vallejo paints. Pale Green 71095 is a bit too light but it’s close to the original. I don’t have any finnish paints.
Happy modelling!
Torsten
1 Like
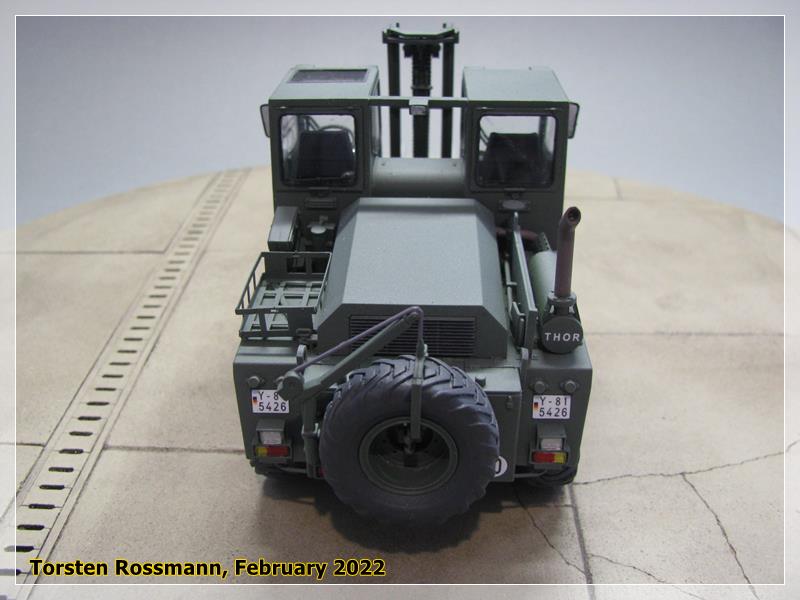
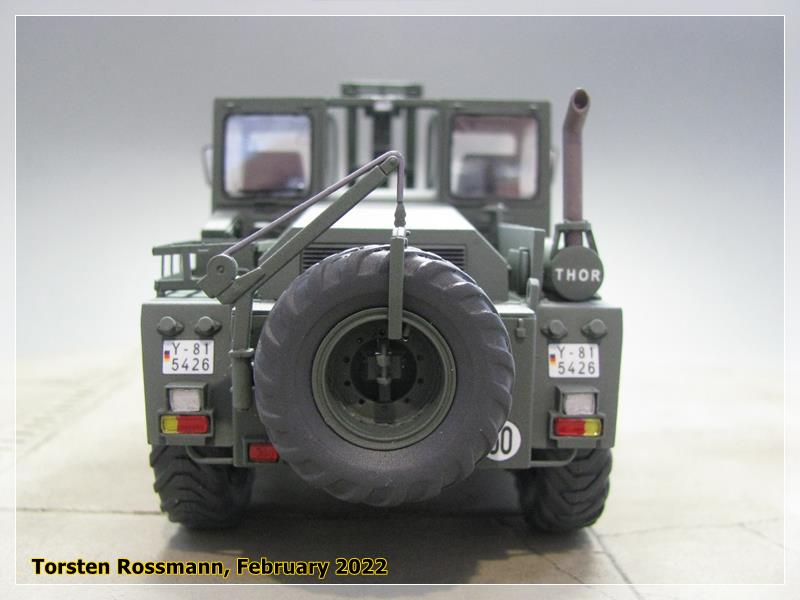
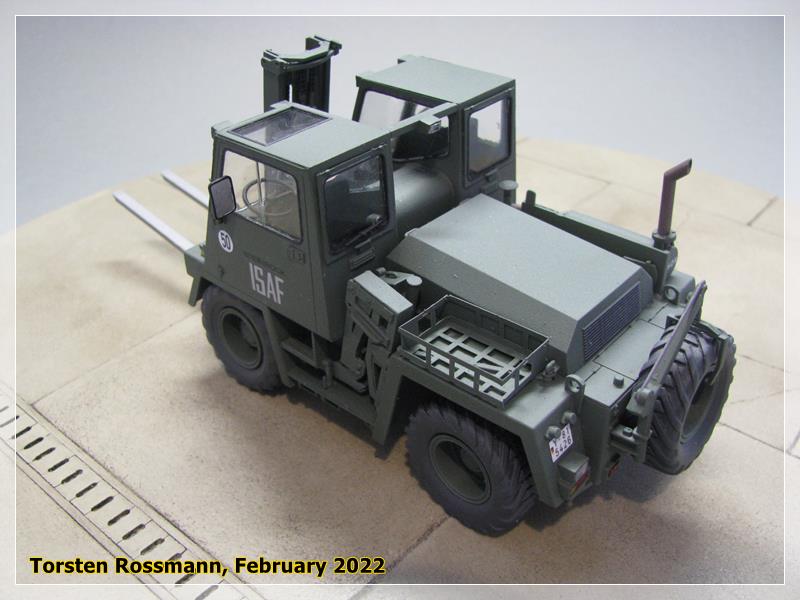
Finished already a few weeks ago, I would like to show you my latest military vehicle, which is also used in civil life. It’s the FUG Feldumschlaggerät 2,5 t from Takom in 1/35 …
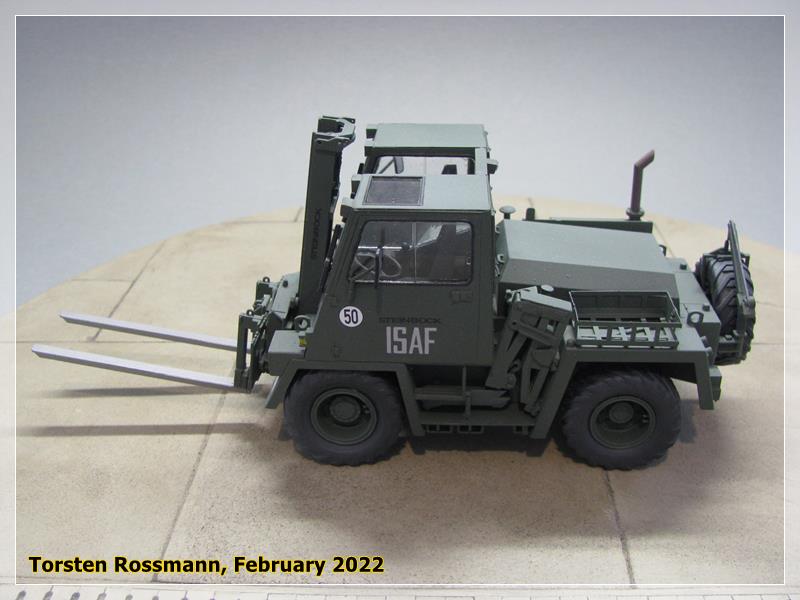
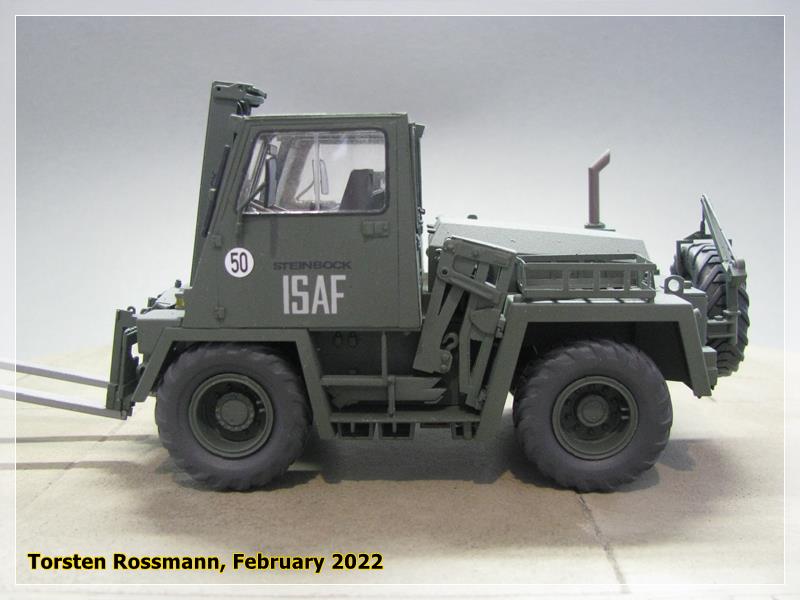
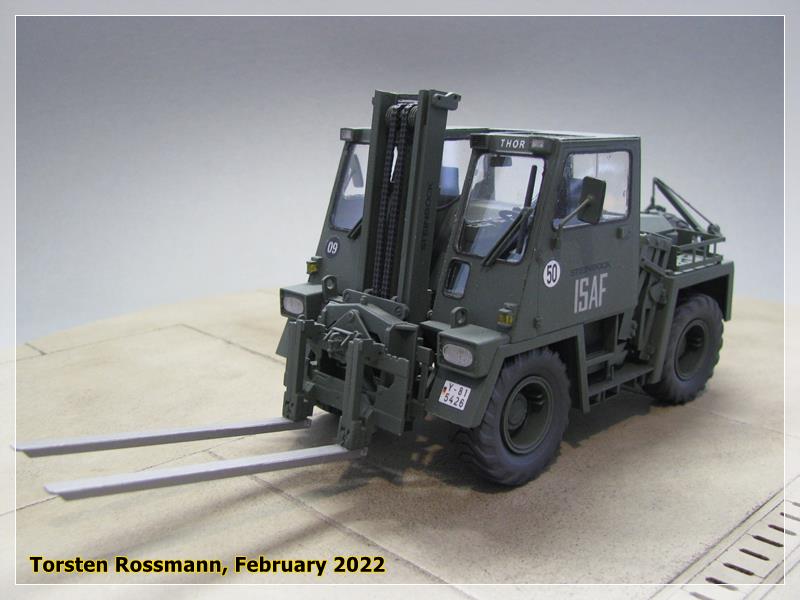
… the Feldumschlaggerät is produced by the german company Steinbock in Moosburg near Munich. Between 1983 and 1992 the Bundeswehr got 577 FUG for their supply units. This very versatile vehicle can not only work with fork lifts but is also able to carry a crane or a dozer blade. The total weight is 8,5 tons with a payload of 2,5 tons. The FUG has off road capabiltiy and is powered by a 6 cylinder diesel engine with 107 hp. The maximum speed is 50 km/h …
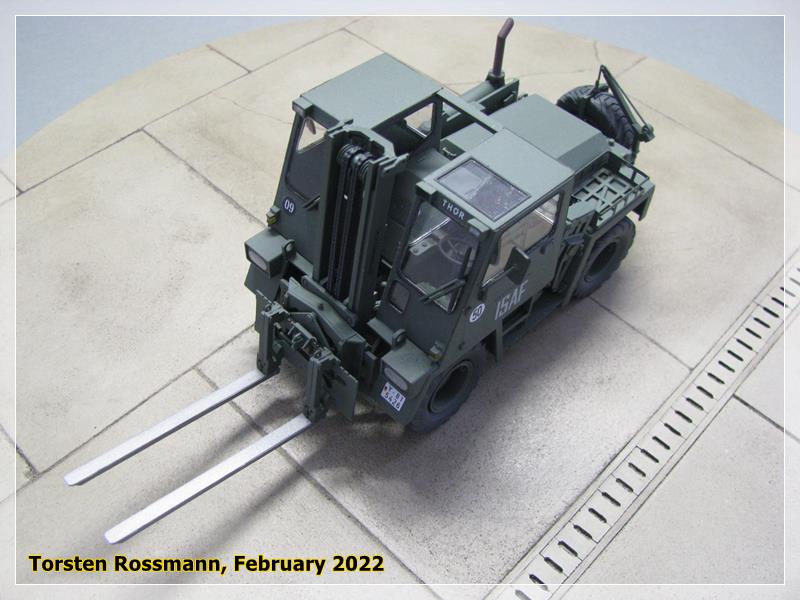
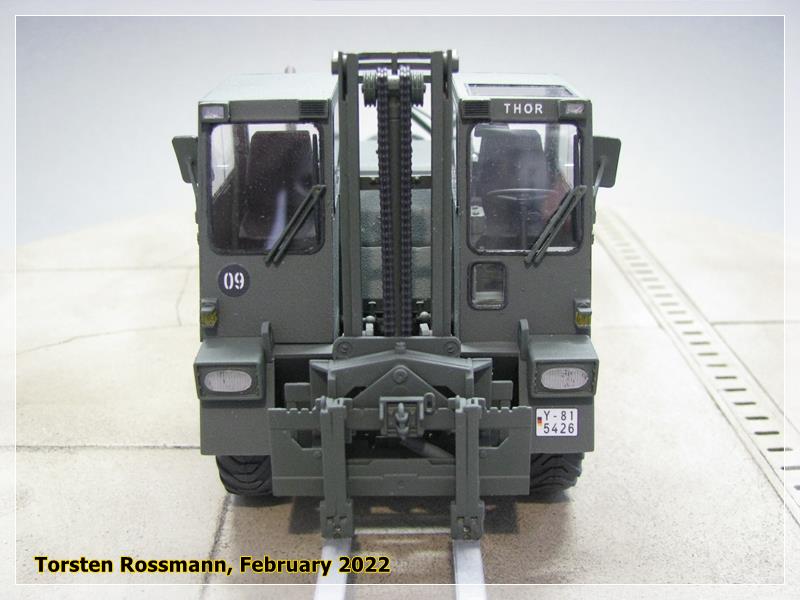
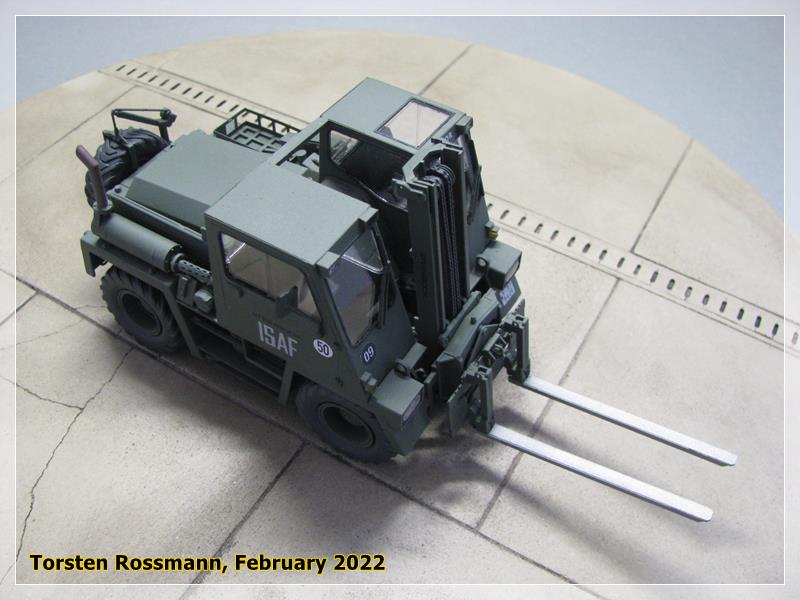
… I have built “Thor”, a FUG of the Versorgungskompanie II at Camp Warehouse in Kabul during the GECON ISAF engagement …
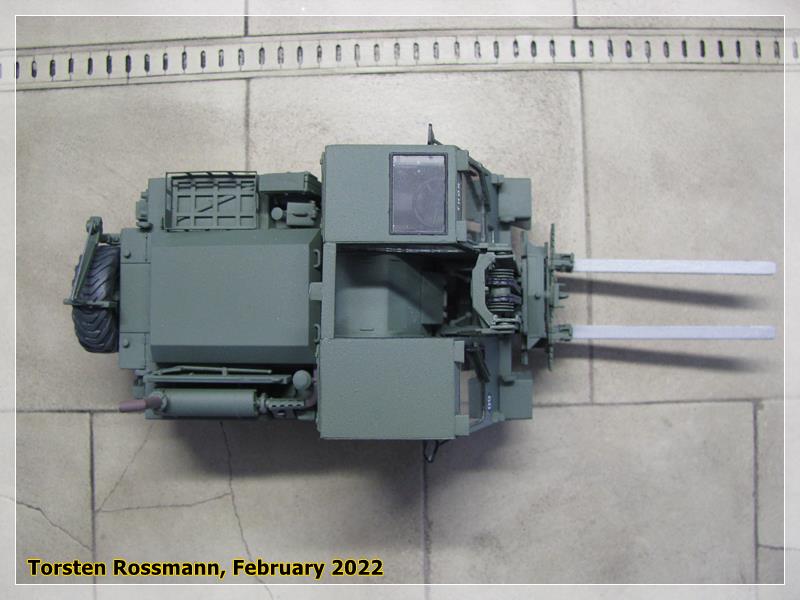
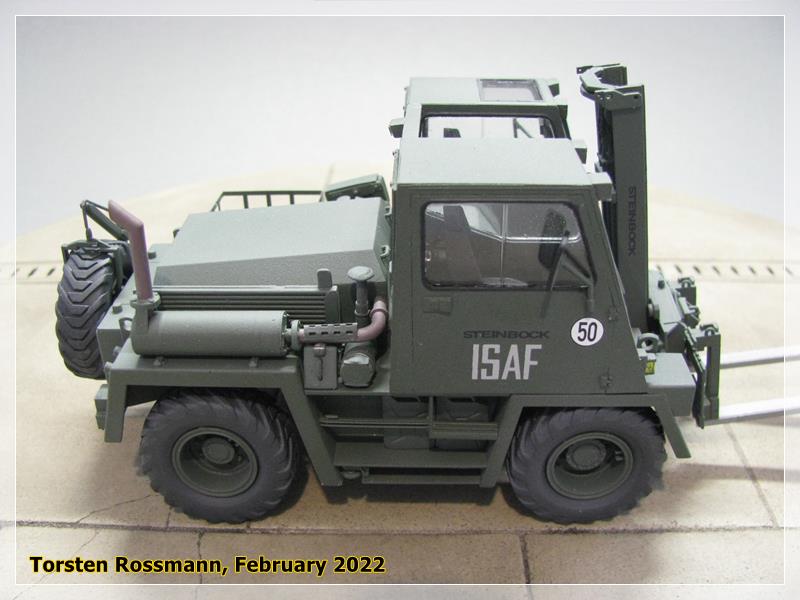
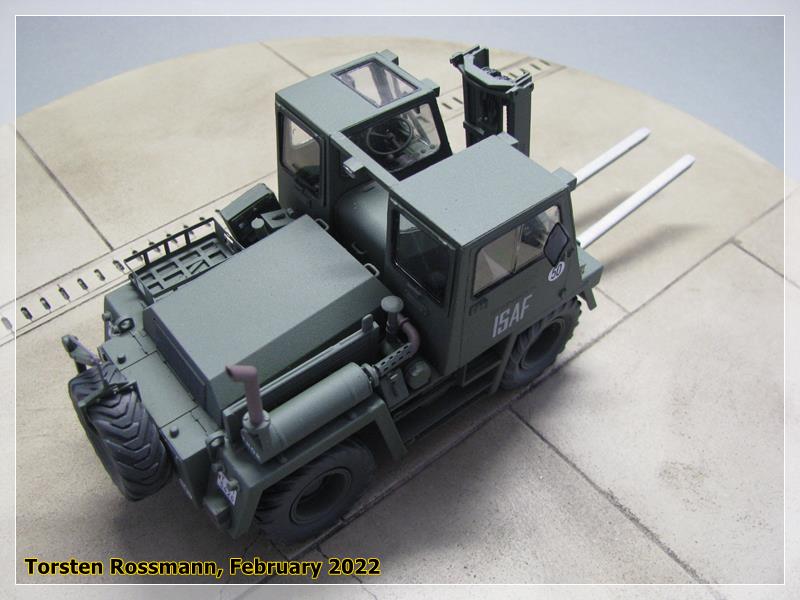
… Takom came first out in 2015 with this kit and I’ve got their 2021 re-release together with the VW T3 Transporter, which I will build some time later. Soon after starting to build the FUG I noticed that the fitting of some parts is not good. Many parts are made workable or movable, like the rear axle and the fork lift but that makes this build only more complex and expensive. This is no Matchbox toy and I won’t lie on the carpet and play with it. It’s for static display so I glued everything in place. There are 3 jerry cans in the kit but only 2 of them fit correctly in place. The head lights are too big to fit in their sockets so I had to sand them to make them fit. That’s why I have not installed the protective gratings over them which you can see on the originals. But I also made a mistake and glued the additional front light at the driver’s cabin the wrong way, front to back. The instruction sheet is not always clear and I only noticed my mistake when it was already too late. So I leave it this way. This is sure no easy “add glue and shake” build, at least not my kit, and I cannot recommend it for the price of the single kit which is between 40 and 45 Euros here in Germany. For the painting I took the easy way and used Bronzegrün RAL 6031 (NATO Green) overall with Revell Aqua No. 65. Some of the older FUG were still painted in Gelboliv RAL 6014 while some others have the modern NATO 3-tone camo. The tyres are made of rubber and I painted them Anthracite Grey with Revell Aqua No. 9 …
Regardless of all the problems I had during building I’m quite happy with the final result and I think I can present the FUG anyway on the coming model shows this year. So far I have planned 4 shows. Thank you for stepping in, I hope you’ve enjoyed it.
Happy modelling!
Torsten 
5 Likes