Leopard and other animals

I have started this thread in 2018 to show my finished armor builds and copy my postings over here, so that I can carry on sooner or later. Of course you are most welcome to comment or just stepping in.

Hi folks!
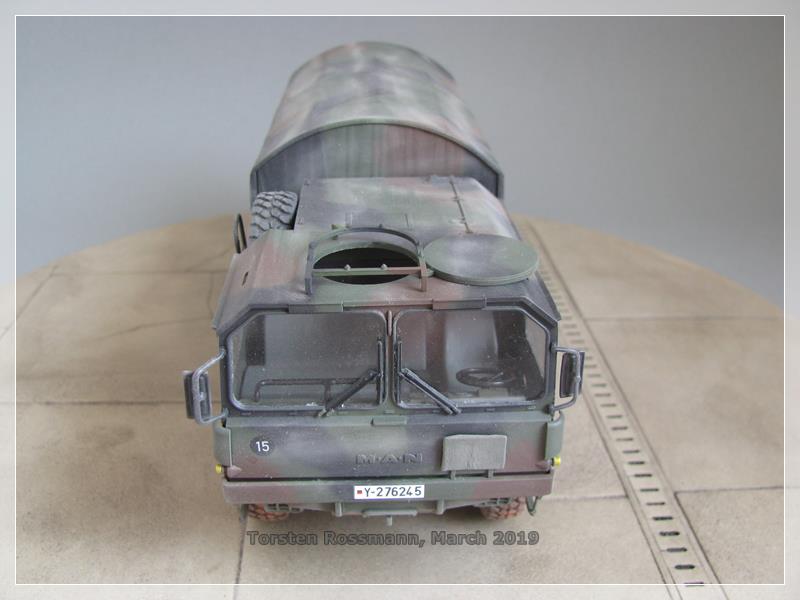
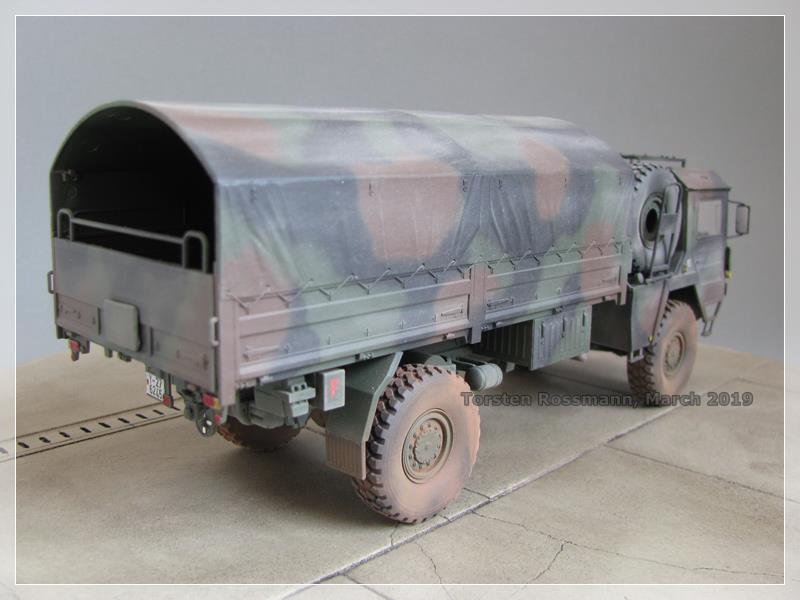
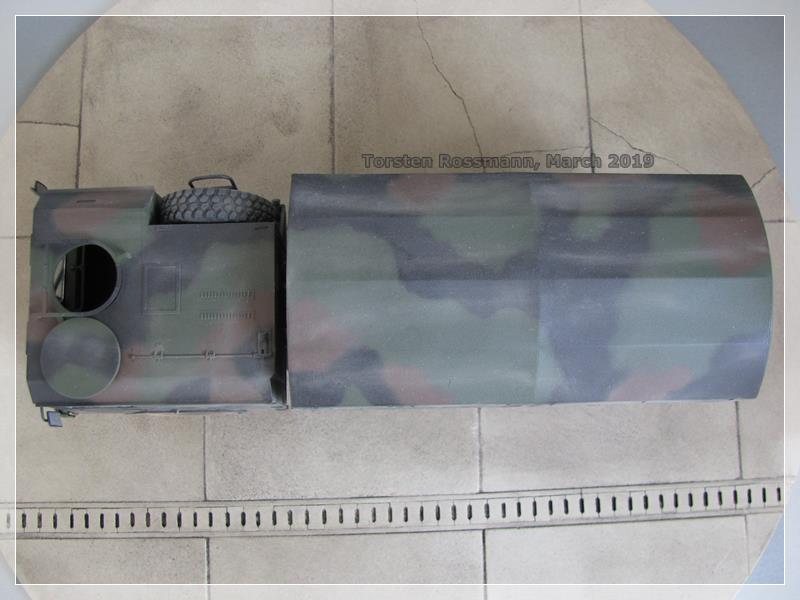
Thanks to Photobucket my old thread on Amorama was destroyed sometime last year. Although I mainly build WW 2 aircraft, from time to time some tracks and wheels find their way on my workbench.

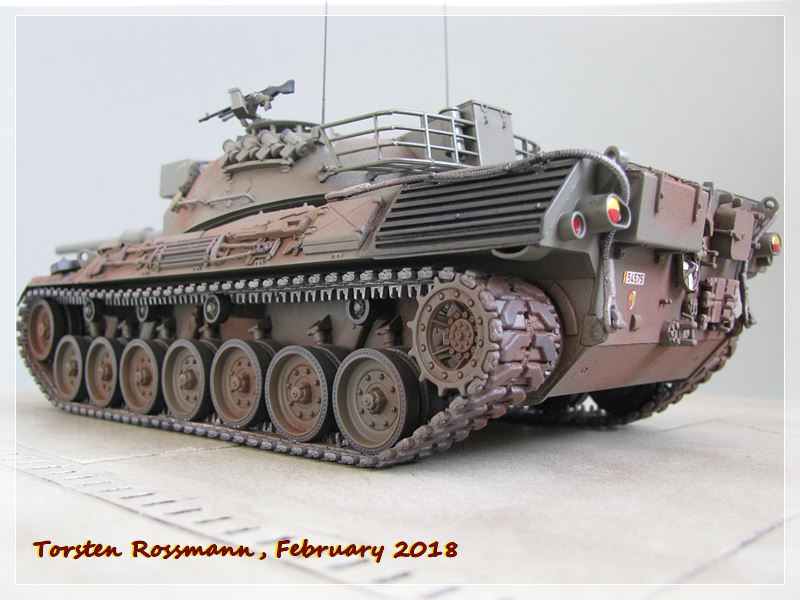
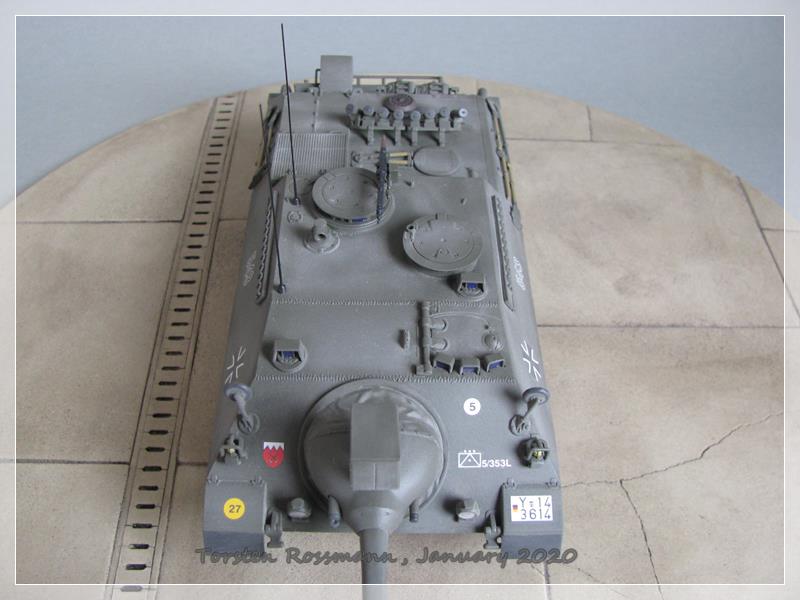
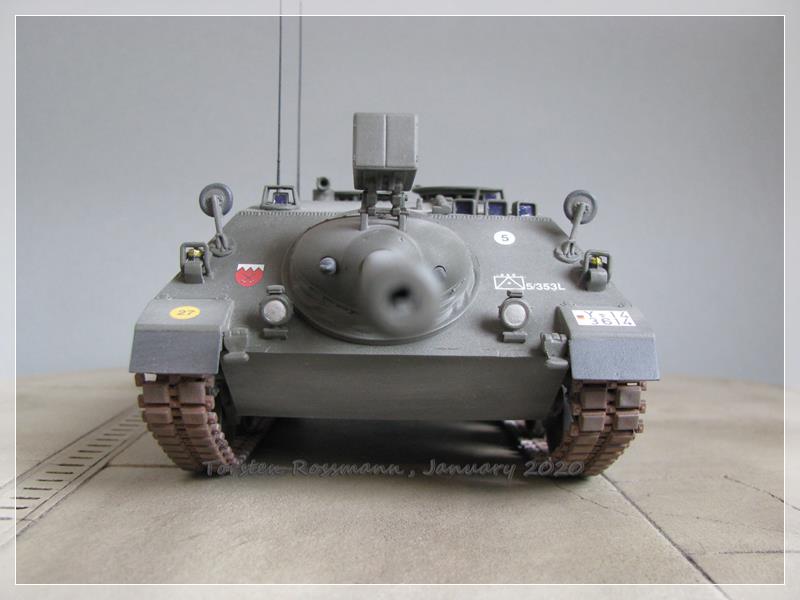
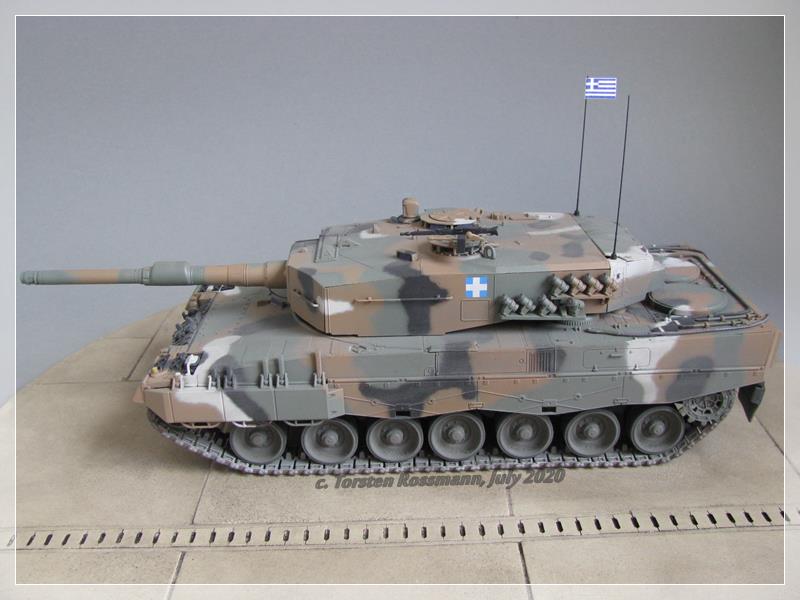
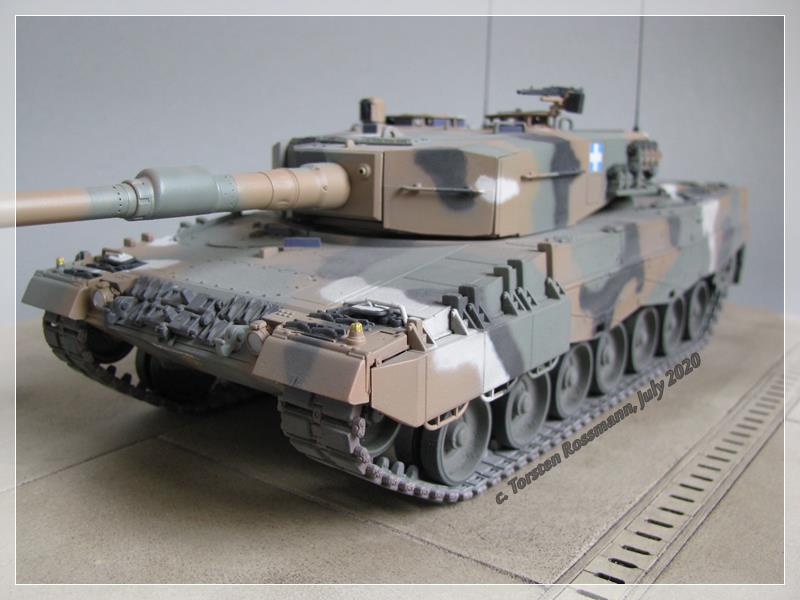
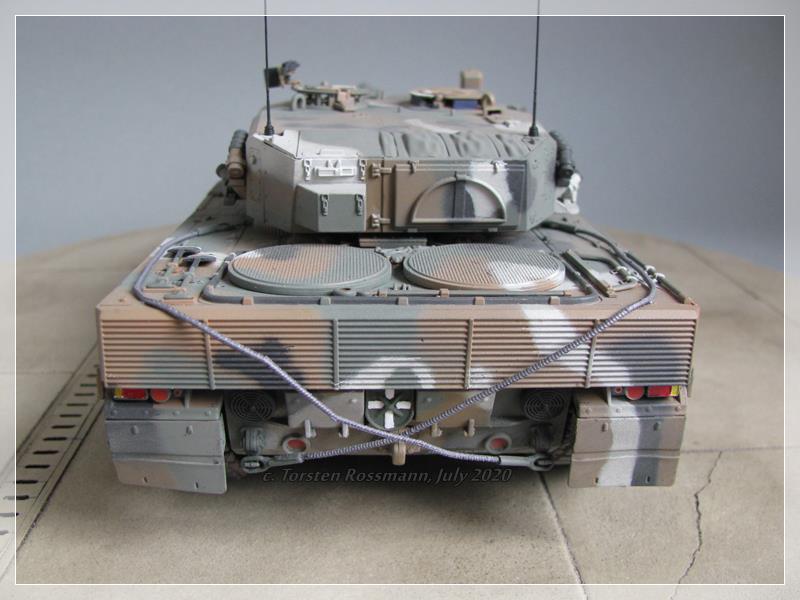
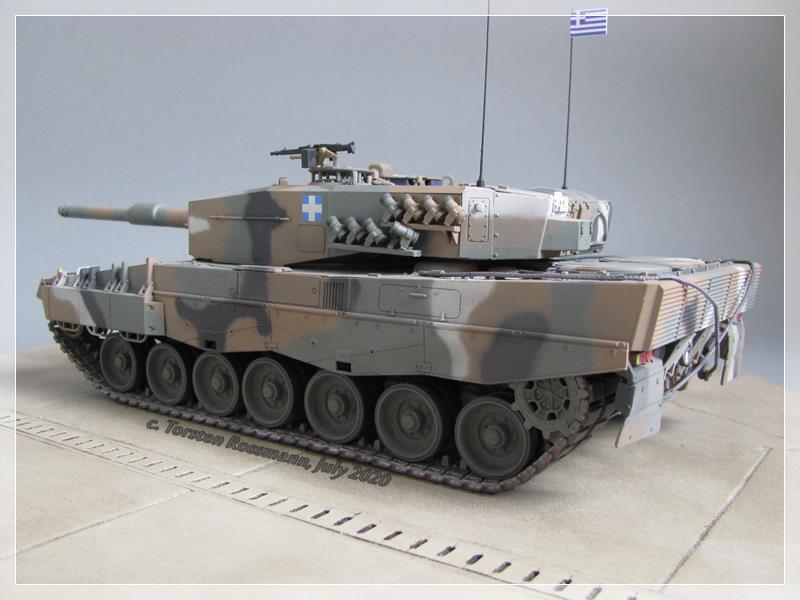
Just finished earlier this month is my new Leopard 1BE from Revell Germany in 1/35 …


oh … uhm … it’s this one … :slight_smile:


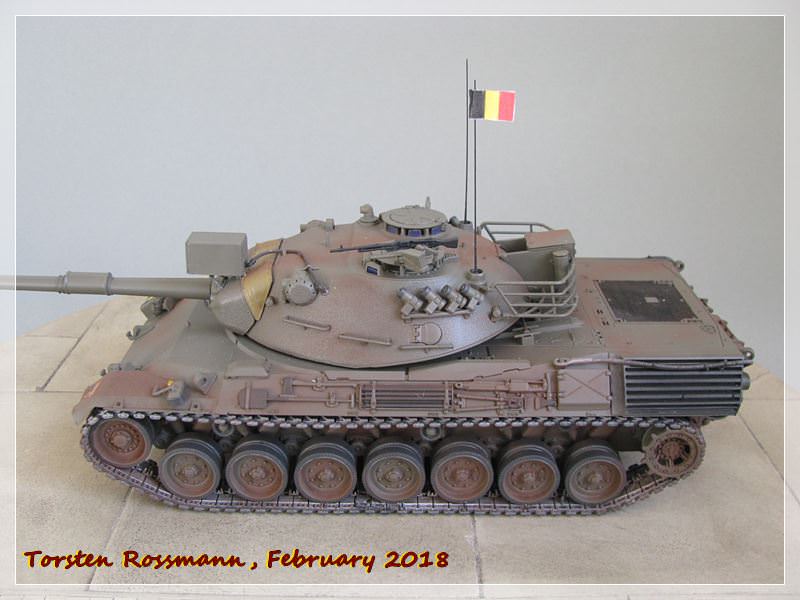
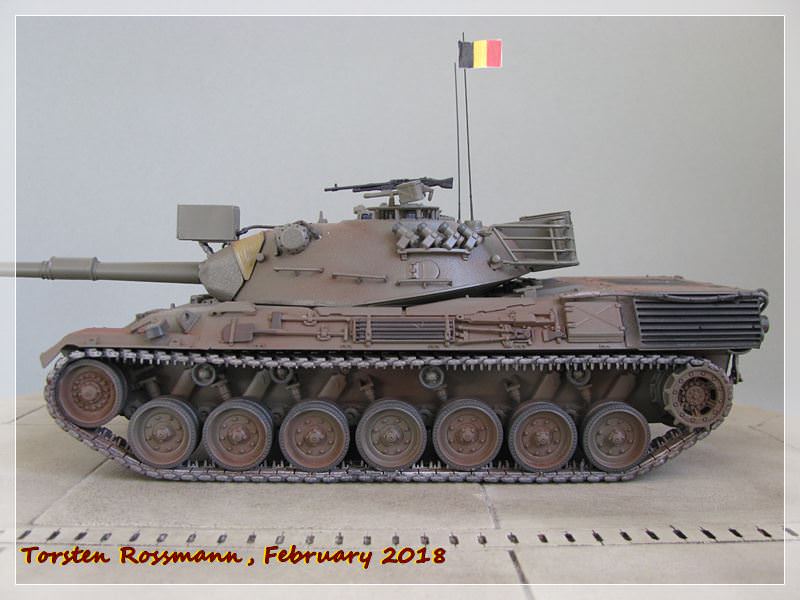
… I’ve built a tank from the 4. Lancers Reg., 16. Tank Div., BSD, based in Soest/Germany in 1969. The BSD were the Belgian Forces in Germany and were based in the southern sector of the British Zone from 1946 until 2004. If you like to know more about our belgian friends in Germany I can recommend this Wikipedia side for some brief informations. Though the german language side is far more detailed …


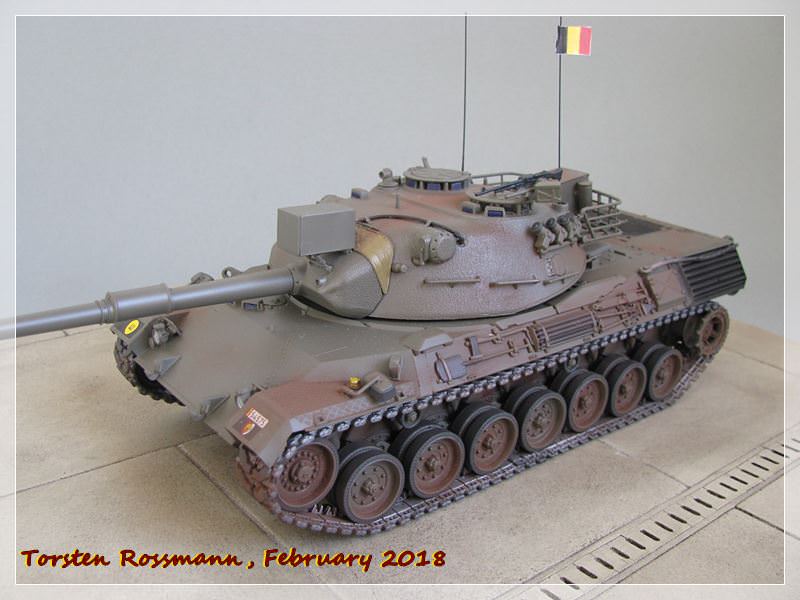
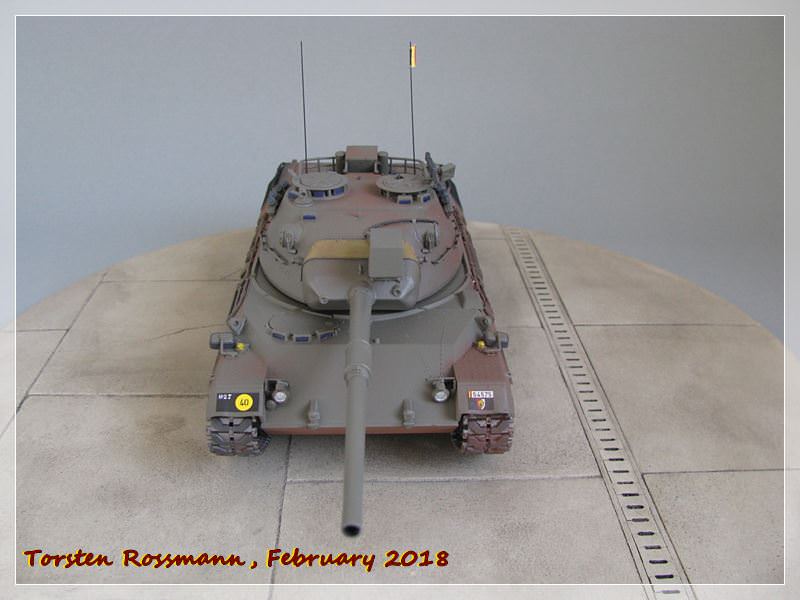
… Belgium was the first NATO partner to buy the new Leopard tank. Between May 1968 and March 1971 a total of 334 Leopard 1 tanks were delivered to the Belgian Army. Shortly afterwards followed the Netherlands and Norway. Belgium used their Leopard 1 tanks until 2014 …


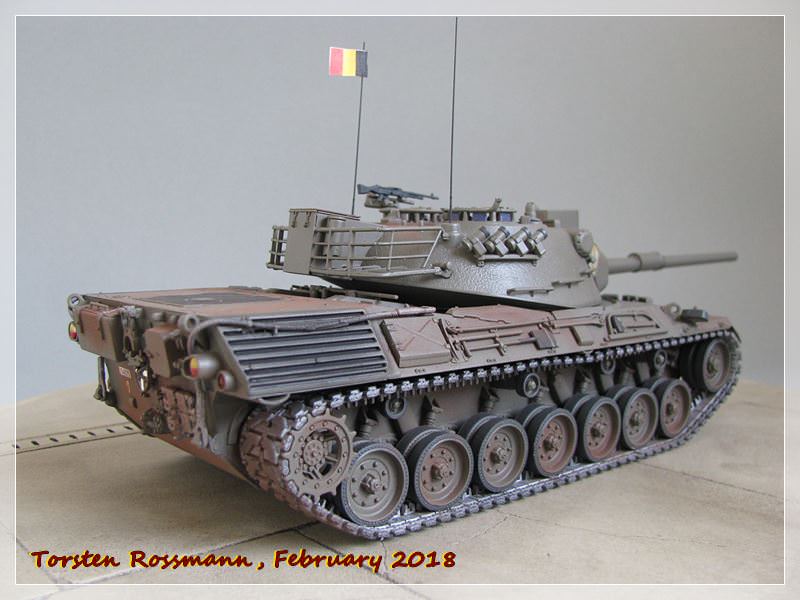
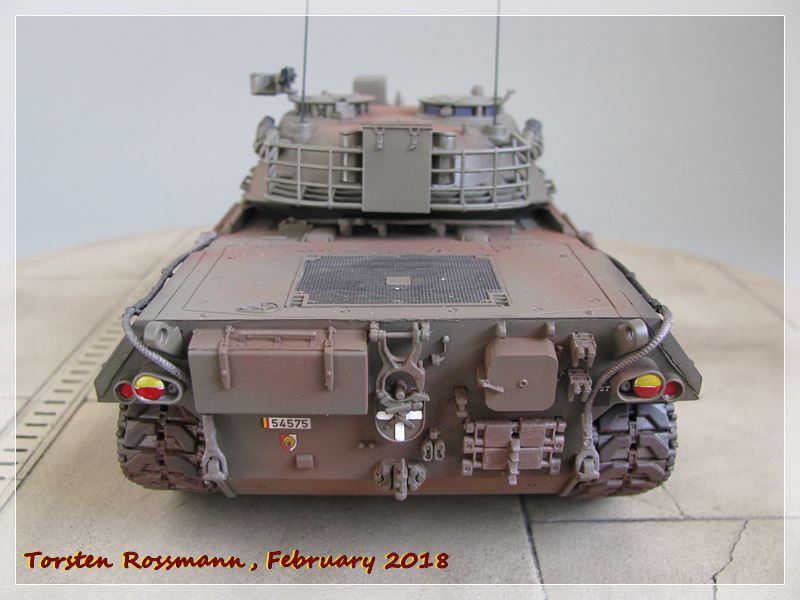
… building this kit is very easy. There are no major issues. My Leopard is build completly oob, except for the antennas and the flag. The antennas come from Modellbau Schatton and are made of brass. With a little bit of ethylacetate they stick strong to the turret. The belgian flag is printed 2 x on normal paper and glued togehter. Luckily I did not need any glue to stick it to the antenna :slight_smile: The vinyl tracks are also taken from the kit. They look fine to me. Okay, if you are more into building AFV than I am, you’ll sure find some nicer AM tracks but for my requirements the kit parts do it well enough …


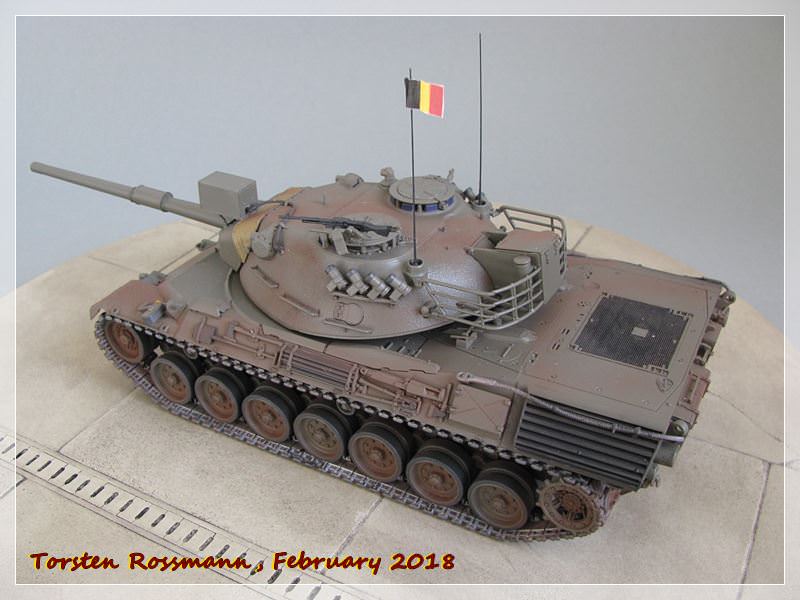
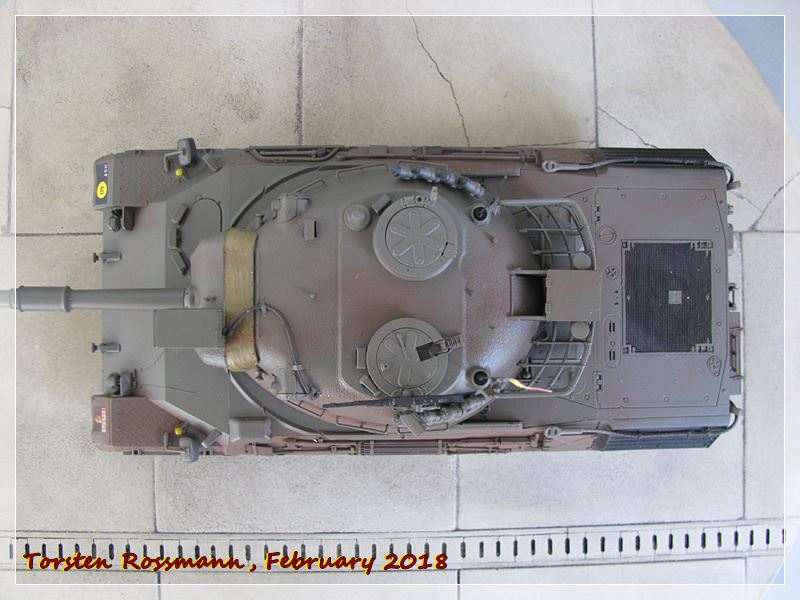
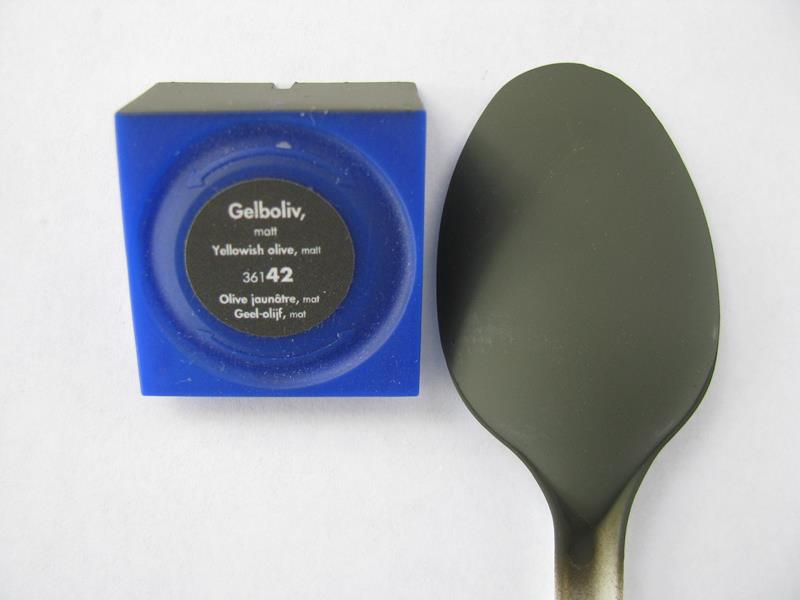
… Revell offers 4 decal versions for this kit, 2 x Germany, 1 x Netherlands and this belgian one. For the main painting I used NATO Olive (Revell No. 46), which is a bit more brownish than RAL 6014 Gelboliv, which goes more into green. The tracks are painted with a mixture of Steel (Revell 91) and Black (Revell 08). I have used only a bit of different pastel chalks for weathering. I’m not a big fan of it. All my aircraft have no weathering at all. But on a Leo 1 the exhausts must look dirty (don’t they?) and I think I did quite well here.

So I thank you for stepping in and having a look on my latest work. I hope you like what you see. Feel free to comment. From time to time I will add another build to this thread. Over the last few years I have build some more Leo 1 and 2 plus some other animals. For today I leave you with this great video clip of some of the last belgian Leopard 1 on exercise in Germany 2011. Probably in Bergen/Hohne, a place I knew well during my 4 years army time in the 1980’s … :wink:

Happy modelling!
Torsten :-H

6 Likes

It has been rather quiet in this thread in the past months. That’s caused by the fact, that I’m busier at Aeroscale building aircraft. But finally I want to show you my latest AFV, finished earlier this month. It’s the Spähpanzer 2 “Luchs” from Revell in 1/35 … :slight_smile:


… the Spähpanzer (SpPz) 2 “Luchs” was introduced into the German Bundeswehr in 1975 where it was used in the tank reconnaissance units. The Luchs was produced by Thyssen-Henschel and its all-wheel-drive made it highly manoeuvrable in all terrain and it was powered by an extremly low running noise Daimler-Benz 10 cylinder engine with 389 hp. It could reach a top speed of 90 km/h forward and backward. The Luchs was armed with a 20 mm machine canon and an MG 3, calibre 7,62 mm. With its movable propellers in the back it was fully amphibious. The crew of 4 consisted of 2 drivers (1 forward and 1 backward), a gunner and the commander. 408 Luchse were build and the last one was taken out of service in 2009. Some were given to museums all over Europe but most of them were scrapped. Germany was the sole user of the Luchs. The successor is the Spähwagen “Fennek”, which is so far not only in use in Germany but also with the Dutch Army …


… the mould of this Revell kit is now 20 years old and surely cannot compete with the 2017 Takom kit when it comes to detailing. So, e.g. the compartment for the jerry cans on the right side is only adumbrated here. But the fitting is very good and the biggest advantage of this kit compared to Takom is the price. It costs less than the half of it. I paid 20 Euros for a month of fun. The tyres are made of rubber, not of plastic, which is not liked by many modellers, including me …


… for painting this vehicle I have used Bronce Green 65 from Revell, NATO Brown 71249 and NATO Black 71251, both from Vallejo. The tyres are painted with Anthrazit 9 from Revell. The kit offers 4 different decal versions, 3 in the well known 3-tone NATO standard camo and 1 in the old 1-tone Gelboliv (RAL 6014). I have decided for the version of the “Multinationale Brigade Süd” during the KFOR engagement in 2000. The kit is build as usual out of box, I only added antennas made of brass form Modellbau Schatton and a small german flag, printed on ordinary paper. For weathering I only put on some pastel chalks to give my Luchs a slightly dusty look …


… this beautiful Lynx and I thank you for stepping in and hope you have enjoyed the little walk around the latest member of my plastic army. If you like, have a look at this video of a SpPz Luchs at the German Tank Museum Munster, where you have to listen carefully to hear the engine sound. Very quiet indeed!
Any comment on my build is welcomed!

Happy modelling!
Torsten :-H

5 Likes

Recently I finished the Logistic Campaign, my first campaign on Armorama. Today I would like to show what I’ve built. It’s the MAN 5 to mil gl of the German Bundeswehr. The kit is from Revell Germany in 1/35 … :slight_smile:


… from 1977 trucks of the so called “Kat 1 Folgegeneration” (“1st follow-on-generation”) entered service in the Bundeswehr. The vehicles have excellent cross-country mobility and are still in use after 40 years, though they are slowly replaced now by more modern trucks. Just recently the german government signed a deal with Rheinmetall-MAN Military Vehicles for nearly 2300 new trucks for the Bundeswehr. In their long career they have seen several NATO- and UN-Missions, like UNSOM, SFOR, KFOR and most recently in Afghanistan with ISAF. The MAN 5 to mil gl is powered by an 8 cylinder Magirus-Deutz diesel engine with 256 hp. It has an (official) maximum speed of 90 km/h and a range of up to 750 kilometers. Another user of these trucks in Germany is the THW (Technisches Hilfswerk). It’s further used in the forces of Austria, Estonia, Greece and Luxemburg …


… I have build the truck Y-276245 of the Transport Group (TrspGrp) of 1./PzBtl 83 in Lüneburg as I drove it for 3 years in the late 1980’s … :slight_smile:


… Revell Germany came out with this kit in 2001 and this is the re-release of 2017. Though meanwhile it’s 18 years it’s still a very good kit which is a pleasure to build. There are only minor fitting problems, not really worth to mention. While I built it many memories came to my mind, as I spent countless days and nights in it and drove about 13000 kilometers with it. For 25 Euros you get a good kit. Hobbyboss recently came out with the “Fünftonner” and probably it’s more detailed but on the other hand it costs up to 3 times more, which is not a fair price in my opinion …


… I painted the truck in the usual 3-tone NATO Standard Camouflage and have used Revell and Vallejo paints for it. NATO Green is Revell 65, NATO Brown is Vallejo 71249 and NATO Black is Vallejo 71251. The exhaust is painted with a mix of Revell 83 Rustbrown and Revell 91 Steel. The covered orange warning signs for dangerous goods on front and rear side are not included in the kit so I made them from Evergreen profiles and a piece of tissue, soaked in water and white glue and painted with Revell 67 Grey Green after it had dried again. To give the truck a slightly dusty look I used some pastel chalks, for the tyres a bit of brown and grey and for the body a bit of grey and green. That’s just the way my truck looked most of the time I drove it …

… this photo was made at the Bergen-Hohne Training Area (yes, that fellow is me 30 years ago …) some time in 1987 or 1988. Here I wait on a shooting range with the cargo area full of empty wooden boxes for 120 mm shells for our Leopard 2A4. If the shells would still be in in the boxes, the orange warning signs would be uncovered.

Well, I hope you’ve enjoyed walking around “my” truck and if you have comments I would love to hear them.

Happy modelling!
Torsten :wave:

6 Likes

After working 5 months on it with some interruptions today I can finally show you my new Self Propelled Howitzer K9 “Moukari” from Academy in 1/35 … :slight_smile:


… the SPH K9 “Thunder” is a south korean development and in use with the ROK Army and Marine Corps since 1999, produced by Hanwha Land Systems. The main armament is a L/52 gun with a calibre of 155 mm. Nearly all 155 mm NATO ammunition can be used with this gun. The firing range is between 18 and 42 km, depending on the propellant. Baptism of fire for the K9 was on the 23. November 2010 during the bombardment of Yeonpyeong, when six K9 were engaged against a surprise attack of North Korean Artillery. Only three K9 were able to counterattack because two K9 were damaged by north korean fire and one K9 had loading problems. About 80 shells were fired. In South Korea the K9 operates together with the K10 Ammunition Resupply Vehicle. Meanwhile also some NATO countries use the K9, that are Estonia, Norway, Poland and Turkey so far. The Finnish Armed Forces bought 48 used K9 in 2017 and call them “Moukari”, which means in english something like “Sledgehammer”. The K9 is powered by a 8 cylinder MTU diesel engine with 1000 hp and has a maximum speed of 66 km/h. The K9 has a weight of 47 tons and a crew of 5 soldiers …


… I have built vehicle Ps 522-29 which was presented to the public in June 2017 at the Finnish Tank Museum in Parolanummi near Hämeenlinna …


… Academy came out with this version of the K9 already in 2017 and being a fan of the scandinavian countries I had to get this kit. In March this years I started the build and was enthused how easy the parts went together. This kit is a dream to build. If you like you can still check out my build blog. The challenge is the three-tone splinter camouflage. Before I started I had to check which parts I can glue to the build before painting and which have to wait until the camo is painted. So it was a lot easier with the masking, which is the main job on this build. You can see many yellow markings I made in the instructions. All these parts were glued to the build afterwards. The paints I have used come Vallejo and Revell Aqua. As I don’t have modern finnish colours I had to use some which came close to the real tones. So I have used 71017 Russian Green and 71095 Pale Green from Vallejo and No. 6 NATO Black from Revell. I think I came pretty close with that. There is only a small decal sheet with 2 options, the other one is a vehicle shown to public in June 2017 in Helsinki on the Flag Day. The only extras on my “Moukari” are the antennas from Modellbau Schatton, made of brass. Actually they are Bundeswehr antennas, which look a little different to the finnish ones, but they are far better looking than the plastic parts from the kit. Another little extra is the finnish flag on one antenna, which is a “must be” for a vehicle during a “Day Of The Open Door”. I didn’t weather my build at all, first because the tank was bandnew in 2017 and of course cleaned for this event. Usually I use some pastel chalk to give it a slight dusty look but not here. The only thing I’ll try to do better next time is the paint of the tracks. I used Steel for the outside and Aluminium for the inside but at least the outside should look a bit rusty. Well, better luck next time. The rubbers on the tracks (182 per side) are handpainted with Anthracite No. 9 from Revell …


… I say “Kiitoksia!” for stepping in and hope you’ve enjoyed walking around my latest build. If you have any comments I would love to hear them.

Happy modelling!
Torsten :wave:

7 Likes

Finished in the early January days I had no time to take photos earlier of my latest model. But today I would like to show you the Kanonenjagdpanzer (or short KanJPz) of Revell Germany in 1/35 … :slight_smile:


… following the good results with assault guns during WW 2 it was decided to establish also anti tank units for the new Bundeswehr. The casemate principle of the tank destroyer is characterised by the installation of a gun at the front of the tank without the necessity for a turret. This allowed a low profile which had a positive effect on speed and weight. After extended trials of 24 prototypes 770 KanJPz were build and remained in service between 1966 and the 1980’s. Together with the anti tank missile launcher on the same chassis the KanJPz was the backbone weapon system of the anti tank batallions. It was fitted with a powerfull 90 mm cannon (for its period) and would have been a dangerous opponent for any armored vehicle. When later fitted with IR searchlight the KanJPz was capable for night combat missions. The potential as a tank destroyer was exhausted when its weapon was no longer a match for more modern soviet tanks like the T-72. From 1983 on 162 KanJPz were converted to anti tank missile launchers Raketenjagdpanzer (RakJPz) “Jaguar”, while many others were used as observation vehicles (after removing the cannon) for artillery and mortar units until 2003. At the end of life some KanJPz found their way to military museums around Europe but the majority of them were scrapped. The Kanonenjagdpanzer had a crew of 4 soldiers, a length of 8,75 m, a height of 2,10 m and a weight of 25,7 to. It was powered by a 500 hp strong Daimler Benz multi fuel engine with 8 cylinders, which gave the tank a top speed of 70 km/h. Its main armament was a 90 mm L/40 gun, made by Rheinmetall, with 51 rounds. The Bundeswehr was the sole user of this tank …


… I have built tank “543” of 5./Panzergrenadierlehrbataillon (PzGrenLBtl) 353 in Hammelburg in the early 1980’s …


… Revell Germany came out with this kit for the first time in 2008 and my model is from the “first batch”. At the start of this build it shows some problems with attaching the side parts of the hull to the upper part. There are gaps on both sides from front to rear which have to be filled with putty and sanded. That takes some time but after that is done the rest of the build goes quick. Revell also made a big mistake with the vision blocks on the commander’s hatch. They should be 8 but there are only 6 of them. On the other hand you barely see them anyway. I think there are AM parts for correction but I didn’t use them. The tracks are made of vinyl and 2 parts per side, which is not nice. Why not just 1 track per side? I have tried to hide the joints as good as possible at the idler and sprocket wheel but when you look close enough you can still them. But the rest of the kit goes well and quick together. I needed 4 weeks for this build …


… painting this kit is quite easy. I have used Revell Aqua No. 42 Gelboliv RAL 6014 all over. The tracks are painted with a mix of Black, Gun Metal and Rust. Revell offers 4 decal versions (3 x KanJPz and 1 x BeobPz). The decals are well printed and after more than 10 years in the box they still went on the kit without problems. The KanJPz is built straight out of box with the exception of the antennas. They are made of brass and come from Modellbau Schatton. Finally I gave the tank a slight dusty look with some pastel chalks. That’s all.
I say “Vielen Dank” for stepping in and walking around this little tank and I hope you enjoyed it. If you have a comment I would love to hear it.

Happy modelling!
Torsten :wave:

6 Likes

Recently I have finished the “40 years of the Leopard 2” Camapaign and if you have missed the campaign thread until now, I want to show you the result of my efforts. It’s the Leopard 2A4GR from Revell Germany in a rather unusual livery … :slight_smile:


… in the early 1980’s Greece added Leopard 1 tanks to its mixed fleet of US and french made MBTs, which by then included M47, M48, M60 and AMX-30. Greece used the opportunity to phase out the AMX-30 and M47 as well as older M48 tanks. In August 2003 the governments of Germany and Greece signed a contract covering the procurement of some more 140 used Leopard 1A5 from Bundewehr stocks plus for the first time 183 Leopard 2A4 tanks. Prior to delivery, these Leopard 2A4 were run through a maintenance program by KMW and were additionaly painted in greek camouflage pattern …


… I have built a Leopard 2A4GR of the Hellenic Army as it was seen on a parade in Athens in October 2005 …


… Revell Germany came out with this kit in traditional dark green plastic in 2013. It consists of little over 200 parts and goes well together. I had no bigger problems with the assembly. Today there are sure better detailed kits of the 2A4 on the market but that’s no reason not to build the older ones. With 30 Euros the kit is also wallet friendly. The kit is completely built oob, including the vinyl tracks, except for the antennas, which are from Modellbau Schatton and of course the little greek flag on one antenna, which I printed on paper. There’s a little crack in one of the towing cables which I will replace later …


… finding the correct colours was a bit of a problem because Revell as usual shows in the painting instruction only their own paint range with these disastrous mix ratios. As I’m no fan of mixing I was looking for something else and finally found all of them at Vallejo’s Air War Colour Series “USAF Vietnam Era”. So I have used Green FS34159 (No. 71329), USAF Brown FS30219 (No. 71125) and USAF Light Grey FS36622 (No. 71296) plus NATO Black FS37030 (No. 71251) and hope I came close enough to the real thing. Very helpful for me was the book “Leopard 2 International” from Tankograd Publishing. From todays view it is missing some international Leopard 2 tanks because it was already published in 2009 but I found some very useful photos of greek 2A4 in it.
Revell offers 7 decal versions for this kit (Spain, Netherlands, Poland, Greece, Austria and 2 x Germany), so the decison what to build is not easy. Consequently I have another kit in my stash …

Again, I say “ευχαριστώ” for stepping in and walking around my latest build and hope you’ve enjoyed it.

Happy modelling!
Torsten :wave:

5 Likes

Some great finished vehicles there. Are you going to now keep this thread live Torsten ? And just keep adding to it ?
John

1 Like

Thanks for stepping in, John!

Yes, I will add more of my AFV in the future. My latest armor build, a M 110, is just waiting for the photographer. I’ve seen him but at the moment he’s busy doing other stuff … :wink: Just check this thread out from time to time. I’ve also a few other builds from before 2018.

Torsten :wave:

Today I would like to show you the latest addition to my family of armored vehicles. It’s the Schwere Feldhaubitze M 110 A-2 from Italeri in 1/35 … :slightly_smiling_face:


… the M 110 was developed in the 1950’s by the US company Pacific Car and Foundry and introduced to the German Bundeswehr in 1964. A total of 80 vehicles were bought, plus another 150 M 107. In 1985 both types were modernized and the M 107 also got the bigger 203 mm caliber, which was the largest the Bundeswehr ever had. They were called M 110 A-2 now. It had a weight of 28,4 tons and was was powered by an 8 cylinder Diesel engine with 405 hp which gave the howitzer a speed of 30 km/h. The firing range varied from 16 to 23 kilometers with standard ammuntion. In 1993 all Bundeswehr M 110 were taken out of service …


… I’ve built a vehicle from the 5./Feldartilleriebataillon (FArtBtl) 11 which had its base in Hannover in the 1980’s. The crew named the howitzer “Auerochse”, which was a massive ancient cattle …


… Italeri came out with this kit sometime in the 1980’s and I had it for quite some time in my stash. This is a re-release from 2012. The “65 years Bundeswehr Campaign” gave me the opportunity to finally tackle this kit. I can’t remember any major fitting issues. It was a quick build. Though I’m not sure about the tracks. The A-2 should have Diehl tracks but the kit includes only the US variant as vinyl tracks. I had no other …


… Italeri offers 4 decal options for this kit. Beside this Bundeswehr there are US, italian and japanese markings included. The sheet has only a handful of decals, a work of an hour or so. It’s nothing compared to my aircraft models. Painting is quite easy, but Italeri makes a mistake here. For the Bundeswehr version it’s also Olive Drab suggested, which is wrong. All Bundeswehr vehicles from the beginning to the early/mid 1980’s were painted in Gelboliv RAL 6014. The paint I used was Revell No. 42. The tracks are painted with a mix of Steel, Black and Reddish Brown. For the track pads I have used Revell 9 Anthracite. Final coating was made as usual with a clear matt coat from Marabu. A bit of weathering was made with grey and brown pastel chalks.

So I say “Vielen Dank” again for stepping in and I hope you’ve enjoyed walking around this big gun.

Happy modelling!
Torsten :wave:

9 Likes

This gun is huge! You did a great job.
I’d love seeing Tamiya release a Gelboliv paint in their acrylic range.

Olivier

2 Likes

Great job, You have another cool addition to your ever growing tracked empire …

1 Like

Thanks for your feedback, guys! :slightly_smiling_face:

Olivier, I read that the gun of the A-2 had a length of 8,26 meters. But I can’t tell about the length of the K9 gun. Would be nice to see them in comparison, 2 generations …

Don’t you get Revell Aqua paints in France? You might give them a try … Tamiya has only a short range of paints, I mainly use Vallejo and Revell.

Edit:
This morning I took a few photos for comparison of the size. No questions asked … :no_mouth:


… and I found this short video of the K9 Moukari with a big bang … :smiley:

2 Likes

I’ll see if I can get the Revell paint. Is the Revell range true acrylic paint?

Olivier

The blue ashlar shaped containers with 18 ml are acrylic paints (Aqua Color). Can be thinned with water but I use Sidolin Window Cleaner (roughly 50 %). The 14 ml metal tins are enamel paints (and stinking …)
Aqua Color für Modellbausätze | Online kaufen im Revell Online-Shop

Thanks for the learning experience :slightly_smiling_face:
I didn’t know what ‘ashlar’ was, now I know it is a ‘quader’ :wink:
The english word is ‘cuboid’, cuboïde in French

1 Like

:laughing:
I didn’t know this word either until yesterday, Robin. I was searching for the translation of the german word “quaderförmig” and had something like “cube or cubic” in mind. My online dictionary had 2 suggestions. This was more what I was looking for. It comes more from the world of construction than from mathematics. Languages can be so difficult sometimes. Everybody learns something every day … :slightly_smiling_face:

Happy modelling!
Torsten

Thank you both of you for saving my time at searching what ashlar could mean. :laughing:
I’ll try to find a retail shop in France which sell Revell paints. It could be interesting to ask for the ashlar type of paint bottle.

Olivier

1 Like

THAT’S a bottle of model paint?! I’ve never seen anything like that in my life!

Seems as if it has some type of flip lid …

Thanks for the link Robin. Wow! That’s a really cool design!