Seems like I submitted my other post before I finished… oops.
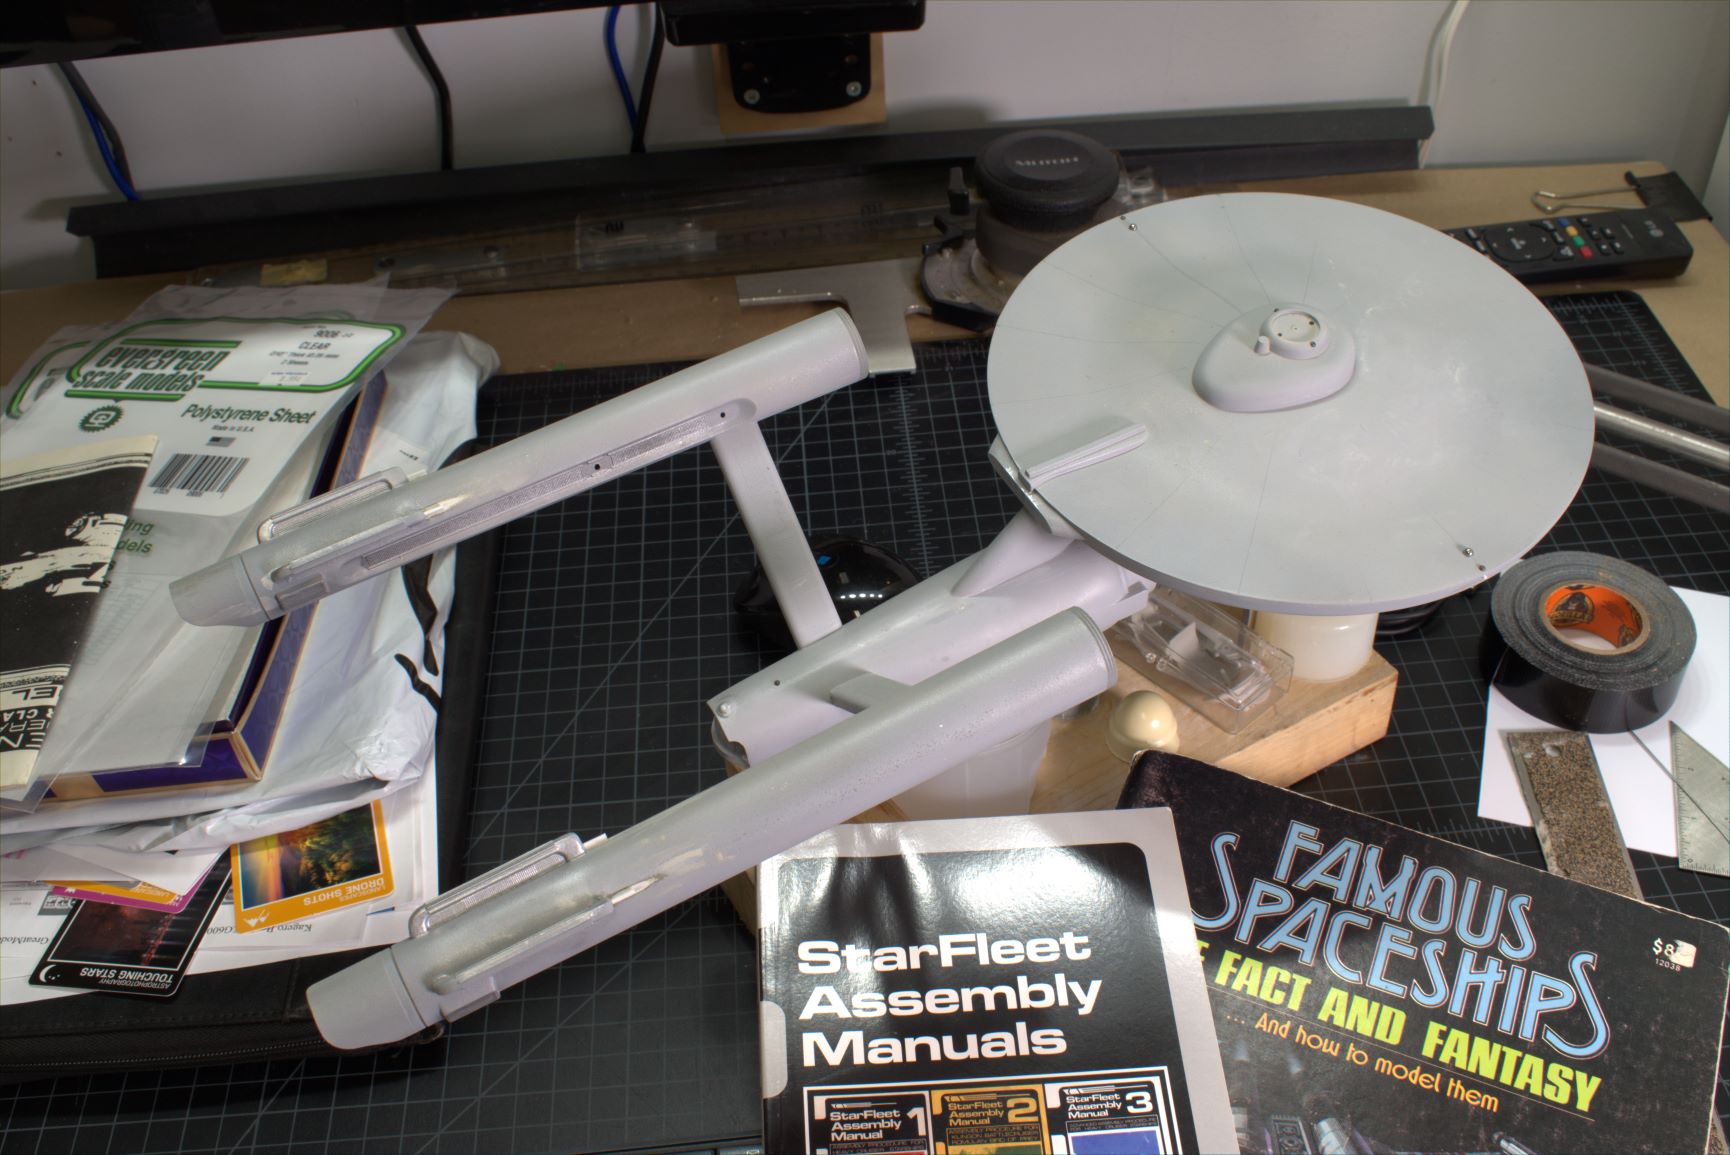
Ok, so I got a new model this weekend, the U.S.S Enterprise 50th Anniversary Edition, and I’m really excited to get started but I have a few questions…
Model Stats
AMT STAR TREK CLASSIC U.S.S. ENTERPRISE (50TH ANNIVERSARY ED) 1:650 SCALE MODEL KIT
Plastic: Styrene
Reissue of AMT610 (2008) with 50th anniversary slip-over cover
Instructions: PDF
Can I use Testors Cement for Plastics to fill seams?
Does all primer fill scratches or is there a specific primer made for filling scratches?
Should I sand this model all over before spray painting?
Should I take the different parts off of the sprue and then sand them and then spray paint?
Is it best to assemble the main parts, (hull, fuselage, left power unit and strut, right power unit and strut) glue them together, fill seams/sand, then spray paint?
Would it be ok to spray it with just a primer?
Should I use Tamiya Basic Type Putty to fill seams, or should I use another method?
For parts that are different colors but are one mold, should I spray paint the whole thing and then hand paint the other color on top of that or should I mask off the smaller part and then spray paint?
I’m going to purchase sanding tools but I’m not sure what to get or where to start. Any tips?
That’s all the questions I have right now, thanks in advance!
Can I use Testors Cement for Plastics on styrene?
Yes. Liquid glue is preferred though as it is less messy and easier to control.
Can I use Testors Cement for Plastics to fill seams? Not really. There are specific filler putties for seam filling. I prefer the Squadron (Green or Gray) products.
Does all primer fill scratches or is there a specific primer made for filling scratches? No, there are specific primers made to fill scratches. Most primers are thin and just give a base coat for other paints to stick to. I actually do not use primers at all as I don’t find the need for it. I do use enamel paints which tend to stick better than acrylics though, so it depends on your paints.
Should I sand this model all over before spray painting? No, this is not needed.
Should I take the different parts off of the sprue and then sand them and then spray paint? No, see #6.
Is it best to assemble the main parts, (hull, fuselage, left power unit and strut, right power unit and strut) glue them together, fill seams/sand, then spray paint? Yes, it is best to build as much of the model as you can and spray it all at once. This is for a couple reasons. One, it gives a better overall finish. Two, glue will not stick to paint. Anywhere you have painted, you will have to scrape the paint off to bare plastic for the glue to stick, then go back and retouch the paint to match.
Would it be ok to spray it with just a primer? Yes, if that is the color you want.
Should I use Tamiya Basic Type Putty to fill seams, or should I use another method? See #3.
For parts that are different colors but are one mold, should I spray paint the whole thing and then hand paint the other color on top of that or should I mask off the smaller part and then spray paint? Either way works, it is really a preference.
I’m going to purchase sanding tools but I’m not sure what to get or where to start. Any tips? I mostly use Emory boards (nail files) for sanding. You can also get a few different grades of sand paper. Many model supply companies make multi-pack sets that have different grades of sandpapers. You want a good range from about 300 up to around 1500 for finer finishing. Wet/dry paper is best as well as wet sanding at finer grits will give a much smoother finish.
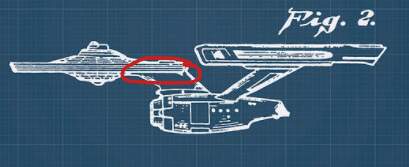
Thank you so much @HeavyArty! One last thing: as I am dry fitting everything together, I’m noticing that there is a significant gap where the neck of the upper hull and the lower fuselage join together…
just to give you an idea:
I’m planning on assembling and gluing together the fuselage and the hull as separate pieces and then spray painting them and gluing them. How would I fill that gap? I would rather not glue it all together and then spray paint it but if I do have to, how do I spray paint it properly and evenly? (btw my spray painting happens outside on a tarp)
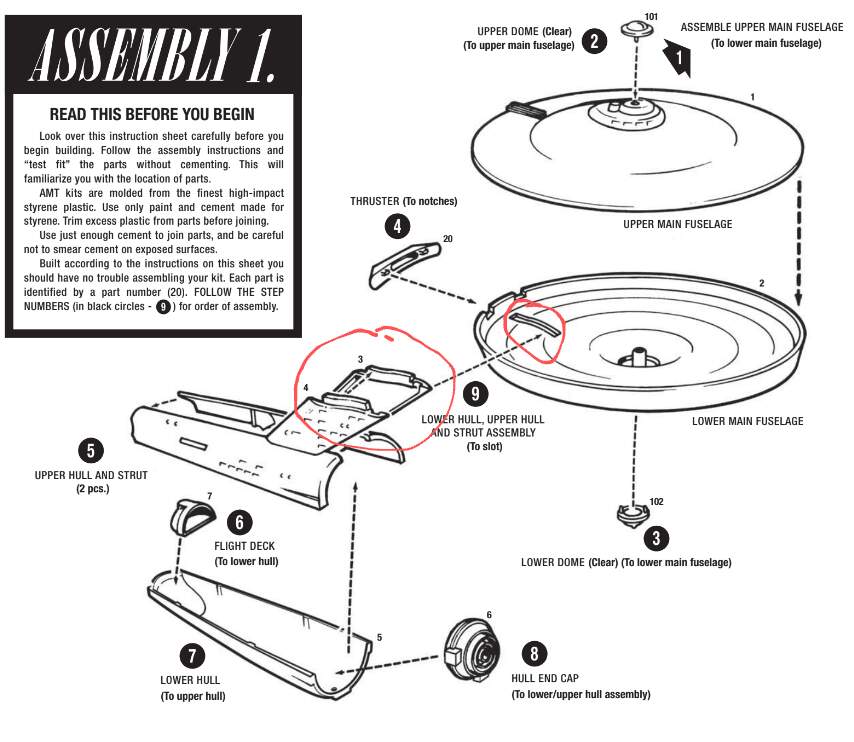
Oh, ok. Got it. I think what I’ll do is mask off the parts that are used to join the sections [image] so that I won’t have to scrape off any paint but how do I apply fill and then sand it when it’s a tight spot? I also don’t have the color paint that I will be using in liquid form so I won’t be able to do it by hand, is it okay to do touch ups using the spray can?
Congratulations on owning the classic scifi kit. If anyone tells you it’s some other kit…ignore them…that’s just crazy talk. @HeavyArty has supplied a really complete set of answers for you but there are a couple of useful tips for that kit. I started mine many years ago, lost one of the nacelle domes and just kind of stopped. It’s been sitting on the shelf for many years.
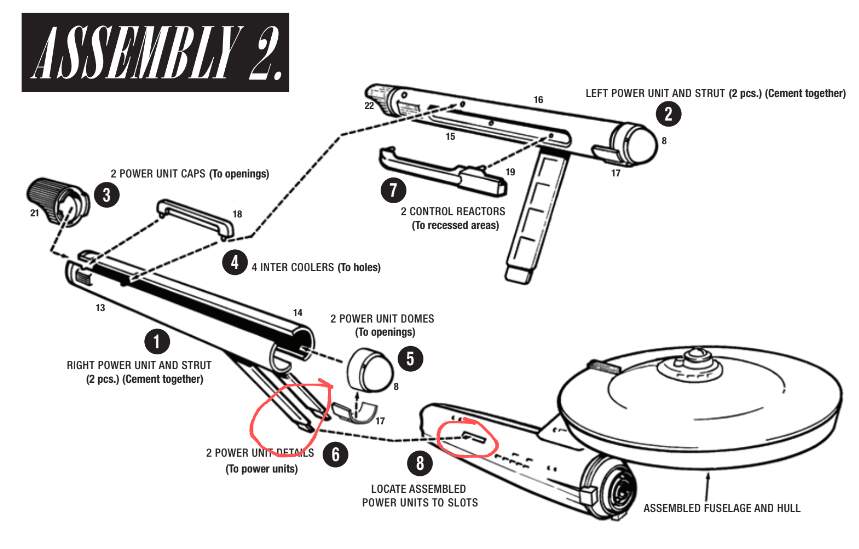
The kit can be assembled almost completely and all seams filled and sanded before any painting. The only bits to leave off are bridge dome and the phaser emitter (the two clear parts) and the main sensor/navigational deflector dish on the front of the secondary hull. You can add them right at the end of the build after you’ve painted the secondary hull front cover. As the vessel is very light coloured you won’t have a problem applying other colours over the light base.
You’ll find that most of the seams fit pretty well and very little filler is need for gaps - just a little for smoothing joints. The biggest problem joint you already noticed. Cleaning up the saucer to pylon joint is a matter of patience and perseverance.
The most useful bit of advice for this kit is to reinforce the joint between the secondary hull top halves. When you first assemble the two parts (#5 in assembly step 1) reinforce the joint before adding the secondary hull bottom. A strip of styrene overlapping the joint along it’s length will save you a lot of frustration. Every time you even look at the engine nacelles they’ll flex and try and split that seam.
For color advice you can have a look at this site:
and for general reference you won’t do much better than this:
the Smithsonian site also has a lot of photographs taken during the Enterprise restoration.
Good luck with your build and may the force be…ahem, I mean…live long and prosper.
Reinforce the joint from the inside of the hull. You don’t want the reinforcing strip to be visible on the finished model. If you search the web you’ll find a number of solutions: bead of superglue or epoxy, bulkheads, resin with mesh screen, etc. I used styrene strip because it’s what was on hand. Have a poke around the dedicated scifi sites and see what you’re comfortable with. Some of the materials are very effective but messy to work with.
Hello, I had some questions concerning American armor, and they suggested that I talk to you, as they said you were very knowledgeable about American armor. I don’t want to start a new chat in an old topic, so could you go to this link: Information (about color) on the M26 Pershing