Got this AB couple of years ago. Like everyone says works real well more like a more costly name brand. I do have a problem though. Used and cleaned several times. Field striped after each use. Seem that the spray trigger is slow to return to the off position. Pulling back and releasing works fine. Pushing down and releasing is like slow motion. Since it’s been stripped and cleaned and is still slow to return I am at my wits end.
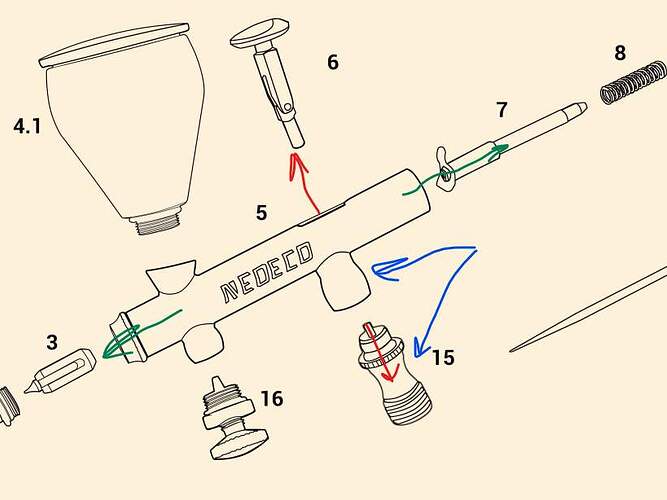
Movement in the directions shown by the green arrows is OK
Movement up/down (red arrows) is not OK
Check if you can get into part 15, the air valve, or the part of the airbrush body where
part 15 screws into (blue arrows).
I presume that there is a narrow cylinder that the bottom part (rod)) of the trigger travels
up and down when pushing against the peg on part 15.
Gunk in this hole will make the trigger sticky, gunk or dissolving seals inside part 15
will also make the trigger sticky.
I had this problem on my old Badger 150, after a few years of usage and cleaning the air valve
collects enough gunk to cause problems.
Clean and possibly lubricate with wax.
Thanks. Will try that.
I was able to isolate the problem but still can’t solve it. The plunger on part 15 above works fine, no fouling or binding. Issue seems to be a seal that the brass post on the trigger slides into. It’s tight. Could this have expanded somehow? There was no problem the first several times I used the AB. I could try some kind of lubricant but not sure what to use that won’t damage the seal. The seal seems rubbery but not certain that it is actually rubber.
That seal could have been damaged by solvents (causing swelling).
I would try lubricating with wax or vaseline.
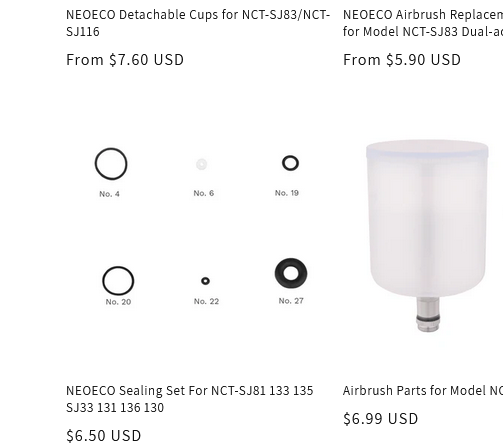
What does the seal look like? Is it an O-ring?
Getting one or two sets of seals might be a good investment …
Looks closest to number 6 on the chart above.
I was guessing #6 or #22
I am the exact opposite of an airbrush expert and spend more than half of every paint session cleaning or trying to solve the latest problem.
When the trigger on my Iwata sticks, I use some lubricant (that came with the airbrush) on the trigger stem (Part 6 in the diagram above). Doing so always solves the problem for a few sessions.
Iwata Needle Lube or Badger Regdab lube. In a pinch, a small dab of hair conditioner can be substituted. Only ever put this on the needle and in a VERY sparing amount (about a pin head sized dab) spread around the shaft of the needle back from the tapered tip. You want the lube to scrape off the needle at the packing seal as you insert the clean and lubed needle into the AB from the handle end. That is, you don’t need or want any lube on the part of the needle that goes through the paint bowl into the paint tip.
When cleaning an AB, avoid practices like immerging the entire AB into a cleaning tank or sonic cleaner. There’s no need to clean the air valve assembly unless you’ve somehow allowed paint to dribble down past the trigger onto the top of the valve. (If you do, reassess how you’re handling the AB as this should only ever be a MAJOR accident and never a routine thing. If you do get paint down the trigger area, STOP and clean up the mess immediately.)
Don’t abuse the needle packing seal located between the paint bowl and the AB body forward of the trigger. If you’ve allowed paint to dry and form an annular ring around the needle at the bottom of the paint bowl, then remove the need from the FRONT of the AB after removing the air and paint tips. If you drag or force the ring of hard paint backwards through the packing seal you will eventually damage it - perhaps enough that paint will leak backwards from the bowl and down onto the air valve. If this is what is happening, the packing seal will need to be replaced (although needle lube may keep it going for a while by sealing the packing seal washer).
You might try a little needle lube on the plunger end of the trigger (part 6 in the diagram). In general, you shouldn’t ever have to lube the air valve, but if it gets “sticky” or starts to leak air, a little (very little) needle lube might fix things. The valve seals are lubed enough at the factory that they should be good, and if you immerse the valve assembly into some sort of cleaning bath or sonic cleaner, you will remove the lube (and like as not introduce contaminants into the valve).
The air valve can usually be disassembled and cleaned, but this this is a chore and the soft brass parts are easily damaged by pliers or other tools as you try to unscrew the parts. This can be done but consider it a last resort and be prepared with a plan “B” to replace the entire valve assembly, if necessary.

