Operation Anthropoid

Sorry for the suspense guys, I had to go dark for a while taking care of my wife 24/7 after a very bad reaction to anaesthesia for an eye operation a couple of weeks back - bad news, but the good news is she’s now got 20/20 vision in the operated eye. The other eye’s being done next week so I’ll be disappearing again, but meanwhile here’s where I’d got to with the park railings, or How I Learned To Stop Worrying and Love DIY Photo-etching.

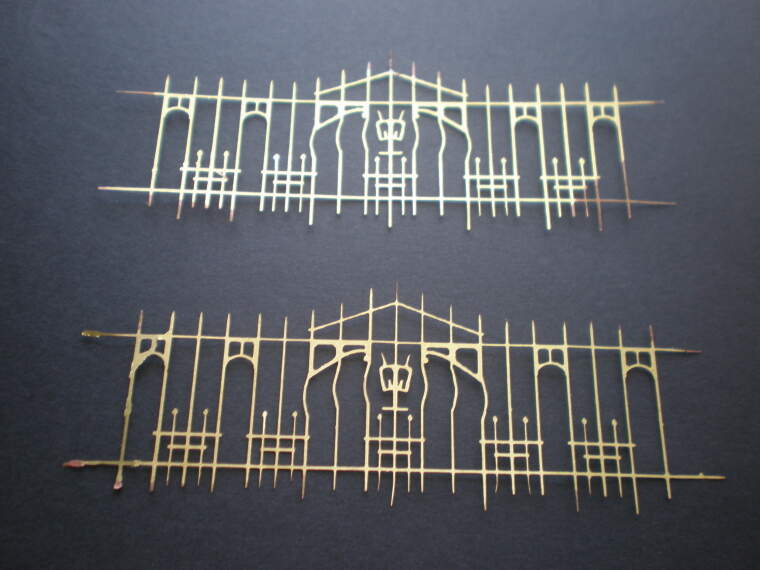
To recap, I need 11 custom railings for this diorama and worked up the original design using MS Paint, which was then printed onto transparency stock. I’d been inspired to try out the process after discovering a short tutorial last year by David Danek on youtube, especially because he used 1/35 scale railings as the example. I followed it to the letter, but before you click on it here’s a few pointers: his accent needs some tuning into; when he says “zinc” he means of course brass; he uses wide clear tape not “duct tape”; and ignore the part from 9 minutes on where he goes on to use the quicker/stronger etching agents (hydrogen peroxide/chloride), not relevant because I used his first method. WARNING – he ain’t kidding about the safety gear, anti-fume masks & rubber gloves & goggles are essential:

So there you go, a snap right? Well here’s a bucket of ice-cold water to temper your excitement, with additional details & notes not sufficiently explained in the video:

Cost of all materials – not much change out of US $150, mostly imported to Australia so possibly cheaper for European & North American players. But I could probably make 30 or 40 more of those railings before needing to reorder anything…well, apart from more brass sheets which aren’t expensive anyway.

At 4.45 he uses the Positiv20 photo-sensitive lacquer and simply sprays it on the brass sheet holding the can nearly horizontal, seemingly in normal lighting conditions. What he didn’t mention was the following from the manufacturer’s on-line instructions, which I only searched for AFTER I’d made all my mistakes, natch:

“To overcome discontinuities while spraying, the aerosol can should not be held too tilted. After application of the film, boards must be dried immediately in the dark. The drying temperature should be increased slowly (over 15 minutes) to 70°C and kept at that temperature for approximately 15 minutes. Infrared or forced air drying is possible. When air drying at ambient temperature is used (24 hrs minimum), the quality of the film will only allow very simple work. The adhesion is poor and the danger for dust entrapment and pinholes is high.” (In fact I found letting it dry at room temp for 24 hours worked fine)

Regarding the light exposure phase, it says “In practice the exposure time is between 60 and 120 seconds when lamps are used from a distance of 25-30 cm. It is recommended to allow the lamps to warm-up for approximately 3 minutes”. I need to experiment with the exposure time some more, early results suggest at least 75 secs would produce a clearer image.

So, not quite as simple as it seems in the video.

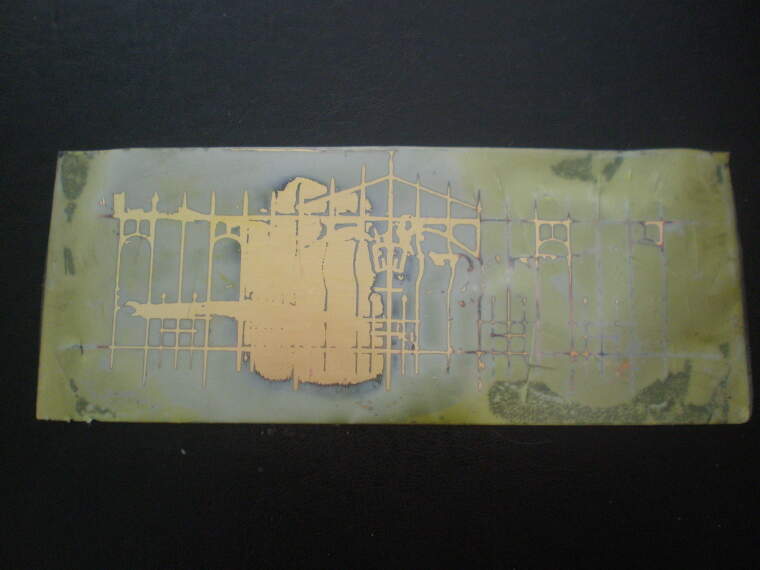
At 5.45 the “critical phase”, chemical development. He showed us a bottle of sodium hydroxide (NaOH, aka caustic soda) at the beginning of the video without any clue to its concentration – a crucial omission, as I found out the hard way. I was only able to source pure NaOH locally in the form of a sachet in crystal pellet form, 16g. which the instructions said made 1 litre when added to water. I trawled the net looking for recommended concentration, it’s also used to develop printed circuit board (PCB) layouts. Ranging from 50g per litre (which would melt the skin right off your hands) downwards, the general consensus amongst the PCB makers was 10g worked fine & takes about 30 seconds to work. Looking again at the video, the reaction’s instantaneous so he clearly used a much stronger mix…so I figured my 16g. should be OK. Whoosh, in a micro-second I saw my railing design appear…and disappear…before my eyes before I could fish it out.

And that’s when I looked again at the tiny print on the Positiv20 can with a magnifying glass – “Use a 7g. per litre NaOH solution”, although I subsequently found that the on-line instructions specify “The exposed plate is developed by immersion in a sodium hydroxide bath (10 g/lL sodium hydroxide in water) at ambient temperature for approximately 60 seconds.” It’s a pity they can’t be consistent but whatever it’s a small variation, and clearly I had used about double the recommended concentration. So I cut the next attempt with a third of water and that dilution worked fine, taking maybe 30 or 40 seconds giving ample time to fish it out at the right time. I should add that some guys on the ‘net claim Drano or similar domestic drain-cleaners work for PCB’s, but the concentrations vary and there are usually other constituents at play, so most recommend using only pure NaOH.

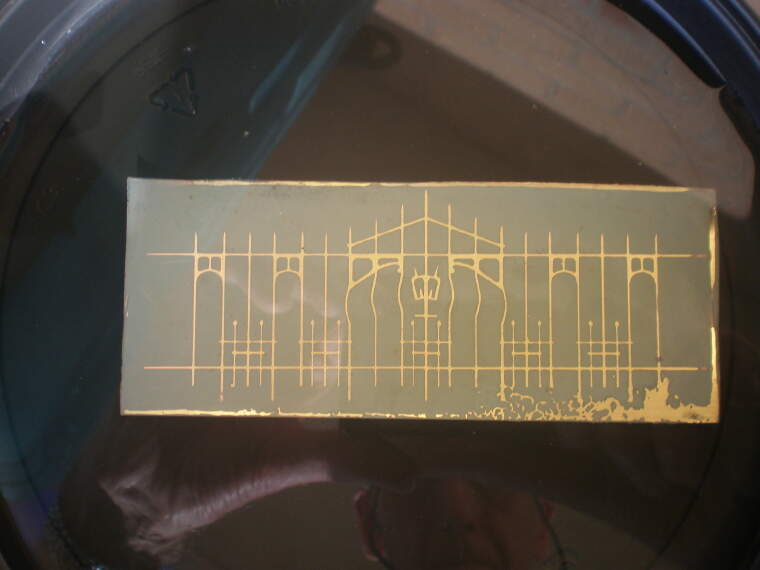
Then came the etching process which is indeed as simple as represented, if scary watching metal almost visibly dissolve. So this was how one attempt looked after I’d made several errors…

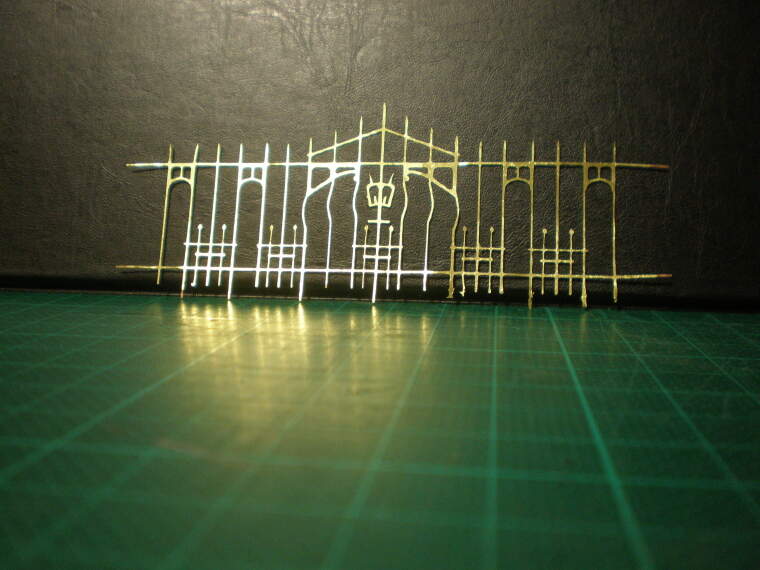
…and after all that learning process this is what the latest looked like…

…and after teasing off the backing tape…

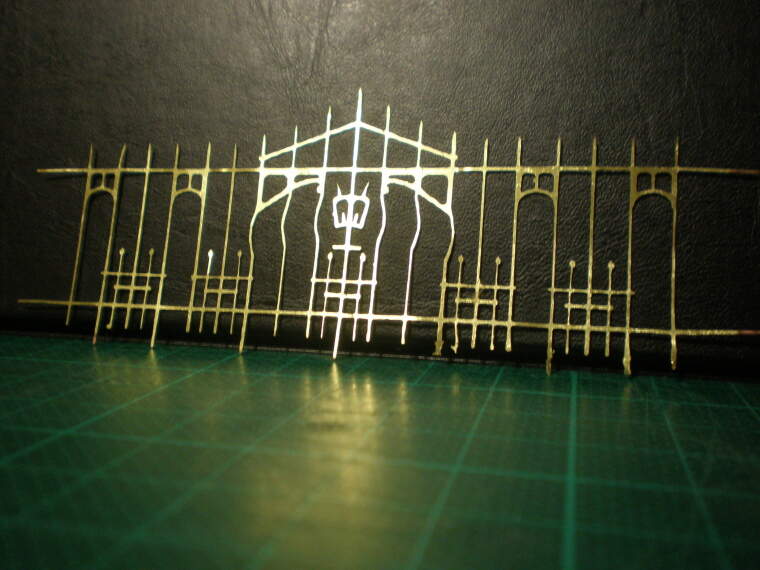
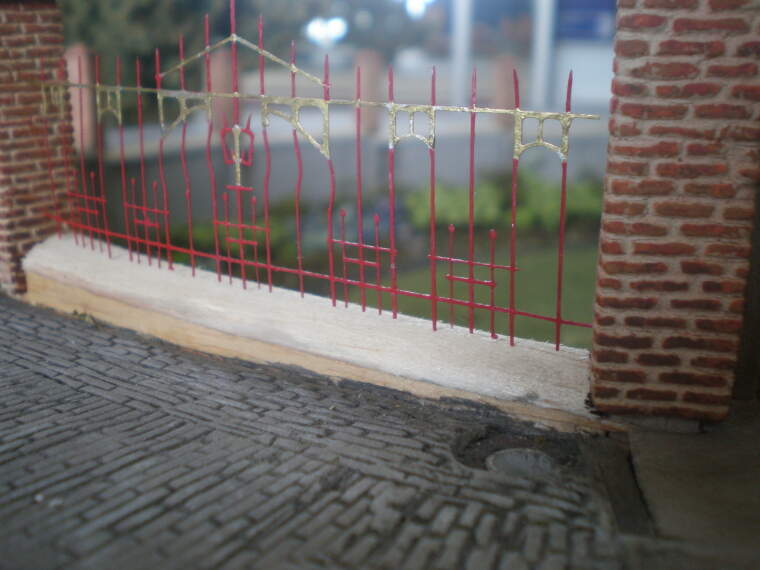
Not perfect, with some minor imperfections I can trim off later. But hey, how’s that for a novice?

Ecological footnote: the sodium hydroxide is re-usable, but eventually loses its power. Being effectively drain cleaner it can go down the sink, preferably heavily flushed down with water. Ferric chloride’s different, suffused with the metal sludge so NOT to go down any drain. I’ll dispose of it by first adding a solution containing dissolved bicarbonate of soda to neutralise it & then take it to the local waste-chemical disposal centre when I’ve done all 11 railings.

:tumbler_glass:

11 Likes

Nice job and fast learning curve man! That gate looks the biz.
J

New class for high school/freshman chemistry, photoetching 101.

Bloody hell Tim! You’re The Man!

Seriously, fantastic work; I just wouldn’t have the energy for half of this let alone the skill. All grist to those who wish to experiment though, and encouraging; well done!

Brian

Hi Tim,

Welcome back, hope your good lady is feeling better.

For a first attempt the PE looks really good, I’m really impressed, as Brian says…‘You’re the man!’, :slightly_smiling_face:.

Cheers, :beer:,

G

Thoughts and prayers for you and the wife Tim .
Excellent work on the pe , waaaaaaaay above my pay grade though . That’s one " hey ya’ll watch this " I just won’t try !!

Thanks guys for positive comments & spousal best wishes, she’s one quietly brave woman & deserves medals. Well I reckon all of you maestros are perfectly capable of trying this out & for any serious model-maker being able to make your own brass detailing is a huge plus limited only by the imagination. I’m still coming to terms with what else I can do now I’ve ironed out most of the bugs – a whole new world out there.

As it happened I spent most of yesterday evening sipping lemonade with my other railroad mate - I think I’ll be getting some orders from him for ventilation grills etc. within the next few days – he’s got around 150 locomotives. He asked why I didn’t try 3D printing & I explained resin would be way too fragile, something my other railroad mate (who has a 3D printer) would confirm because I’d already observed the limits of delicacy he can (& can’t) achieve. It’s also been suggested I should re-publish my report for the ships/cars/aircraft guys who may never look in the Diorama section, maybe I will :tumbler_glass:

2 Likes

I should have spoken up sooner, but I have been following along… Excellent work and research! I really appreciate the effort to get all the details correct (along with the great modeling work, itself!).

A detailed case study of this event (among many similar others) was part of the curriculum for a course I took part in some years ago. I can understand the amount of research that you’ve done here. No simple thing!

I’m really looking forward to seeing more as you progress along!

Thanks Michael & welcome aboard, if you’ve still got your notes let me know if anything looks awry - the research has been such a collective effort there’s a good chance I could blame someone else! No seriously it would be all my fault, plus there are too many things I’ve had to guess & it’s highly unlikely I’m right about all of them. Even so I hope I’ve squashed at least some of the myths & misinformation about this event, even if it’s only the one about the green Merc :tumbler_glass:

1 Like

That is some great PE you got there… It does show the downside of using paint as a source however. Every pixel out of place shows… I don’t have the skills, but someone with autocad (or similar) skills might be able to create a better drawing?

@Dioramartin Unfortunately, it was one of those kinds of courses where there were no notes allowed outside of the classroom so no possibility to share. The incident was noteworthy for how well it was planned and executed based on careful resonnaisance and surveillance of the target, though. Quite literally a “text book” example.

From memory, though, you are “dead nuts” on, or at least as close anyone will ever get.

Awesome, it worked well. You are brave, Bro!

Thanks guys, Erwin it’s not so much the design that’s amiss. I doubled its size in the above post which does show some ragged edges (eg the central section’s curving verticals) but they’re not visible at 1/35 size. The exposed plate also looked “clean”, the problem’s more about the etching process. I think I didn’t float the plate in enough ferric chloride – I used a depth of maybe a centimetre and the plate floats under surface tension, taped side up.

The dissolving brass falls away to the bottom leaving the etching process to keep attacking the underside. But I noticed the process seemed to slow down to a stop after 2 hours & I pulled it out even though you can see some unwanted brass was still there - I cut my losses because I felt the design itself was about to start to dissolving too if I left it in any longer. So I think I need to increase the depth of the bath to maybe 1.5 cm, we’ll see. My wife’s having her 2nd eye op as I type so I won’t be doing much else other than looking after her for the next few days :tumbler_glass:

3 Likes

113

Okay… closeup pics often show what the naked eye doesn’t see…

Well you aced your etchers badge , well done and well deserved !!

Thanks guys, well they say a reliable experiment is when the same result can be replicated, so I must be in business…

Speeding up production time & economising on chemicals I tried doing this pair together, separate brass sheets but bathed one after the other in the same fluids. I was right about making the ferric chloride deeper (to 1.5cms) because the first railing etched in half the time (1 hour) and the second in 1 hour 20 with minimal flash. I only just noticed the ferric chloride label says it’s “boosted”, a slanderous lie I paid good money but maybe it’s more concentrated than I thought. Three railings down & eight to go, here’s the first railing painted in situ…

I was guessing the railings were painted in Prague red & gold but now I’m not so sure, the monochrome contrasts look way off…

Any suggestions? I would have taken photos outside for a better comparison in full sun but it was gusting 60 kph winds at 43°C/109°F (recorded temp Sydney airport which I can see from here) by mid-afternoon & it’s not even summer yet - same conditions yesterday, like in a fan-forced oven out there…it’s OK I don’t expect any sympathy. Anyhow I hope y’all noticed in the closest-up shot how the cement on the right-hand pillar has some hairline cracking um er exactly as I intended… :tumbler_glass:

7 Likes

AcXJ2ph

That works quite nicely!

Tim,

I think the red and gold is most likely, you know, a sort of municipality thing? “All public parks will be enclosed in such and such type of railings and these are to be painted in the following city colours…”

What may appear slightly garish to today’s tastes may have been perfectly acceptable back in the day; I also suspect that they were painted before the war at installment or say, biennially, then languished a bit once the German occupation occurred; that said, we all know of the surreal instances when even in the middle of absolute mayhem or even combat, the banal continues to take place.

Brian

1 Like