Painting after the build is complete

I’ve seen pics of kits, built up, or very close to finished that haven’t been painted yet. I’ve always painted then assembled, but is there another way?

Just looking at the intricacies of my AFV Club M54A2 project, I’m wondering if it can really be airbrushed after its complete?

Any opinions or views on this? I’m a very basic airbrush-ist btw.

1 Like

To be honest it depends on the kit, how it’s constructed and the order of build. I paint as I go, if the sequence demands it. That means interiors have to be dealt with (I’m talking AFVs here), and for me, often the suspension - I always weather the hull sides etc - before installing the road wheels.

Once the build is finished, I mask as necessary if the detailing requires it then prime. I used to wash the model but gave that up, though I can’t really remember why; something to do with paint adhesion I suspect, but then, I find a primer quite forgiving in that respect.

Thereafter, this is how I tackle my models:

Wash model (if desired)

Primer - as mentioned above

Base coat (or camouflage pattern as necessary) - airbrush normally, but I’m not averse to using rattle cans

Paint details

Gloss varnish (this will secure the base colour and details, enable decals and facilitate washes etc)

Decals

Chipping - minimal for me and often not at all

Wash – including pin washes

Dry brush - still effective I reckon

Matt varnish – re-gloss where necessary; if gloss finish then matt details

Add antennae/light lenses – latter can be affixed before but will need masking

Weather – paint/pastels

Blend to base if using one eg Tamiya Buff etc

Exhaust pastels if appropriate

I’m not saying this is the only way to do it all, and it may not be quite what you’re after, but it sort of works for me.
8 Likes

It depends.
I decide part by part, do I absolutely have to paint it now or is it reasonably easy to do it later.
Painting now vs assembling painted parts where the glue might affect the paint?
Painting later vs tricky to reach areas if I assemble too much?

Airbrush: If you can see it you can spray it
BUT
protecting surrounding areas from paint going everywhere can be difficult/impossible.

4 Likes

I also assemble as much as possible and usually only leave off tools, gear, antennas, roadwheels/wheels and tracks when painting. I find if the airbrush can’t get into an area, and you can’t brush paint it, it won’t be seen anyways, so don’t worry about it.

If there is an interior that gets painted a different color, I will do that first and then tape it off/seal it up when painting the exterior. I build all that can be that is the same color. Paint all the same color parts, hopefully, mostly in the hull. I then use super glue to attach the smaller parts.

5 Likes

I like to build the model so that it all fits together nicely. This doesn’t mean everything has to be glued together just that all the subassemblies fit together correctly.

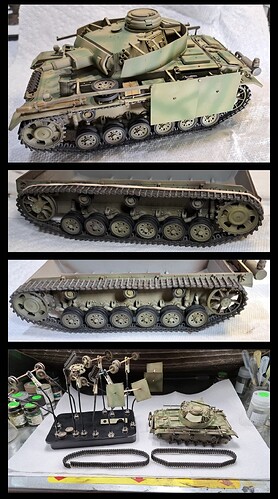
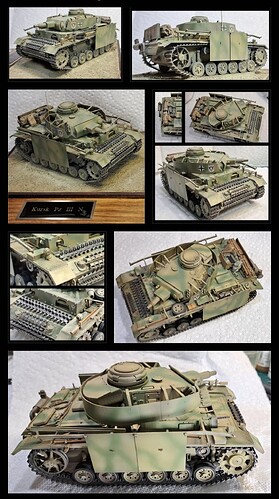
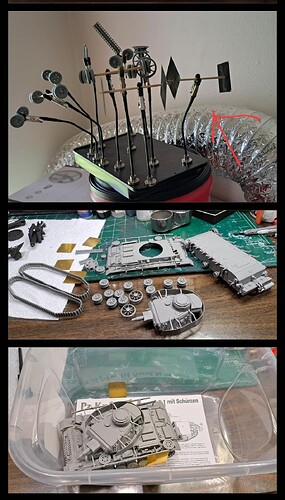
This is an example of what works well for me.

In the above, the entire Pz III was completed and test fitted together. For painting the Pz III came apart as shown. A parts holder was used etc.

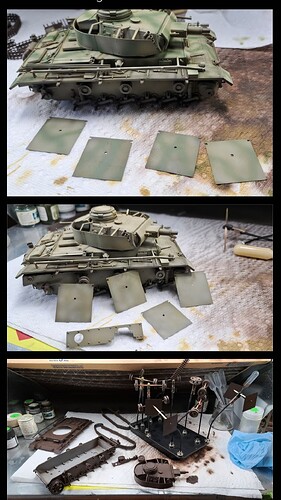
In the above the base coat, color coat & camo are applied.

Suspension details painted and assembled, then the hull halves were assembled. The fit of the hull halves had previously been addressed so there wouldn’t be any nasty surprises at this step. Upper hull details like tools etc painted.

Weathering, gloss coat, decals, gloss coat, more weathering, flat coat and last a dust filter.

HTH

8 Likes

Thanks everyone for your input and support. Certainly some interesting and different views.

Gino, it was your current build pics that got me thinking about this.

I’m working on the frame of my dump truck so I’ll keep on going and build as much as I can.

Thanks again everybody.

1 Like

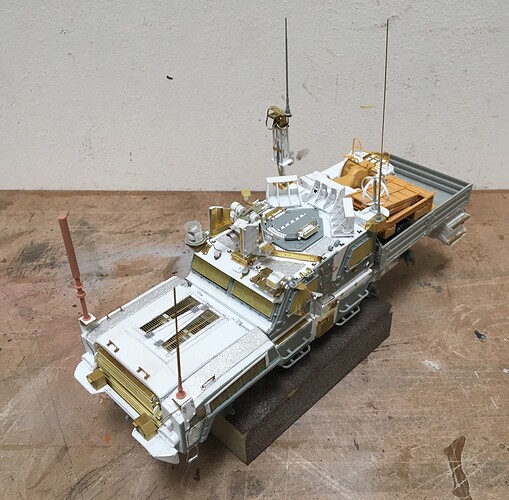
This is a really interesting question - like some have said above, if the kit has an interior, I will paint and weather it as a module, then paint all of the exterior:

It’s kind of funny I suppose, in that when I got into “serious” model building, I noticed in various build threads, many built the whole project, and then painted it, so that’s what I did, and have continued doing:

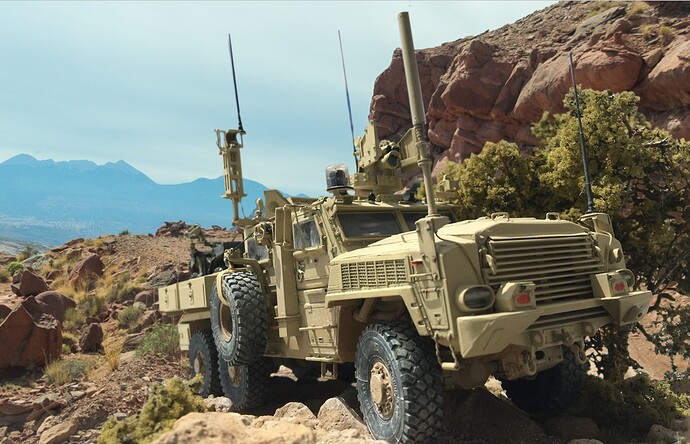
Once the base coat is on, add various bits of weathering. The only parts I always paint separately are tires and wheels, which is one of my least favorite steps of any build!

A downside of this approach to overall painting is that you have to be really careful with items sticking out of the body like barrels, CROWS, antennae etc, but with some practice it get easier.

For cars, I paint the body and interior separately from the chassis:

I hate to sound too obvious, but practicing on a variety of projects, will lead you to do what you like doing, or works best for you.

Cheers
Nick

7 Likes

I love your models dude, you’re too cool

Cajun :crocodile:

1 Like

The real question is when are you going to sell this as a kit?

1 Like

Looks like you’ve got enough sensible answers, I’d just add that I tend to custom-mix my own colours (bar metallics) and I do that before I even start construction, and test them on scrap plastic. I use a bunch of those old 35mm plastic film cannisters to keep them airtight in, the record for still-usable acrylic paint is nearly 2 years.

So during construction I can either air- or hand-brush anything that’s awkwardly positioned. Sometimes it gets dicey whether I’ll have enough left for the final coat(s) even allowing for some dilution, but I guess that all adds to the excitement of model-making.

3 Likes

It usually depends on the kit. Normally i try to paint as i ho. Or paint each subassembly as i build, putting the subs together. Then add my weathering. All depends on how you feel comfortable. Just remember, you be tou! And most of all have FUN!

4 Likes

As others have said, it really just depends. Having said that, I generally follow the strategy to paint in the largest assemblies possible contingent on the difficulty of getting the quality of finish that I want. That is, an aggregate of some number of parts that will all be finished in the same colors and consistently weathered as a whole will generally be painted all together.

But, on any given project, I may have a couple of rather larger sub-assemblies along with a number of smaller sub-assemblies and quite likely a number of individual parts, all to be painted separately. This would be because my estimate of that particular project suggests to me that I need to paint the various assemblies and parts that way to achieve the results I want.

I might also paint individual parts and assemble then and then continue painting that particular sub-assembly to get the kind of finish I want. Some painting stages might wait until the very end when the entire model is almost completely finished. So, some areas have been painted but not entirely or finally until they get some, last, final step done (like maybe a nearly transparent final dust glaze and clear flat).

In the end, for me, it’s about modifying my painting process to achieve particular results rather than adhering to a set painting process and just accepting the results it produces.

I think how you approach the finishing is (or should be) really more a matter of what your vision is for the build and how you think you can best achieve that vision. There is no single finishing method or process or step-by-step that is flexible enough to achieve every possible result. Sometimes that might be painting the whole model once it’s complete, but, more often than not, that probably means painting it in some stages.

5 Likes

I prefer to build & paint in sub-assemblies, especially running gear wheels & tracks.
I have recently bought some 1/48th & 1/35th
resin 3D printed models, in one/few pieces, which will test my painting/motor skills

3 Likes

And with consideration for the mechanical aspects of the assembly. For example, tools are much easier to paint separately, but the adhesion of glue on a layer of paint on the vehicle is going to be abysmal (easy to pull up the paint at the glue joint), so if you’re going to paint separately, you’re going to want to mask the locations of the glue joints before painting the vehicle, which can become more fiddly than affixing the tools, painting the vehicle, then painting the tools. And depending on the subject, you can find photographs where they didn’t bother taking the tools off before painting and just sprayed over the tools. If the painting and weathering of the vehicle demands it, as you say, all that happens before the tools go on, but it can be a really subjective decision, and I don’t see that there’s any one ‘right’ way to do it.

2 Likes

In the beginning I painted tools before gluing them to the model and then I switched to painting after assembly. I slide a thin paper in under the handles and blades/points. The fasteners get the same colour as the vehicle so the demarcation line is between the tool and the fastener so it is the same difficulty regardless of method.
Having the tools on the model also makes it easier to handle them …

3 Likes

And this is all that matters. As long as the methods and techniques achieve the results you have envisioned, those are the “correct” methods and techniques to use. The “best” technique is the one that works for you and your desired results.

Learning many different ways (techniques and methods) is useful in that knowledge gives you flexibility and options to choose from. Learning different ways also presents the possibility of discovering a new way to do the same thing that might be easier or produce better results when combined with your other skills, knowledge, and abilities or with the tools and materials that you have most available.

2 Likes

When a vehicle has an interior, I assemble and paint that as one, then mask it off and move on. With AFV’s, I assemble everything before painting, leaving off only wheels, tracks, and tools. I never pre-paint parts, especially not on the sprues. That is a sure way to guarantee fit issues. Model kits are engineered to be assembled unpainted, and that is how they fit together. Scraping paint from mating surfaces inevitably leads to gaps between parts. Pre-painting is just a recipe for disaster. Build as much as you can, in sub-assemblies if necessary, before you paint, and airbrush as much as possible. You can almost always tell airbrushed finishes from brush painted ones.

2 Likes

^^Ditto to what Matt says above.^^ That is how I do it as well.

Not really necessary. I attach smaller items like tools and gear with super glue after painting and have no issue with adhesion or items coming loose.

1 Like

All good recommendations from very experience builders/painters. However, whatever method you decide on, keep careful notes of the process. Between trying to remember what you’ve read here and other related posts and when you actually pick up the airbrush/paintbrush can drive you bat-sh!t-crazy. :lab_coat:

—mike

3 Likes

Sean, respectfully, consider a few points for painting tools in place on the model.

  1. The paper under the tool tip Robin mentioned helps make it easy.

  2. Thinned paint literally flows around the tool or tool handle like a wash making the task very easy if the tool is securely attached to the model.

  3. I can paint tools attached to the model to a higher standard in half the time than if they are separate.

  4. Water based acrylics allow a damp brush to remove “tool paint mistakes” from the model.

  5. Tool paint mistakes can be dry brushed away with color coat or used as a guide for manually applied chipping.

  6. No glue drama like using super glue and leaving spots or scraping paint away, or apply liquid cement to painted parts.

After a model build or two for the hang of painting tools on vehicle, it’s made the process much faster with better results for me. Of course use the technique that works best for you but on board painting can pay nice dividends.

YMMV

1 Like