Recon meets Recon: Panzer II J vs. BA-64B Armored Car

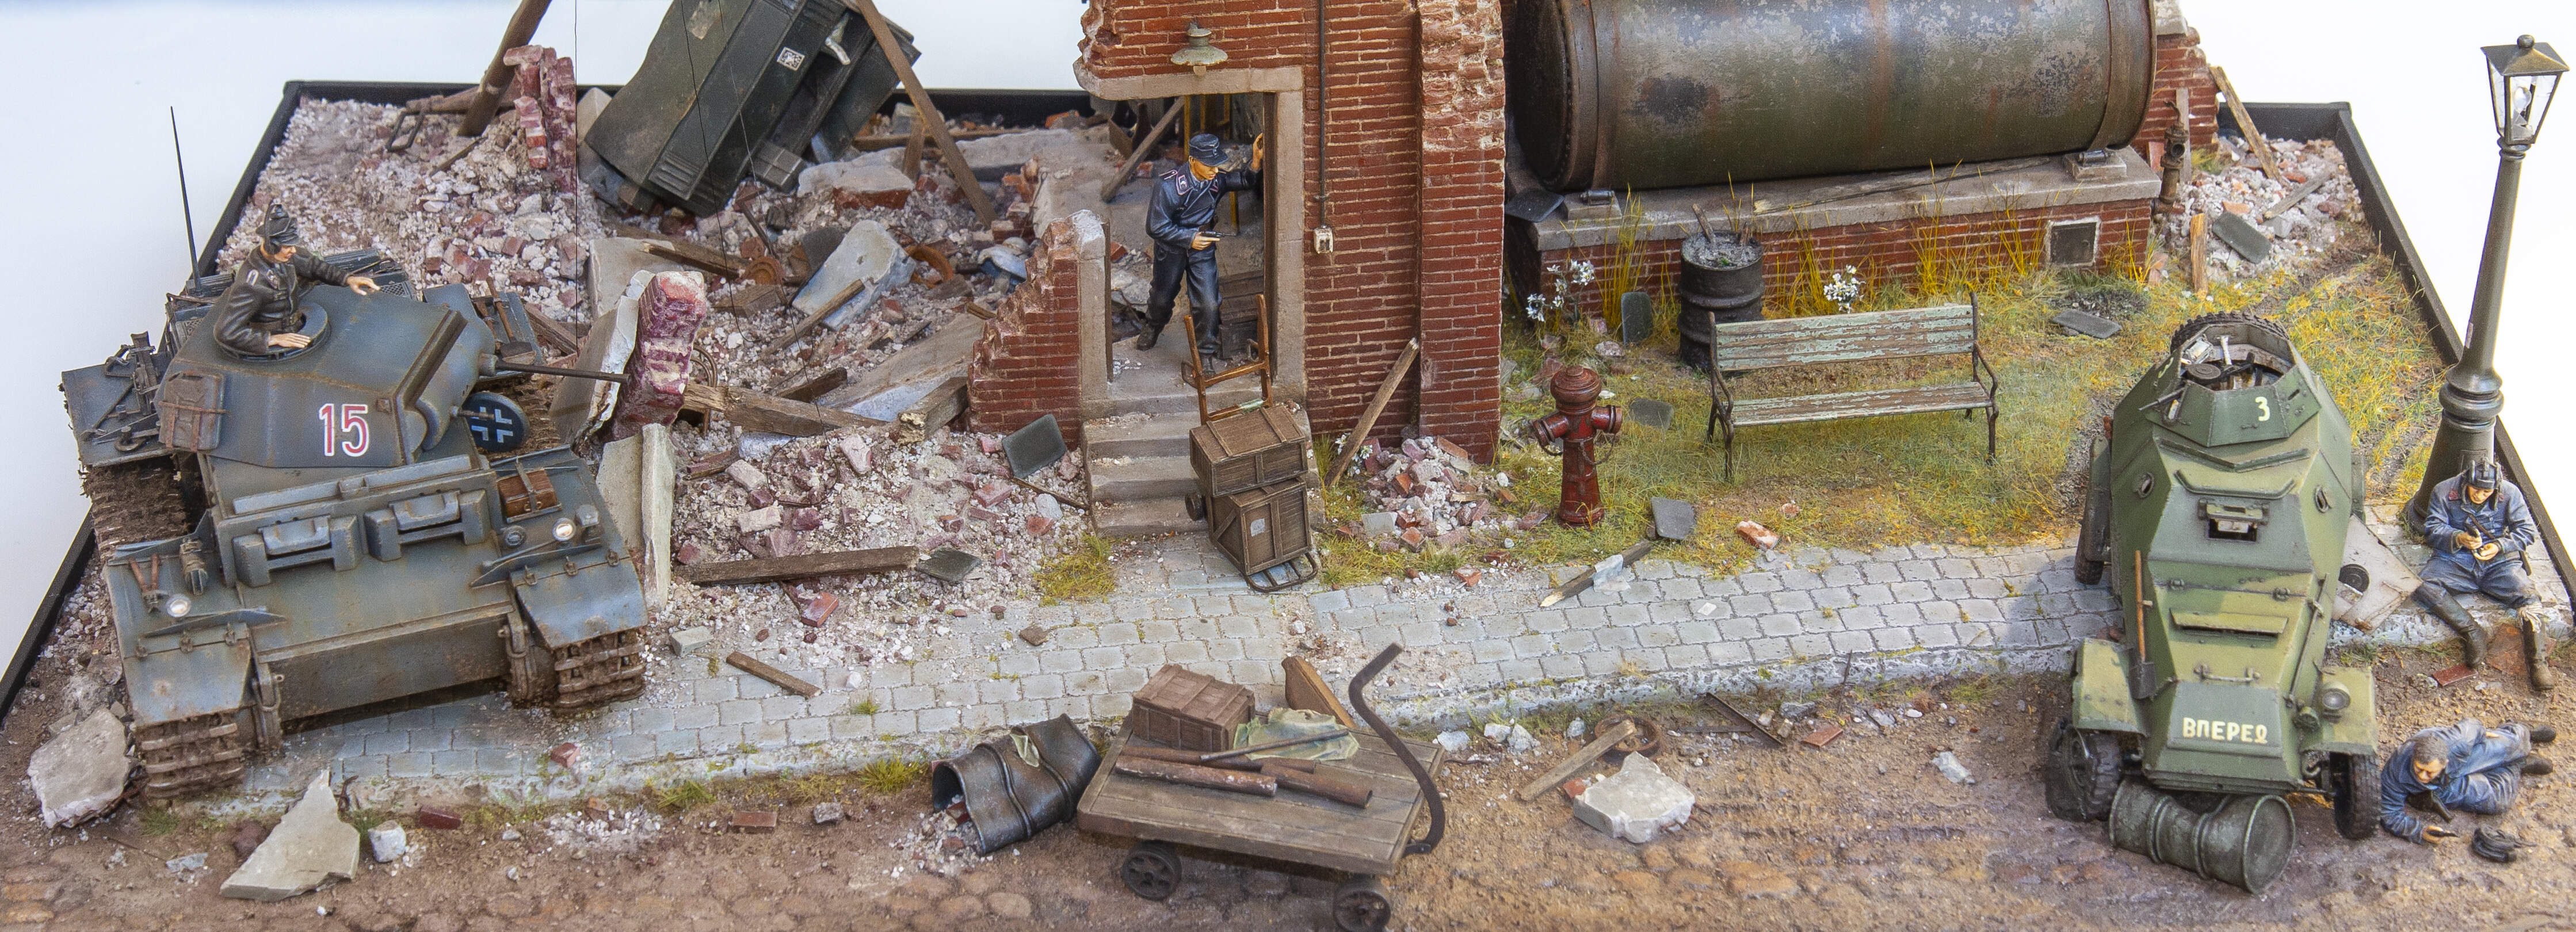
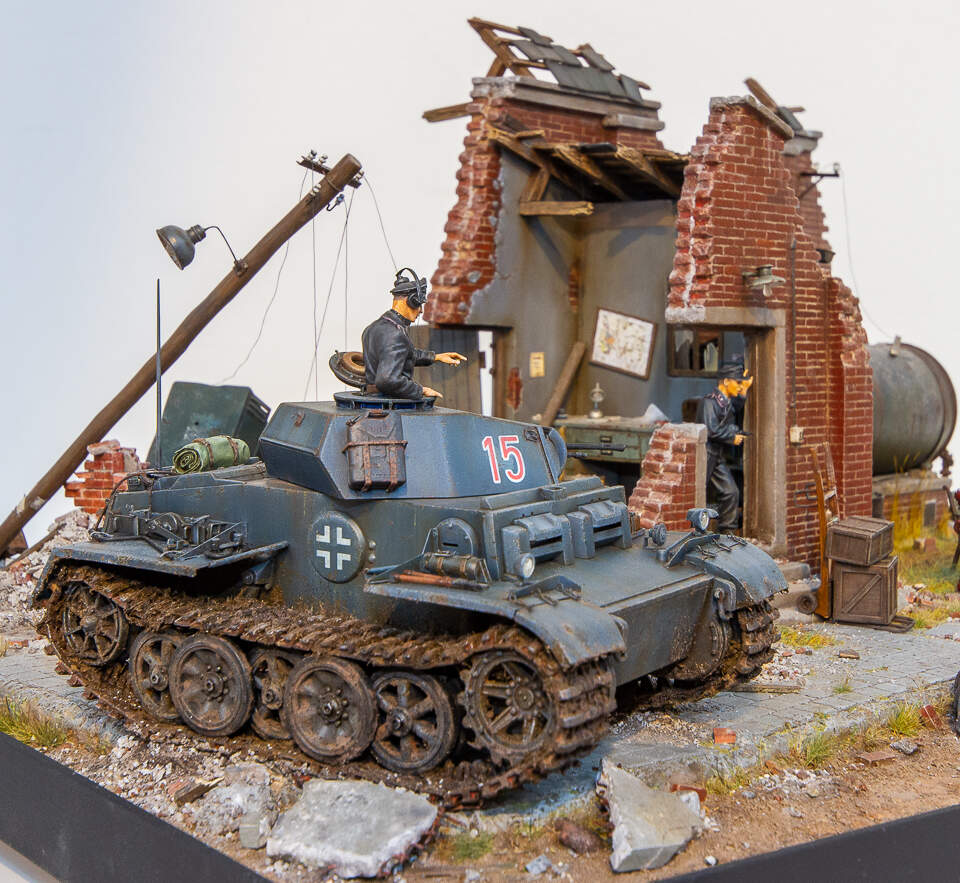
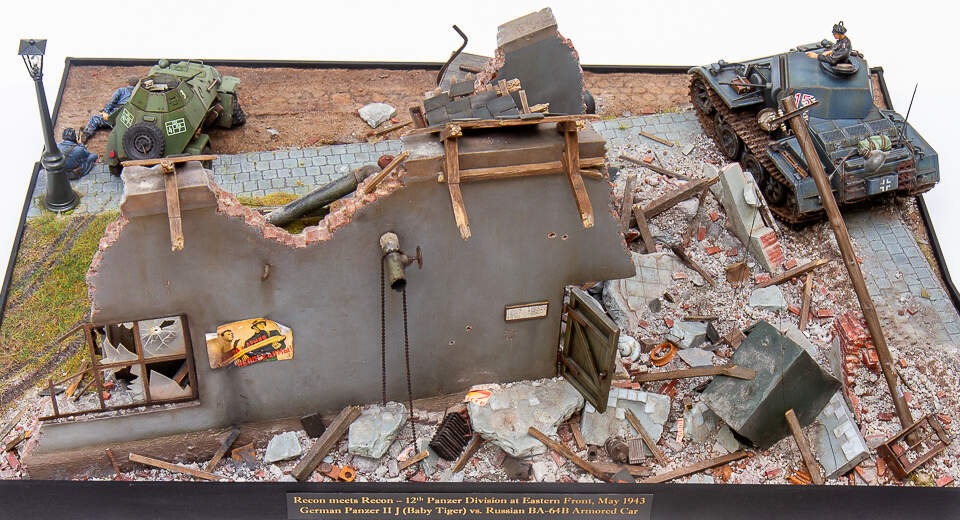
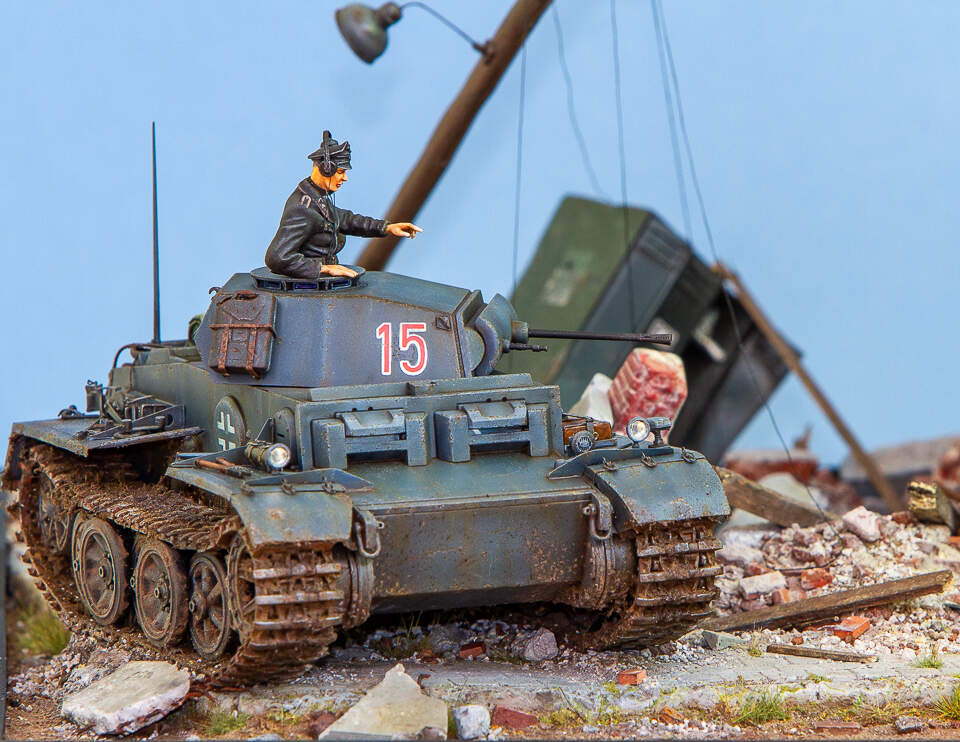
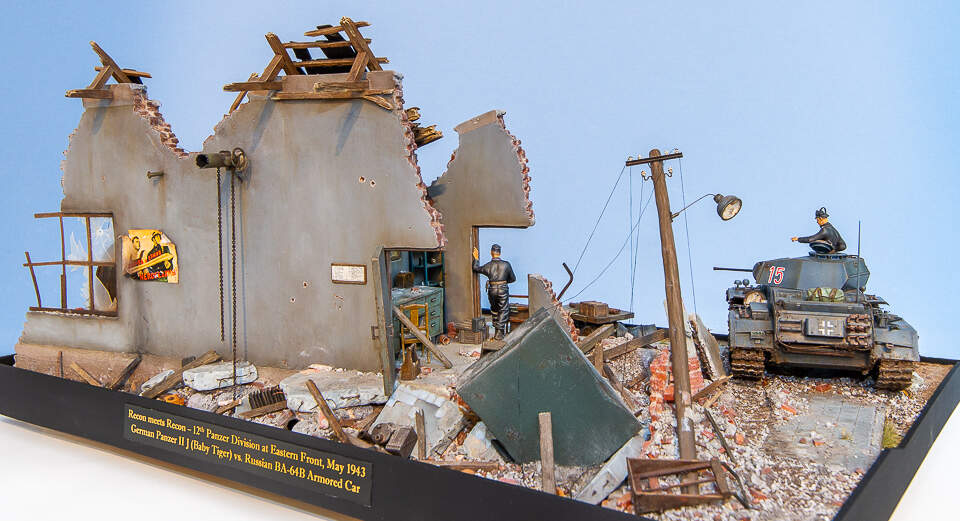
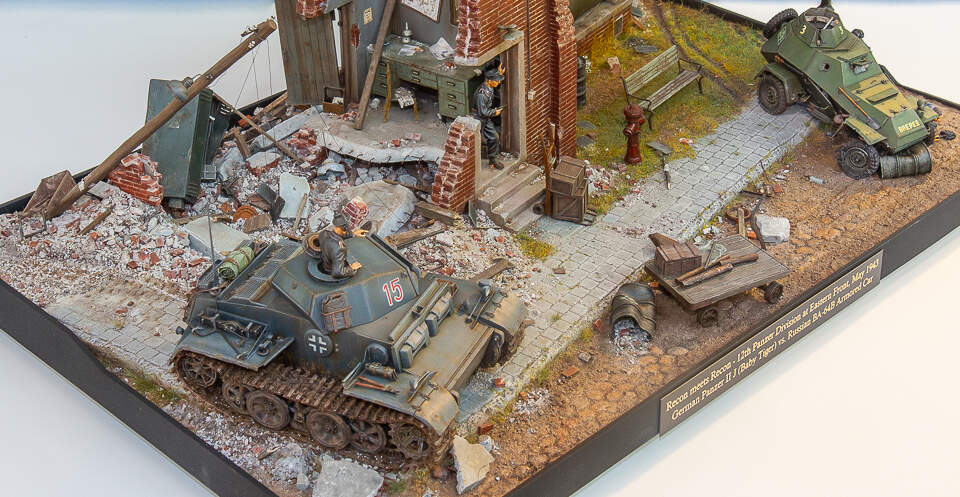
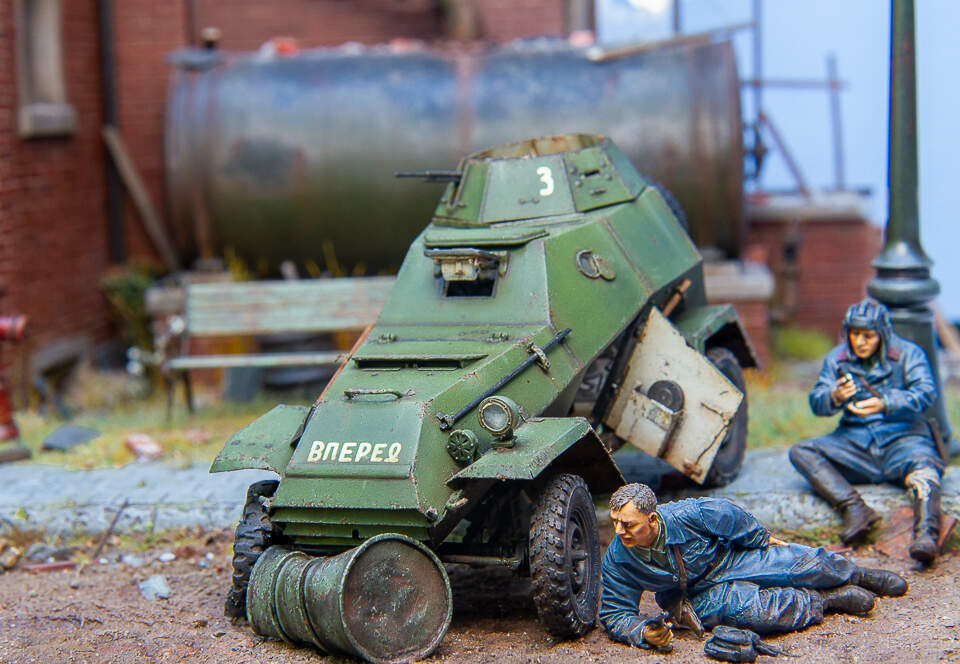
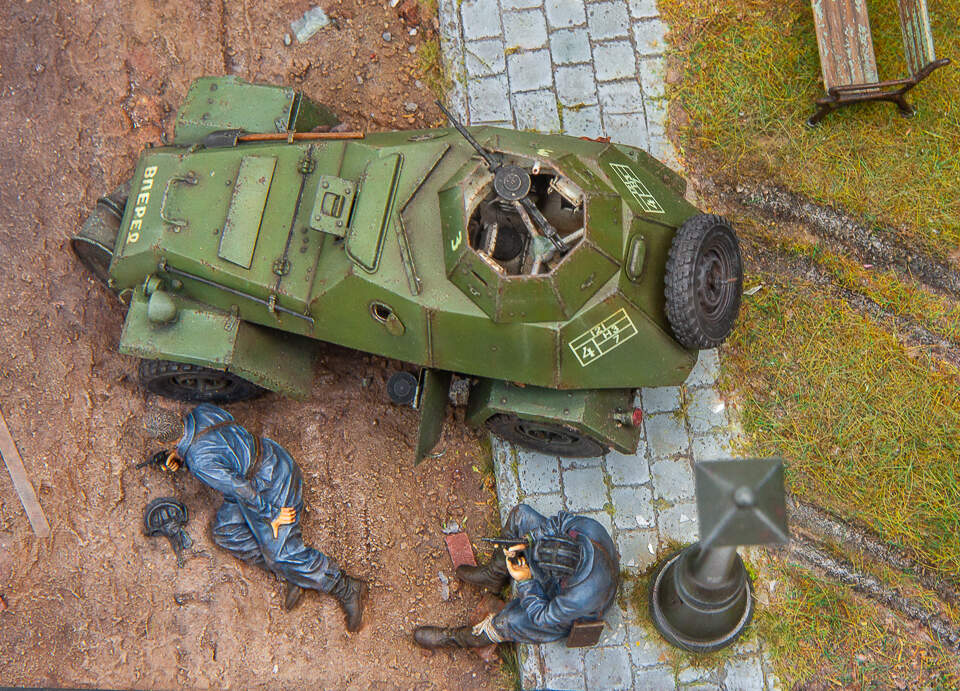
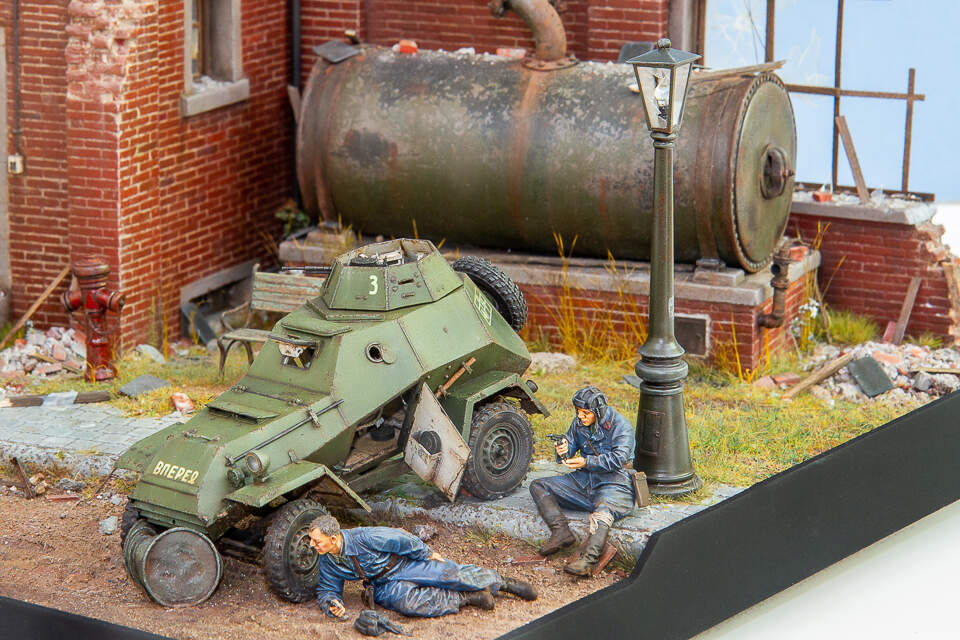
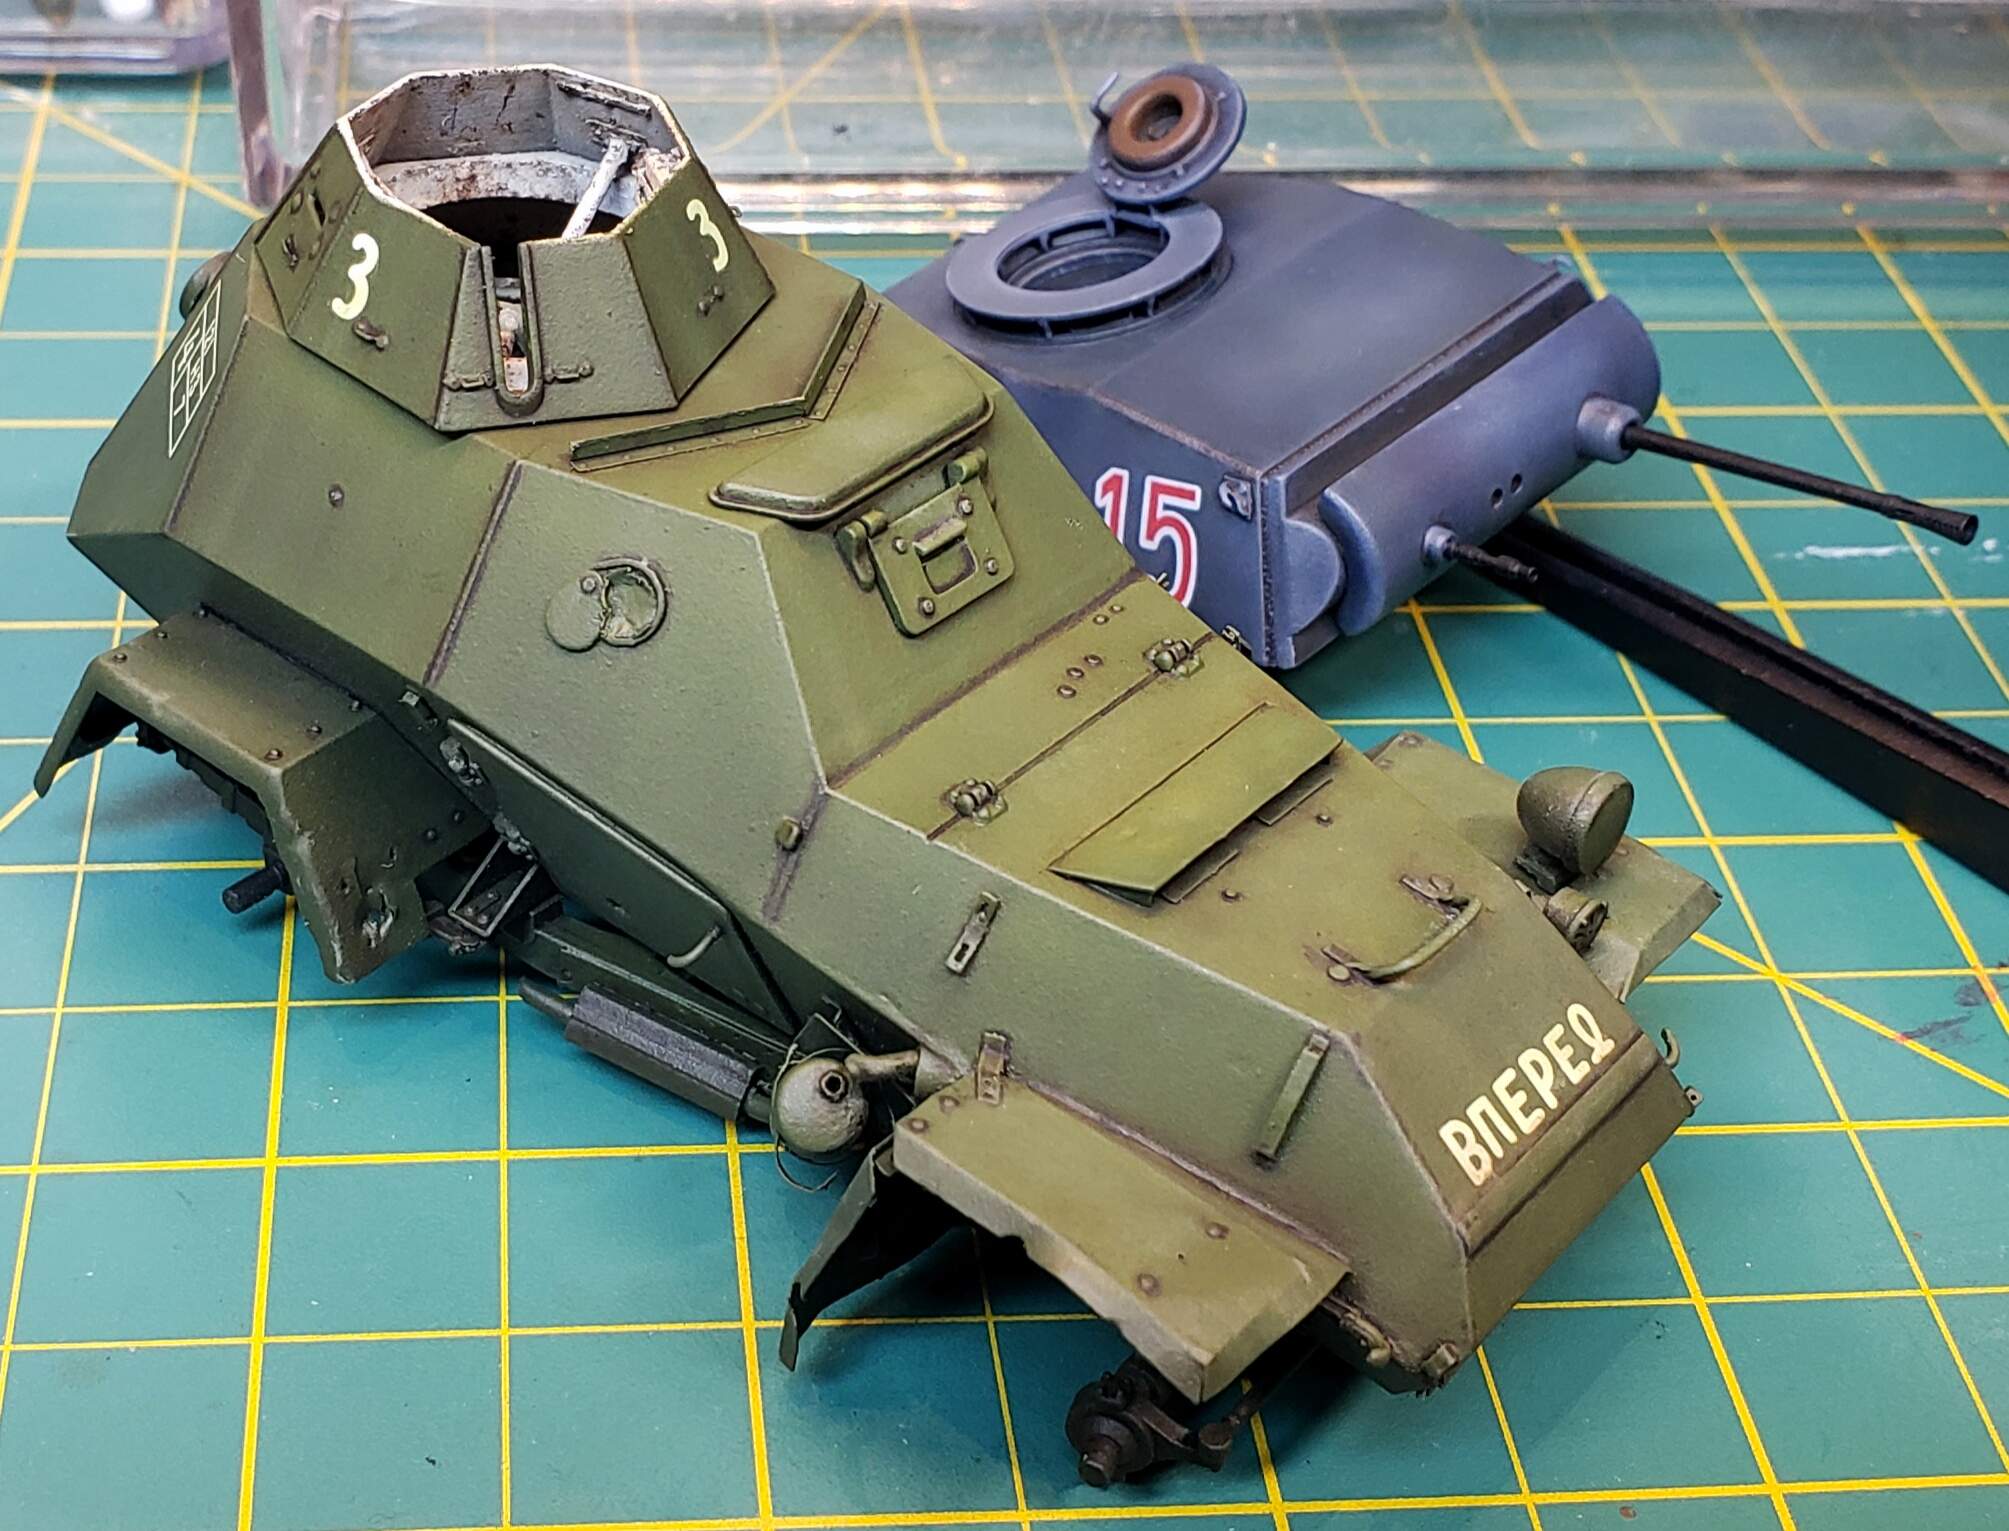
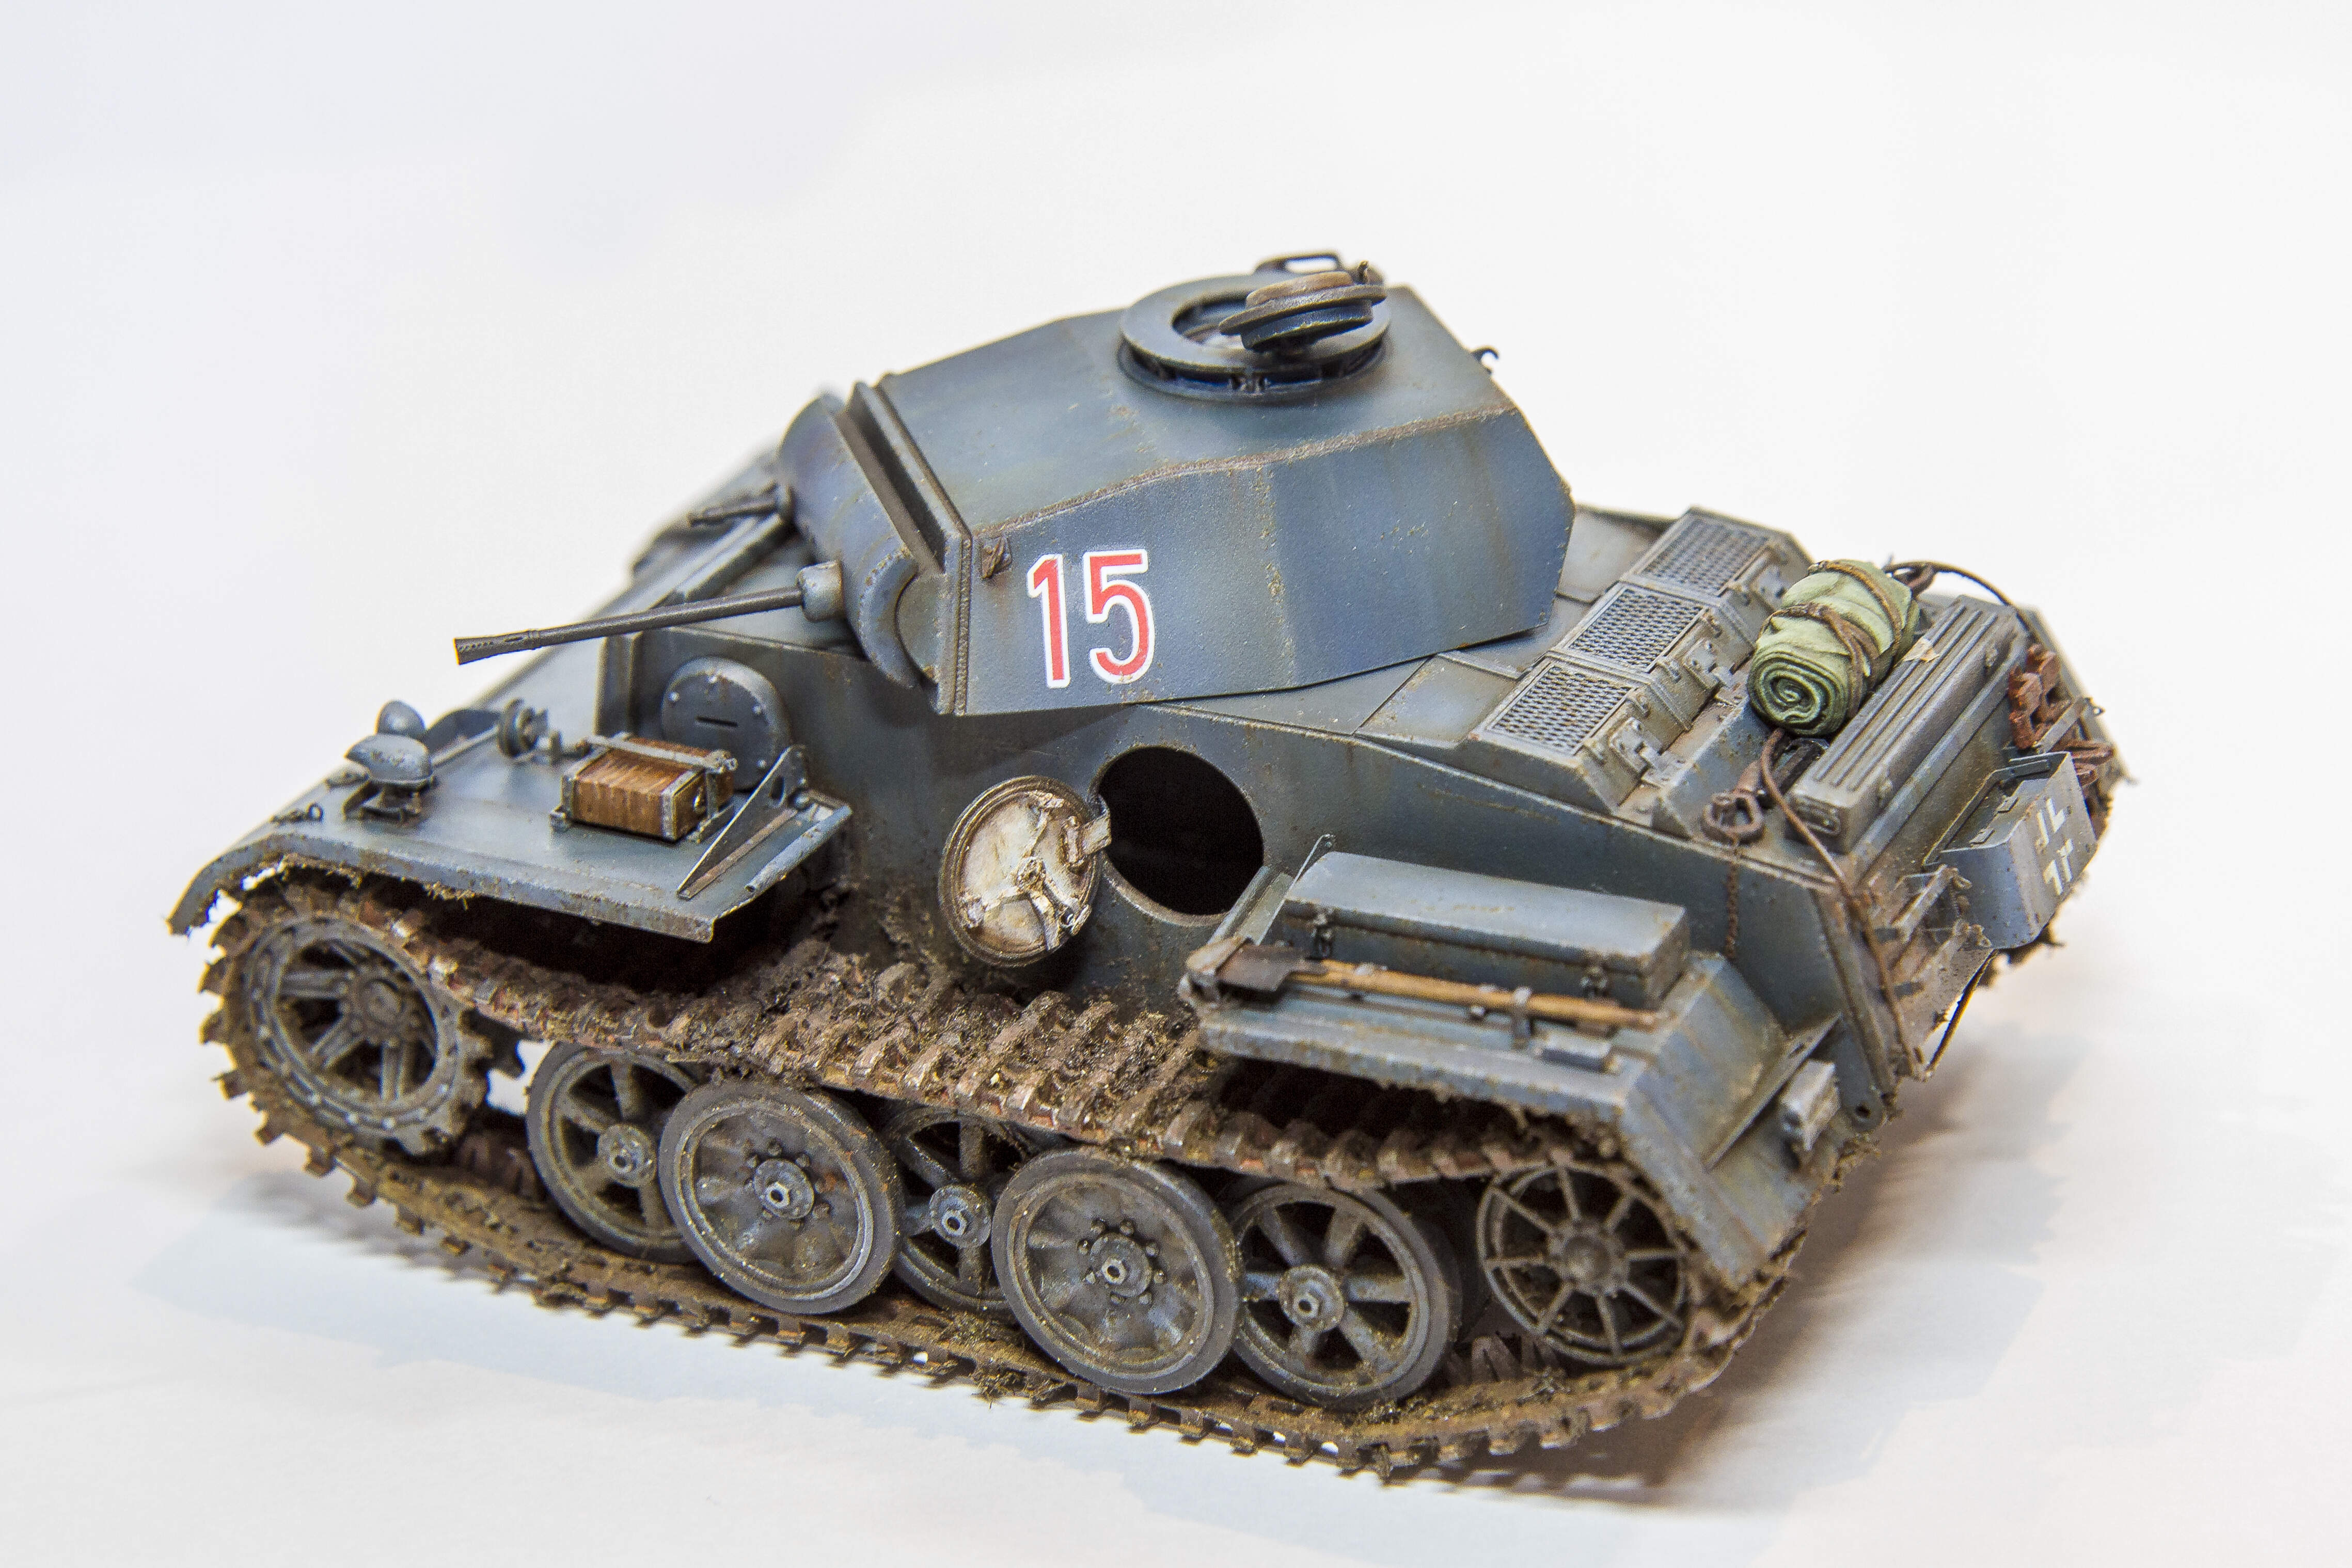
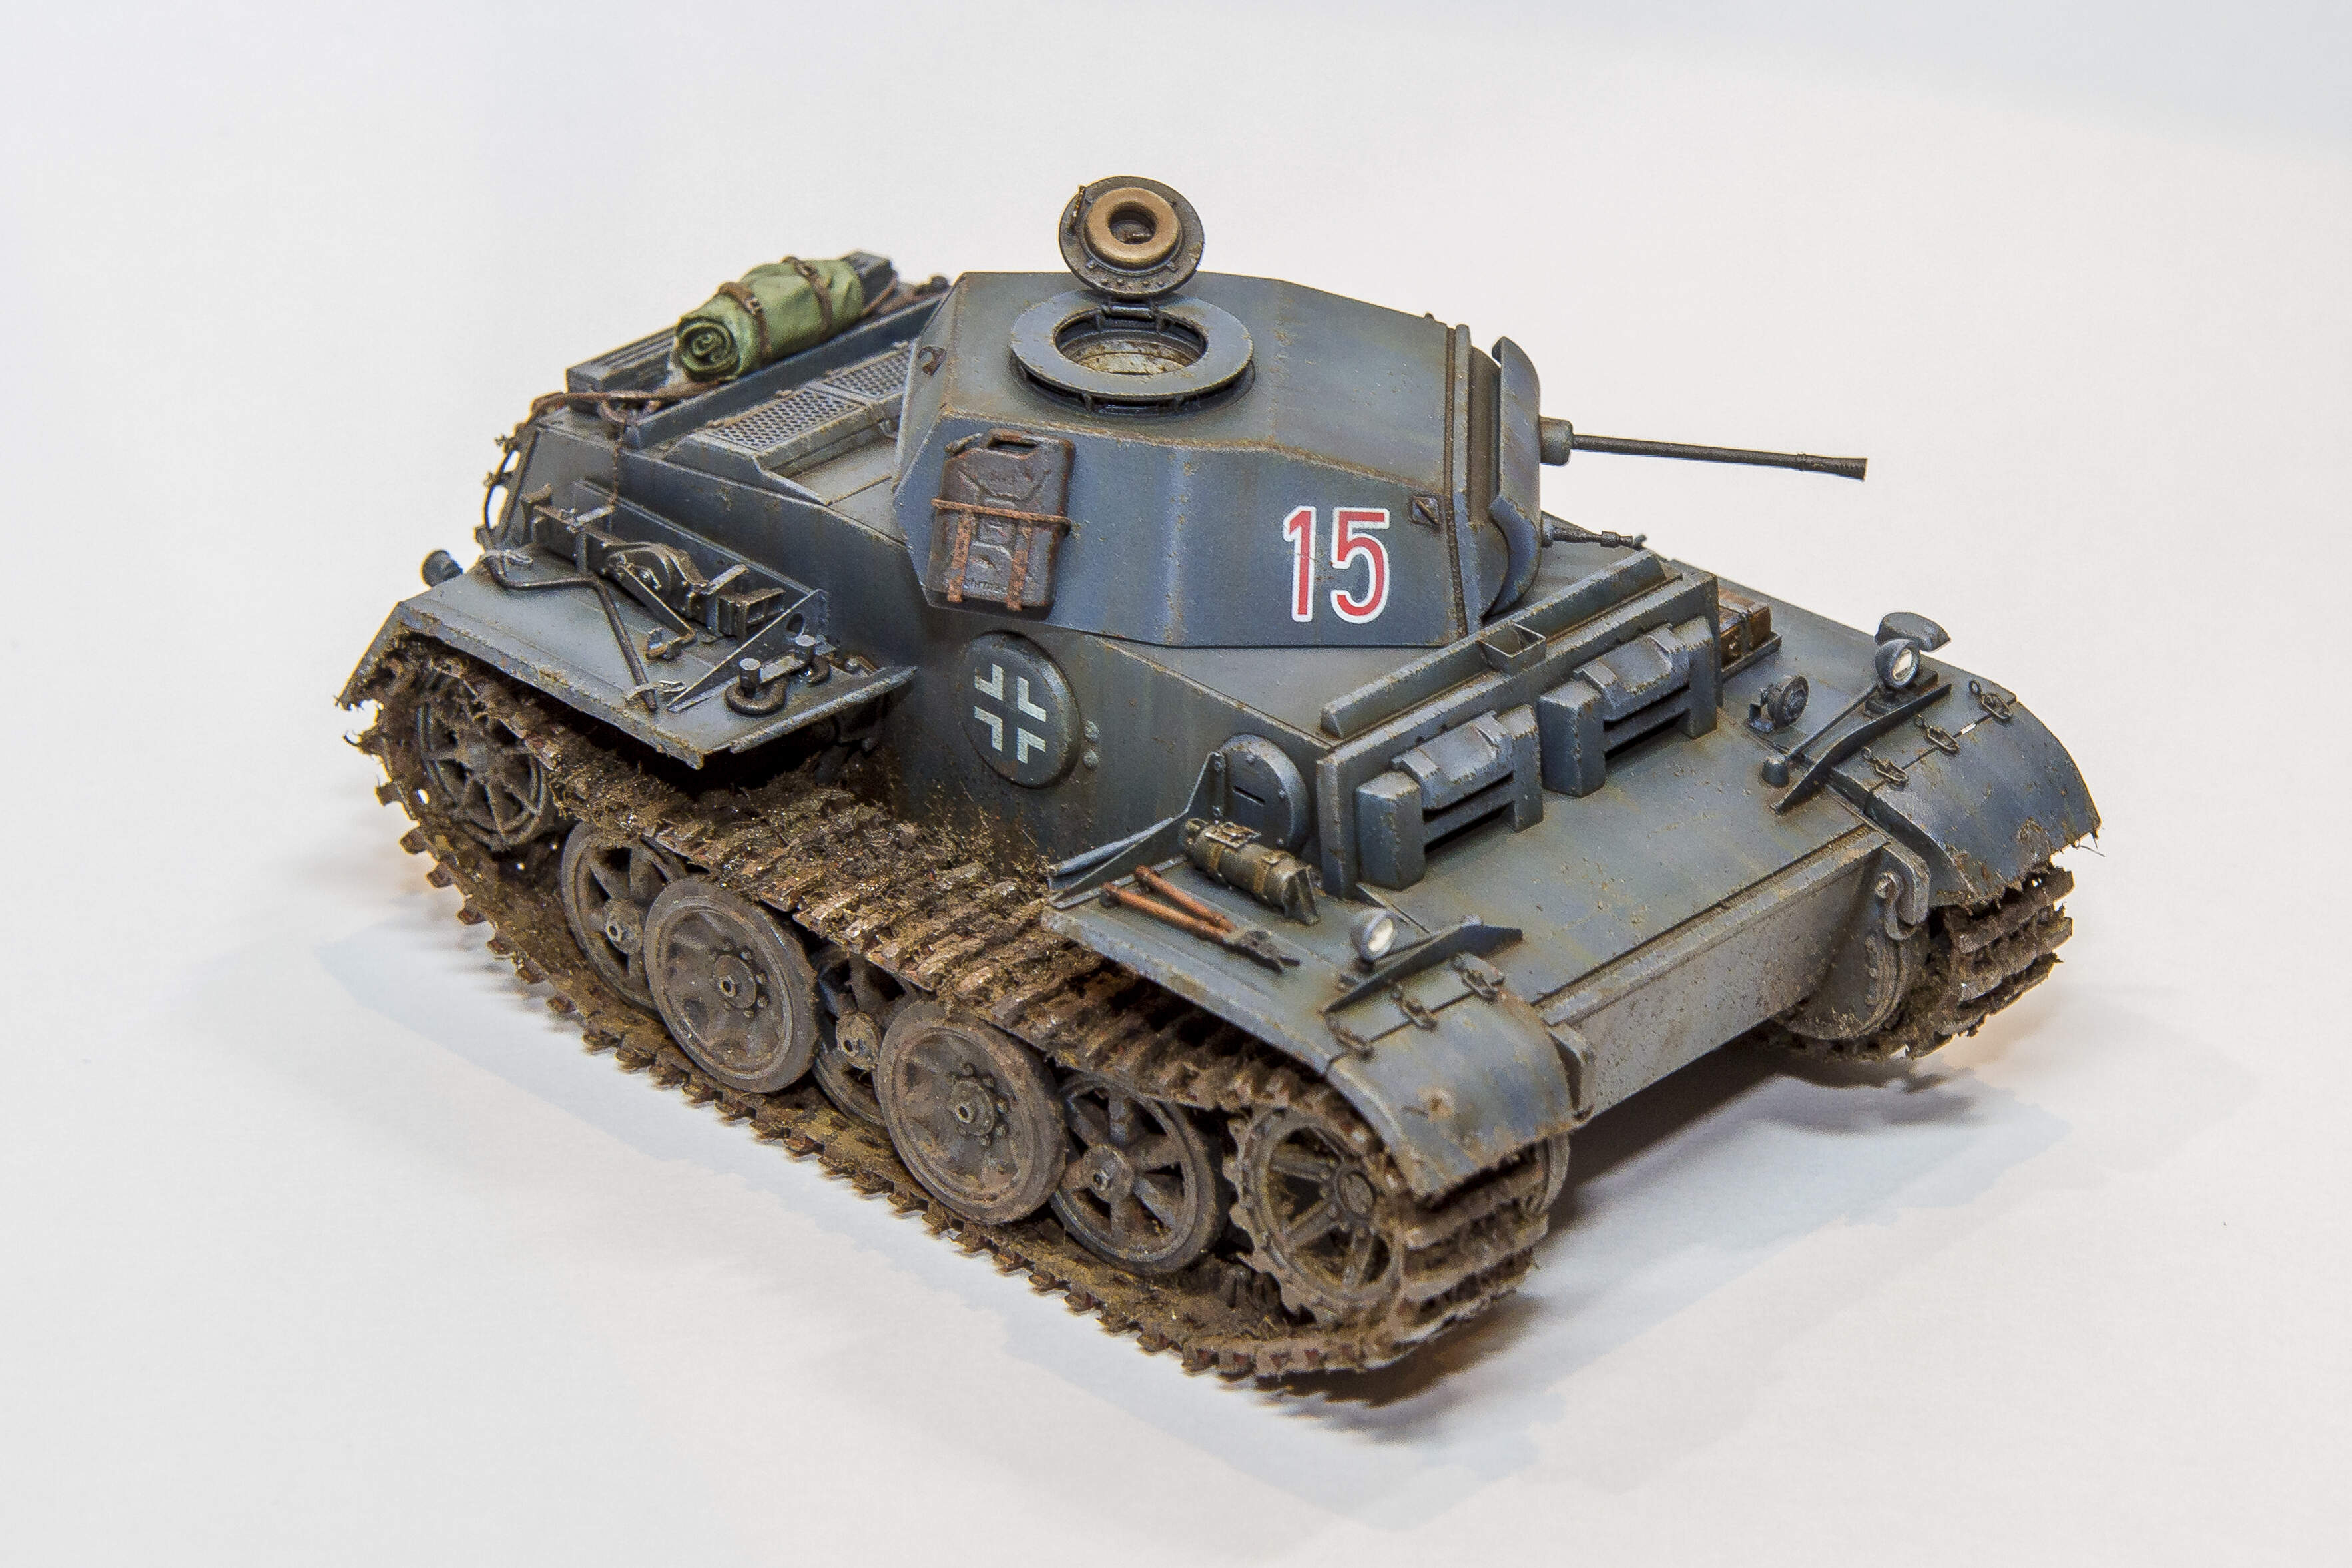
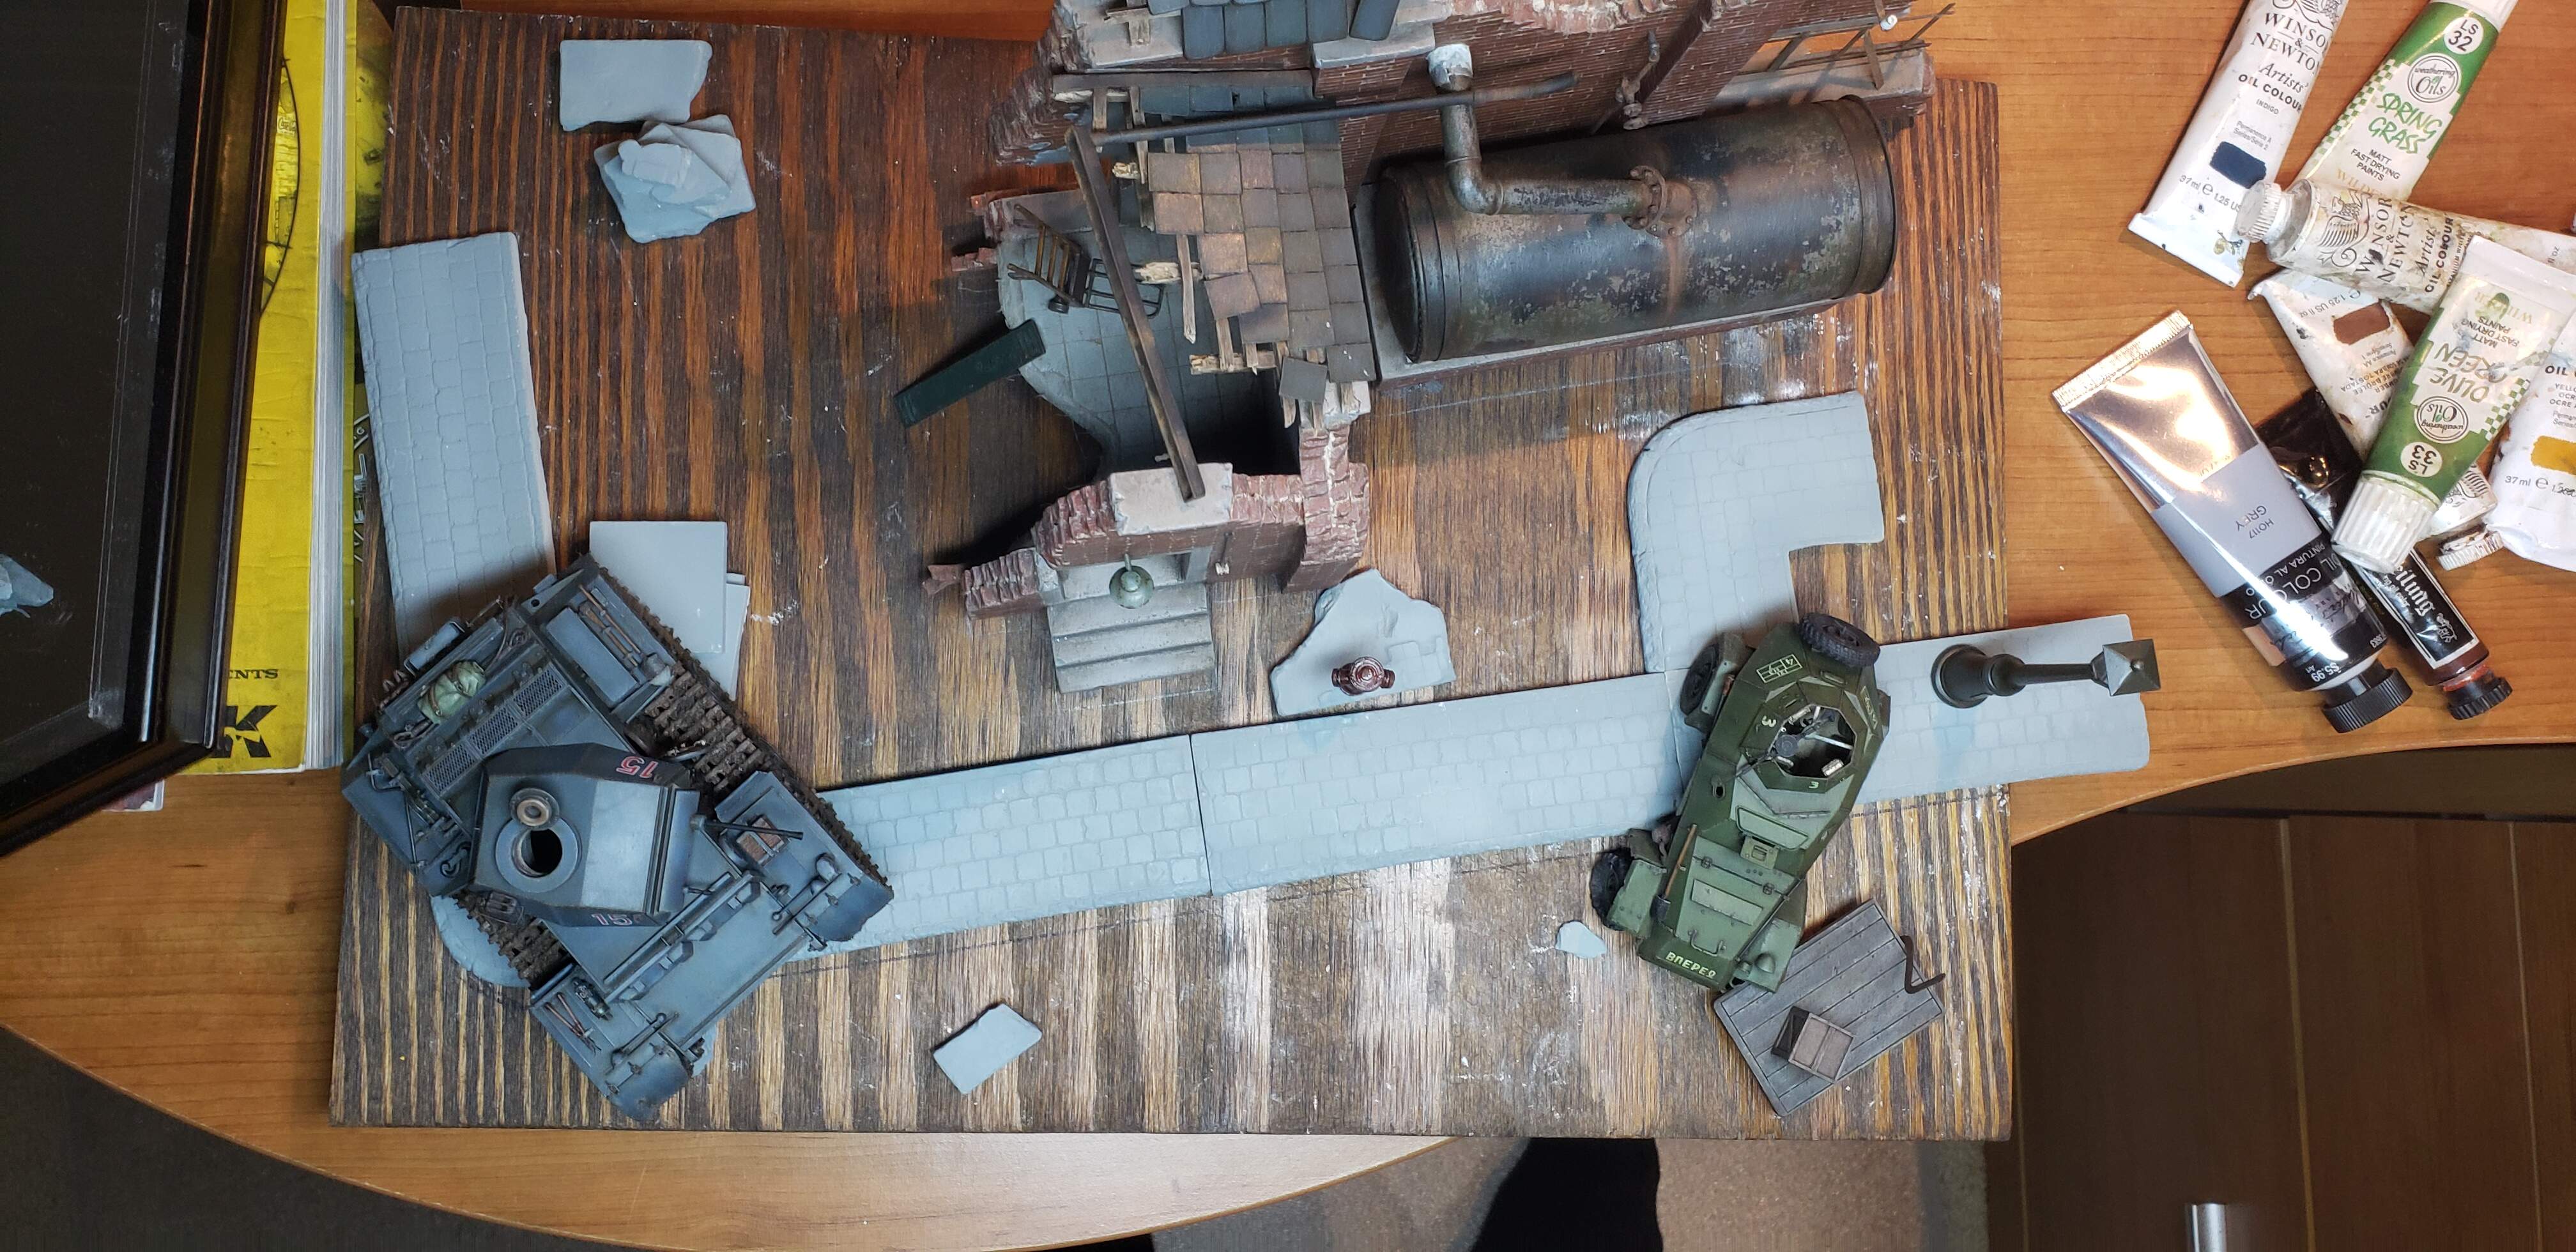
The build depicts a chance encounter between Russian and German recon units along the Eastern Front where this Panzer IIJ has crossed paths with a Russian recon unit while searching for loot in the ruins of a small Russian factory. To me this would be an interesting and unique encounter due to the presence of the rare Panzer IIJ in contrast to the much more numerous Soviet BA-64 Armored Car. Even though only 22 Panzer IIJ’s were produced, it always interested me since the vehicle had the thickest armor of any light tank at 80mm front and 50mm sides and rear. This was equal to the armor of the Tiger I and was actually nicknamed “Baby Tiger” by its crew and the Russians who encountered it on the battlefield.

Since I wanted to depict the Panzer IIJ in a conceivable front line scenario I did some research using the publication Panzer Tracts No.2-2, Panzerkampfwagen II Ausf.G,H,J,L and M. This publication indicated the Panzer IIJ served operationally with the 12th Panzer Division on the Eastern Front while others were allocated to various Polizei Panzer Kompanie units. I decided to focus this scene with the former. The 12th Panzer Division received about 12 Panzer IIJs over two separate batches, with the final including some original rebuilt units. Final operational status of about three to four were recorded from April to June 1943 which were scattered throughout the unit before being transferred to a “Polizei Panzer Kompanie”. It is those final months (spring to early summer 1943) with the 12th Panzer Division where this Panzer IIJ encountered its weaker counterpart and got the easy upper hand with a few 20mm rounds into the BA64B.

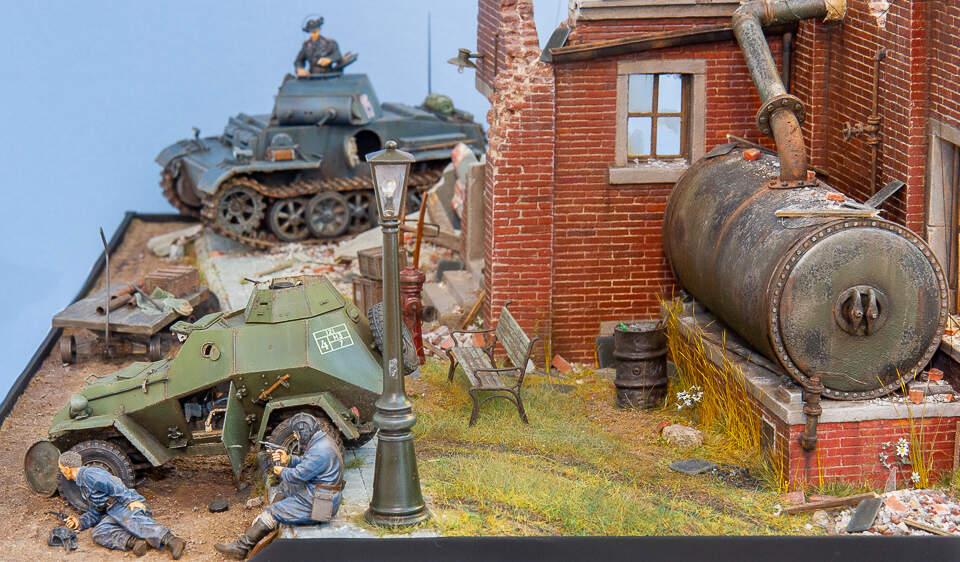
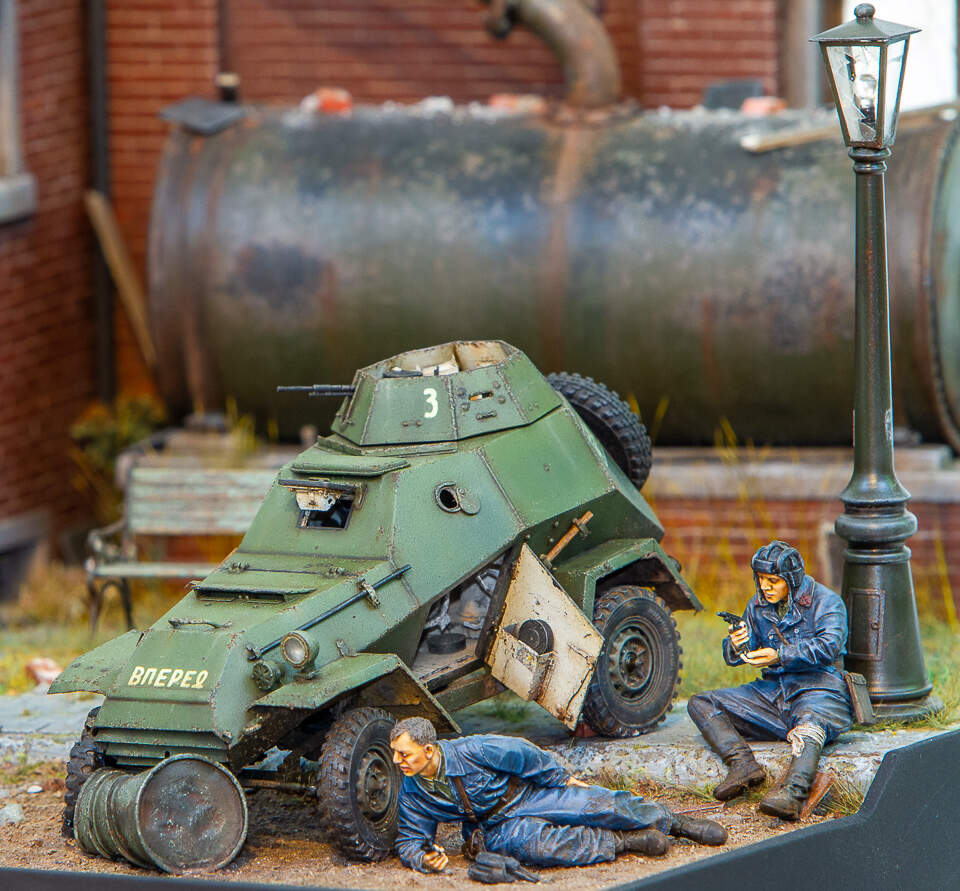
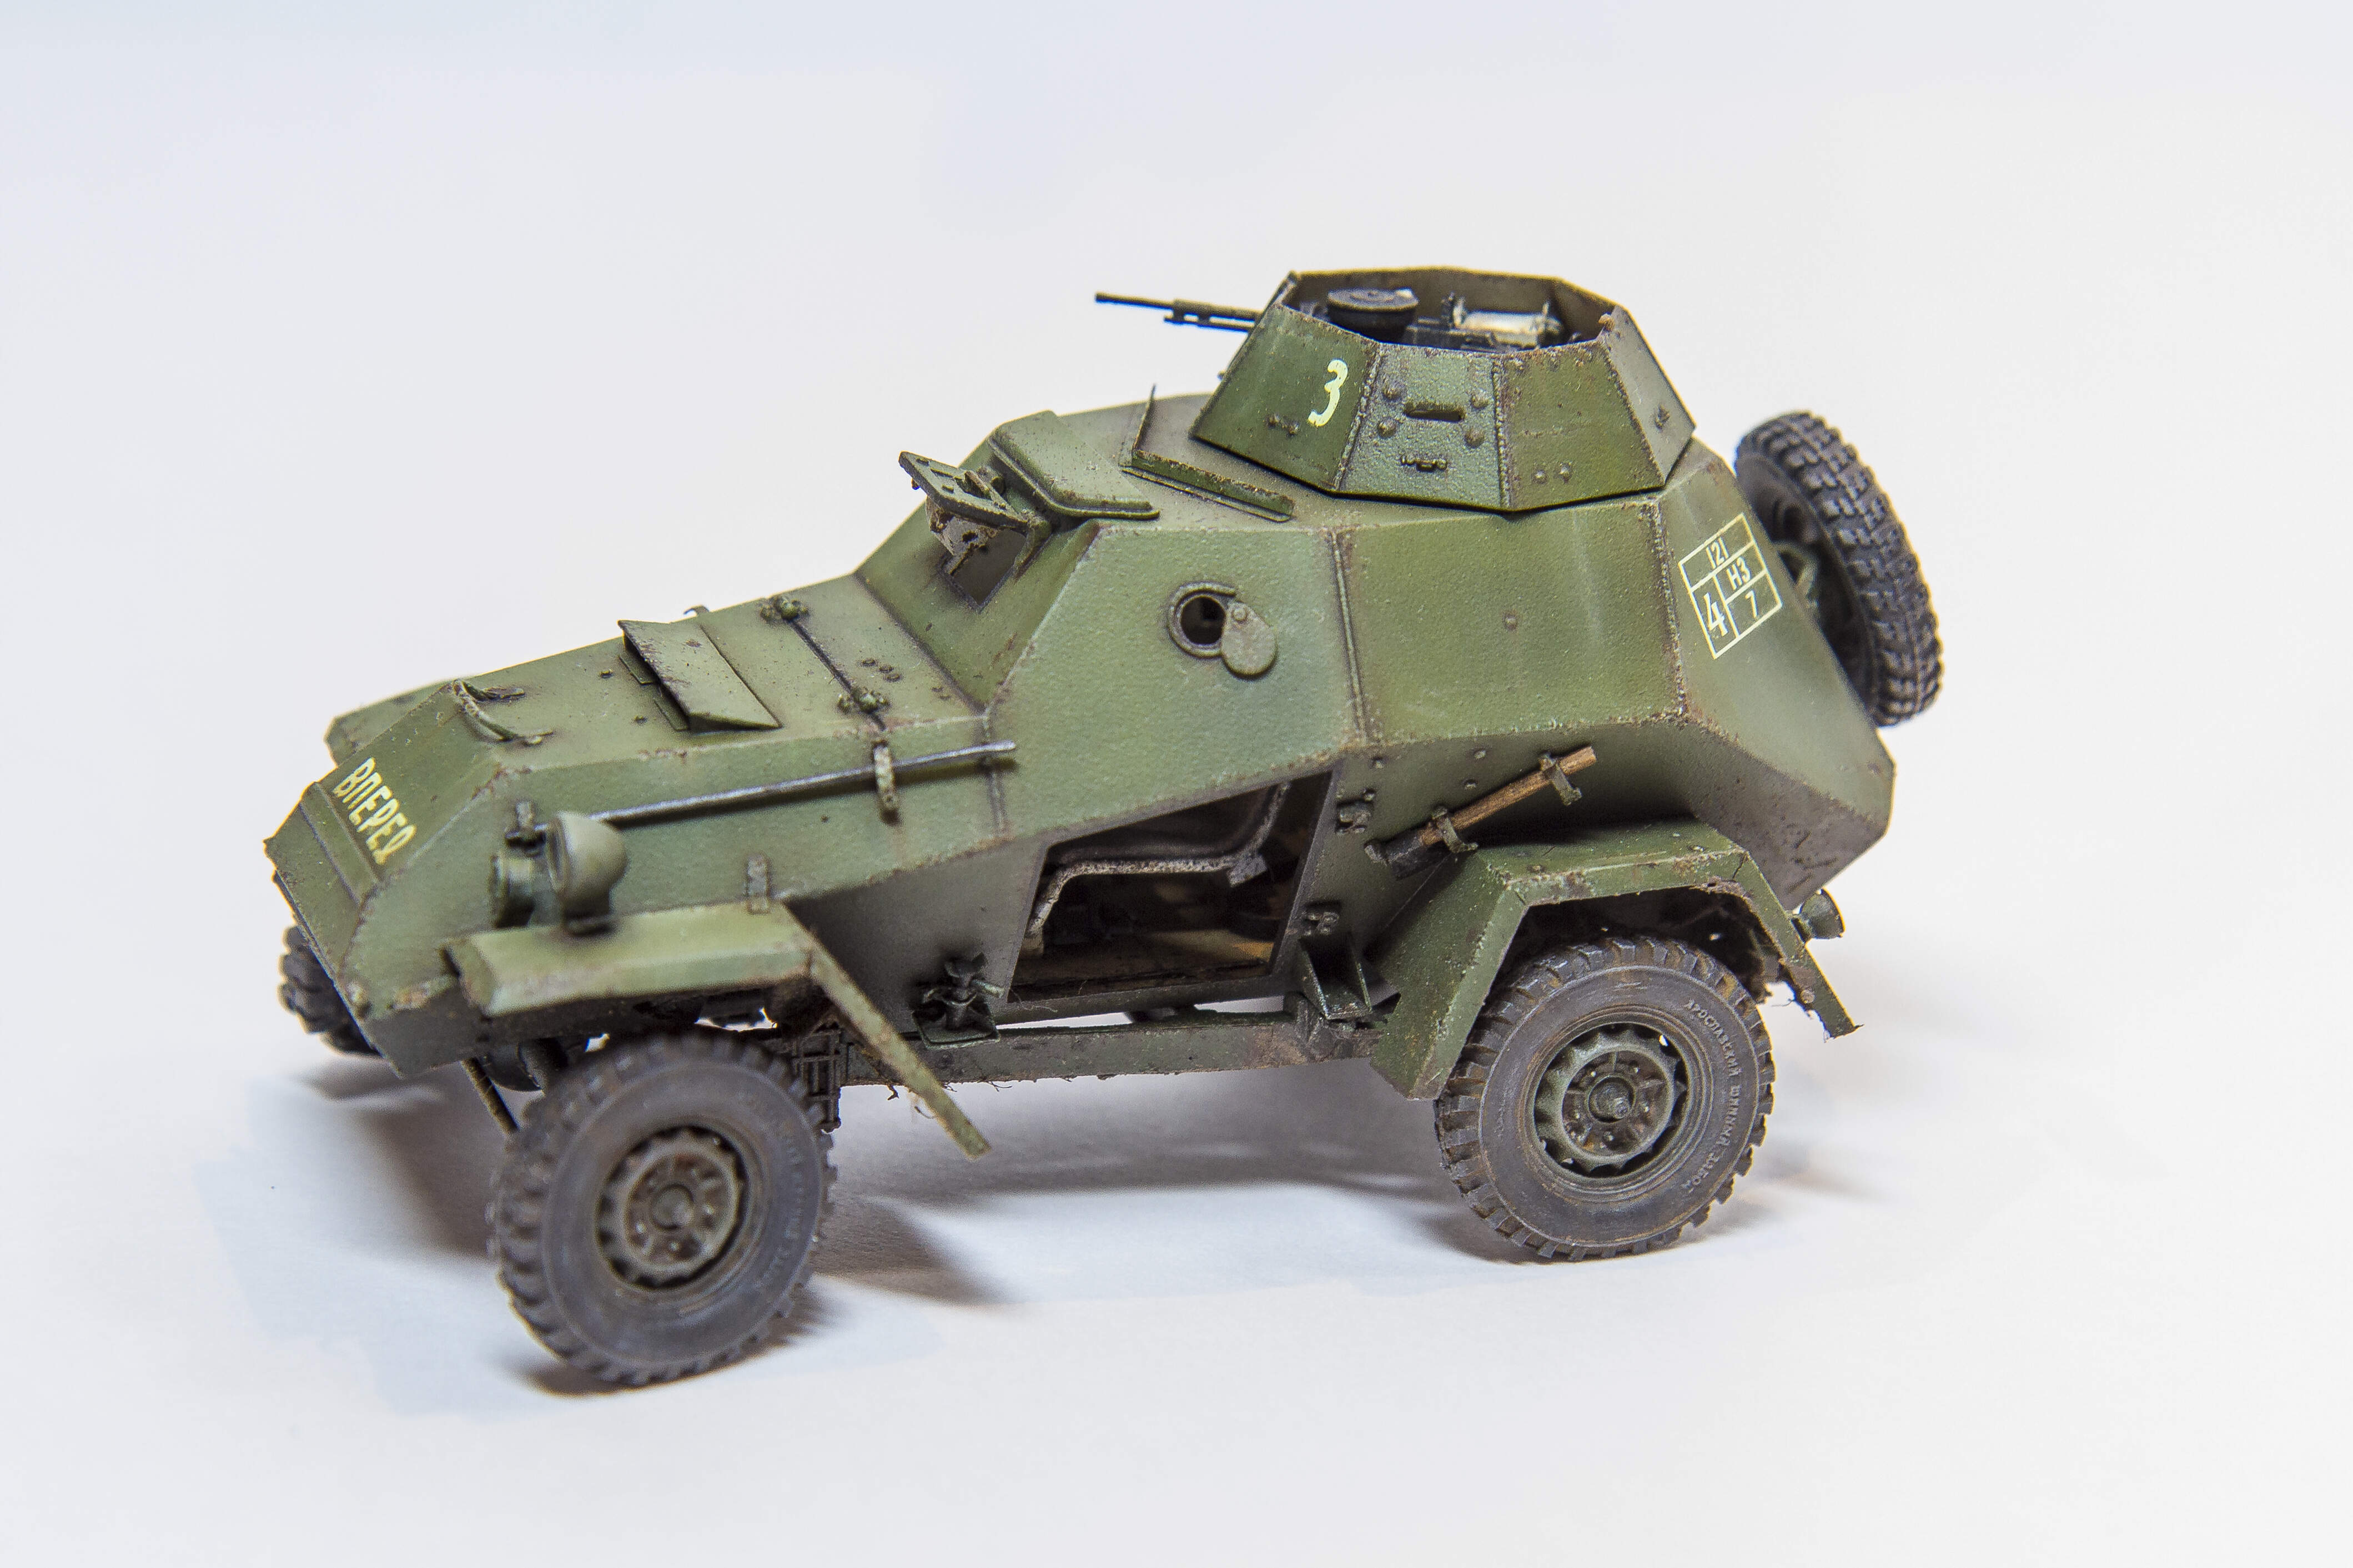
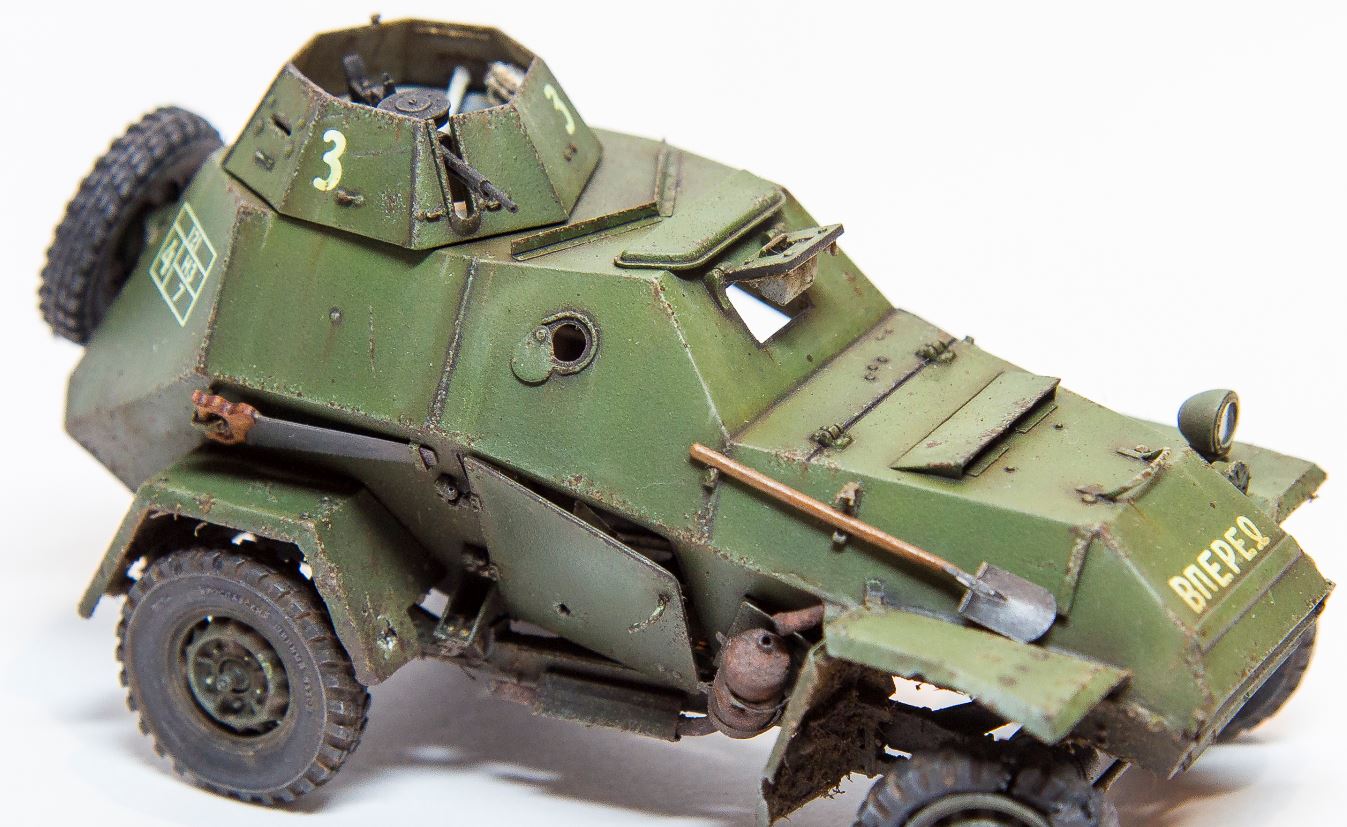
I attempted to depict a scenario where the Panzer IIJ fired only a few key rounds into the right side of the BA64B front fender/tire, door, and rear fender area. I used the kit tires for the damaged tire since they came partially hollowed out. However, it still required extensive modification using a Dremel tool, Milliput and studying photos of actual damaged tires. Research indicated that the BA64 used both bullet-proof tires (with foam rubber) and conventional pneumatic tires. This was my first attempt at modeling damaged tires and results were okay but want to try other methods next time. For the severely warped front fender I used a PE part with top front pulled back from body and top bent down over wheel. Bottom of fender received impact near center that also impacted muffler. Muffler damage was depicted by hollowing out plastic part with a Dremel and modeling the upper PE strap broken to show the muffler hanging and broke free from the upper exhaust pipe. For the door and rear fender, I used the plastic kit parts thinned as necessary to show accurate thickness from impacts.

Models
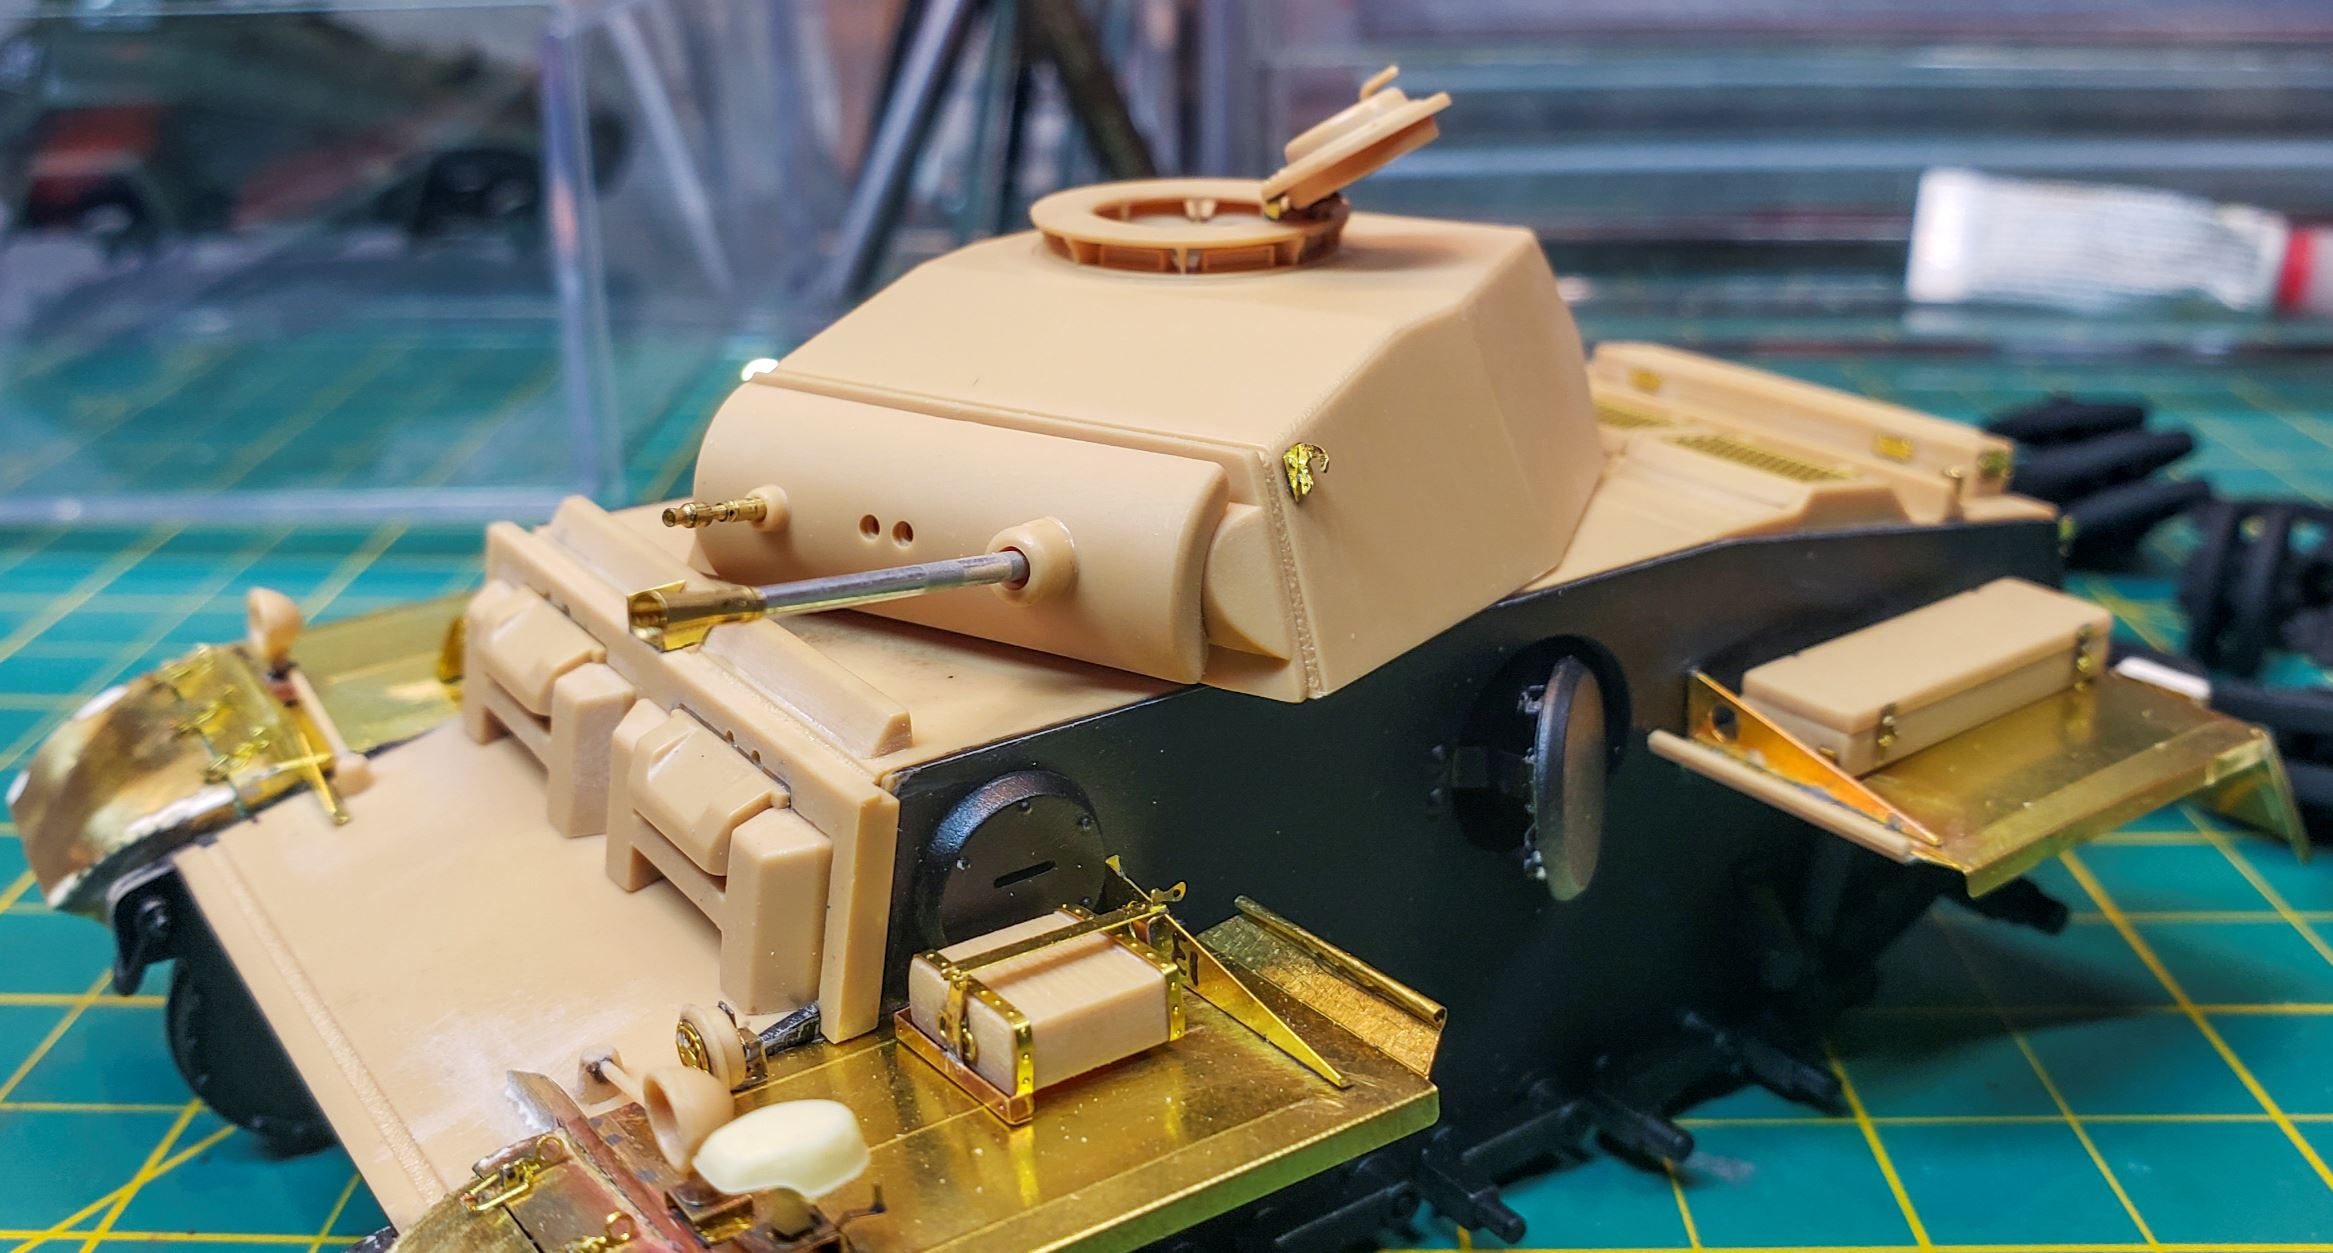
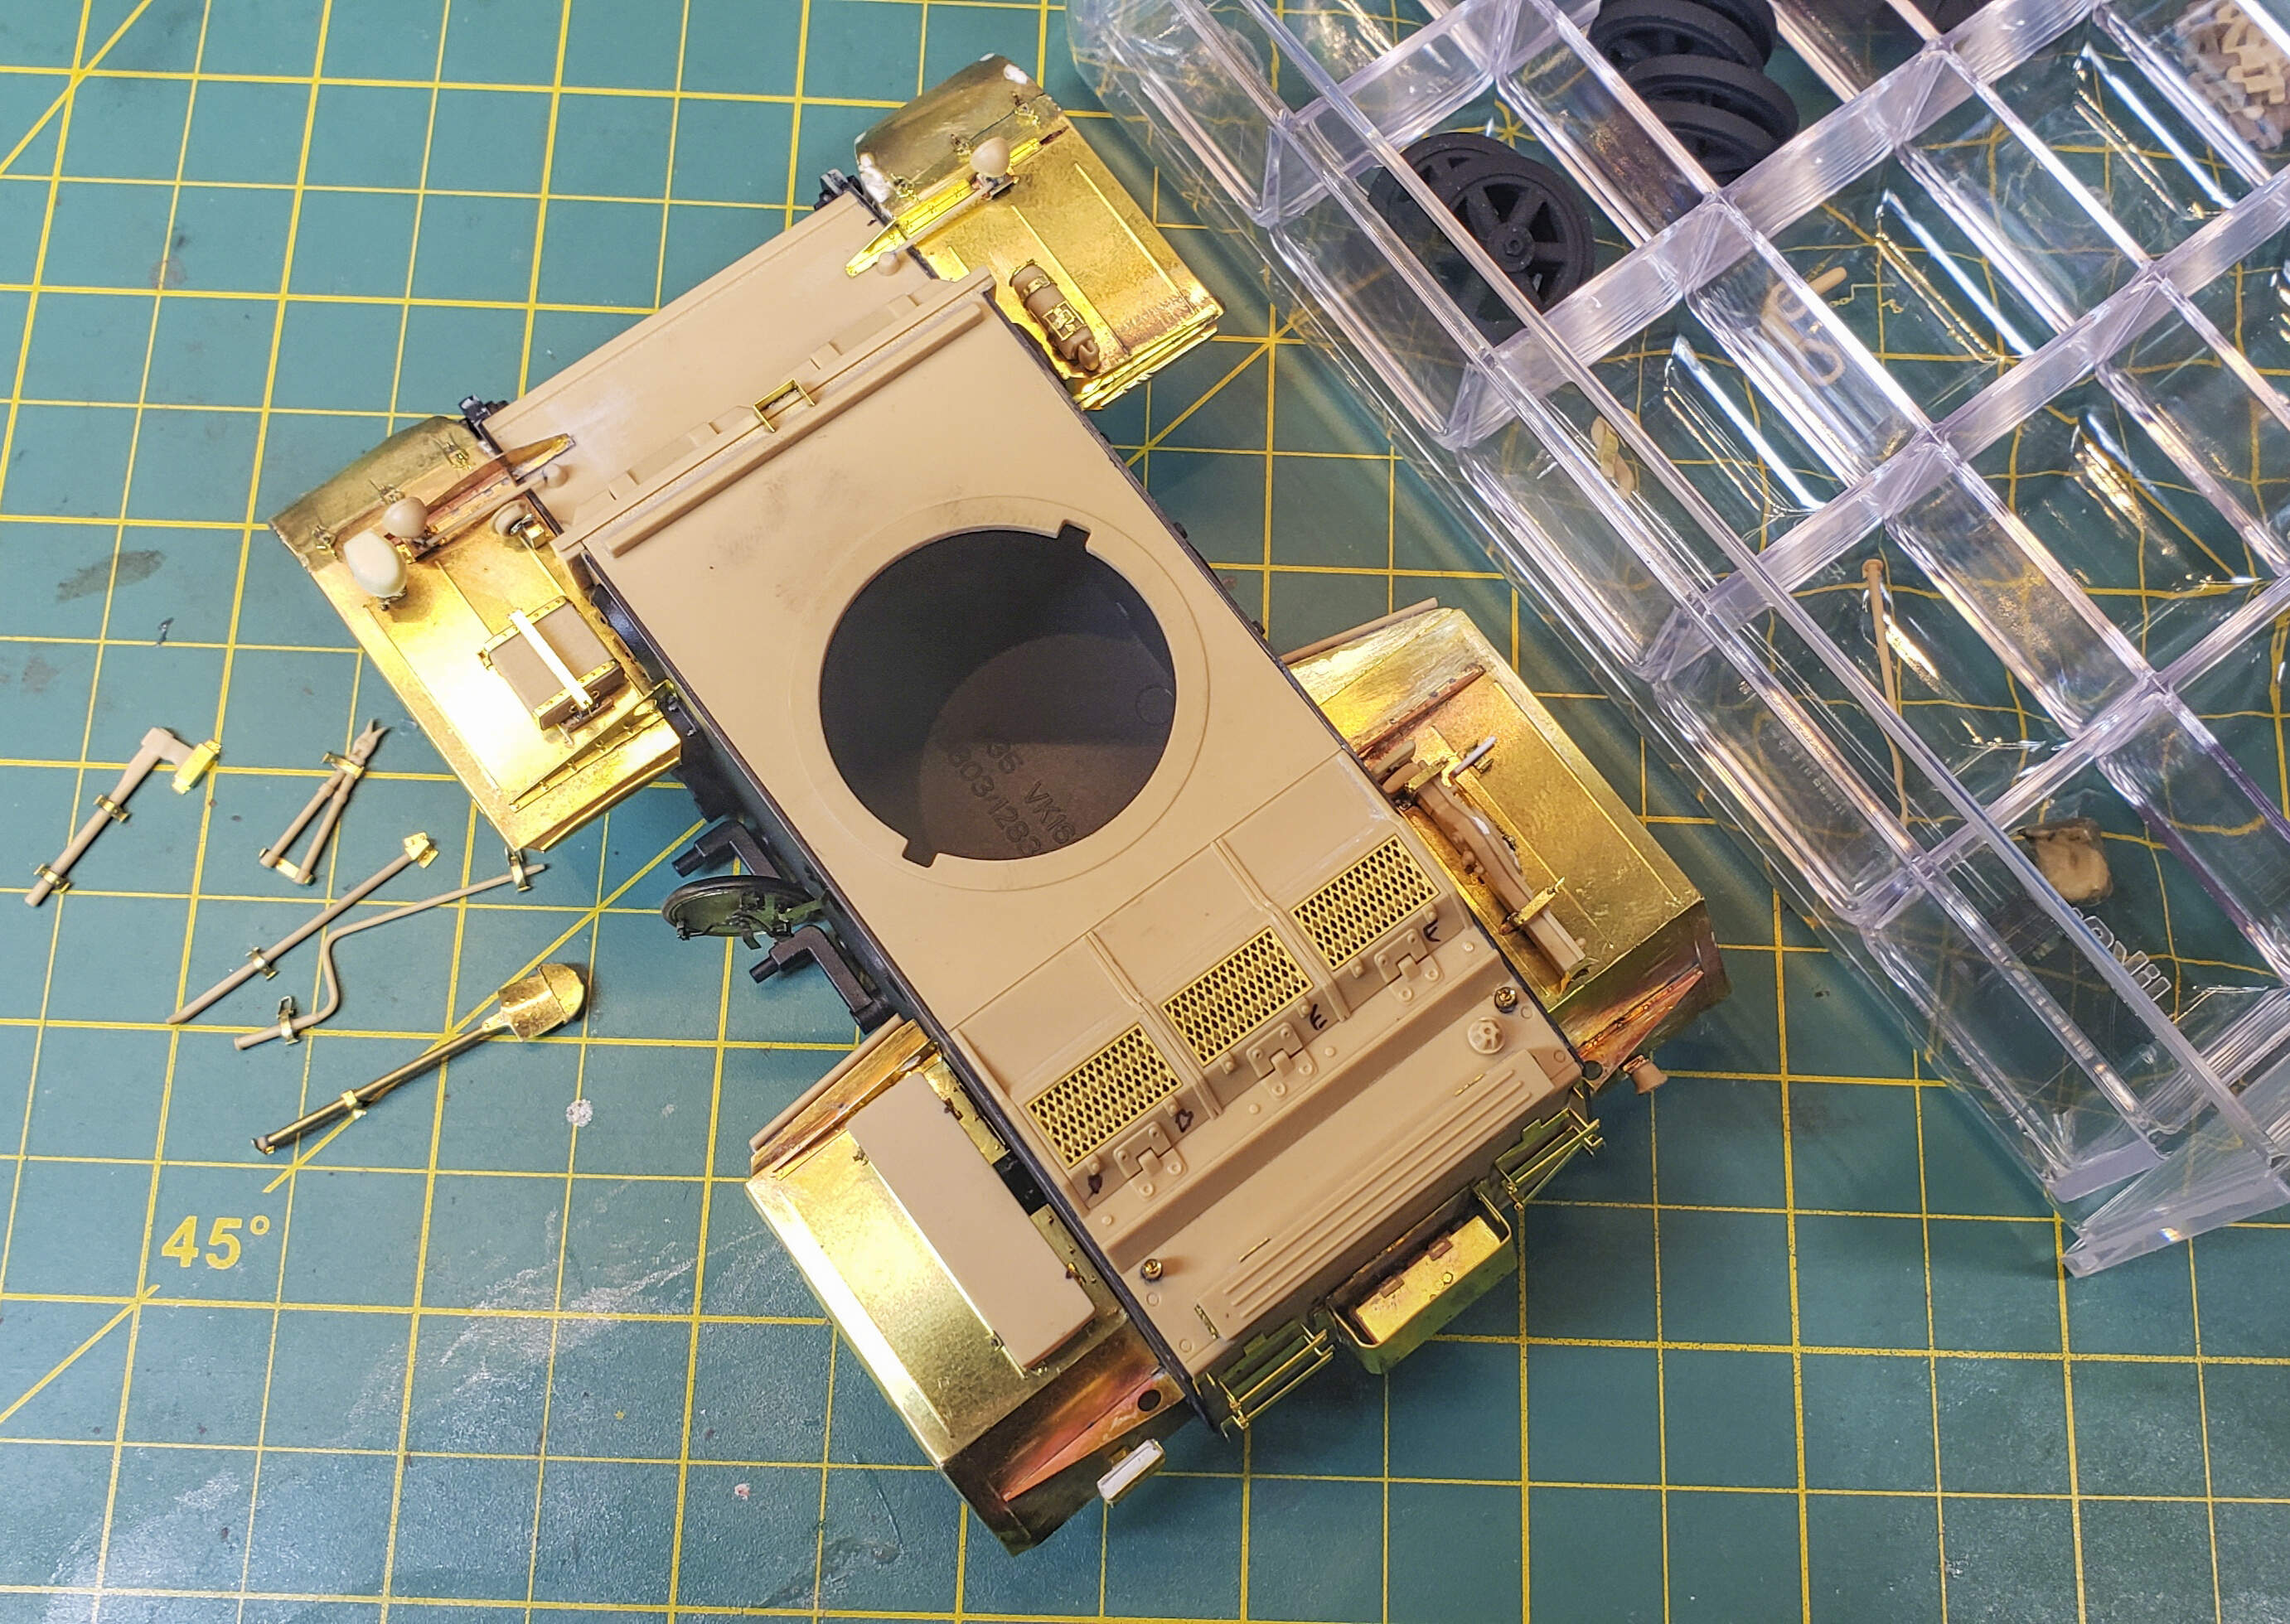
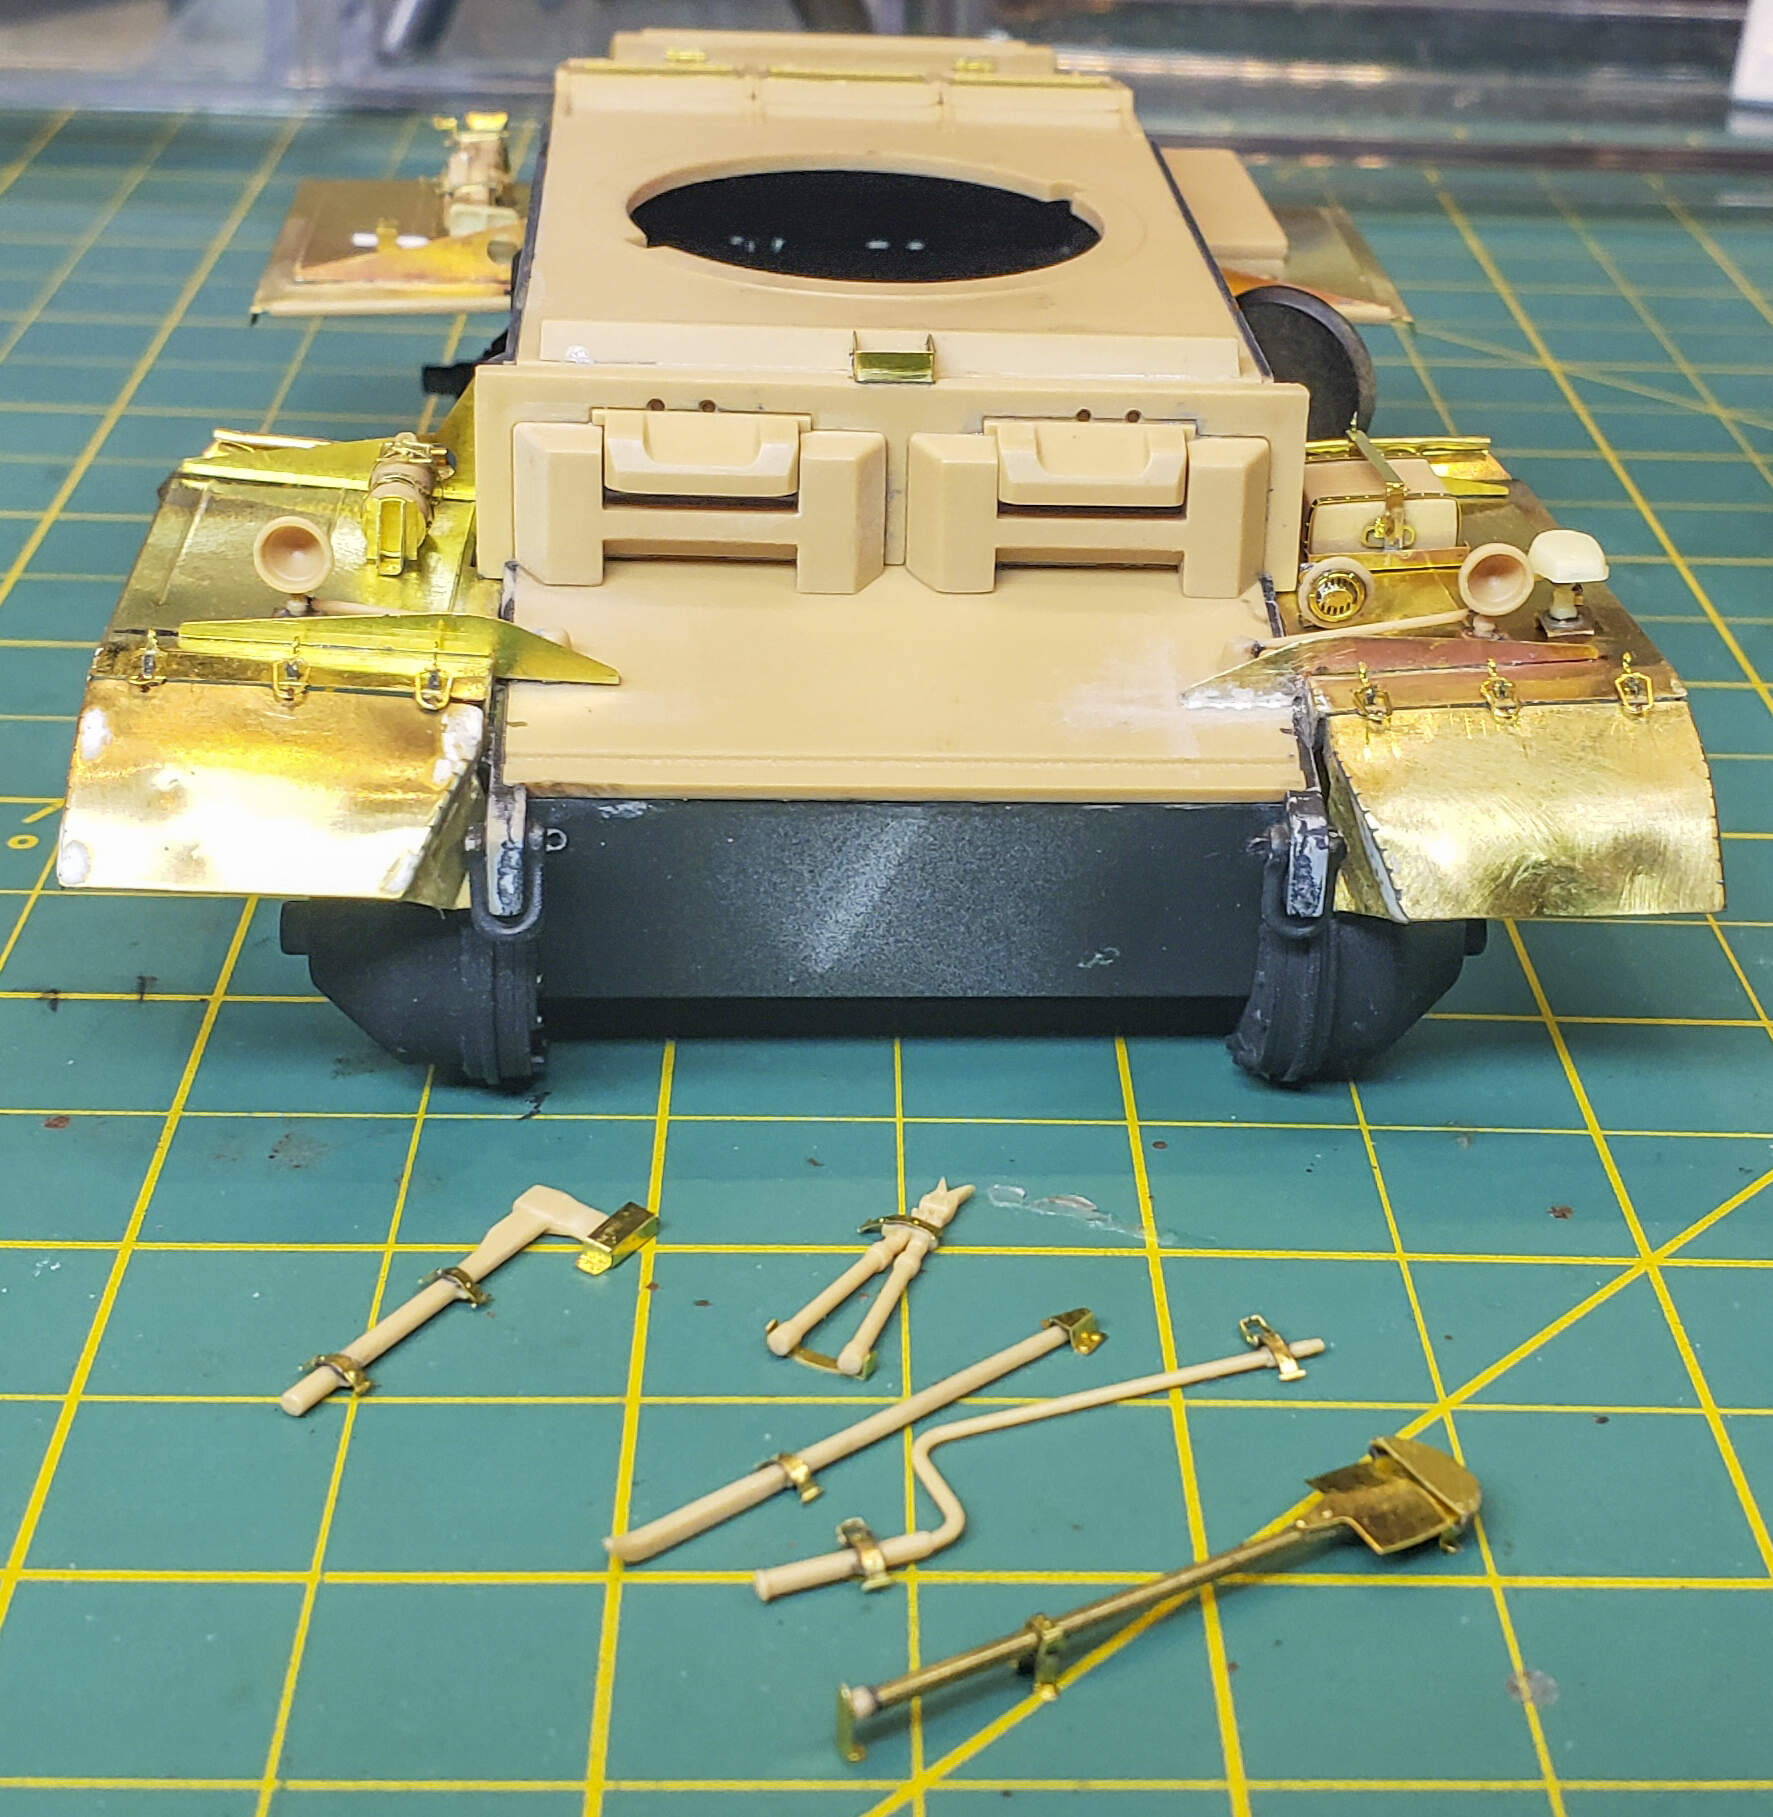
German Panzer IIJ: Hobby Boss 83803 1/35 German Pzkpfw.II Ausf.J with the following accessories:
• Detail PE set with metal gun barrel: Voyager Model-PE35592

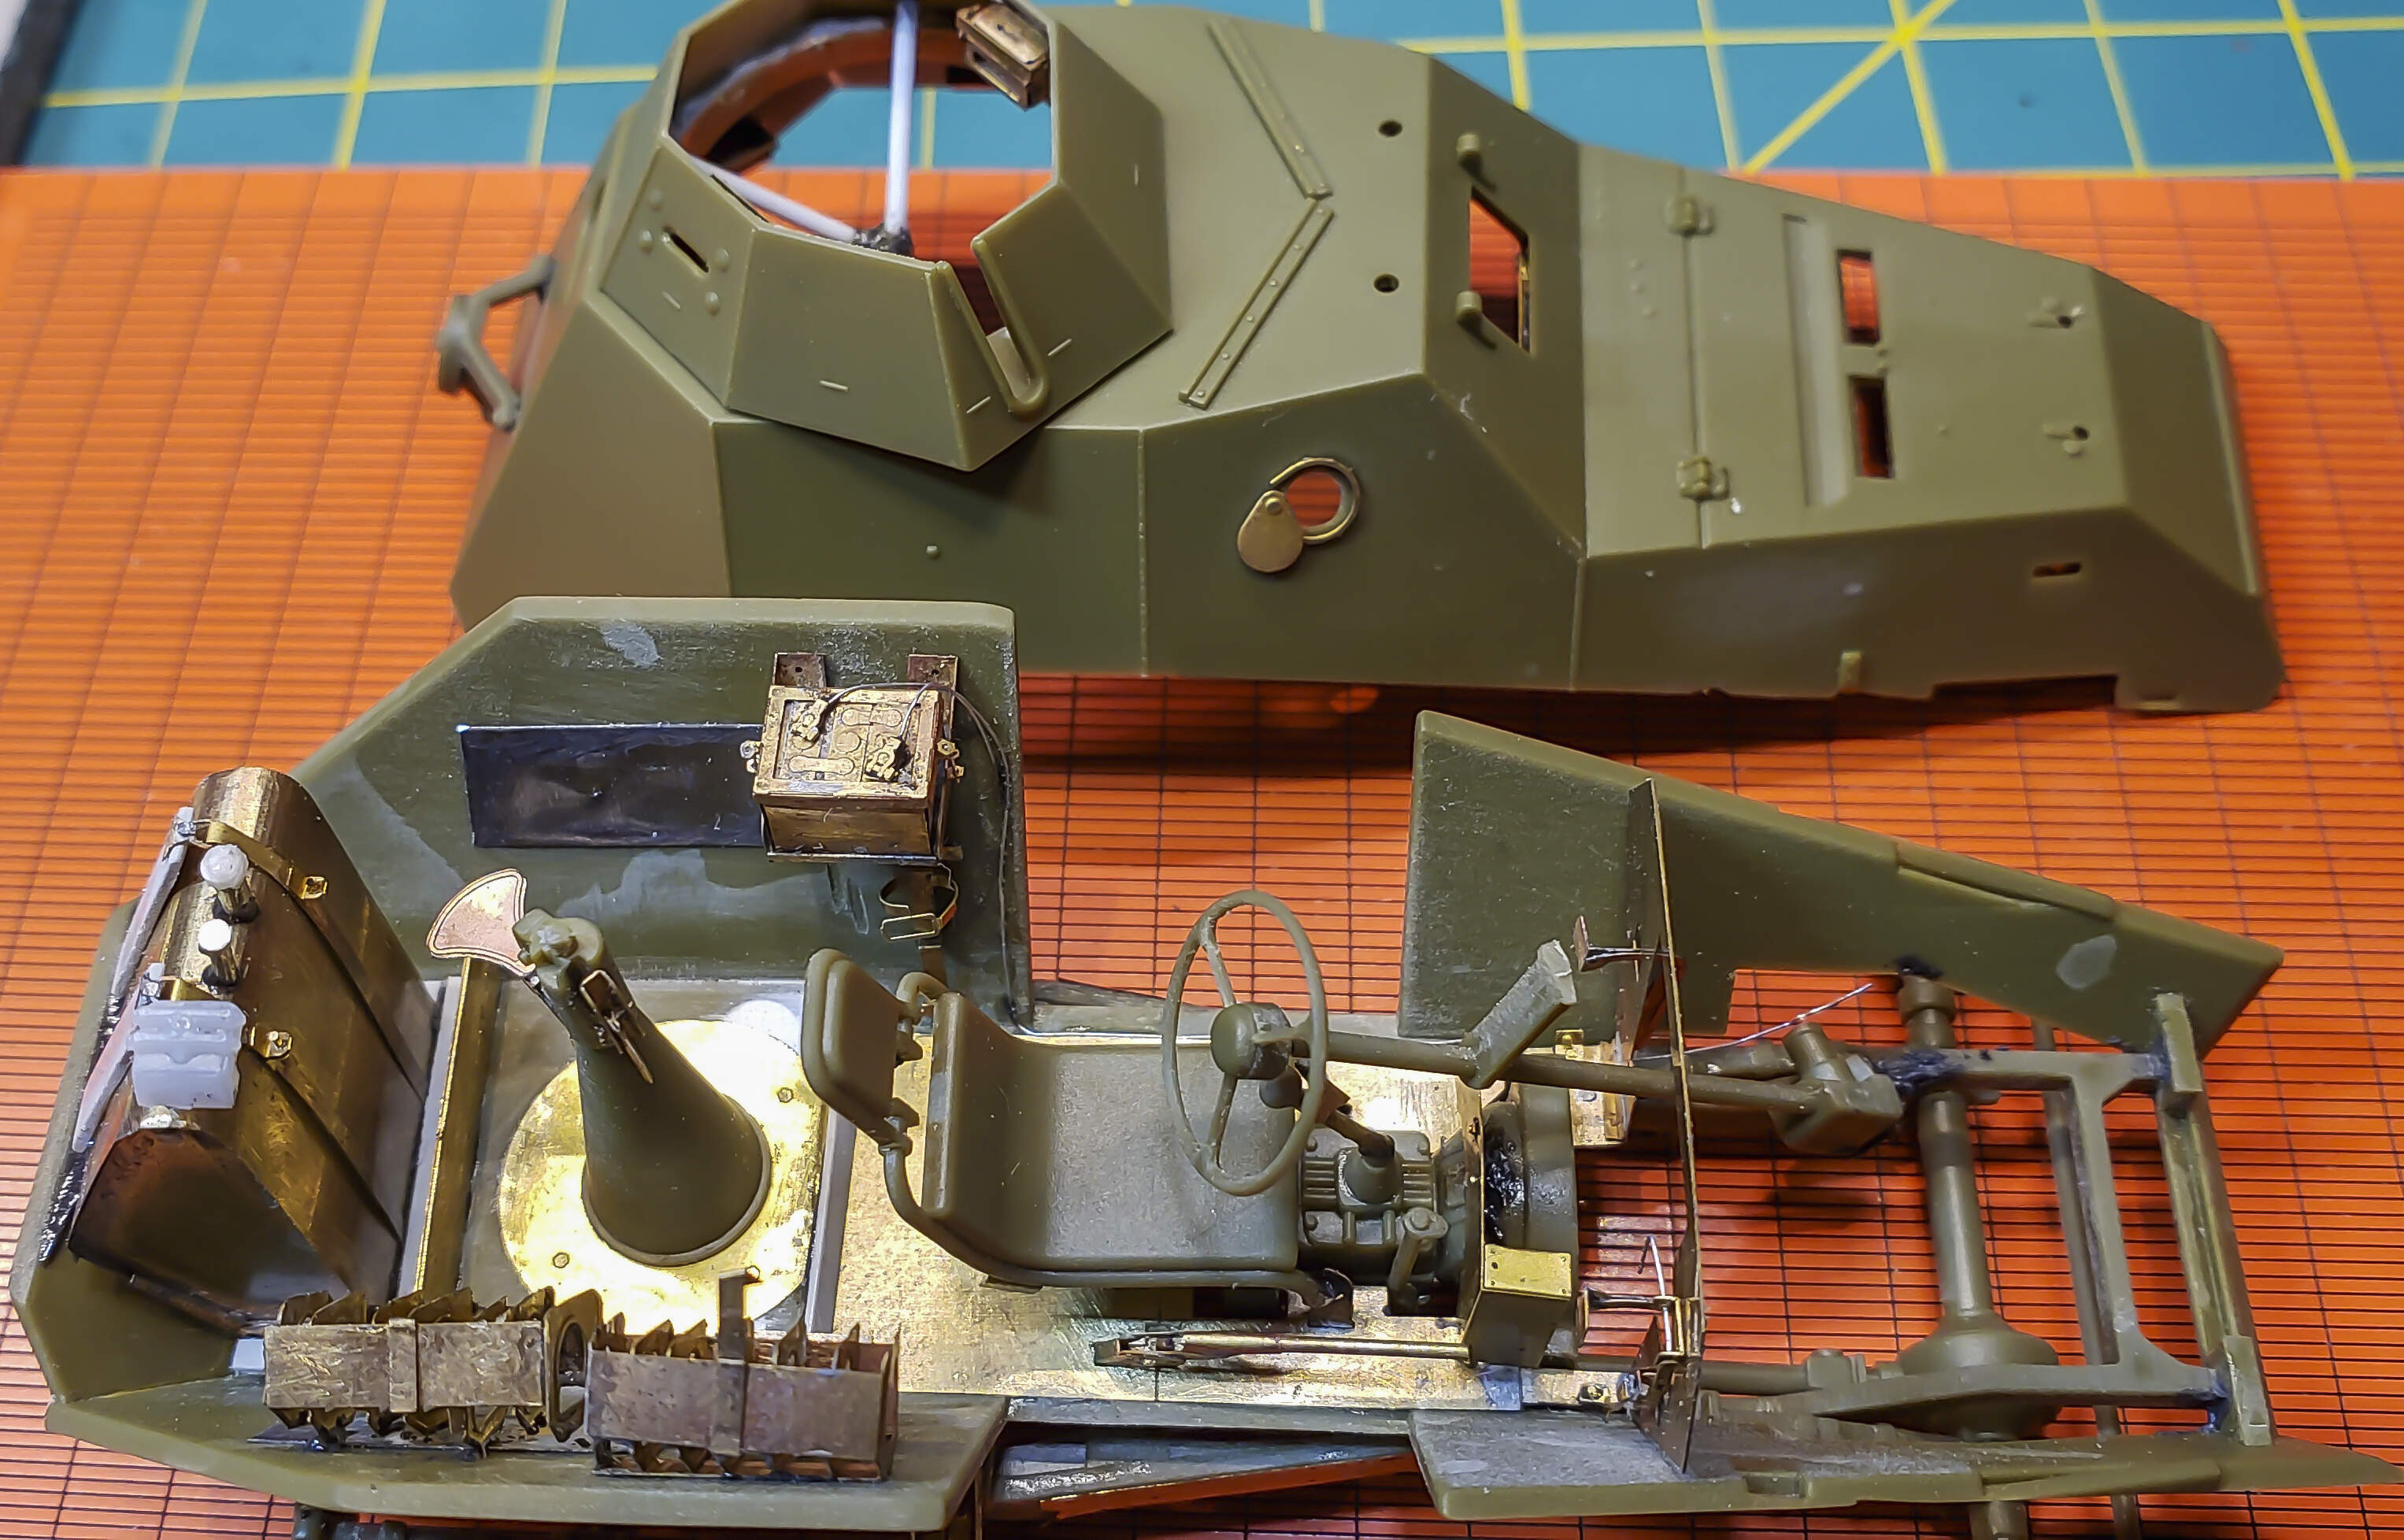
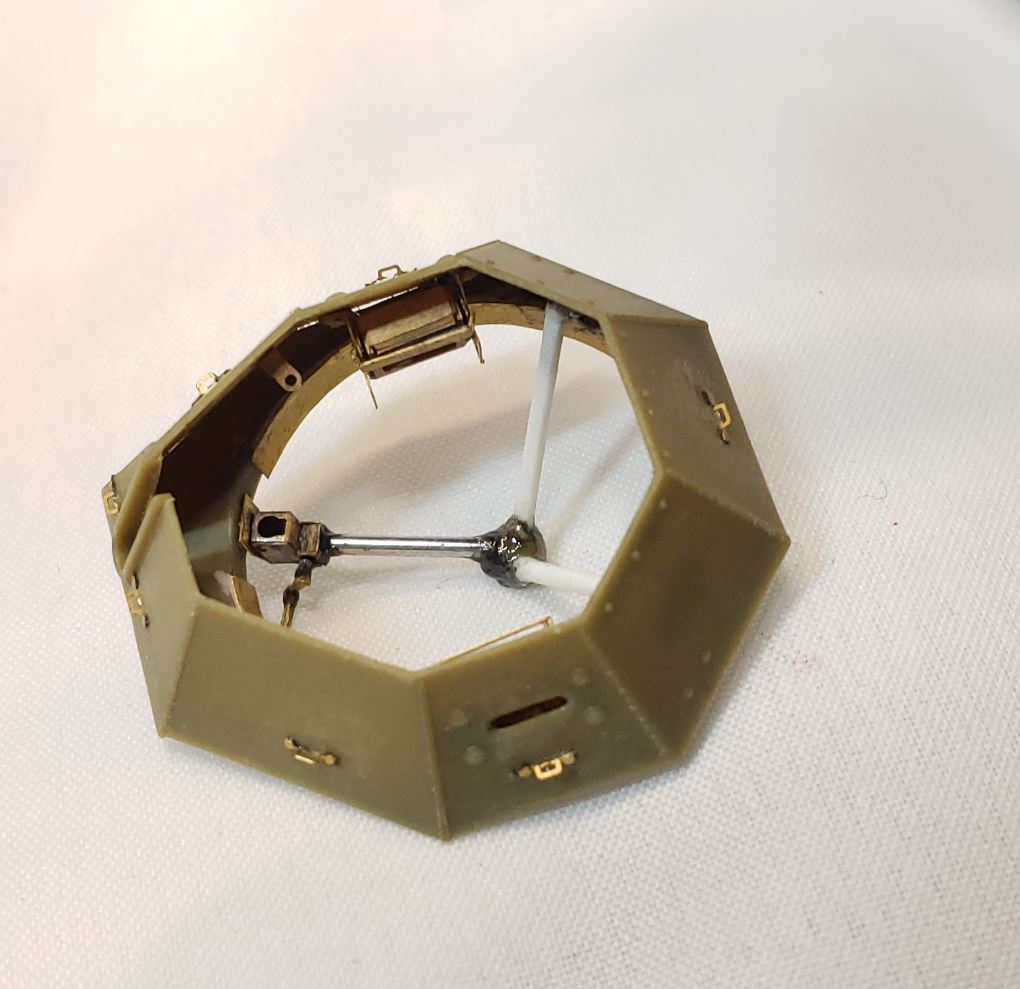
Russian BA-64B Armored Car: Vision Models | No. VM35002
• Complete Detail PE set for Vison/Mini Art Kit (Interior and Exterior): Minor SKU: M-VMD35013
• DT 7.62mm Machine Gun: Miniart Kit #35255, Soviet Machineguns and Equipment
• Metal Round Clips for Soviet 7.62mm Tank Machine Gun DT: Aber Kit AB 35P-2, Round Clips for
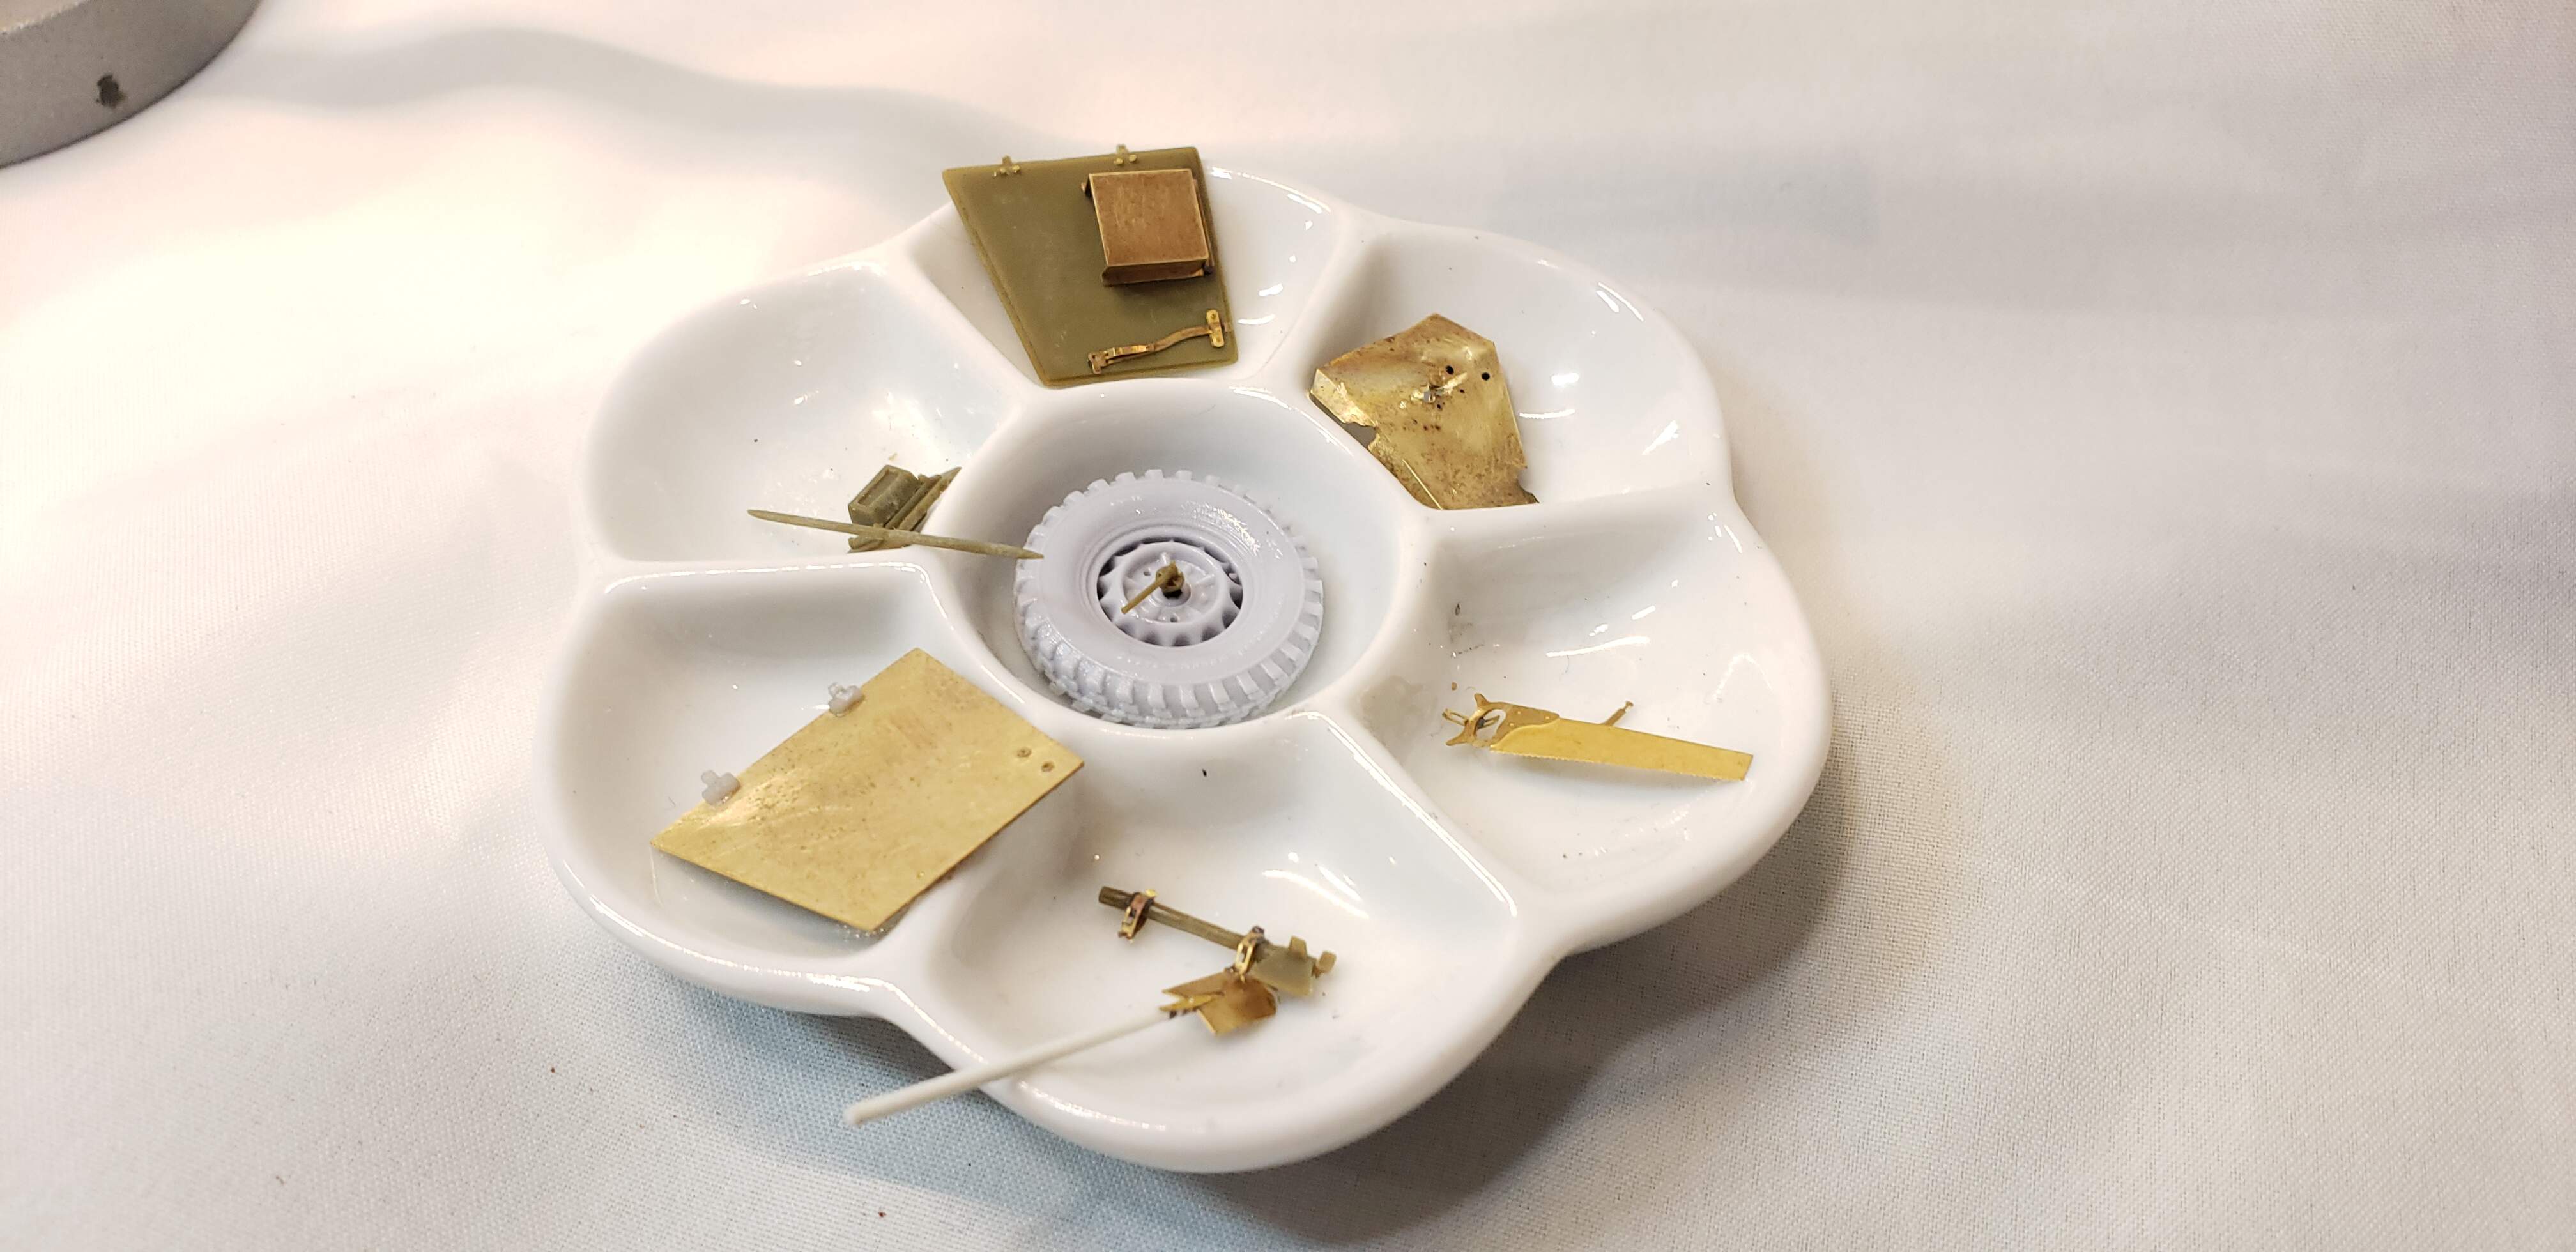
• Sagged Wheel Set: Def.Model # DW30014 (used for the three non-damaged wheels and spare)

Figures
Injured Russians: Evolution EM-35171 Soviet Wounded Tank Crews 1939-1943
German Tank Commander: Heavily modified Andrea Miniatures - Panzer Lieutenant, 1943
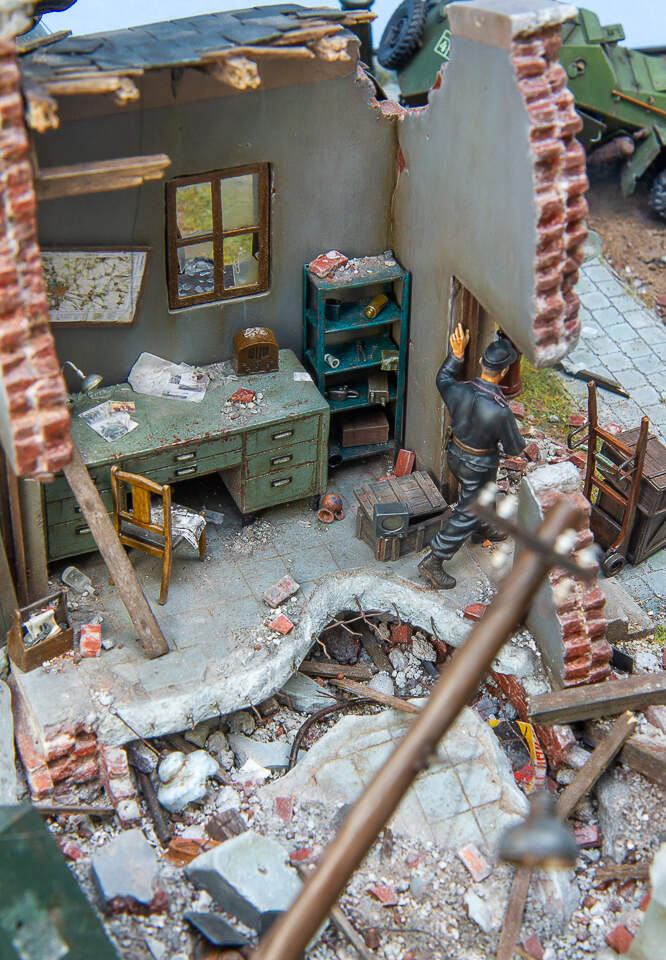
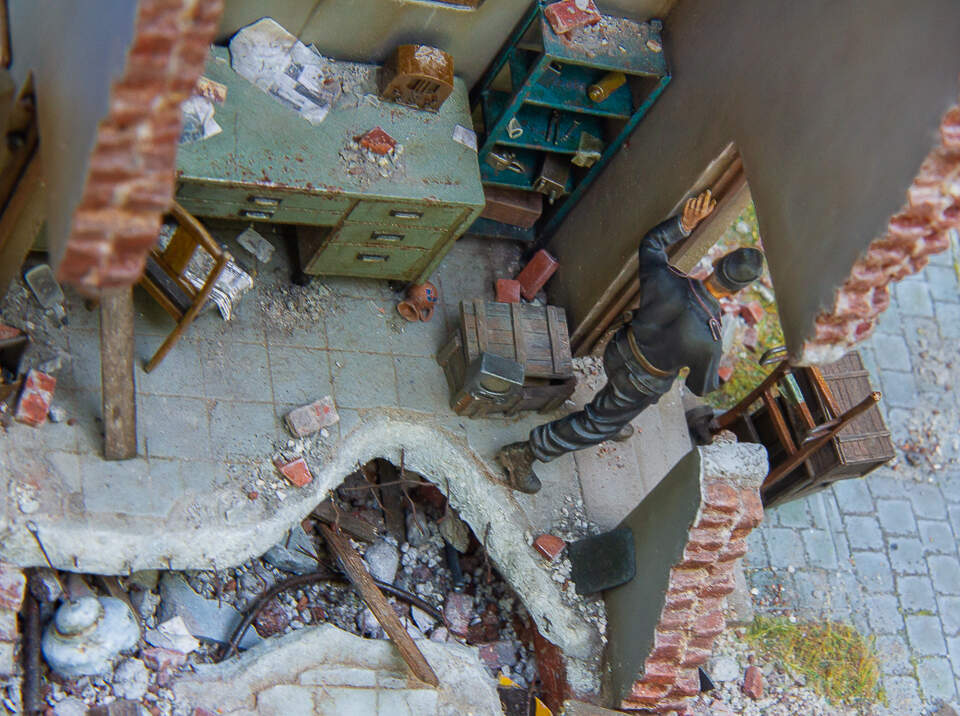
German Tank Crewman in Building: Heavily modified Dragon Figure from Survivors, Panzer Crew (Kursk 1943) Dragon | No. 6129

Buildings and Accessories
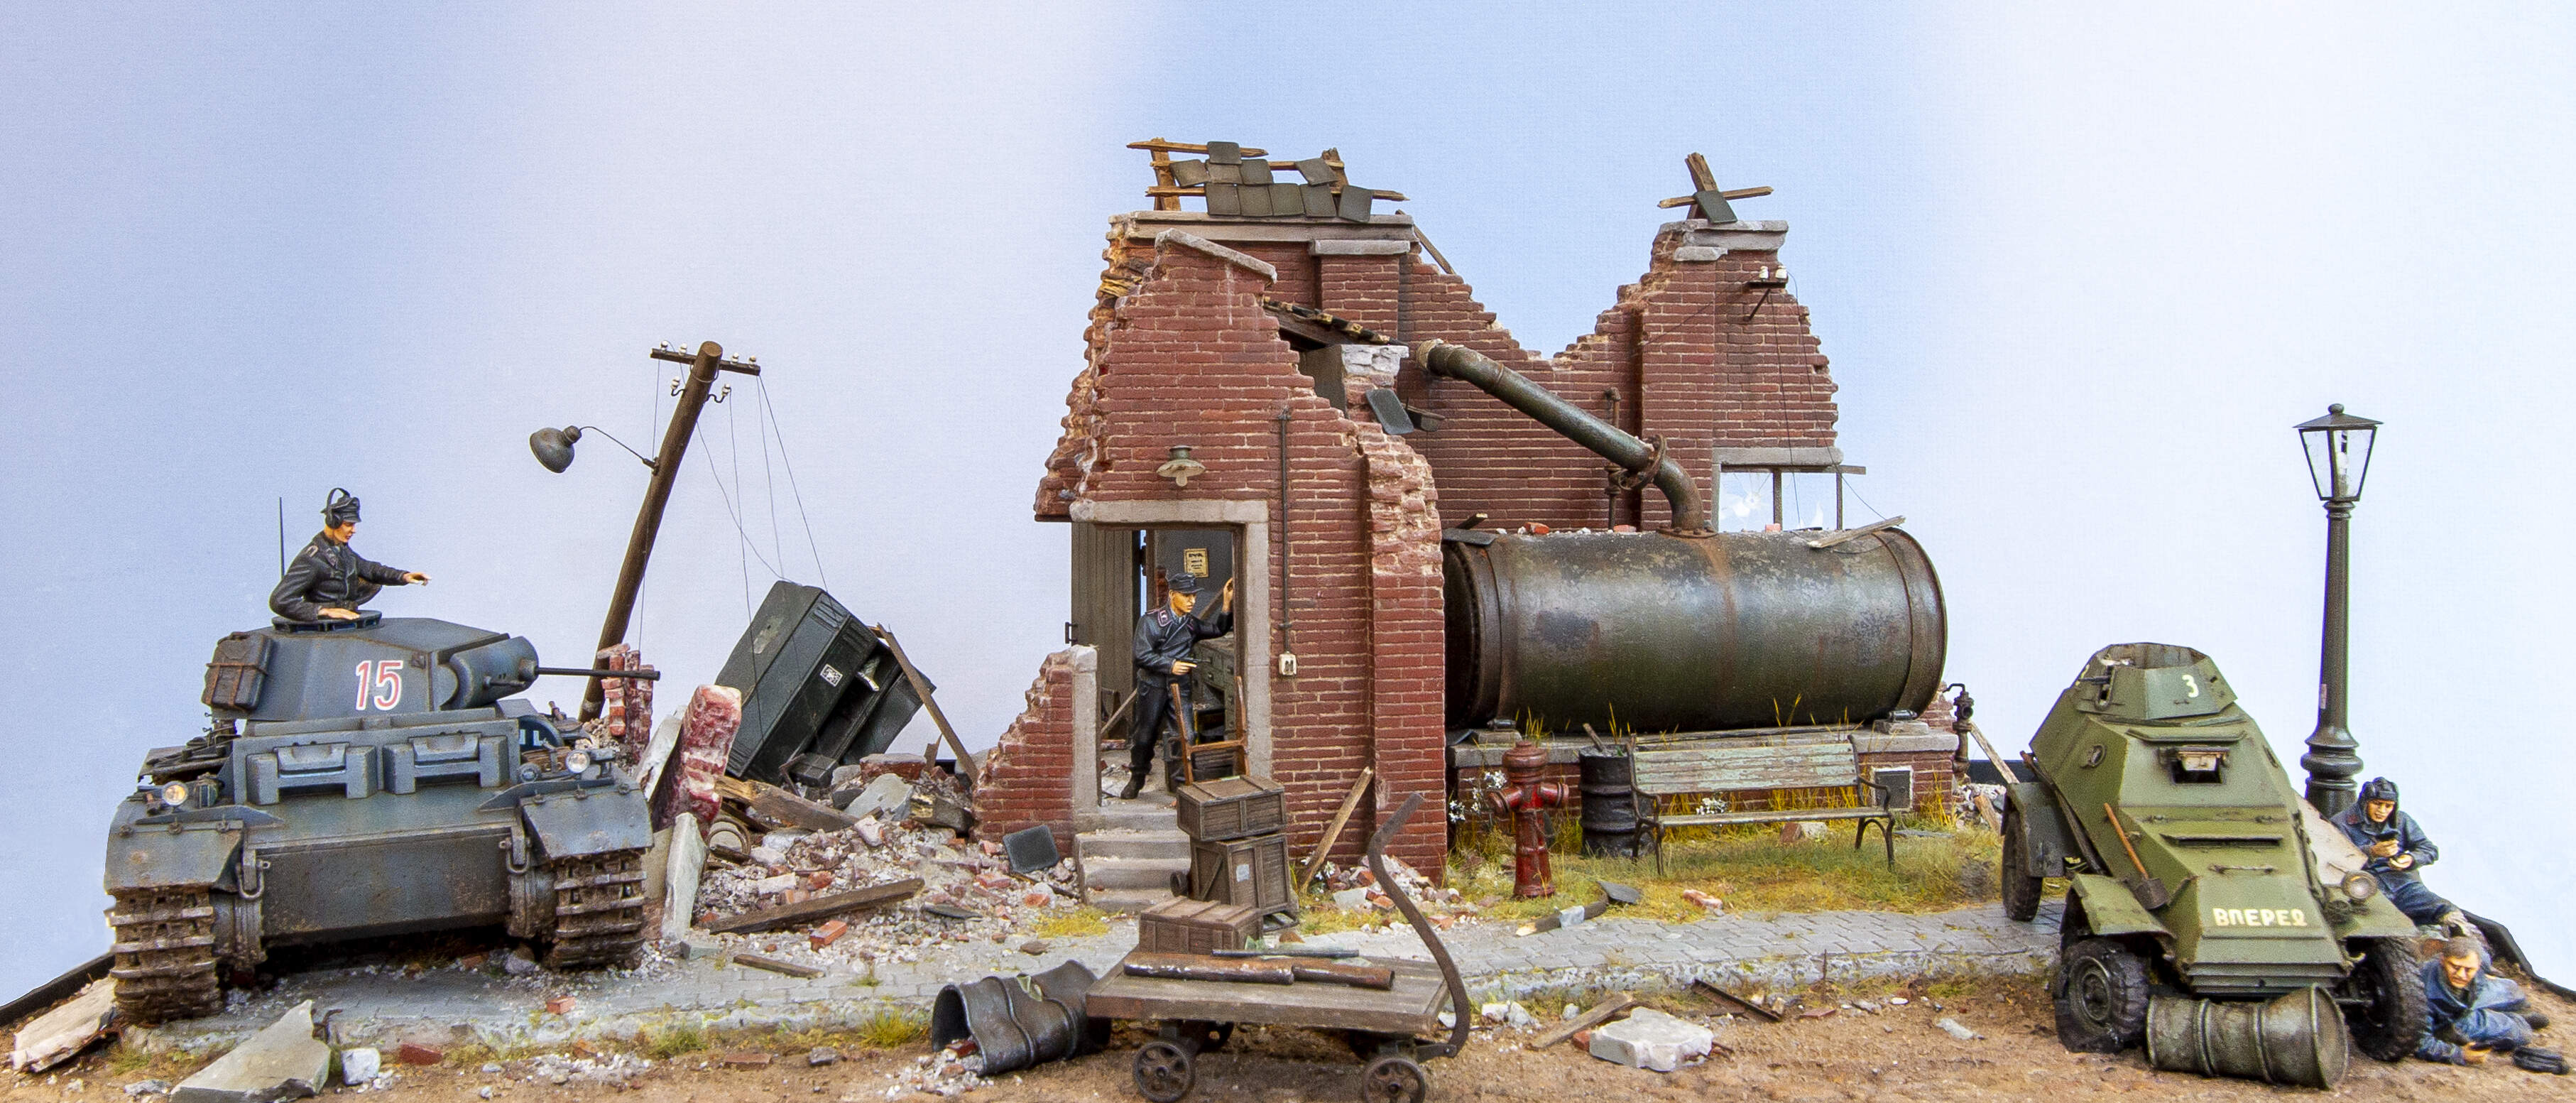
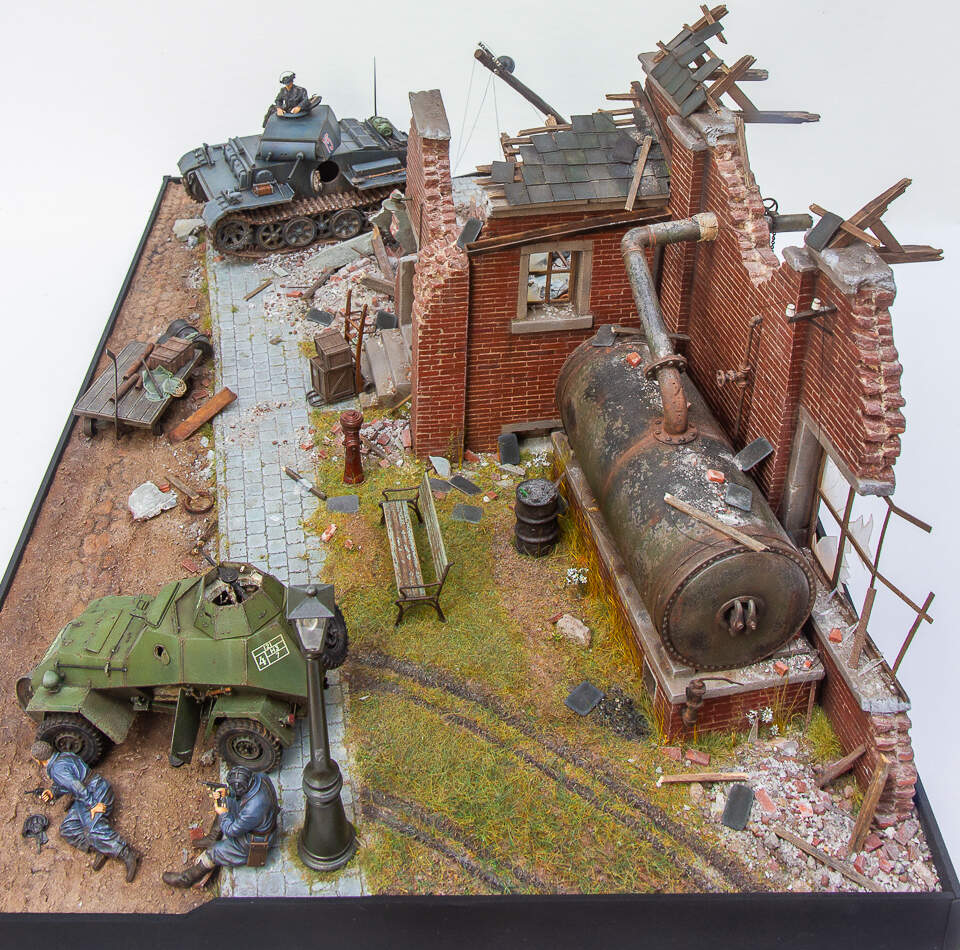
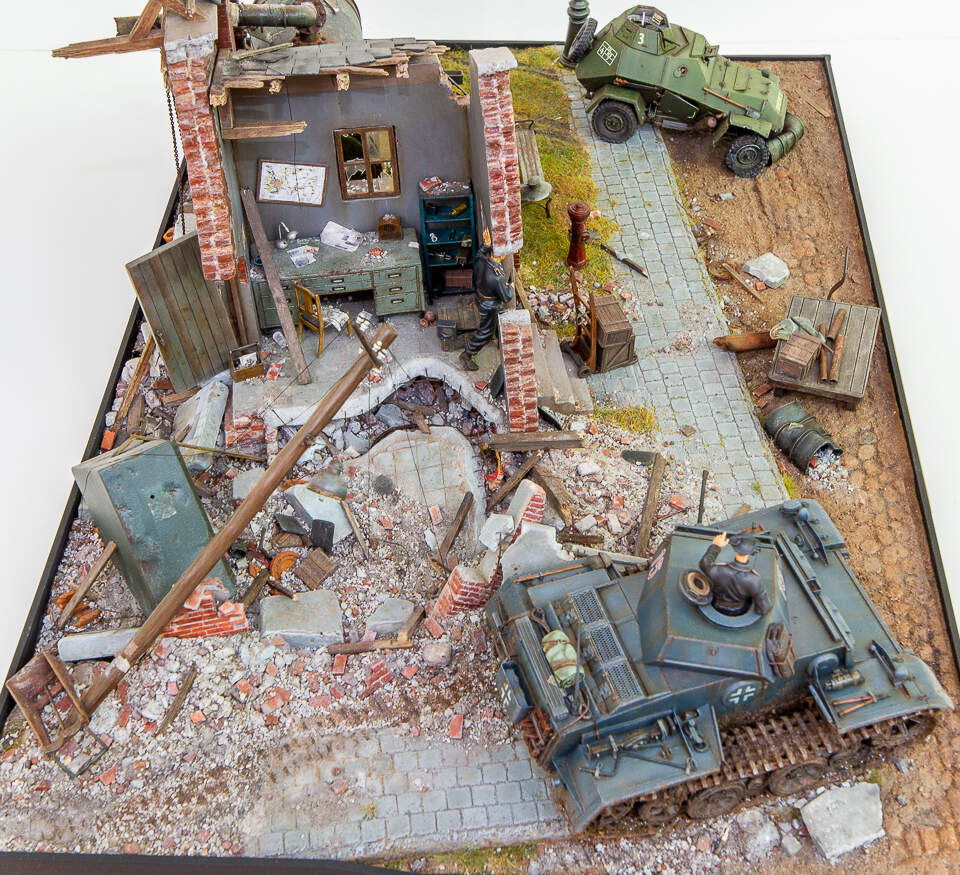
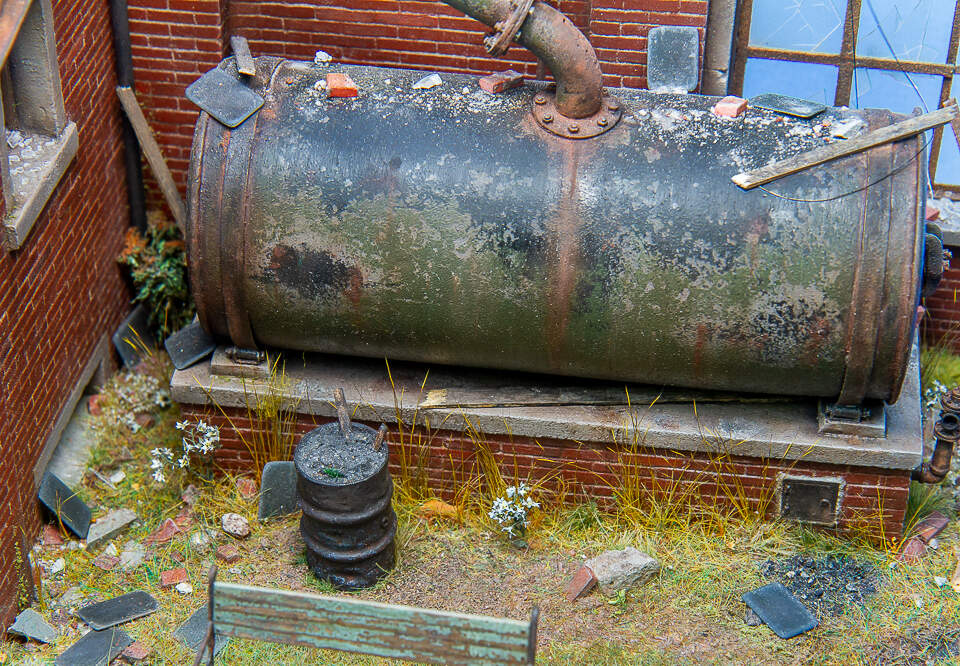
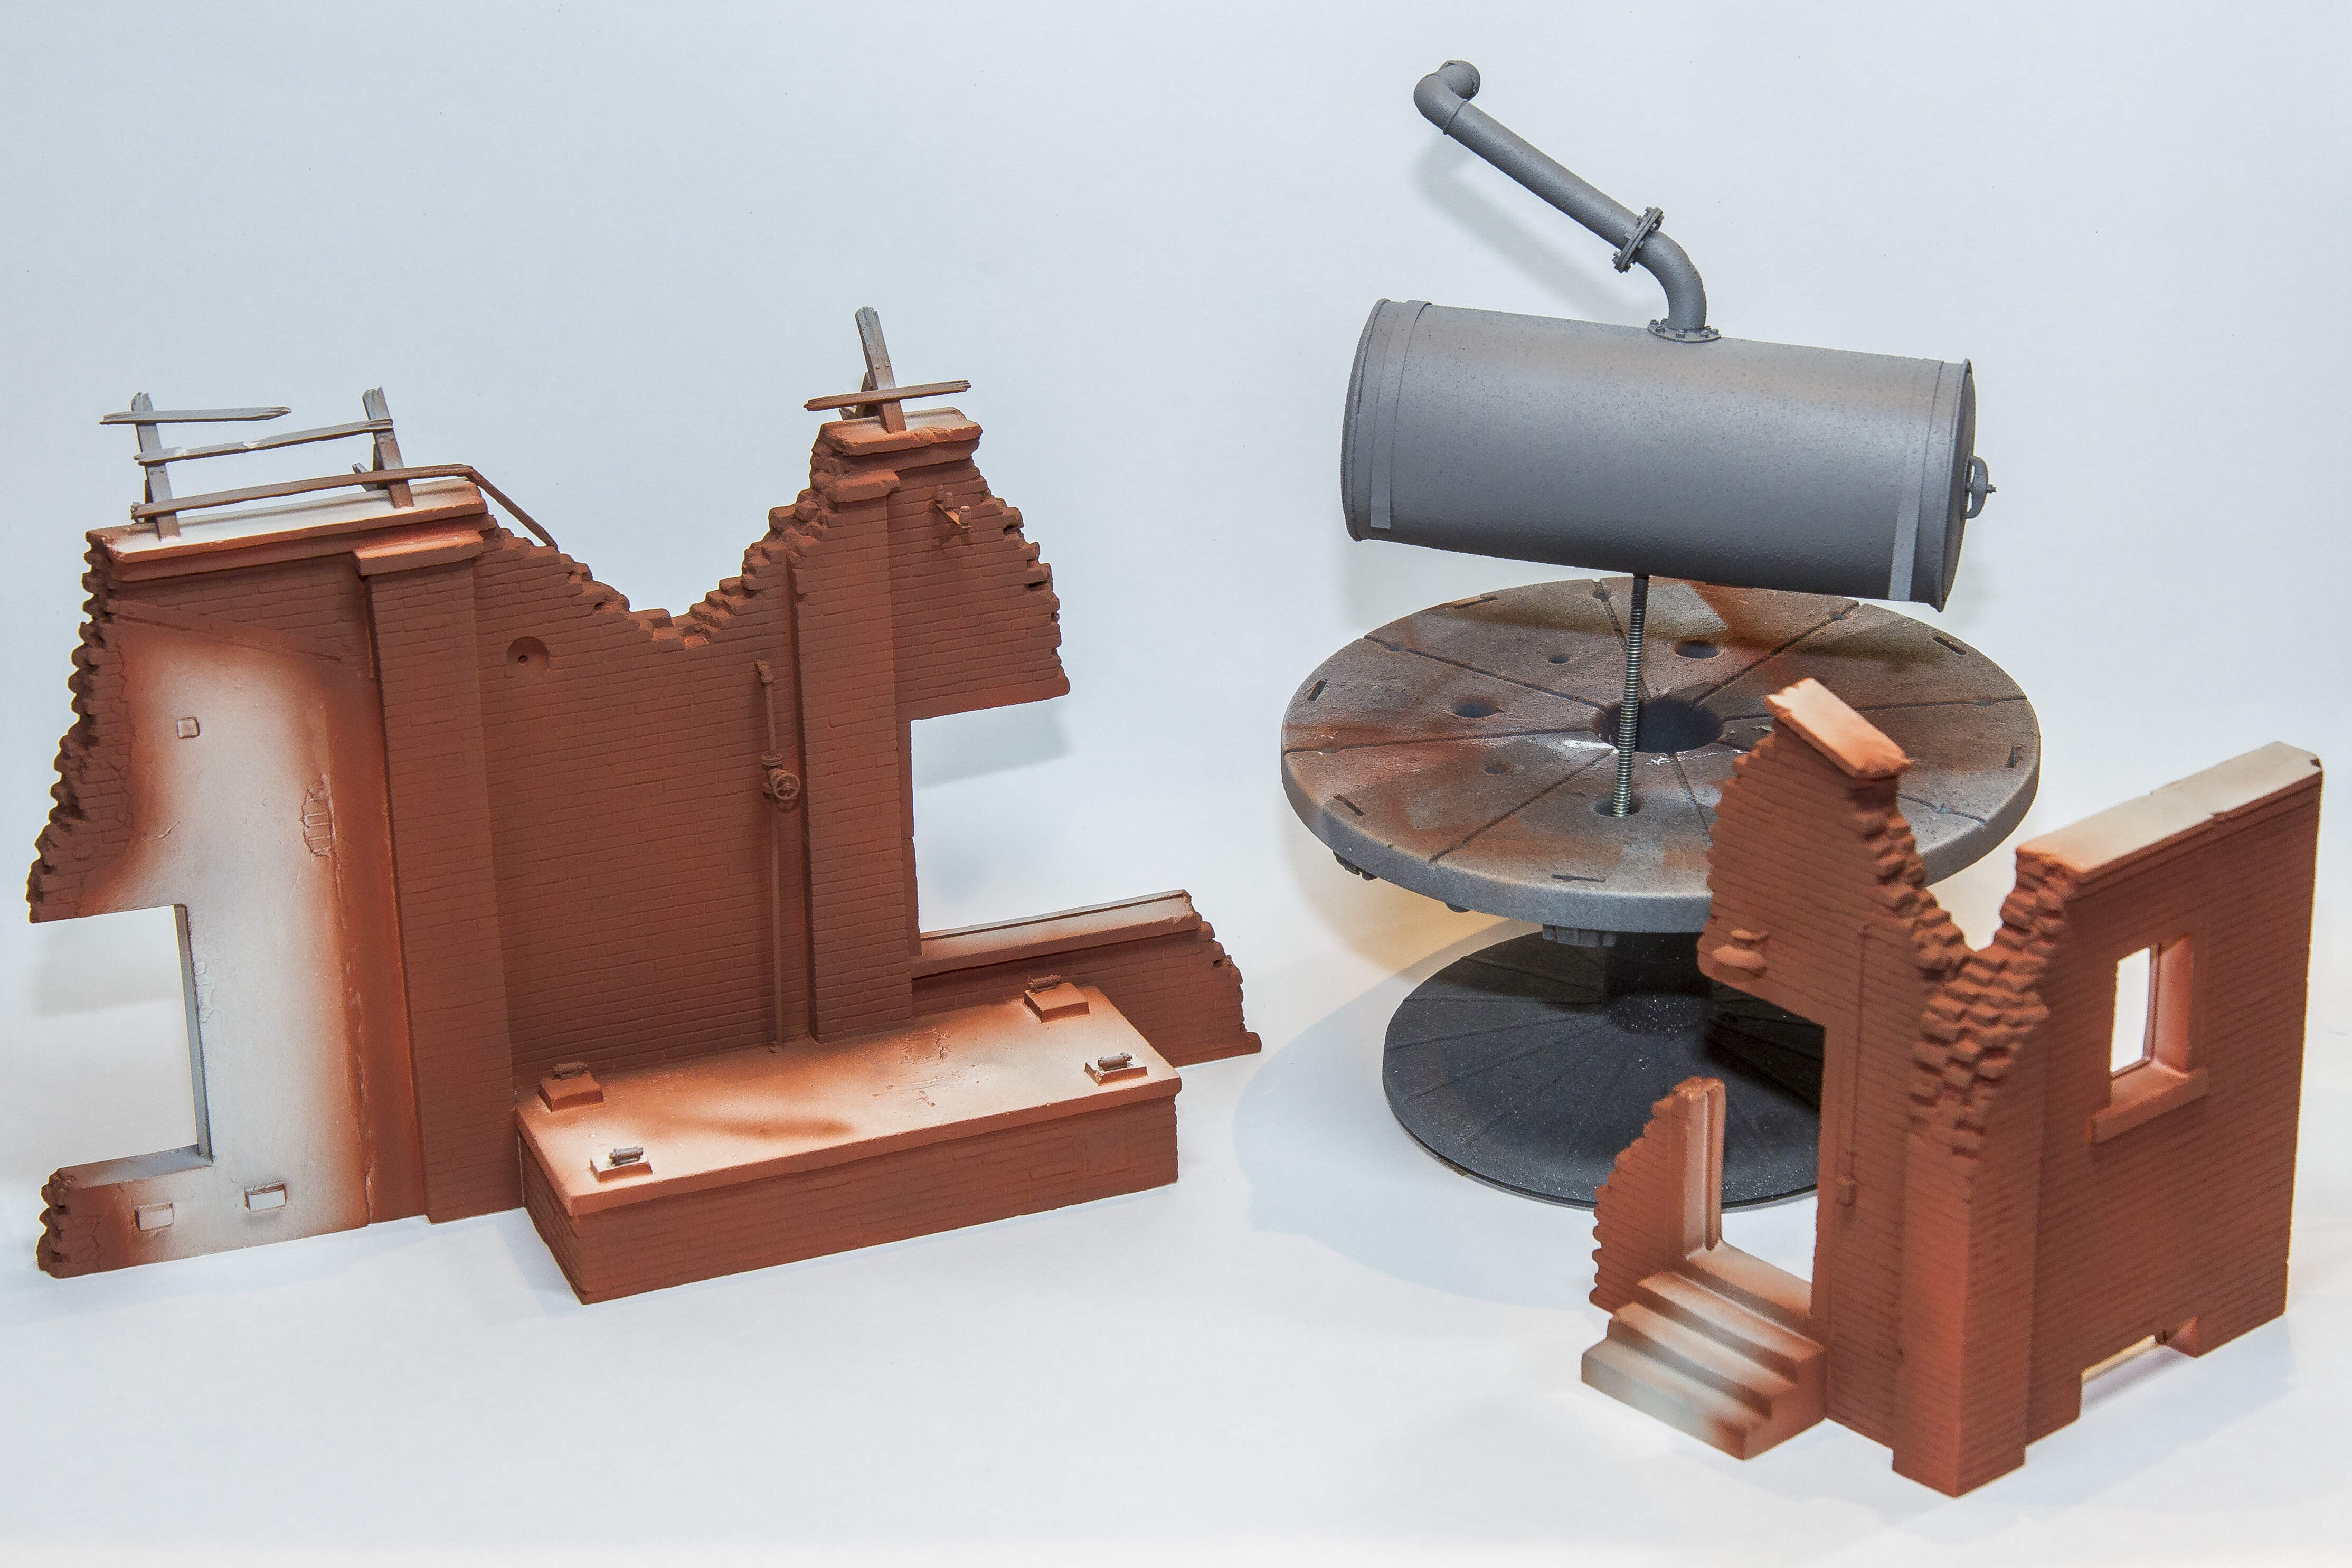
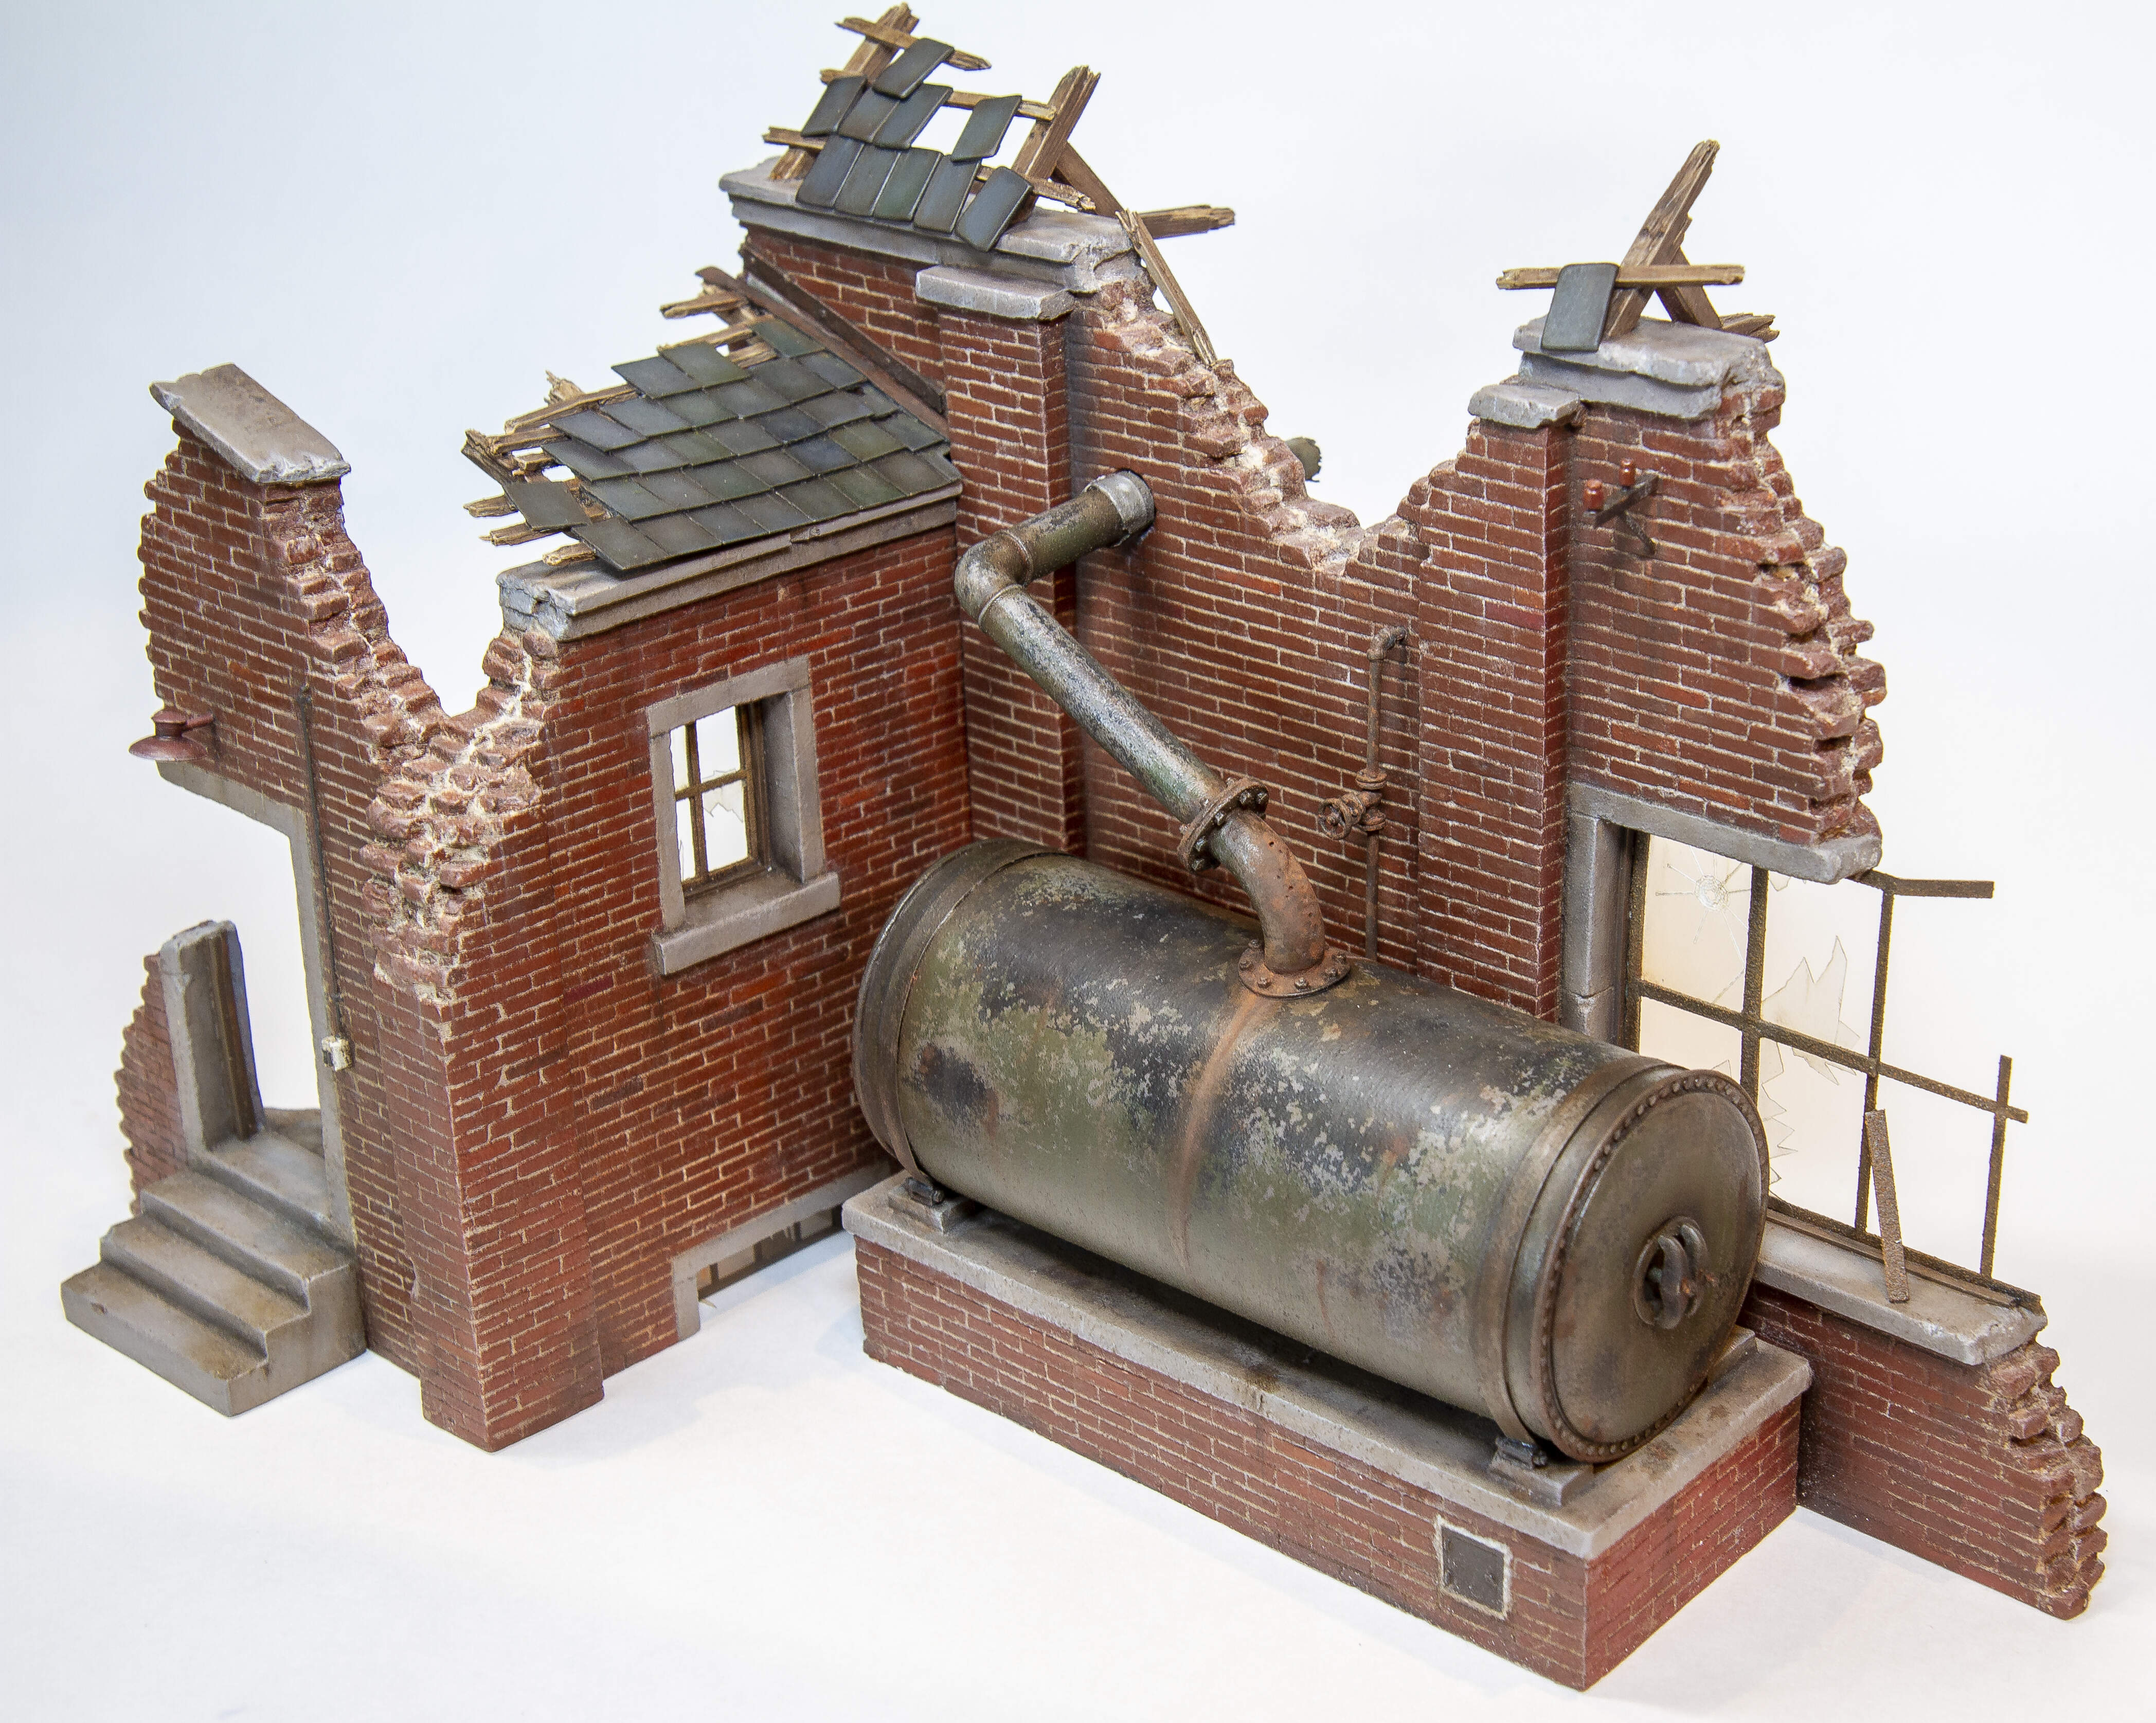
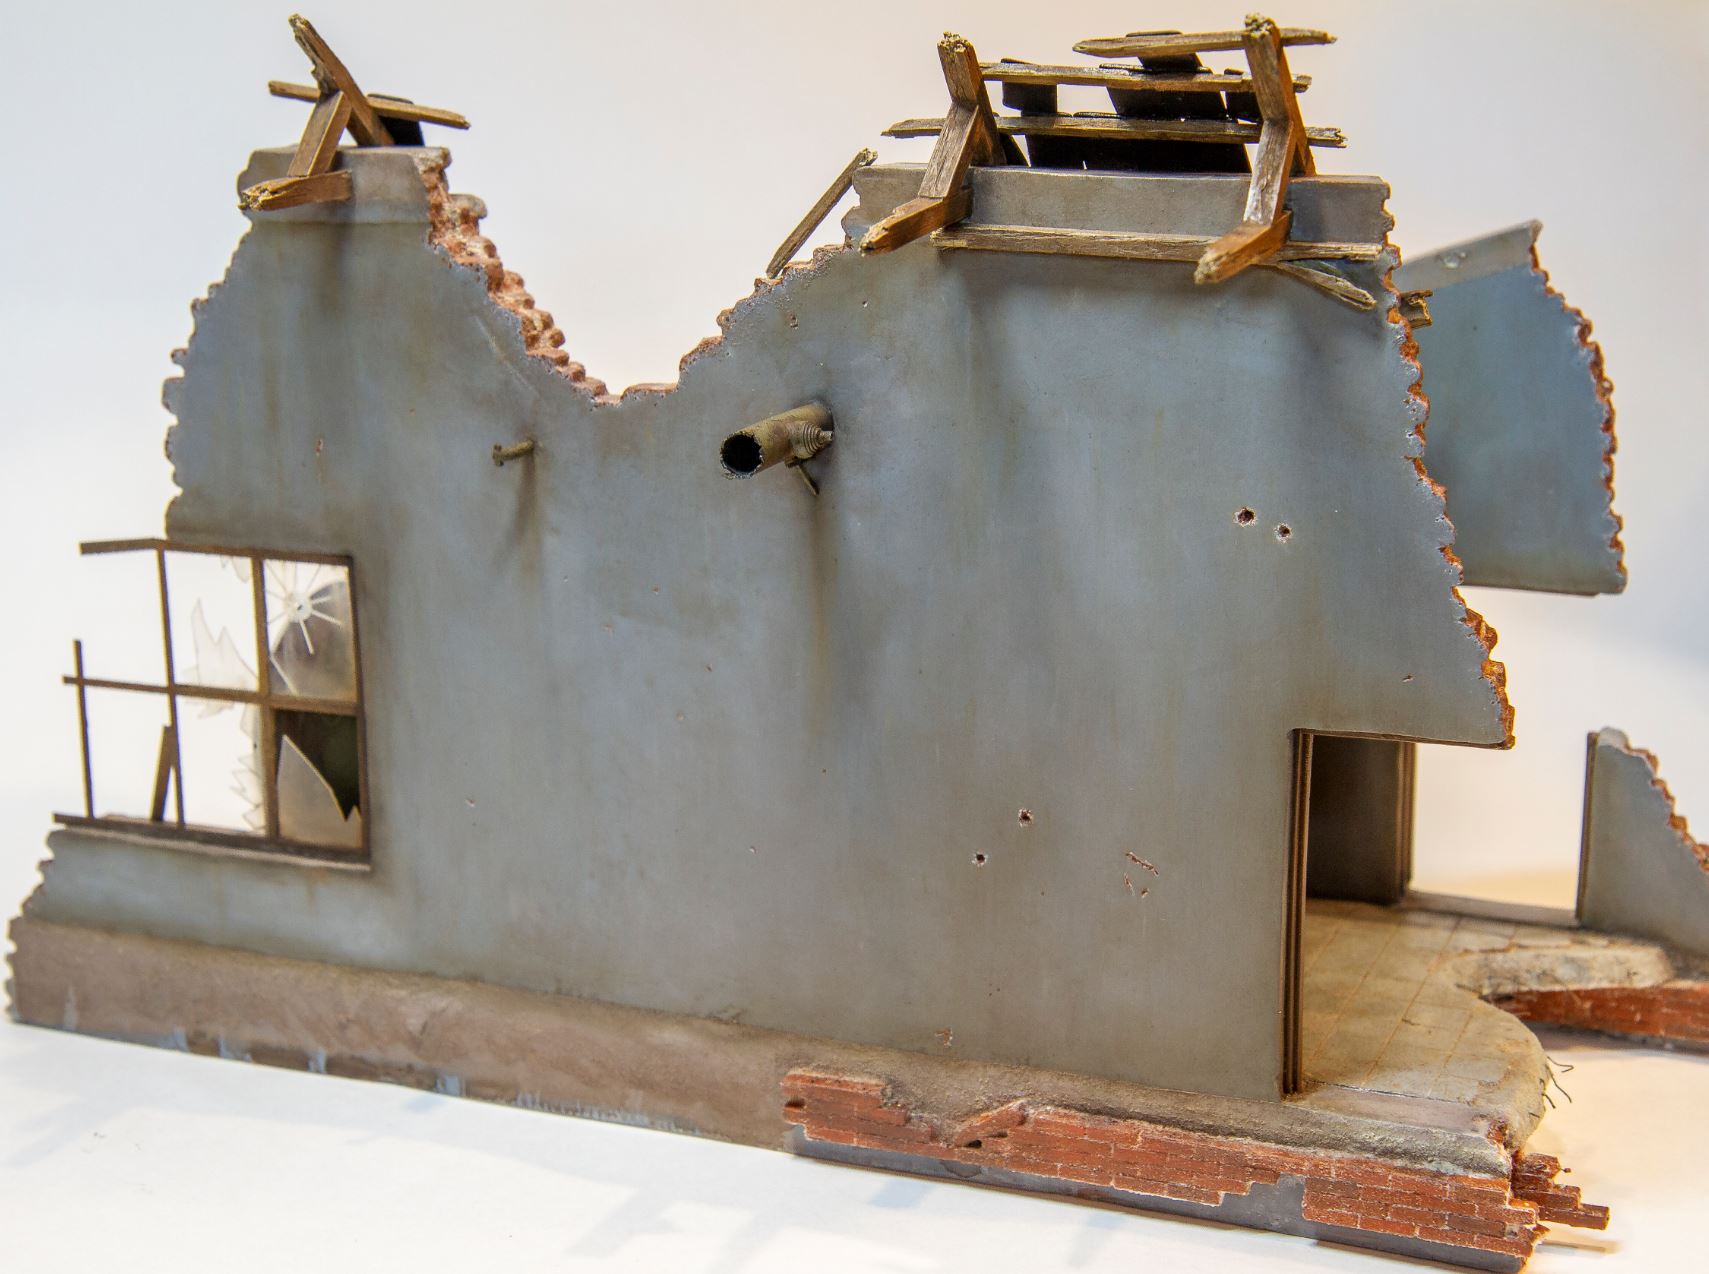
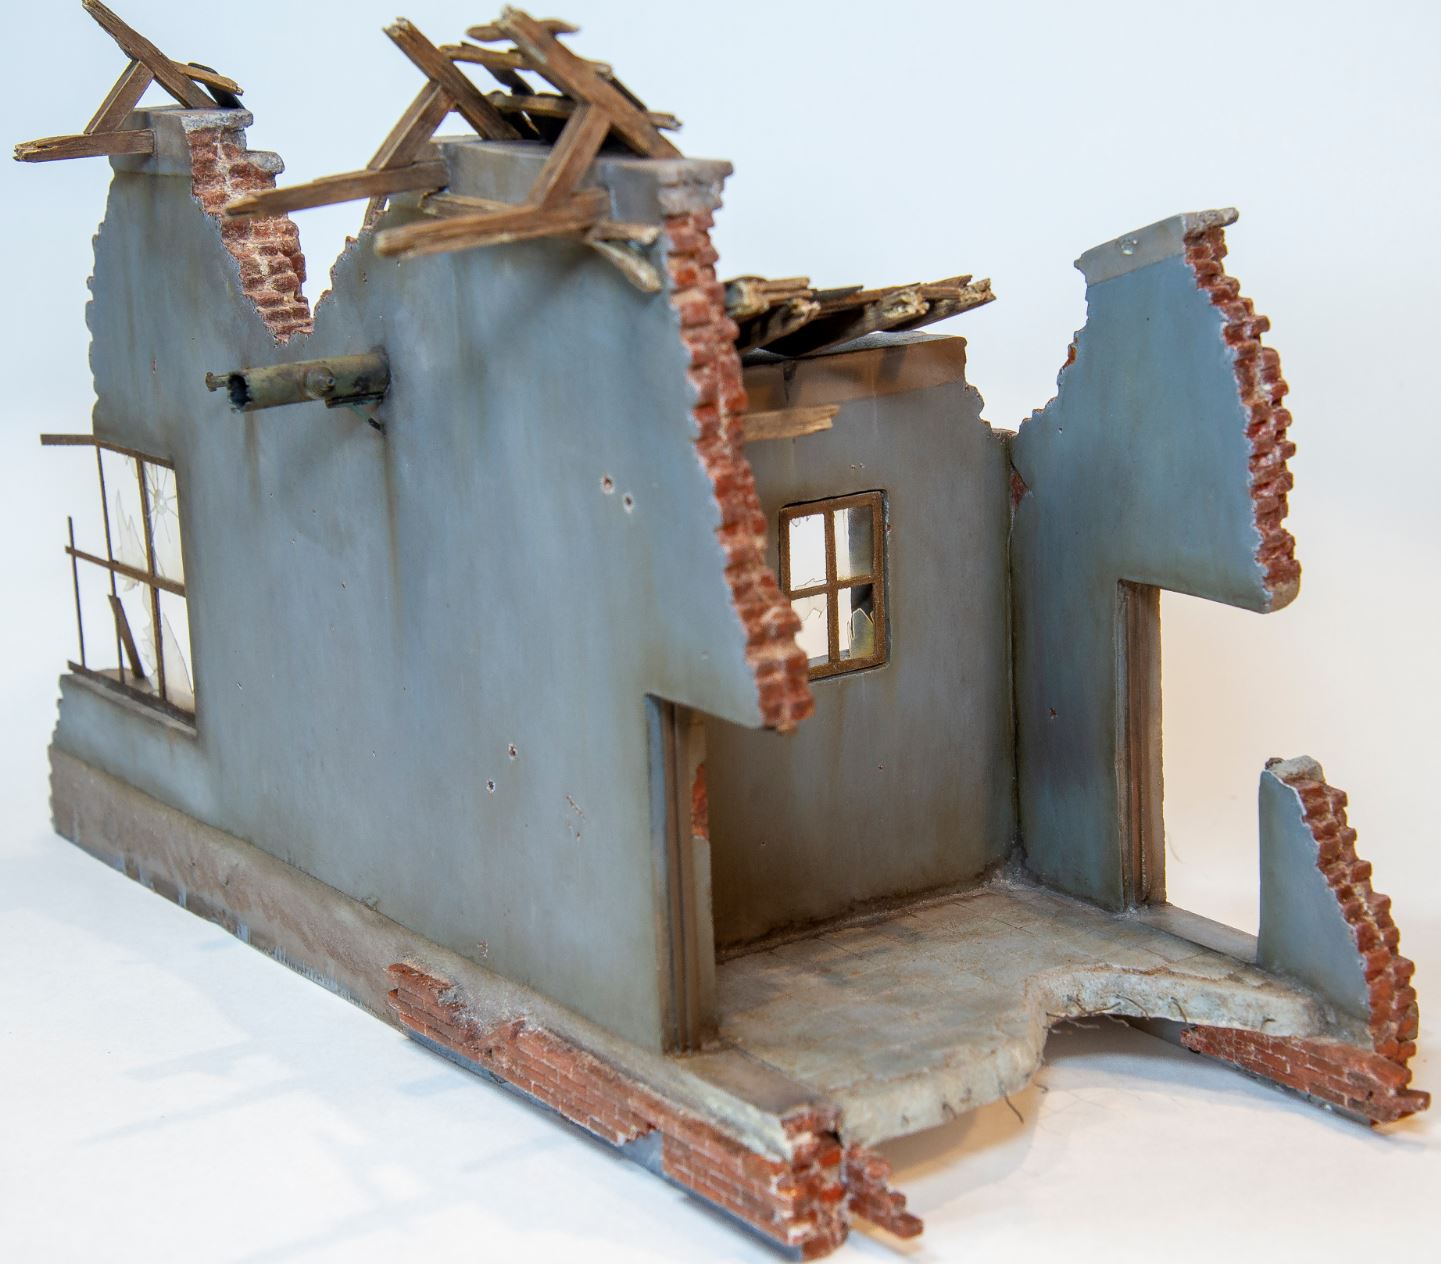
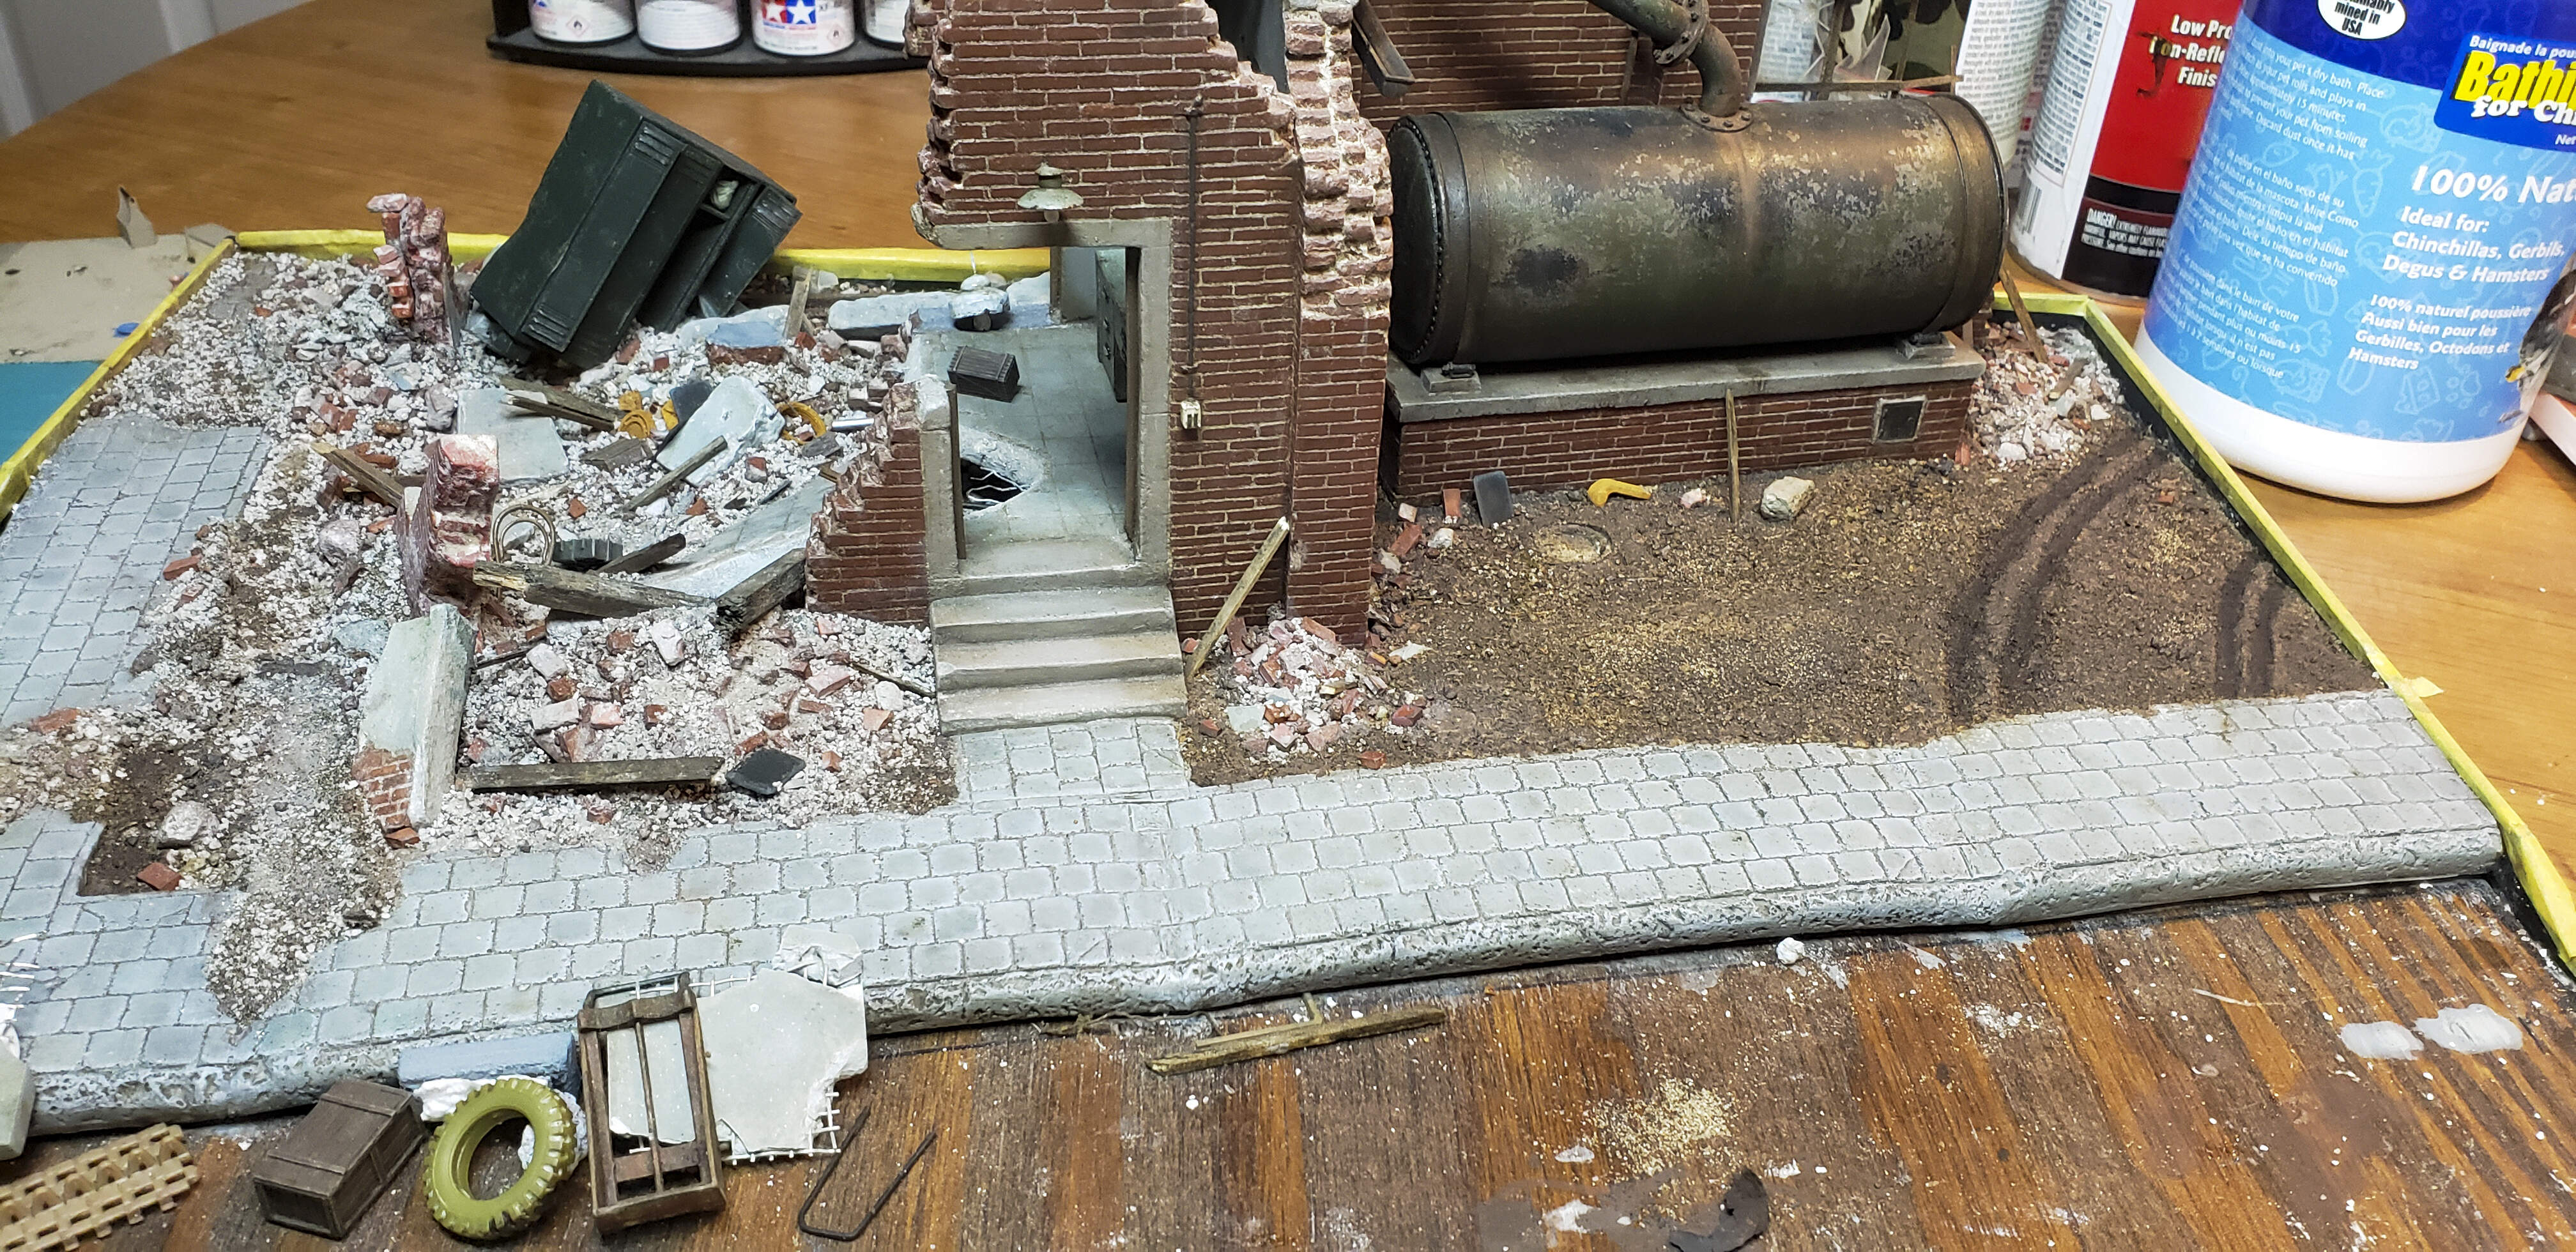
For the rest of the diorama, the building is an excellent kit by Royal Model, #656, Factory Ruin with Steam Boiler. However, I added a lot more detail to the scene including:
• More Roof tiles from sheet styrene
• Additional wood planking from balsawood
• Additional bricks for the smaller walls, foundation below kit, and individual debris using a combination of the old vintage TAMIYA Brick Wall Set (TAM35028) and Juweela Brick Debris
• Smaller concrete debris, rubble, and rock comes from graded/sifted soil painted in both gray and red debris shades (in advance using disposal aluminum cooking pans)
• Cobblestone road pattern is sheet styrene pattern from Evergreen
• Lamppost is by Hauler (HLU35087) and power pole is an old Tamiya Kit pole with light by ResiCast (35.2399)
• The desk, locker, hand trucks, radios, and other various accessories are a mixture of Resicast, Plus Model and Royal Model.

5 Likes

Excellent build. Excellent background story. Excellent presentation.
:+1:t2:
Cheers,
C.

1 Like

Additional pics (no text this time)!

6 Likes

Thanks for the nice comments. I may add a couple of “In Process” photos tomorrow of the models and groundwork/base. At first I wanted to do a build blog but kept putting off creating a new post.

I originally wanted to do a “super detail” build of the Russian BA64B as a standalone kit so bought that Minor full interior/exterior PE detail set. Only later deciding to make it part of a bigger dio. Due to all the PE, it took just as long to build that little armored car as your standard tank. Of course since its damaged and wide open, the interior is still highly visible. The Panzer IIJ, not so much. The only interior details for it is the one opened side hatch.

BTW, if anyone is going to be at the SC Mega Show tomorrow, it will be there in person along with a few hundred others I am sure. First show of the year for me and looking forward to it!

1 Like

After looking at these images and then taking the time to wipe the drool off of my screen. I have now decided that you are my new hero. Every image shows an outstanding pension to detail. This is absolute model porn of the highest level

3 Likes

Sad to say I will be missing the show, would have had to spend some time taking this dio in. Hope you do well.

1 Like

Finally getting around to adding some build pics. First built the BA64 using the Minor Interior/Exterior PE Detail set. Also added a makeshift engine block from parts box since it is a little visible in the fender wheel area. I will not claim it is accurate (in reality it is an old air compressor from the parts box).

The extra detail must have quadrupled my time to construct what is really a basic model from Vision (I understand MiniArt reboxed this as there own or vice versa; not sure??). One interesting tidbit, this truly is the same kit as the Mini Art one but the Mini Art version is almost impossible to find. I tracked this one down on Ebay after I learned they were the same.

Airbrushed using Tamiya Paint with a bit of fading on central upper surfaces by lighting up the base coat. Followed that with some “oil painting rendering” for filters, fading and grime (similar to how Mike Rinaldi describes in his excellent Tank Art books). Then chipped with acrylics and final weathering with oils.

2 Likes

Next up was the Hobby Boss Panzer IIJ. Also a good straightforward kit (my first Hobby Boss kit) with no real complaints. The PE set really brought out the extra detail where it was needed most but I don’t recall feeling it had to have it. Mostly helpful for making realistic damage to the fenders, interior hatches, and various tools and hooks. It also came with a metal gun barrel.

Finishing was done similar to that described for the BA64 but using a Panzer Grey shade with a bit of a bluer touch. First pic below shows both kits in the early stages of weathering.

Final weathering just before adding to base.

3 Likes

Beautiful work indeed. The fuel tank in the BA , is that part of the kit or did you make it? That fuel tank is beautiful .

Finally I constructed the major elements of the base, which primarily consisted of the industrial building by Royal Model, which was 100% plaster minus the wood and tiles which were plastic. The first pic below shows what the basic kit came with, which obviously it not quite enough to show debris and destruction. Building was base painted using Tamiya colors. The light mortar color is actually real life spackle from home improvement store that was spread on and wiped off leaving only a little residue in between the bricks. It did take a while to get the right affect and I then found it necessary to tone down the bright white with darker washes. The worn paint on the boiler was done using three different layers of the hairspray method.

As I stated in top post, I added a little bit of a foundation to give more depth under the first floor in order to create more room for all that debris; and the fact there is a basement window under the office. That tamiya brick kit came in handy for larger wall pieces but needed to be roughed up to match the individual bricks I got from Juweela, which I highly recommend. The Juweela products are so good they almost do not need painting, although I did to make sure everything was uniform between the building, tamiya bricks, and the Juweela’s product.

Roughing in the overall layout below.

The rest of the debris I acquired from natural sources along stream banks, gutters, and driveways. I have a sieve set (thru work) that I used to better organize the various grades of sand and pebbles by size. This also helped when painting them either a gray (for concrete debris) or red (for brick debris). This was done by spreading each category of debris in a single layer in a disposable cooking pan and then spraying them with cheap spray can paint while rocking the pan back in forth. This allowed me to cover all sides of the grains with its new debris color (before and after paint pics below).

To keep all the smaller sized grains in place I used a combination of Woodlands Scenic Cement or AKs Gravel & Sand Size Fixer. I found that AK’s product was superior for the smaller sized grains and pigments. Not because it held it in place better but how it looked when dried. To me, it kept its original shape/color more when adhered by AK’s Fixer. Just thought I would share what my experimentation reveled. I used the more traditional celluclay for areas dominated by turf and the mud in the cobblestone road.

That about wraps it up. This was my first urban diorama since coming back into the hobby 5 years ago and took me almost 2 years from start to finish. Thus I am open for any feedback or thoughts on the build both positive and negative (the AMPS way! :wink:)

4 Likes

Hi Chris, thanks for the kind comments. I was working on the above post when you replied which may explain more. The tank/steam boiler was part of the building kit. However, I was surprised that it too was made of plaster. Plaster was great for the wall/brick detail but not so much (IMHO) for a metal tank. It also had a small crack I had to fill in. I had to really sand it down to make it lose its plaster texture to it, which isn’t easy to do evenly on a cylinder.

As I stated in last post, I wanted to really make it look like it was old and worn and had lost several coats of paint. I had recently tried the hairspray method on something else so thought it would work here too. But to get the look I had to make three different layers (for each color). The actual product was Mig’s Heavy Chipping Effect, which I sprayed on using an airbrush.

Thanks!

2 Likes

really well done. i love the way you got the muddy tracks on the grass! (well, I love lots about it, but I have trouble with making believable ground).

A couple of quick questions - how do you paint the ground?

  • is there an easy way to paint the grout between the bricks?
1 Like

Very nice! All aspects, the vehicles, the figures and the diorama components look great.

1 Like

Hi Phil. I did paint the base color of the groundwork a bit different than usual since I already had the building in place and didn’t want to use a spray can or even airbrush to put on a base brown color. Instead I actually died the celluclay a dark brown while mixing it by adding a few drops of cheap acrylic paint. That way it was already a brownish dirt color when dried without having to mask off the completed building and debris (I did the building and most of the debris first). However, in the past when I only had earth as ground cover I have put celluclay down, which dries to a light gray color. I usually add some sand or small gravel to the celluclay before it dries. Once dry I usually just use a cheap spray can of brown or tan paint for the base coat. After that I treat it similar to a model and give it a dark wash followed by lighter shades of dry brushing. Sometimes use a different shade of brown or tan for a base coat in drier or wetter portions of the ground cover.

Painting the grout was a bit difficult and trial by error and I am not convinced its the best way. In the end I used that white spackle product that you use for wall repairs on real homes but mixed it with water so it would flow easier. I spread it on the already painted bricks and then wiped it off, allowing some to stay behind in the recess between the bricks. This still wasn’t easy and I had to repeat it several times. The result was also to white but that can be toned down by a darker wash after it dries. I may try something different next time. I hope that helps.

2 Likes

Really nice diorama, well done. I hope you enjoyed the two years while building it:) Thanks for cheering this. /Erik

1 Like

I do the same trick with spackle . Also another way is to brush undiluted white oil paint in the bricks and wipe away the excess
I have gone back and studied your work again and the subtle parts like the debris is stunning.

1 Like

Hi Chris_Bryan (BTW my first name is Bryan…). Good idea about the white oil paint being undiluted. That might do the trick while leaving behind some realistic white streaks, which you see in real life anyway. I like the spackle too because it has that grit to it that seems realistic. I will have to try this all again!

Yes debris took a very long time. I broke it up in sections and did one at a time, usually a day on each. For example the area just behind the building (long and thin) was one section while another was the larger pile to the left of the door, etc.

1 Like

Bryan I will see if I have a image of brick with the white oil. If not I will take a pic for you.
I absolutely love the detail in your work .

1 Like

@Panzer948. Bryan I did find a pic for you . In this one the oil was just wiped away to give the old weathered look . It can be cleaned up further with naptha and cotton buds. Doing that will result in a very defined look.
FB_IMG_1622060811357(1)

2 Likes

Superb. Thanks for showing it in detail.

1 Like