Or the archer where the driver gets to watch the country side while war goes on behind him
1 Like
I gave it another pass, there are always some little hidden places that I miss.
By the way, what color should I use for the fuel tanks?
Dark iron seem to close to the box art.
Do you know what is the Vallejo Air equivalent of the Tamiya Dark Iron? I find it’s a very useful color but those Tamiya little bottles are annoying.
How do you take the paint out without splashing the lid?
I’m not sure where the fuel tanks are on the box art, could you point them out, please?
Are you talking about the Jerry cans? If so I think black or dark steel of some should work. Notice the one on the back with the white cross. I believe the white cross on a jerry can signals it was for Wasser or water
2 Likes
Either that or Dunkelgrau. I’d look for photos of jerrycans next to the vehicle, then you can compare the colors.
2 Likes
Jerry Cans were painted the exact same colors as the military vehicles themselves. At the start of the war, they came in Panzer Dark Grey. As the colors of the tanks changed, so did the colors of the cans. So, in the dessert, they could appear in solid desert colors. When Panzer Dark Yellow becomes standard in 1943, they start appearing in that color.
The old cans remained in circulation. As the war progressed, a vehicle might carry cans in multiple colors.
Cans with a white cross always carried water. This was particularly common in the desert.
Desert vehicles often carried extra cans. Sometimes, they carried large numbers of extra cans because maneuver was so important in the immense desert environment.
It is very easy to miss nooks and crannies with an airbrush. When I find I missed a spot, sometimes I make a second pass with the airbrush, just like you did. Sometimes I use a fine paint brush and hand paint the spot. Sometimes I get the spot when spraying on mud or other weathering effects. Sometimes I hand paint dried mud up up into recesses. The best way to deal with them really depends on the final look you want. Painting is way more of an art than a science.
Vallejo paint information:
Panzer Grey: RAL-7021 Dunklegrau 71.056
Panzer Camouflage Grey Green: RAL 7008 Graugrun 71.116
Panzer Yellow Brown: RAL 8000 Gelbbraun 71.272
Panzer Camouflage Brown: RAL 8020 Braun 71.117
Panzer Camouflage Grey: RAL 7027 Grau 71.118
Panzer Medium Olive: RAY 8003 Olivgrun 71.092
The Vallejo DAK Colors 1941-1944 (71.207) set contains all of the above colors. Although I own the above colors, I have not yet tried any of them and cannot offer an opinion on color accuracy. Vallejo seems to change their formulations rather often.
2 Likes
Thanks, very detailed informations.
I meant jerry cans, my English is somewhat limited, bear with me.
So, I have dark iron, but also some Panzer Grey (I think it’s the standard German gray).
I’ll experiment and see what I like most. I’d rather avoid the sand color, I like some chromatic difference on a model.
Right now, what really worries me most are the tires.
I have a bottle of Italeri “Tire black” which is perfect but I really don’t know how to spray it without messing with the wheel metal part which is sand color.
I have some masking tape (the small Tamiya version) but I don’t know how to cover the round wheel section.
I could hand paint it but I am really bad at it, I always end up leaving visible paint streaks.
I have the Italeri paint and their thinner, but maybe I never nailed the correct ratio for brush painting.
1 Like
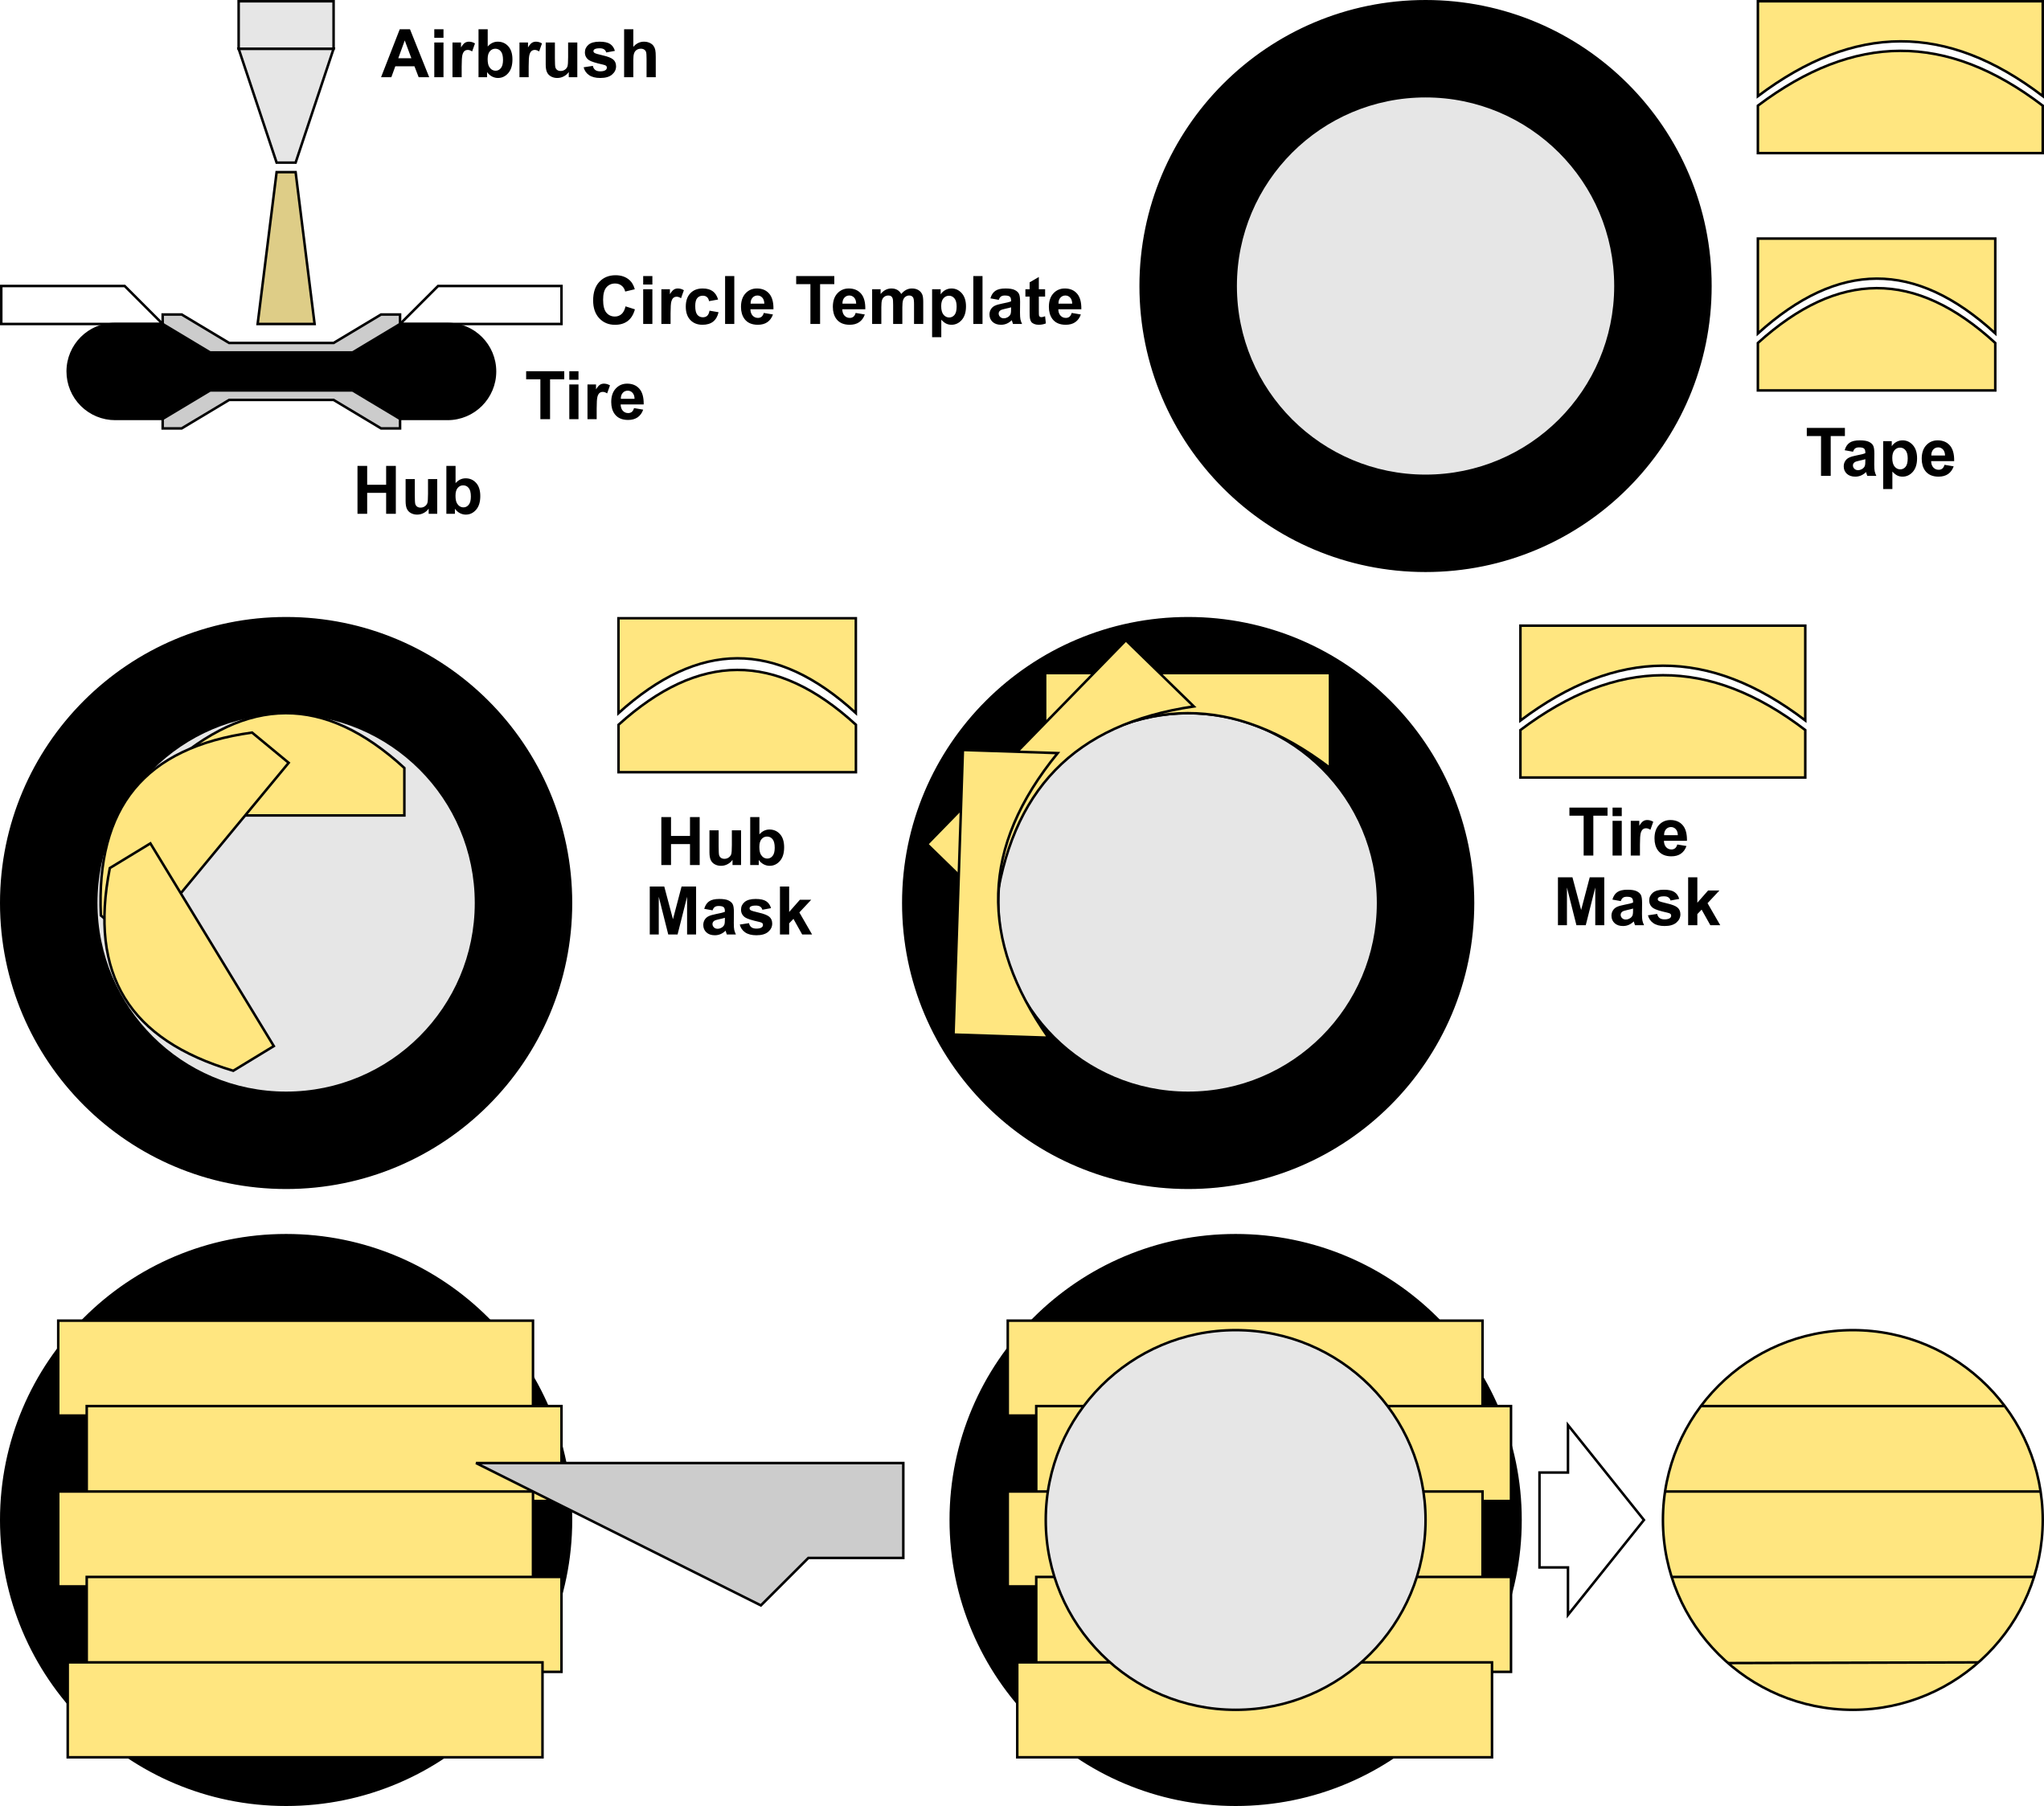
I use a circle template to paint most wheels. First, I paint the tire portion black (or whatever) and let that dry. Next, I place a paper towel over my hand, the wheel on the paper towel, and the circle template over the wheel, selecting the hole that most closely matches the hub size. Finally, I airbrush the hub, shooting down. I try not to shoot sideways because that can cause paint to sneak under the circle template. Please note, this method will not work on balloon tires where the hub sits down in a recess such that the circle template cannot make contact with the edge of the rim.
The above method gets things most of the way there. A bit of touch up work or weathering eliminates any overspray.
Masking is also fairly easy. Cut curved pieces of tape. If you want to mask the hub and spray the tire, the outer portion of the curve butts against the edge of the rim. If you want to mask the tire and spray the hub, use the inner portion of the curve to butt against the outer edge of the rim. When spraying, do NOT flood the mask with paint. It will seep under the mask and cause all sorts of mayhem.
Please give me 20 minutes and I will make a picture in Inkscape.
2 Likes
Couple options.
Run strips of your Tamiya tape across the wheel assembly so that it covers all of the rim (don’t worry about covering all the rubber).
Next take a sharp hobby knife and carefully run it around the outside lip of the rim. This should leave you with something reasonably close to a circular mask covering the wheel hub.
This will probably work better with wider tape, which you should be able to grab cheap like from your local building supply or what have you.
Other option is a masking template. You should be able to locate a Circular draughtsman’s template
Spray the whole wheel tire black first, the fine the circle that gets you closest to your hub. Depending on the actual diameter you may need a little touch up after.
2 Likes
4 Likes
Thank you guys, good ideas.
Spot on. I’m glad someone understands my ramblings.
1 Like
You could make one or two of them the sand color and the rest dunkelgrau (standard german gray) and make one of them a water can. That would diversify the model.
The circle template the fastest way I’ve found! Super effective and you can do set of wheels over a couple hours. Usually I’ll spray the black one day and the hub the next or I’ve found the template can scrape the tire paint off
1 Like
How do circle templates hold up for brush painting?
Never tried but I imagine they’d work if you tacked it to the wheel some how
It might just be worth it to be careful, then.
Be extremely careful. Capillary action may pull your paint into the thin cavity between the template and wheel, creating a mess.
1 Like
Nightgaunt !
"Annoying spray cans" ???
- So how annoying was the mixing and diluting of the paint that went into your airbrush?
- How annoying was the clean up? (that you were critical about?)
- How annoying was the clogging? (That you were critical about?)
- Also how annoying is the time and effort required to do a color change in an airbrush?
Sorry to rag you on this topic ~ but IMHO often, (I feel) the airbrush is greatly over rated and very often unnecessary. Granted there are things (like outlined German camo) that require an airbrush.
However I own an airbrush and a compressor but hardly ever use them.
I do nearly all my painting (including some German camo) using spray cans.*
*I use Tamiya spray cans almost exclusively. Their spray paints, especially the matte colors, are self-leveling and very forgiving if you happen to go a little too heavy on a pass. The Tamiya nozzles are designed to deliver a very small, well atomized droplet size so you are actually coming close to laying down a SCALE thickness coat of paint. Also the Tamiya Matte Clear rattle can (TS-80) is the best in the business ~ bar none!
One other thing that many will disagree on: I NEVER use the big “Home Depot” spray cans for anything model related! Those paint can nozzles are designed for to lay down a heavy cover of paint all in one pass. Again IMHO these cans are best reserved for use painting old rusty Bar-B-Que grills, patio furniture and outdoor wooden fences.
I know hundreds of folks on here will disagree ~ I didn’t come here to argue with Y’all. You do what makes you happy and I will do what I know works!
In my younger years I helped my Dad with his small sideline business of repairing and rebuilding automotive paint spray guns. Helped him do automotive painting and later on worked in an auto paint supply store mixing custom automotive colors.
(Back in the days when there were no computer color matching machines. Back when you had a sizable file cabinet of every auto manufacturer’s color formula cards and you used a precision scale that measured in tenths of a gram to weigh out your mixing colors, carriers and mixing bases.)
Some Pudding for the Proof:
An airbrush has never touched these models.

I apologize if I come off sounding as a bit of an A-hole here ~ but I just get seriously tired of so many people on this site paying homage to the all mighty airbrush and making all the newbies think they cannot build rewarding, pleasing and even award winning models until they go out and spend $200 - $400 - $600 on an airbrush and compressor.
1 Like
I’m gonna jump on one other thing while I am on a roll:
Almost all plastic and resin model tires have a nicely molded lip (rim, edge, whatever you want to call it) that divides the “rubber tire” from the “metal” rim. (Just like REAL tires.)
So I would suggest first painting the otherwise unmasked center tire rim in whatever vehicle color you are using and by using whatever paint deposition system you choose to use. (Please also paint the tire “rubber” with this same base coat of paint while you are at because we are going to need a uniform base coat on there later.)
Now BRUSH on whatever slightly deluted tire black color* you find to your liking. With a little bit of care that tire rim lip will serve as a dam to stop your tire black from encroaching on the inside rim. Hand painting the “rubber” portion of the tire will probably take just about the same amount of time as masking each tire and might just be quicker!
*As to choosing the infamous correct “tire black” color:~ Flat black is too black and most rubber colored paints just don’t look right. Now you CAN mix yourself up some matte black with a little gray and just a touch of silver mixed in. OR You can just buy the pre-deluted “gun metal” bottle color already made. I brush it straight out of the bottle without shaking the bottle too much as this will leave the majority of those silver particles in the bottom of the bottle.
Real tires are not jet black. (Unless you just hit them with some armor-all or paid extra at the carwash for that black tire coating stuff.)
Real tires, used tires, are actually a very dark gray and if you think about it, they also have a slight silver cast to that gray. Rubber tires oxidize in direct sunlight and that is that silver/gray color you might perceive.
The pre-thinned gun metal is IMHO just about the perfect shade for REAL tire black as long as you don’t shake up the bottle and go too crazy with the silver particles.
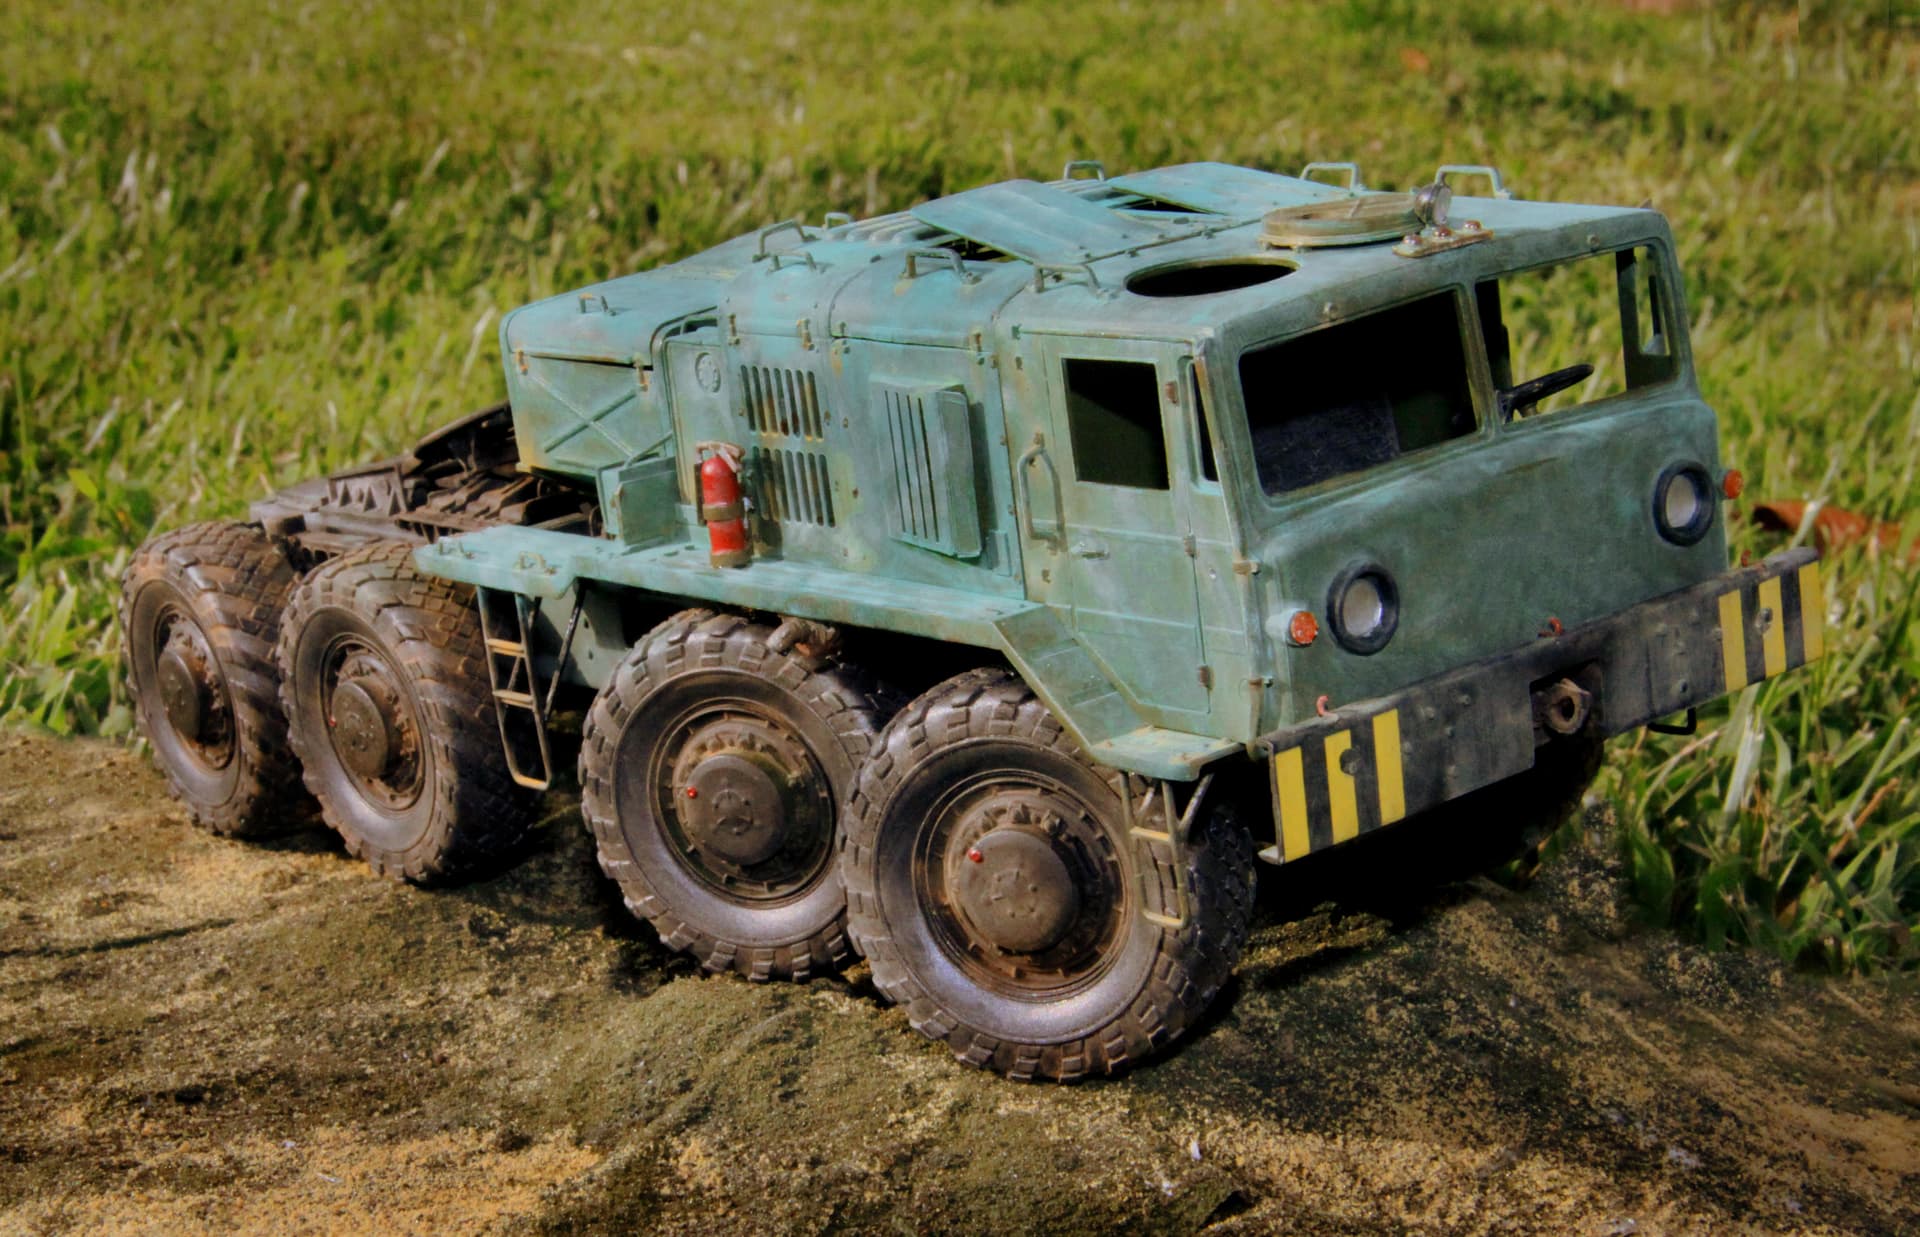
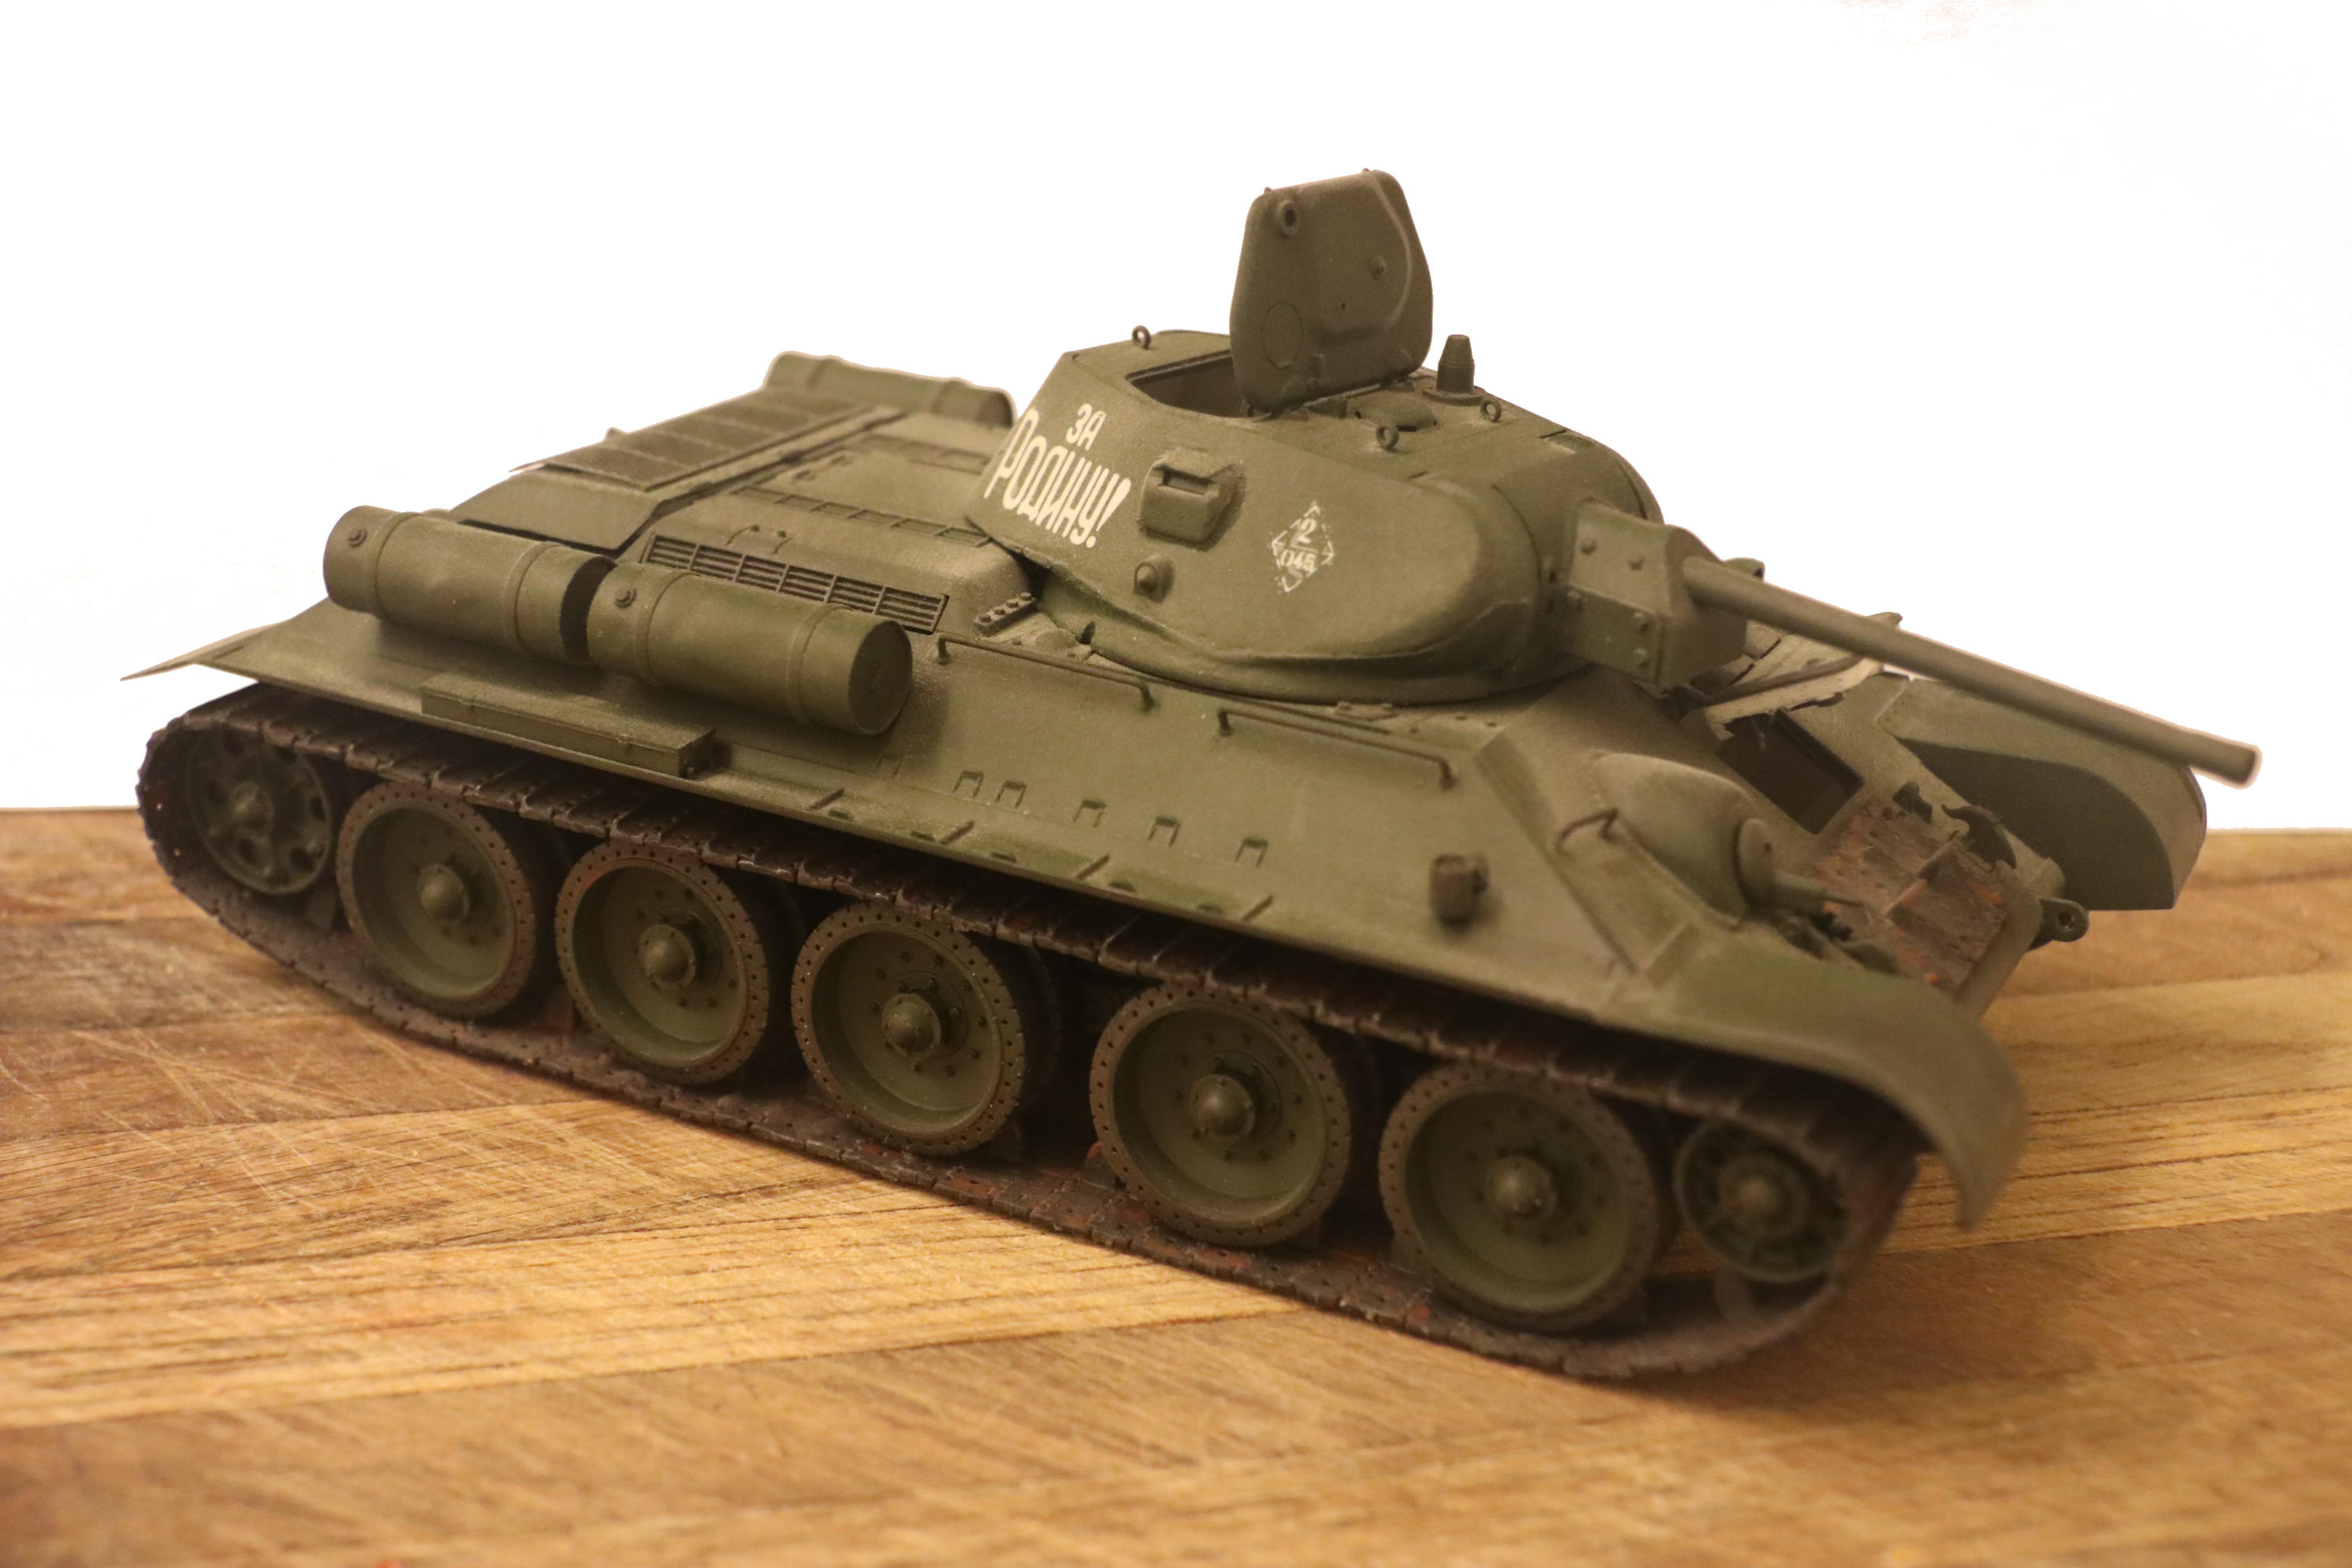
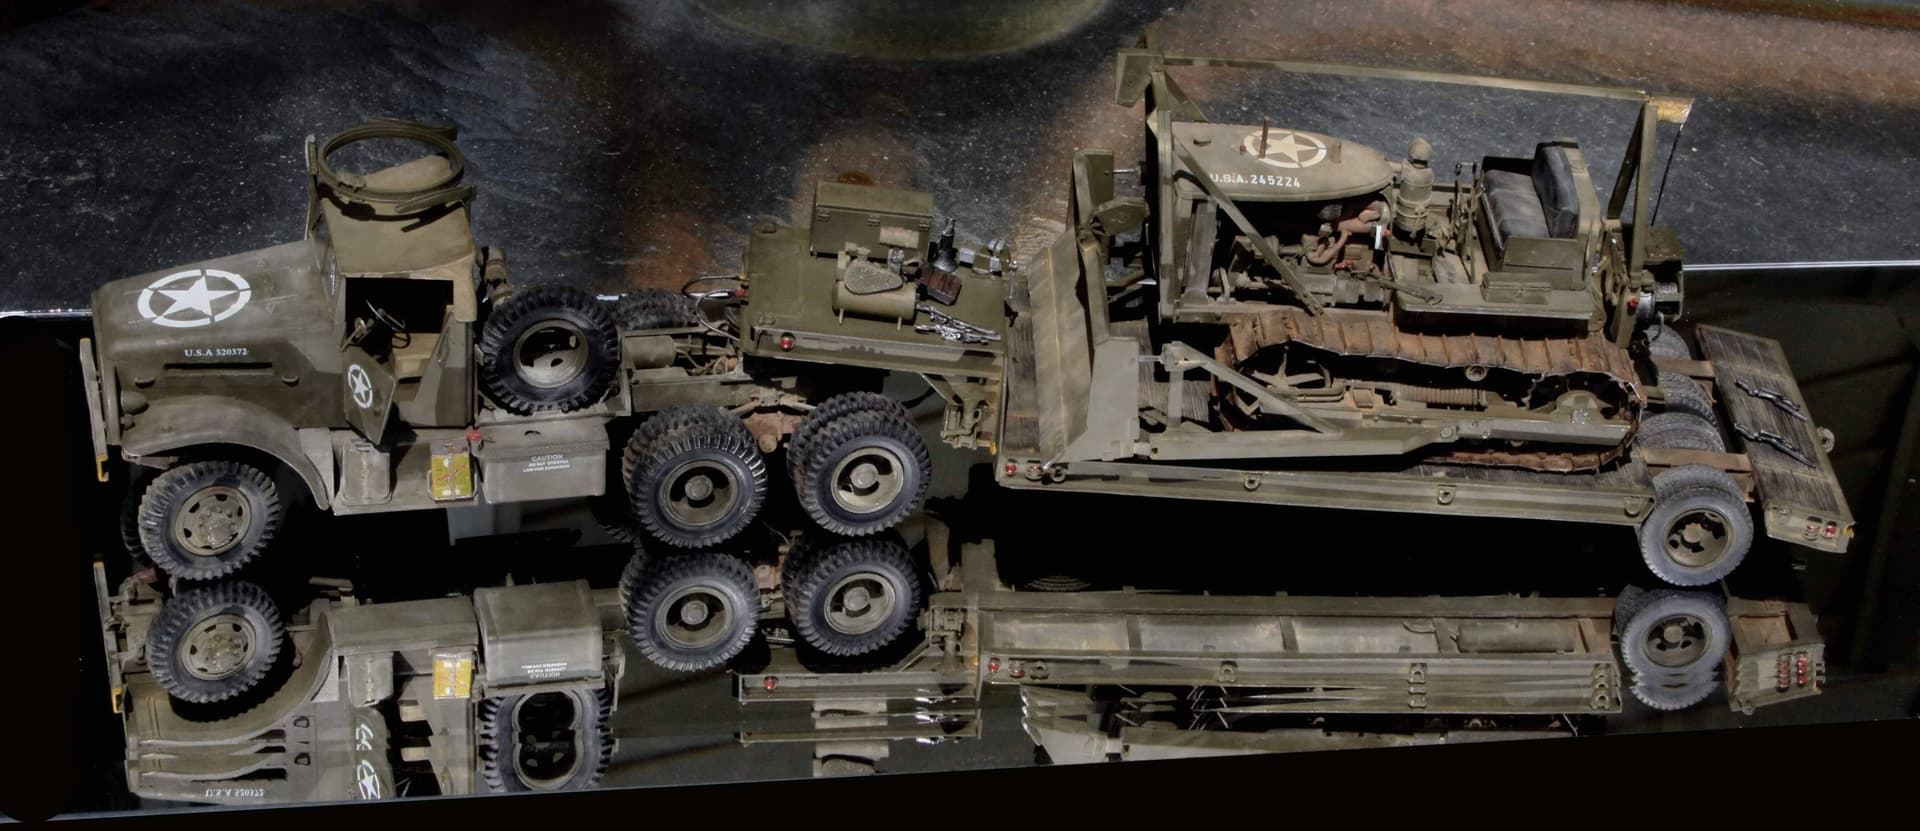
All the tires and tank wheel rims in the photos above have been painted that way except the Blitz and the Semi-tractor as they both have actual real rubber tires and those I never paint but just use pigments to weather them.
p.s. For gun barrels and other weapons shake it like crazy because then you may want that silvered look.
Here is an example of that gun metal paint at work on the tires.
Note especially the front mounted spare tire that is fairly clean:

1 Like