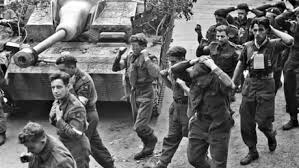
“They didn’t tell us about this Lot.”
Troopers of the British 1st Airborne, stuck in the streets of Arnhem.
After watching James Holland and Al Murray’s ‘Walk the Battlefields’ YouTube coverage of Arnhem, I decided on a project that would depict some telling aspect of that battle.
The British Paras were stuck in the town, fighting and being hunted by the men of the SS NCO school cadre, the 9th SS Panzer Division, and the newly formed 280 Strumgeschutz Brigade.
The men of the 1st Airborne didn’t expect to encounter enemies of that caliber and were underequipped to fight them.
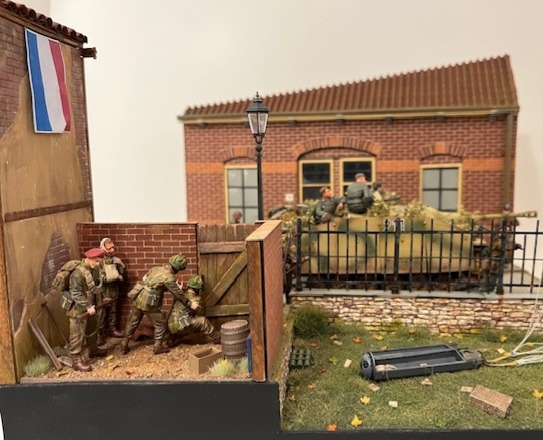
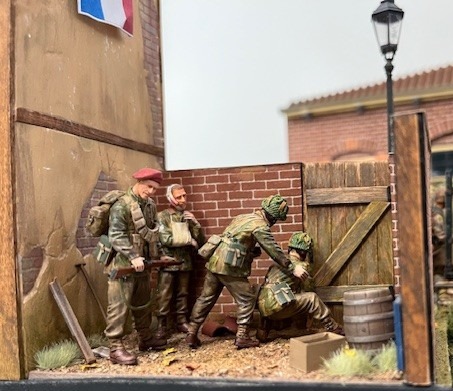
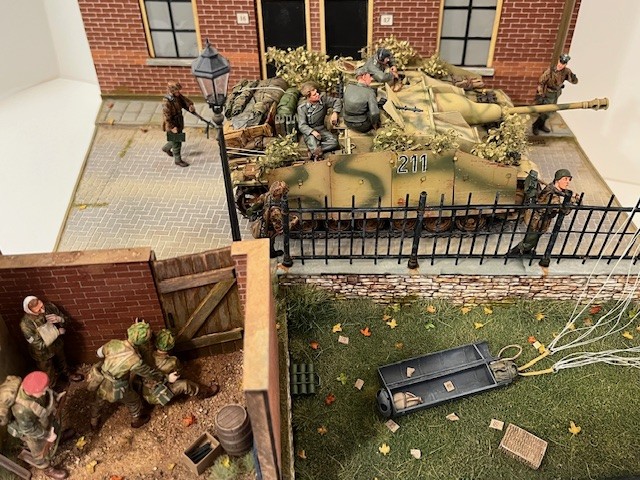
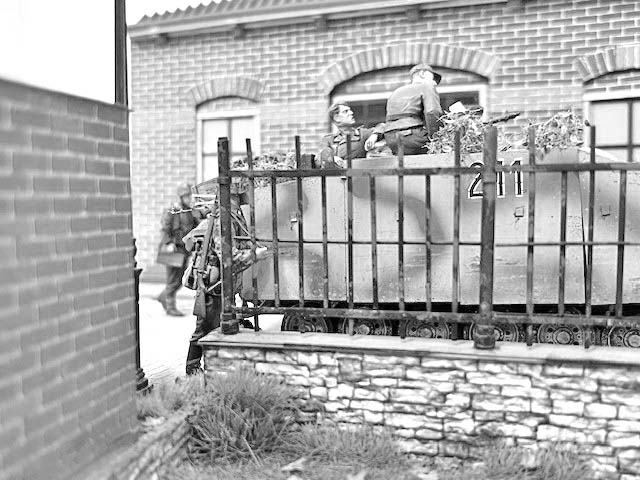
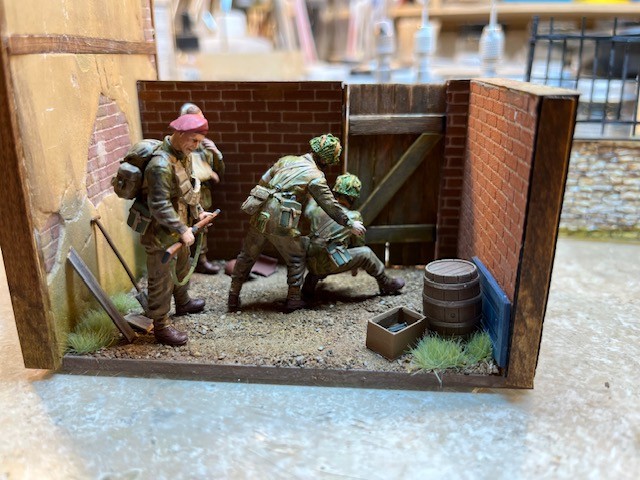
In this diorama, a small group of paras found themselves trapped and hiding from German armor, patrolling the streets.
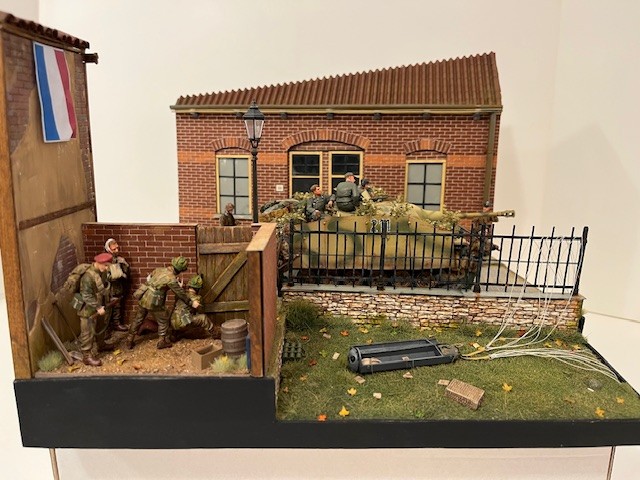
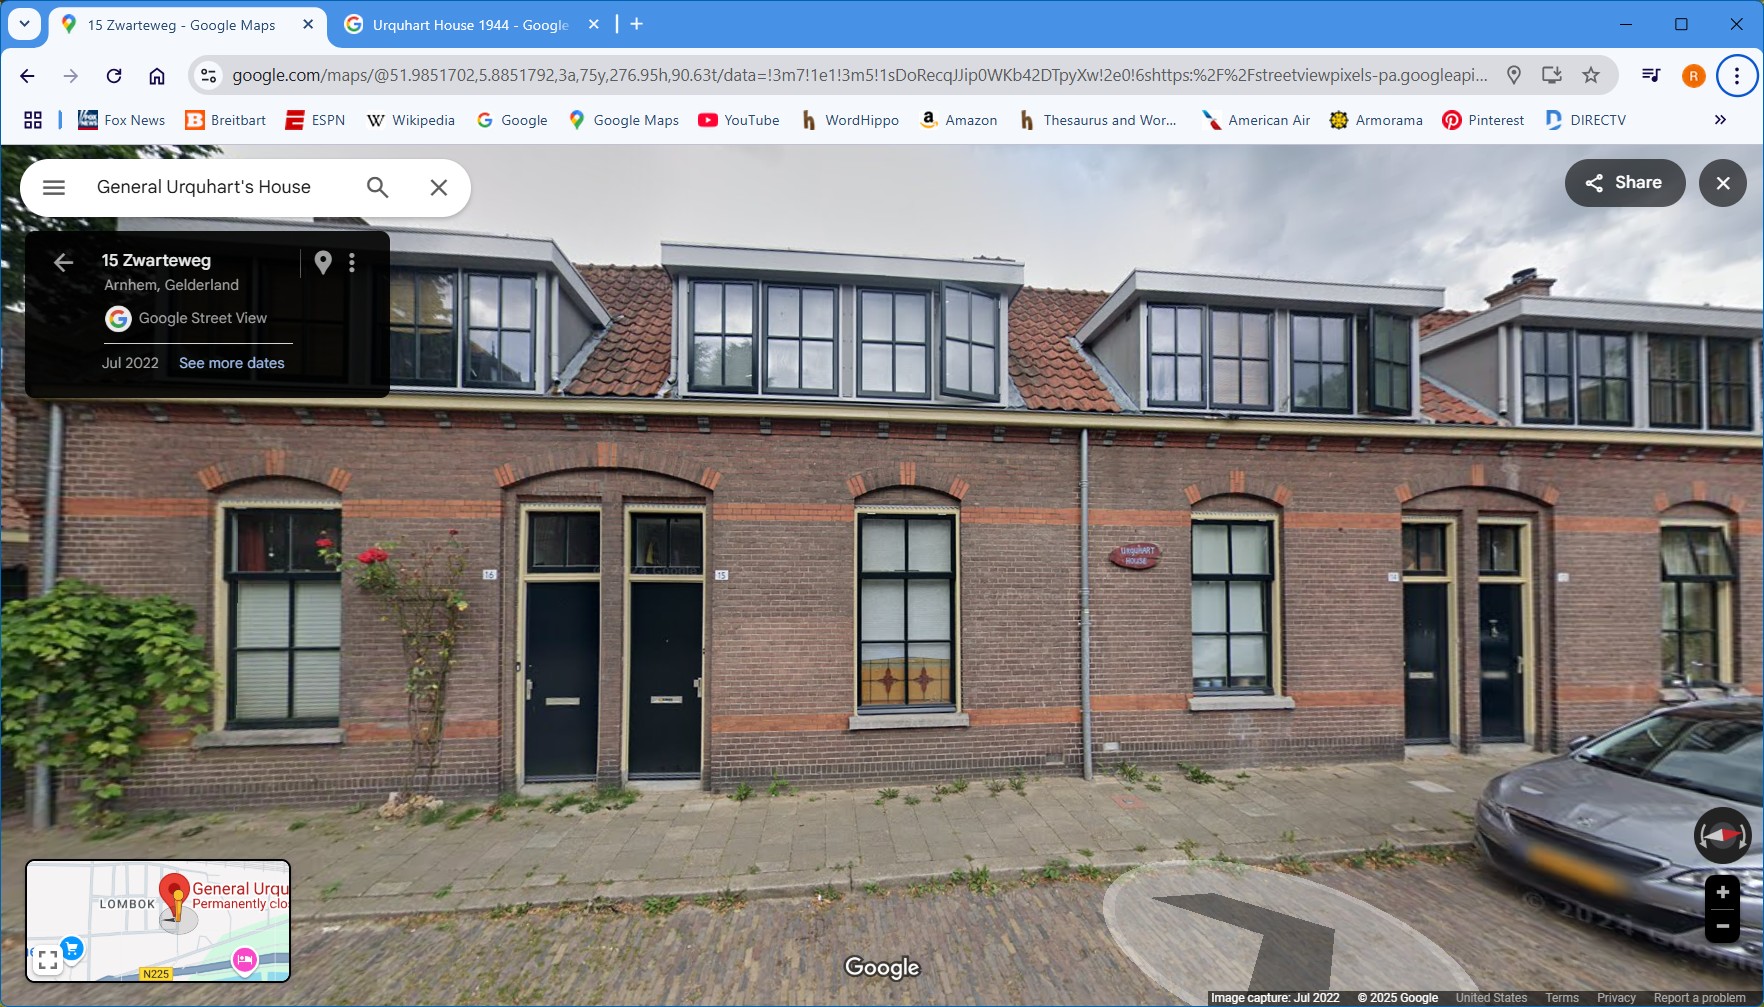
The rather pristine street/building was modeled after the same roadway and buildings made famous as the area where General Urquhart spent his uncomfortable day in hiding from a similar team of Germans. (The house is still there, looking much the same as it did back then.) Arnhem hadn’t been bombed prior to the battle, so the streets were substantially modern, clean and undamaged.
Find that place on Google Maps, StreetView.
I had the Border Stug III G, with full interior, crew and extras in my stash. I’d gotten a great deal on the kit, but as the inside would never be seen, I intended to leave it out of the build. A waste, but I do doubt the value of those interiors -laboriously assembled, but barely ever seen in a fully armored vehicle.
I wound up abandoning that kit (sorry Border), I found too much flash, prominent seams and sink holes. There were too many parts, and the instructions were often vague. It came with a page of ‘corrections’, as well – never a good sign.
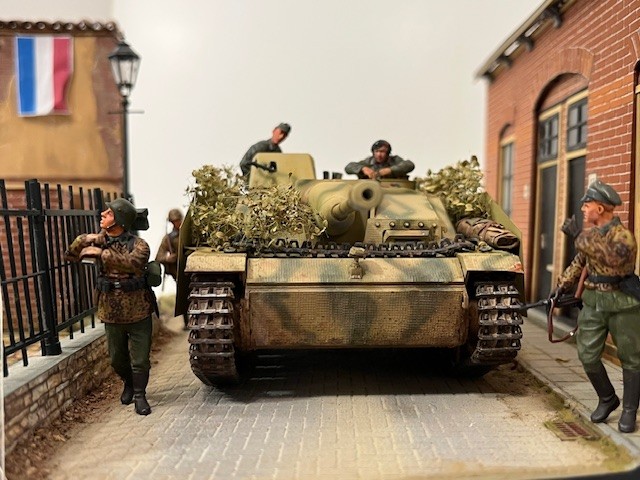
Instead, I went with the simpler Takom Blitz kit. Added Def Model Zim for better accuracy, and used a set of MiniArt side-skirts, from yet another Stug kit, I abandoned.
I’m much happier with the result.
As always, I added Value Gear stowage to the vehicle.
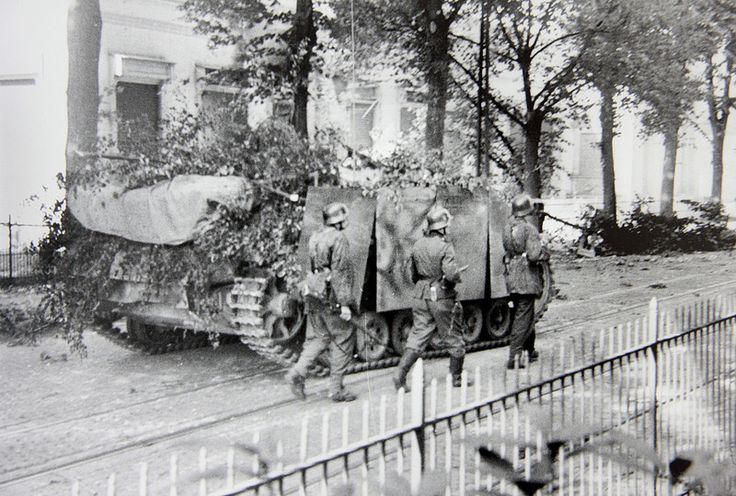
This is what I was shooting for…
I picked up the MB British Para figure sets and added assorted other pieces as needed.
The SS Landser were also from MB, and their poses were gently modified, while the Stug crew was from MiniArt. All with Hornet heads.
I cheated a bit with the buildings and the roadway, using the Tamiya printed brick sheets. Prior to the battle the city was relatively undamaged, clean and modern, to the Dutch standards. So, there was no call for aged, or damaged stonework.
I found embossed paper sheets of stonework on eBay (supplier: ‘Starboc1’; search: ‘16 SHEETS EMBOSSED PAPER stone’) for those retaining wall sections. They look fantastic (IMHO), and are much easier than carving and painting your own. A full range of patterns and surfaces are available. Check them out. BTW. 16 sheets (20x28cm) is a lifetime supply for a diorama builder like me.
I designed the building facades, estimating measurements, based on photos, on my computer, and printed off two copies. One on paper to use as a blueprint. The other on clear transparencies. The clear windows were then cut out and (Evergreen) plastic strips were glued on, to form the window frames. An easy approach…
I’m afraid the windows are oversized, though.
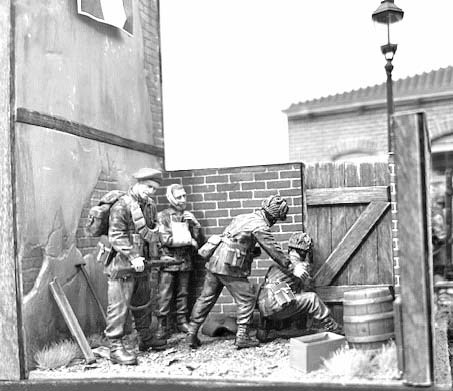
As Always I enjoy converting the photos to Black and White to compare them to period pics.
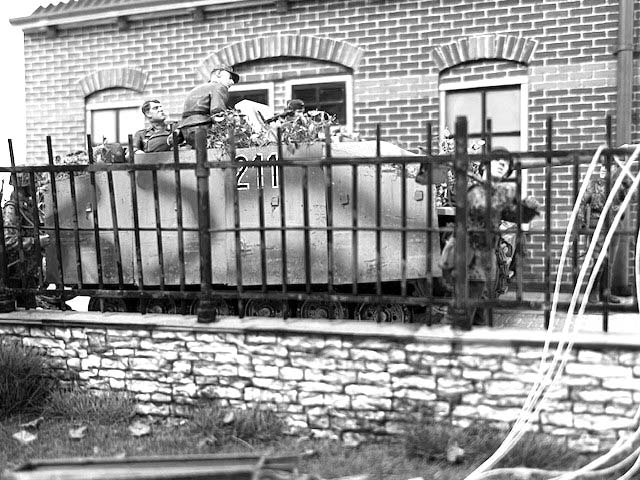
I built the base in sub-assemblies, and even populated the ‘para corner’, making it almost a drop-in, standalone vignette.
All-in-all, I’m afraid this project is not a favorite. The frustrating challenges faced to arrive at a suitable Stug drove me toward insanity. I’m not pleased with how bright the paintjob is on it either. It appears that the building façade, despite my best efforts, is out of scale – too big, more like 1/30 than 1/35.
I do like the story it tells. And the vignette of the paratroopers peeking out of their little hide, seems to work well.
I’m happy to be done with this diorama; looking forward to starting on something new.
Bonus Material:
I’ve mentioned this before, how I paint figures’ heads, but felt it worth repeating. This applies only to 1/35 figures (or smaller). Not to larger scale figures or busts, where I use artist’s oils.
After priming in white with a Tamiya rattle-can, I lay on a thin coat of a (Tamiya) flesh color, custom-mixed to be a paler shade.
Then I apply a red wash by Citadel (Games Workshop), called ‘Reikland Fleshade’
It settles into the creases, and adds a bit of reddish tint over the flesh-tone.
A darker, brown wash around the edges of the face adds more depth and can provide a five-O’clock shadow.
Then, if necessary, I’ll go back with some normal (AK) acrylic flesh colors to add highlights to the nose, cheeks and forehead. A touch of thinned red on the lips also helps.
If the casting has decent eyes, I’ll use a fine-tipped brush to lay in a very thin, off-white color into the eye socket, and ‘dot the eye’ using an ultra-fine Micron ink pen (005). That’s as far as I go in 1/35.
Give this approach a try, if you’re not happy with the figures you’re currently producing.
One other point on heads. The final product is hugely dependent on the quality of the sculpt. I’m afraid that real expressions, are only found on after-market heads. I NEVER use the heads that come with the (plastic) figure sets. The bodies are often fine, but…
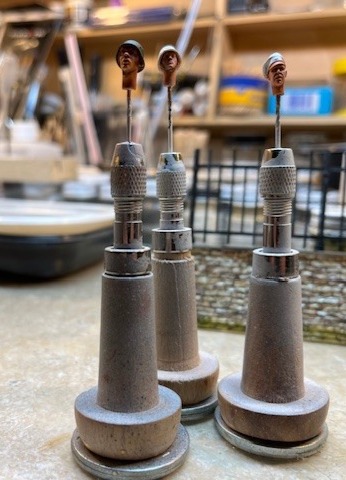
I always paint the heads separately. On my custom mounts. Then place them into drilled-out necks on the bodies. Add life by positioning them off-kilter – lean them or twist them.
For all straps, I use either solder or lead wire, flattened with a roller on a hard surface (my thicker Xacto blade handle). I buy RadioShack solder .015 or .022 on Amazon, or lead wire sold for fly-fishing, lure making. In the USA, ‘Bass Pro/Cabelas’ stores sell a great six spool assortment (.010 - .035)
A single spool of either will last a decade.
It’s flexible, and holds it shape perfectly through many bends and twists.
I also make better tow cables with three strands wound together. More flexible than copper.
For beginners – don’t hesitate to cut the sprue tree to gain easier access to the part. Don’t lose track of the part number, or cut off the sprue-tree identifier (as in “A”). But make every effort to get a clean cut of the part.
Make sure to remove ALL flash, and EVERY nub and mold seam from every part. It’s modeler hell, when after you’ve assembled and painted your model or figure, you notice a missed imperfection.
Paint frustration…
There are so many brands, and I have a huge collection accumulated over the years. I used to rely on Acrylics from Polly-S, then Model Master, but they’re now gone.
Then I switched to Tamaya for airbrushing (exclusively), and AK or Vallejo, for brush-work. I’ve been happy with that…
But now even those are becoming obsolete with newer lines and generations, and several new manufacturers, as well.
Do they expect me (us) to switch, and buy whole new collections of colors? I can’t afford it, nor do I have the storage space for more bottles.
And I worry about mixing pure, old, water-based acrylics with the new solvent-based colors.
I should probably pose this question as a separate BLOG, but what do you folks think?
I expect the old lines to slowly fade away, and I’ll be forced to switch over to the newer sets, but I’m not looking forward to changing my painting approach to fit the new mixtures, thinners and brush cleaners.
Thanks,
Ralph (Bravo36)