 Really great build log! Nice to see and read about the difference between the kits. It’s a bit like what I am doing with building 9 LAV’s of three different brands, you really notice differences between the kits when you do something like this.
The only thing about your build log is that I can not get rid of this image in my head of you building and hitting a chess clock every time … 
4 Likes
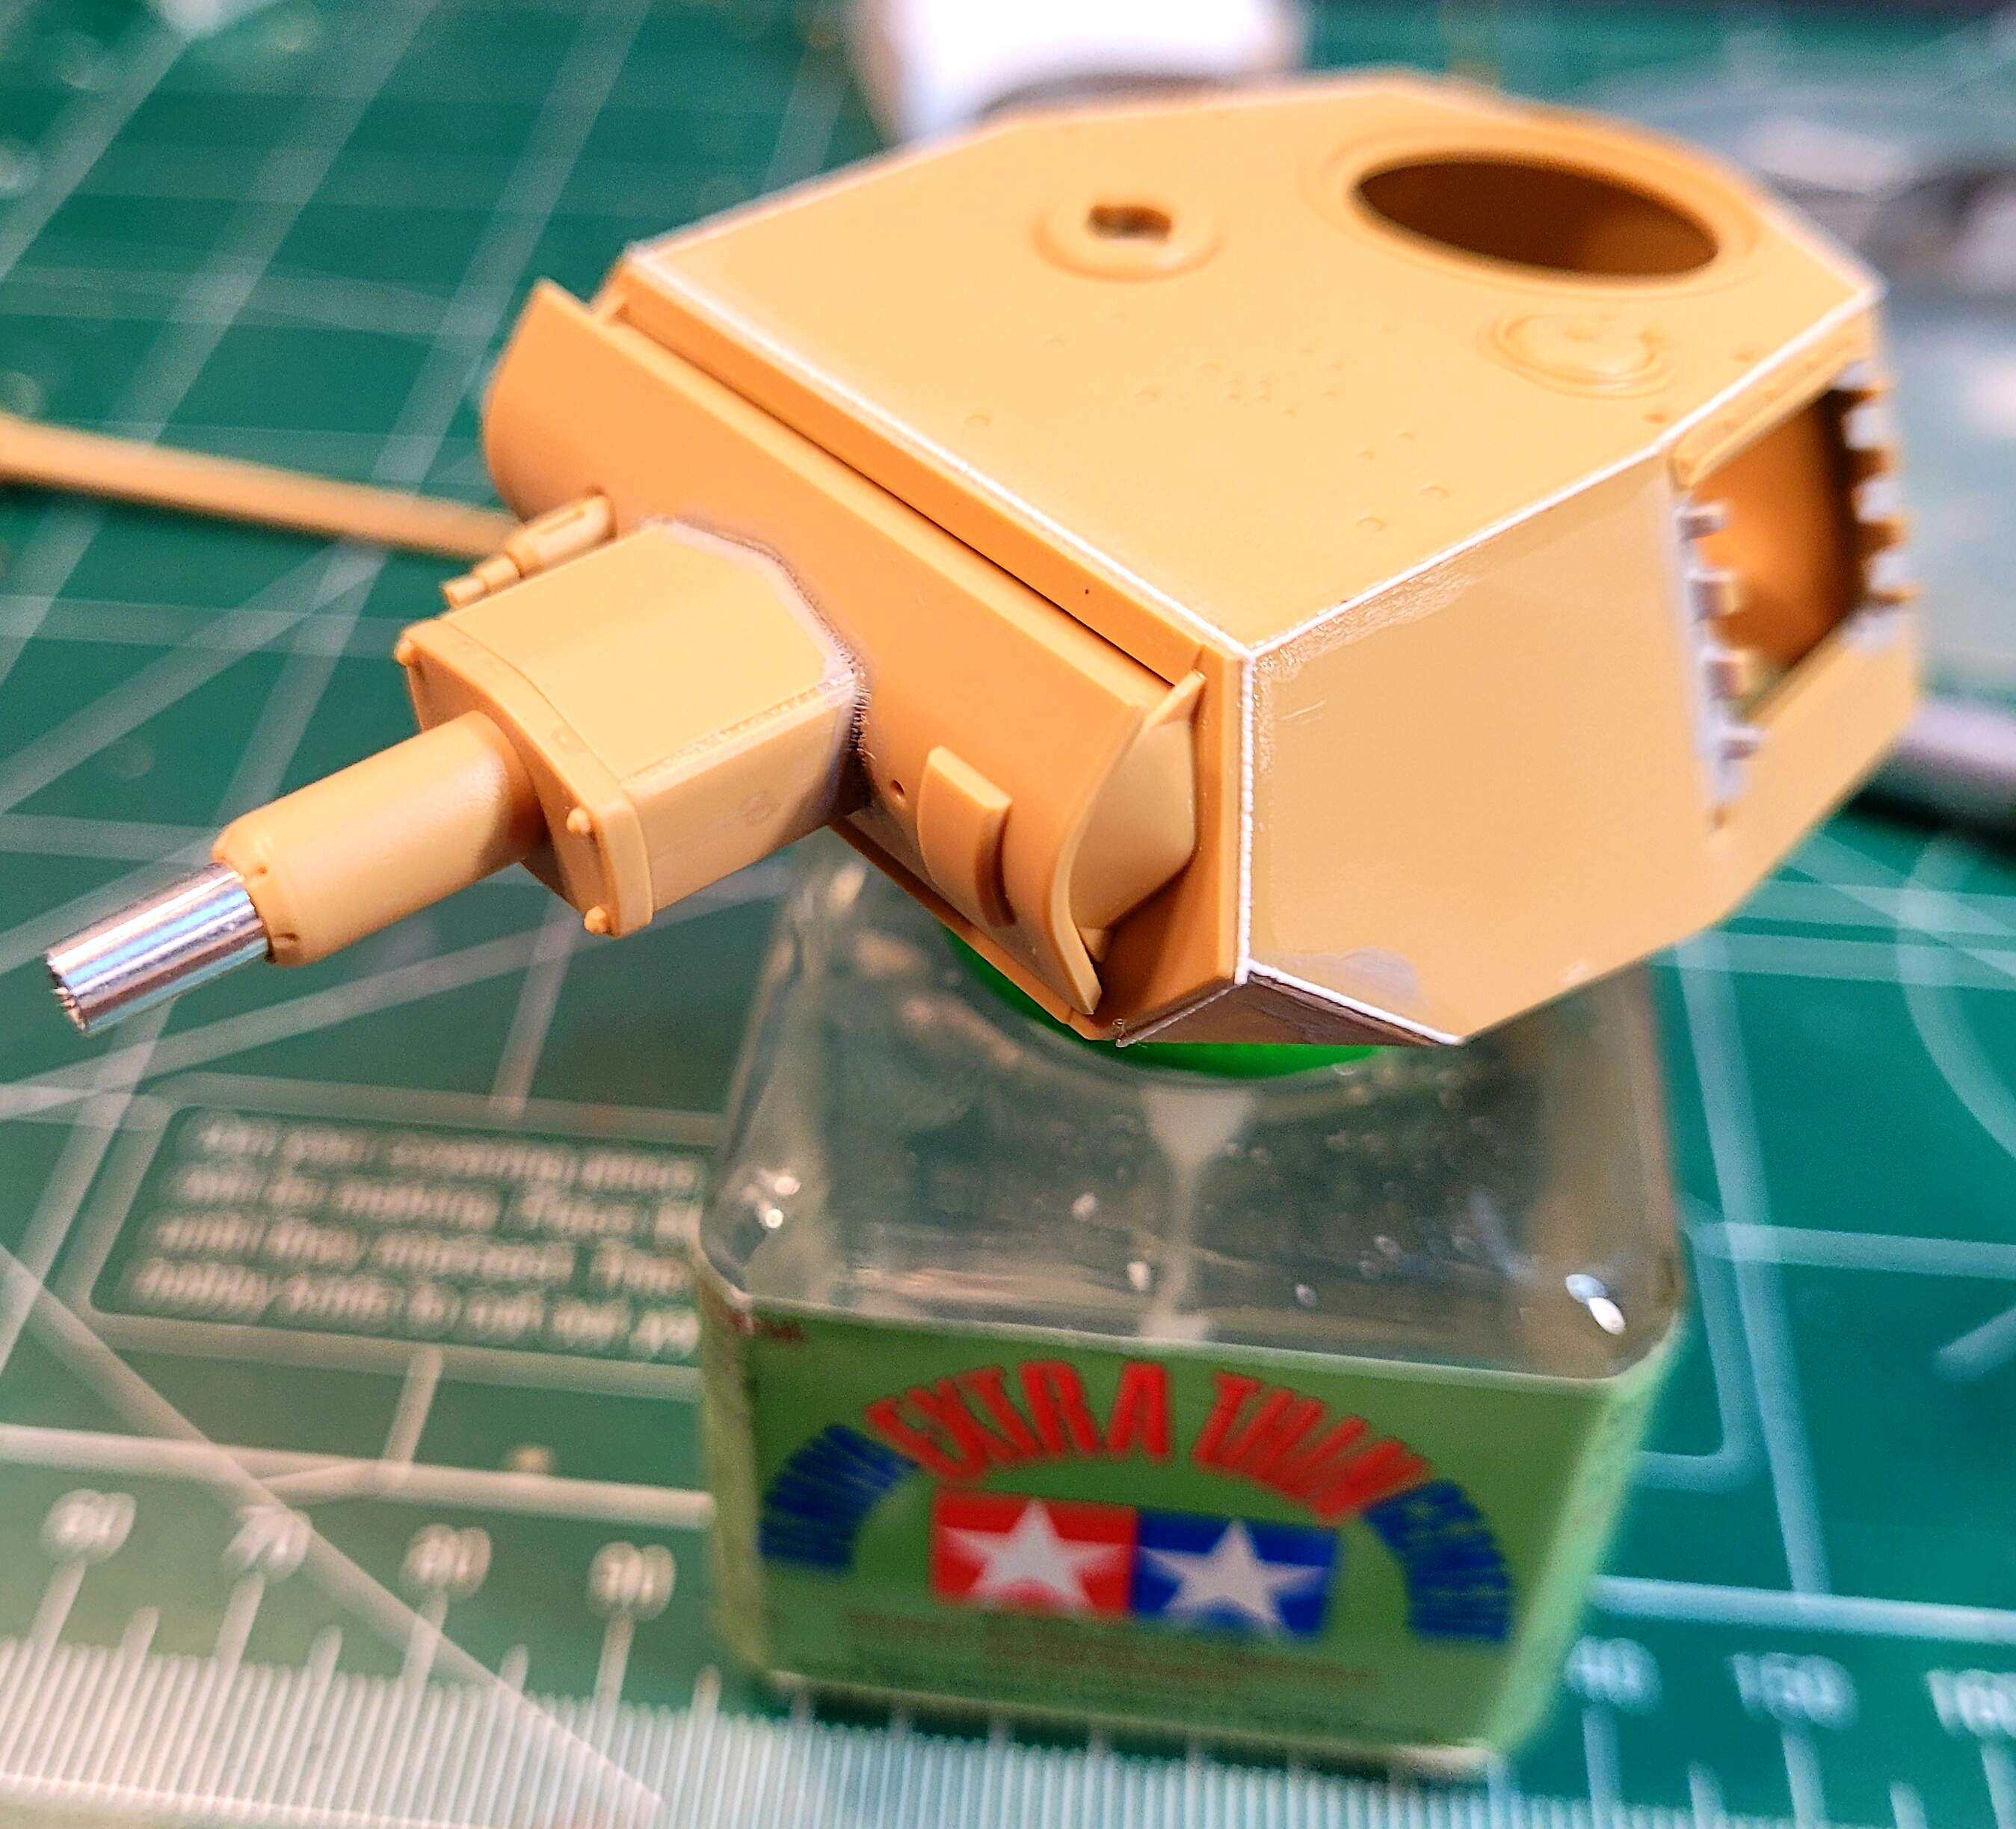
Step 16 Attaching Main Gun <20 minutes > total time 20 hours 33 minutes
YUCK  - The stock weld seam detail on the turret is pretty terrible
 . It looks like something Monogram would have been proud of …in the 1970’s.
The hinge assembly fits fairly well but needs a glaze of Molak Stucco in my opinion. Likewise with the turret cheeks. They fit OK but a thin glaze of Molak Stucco helps.
Really the turret really needs all the turret weld seams reworked and the flat head screw details tweaked.


7 Likes
@bwilt Thank you Bert! Very happy you’re enjoying the thread. Wow! 9 LAV’s at once that hard-core! I like it. Please feel free to post a link, I’m sure many of the folks reading this would love to check out your LAV thread!
LOL! Chess Clock is pretty close ![]()
I’m actually using the stop watch timer on my ![]() phone! Might as well put my OCD tendencies in model building to an entertaining use!
phone! Might as well put my OCD tendencies in model building to an entertaining use!
1 Like
I was wondering! ![]() Though I’m much too lazy to reach for my iPhone’s timer, I do glance at a wall clock at the beginning and end of each session (separating building vs painting times), then I log the time into a Numbers Spreadsheet. Looking back, it’s shameful how long it takes me to complete things these days.
Though I’m much too lazy to reach for my iPhone’s timer, I do glance at a wall clock at the beginning and end of each session (separating building vs painting times), then I log the time into a Numbers Spreadsheet. Looking back, it’s shameful how long it takes me to complete things these days.![]()
I do still enjoy modeling though!![]()
—mike
1 Like
@justsendit Mike how does the build time vs painting/weathering time play out?
I used to be ~60 hours build 40 hours paint on the typical project. Thankfully after Carpal Tunnel surgery and some new tools my build time has improved quite a bit. My paint weathering time is still very  slow.
slow.
I realized tracking build time was a good idea long ago. It helped me avoid grandiose projects that bogged down some of my friends…you know like 3,300 part seize gun build etc. I get really bored with most projects around the 100 hour mark.
Have the Plastistruct welding rod out…wink…going rework most of the turret welds and add several Tamiya missed.


5 Likes
60/40 is right on target for my current build which is a very complex kit with additional scratch-building by choice — can’t resist the Evergreen! I seem to do okay with building but it feels like I’m reliant on luck to get me through the painting stage. Now let’s throw Franken-figuring into the fray — a separate time-clock altogether! ![]() … And then there’s research… endless hours of research — can’t even begin to clock that.
… And then there’s research… endless hours of research — can’t even begin to clock that.
Now, back to following your incredible work. Keep going! ![]()
—mike
1 Like
Thank you Mike for the kind words 
All the Plastistruct rod is in place for the turret. Lots of chopping a head to texture the welds

6 Likes
6 Likes
It was nice outside today so very little work on the Tamiya Pz IIIN.
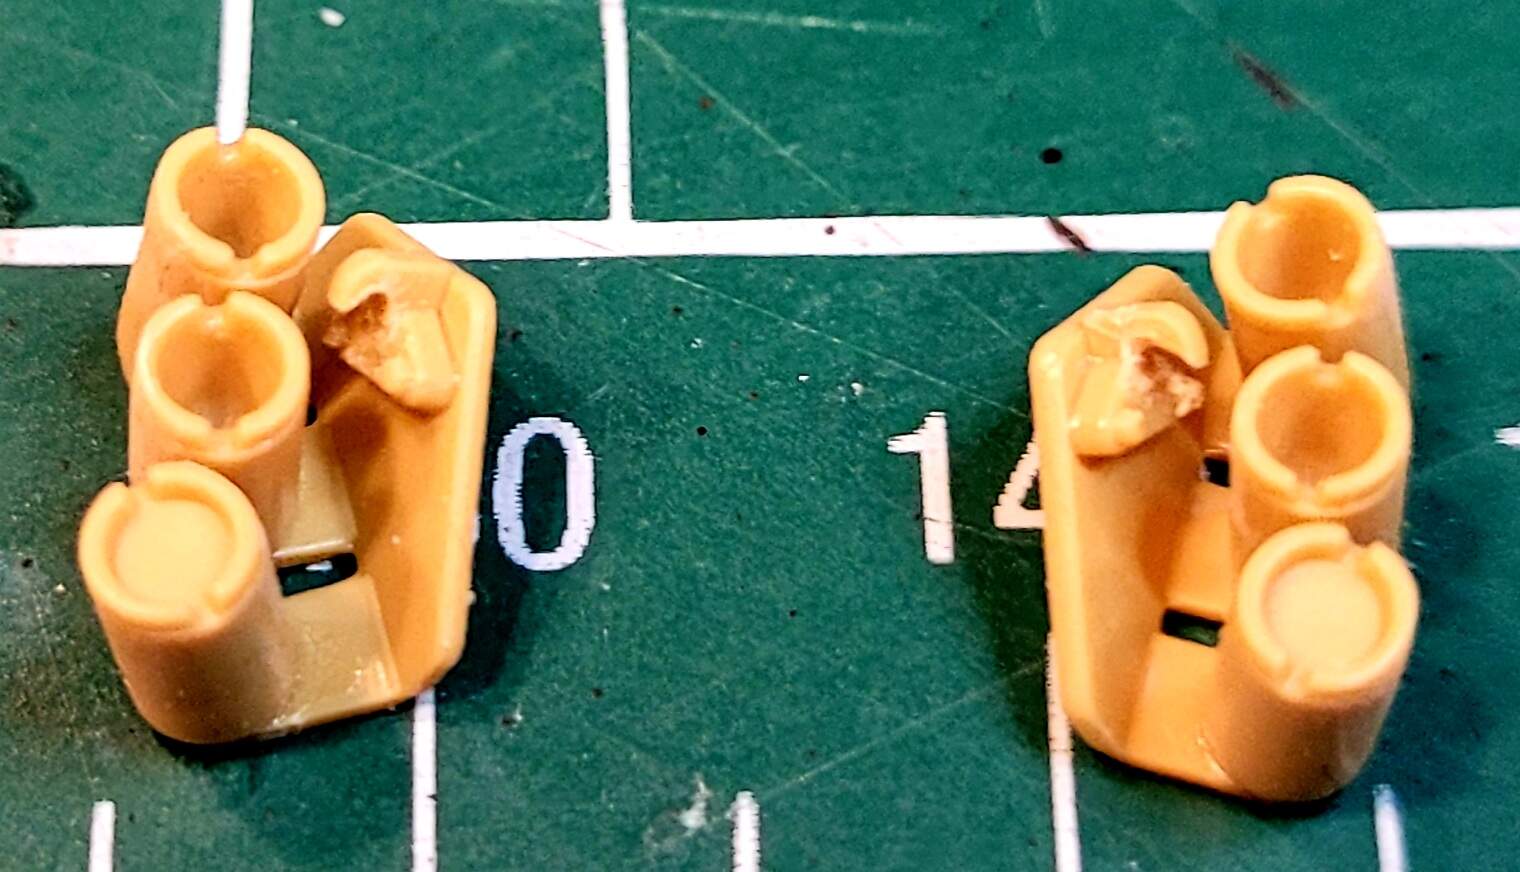
Step 16D Turret Detail <2 hours 47 minutes > total time 23 hours 20 minutes
All Turret weld seams redone with #11 blade textured .010 Plastistruct rod. Added missing tow welds to Turret rear and added one missing weld to front of Turret roof behind mantlet.
Doing the welds it’s impossible to miss the lack of flat head screw detail. The holes are there but the single slot isn’t.

The fix is a little crude but I feel it’s acceptable. Ironically they were added with a TAMIYA .1mm scriber

While the German armor plate of that era was pretty smooth the acres of bare open plate is just totally  boring to my eyes. Added just a bit of texture with Testor’s Liquid Cement & thinned Molak Stucco Putty to the front, sides & rear. Will work the plates on the hull later.

6 Likes
Italeri molded much better hooks in the 70’s for their Pz IV kit, so I really don’t understand how why Tamiya put this crap in the box.

Below leads to a picture if your wondering what the brouhaha is all about.
WW2Aces Pz IV picture - note hook on turret just to the left of the turret number
So anyway this one got the GodHand nippers treatment to cut out and make it have a hook. Plus a touch of a needle file.

Starting step 17
6 Likes
Step 17 Smoke Dischargers <20 minutes > total time 23 hours 40 minutes
I really like that Tamiya gave the choice of tubes with or without smoke grenades! So there are two sets F26 & F27 of very nice tubes with the double notch at the end of the tube. There is also a spare set of Stug G smoke grenade tubes on the A sprues but they lack the end notches. So two spare sets for other projects:)
F24 & F25 both have a punch mark on the back of the center grenade launcher arm. The two top launcher arms had slight sink marks to fill or sand out.
3 Likes
Step 18 Turret Assembly 1 <42 minutes > total time 24 hours 22 minutes
No surprises. There’s an extra pair of hatch stops A29 & A30 that can come in useful for tarting up an old obsolete Pz III/IV kit.

Decided to do a 19D Step for cupola details because we have a cupola with five raw openings. Easy to see though:)

The cupola top C26 is a bit disappointing in its fitment. About 2/3 of the diameter had a hairline seam . Thinned Molak Stucco to the rescue again.
5 Likes
Good job Wade!
I’m really enjoying these side by side builds!
1 Like
Thank you Ezra, it’s definitely good to know there’s interest in the trio of builds. I hoped the Tamiya Pz IIIN would wrap this weekend but it hit a few bumps.
C7 the fan cover housing had a sink mark on the top It looks like a nice orange C.

It’s shallow and a few passes with 1000 grit takes care of it.

Next added flat head screw details with .1mm scriber.

3 Likes
Inspirational! I’m hooked on the super-detailing! 
—mike
2 Likes
I’m hooked on watching others super detail
2 Likes
Just a few fiddly improvements here and there:)
Steps 19, 20 & 20D Turret Assembly plus Details < 1 hour & 55 minutes > 26 hours 17 minutes
Attaching hatch doors, smoke dischargers were done at same time blurring steps 19 & 20 into one step.
The turret hatch doors needed a touch of thinned Stucco in the corners to seal as desired.
The stowage box is lacks an inside face. Its obvious its hallow with a decent lighting. It was filled with clay then painted.
The five raw openings for cupola vision blocks were filled from the inside with Evergreen strip. The cupola had ten rain drain holes added on exterior ring that goes around the hatch. Likewise five weld seams were added between the vision blocks below the rain holes.


Mild annoyance, I didn’t have a PE vane sight for the turret. Rocked it with Shep Paine style and used Evergreen strip.


6 Likes
Really close to wrapping the Tamiya Pz IIIN:)
Step 21D Final Hull Details < 1 hour 2 minutes > 27 hours 19 minutes
Added Aber 2m antenna
Added air intake screens after painting inside vent. Bent the 4 tabs slightly to ensure they lay flat against the engine compartment top.


Added very light texture to hull front, sides & rear with Testor’s Liquid Cement and Molak Stucco Putty.
Attached Spaced Armor after painting inside.
Texture Spaced Armor

6 Likes
Step 21 Turret to Hull < 2 minutes > 27 hours 21 minutes
Total Build Time 27 hours 21 minutes.
Probably 10 hours of that is my choice of added details.


With spare tracks installed


After the build comments & opinion:
Best points: Ease of assembly, outstanding engineering, excellent fit. Crisp quality molding, good detail, Basic PE screens included. Almost no flash
Worst points: The new style vinyl tracks, missing weld seams on top of hull & turret. Cupola isn’t up to standard of kit. MG’s should have been slide molded for a 2008 release. Buying aftermarket tracks almost a given.
Would you buy this kit again for $35?
*Sure, I build the Tamiya Pz III L previously. Pitched the kit tracks on that one too for a set of Fruils. Excellent build experience. Even $45 *
Would you recommend this kit? *Recommended with reservations
The kit tracks need replacement for most to be happy in 2020 with the kit. That will add to the cost.*
Build experience - Outstanding, joy to build, kits like this are why model building is FUN in my opinion.
Cost could be a concern $35 to $45 for the kit plus a set of aftermarket tracks $40 to $60 in many cases. With a stash of 145 kits clearly my time is a far more limiting factor than cost.
Overall rating 7 out of 10
10 Likes


