I need to learn the technique for fading a canvas tarp for my ODS era softskins.
My last build, an M813, has a NATO green tarp and cab roof that is way too new compared to the rest of the vehicle.
Can anyone point me in the right direction? Ive seen a “how to” on Youtube using an airbrush but I have a feeling that some sort of drybrushing would be safer.
You could go with a lighter green as well. Either will work. No idea on an vids that show this.
I did similar on the bags on my recent M60A1 RISE / Passive w/ERA and M9 dozer blade though. I went with a lighter base color and then drybrushed a darker green, then a sand wash.
Canvas by nature attracts dust. The weave collects it and then rain will set it in. So basically a dusty appearance is most often what you want. If left to the elements you will get mould spots where water may have collected in depressions or where the canvas was folded when wet.
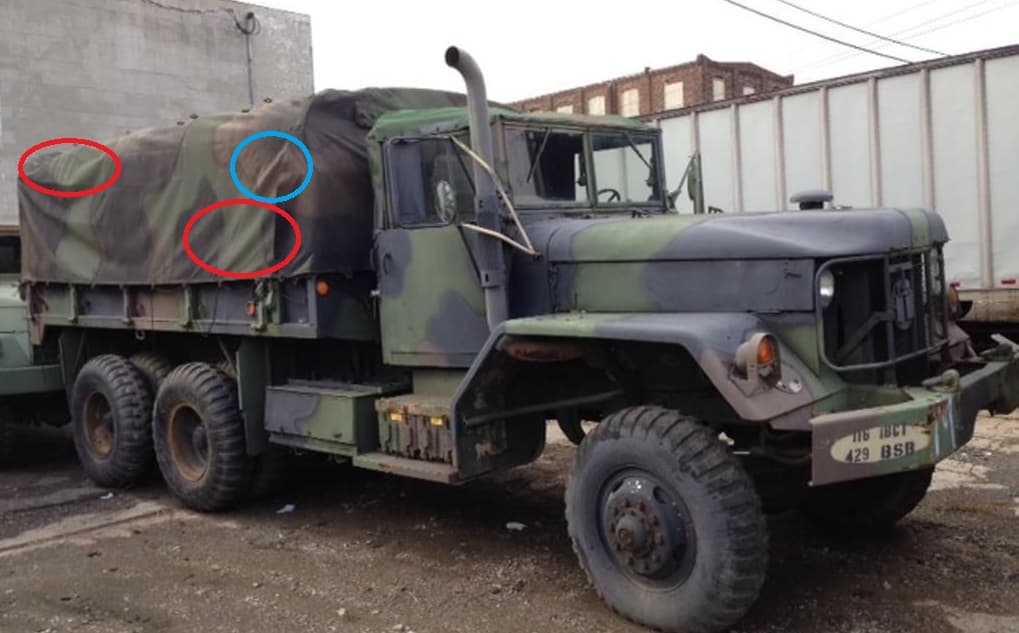
I always look to real life for inspiration. Here is a pic that demonstrates the lighter green on green Gino suggested. It also shows a lighter brown on brown, etc. You will also note the darker colour due to shade - that is also important for your scale effect. Then overall a very thin wash for the layer of dust to bring it all together.
Don’t be tempted to use more paint to bring the detail out. Very light passes to gradually build up the paint will still bring out details and highlights, rather than a single or few brush strokes.
Don’t expect it to be done in one go. The best effects are a gradual build up after letting previous sessions harden.
Avoid white and black to change your colour. White will deaden and turn a colour toward the grey. If you can, use a lighter or darker shade of the same colour to keep the richness of the basic hue, or for green lighten with yellow or beige/buff, for black and brown lightenwith Flesh (no I am not off my meds…) .
And as always, practice on an old model or scrap if you can, just to see the result.
For what it’s worth, my preferred method involves artist’s soft pastels (widely available from art shops). Not to be confused with oil pastels, these can be ground down to a powder (using either the edge of a craft knife or a piece of sandpaper), and simply brushed over the required area. A darker shade of the base colour (or a dark grey) can be used to emphasise shadow in folds and creases, and a light sand-tone to give the impression of accumulated dust over the surface. If applied carefully, the result can be quite subtle, and any excess is easily removed (either with a dry brush or a brush moistened with water).
If you intend to handle the model frequently, it’s worth sealing the surface with a matt varnish; since my subjects are always incorporated in a diorama/vignette, they’re never handled, so I don’t bother with this step.
Just a side related note, but there are several types of tarps that I came across in service around that time fram. There is the old fashioned rough canvas, usually dyed OD… a later vinyl type that is more of CARC green when new, and then the NATO pattern painted vinyl type like in the photo above. On those the surface texture is much more smooth than canvas. Although in the desert (and other field conditions) they do get just as filthy as the older canvas types.
Thanks for the links. I started watching them, but I’ll be tied up replacing the kit wheels with DEF ones for a few days before I get to the tarp. TBH I’m considering starting from scratch with another Italeri tarp. Then I can maybe start with a slightly lighter base color?
When I am doing “canvas” or fabric like material, I look at the end result I am trying to achieve. I start with a fairly dark shade of what I trying to achieve. I then just keep applying lighter and lighter shade until I get to the look I am trying for. It can take some time and effort. I have been known to get several layers into it and go total dark again and start over.
Really nice explanations. Thank you guys. I’ve had good results adding burnt umber to browns to darken and light sand or buff to lighten the color as was described. Haven’t tried a light dust wash, but have used dust pigments at the end to lighten the whole effect.