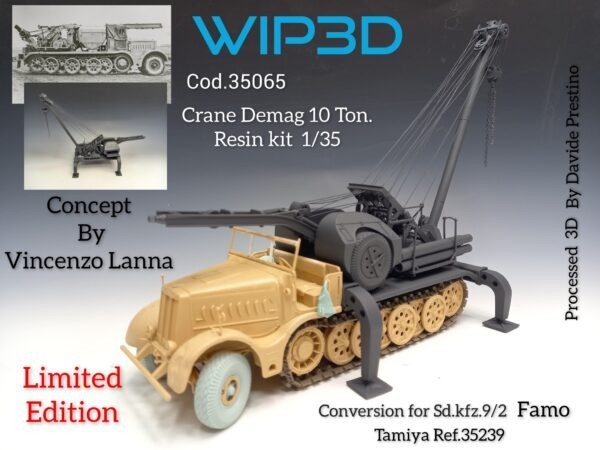
New resin conversion for an Sd.Kfz. 9/2 with Demag 10t Crane
This is partial text from the full article (usually with photos) at https://armorama.com/news/wip3d-sd-kfz--9-2-10t-crane-conversion
New resin conversion for an Sd.Kfz. 9/2 with Demag 10t Crane
While this is a nice looking kit and I have bought many nice, fret free 3D models, I would need to see how the parts come to the buyer first. I’ve bought so many 3D kits, large and small that had so many printing “frets” that removing them carefully to avoid damaging the item and then cleaning up scores, if not hundreds of little bumps all over the item because of the cut points. So, an article like this needs to have pictures of how it comes to us, like the articles do in the very fine new kits site called Modeling News. That site seems to be primarily resin and plastic oriented, but you get my drift. I don’t want to spend more time on clean up than build which makes resin so inviting because there are so few points to clean.
Perhaps I’ve missed something, but I read “resin” as cast, as opposed to a 3D printing. I may be wrong. I’d quite like to get this, would need to source another FAMO. Bet it’s expensive. Any news on stockists?
Or is it direct from manufacturer?
Im not sure if I get your point because I have no idea why you would need to “source” another Famo and the rest of the message has nothing to do with me. When I say resin as cast as opposed to 3D printing what I mean is that I have had kits as big and bigger made of resin and the parts are simple to clean up because they are cast and only have one casting block to remove. 3D has many little sticks which apparently were necessary for the 3D printer to print to make sure the “ink” creates the part. I spent more than 15 minutes removing those “sticks” to free the big finished piece, a replica Tiger E engine that is super detailed. When I finished I discovered scores of little hardened ink at the point where the “sticks” met the final piece, so many that I decided to use a replica in resin that was not quite so well detailed. Oh yes, and I had married one bit of the engine mount trying to remove the ink sticks. AS I bought a number of the 3d engines, I will be happy to send one to you so that my message will be really easy to understand. Just send me your address. And if you look at Modeling News you can see that most items have a “read more” button that goest to a review article that shows the plastic sprues that you get with that kit. It is helpful because I know never to buy a certain brand’s product.
Kinda the fun part of modeling ![]()
I mean would you prefer it come as one already built and painted piece?
Resin (SLA) printing works by gradually exposing a print plate lowered into a vat of UV-curing resin (the “ink”), using an LCD to flash UV light in the shape of each layer of a 3d model onto the resin, curing it onto the print plate.
The “sticks” are supports, and honestly 15 is nothing. My SLA-printed Canadian infantry in 1/35 have somewhere around 30 supports. Without a support, the model would not print, as overhanging détail would be ripped off the print plate by the suction caused by the FEP film that separates the resin from the LCD screen.
You say you’ve bought engines, I’m not entirely surprised the detail wasn’t the best. As somebody who deals with both tanks and cars, SLA engines for cars are generally printed in a number of parts, to ensure each part is fully detailed.
If you’re having trouble removing the supports or smoothing out the model, use side cutters to cut the supports off, and 99% IPA to smooth out any layer lines. Just remember to cure the print in UV light after.
I will say, generally resin printed parts are way harder for the manufacturer to produce (SLA printing is toxic and messy) but very end-user friendly!
I don´t understand the rand against “sticks” on 3D printing parts .Sawing and sanding resinparts is much more horrible as this .Sawing resin makes a lot of poison dust and sanding either .Most of the time you have to use filler for all the bubbles and the parts are bend or broken .3D Prints are much more detailed and you need less parts because they are more complex .Use a Tamiya cutter that will solve your problems and your 3D-phobica .And you don´t know either how the resinparts will delivered to your home .
Sorry, didn’t make myself clear. From the photos it looks like a cast resin kit as opposed to a printed one, but the company name (I’m not familiar with them BTW) would seem to suggest otherwise. I’ve not had much success with printed parts supplied in kits I’ve made, perhaps it’s my clumsiness, but they’ve always broken and proved unusable, so I’m inclined to avoid them. The reason I would have to “source” another FAMO, is that I have two kits of the Tamiya vehicle, both assembled and painted. I’m assuming this kit is an add-on, so I need to buy another FAMO to put it on.
Wow. Supports on one part? Not very daunting. Now this is daunting. All this for a 1/48 scale kit. There was more, but I didn’t think to photograph it until I’d removed the supports and tossed several of them.
Unfortunately, it appears that this conversion is wrong and inaccurate. While I haven’t looked at the crane closely, the mounting is completely wrong. The 9/2 did not have solid deck between the fenders. The 9/2 was built using a custom frame that was wider, longer and also deeper at the rear then the regular Famo. The turntable mounting for the crane was slung between the two frame members and the rest of the frame was completely open, so all the torsion bar mountings are exposed. There is no solid floor or deck mounted anywhere between the frame rails at the rear.
If you want an accurate model, I would suggest searching out the Panzer Concepts conversion that was released a few years ago (although now unavailable direct from Panzer Concepts). It has a completely new, accurate frame with all the necessary details.

