Wrapping really tiny PE around really tiny plastic

I’m working on a mini-art SU85. I’ve been saving all the PE parts of it until now. (I’m not sure that was the best idea). So there are a few straps for holding things down made out of PE. I think I can thread the two strap parts. But the end of each straps wraps around a tiny plastic handle (most of them are plastic but some are extremely tiny PE. I could use some tips on how to do this wrap around the plastic bit…

Thanks.

Well, without knowing more details, I’m assuming that you’re doing the straps that hold the tarp, fuel tanks and tools (?).

The best general advice that I could offer is to anneal the PE parts ad then pre-bend them around something like wire or small drill bits that are the same diameter as the plastic bits. Open the PE bends just enough to slip them onto the plastic bits then use tweezers to close the bends back. The plastic bits can be glued on first in most cases. If you do, allow the glue to dry overnight.

Annealing will make the PE straps very soft and pliable. Note that you DO NOT want to try to quench the PE after you heat it. Just allow it to cool naturally. (Heating and quenching is how to temper the metal and make it harder, the exact opposite of what you want.)

If you use a gas flame to anneal, be careful that you don’t overheat the brass. You can literally burn it to ash. All you need to do is heat it enough to make it turn color. Cherry red is OK, but you really don’t need to even go that hot. The brass will “flash” from gold to blue then silver. More heat will make it glow red, and more heat might burn it up. If you hold the brass strap with tweezers by one end, rotate it and hold it by the first end heated to heat the other end.

If you use a candle to anneal the brass, don’t hold the parts in the flame which will cover them in soot. Hold them just above the flame but as close as you can without being in the flame. This give the best and cleanest heating. If the parts get sooty, clean them before trying to glue or solder.

Other parts that don’t need to be formed by bending don’t need to be annealed, so all things being equal, I don’t heat the entire fret, just the individual parts that will benefit.

4 Likes

Yes, those are the parts - not the tools attached to the side of the superstructure, but the tie downs for the things that rest on the fenders - tarp and ice cleats (I think?). I will do what you suggest. I think I’m going to replace the PE “hooks” with my own shaped from brass wire. The PE parts just look too tiny.

I’m convinced the designer at mini-art has a masochistic streak…

Thanks for your suggestion. Angel recommended using annealing on some parts and I’ve been hesitant but I think it’s time to add this technique.

Annealing is a technique that anyone who’s going to work with PE parts pretty much has to learn sooner or later. It sounds like some sort of alchemy, but it’s really very basic. It’ll “click” very quickly after you’ve done a few pieces.

FWIW, I’d recommend using one of the miniature butane torches that are available. You can find these locally at Harbor Freight or Northern Tools. Also, a lot of auto parts vendors sell them for guys to use to heat wiring shrink wrap. Another potential source is a store that sells kitchen supplies like pots, pans, and utensils. Chefs use a butane torch to “brown” the tops of their meringue pie toppings.

Here are two examples of butane torches I got from Northern Tools.

This first one is my favorite, but alas, the plastic slide on-off switch breaks too easily. It’s just not made for constant use, lighting it over and over many dozens of times. Eventually, the little switch just breaks from fatigue.

This larger one can stand on its own to allow you to use both hands. It also has a built in piezo electric igniter which is really handy. Without a self igniter, you’ll need a cigarette lighter to light your torch. A little awkward, but easy to get used to.

This is a torch I found at the local auto parts store for less than US$5. You do get what you pay for, and this one is not too durable, but it worked for a while. It has a nice, small flame, but it can’t be adjusted for flame size. It’s either on or off. Still works quite well for most PE annealing and soldering.

Refill butane can be found at the same place you buy the torch or with the cigarette-cigar-pipe smoking supplies anywhere that sells tobacco products. You don’t need to buy the torch brand name proprietary stuff, either. The ordinary lighter refill butane is the exact same stuff and usually cheaper.

This photo shows about the ideal proximity of the tip of the flame to the part. However, with a butane torch, if the part gets into the flame, there’s not sooty residue.

Although captioned for something entirely different (an example of how to form a PE piano hinge), you can see the way the brass discolors after it’s been annealed. Just heating it until it changes color is usually enough to soften it. You also don’t need to heat every area on a large part, just the areas that will need to be formed. That way you can keep some of the temper or hardness in the rest of the part to help it resist distortion.

Phil. Annealing is a must where you need to roll parts - large or small. You will be very surprised the difference it makes. As Michael says, don’t anneal everything, especially anything with 90 degree bends like boxes, etc. You need to avoid the brass distorting or curling.

Leaving the straps to last is not always a good thing, especially where there are fine handles like you mention. Usually the strap is meant to thread through 2 of these with the cargo item or tool placed between them and the two strap ends curled around the cargo. This means there will be a taught straight section of strap that sits against the hull - that section is what you should glue down first, after you have preformed the end sections as per the advice given above. Then add the handles over that - that way you do not pull the handles off trying to thread and curl the straps later.

Thanks guys. Good advice all around.

Peter, I wish I’d read all the directions before I started. On this kit there is only one strap that goes around a tool - the shovel on the side of the superstructure. The strap is also shown looping through the eye of the tow hook. The instructions call to wrap this strap well after both of those are attached. So I cut it and looped it around the shovel which looks fine.

I’ve started studying the instructions for my mini-art T-34/85 hoping to avoid these kinds of issues in that build. Mini-art suggests wrapping the straps around the plastic handles and then gluing the whole thing down. Anyway it’s done it will be a delicate operation…

Regards,
Phil

Climbing the learning curve now. On the larger straps this seems to have worked well. The first smaller strap I tried bent when I got it close to the flame, then broke when I laid it down… I guess I should try to do it without annealing first on each part and just anneal the ones that need it. Lesson learned.

Given that getting a piece close to a flame disintegrated it, I’m wondering how to tell when it’s safe attempting to solder a piece?

There are some brush guards around the headlights on my Valentine. The strap in back is stable but the guard piece itself are pretty small and unstable so I shaped some copper wire for those. I would like to solder that to the PE strap but am a little hesitant. Tips?

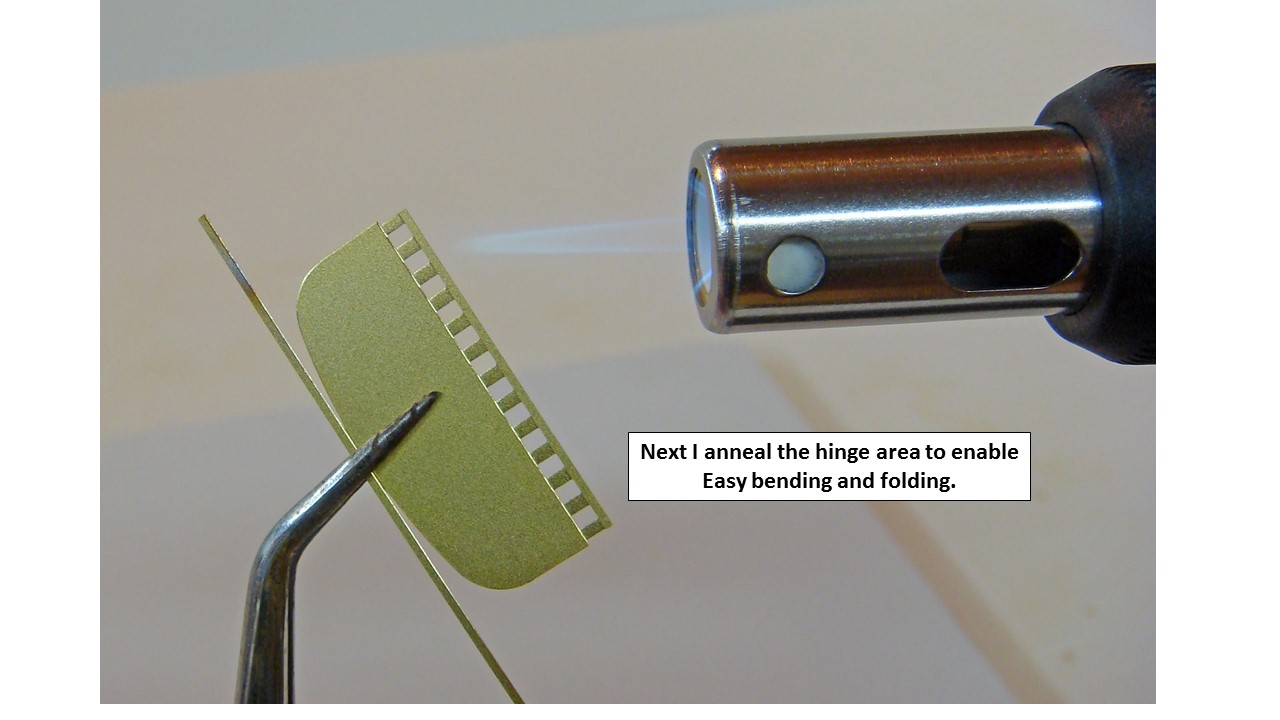
Keep in mind that you ONLY have to get the brass hot enough to discolor. You don’t really need to heat it until it glows cherry red. So, for small parts or pieces that are thin and / or narrow, bring the part to the flame slowly while watching it. When it gets hot enough that it turns color, either remove it from the heat, or move slowly along the heat source to anneal the entire length - but without bringing it any closer.

Admittedly, this takes some practice and little experience, but that’s how it’s done.

Note that a lot of PE is designed with thinner “bending” areas etched into it. You don’t really need to anneal these, and in fact, they’re often so thin that if you do anneal them, you’ll only get one shot at the bend. Also note, though, that the brass will increase its hardness and brittleness every time it’s bent. Even annealed, if you work and bend back and forth you’re setting yourself up for breakage at the bend. exercise extreme caution if you have to un-bend and then re-bend a PE part.

Soldering only requires that enough heat is applied to melt the solder - period. More heat does not help or improve things at all. When the solder melts and flows, stop! and remove the heat.

IF the solder does not flow, you may have to do one or all of the following:

Clean the parts to remove any residual burned lacquer or oils from you hands and fingers.

Use more flux. Remember that the solder will only flow in the areas where the flux has been applied. Even flux will not make the solder flow into some areas if they are too dirty.

A liquid, acid flux is generally better than a paste flux. Capillary action will spread the liquid flux through the joint. If you use a paste flux, you should apply the flux, heat the joint to make the flux melt and flow, then do the soldering.

Also keep in mind that:

The solder always flows TOWARDS the heat source. Apply your heat on the side of the joint away from the solder.

IF there is a large difference in the MASS of the two parts (i.e. one part is much thicker and heavier than the other), the lighter / small part with heat up faster and the solder will want to flow towards or around it. Apply the heat source to the heavier / larger part and allow conduction to carry the heat from it into the small part. The solder will flow when both parts are hot enough to melt it.

A variation of this theme is when using a pair of tweezers to clamp and hold the brass parts together is to apply the heat to the tweezers and allow conduction to heat the smaller parts. The solder will usually not stick the parts to the tweezers, and when it does, it usually releases from them easily.

A final concern is trying to solder two different kinds of metals together, like brass to steel. The steel takes a lot more heat applied to it than the brass to reach the melting point of the solder. This is tricky, and you really do have to make sure that the steel is being heated first and allowed to conduct to the brass. The heat has to be applied away from the solder, and the brass should be what is touching the solder and conducting the heat into it to melt it.

You cannot solder aluminum to either brass or steel. Aluminum can be soldered to aluminum, but it requires special solders and fluxes.

Brass to brass = OK. Brass to copper = OK. Brass or copper to steel = problematic. Brass, copper or steel to aluminum = not possible. Aluminum to aluminum = OK with special solder and flux.

1 Like