Your weathering workflow

Now I know this is a massive topic and everyone will have different answers that depend on

  1. paint scheme and theatre
  2. vehicle type
  3. time of year they are depicting/weather
  4. personal preference
  5. etc.

But I am looking for general advice on typical steps to weather an AFV. I know about general things like dry brushing, washes, filters, pigments, and streaking and stuff. I’ve read up lots and watched lots of videos. However, most of these videos and articles focus on a single technique and not an overall flow. I’m finding it a little bit hard to know what steps to do and when. So I am looking for general advice on what weathering steps people “generally” do and in what order?

I recently finished my T-54 minus weathering. I told myself I wasn’t going to weather this one as I was too happy with how it turned out and didn’t want to ruin it by trying to weather for the first time. But this is silly. I’ll only learn by trying right? So I am looking for a general idea of what steps to take. I’ll probably focus on a lighter weathering for my first attempt, no thick mud or anything.

Thanks in advance!

Here’s my own personal weathering sequence, your mileage may vary:

  1. Acrylic or lacquer camo paint
  2. Acrylic clear gloss
  3. Decals or dry transfers
  4. Acrylic clear gloss
  5. Acrylic clear flat
  6. Overall oil washes
  7. Oil panel washes (filters)
  8. Oil pin washes
  9. Oil fading (dot method)
  10. Oil drybrushing
  11. Chipping and scuffing (Prismacolor pencils)
  12. Pigments
  13. Mount to base so nobody touches the pigments
1 Like

Well, here’s my general sequence. But I don’t follow it religiously. I mix it up and try new approaches, in some aspect, pretty much every time.

First: Prime (I often use rattle-cans either Tamiya or even off-the-hardware store shelf.) Confession time: I’m often too lazy to drag out my airbrush, and clean up afterward for this step.

If I’m using the hairspray technique (for chipping German vehicles) I’d prime in rust red, then lay down a coat of hairspray.

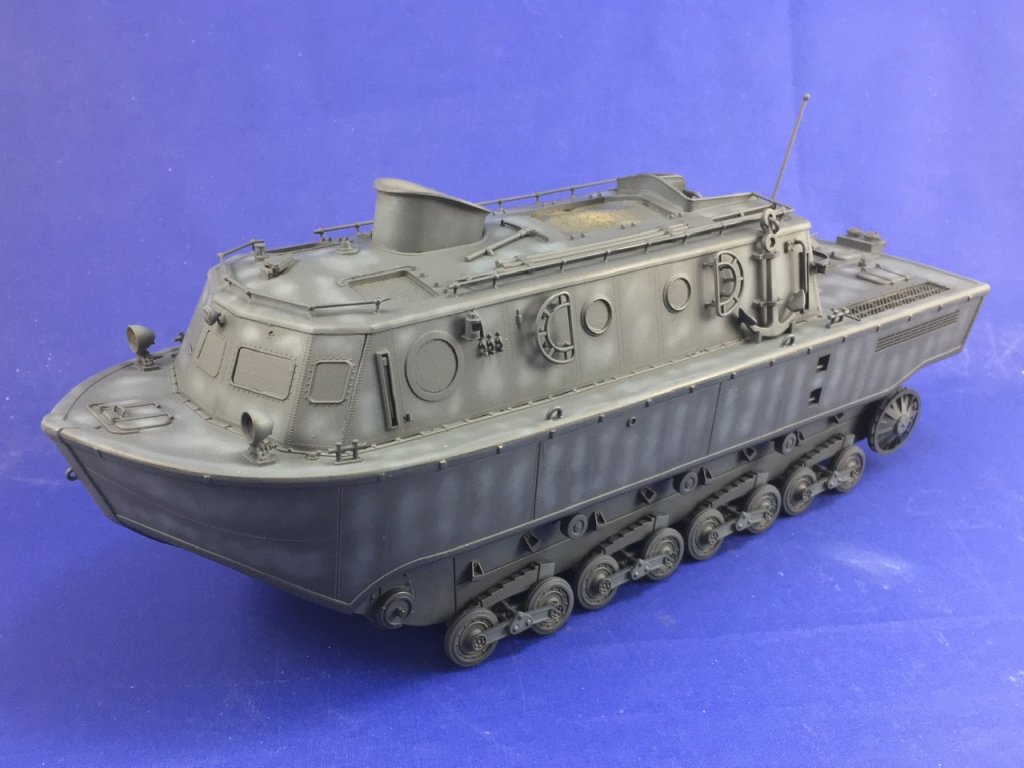
Then comes the base coat Panzer grey, Dunkelgelb, etc.

Then chip. (Note: chipping isn’t really appropriate for, OD or green allied vehicles. It’s an issue with paint quality.

I don’t use any clear coats, but if I did, now would be a good time, to protect the paint.

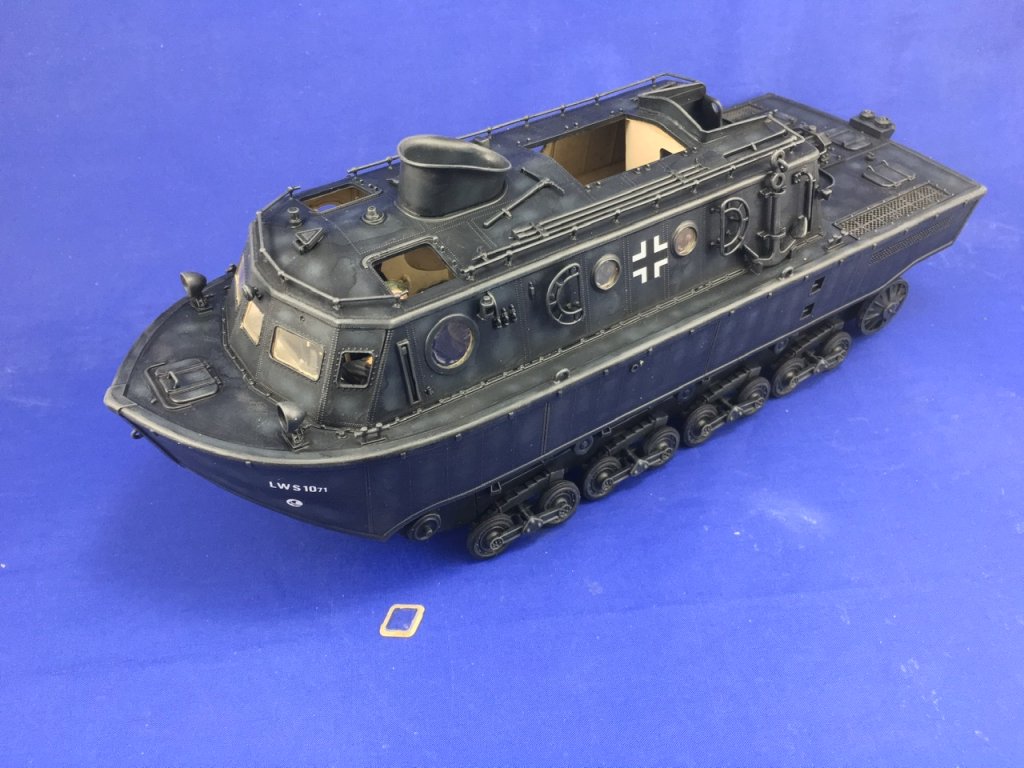
I would then add cammo colors, and then chip them with a sponge or brush.

Usually decals or my preferred dry transfers (Archer) would usually be next.

I might dry-brush lighter shades on high points or sharp edges, at this point. Dry-brushing has seemed to lose popularity, lately, but I still think it has its place.

Paint all of the tools, external stowage, around now.

Then I’d lay on my first layer of panel-liner and washes – I use artists oils – Burnt Umber or Raw Umber, most of the time. They’re so forgiving – don’t like it: wash them away with a little thinner. It won’t hurt the acrylics underneath.

Again, some might use a clearcoat, either before or after that step. Not me.

Next would be whitewashes (if winter and so desired.)

Followed by more chipping, washes and panel liners

At this point I might use a graphite pencil to bring out a little metallic sheen on sharp edges.

Rust washes and chips might be added around now, to likely places.

Finally, I start on dust, dirt and mud. For dust I love artist oils (Titanium Buff). For the rest I employ various pre-mixed dirt and mud or dry pigments. Layer upon layer of this stuff…

Of course, depending on the vehicle, and the kit, I’d hold off on mounting the tracks as long as I can. Painting them separately, or perhaps before you mate the upper and lower hulls, is always best. I would certainly put them on the tank before you start the dirt and mud step. I must admit, though, that I have often enough painted the tracks, in place - as a later step.

There’s so much more I could or should say, but that’s the basics for me.

Check out the Night Shift channel on YouTube. He’s my current, favorite Guru, and he constantly varies his approach.

Hope this helps, (I’m sure I missed something, or many things, but I tried…)

Ralph

Two process very similar.

Decide YES decals will be used

  1. Floquil Rail Road Weathered Black base coat.

  2. Shadow paint base color.

  3. Attached tools & paint details

4.Overall oil washes

  1. Oil pin washes

  2. Dry brush base & camo paint onto flat surfaces

  3. Oil drybrushing (oil paint mixed with the Floquil color). Three times. Lighter shade each time.

  4. Oil drybrushing very light with Titanium White

  5. Minor chipping on occasion with small brush

10D. Floquil Crystal Coat for gloss coat

11D. Oil fading (dot method)

12D. Decals - tone down with pastels

13D. Floquil Crystal Coat for gloss coat

14D. Pactra Flat Clear

15D. Chalk dust/Pigments

16D. Mount to base for ease of handling so nobody touches the pigments

17D Inspect and touch up as needed.

Decide NO decals will be used

  1. Floquil Rail Road Weathered Black base coat.

  2. Shadow paint base color.

  3. Attached tools & paint details

4.Overall oil washes

  1. Oil pin washes

  2. Dry brush base & camo paint onto flat surfaces

  3. Oil drybrushing (oil paint mixed with the Floquil color). Three times. Lighter shade each time.

  4. Oil drybrushing very light with Titanium White

  5. Minor chipping on occasion with small brush

10T. Apply dry transfer, stencil or hand paint, tone down with pastels

11T. Fading with Chalk dust/Pigments streaks with rubber brush

12T. Pactra Flat Clear

13T. Chalk dust/Pigments

14T. Mount to base for ease of handling so nobody touches the pigments

15T Inspect and touch up as needed.

Thanks for the replies, this helps a lot.