1/35 M4 Grizzly with 17 pdr

Here is my build log for my 1/35 Canadian M4 Grizzly with 17 pdr. This build is a big group effort and I need to start of with thanks. Thank you @SSGToms, @Mead93 and @Armor_Buff and @DennisatAutoloader for your amazing help in this build.

image
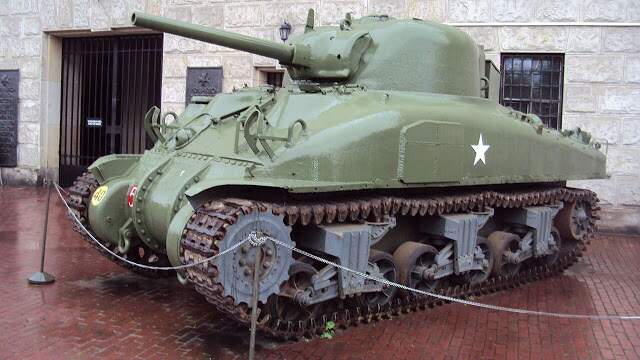
Some history on the M4 Grizzly.

The Grizzly I was a Canadian-built M4A1 Sherman tank with some modifications, it had thicker armor (applique armor welded or extra-casting in the sides of upper hull and casting armor in the right cheek of the turret), had a longer range, and, most notably was fitted with Canadian Dry Pin (CDP) tracks, which did not require rubber, a scarce wartime material.
After the fall of France, it was decided the nascent Canadian armored divisions would be equipped by tanks produced in Canada. The result was the Ram cruiser tank, based on the chassis and running gear of the US M3 Lee. Rams were produced by the Montreal Locomotive Works from 1941 to 1943. The M3 was succeeded by the superior M4 Sherman.
In September 1942, specifications were issued in Canada for the production of the Sherman modified to meet Canadian requirements. It was intended to replace the Ram Mk II on the assembly lines at the Montreal Locomotive Works. The change over was delayed until August 1943 to minimize any disruption of the production effort. The model of the Sherman selected was the M4A1 designated by the Canadians as the Grizzly 1.
It was essentially identical to the U.S. version except for British stowage and the installation of a Number 19 radio set and a 2 inch bomb thrower (smoke mortar) in the turret.
The latter item was subsequently adopted as standard on U.S. tanks. Some of the Grizzlies were fitted with the short pitch Canadian Dry Pin (CDP) track requiring special 17 tooth sprockets. In comparison, the M4 used 13 tooth drive sprockets. The CDP track was lighter and simpler than the standard US tracks and did not require rubber, which was scarce since the Japanese advance into Southeast Asia.
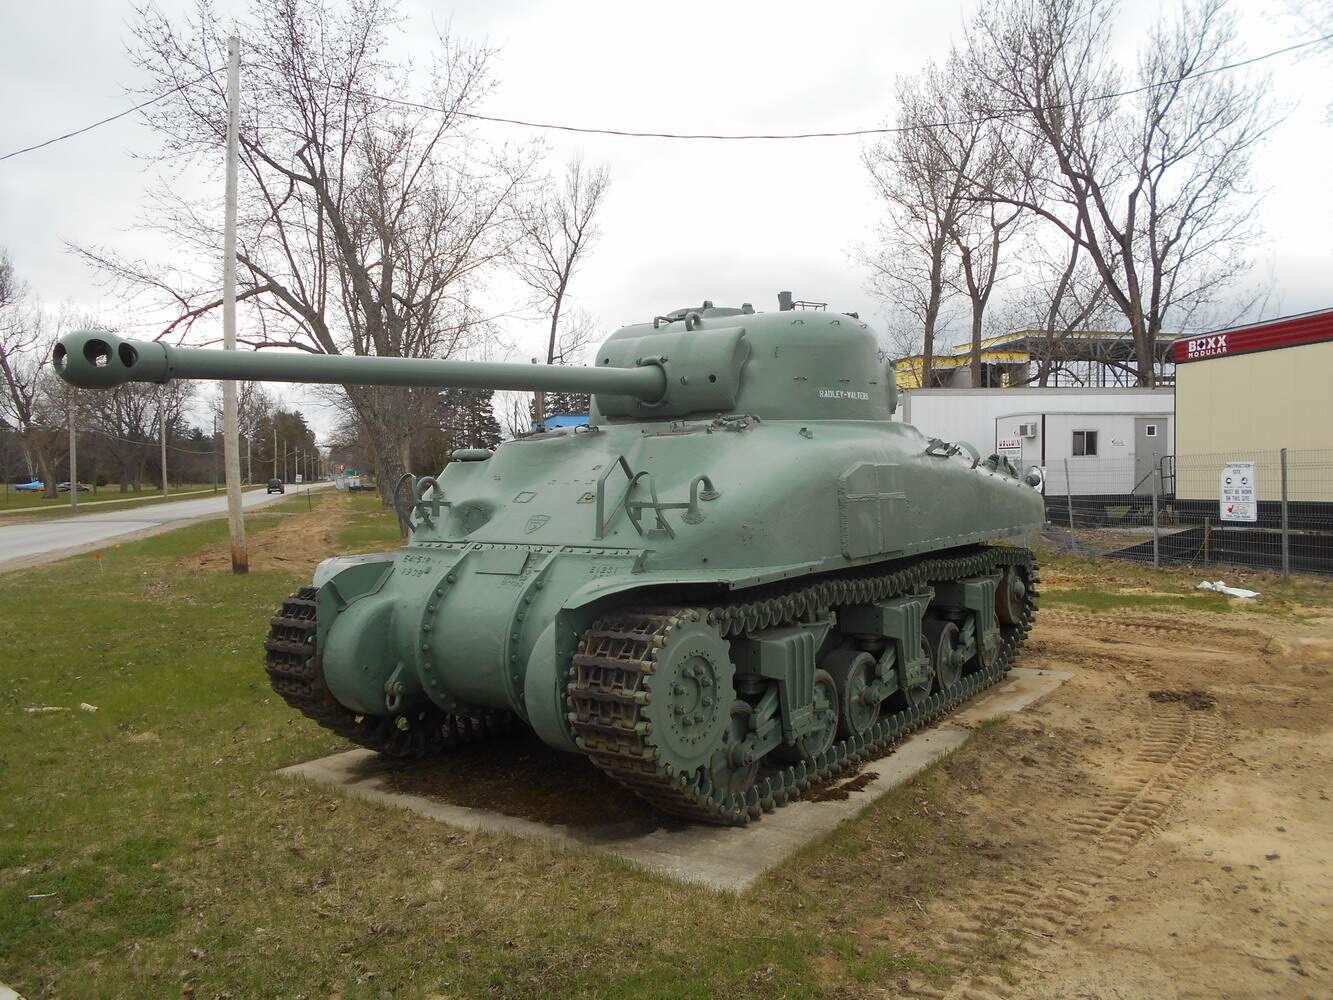
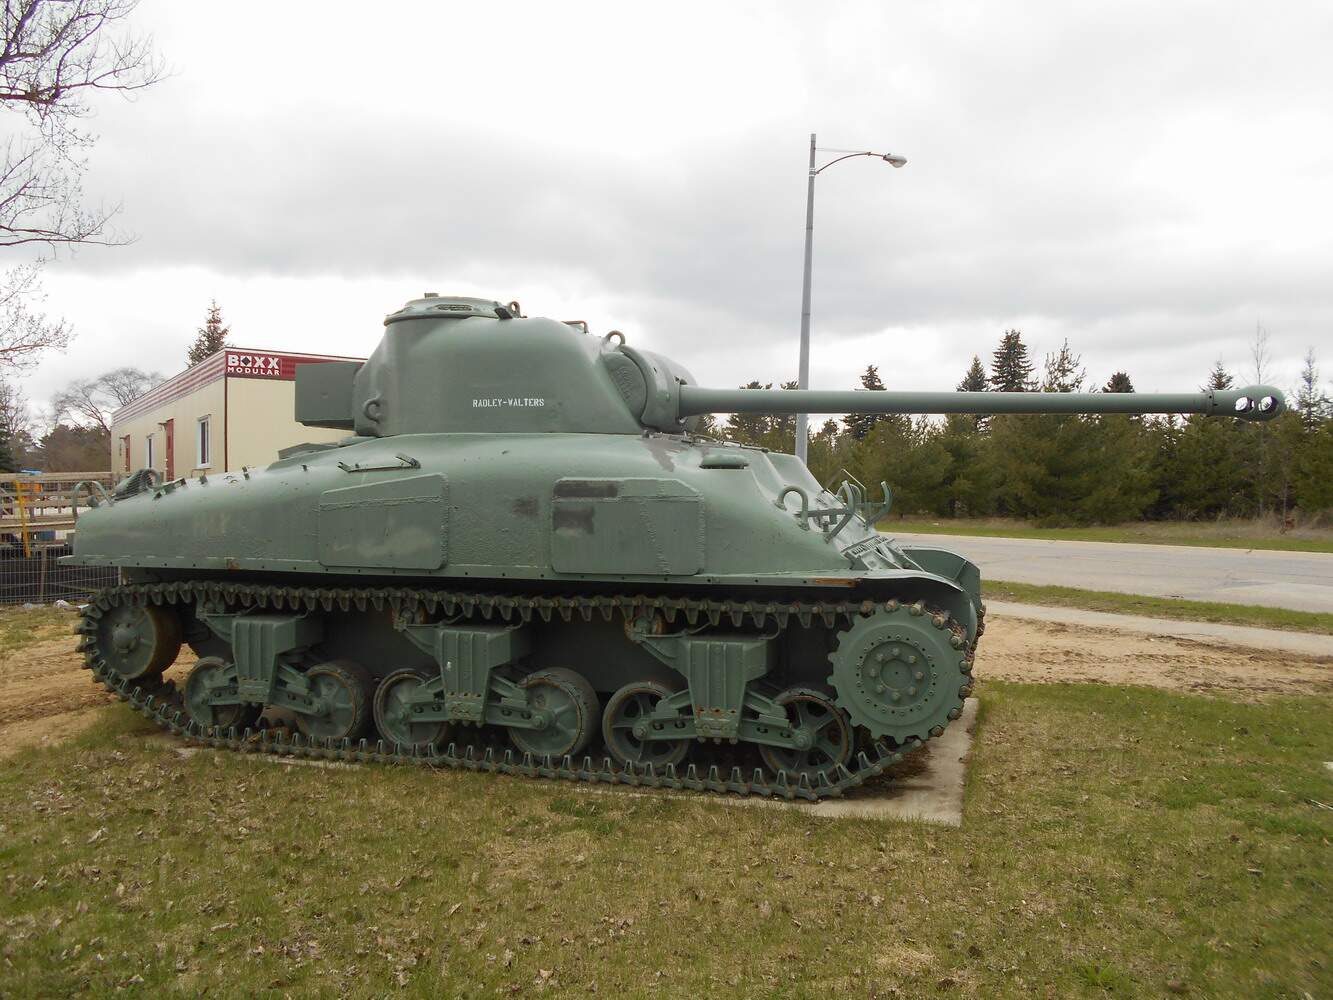
image

The particular Grizzly Iā€™m building

During the war the British shipped over a 17 pdr to Canada that the Canadians then mounted into a Grizzly. Iā€™m not sure if it was a full conversion or not.
(I will update this when the Canadian war museum emails me back)
It is currently on display in at the Borden War museum in Canada.


The kit

For the build I will be using the 1/35 Dragon M4a1 early
(Sent by Matt)
It looks like a perfect kit to use as a base, with great details.

The Aftermarket parts

1/35 Friulmodels CDP tracks for Grizzly and Sexton

1/35 Solid M4 road wheels
(Sent by Wade)

1/35 Applique armor and rear bin for a Firefly
(Sent by Mead)

1/35 Decals by Autoloader
(Made by Dennis)

Parts still needed

1/35 Sherman firefly turret top half

1/35 Sherman firefly Hatches

1/35 Sherman Firefly barrel

Next update will come when I receive the first packages.

8 Likes

Is there any practical reason for the spoked wheels only on the first bogie on both sides, and solid wheels on the rest? Or is that just a random arrangement?
:smiley:

I would just think that they got switched out randomly, because on the other side it has only one spoked wheel on the second bogey. For anyone whos wondering the paint scheme, I will be doing the current paint scheme at Borden, with the Radley Walters inscription.

I would agree it seems random, as that is what the museum had access to make a complete tank.

There was this old thread on the old site. Maybe the way back machine has better saved copy before things went south to help you.

2 Likes

Thanks Ryan! The first packages arrived today, namely the Friulmodel tracks and solid Sherman wheels. The tracks look really good and Im surprised by how good the detail on the drive sprocket is.
Imgur
Hopefully the Dragon M4a1 will arrive later today.

1 Like

The Shermie arrived and Iā€™ve made some progress! I built the Dragon bogies with the Taska road wheels to imitate what you can see it the tank at Borden. I will now get to drilling and plugging up the hull machine gun port.
Imgur
Imgur

I just ran into a big hiccup with the Grizz, the Dragon kit comes with a single piece transmission housing but Grizzlies had a 3 piece oneā€¦ so after digging through my spare parts I found a Dragon 3 piece housing BUT its not going on without major surgery, worse as in the photos above I already glued on the single piece cover and had to rip it off! I also need to scratch build new mud guards for the front, plus needing hours of filling and sandingā€¦ :face_with_symbols_over_mouth:

I think Ive pretty much taken care of the gaps and fit issues. I think I can hide most of the other issues with the drive sprocket and first bogey as they cover the area pretty good.
Imgur
Imgur
Now to cover it up with some armor texture.

1 Like

Just bought the last part I need for the Grizz, a Verlinden 1/35 Firefly turret. It will arrive in about a week.

1 Like

The finally finished lower hull! After about 5 hours of filling and sanding I think Im pretty much finished.
Imgur
Imgur

A word to anyone attempting this conversion, be carful because no matter how hard you try there will still be a 2mm gap and a 1mm step you will have to fill and sand if you transplant a 3 piece transmission onto a cast hull.
I also applied cast texture over the rest of the hull.
Imgur

2 Likes

Excellent workā€¦Ezraā€¦I am following with interest!
Cheers,

Looking good Ezra. Your speed and quality of build are amazing.

Thanks guys! Ive spent 3 and a half long hours assembling one side of the Canadian dry pin tracksā€¦ now Im about to tackle to other sideā€¦ atleast its pretty enjoyable if your watching/listening to something you like, for me its Red vs Blue (I watched through season 1-4 in the time it took for one side.) . Hopefully I should have the tracks finished in like 3 hours. :persevere:
Imgur

2 Likes

The Shaddocks website is excellent for all things M4, and he makes mention of this particular Tank as being production No 65. It is unique not just because it is a Grizzly hull, but because it is based on a M4A1, which apparently was not one of the types of M4 used to convert to Fireflies. It does mention that the Canadians did manage to reconfigure the interior, and therefore I suspect it was a full conversion.

ā€œTanksā€ for the info Norman!

I finally finished the tracks after a full 8 hours of building! I think they look great. They will defiantly look a treat with some blacking fluid added.
Imgur
Imgur
Imgur
Hopefully I can get some bench time tomorrow and start work on the upper hull.

4 Likes

Small progress. Applique armor and rear basket parts arrived from Canada sent by Matt today so I got them on. The applique armor is great, and I used a spare piece for the right side. I will later add the weld beads and flame cut marks.
Imgur
Imgur
I also used the sides of the turret basket he sent, sadly I cant use the top at the Borden firefly has just a riveted top. I was able to find a spare top in the Dragon kit I didnt use that was correct.
Imgur
Just placed on the turret.
(I will not be using the kits turret as I have a Verlinden resin turret coming in the mail.)
Imgur
Imgur
I may need to source a new 17 pounder barrel. Im not sure how warped the kit one is.

and finally I made the thing (Yes that is the technical term) on the front out of copper sheeting.
Imgur

Tomorrow I will try to tackle the tools.

Iā€™m not sure on the markings yet. I may paint it as it looks currently or I can go for hypothetical markings for what the tank may have looked like at Borden in 1944, with the regular Grizzly markings and some artistic license.

2 Likes

Looking great!! Glad the parts worked out!

1 Like

The ā€˜thingā€™ is actually the horn/siren guard used after the decision was made to move it(the horn)from the driver side fender to the hull front. The new position made the horn more vulnerable to damage hence the need for the guard. The later type guard was more elaborate and looked similar to the headlight guards. If you still need the ā€˜Fireflyā€™ barrel and hatch I may have a few in my stash. I dislike two piece plastic barrels since no matter how I try I can never get them to stay round! I usually chuck them in the parts box and get a metal replacement. Let me know if you still need the parts at my e-mail; hardcash72@yahoo.com.
Regards,Bob

1 Like

Cool thanks! e-mail sent.

Why not use plastic or metal tubing to replace the middle warp part and keep the ends?

1 Like