Morning all!
The time has come for me to start Tamiya’s Type 16 kit, and with it being somewhat newish I figured it would be neat to post regular updates here. I’ve wanted to do this ever since I picked up my sprue nippers, so I plan to actually, just maybe, put some effort into it 
Here’s what the box looks like, note that I was able to get my hands on the turned metal barrel.
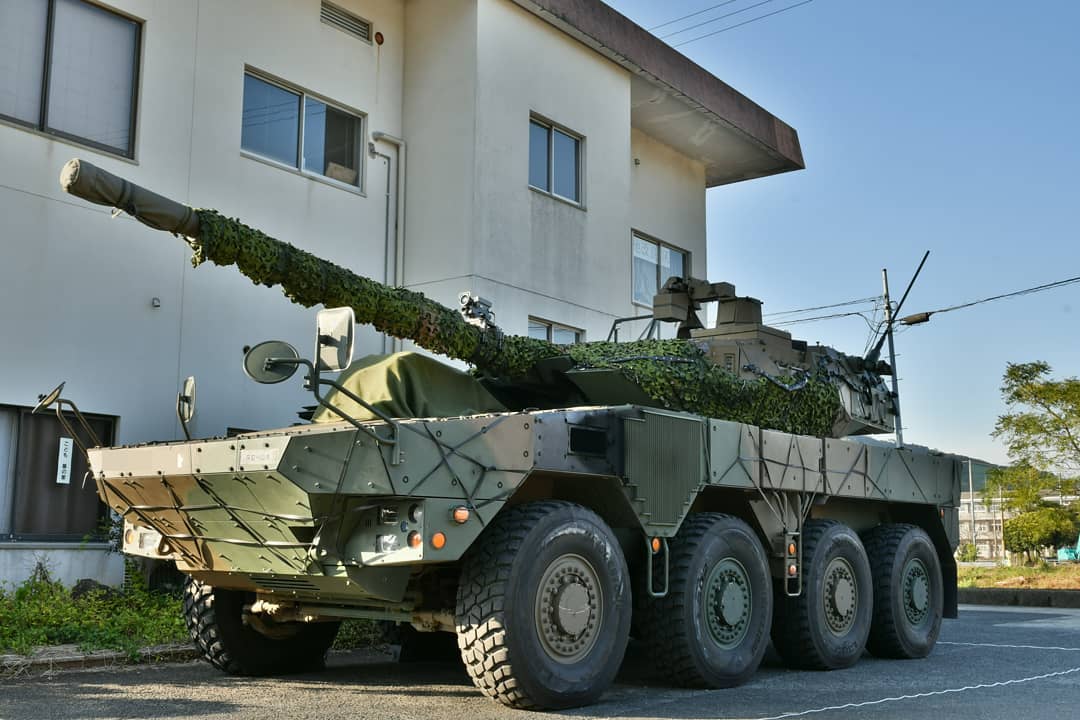
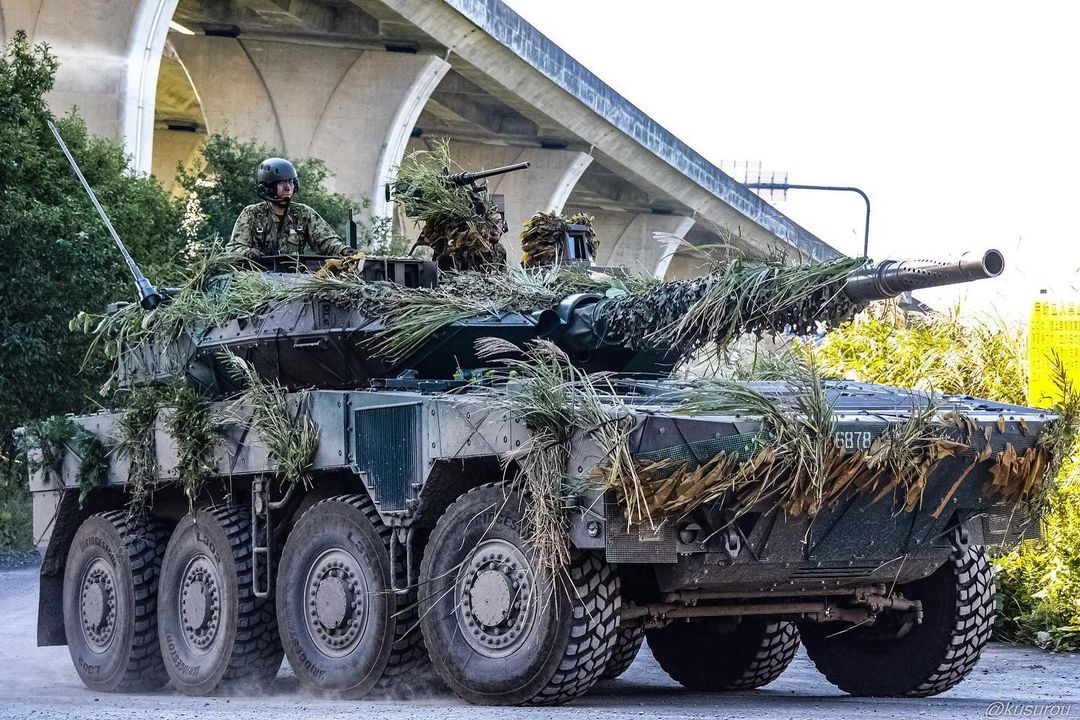
My general plan is to make your standard Type 16, but with some of that foliage camouflage the JGSDF is known for using. To that end, I’ve found some neat reference photos -
Frankly, I’m leaning towards making a vehicle more in the vein of the latter photo!
That’s all for now, time to get building!!!
5 Likes
Sweet! Im definitely following along.
1 Like
Great kit, but the turned metal barrel from Tamiya is not so great. While it is a huge improvement on the kit barrel since the muzzle brake holes are open instead of using the silly decal (who thought of that!), it doesn’t have the rifling inside. Tamiya goes to all the trouble to make a barrel, but doesn’t bother to include things that we would normally expect to see on a turned barrel.
Since the kit barrel is in one piece (except for the fume extractor and recoil cover, of which the seams are easy to fill)) you really only need to replace the muzzle brake. Passion Models has a turned one that is great, and DEF includes a resin muzzle brake in their wheel set (along with wheel chocks, so a good deal). Both have the rifling included so much better replacements.
2 Likes
Yes, sadly I only learned about the rifle detail AFTER the barrel came  You’re bang on about the DEF kit, had my financial situation been different I think I would have gone for that. As it was, I got a smoking good deal on the barrel from Hobbylink Japan, so you take what you can get I guess. For anyone getting the kit, I’d suggest the DEF set, because you’re right about the muzzle brake. I’m not sure who at Tamiya thought that a decal would be a good idea, but there you have it.
3 Likes
Looking forward to seeing this build- best of luck with it  .
.
2 Likes
I have the 1/48 scale Type 16 and it also comes with these weird decals for the sights and the muzzle brake.
I’ll follow your build with interest.
Olivier
Looking forward to following the build.
Tamiya does seem to have developed a habit of doing the heavy lifting involved with making a nice kit and aftermarket parts, only to cut a couple of critical corners and compromise the project.
Examples - Newly released kits with string tow cables and MG’s not slide molded MG’s.
1 Like
Have the same kit in my stash and plan to build it this year. This AFV looks super cool! So I’m here and will look over your shoulder, Dennis! My build will be oob but maybe I find some useful informations in yours which I can silently “steal” … 
Enjoy your build!
Torsten
1 Like
Hello all!
It’s 1 in the morning here in Canada. I’ve just finished a huge business order which required my use of the airbrush booth and work bench, so this weekend I haven’t been able to touch the Type 16 at all until just now.
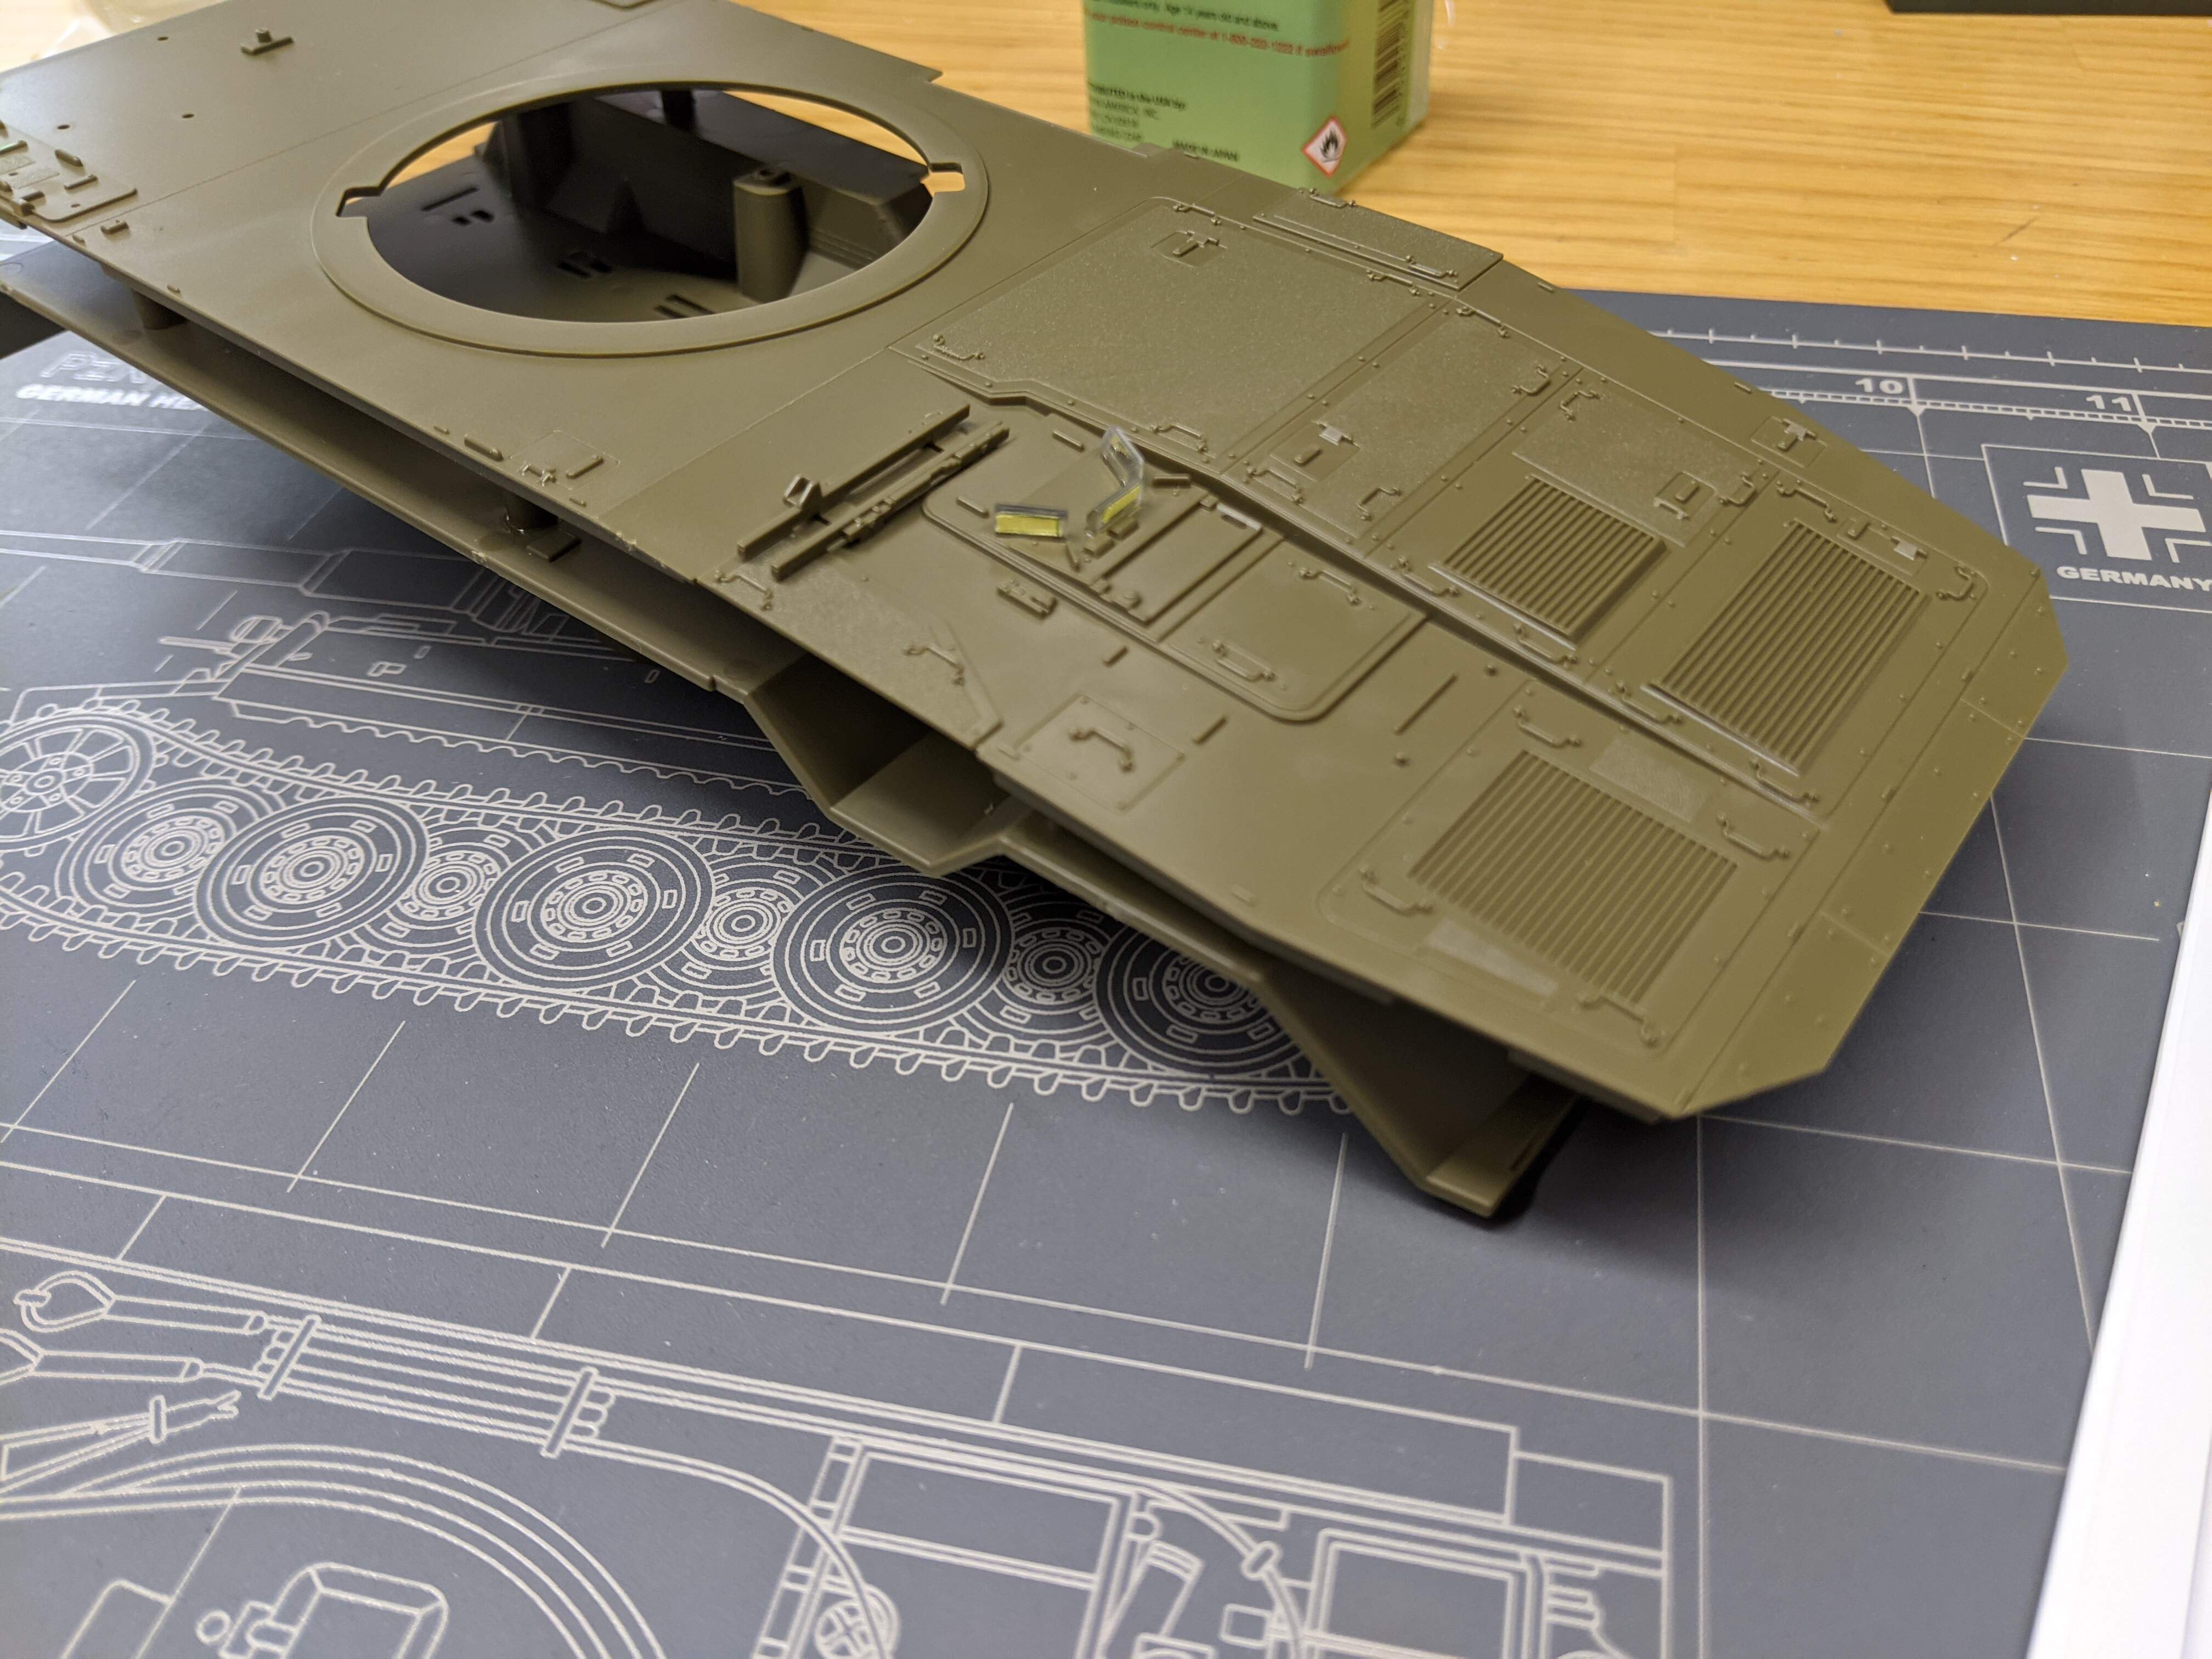
This morning I worked on getting page one of the instructions done, as well as getting ready for page two.
The way Tamiya has designed the hull is similar in a way to some of their new multipart tank hulls. Rather than two “bathtubs” you glue together (think Trumpeter LAVs), the Tamiya kit uses a sprue of flat pieces that you attach using little nubs. I put the driver’s periscopes in, everything went very well. Nothing really to report, other than I’m liking the parts count and moulded-on detail.
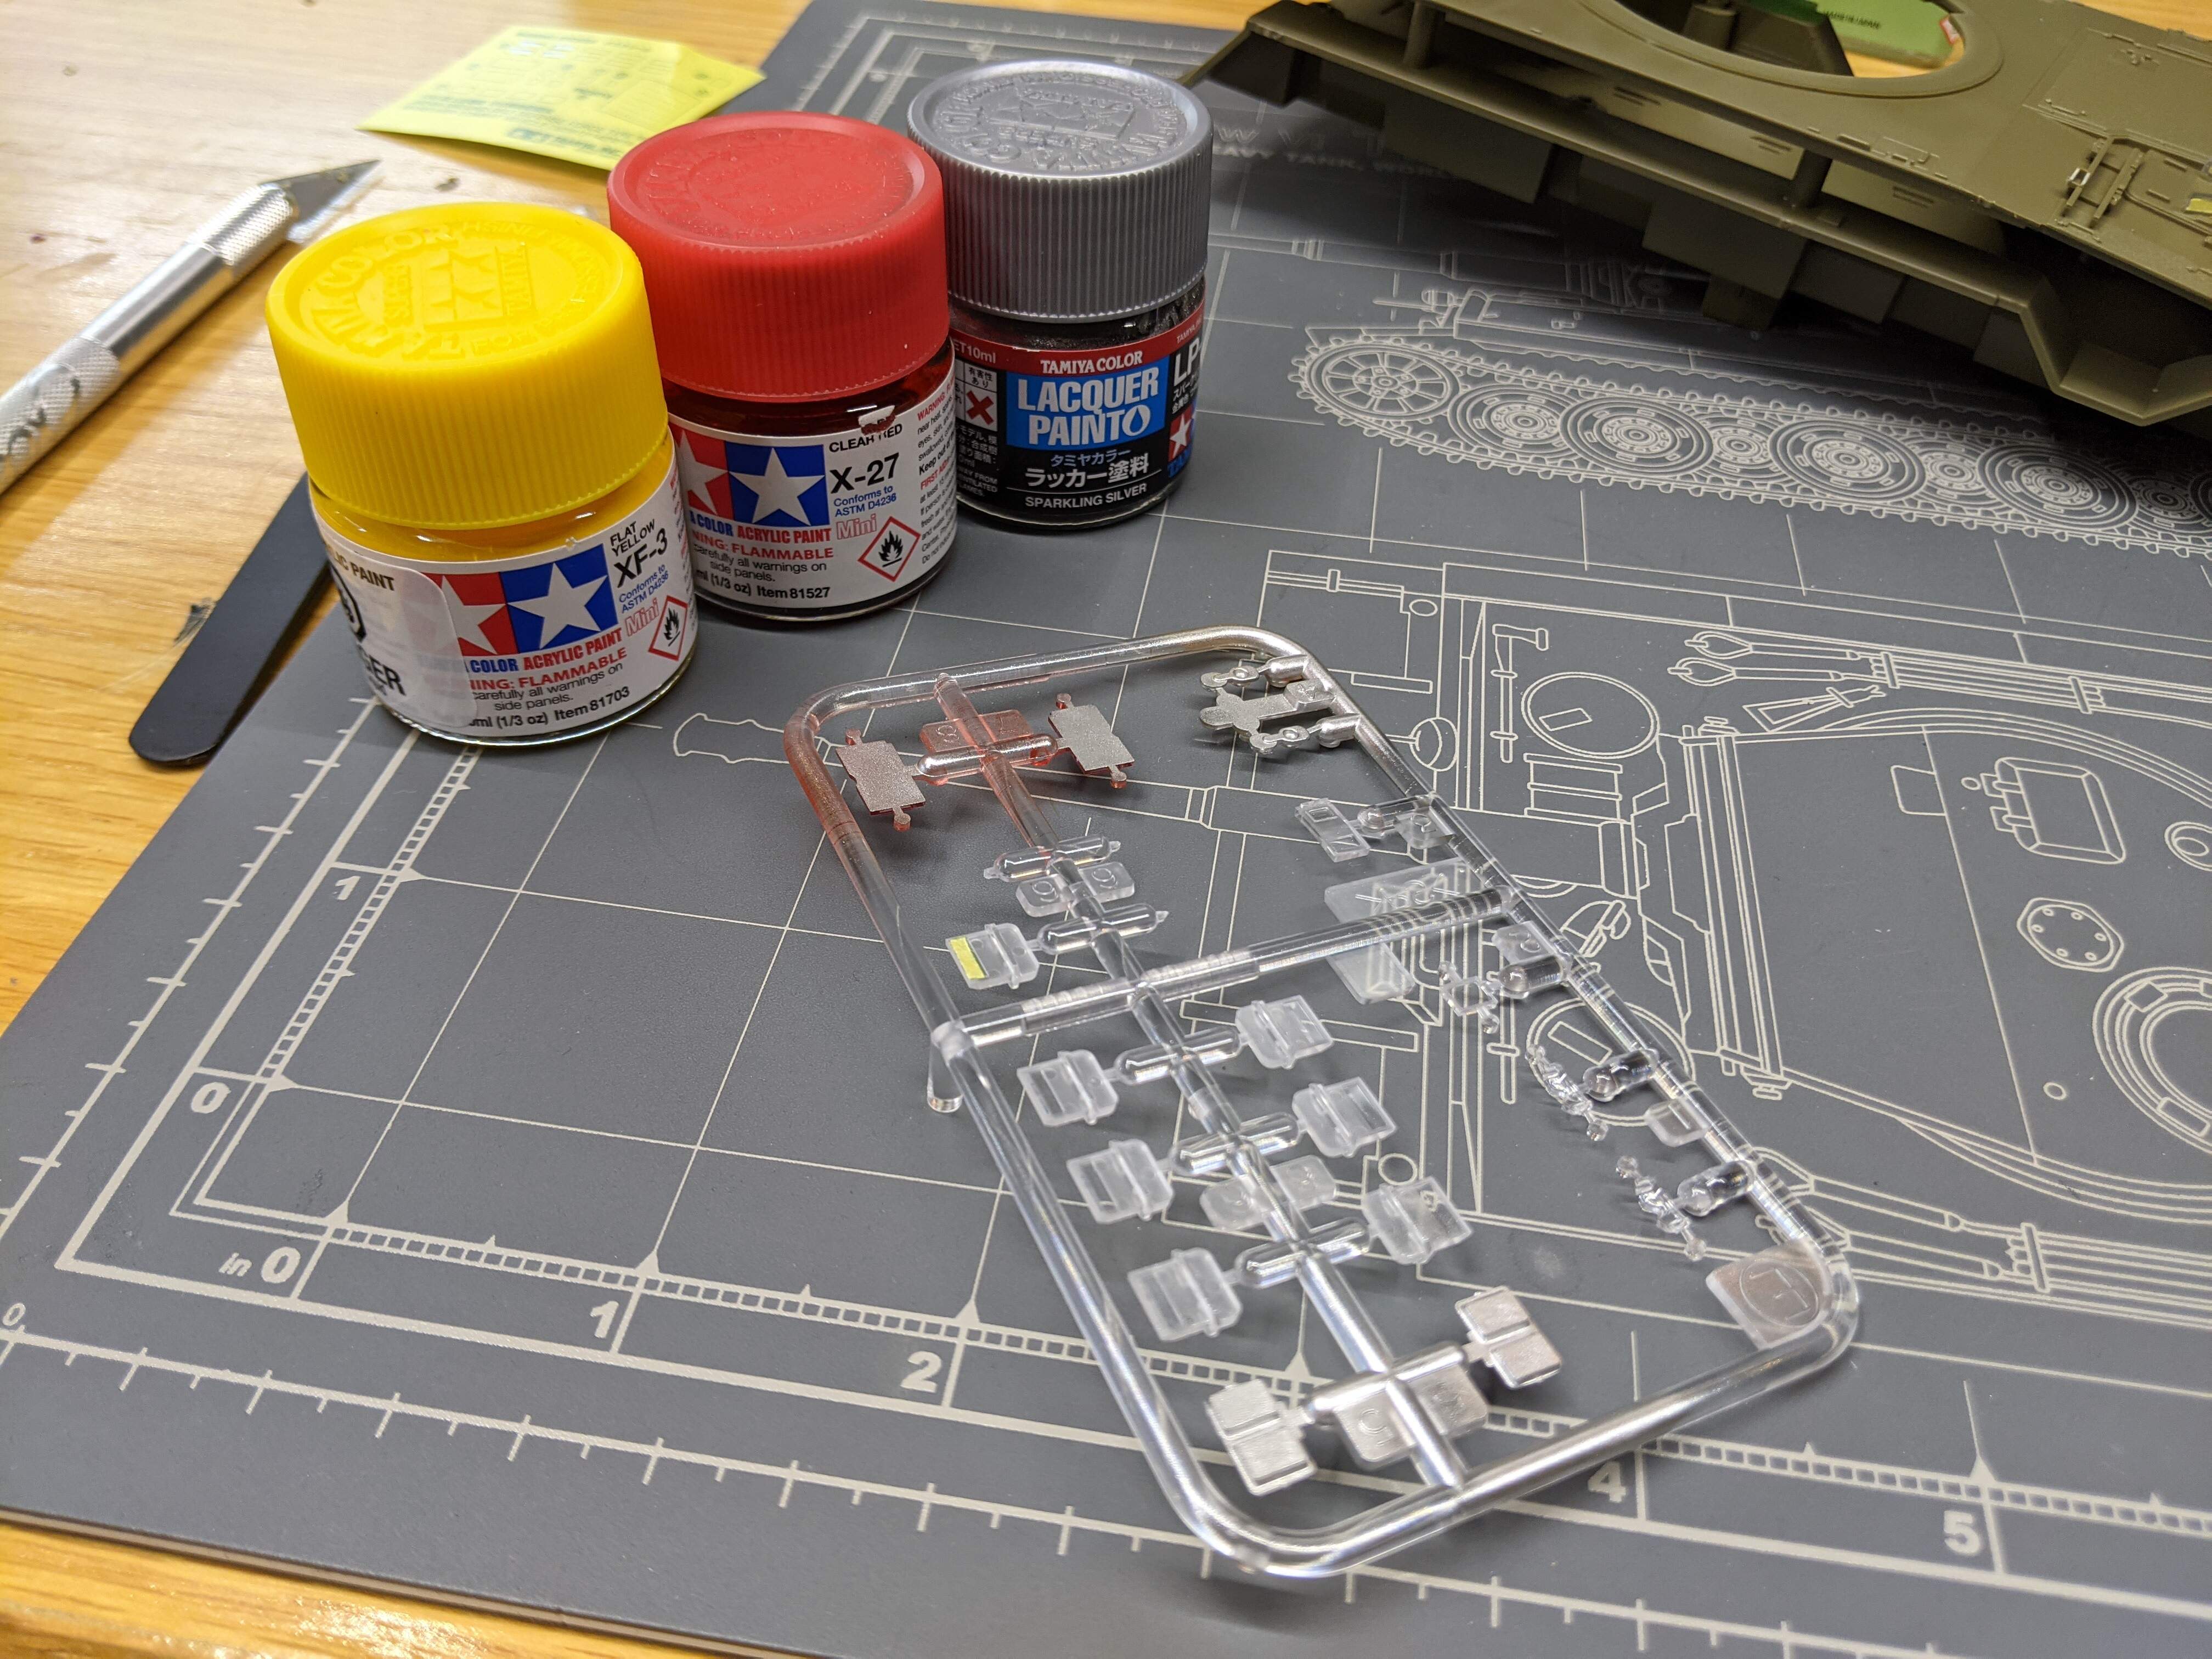
The kit then has you paint the clear light lenses so that you might attach them to the hull pieces prior to putting them all together. For the rear lights, I sprayed XF-27 mixed with XF-3 to get the right looking turn signal colours, and lacquer silver for the front lights.
I’ve been packaging decals all night, I’m beat. Hopefully there’ll be another update tomorrow!
Take care and don’t get the roni,
Dennis
2 Likes
I built that kit last year, those decals were certainly weird! This kit gives you them as well, but if you want to remain OOB with this kit Tamiya also provides a masking sticker that shows you where to drill holes on the muzzle brake.
1 Like
Good start! Looking forward to more.
2 Likes
I didn’t notice any sticker yet in the box. It’s probably only present in the 1/35 model.
Olivier
1 Like
Evening everyone;
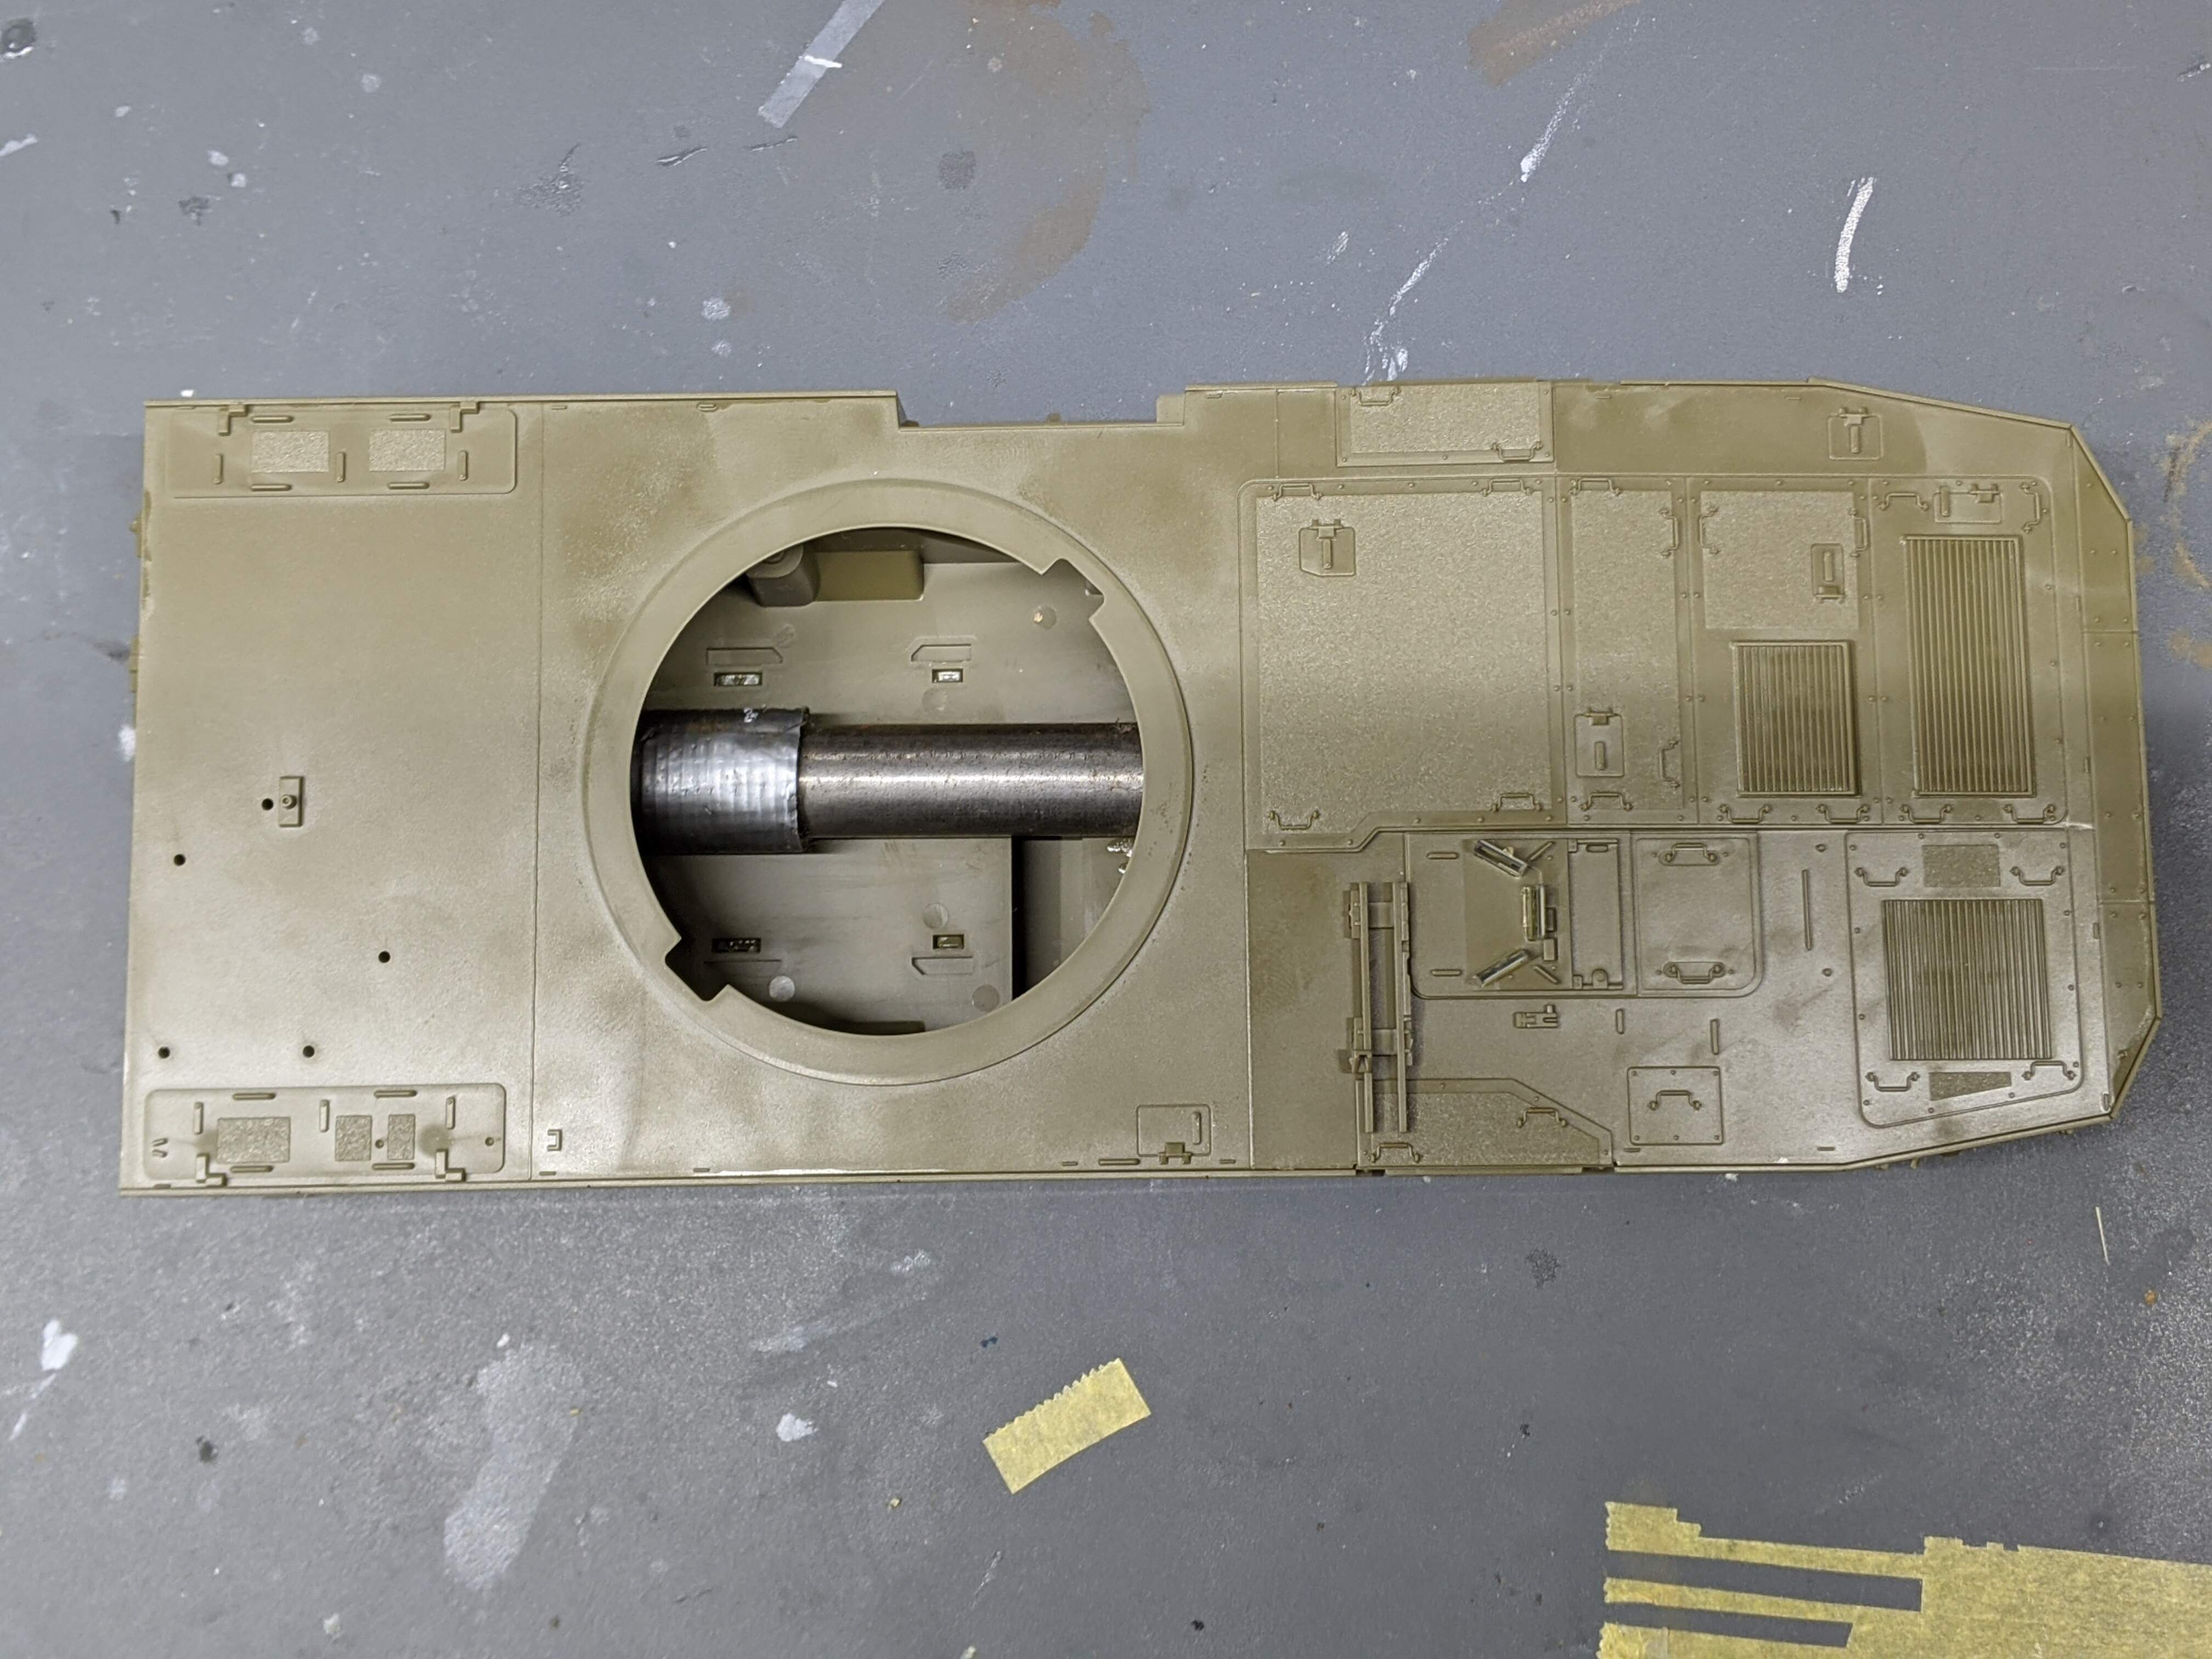
Well, where last night was marked by little progress, tonight was the complete opposite. Perhaps it was watching videos of Type 16’s at the range, or perhaps it was the sushi for dinner, but I ripped through the majority of the hull. First, I attached the composite armour panels around the hull (the ones I had begun work on last night), but not before I had glued in some scrap metal to increase the weight of the model. You can see it here -
I figure it’ll add a nice bit of weight to the finished model. Next, I begun work on the steering. The steering is made up of a number of pivots connected by snap-together rods that fit into poly caps on the lower hull. You can see exactly what I’m talking about if you look up the instructions, but in short basically the idea is that each of the four front wheels has it’s own pivot, of which all are interconnected. Frankly, the engineering on this section of the kit is a work of art. It just works, which is one of the reasons I’m a big fan of Tamiya kits. I then assembled the differentials, which went together fuss-free.
As you can see, the underside of this AFV is very busy! It’ll be quite fun to weather it all. I foresee that even by tomorrow I may begin work on the turret.
Well, that’s all for me tonight. Hope you all had a pleasant Valentine’s Day
Stay safe and don’t get the rona,
-Dennis
3 Likes
Nice job on the steering. This is a real gem from Tamiya. This counter balance the weird decals for the gun muzzle.
Olivier
2 Likes
Morning everyone;
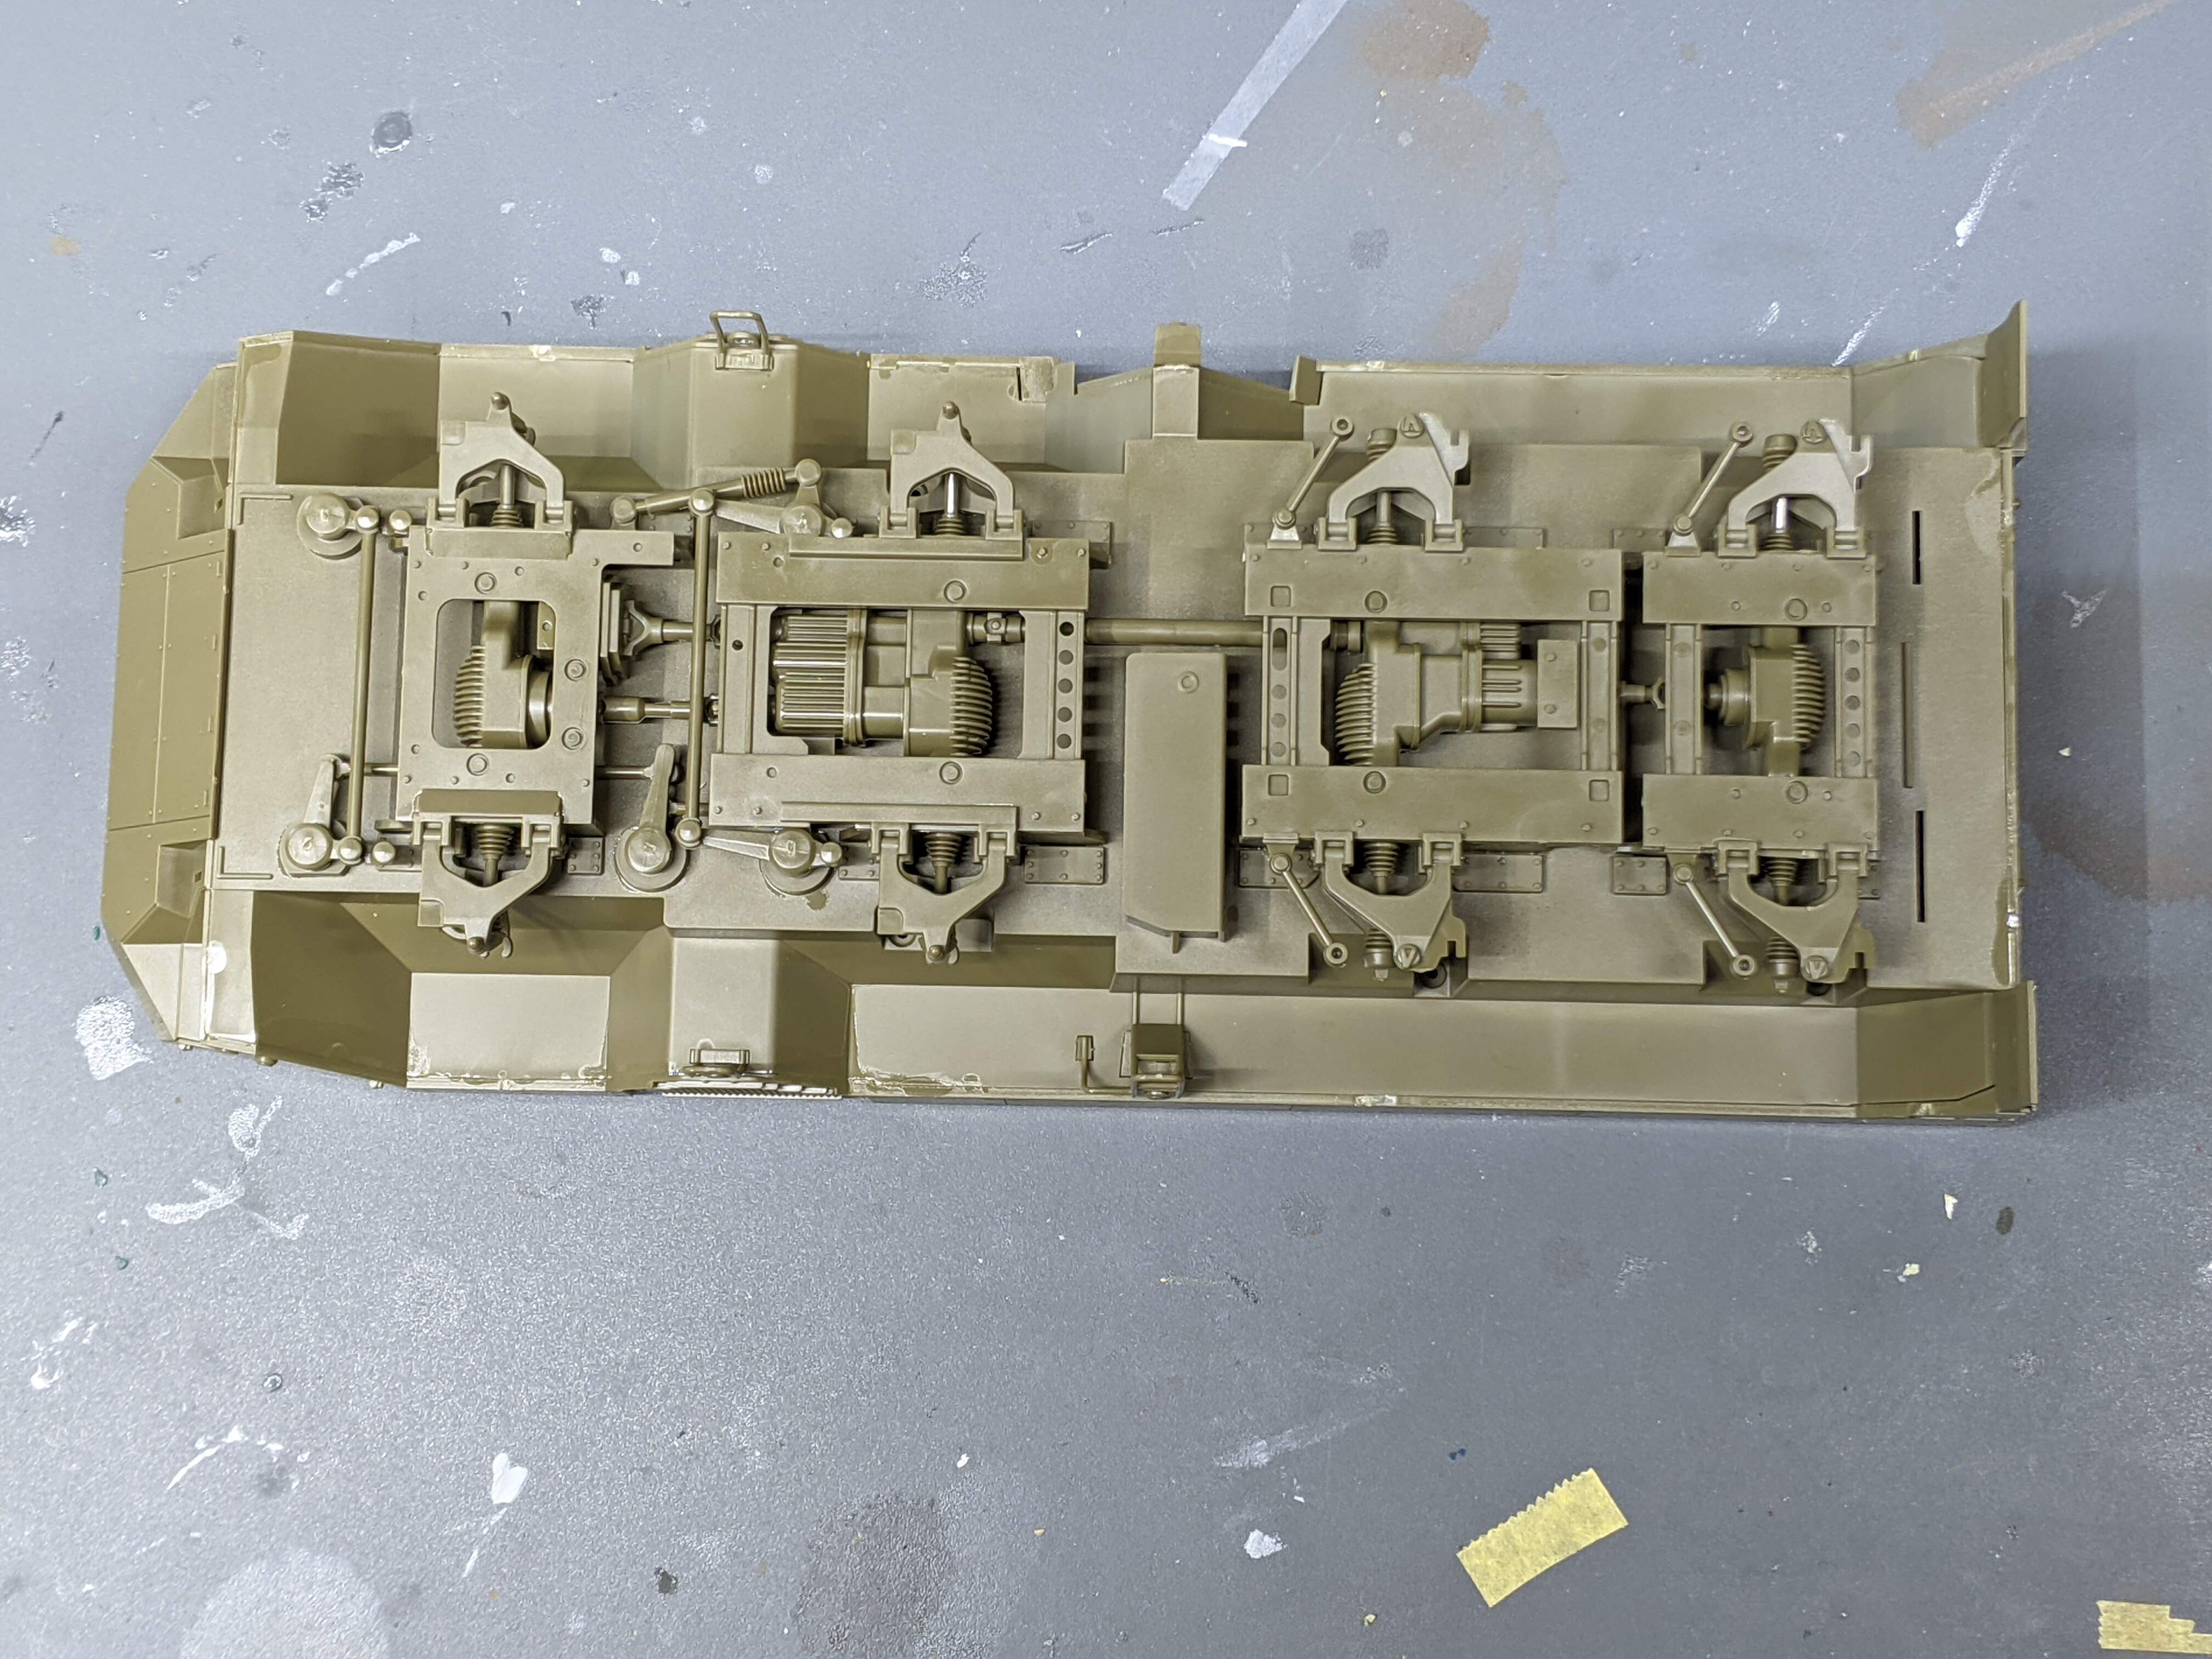
Last night was another one full of progress. I’m happy to say that I have finished the entirety of the lower hull. All that’s left to do now is the turret!
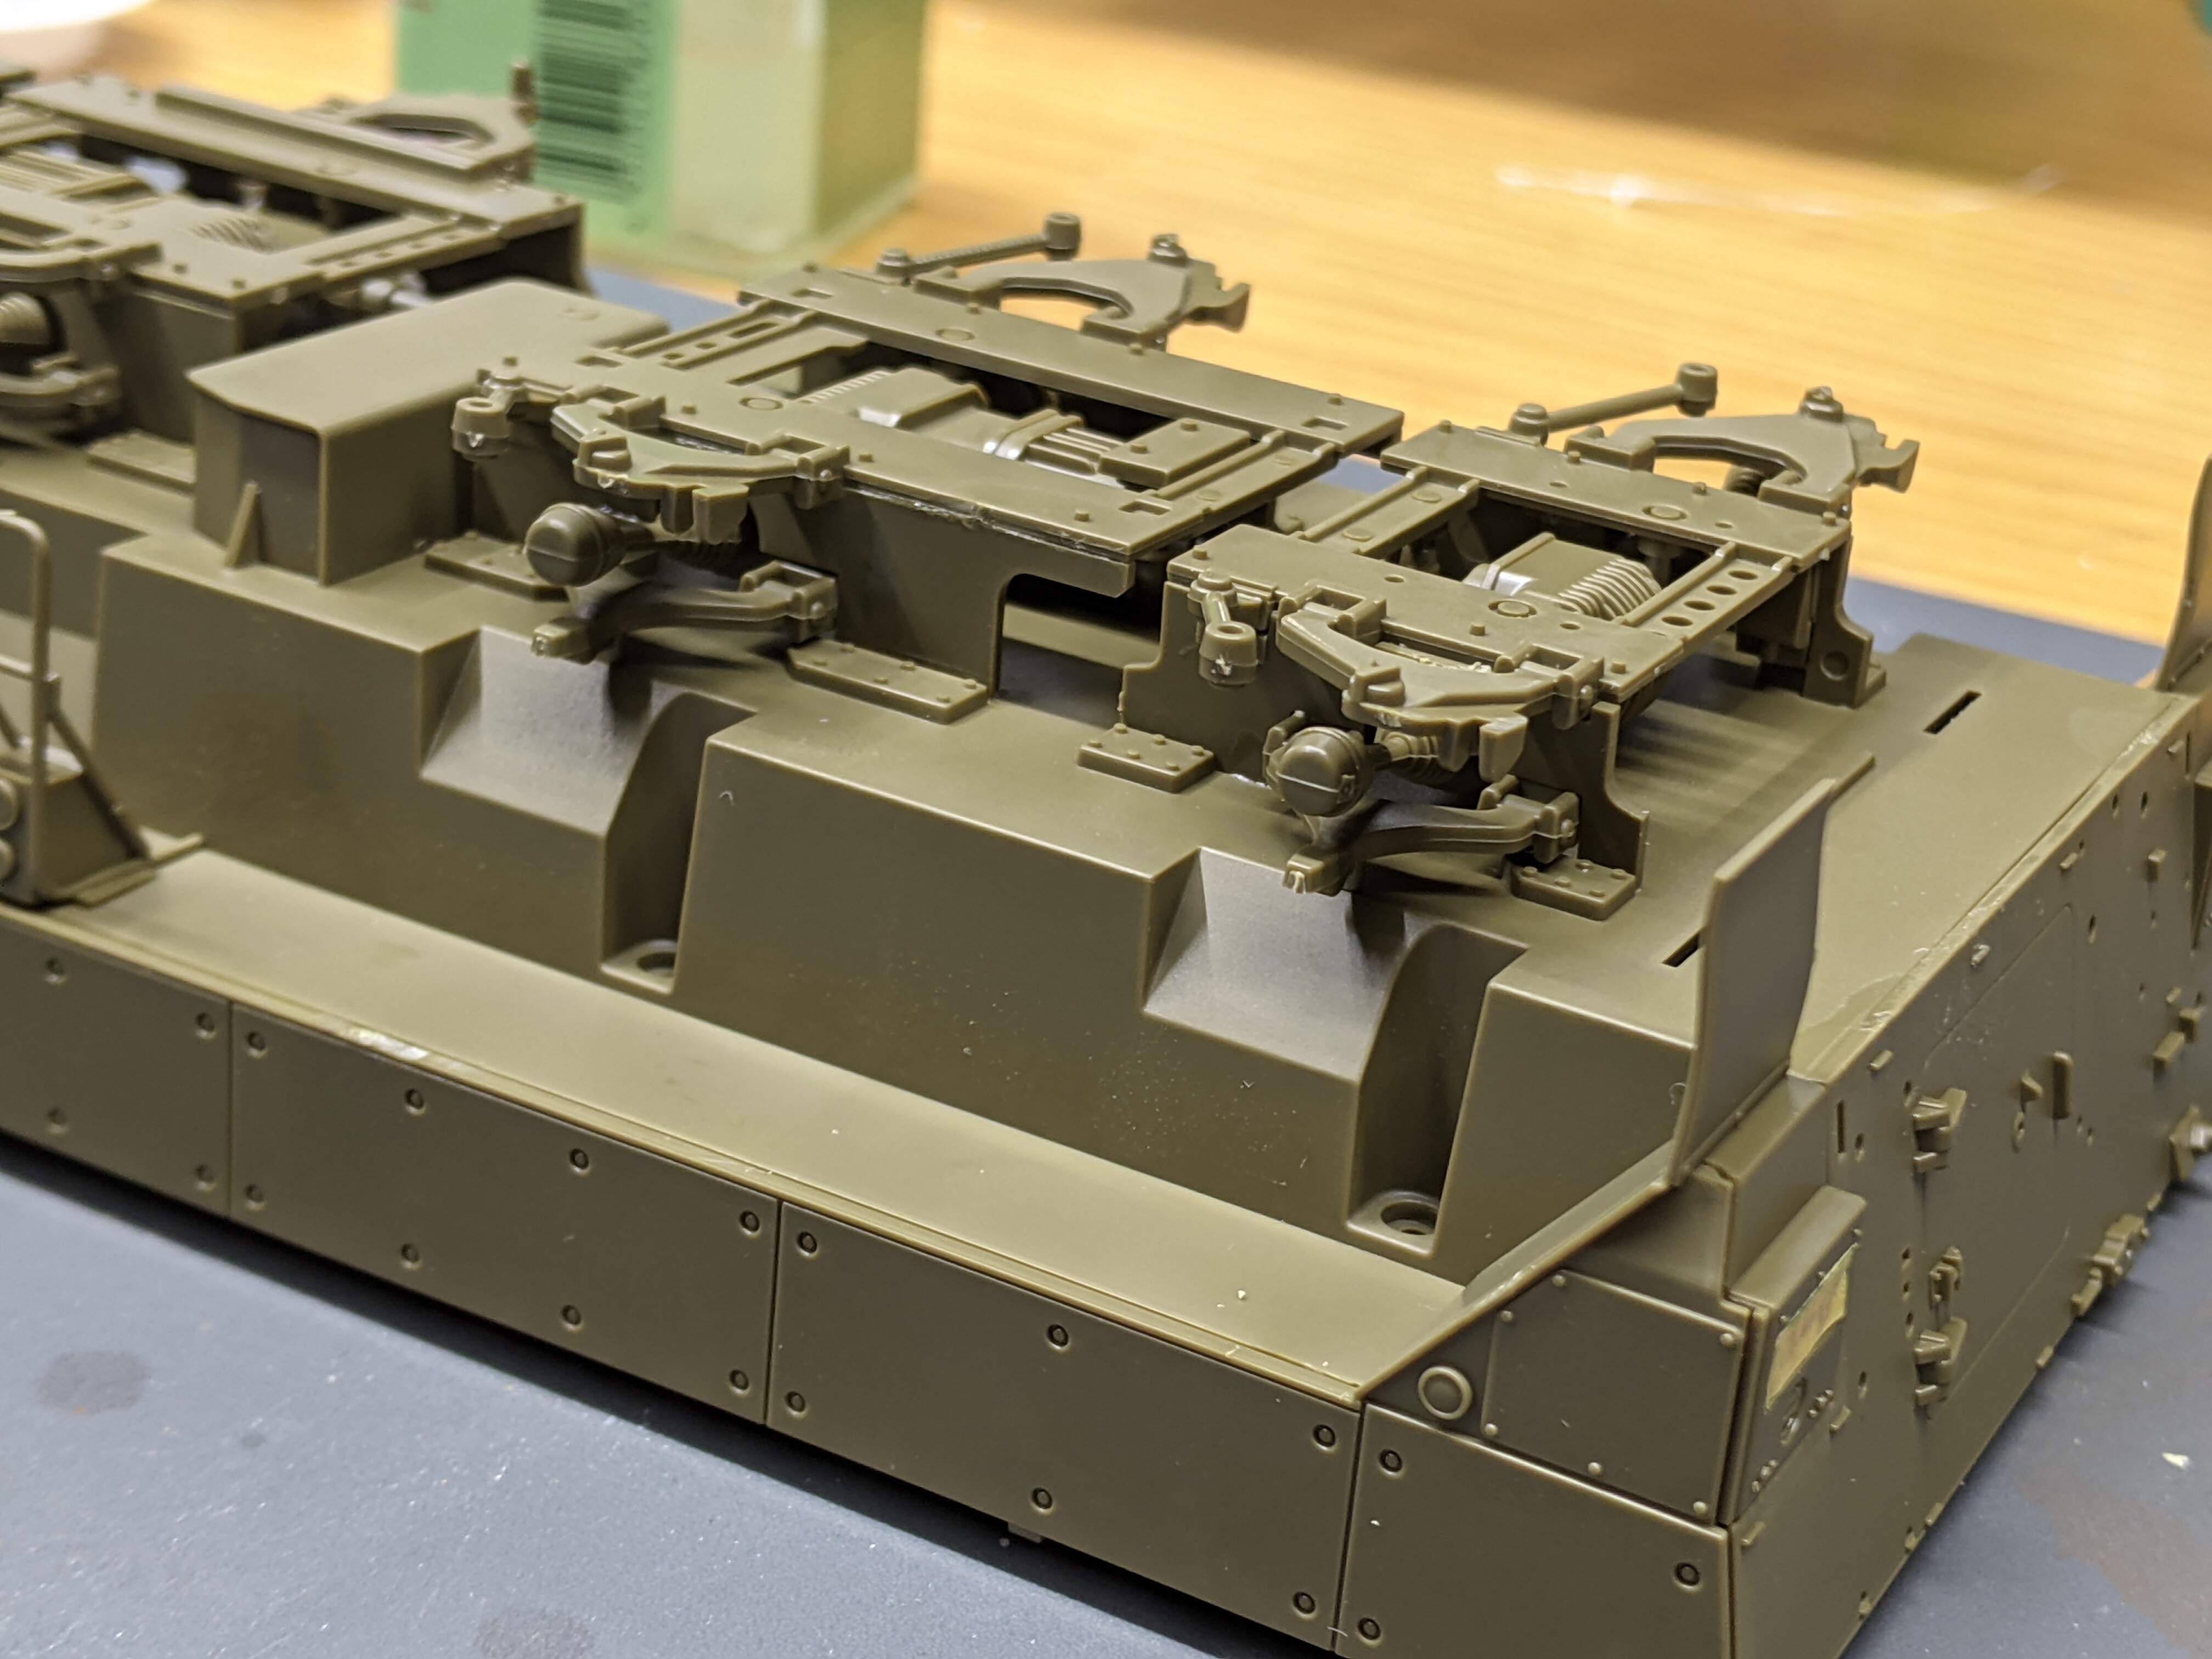
Here’s what the differentials look like with all the suspension components and the wheels on:
I know for sure this won’t be glued to a base, this detail is far too good to leave covered up. Next, I finished the hull off by attaching all the tools on the back panel:
One thing I think is interesting to note here is that the rear panel didn’t feature any parts that weren’t on the 1/48 version of this kit that Tamiya made. Shows how good those kits are!
Next, I began work on the turret. If you’ve built a Tamiya kit before, you’re probably familiar with the two poly cap/mantlet system they’ve got going, where you insert a piece of the turret mantlet in between two tabs containing poly caps so as to actuate the movement of the gun barrel. Same deal here on the Type 16. There’s no interior on the turret, but at least Tamiya provides two good figures to fill up the hatches. I also added the metal barrel. I know some people don’t like the fact that it doesn’t have rifle detail, but I like it. Metal barrel cool.
That’s all for this morning! Thanks for popping in 
-Dennis
3 Likes
Hi guys;
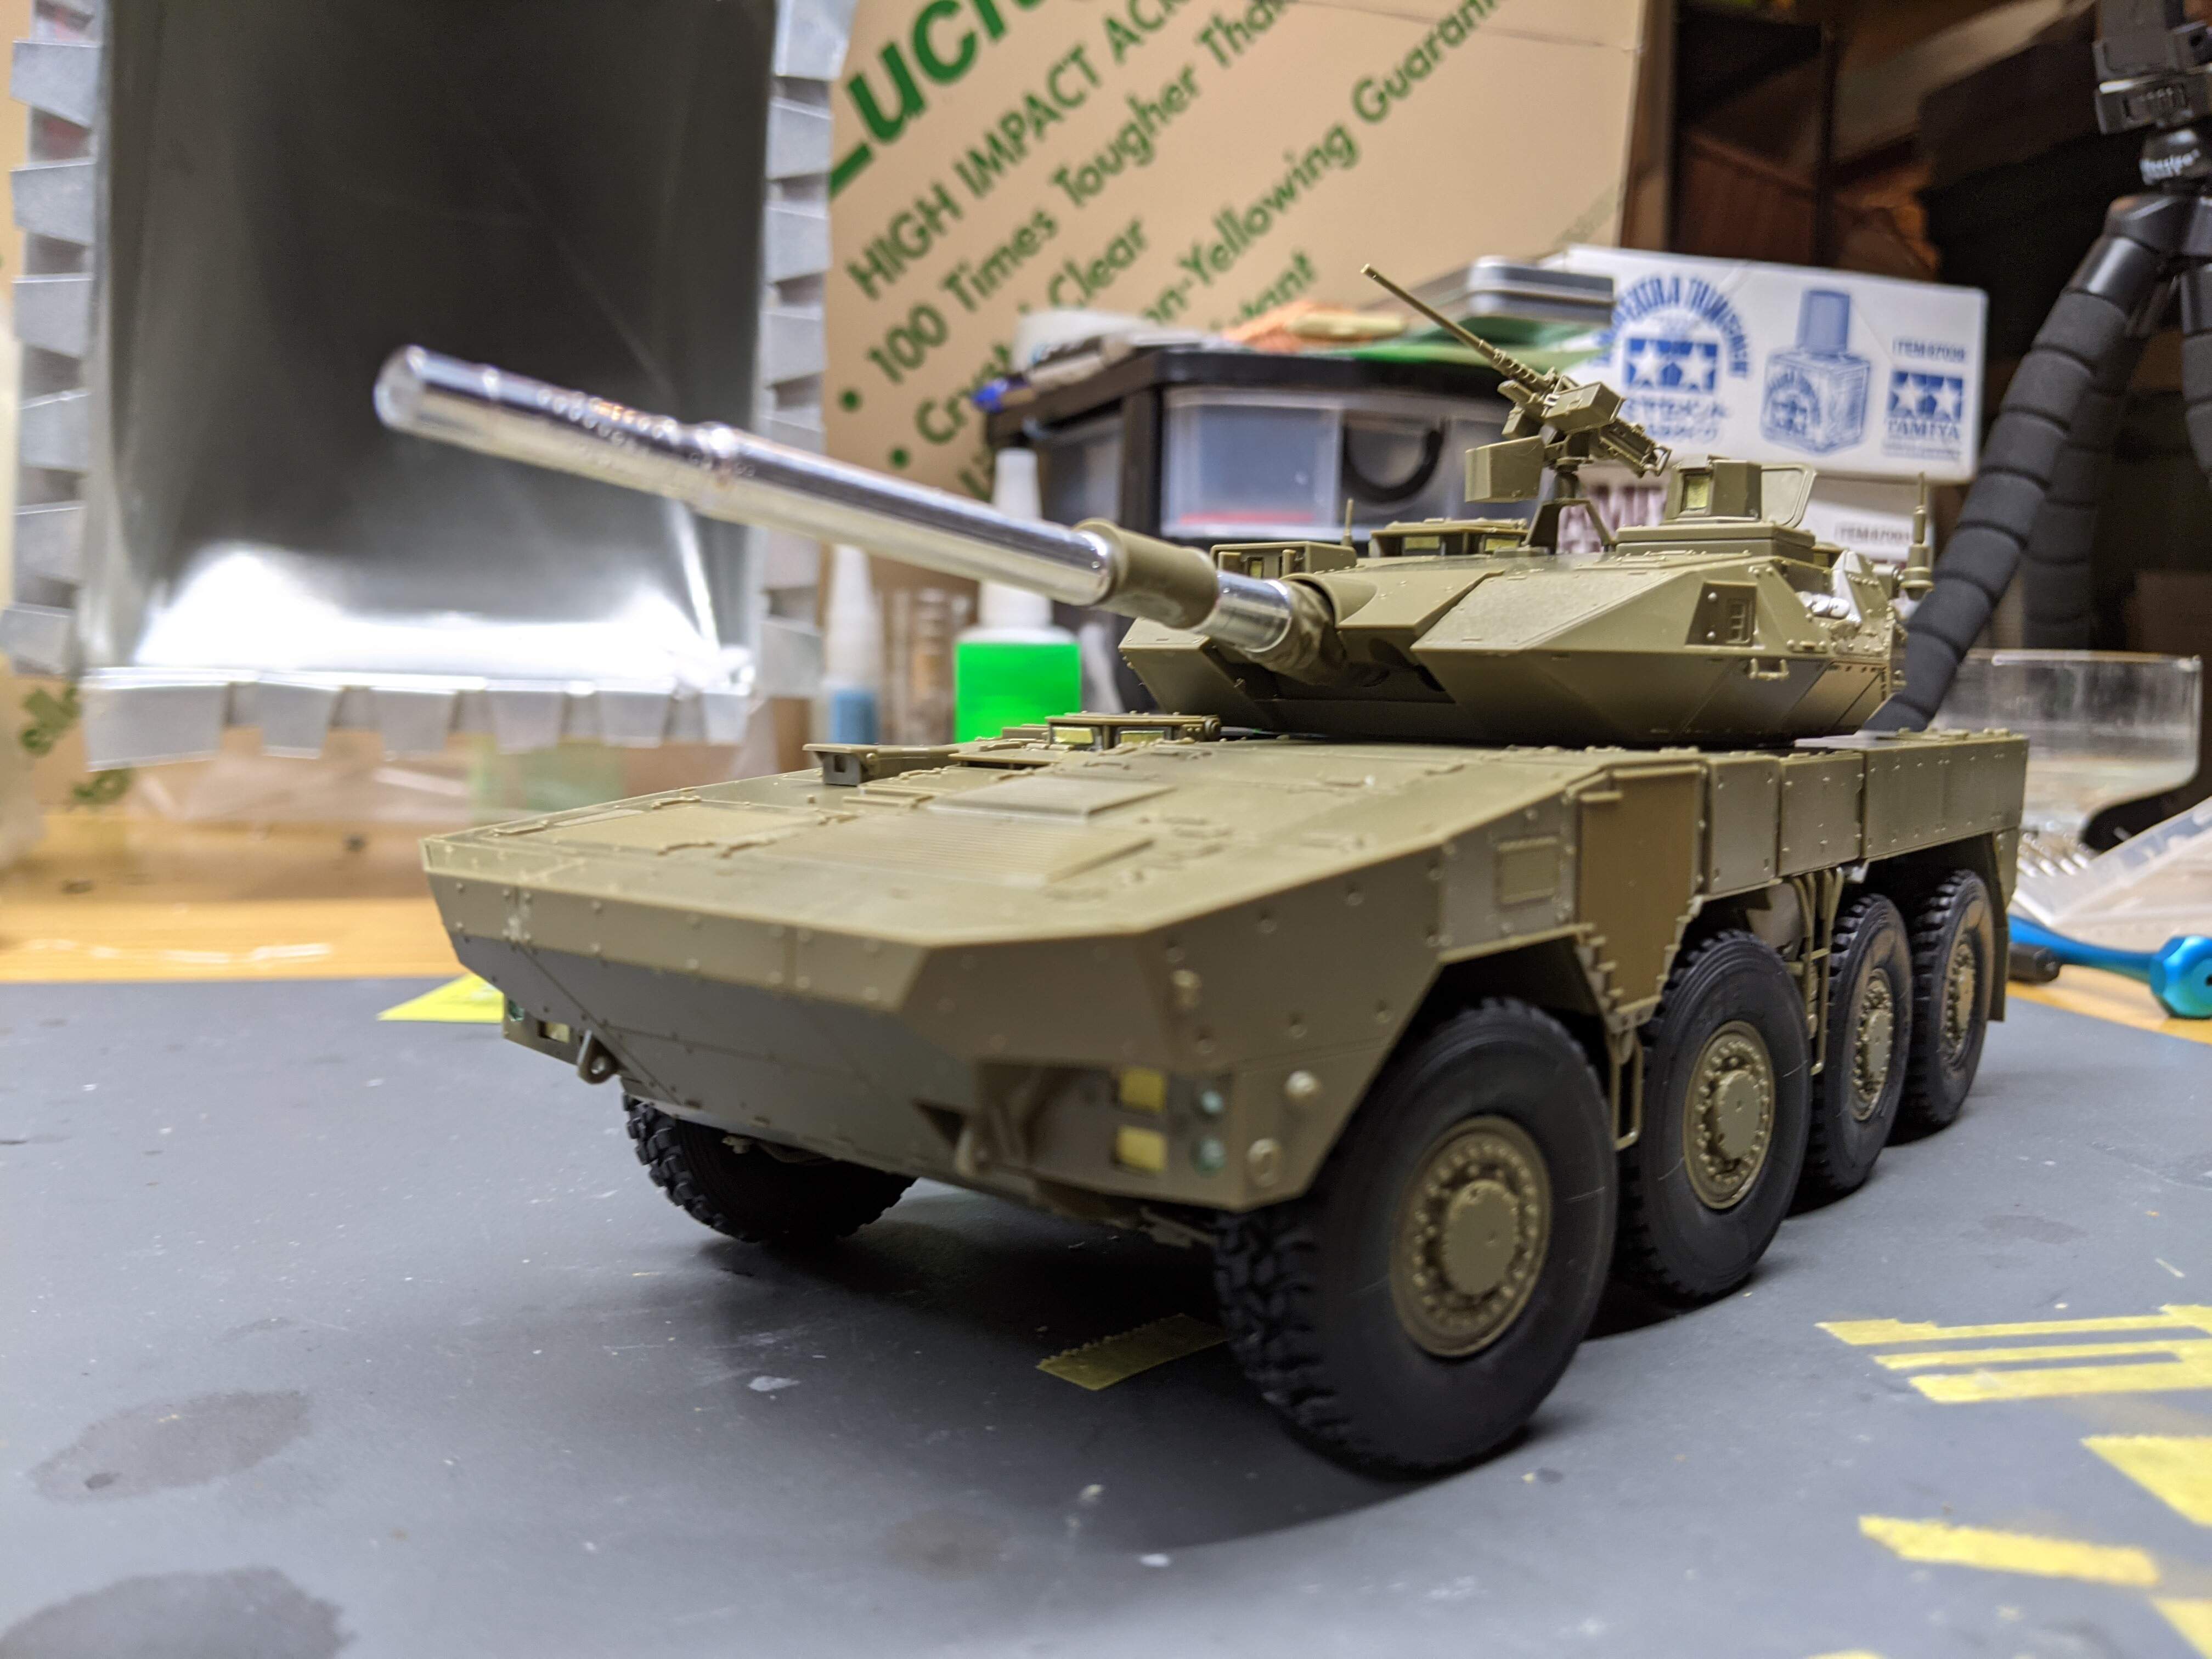
Well, the construction is done. This kit absolutely flew together, only took four sessions and now it’s all done. That’s Tamiya for ya. Today the main focus was on the turret. As I posted this morning, the turret was pretty far along, so this afternoon I built up the hatches, antenna, bustle rack, and the .50 cal (my favourite!)
Here’s how she looks now
Now that’s a proper armoured car.
As I was putting the 50 together, I recalled reading in many places less than favourable reviews of Tamiya’s M2HB subassemblies, so I figured that I would like very much to use my soapbox to present an alternative perspective.
The M2 in the kit is fairly new for Tamiya, being released for their Type 90 kits, and being put in every subsequent JGSDF kit. It’s clearly taken from the parts they released in the early 2000’s, those being for a two-piece receiver and ammo box on a pintle mount. Now, many people have criticized the parts Tamiya uses as being overly simplistic and poorly done, but I would like to counter with this photograph:
As far as the Sumimoto M2HB is concerned, I would argue that Tamiya’s parts are by far the most accurate and well-detailed on the market. Later tonight I’ll post a photo of the kit’s M2 to show you what I mean.
Regardless, this kit was an absolute joy to build. I would be lying if I said it wasn’t my favourite of all time. If you like Japanese armour, I highly recommend building this kit. Hopefully tonight I’ll get around to priming it!
Dennis
3 Likes
This looks like a really nice kit! Cant wait to see it primed.
2 Likes
Great work Dennis- I also think their JGSDF M2’s look pretty good.
2 Likes
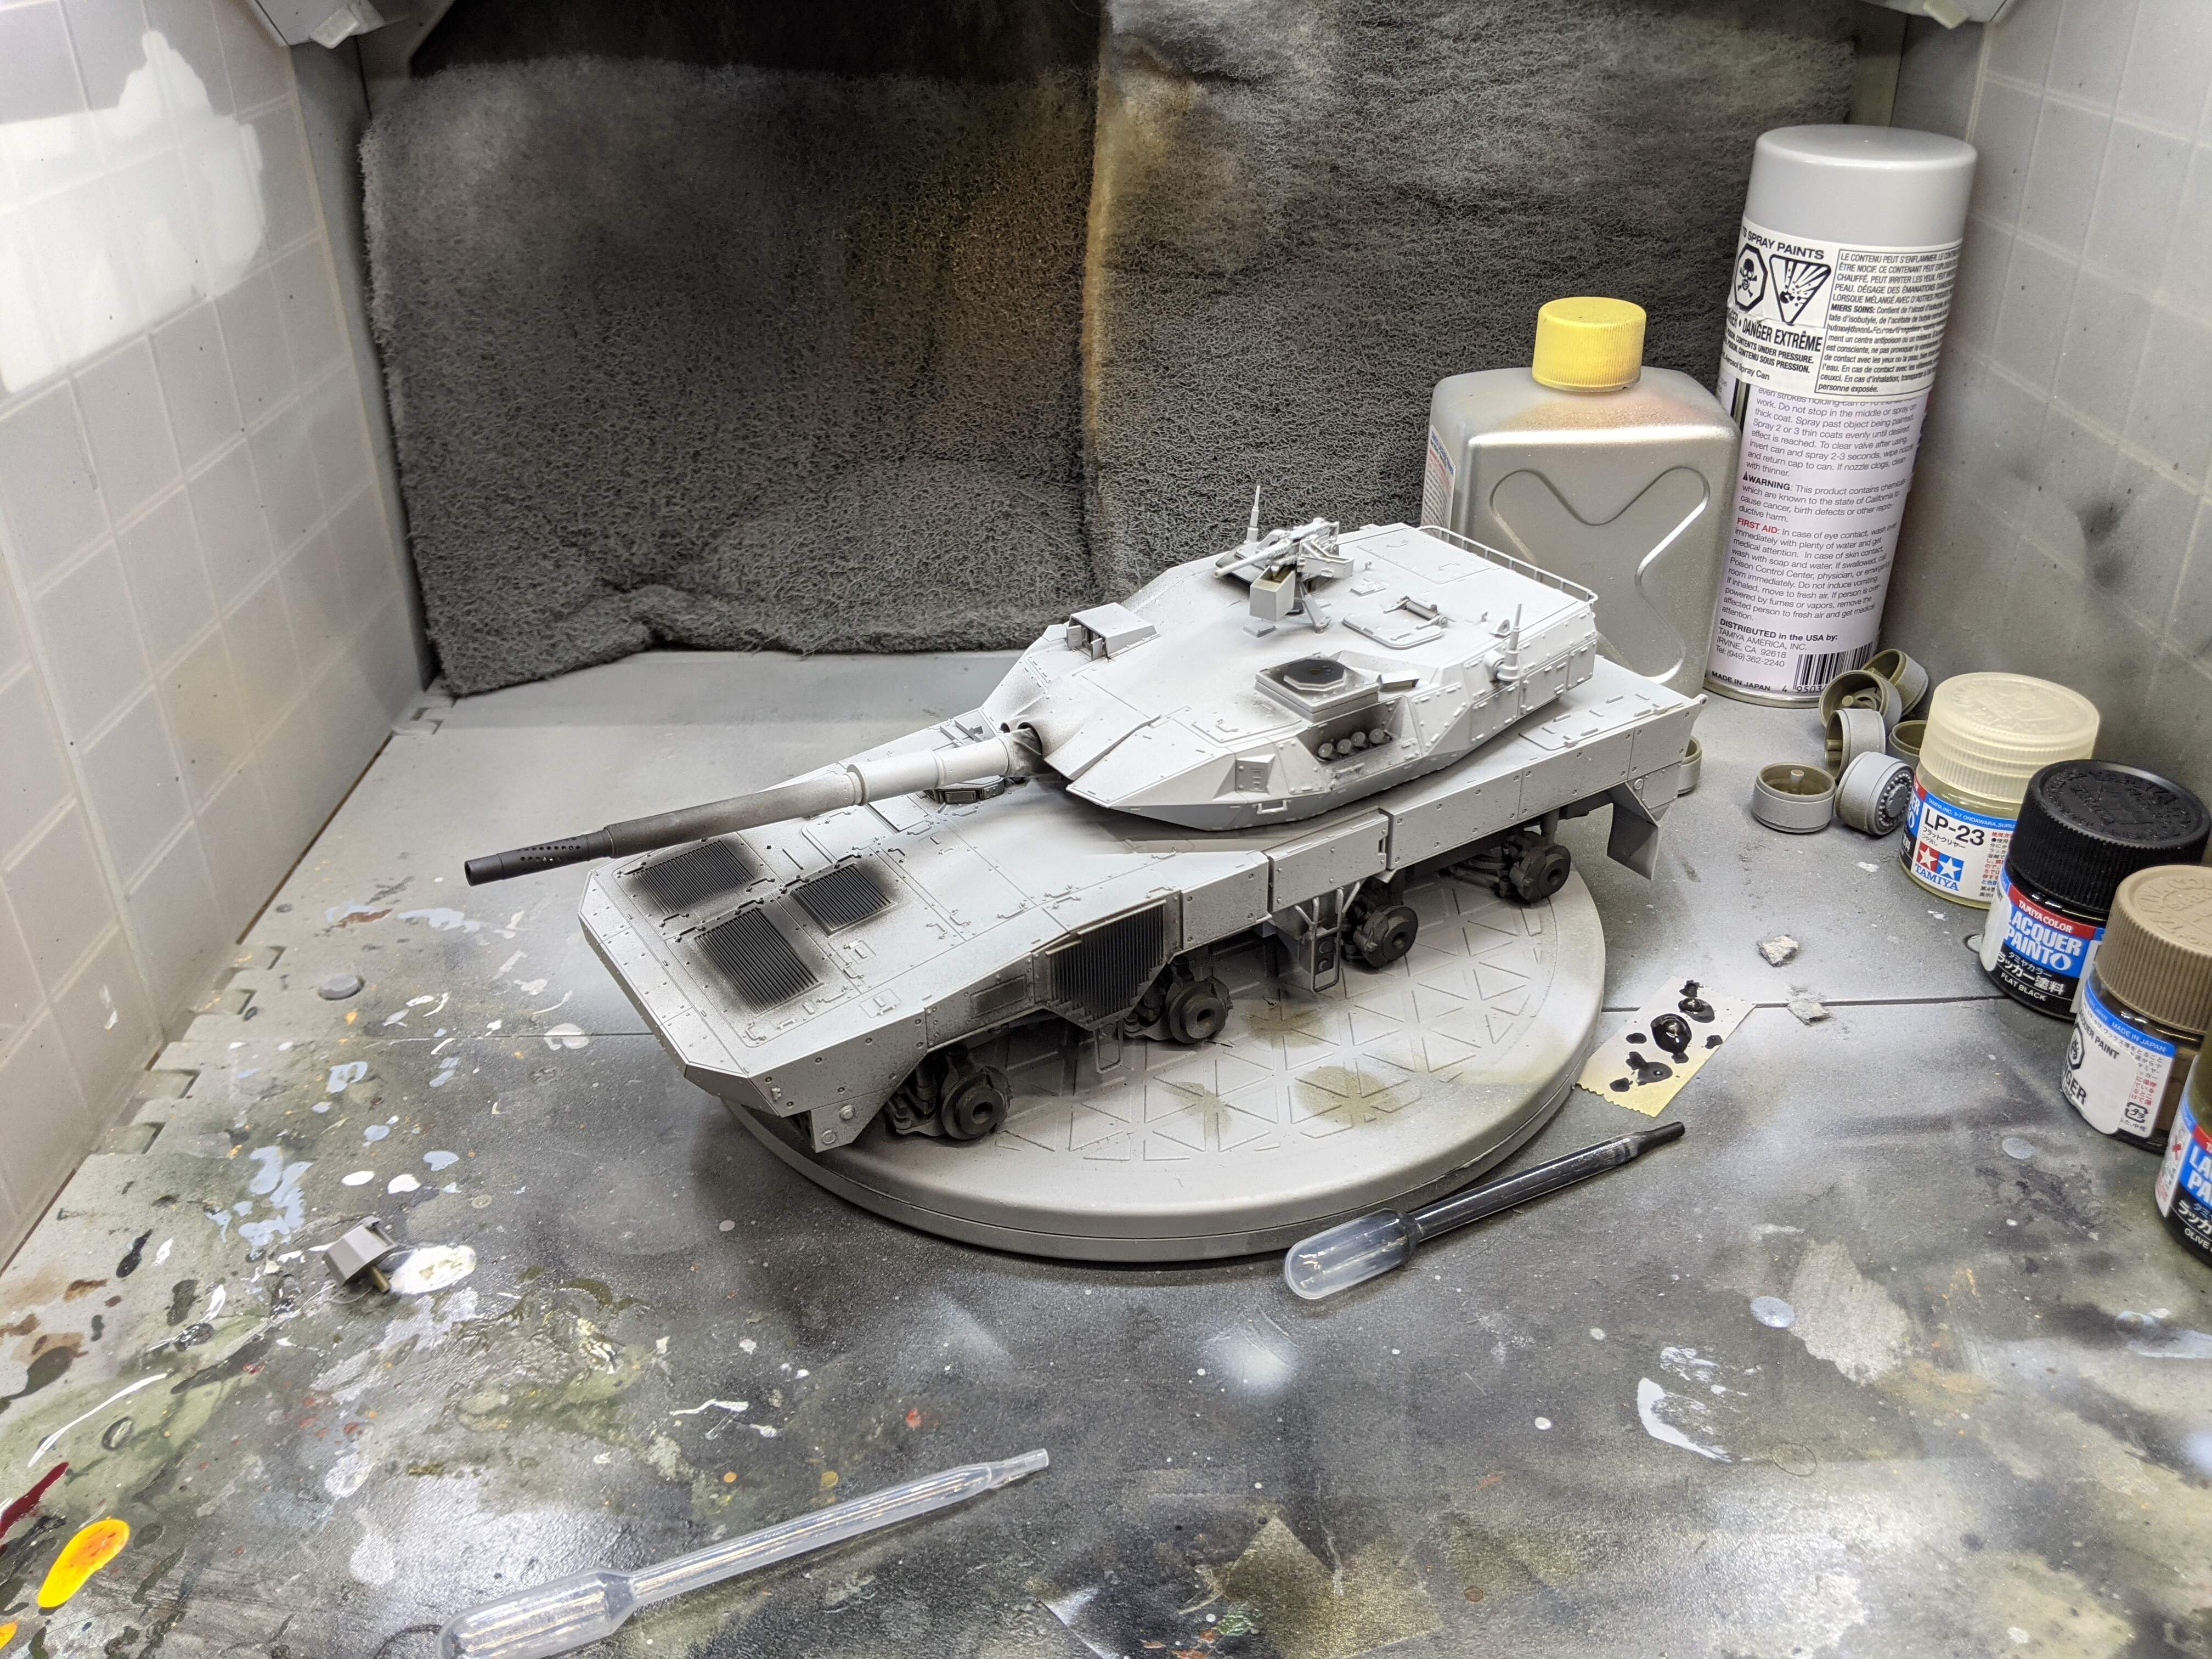
Morning all!
More great progress last night. My main focus, after finishing the build portion, was to prime the Type 16 and get the preshading done. Here’s what the model looked like after I primed and shaded it:
To prime the kit, I used Tamiya’s grey spray primer. I’ve used airbrush primers from Mission Models before, but I find that this primer has far better adherence and strength, and I find the grey undercoat works well for shading. Speaking of shading, this is the first build I’ve done where I have decided to preshade the model. I used Tamiya’s black lacquer to shade radiators, exhausts, smoke dischargers, shadowy areas, as well as the gun barrel. I tried to graduate the intensity of the shading on the cannon, so as to represent the effects of the flash when firing.
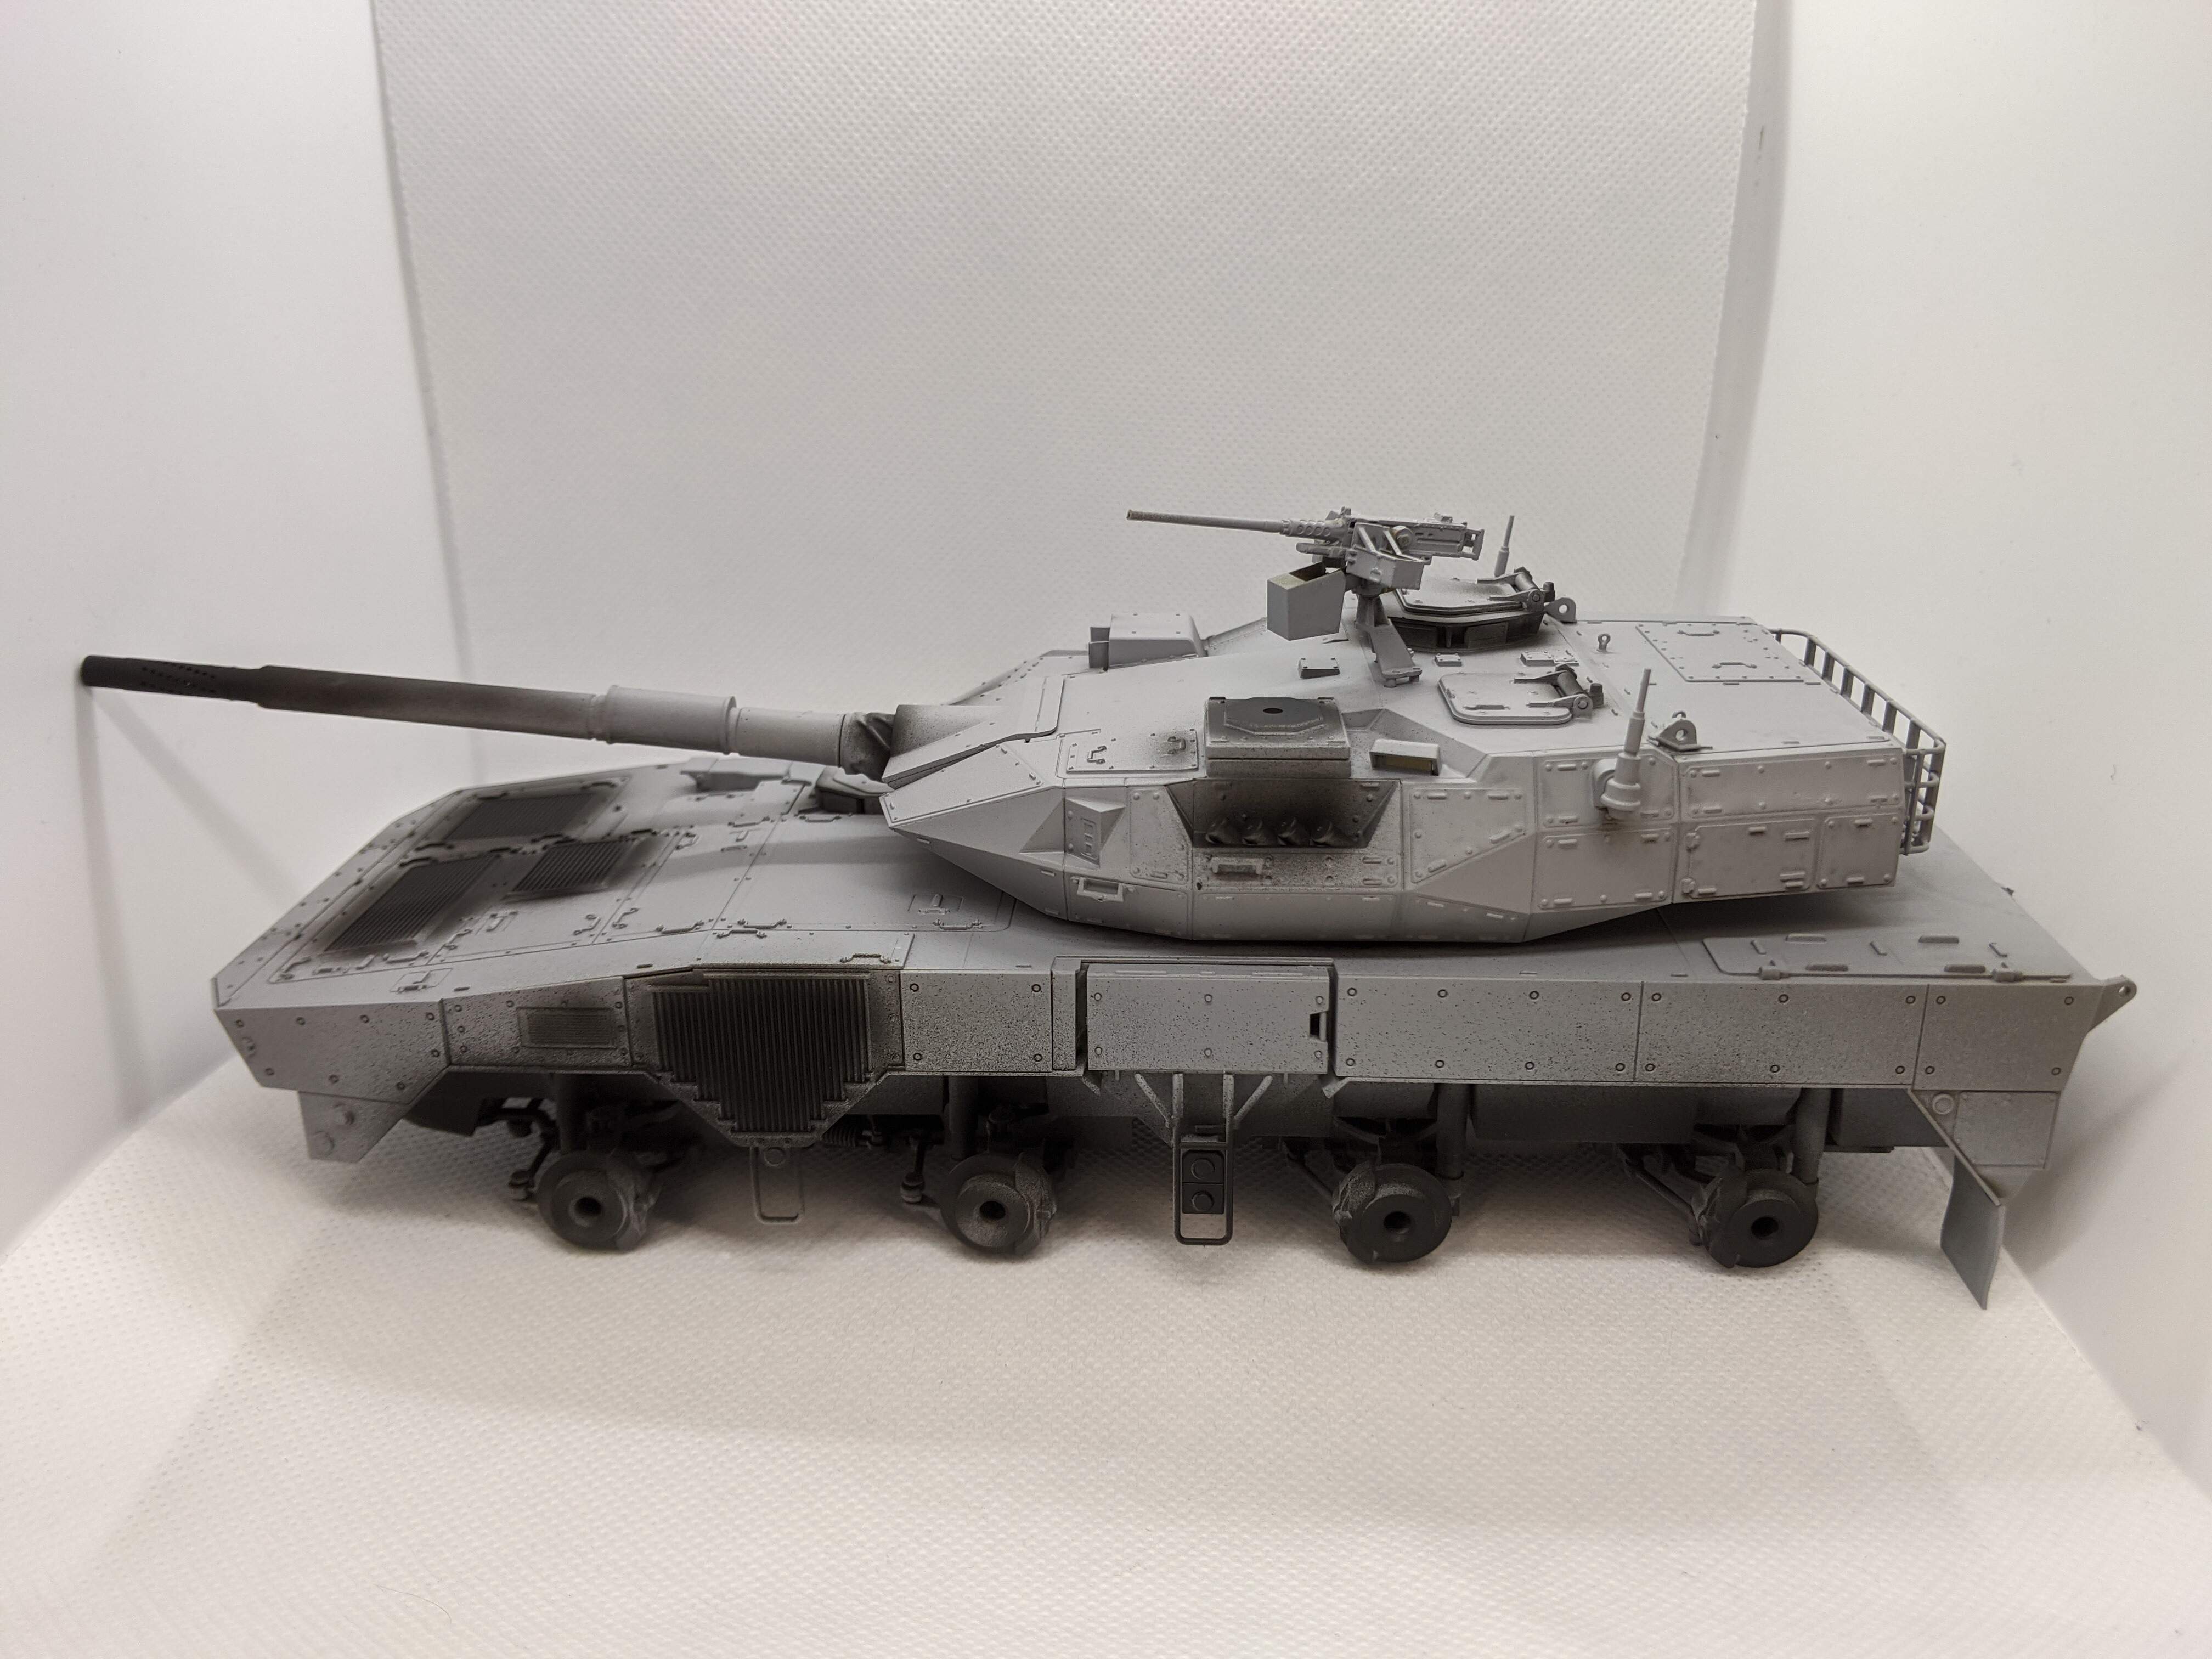
One thing that’s really pushed me towards using lacquer paints has been how quickly they flash off and dry. Without a doubt, they improve this stage of a project immensely. In one night, I was able to completely paint the entire kit! After the shading was done, I painted the underside of the Type 16 in Olive Drab lacquer (freehand, I don’t think I’ll be using masking tape at all on this kit). From there, I painted the rest of the vehicle in JGSDF Brown, also a lacquer. The reason why the entire kit got painted in brown is because, if you look at the real vehicles, it’s clear that brown is in fact the dominant colour. If I had to guess, I’m going to say that Mitsubishi HI has machines that spray the green strokes either in the absence of brown or overtop it. Ergo, I want to copy this process.
Here’s what that looks like:
Well, that’s all I have for this morning. Hopefully the Dark Green will go on tonight!
Stay safe,
-Dennis
4 Likes