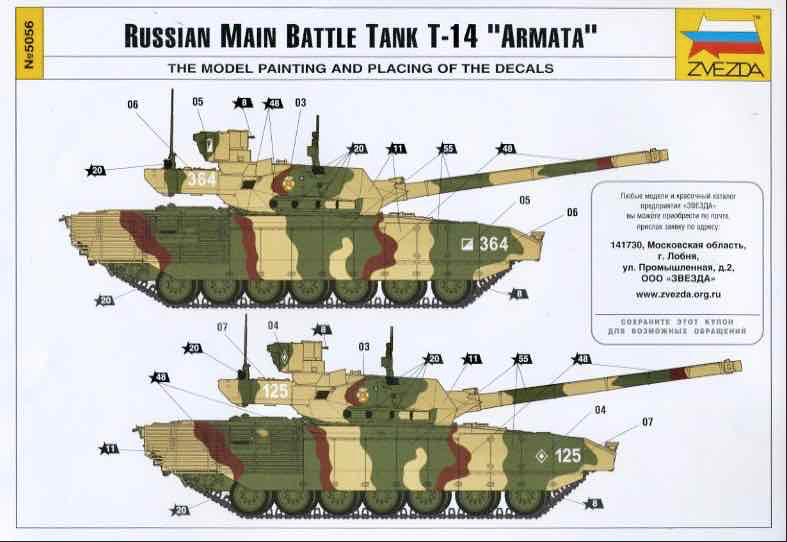
A newly acquired kit and a new photos test for this new version of Armorama. Been a while since I’ve done any reviews or BLOGs so a bit of a test of some rusty skills. ![]()
Cheers,
Jan ![]()
![]()
![]()


A newly acquired kit and a new photos test for this new version of Armorama. Been a while since I’ve done any reviews or BLOGs so a bit of a test of some rusty skills. ![]()
Cheers,
Jan ![]()
![]()
![]()
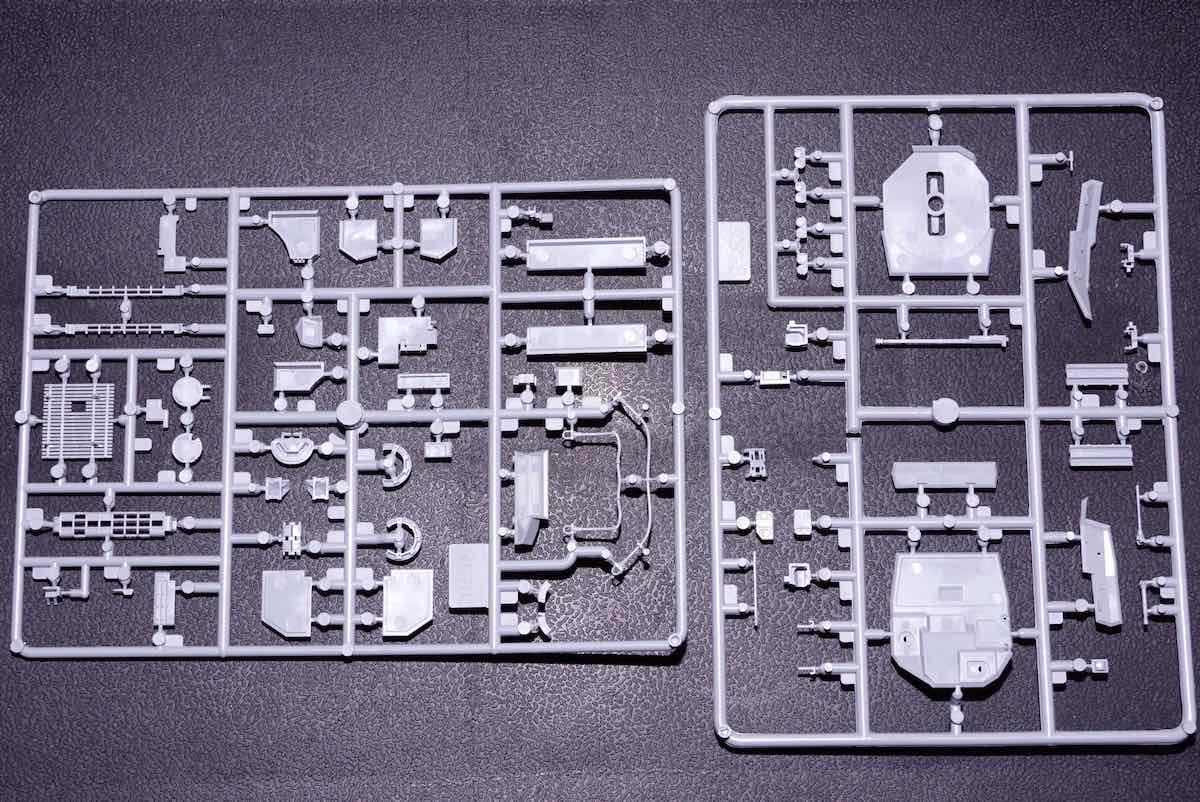
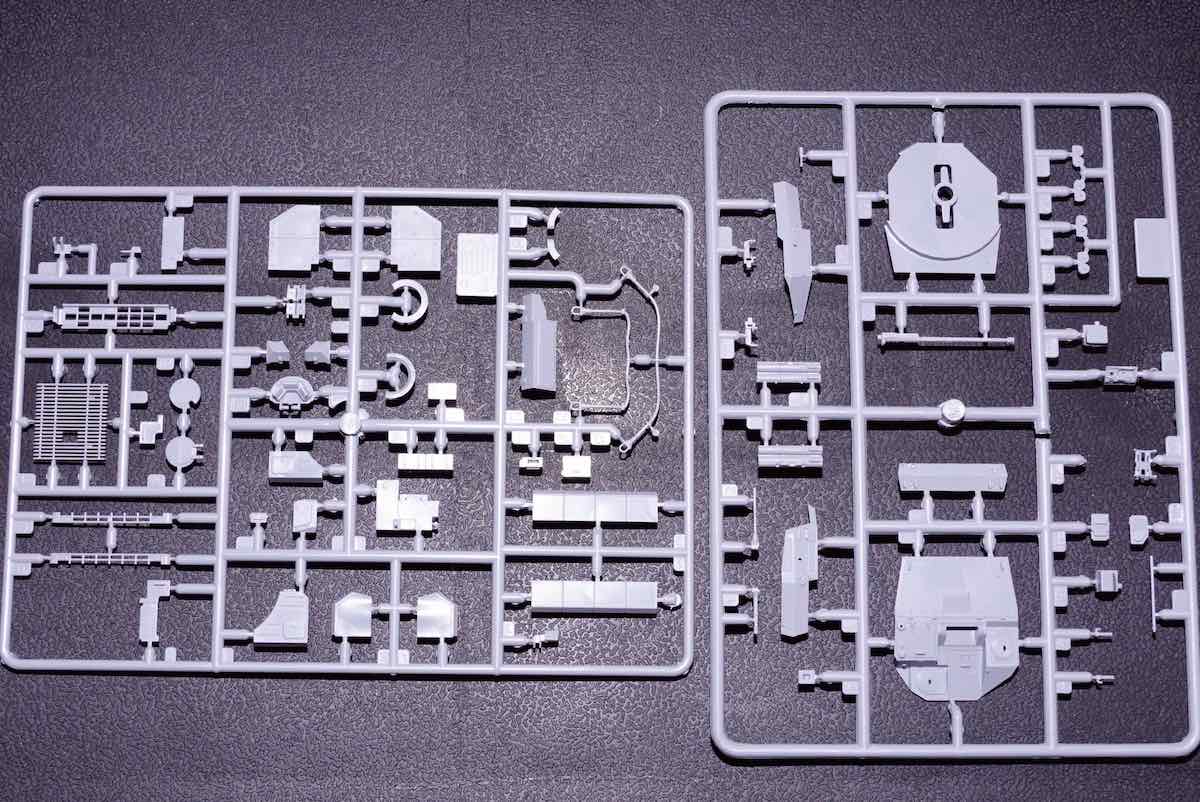
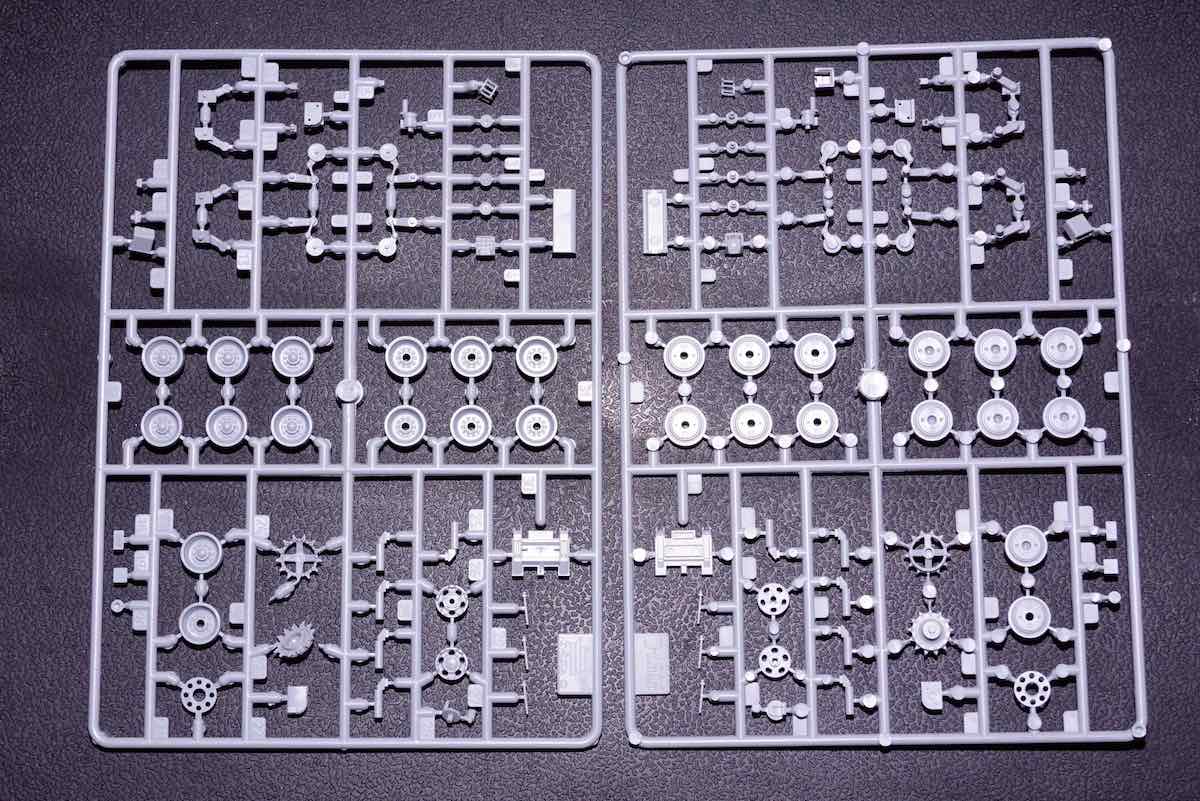
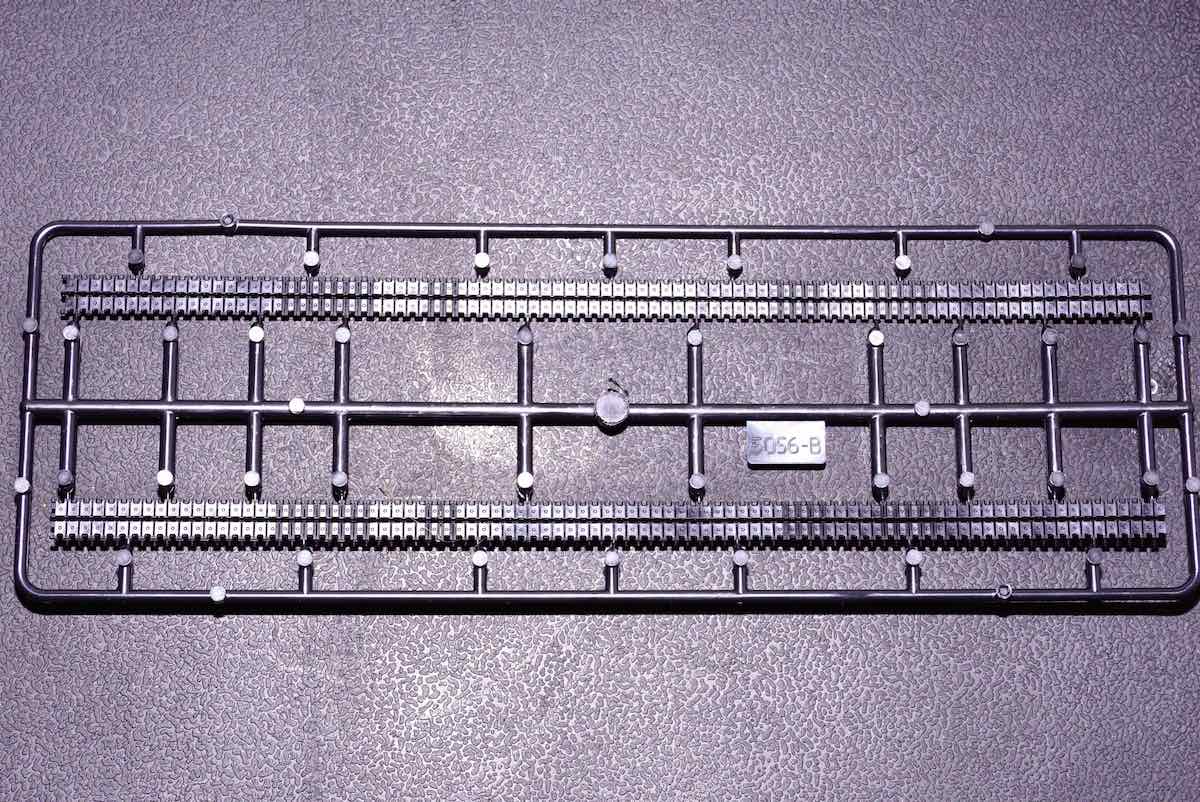
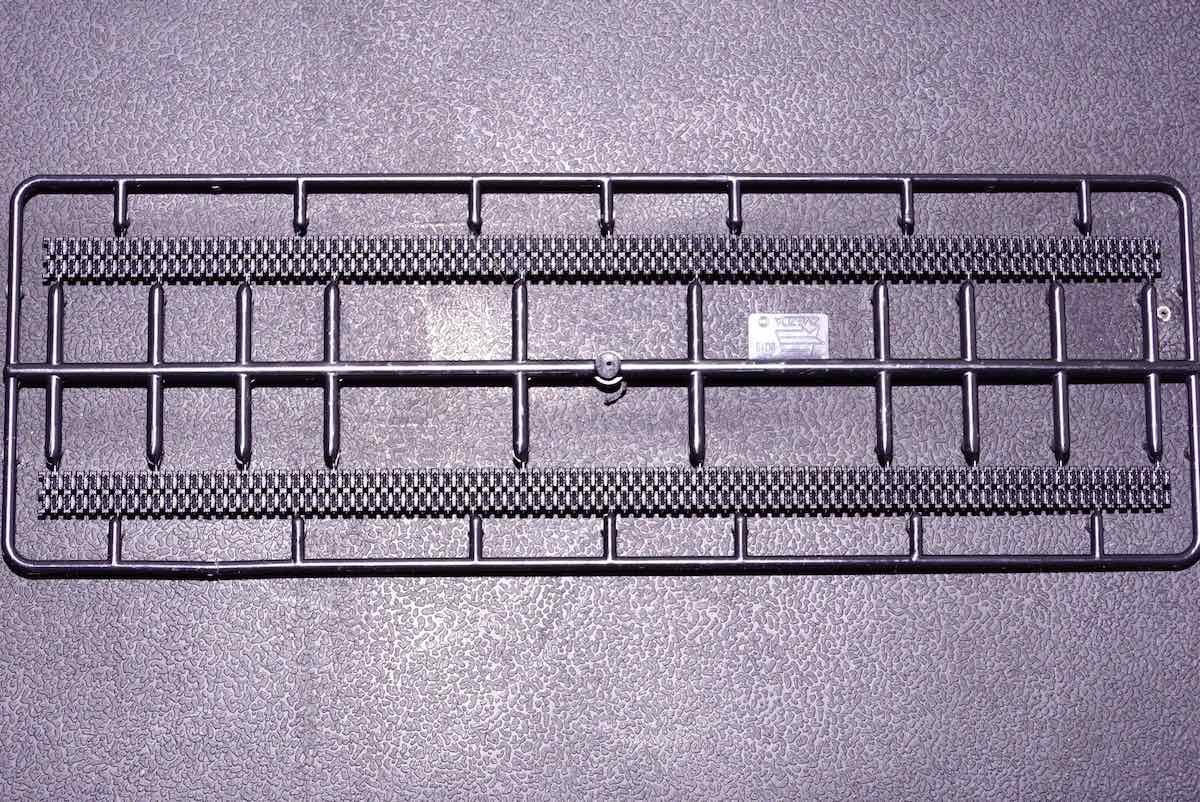
A few more sprue shots taken with a different image hosting setup. 
Well that seems to work! 
Cheers,
Jan 
Isn’t there a T-14 too? Or is that a different type of vehicle? Don’t know much about these Soviet machines but they sure are interesting and much more so in the real scale, hihi Looks like you’ll be busy working on this and the other wingy thing.
I’m still using Photobucket and the link is now rather a lengthy one when posting. I will have to move my recent build log over to this new site, hope things work out?
~Eddy 
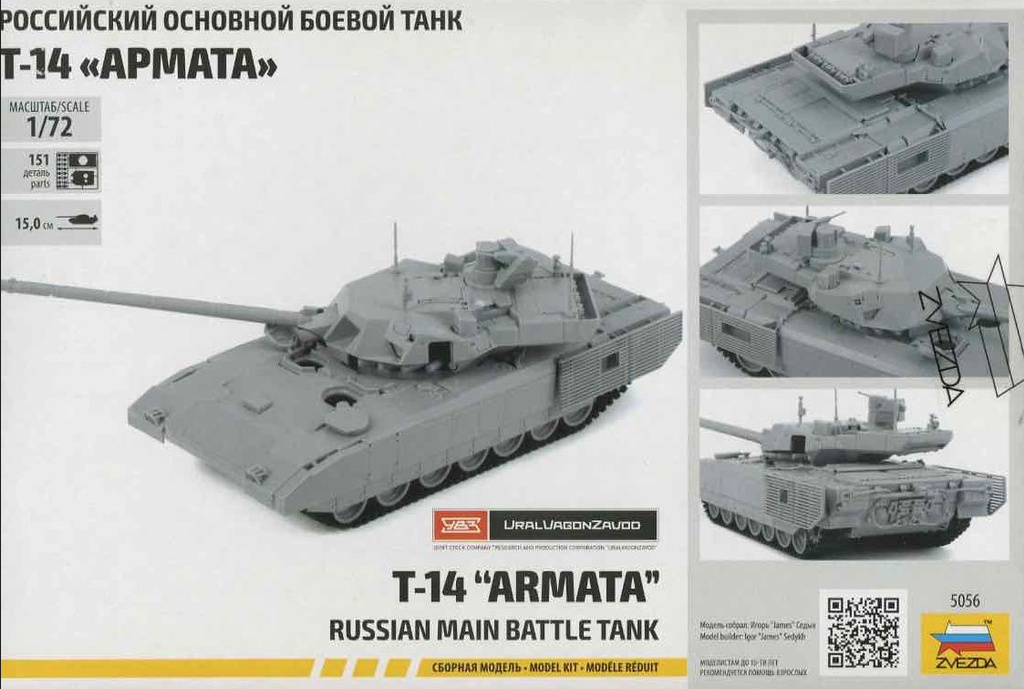
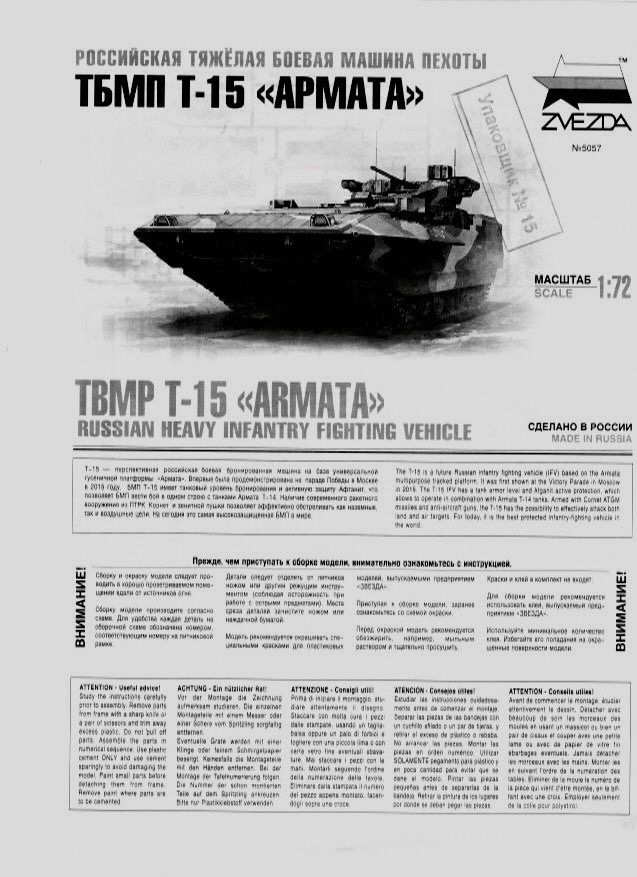
Yes, Eddy, there is also the T-14 Armata and I am also in possesion of the Zvezda version of that beast.
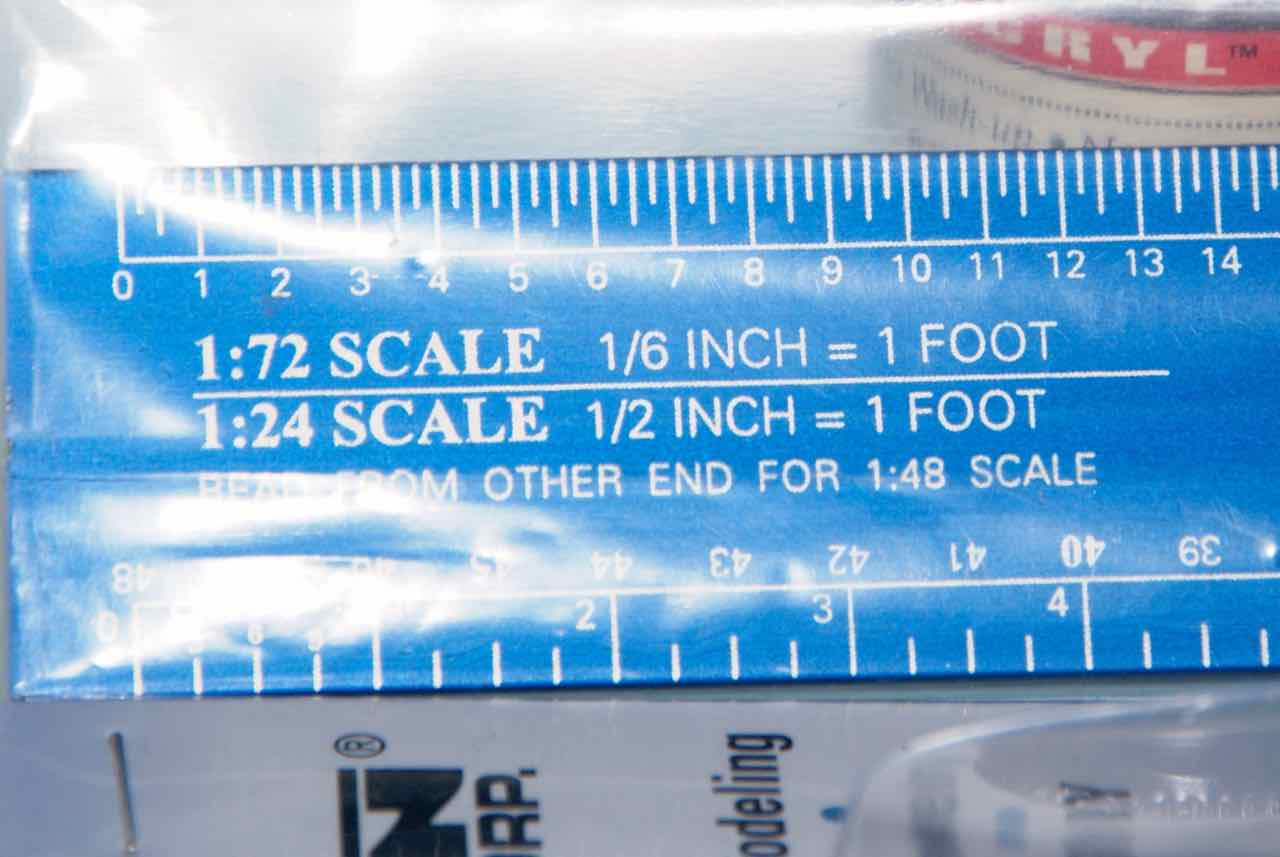
A newly acquired scale measuring device for the One True Scale from our only hobby shops’ closeout sale. Plus:
Plus:
Cheers,
Jan 
Ok, I see now. I thought the T-15 looked a little off from what I remember seeing of the T-14? Good idea about getting a scale ruler, they come in real handy for scratch building items or the entire project. I do hope that you did not mean that your LHS would be closing, that would not be a good thing?
It dose look like you do have a line up of kits to put together and depending on your time you’ll be quite busy working on the bench. I can’t think of a better way to spend time having some enjoyable fun.
~Eddy
Sadly Eddy that was the case, we never new until then that it could happen. It was the biggest and best for over 30 miles and rivaled some of the big shops in Toronto. Now we have a couple of game shops that stock Tamiya paint and can order kits from a limited number of companies. ![]()
Yes I have a few kits in my stash and got a few from Hong Kong before the pandemic hit. Once I sharpen a few dormant skills I look forward to a few interesting builds on this new Kitmaker. ![]()
Cheers,
Jan ![]()
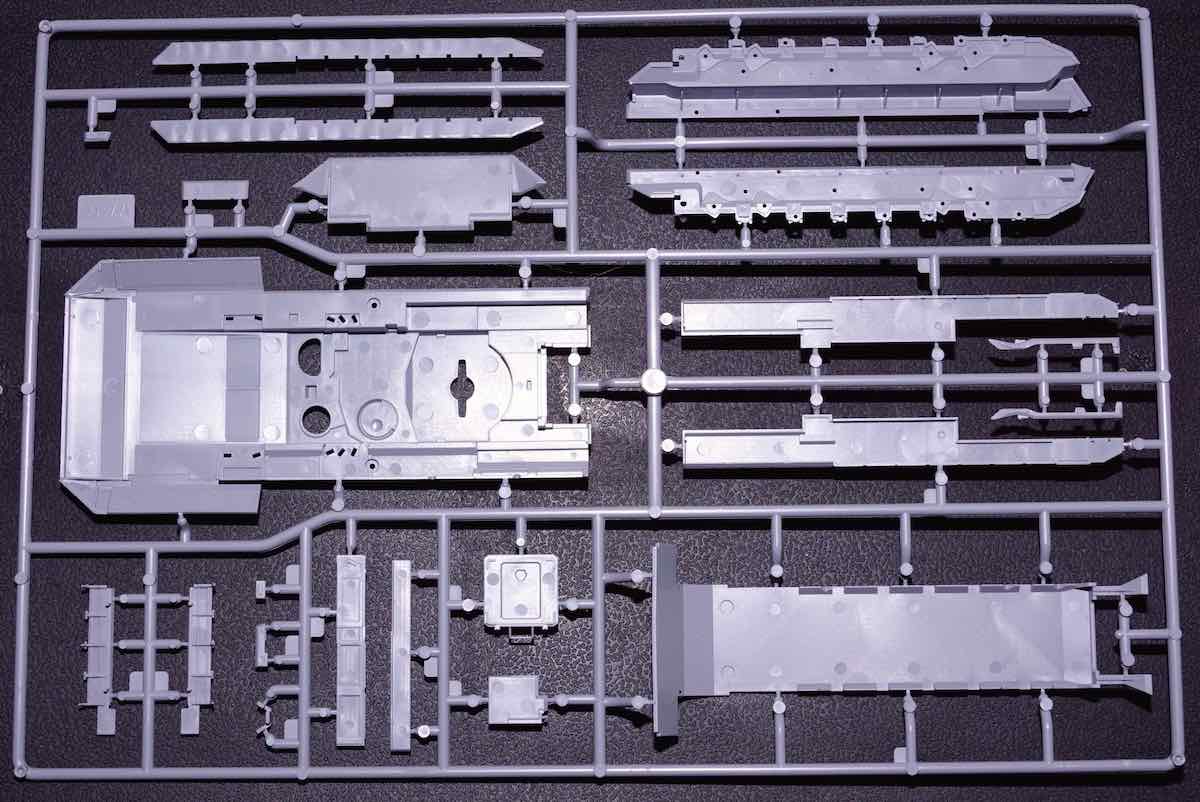
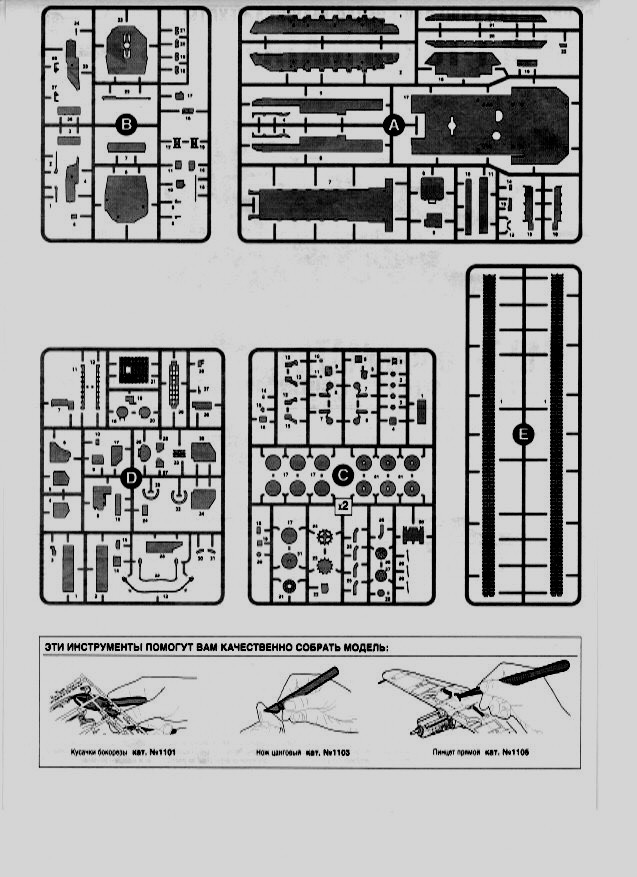
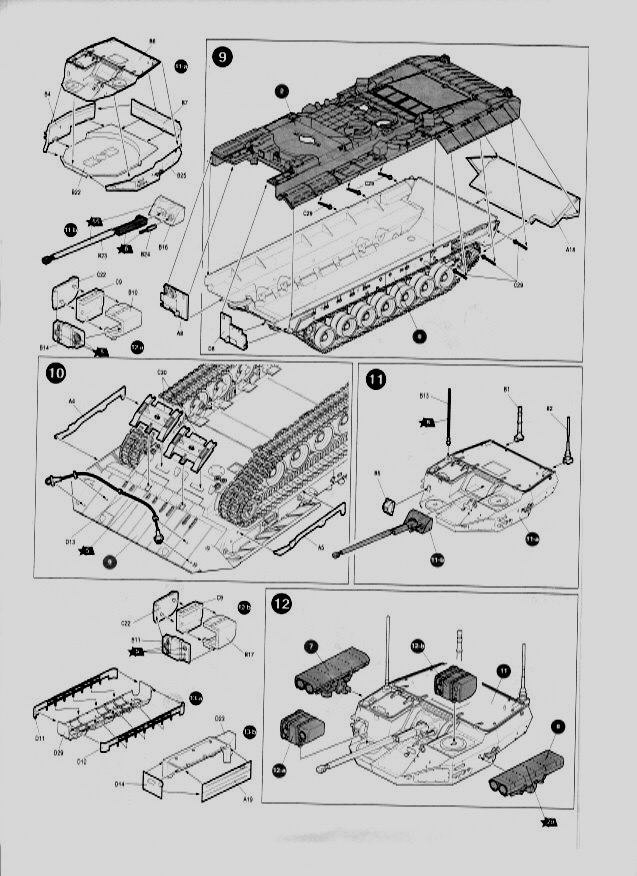
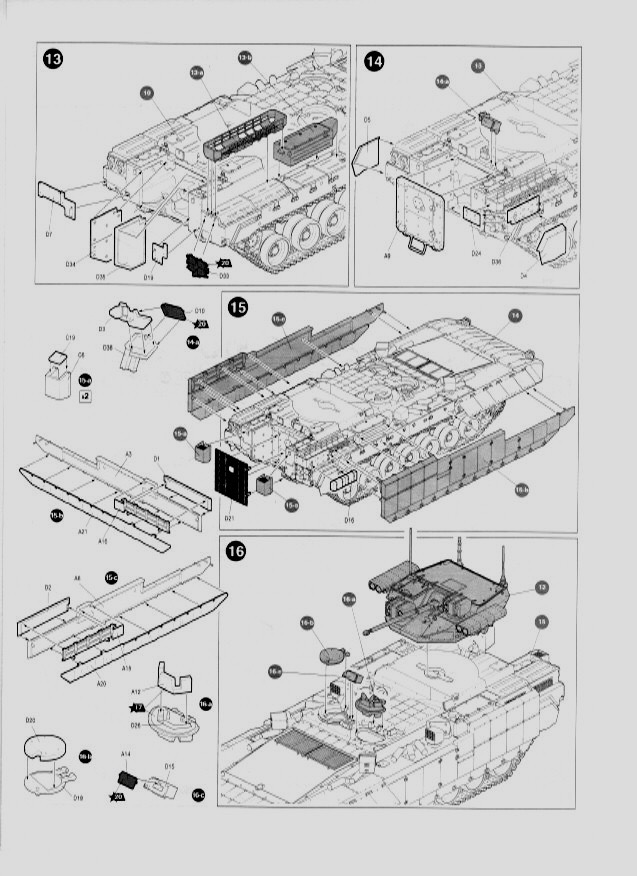
Okay, due to a few technical “glitches” going further with this post has been delayed.  However, I was finally able to wrestle the new scanner and photo software into at least temporary submission and complete the instruction scans. It’s not overly complex kit by far but there are still 145 1/72 scale individual parts in this scale size to deal with.
As I’m currently working on more than one project I don’t know when I’ll next post an update so until then take care and stay safe.
Cheers,
Jan
Greetings all,
While I am not “A Rivet Counter” I do like to know information about a model that I intend to build. ![]() Thankfully a fellow Canadian and Armorama member, Jason Bobrowich had started his larger scale T-15 Armata Build Blog. His pre-build introduction to this beast is excellent as is his commentary throughout his Blog. I thank him for making his work available to us members.
Thankfully a fellow Canadian and Armorama member, Jason Bobrowich had started his larger scale T-15 Armata Build Blog. His pre-build introduction to this beast is excellent as is his commentary throughout his Blog. I thank him for making his work available to us members. ![]() (The Blog is hosted on the older Armorama site)
(The Blog is hosted on the older Armorama site)
Cheers,
Jan ![]()
![]()
![]()
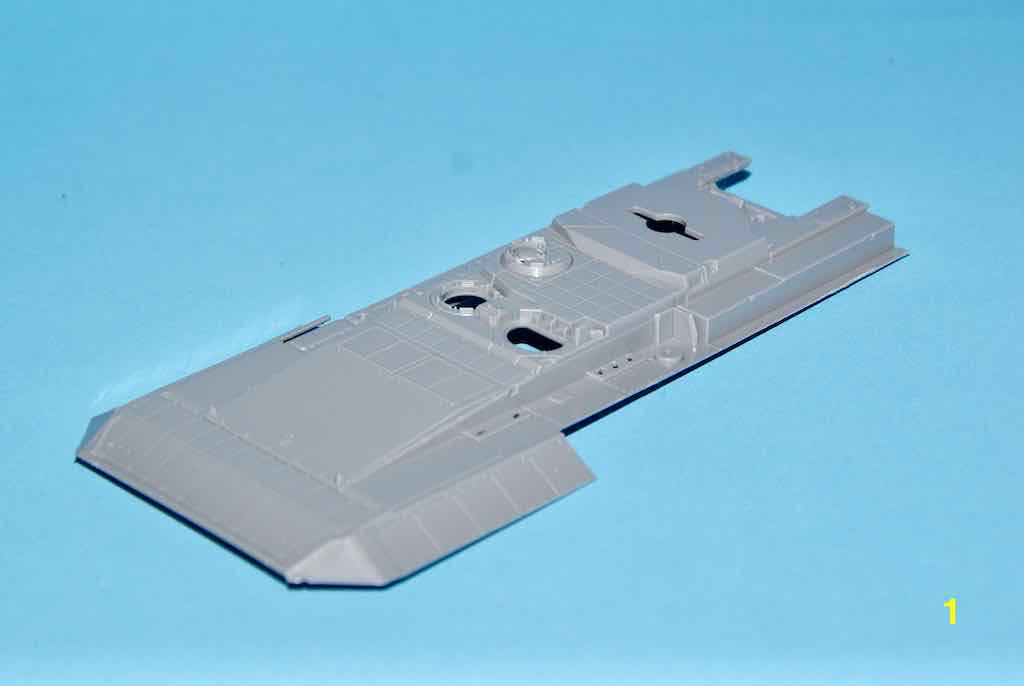
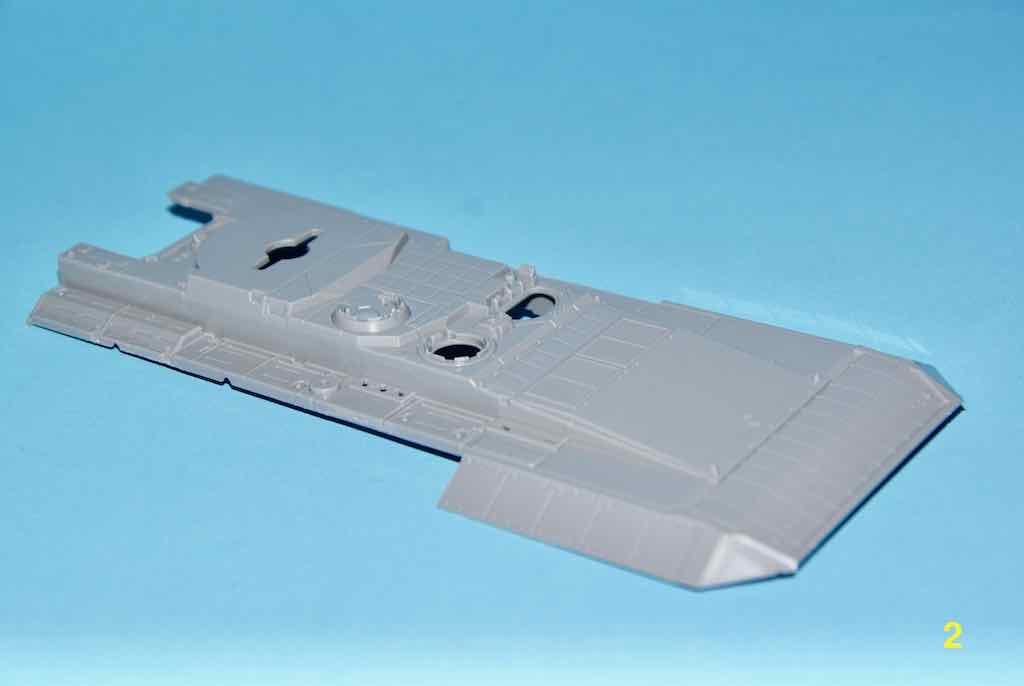
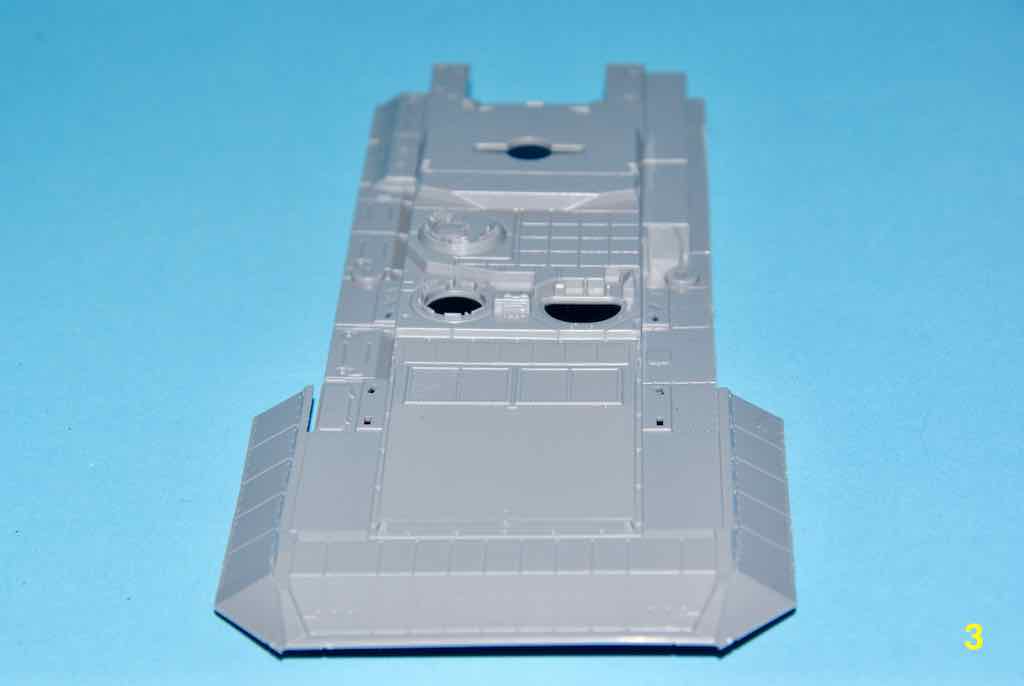
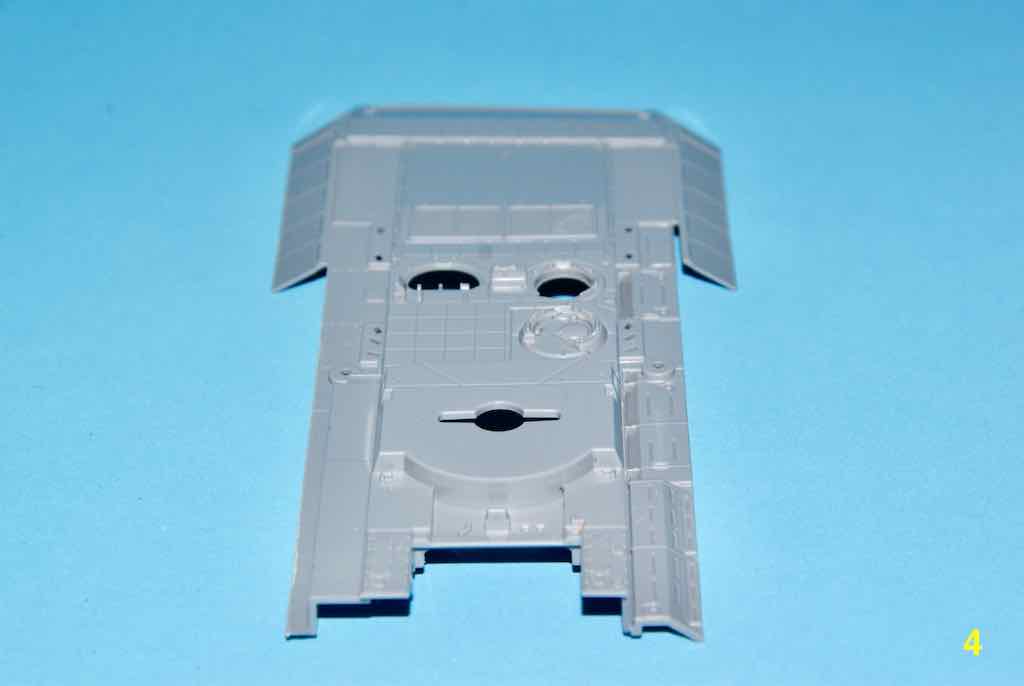
Sorry for the long time since my last update on this kit but circumstances have conspired to greatly slow my progress. While I believe that I have tamed my new and misbehaving photo software time will tell. My sprue cutters have finally met plastic and part A17 has been successfully removed from its sprue and cleaned up. This represents the beginning of STEP 1. This step involves the beginning of placing detail parts on the T-15’s upper hull. Here’s the barren part for inspection.
It is my hope that progress on this Step’s further parts placement will follow shortly.
Chers,
Jan
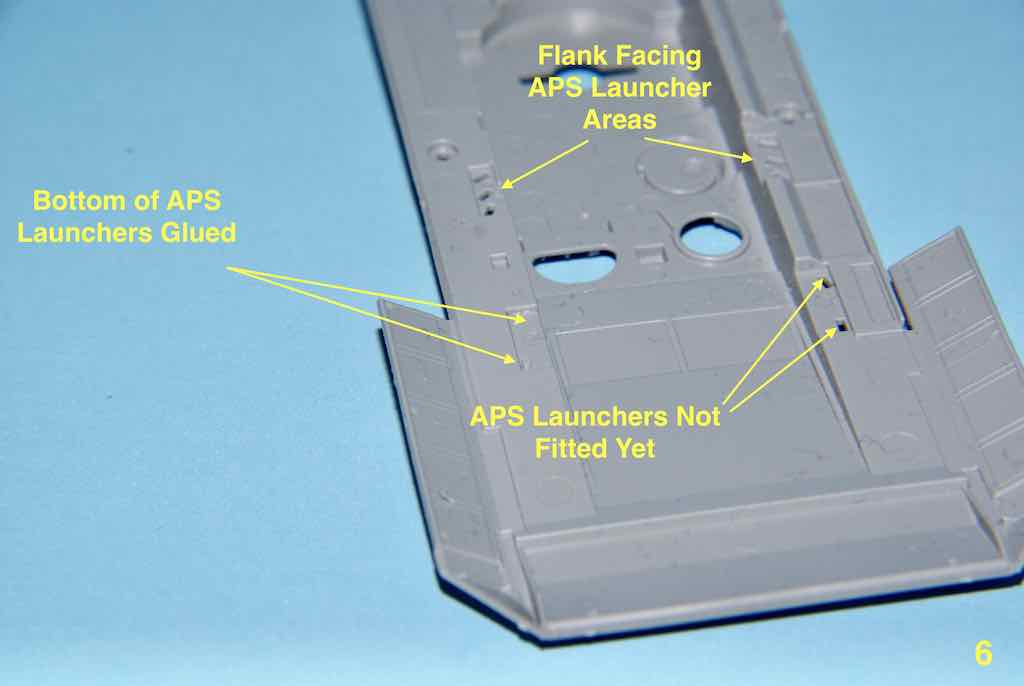
A small bit of progress but sill progress and glue actually met plastic. Part of STEP 1 is placing the various Active Protection System (APS) launchers on the upper body. I started with the larger launch tubes that cover the frontal arc of the vehicle. While not the smallest parts in the kit the tubes are small enough and will require cleanup, especially in the top of the tube where it was attached to the sprue. I used the EXCEL Mini Pick Up Tool to hold these small parts for cleaning.

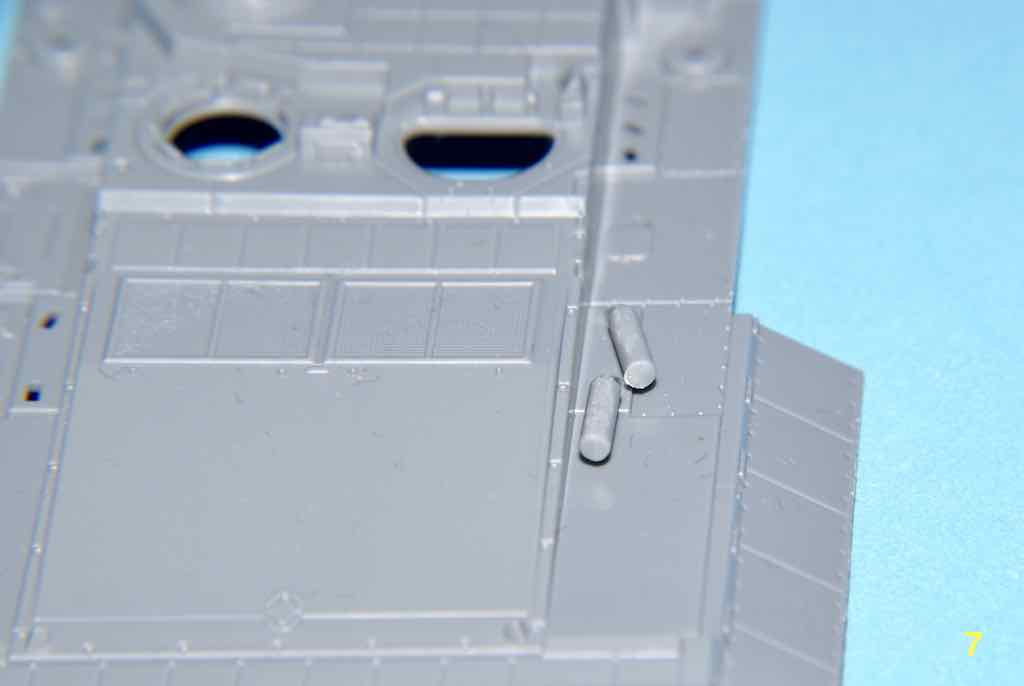
In the first image (#5) we see the first two launchers added.
Image #6 is the view from underneath the body top. The launchers were glue with Tamiya Thin applied from the bottom.
A few more tubes attached.
And yes I did drop two of the tubes during the cleanup process and spent more time searching for them than on the build. A multi-coloured intricate pattern linoleum covered floor is not ideal for a hobby room! ![]()
Cheers,
Jan ![]()
![]()
Looking great!
JoseCesar67,
Thanks for dropping by and having a look.  The left side launchers are now in place and I’ve been working on the right side ones. I hope to have more of Step 1 soon more more pictures.
Cheers,
Jan
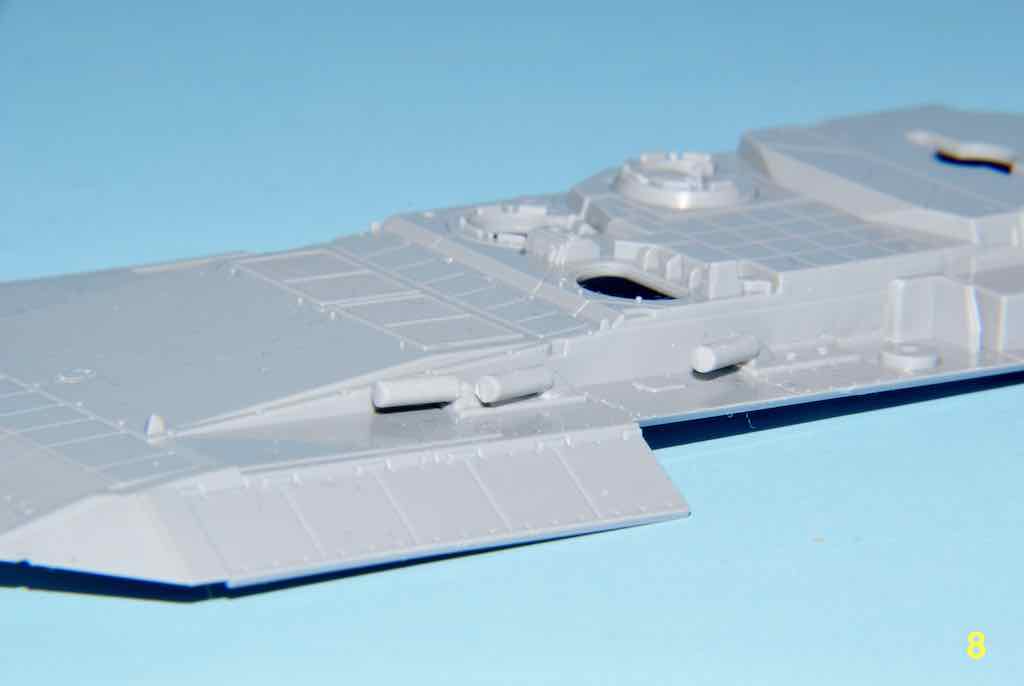
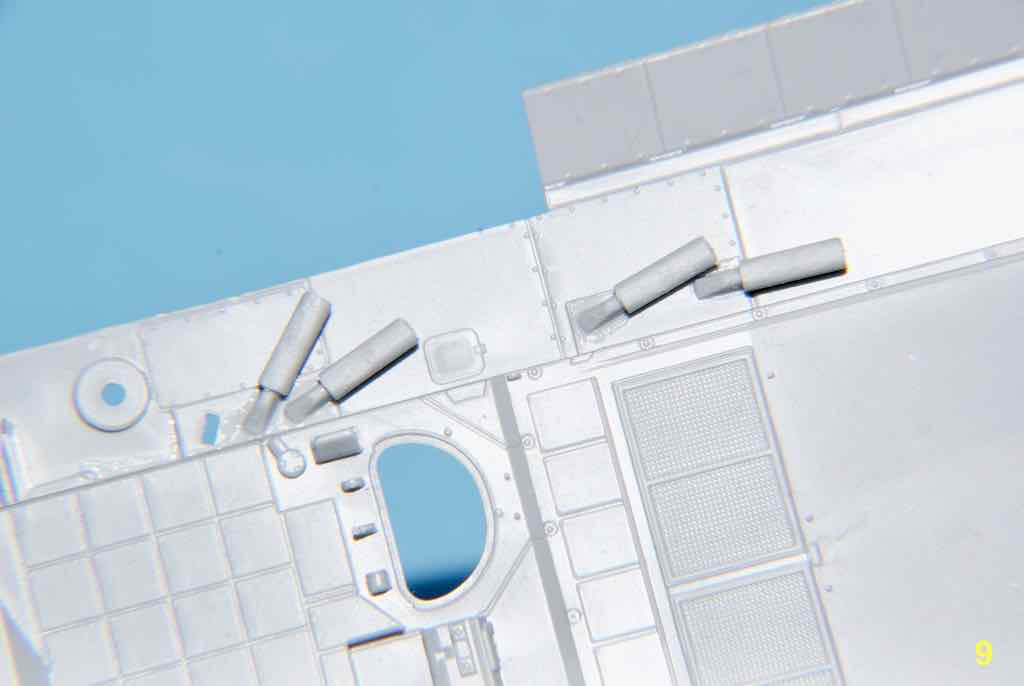
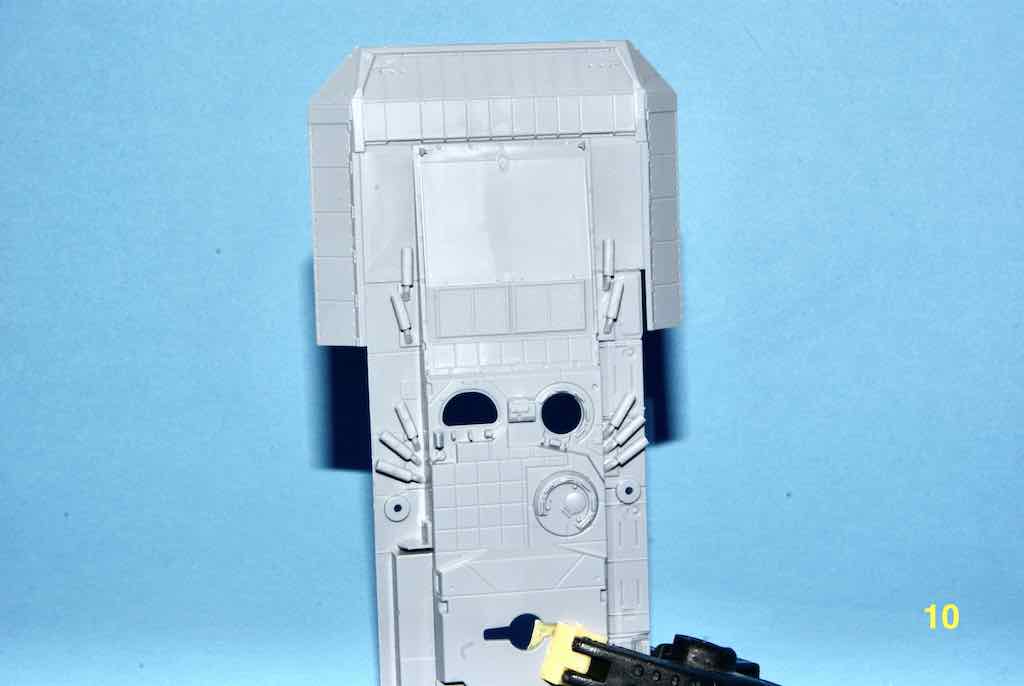
STEP 1 is now completed I just have to bring in the pictures and edit their size a bit.  Here are the images of the right side launchers added and the large APS launchers.
Cheers,
Jan
Now for the continuing saga os STEP 1 of the T-15 Armata build!
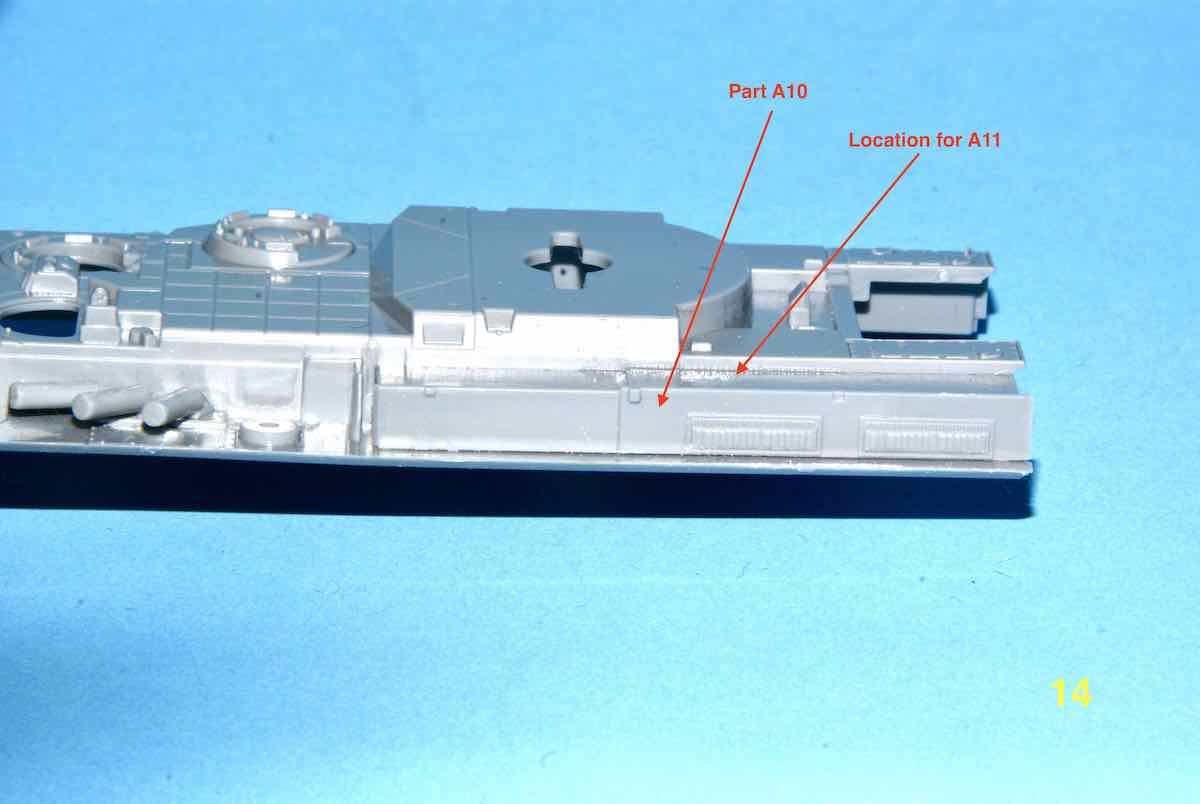
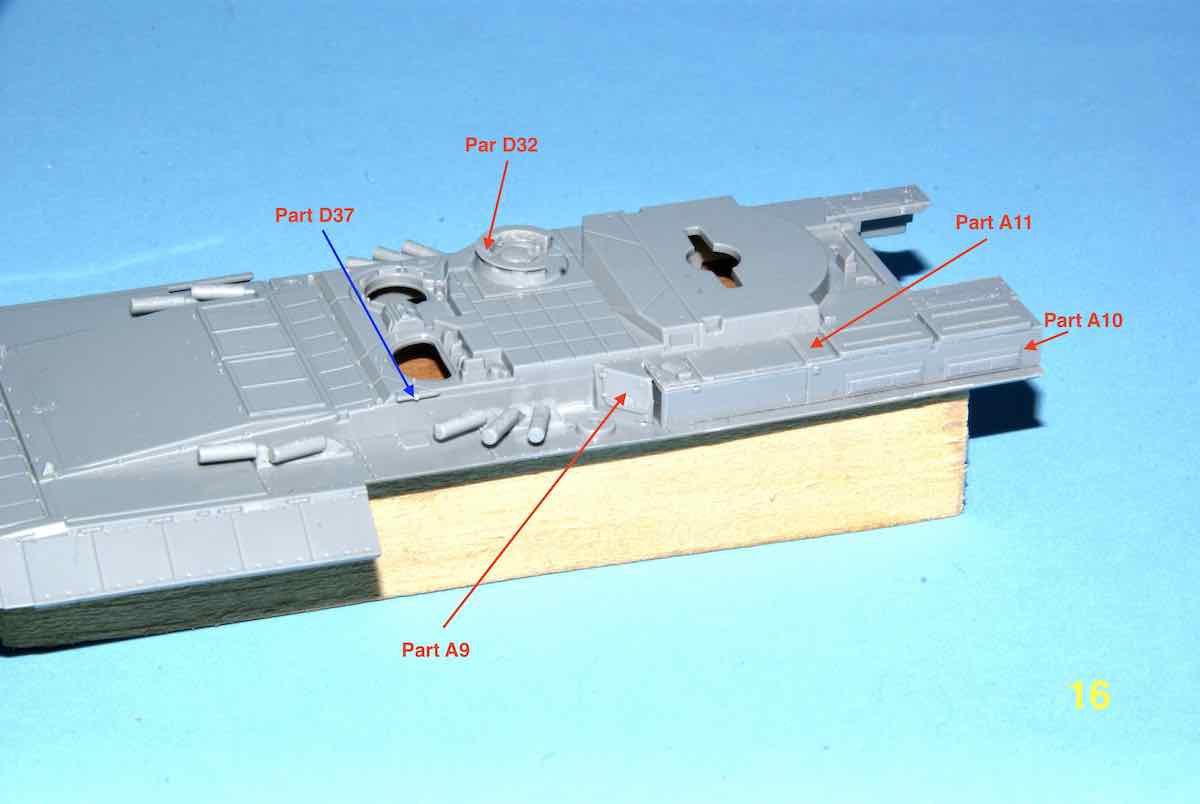
The next parts to tackle were the left rear vertical and horizontal detail pieces Parts A10 and A11 respectively. In this first image we see the locating features for the vertical part A10. The pins on A10 are quite loose fitting so be careful when placing this part that it will line up with A11.
Image 14 shows A10 in place and the location for A11. Note that A11 abuts to the step in the body.
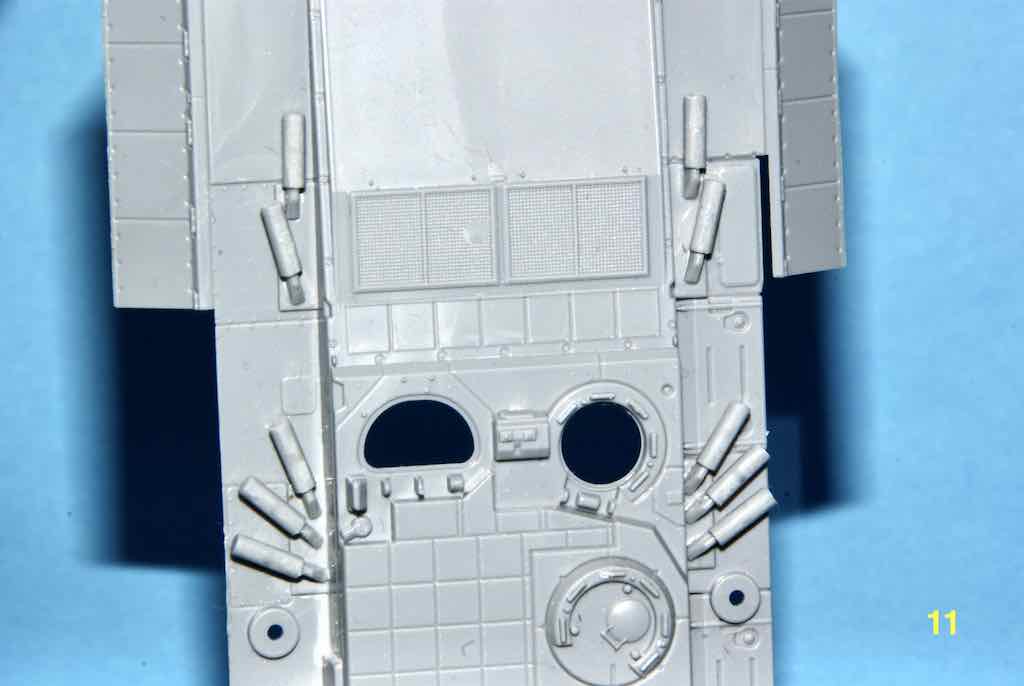
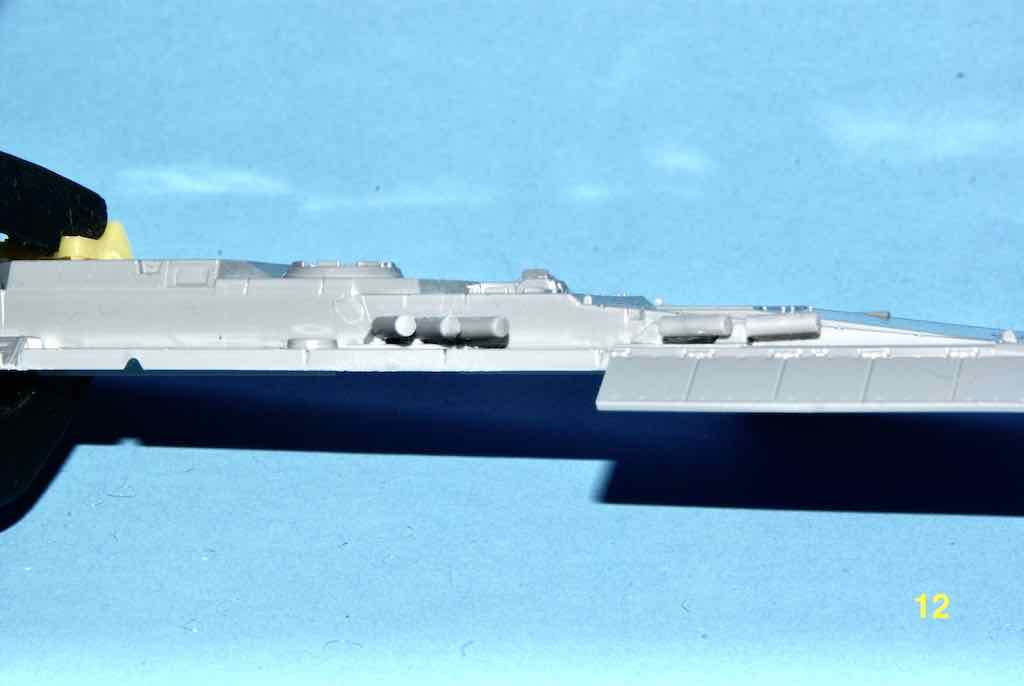
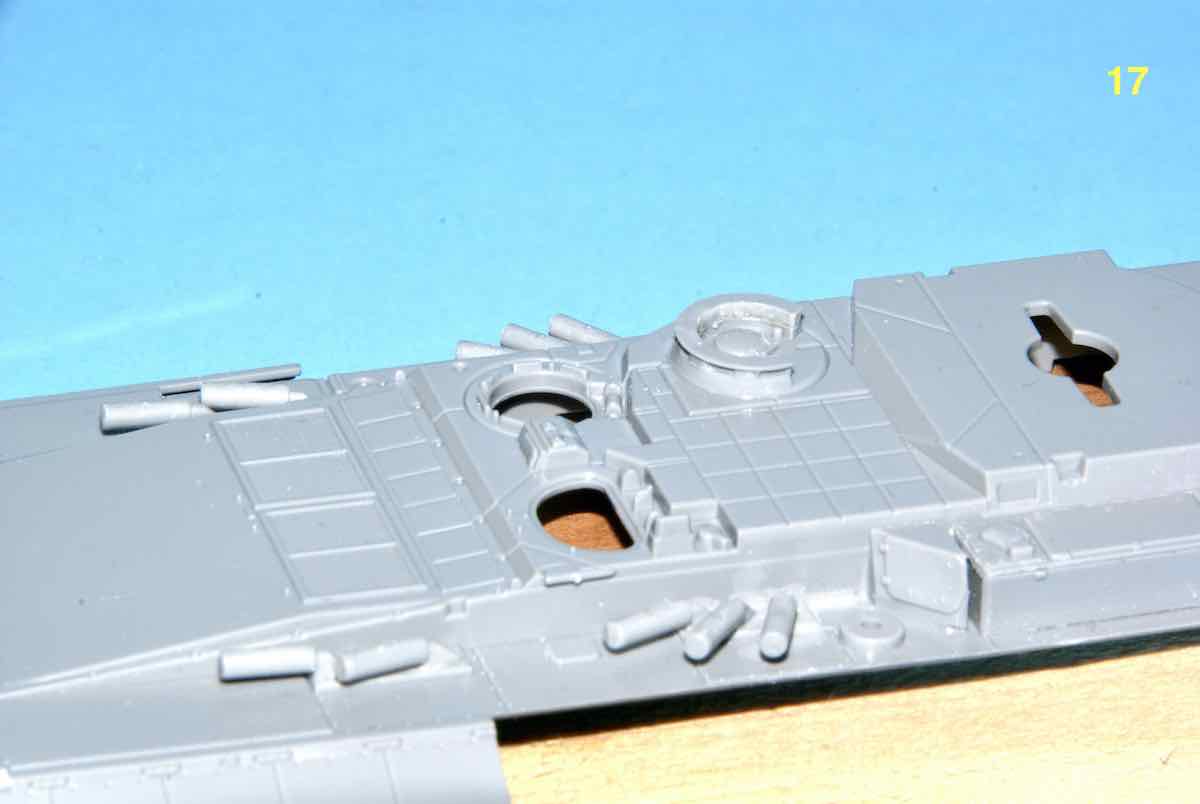
Images 15 and 16 show the addition of the additional parts in STEP 1.
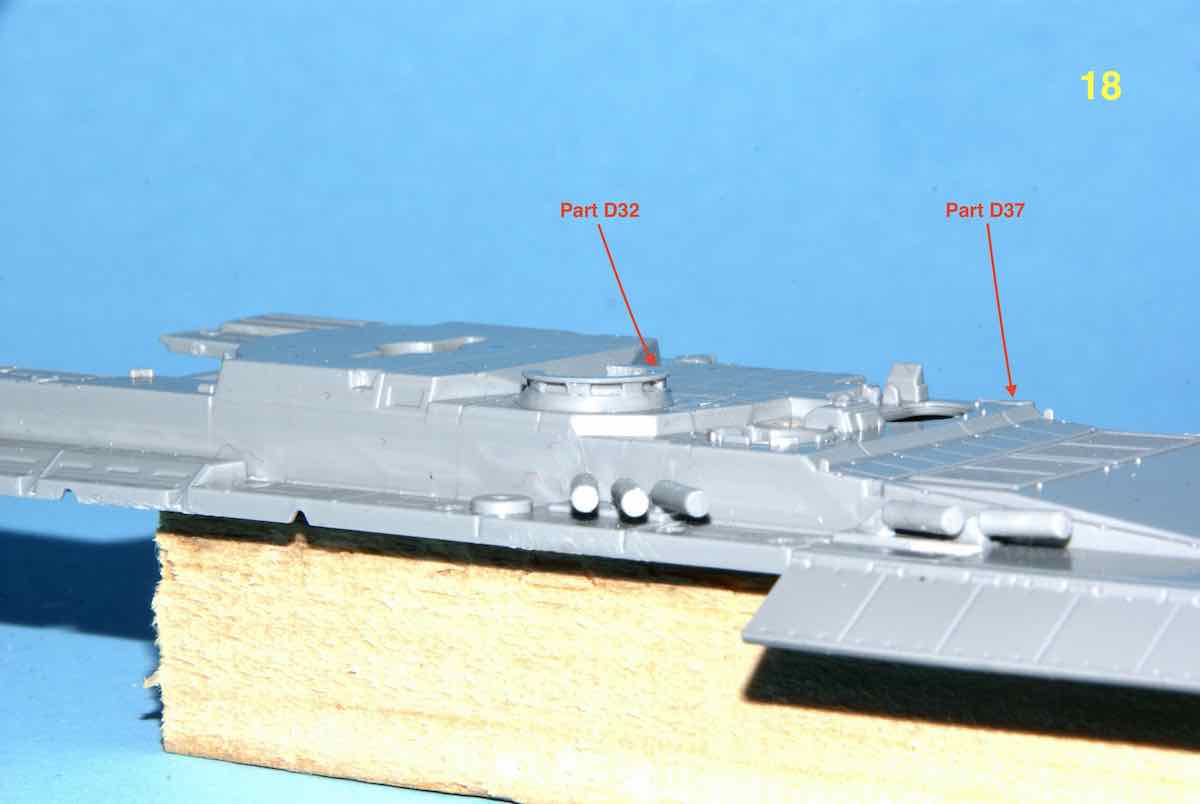
Below is an enlargement to better show the commander’s hatch ring (D32) and the little piece (D37). Note that part D37 has a bit of sprue gate attached and that will be cleaned up before advancing to STEP 2 .
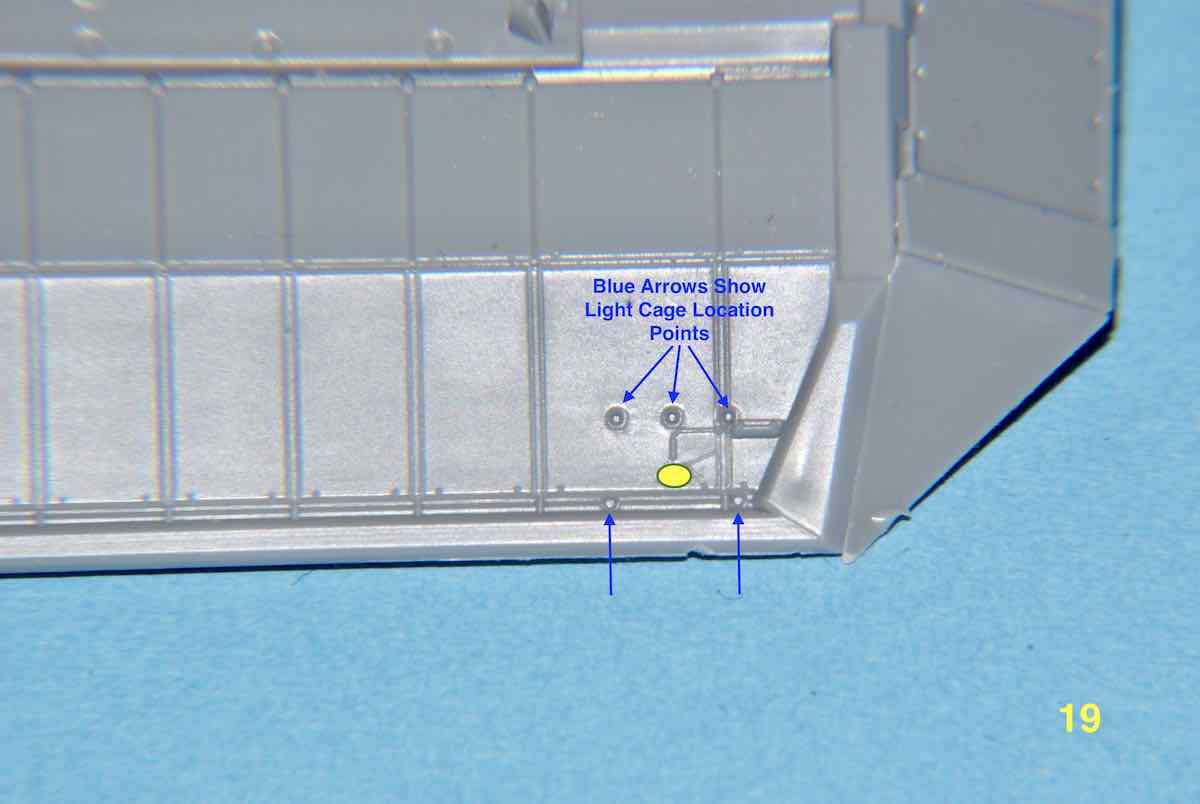
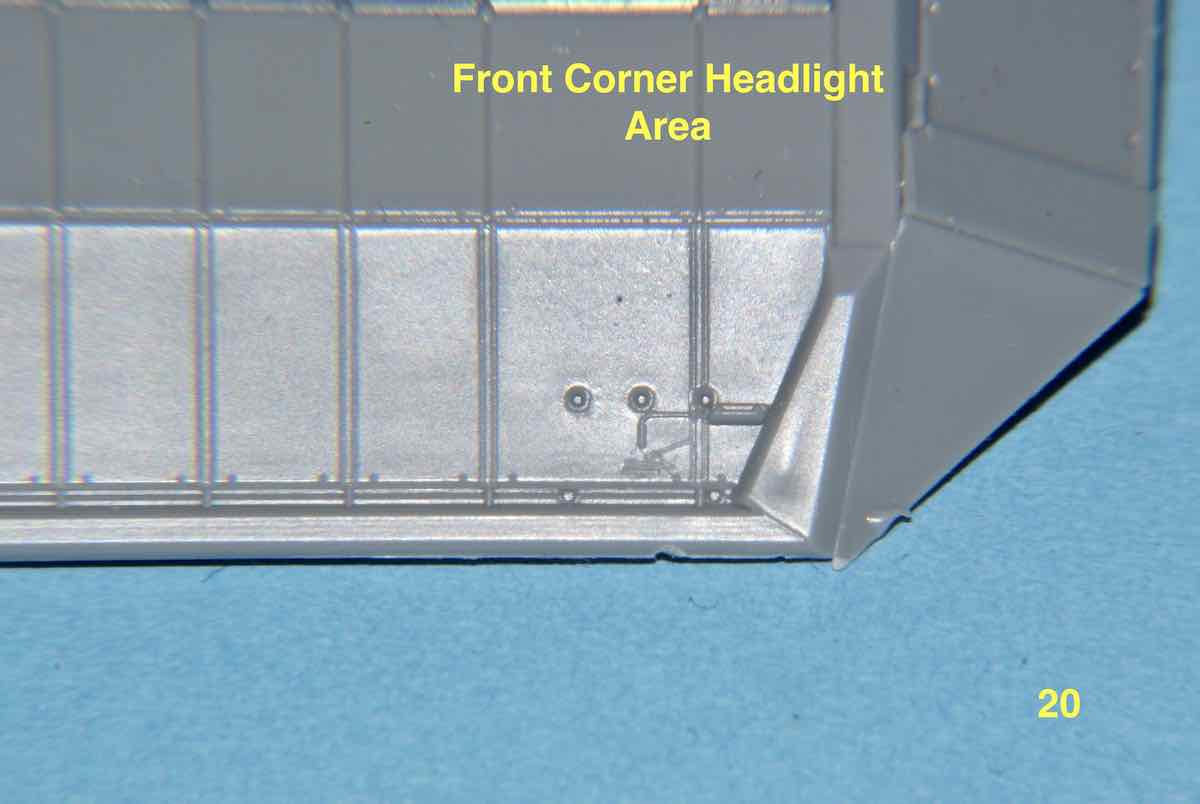
Now part of this step is placing the headlights and headlight guards. Unfortunately Zvezda did not provide any positive locating features for placing the headlights. While the headlight guards have microscopic pins that fit into correspondingly tiny holes, the headlights are supposedly to just rest on their small half moon shaped peg on the upper body area marked by the yellow circle in image 19. Image 20 is a clean 4X macro shot of the same area without any markup.
That’s it for now while I try to decide how to attach these headlights. I may move on to STEP 2 as the parts in that area won’t get in the way of the headlight area.
Cheers,
Jan
Keep up the good work!
Keep up the good work!
Jose,
Thank you again for taking an interest and taking the time to comment. If anything is unclear or if you or for that matter anybody else has any questions, please feel free to ask. I just hope I can answer them effectively. ![]()
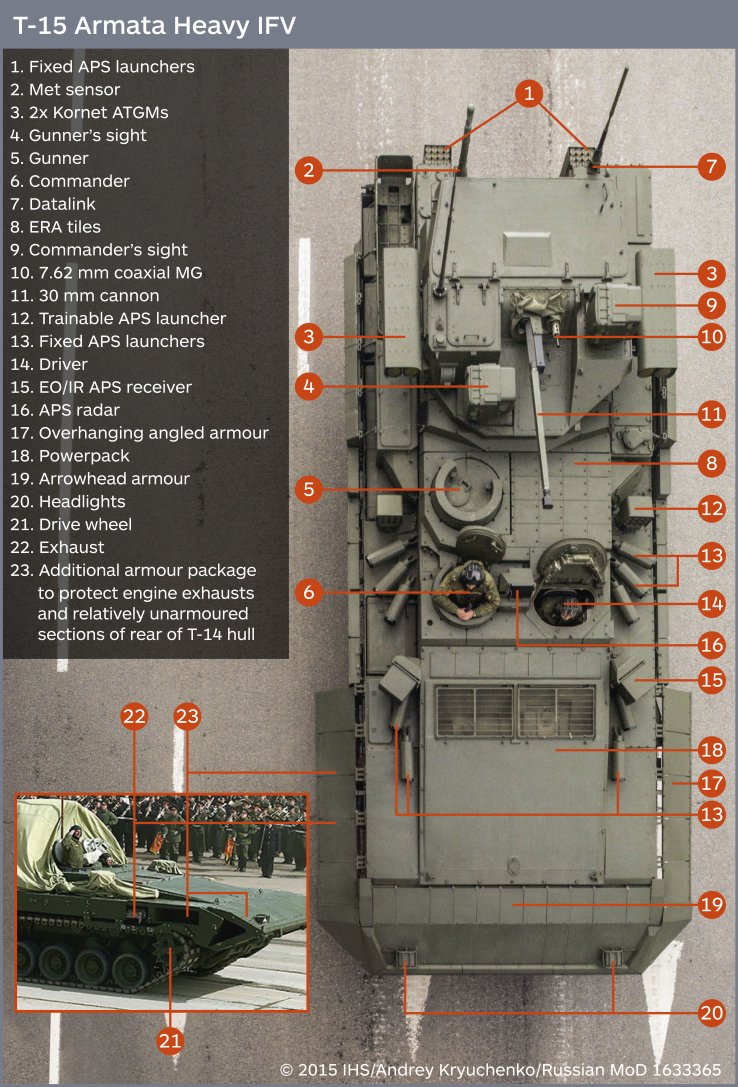
Now for something new purely for discussion purposes. I found a wonderful Website with some images of the T-15 interior as well as others and you can find it at T-15 Armata.
Among the images is the following that lists the various parts of the T-15.
I haven’t quite decided how to handle the headlights yet but I have started on a few subassemblies from STEP 2 .
Take care and cheers,
Jan ![]()
![]()
Jan,
Thanks for your comments about my build on Armorama…it was a fun build of a massive modern AFV.
Jan,
Very good to see you “back in business”, as it were, and straight back in with something that looks like it could turn out to take a little while. The vehicle and the kit breakdown inevitably remind me of the Zvezda Terminator that I have spent a stupidly long time over getting around to finishing (it is finished really, just haven’t cut the cocktail sticks off yet…). These modern things seem to have a lot of intricate surface detail. Hope it continues to go well. Those dimples for the headlight guards are a bit disappointing when one recalls the amazingly excellent fit of parts in Zvezda’s “no glue required” kits.
Your gripping tool looks a bit worrying - I can imagine it simply being yet another means of launching small parts across the room, resulting in that small “click” as it lands somewhere and then bounces on some unpredictable trajectory, while one’s middle aged eyes peer into the out of focus zone hoping to catch a clue as to where it now rests. Whenever possible I have taken to trying to clean up mould seams while parts are either still attached to the sprue or have already been cemented in place.
Matthew
@tread_geek - Jan,
That’s an impressive sized fighting vehicle, sort of looks like a land PT boat. What a target!
Lots of small details to add to the upper hull, that should keep you busy for a while. It does appear to be very well detailed and a nice addition to the build stash. I like that it comes with open hatches, waiting to see more.
~ Eddy