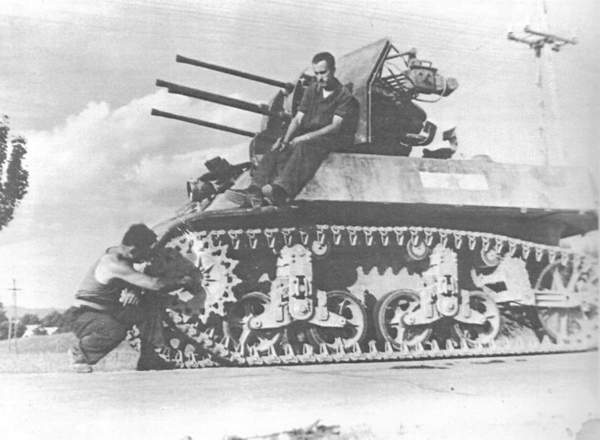
Another dozer (from Australia)
H.P.
I truly love olive drab! ![]()
![]()
Cajun ![]()
Nice base coat
The first Stuart has been completed as far as basic construction goes.
Fit is good, build is straight forward, but there are some pitfalls to watch out for.
One is the plug to fill to hole in the bottom. No idea why it is there, but when using the plug and the interior the prior will lift the latter by about 1mm and the the upper hull will no longer fit the lower one.
I used the Honey-hull because of the contrast.
The rearwall is supposed to fall onto the lower hull sides.
The 2 stowagebins at the back have no inner sidewalls and when placed reveal a gap which needed covering. I also filled the turretring, since that will be visible later.
Other then that I only added some thin rods to keep the forward hatches in place, like with the real thing and I need to add some straps on the stowagebins.
I now understand the distinction you are making about the old Tamiya tracks being less realistic but honestly the visual difference here at this scale seems to be affectively non-existant.
Personally I would be more interested in creating that slight top run sag than trying to see open seperations between the track pads.
And of course with the M8 with the fenders you cant even see the top run.
Please beware of both of the Tamiya kits. Both have incorrect dimensions and poor details on the Engine Deck. I found a great article on Armorama or FSM a few years ago. I’m sure that it is still there.
Bill
Stuart nr.2 a.k.a. Honey has been almost completed. Some finetuning will be needed and a good deal of stowage will be added.
I built it pretty much OOTB as well, but added a few details like supportlegs for the stowagebins, a tool on the front (as shown on foto’s from the time). I drilled out the visionslits of the cupola and struggled with the hatches in the front. I could not get them to close properly. The green parts are simply the (identical) leftovers from the M3A1-kit. I opted for these after having using the sidebars as a testbed to thin these down to size. I managed to get them down to about 50% of the original thickness.
And then I got the brilliant idea of adding some crewmembers; the commander up top, studying a map and the gunner INSIDE the turret, yelling at him. I think this shows how small and cramped the Stuart actually was.
I build the Tamiya M8 two years ago, as Steve Zaloga discribed in a old Military Modelling
Cut it in two and glued 2 x 2.5 mm between the parts as the Tamiya M8 is too short.
I love the little gem.
I have to build a Honey too. Nice work, Ron!
Where did you do the cut?
Ken
Thanks Tini!
Where did you get those tracks from? I was planning on using those too, but it would seem that “our” liberators did not use those. And mine will be situated somewhere between the Belgian border and Hoensbroek.
I built my Tamiya M5 by cutting the hull at the slope leading to the engine deck and closing the gap with 1/8" strip. I also replaced the kit’s wheels. replacing them with aftermarket pieces. I had to change the locations of the wheels given that I had lengthened the hull. I made other repairs with the help of a resin set of details…
Masterclub MTL35149 (they will fit on the M5 as well
i have the article scanned to pdf, if you are interested.
It was in MM 1998 vol 14
2 cuts in the under part. A scratchbuild upper deck
Please do!
Wow, very nice. Did you shave the Tamiya detail off of the original deck or cut and sand down? Thanks for sharing your build tech
Yes, by trimming it of with a Proxxon mini drill at the backside so thin you can almost look through, then with a sharp hobbyknife cut them out.
I have to admit a fuelcap got wrong, so I chopped an old M5 to get the part.
Finally found a great deal on some vintage Kits for that Yugoslavs Stuart I was talking about.

Local shop had a massive stash of vintage model kits for sale, so I picked up two vintage Tamiya kits.
Picked the Stuart for $23
And the Flak38 for $10.
Time to build. ![]()
Problem is just that the FlaKStuart has a M3A3-hull en you, and initially me, have M5A1-hulls, with that hump in the rear.
Guess I’ll have to do some styrene surgery to de-hump that hull.