Thanks Joel. I’ll be taking care of that glossy frame by shooting just a tad bit of dull coat over it to give it a semi gloss look and then I’ll bring out some of the details.
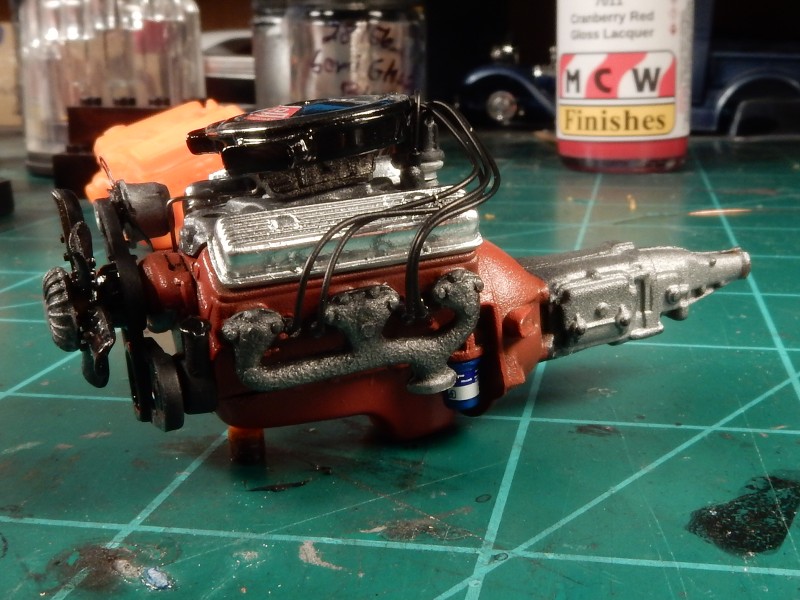
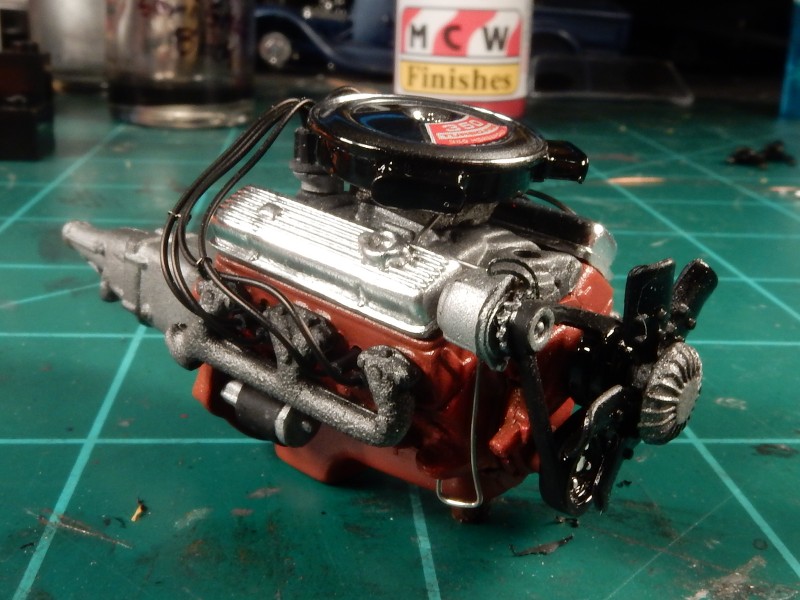
Those pre wired distributors allow me to spend a little more time on other stuff that I normally would’ve missed. I might throw an engine oil dipstick at this engine,
One of the things that I don’t like about this powerplant is the goofy looking fan clutch but that’ll mostly be hidden in the fan shroud.
Joseph,
The big block still looks darn good to me. Nice touch on the starter motor with the Aluminum banding as well as the cap where the starter gear and spring is located. And on the other side is a quick view of a brand new oil filter. Nice touch there as well with the blue label on the glossy white casing.
joel
Thank you both!! I really apologize for the absence. Been busy as hell lately. Looks like I’m going to get hired on with the client company that I’ve been contracting for for the last 8 years. Wow!! Really never thought it would happen.
Wife has been having alot of neck pain and headaches so I’ve been absent across most all forums for the last month or so. Stay tuned…I’ll get in here and look at everyone else’s builds first and then start back up on mine.
Joseph,
Don’t give it another thought about time missed here. Your wife is way more important. I’m also devoting most of my time to my wife’s medical/health needs as two days ago she had a right shoulder replacement and will be home today or tomorrow. For the near future I’ll be basically her right arm/hand, plus the housekeeper, maid, etc.
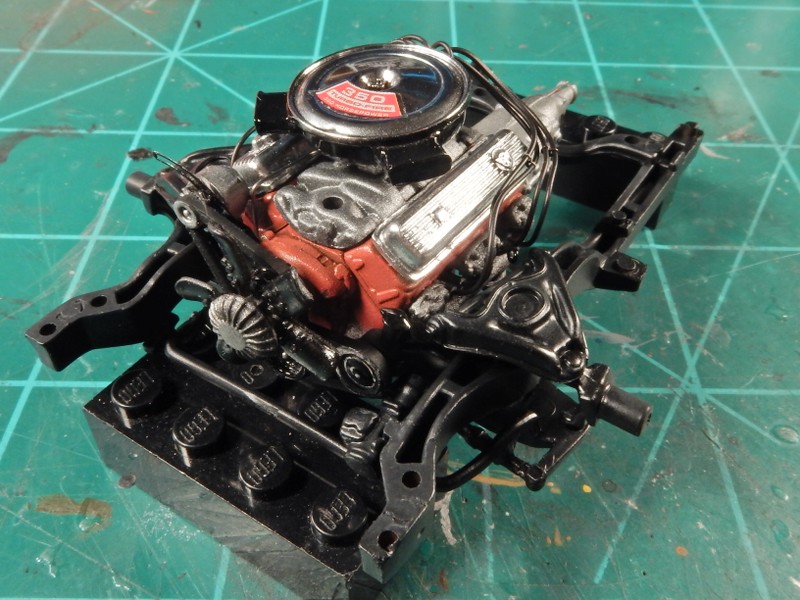
Here completed engine installed onto the subframe. I managed to shoot a coat of semi-gloss black on the chassis followed by a light over coat of super thinned out gray which helped to tone things down some and bring out some of the details. I also installed an engine oil dipstick on the driver’s side of the engine. Here’s everything all fitted up and ready to go now.
Joseph,
Thanks for the support. It’s kind of like a Band of Brothers here these days. Wife came home yesterday, and so far she’s at the bottom of a tall hill with a long way to go. On the pain scale it’s a solid 8+. I’m literally her right arm and hand. One thing for sure after 40+ years I won’t let her down. the Hip replacement was a walk in the park compared to the shoulder so far.
The Bow Tie V8 seating in the chassis member, honestly looks like you photo shopped the real deal. That’s how good it looks to this old timer.
Thanks Joel!! There I went again for another dang month. I’ve really gotta do alot better job of getting in here and participating as I really like this place.
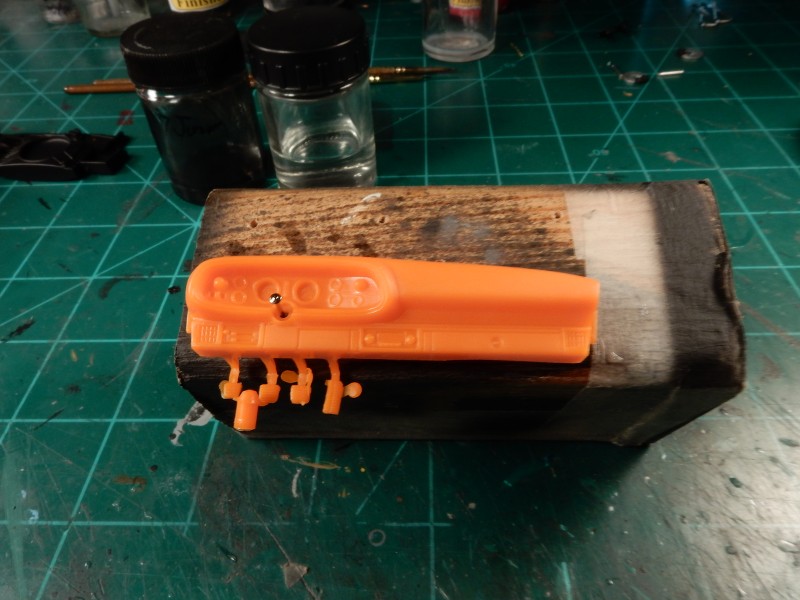
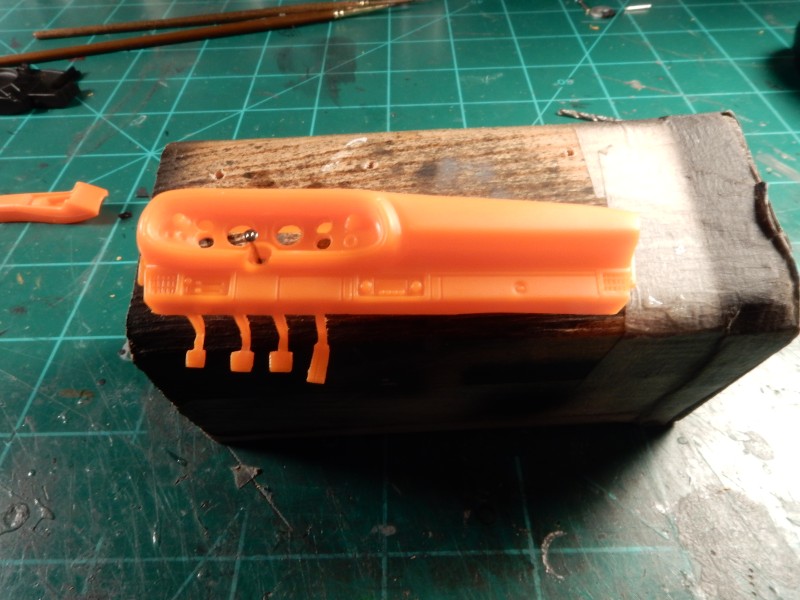
Next up…the interior. This dash took me pretty much a whole week to get done and it’s not the easiest of dashes to negotiate in terms of modeling. I feel that I’ve turned out a lot better ones than this, but you’ll see what I’ve got to work with.
Here’s what I started with:
I ended up cleaning things up a bit flash wise and drilling out all the gauge impressions. The parking brake cable was too long so I ended up shortening it to make it look more like what it’s supposed to be instead of an additional clutch pedal. lol
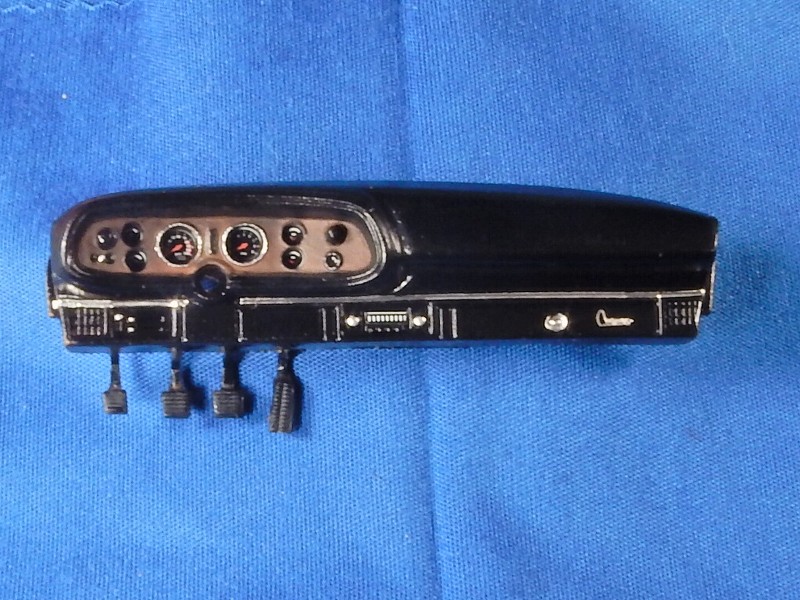
I had some gauges from Goffer Racing that I used for the smaller gauges but used the OOB ones for the speedo and tach to stay as close to OEM look as possible. I then cut them down to squares and glued them in from the back side. The swing pedal levers were then thinned out to a truer to scale thickness and the whole dash was painted up and detailed. The “Camaro” emblem on the glove box was a PE offering from Model Car Garage and the radio face station tuning decal was from the spares box.
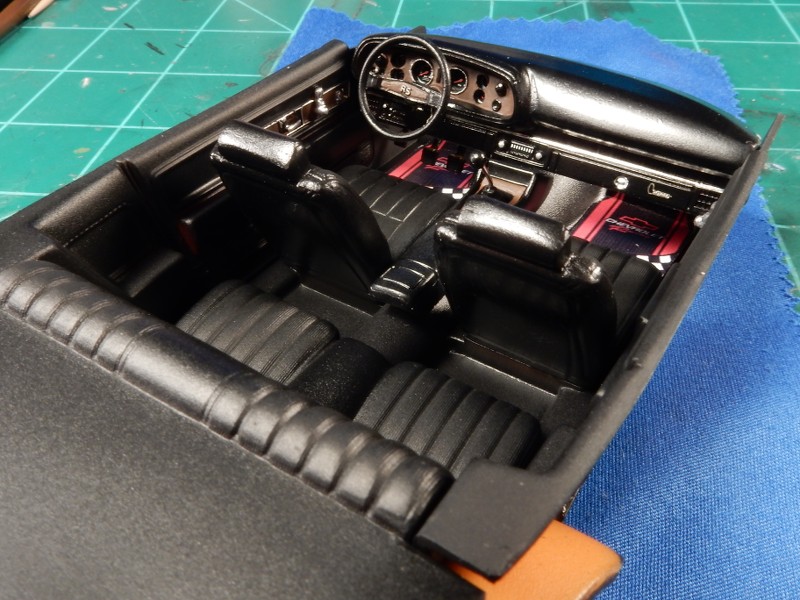
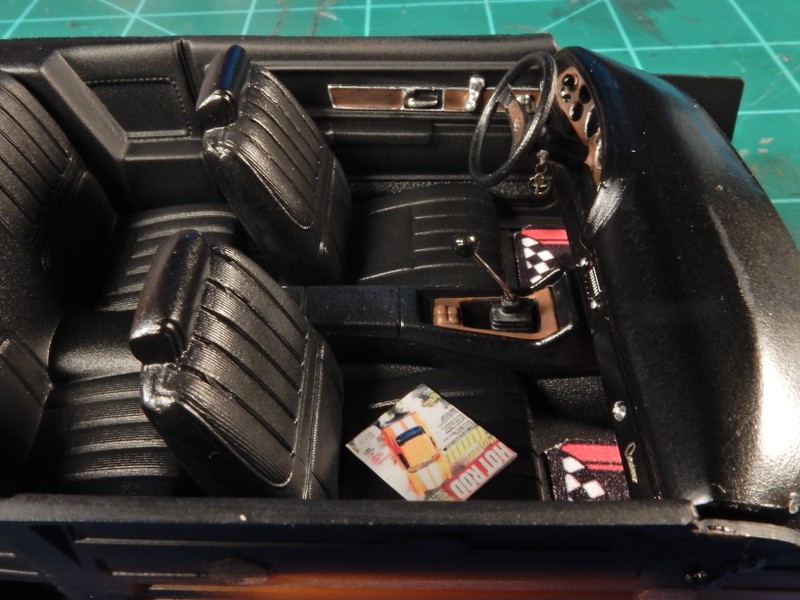
Here is the completed interior. I made a couple of changes and a few upgrades to what was already there OOB. I didn’t like the fake looking shifter lever so I made my own from a bobby pin. Model Car Garage PE adorns areas of the dash and a set of keys now hang from the ignition switch. Floor mats are from Plastic Dreams.
Joseph,
Always a treat to not only have you joining in the various modeling conversations, but viewing your latest update is just what we use to say: mind blowing.
I’m really glad that you posted a picture of the stock dash before you worked your magic. The transformation is simply amazing. If you didn’t say that it’s one of your transformations I’d bet that it’s an after market dash. Even the radio dial looks like the real deal
Nice little touch with the pin for the shifter as it looks darn good and to my eye scales out as I would expect it too. All those extra details really do add up.
Overall, I’d say that the full interior came out as my aircraft building friends would say: simply Aces.
Nice work Joe - always fun to watch your builds since I don’t dabble much in the 1/24 - 1/25 auto scene these days. I used to build a few years back with my older daughter when she was younger- she liked cars ! Fun to see the aftermarket details you use as I am pretty much ignorant of what’s available.
I really appreciate the encouraging words fellas. Interiors and engines are my favorite parts of auto building.
Now onto the next phase…the car body. After spending alot of time cleaning up all the flash, mold lines and detail “bleed throughs” I’ve come to the part where we’re now slinging paint.
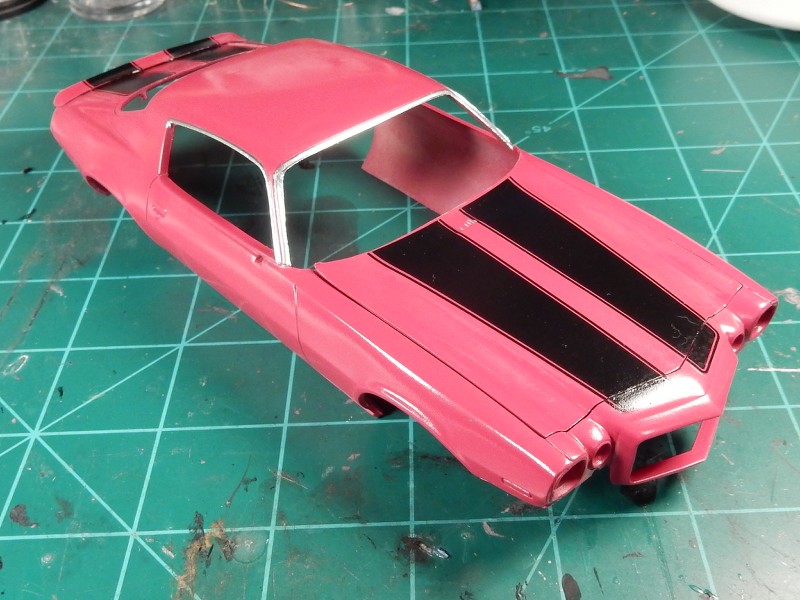
Here’s with the body prepped, primed and the color shot on. We’ll be going with Raspberry Red from MCW finishes.
Here’s with the stripe decals applied. Working on the display settings on the camera to improve upon the correct shade of red in pictures.
I’ve been playing around with the exposure setting on the camera in order to bring out the correct shade of red that this Raspberry Red actually is.
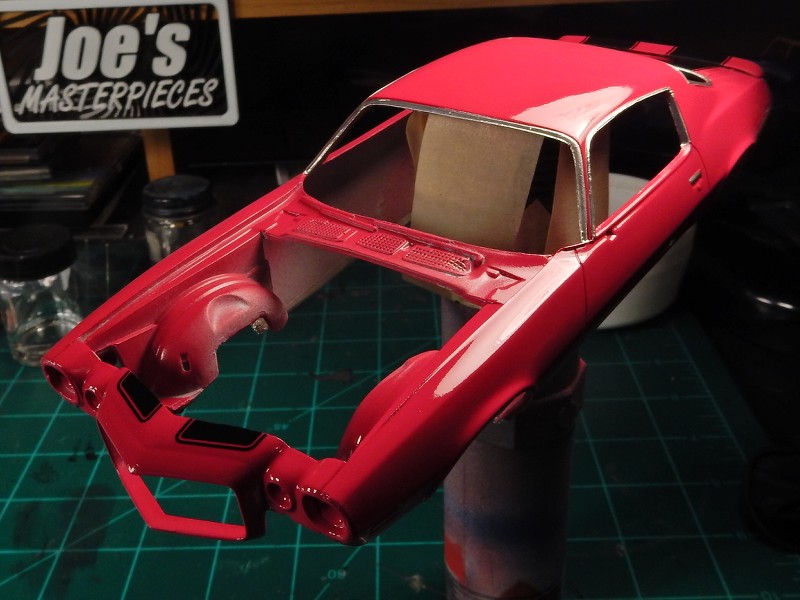
Got the gloss / clear coat applied. I’m very happy with this.
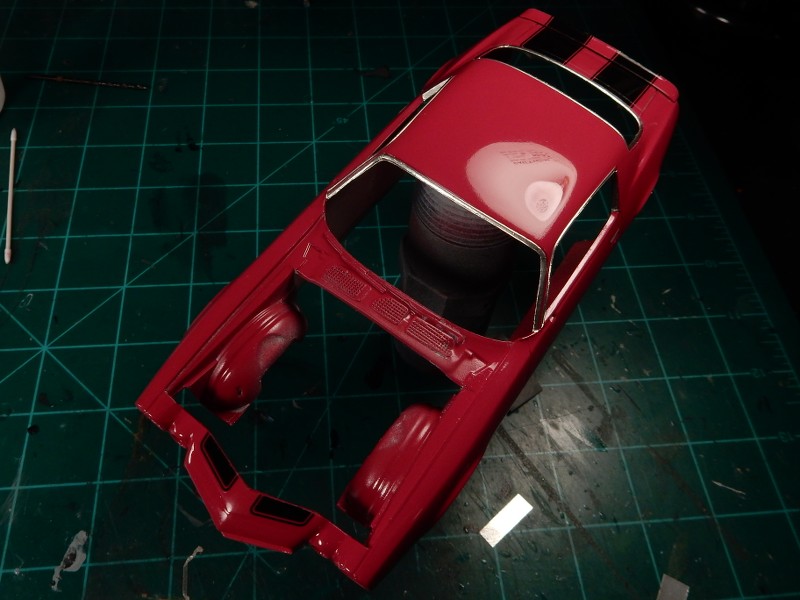
After letting this gas out for a couple of days, I hit the body with some fine sanding paper and some polish…
Joseph,
Gotta give you another A+ for the prep/prime/paint/ stripe decals/and polish. Just smooth as silk. Can’t see a single ripple from the dreaded Orange Peal.
I noticed that your chrome trim looks just as Chrome should. Did you mask and air brush it, and if so, what Metallic paint did you use, or is it BMF? And if it’s foil, my hat is off to you. I continually have the worst results with it as it just never seems to stay stuck in place even after burnishing it.
As for the Raspberry color shift, is just like painting, it’s 90% prep work. Your light source needs to be 5000 Kelvin so that the colors are like they are in soft Natural light. Any other K temps will shift the color spectrum. Exposure only lets you adjust the amount of given light so that your picture isn’t over or under exposed.
Joseph,
I took a real good look at your pics again, and it does look like BMF. Have you experienced the non stick issues that I have? and I have two sleeves of the stuff.
The flash in your phone or camera is 5000 K. You can get light bulbs that are also that K temp, My photo processing program is One Photo Raw which lets me change the Kelvin temps in a picture, which believe me is a huge help at times.
Looking forward to seeing the pics of your Camaro crossing the finish line.
Thanks fellas. Yes I’ve come up against some BMF that just didn’t work. It was the Black Chrome foil. Stuff was just crap. However I did get with the owner of Bare Metal Foil and he said that if you have a sleeve that you get from him that doesn’t stick , he’ll replace it for free.