I need some for a Tamiya 38t. Who has a set? I havent been able to find any.
There is metal and resin but I don’t know of any rubber band tracks.
I only know of AFV Club making some old sets for Sherman belt tracks.
The only option would be from one of the old Italeri kits. But those are real stiff, and I wouldn’t recommend them.
1 Like
Bummer,I guess this one is going trackless.
Are you missing parts or doesn’t like the link and length track provided?
Am I missing something or do most people get aftermarket tracks because the rubber band tracks supplied are just shite?
Hence, aftermarket tracks are, erm… not rubber band tracks.
1 Like
This and some other Tamiya newer kits are only link and length, no more both or rubber tracks. Some people don’t like indy tracks. AFV Club has/had a line of rubber aftermarket tracks that looked decent as I recall.
I cant do those tiny links. Are they supposed to be glued to the longer sections of track?
How do you know what kind of tracks come with a kit anyway?
Yes, the long runs make up the flat top and bottom of the tracks, and the individual links make up the curved parts. They are not that hard to do once you get the hang of it. The best bet is to make two parts; upper and lower sections, and leave the sprocket and idler wheel loose to make it easier to attach the track. Place the two section on the tank and glue them where they meet.
Look up reviews of the kits before you buy them.
Gino, answered both but for question 2. You can review most kits starting here https://www.scalemates.com/
Look at the instructions and hobby shops that sells them. Many Asian and Europe companies photographed all items in the kit.
I get what you mean with the track. In this case maybe a actual link track set where you stick one pin though the both parts might be easier. When you have a full length together it will easily draped over the sprocket. A pair of tweezers can help move the small parts around.
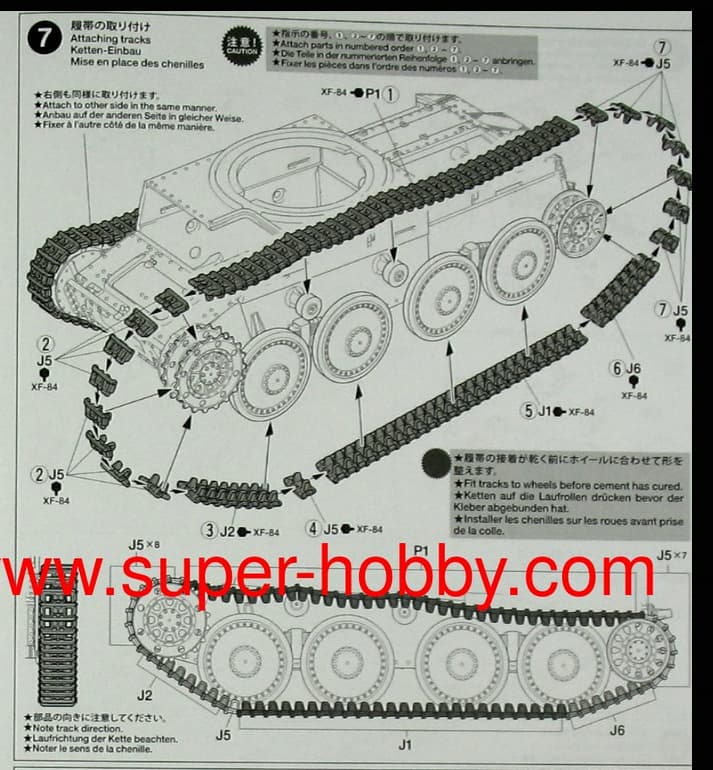
Place the tank upside down.
Glue one J2 to one J5, to J1 to J6. Drape over the wheels and let the glue set.
Glue 3 x J5 to the free end of J2 and arrange to fit the sprocket teeth. Let the glue set.
The position of 3 x J5 +J2 + J5 + J1 + J6 is now fixated by the sprocket teeth.
Glue 7 x J5 for the curve around the idler (the rear end). Let set slightly, drape around the idler and attach (glue) to the free end of J6.
Glue 2 x J5 to the front end of P1. Glue this assembly to the track coming up around the idler and adjust to the sprocket. Now you have almost assembled a complete track. The 3 remaining J5 are not glued to the track until the track is finally mounted.
Paint the track separately or while mounted on the tank, this step is a matter of personal preference.
With some care the track can be handled once the glue has set and then pushed back onto the tank (from the rear). Closing the track by glueing in those 3 last J5 will fix the track in position.
Glueing the track to the roadwheels helps to prevent accidents.
1 Like
Wow! Thanks for the explanation.