Im with 18B on having a stalled out old B-25 project that I wouldn’t mind adding here when I resume it soon…
In the meantime for some inspiration motivation, a pre CGI movie clip…

Im with 18B on having a stalled out old B-25 project that I wouldn’t mind adding here when I resume it soon…
In the meantime for some inspiration motivation, a pre CGI movie clip…
Great scene. EWhat is really amazing is that they had seventeen flyable aircrsaft for the movie.
Yeah I’m curious as to where they got them from. Although at the time, many were likely firefighter types in service. I know that they filmed this stuff down in Baja or Sonora.
One is thirty minutes from me. The other less than two hours.
Coming this year, date TBD.
Hi Everyone,
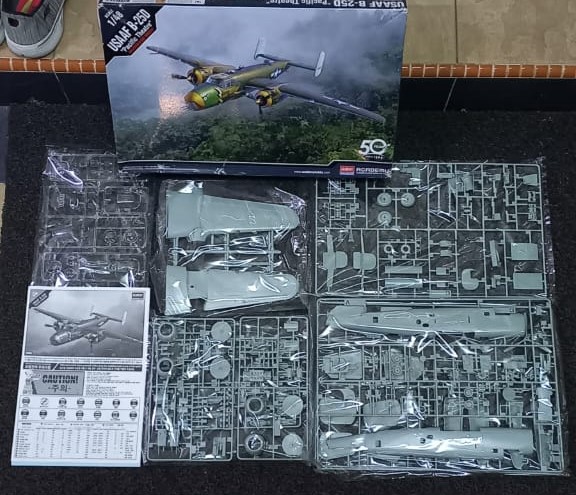
I finally made up my mind! I’ll be doing an OOB build of the Academy B-25D, which is really the Accurate Miniatures B-25. I’ve already started with some test fitting, seems to be a pretty decent kit, we’ll find out.
Till next time, stay safe and wash your hands!
And don’t forget your towel!
Most important! ![]()
![]()
Hi Everyone,
I’ve been trundling along with the Academy B-25D. Having built the Monogram/Revell B-25J, which is much older than the Accurate Miniatures B-25 series, I was curious to see what differences existed. Overall, it appears that the molding followed the Monogram in philosophy, the parts are a bit more detailed (as one would expect), and all the panel lines are recessed and include rivet detail as well. Which is quite nice, however it should be noted that the real B-25 has lapped panels, making the Monogram exterior molding more accurate. Not being a rivet counter, nor do I participate in contests (none here, and I won’t be travelling great distances for a show), it doesn’t bother me in the bit. Ironically, the same issues I delt with on the Monogram kit seem to be present on this kit as well. Perhaps my modeling skills haven’t improved as much I give myself credit for!
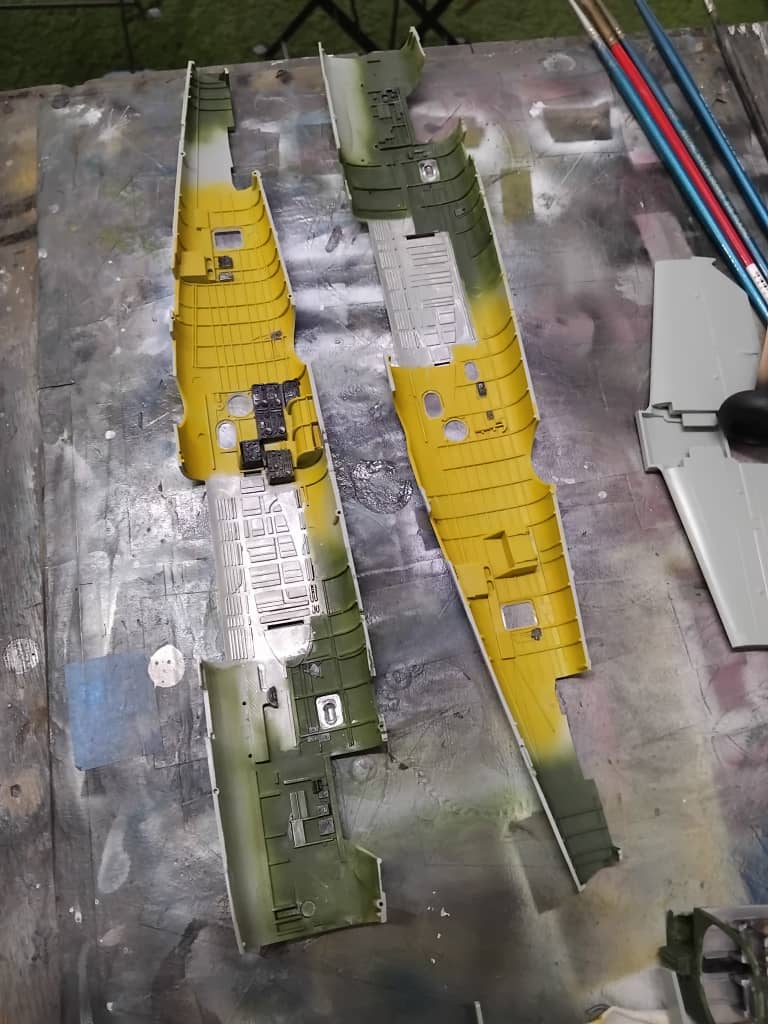
Construction began with the interior. I used the very good references from the IPMS Stockholm site, where the author has extensive experience in the manufacture of paint and seems to enjoy the history of it. Additionally, I helped restore a B-25J back in the 80’s, so I leaned on that as well. Wanting something that would be a little different, I opted to go with the metal floor in the cockpit area, and used Tamiya flat green for the cockpit interior color, having mixed a bronze green that came off way too dark to allow for any detail to be seen from the outside. The bomb bay was painted silver to represent the unpainted bomb bays of B-25’s and used Mr. Color interior green (weakly green) for the rear portion of the fuselage. I think it turned out interesting, though once closed up practically nothing will be seen.
My phone bit the big one, which is my camera, so in-process pictures didn’t happen, though with its replacement I was able to snap off some pics of the completed interior subassemblies.
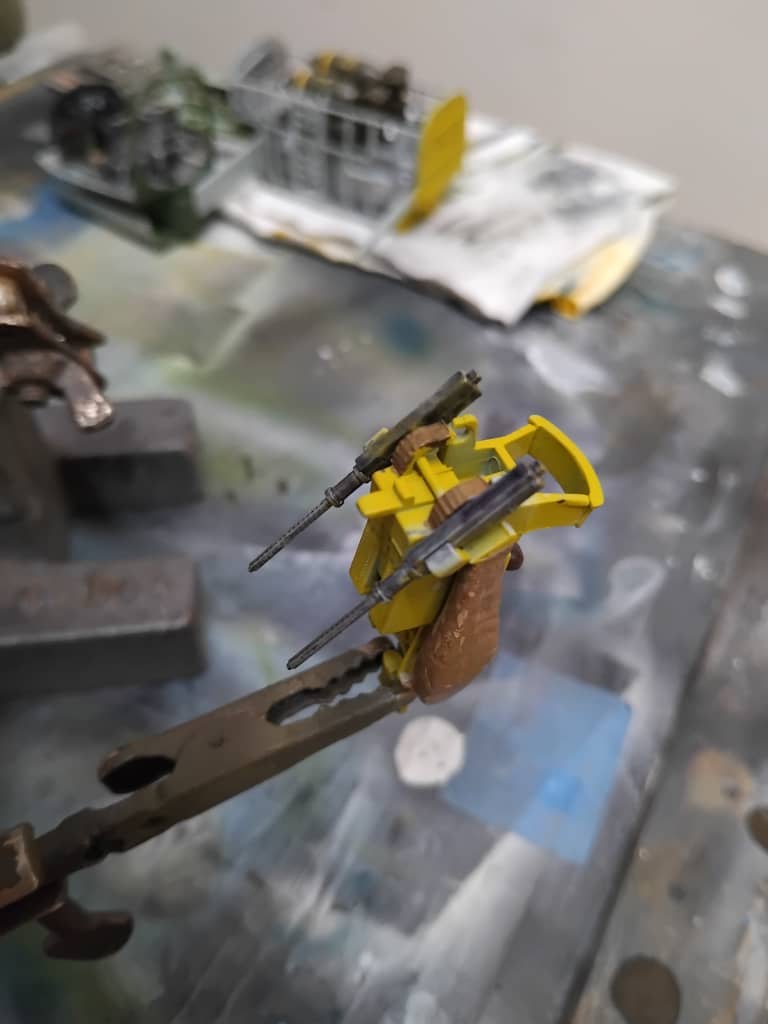
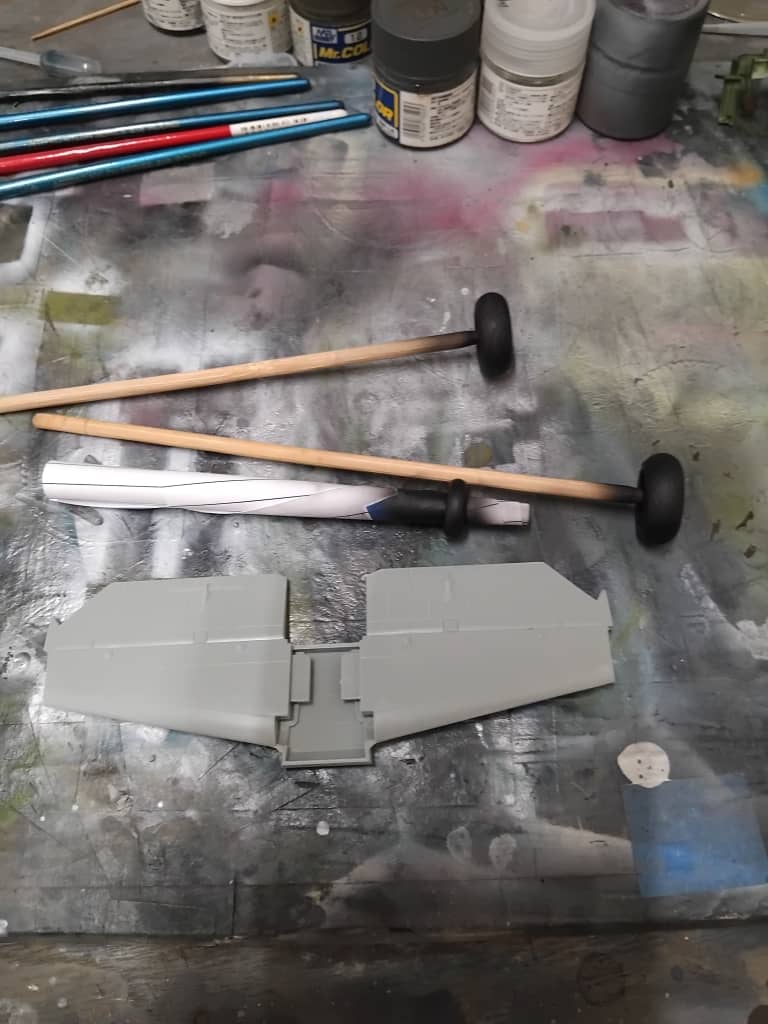
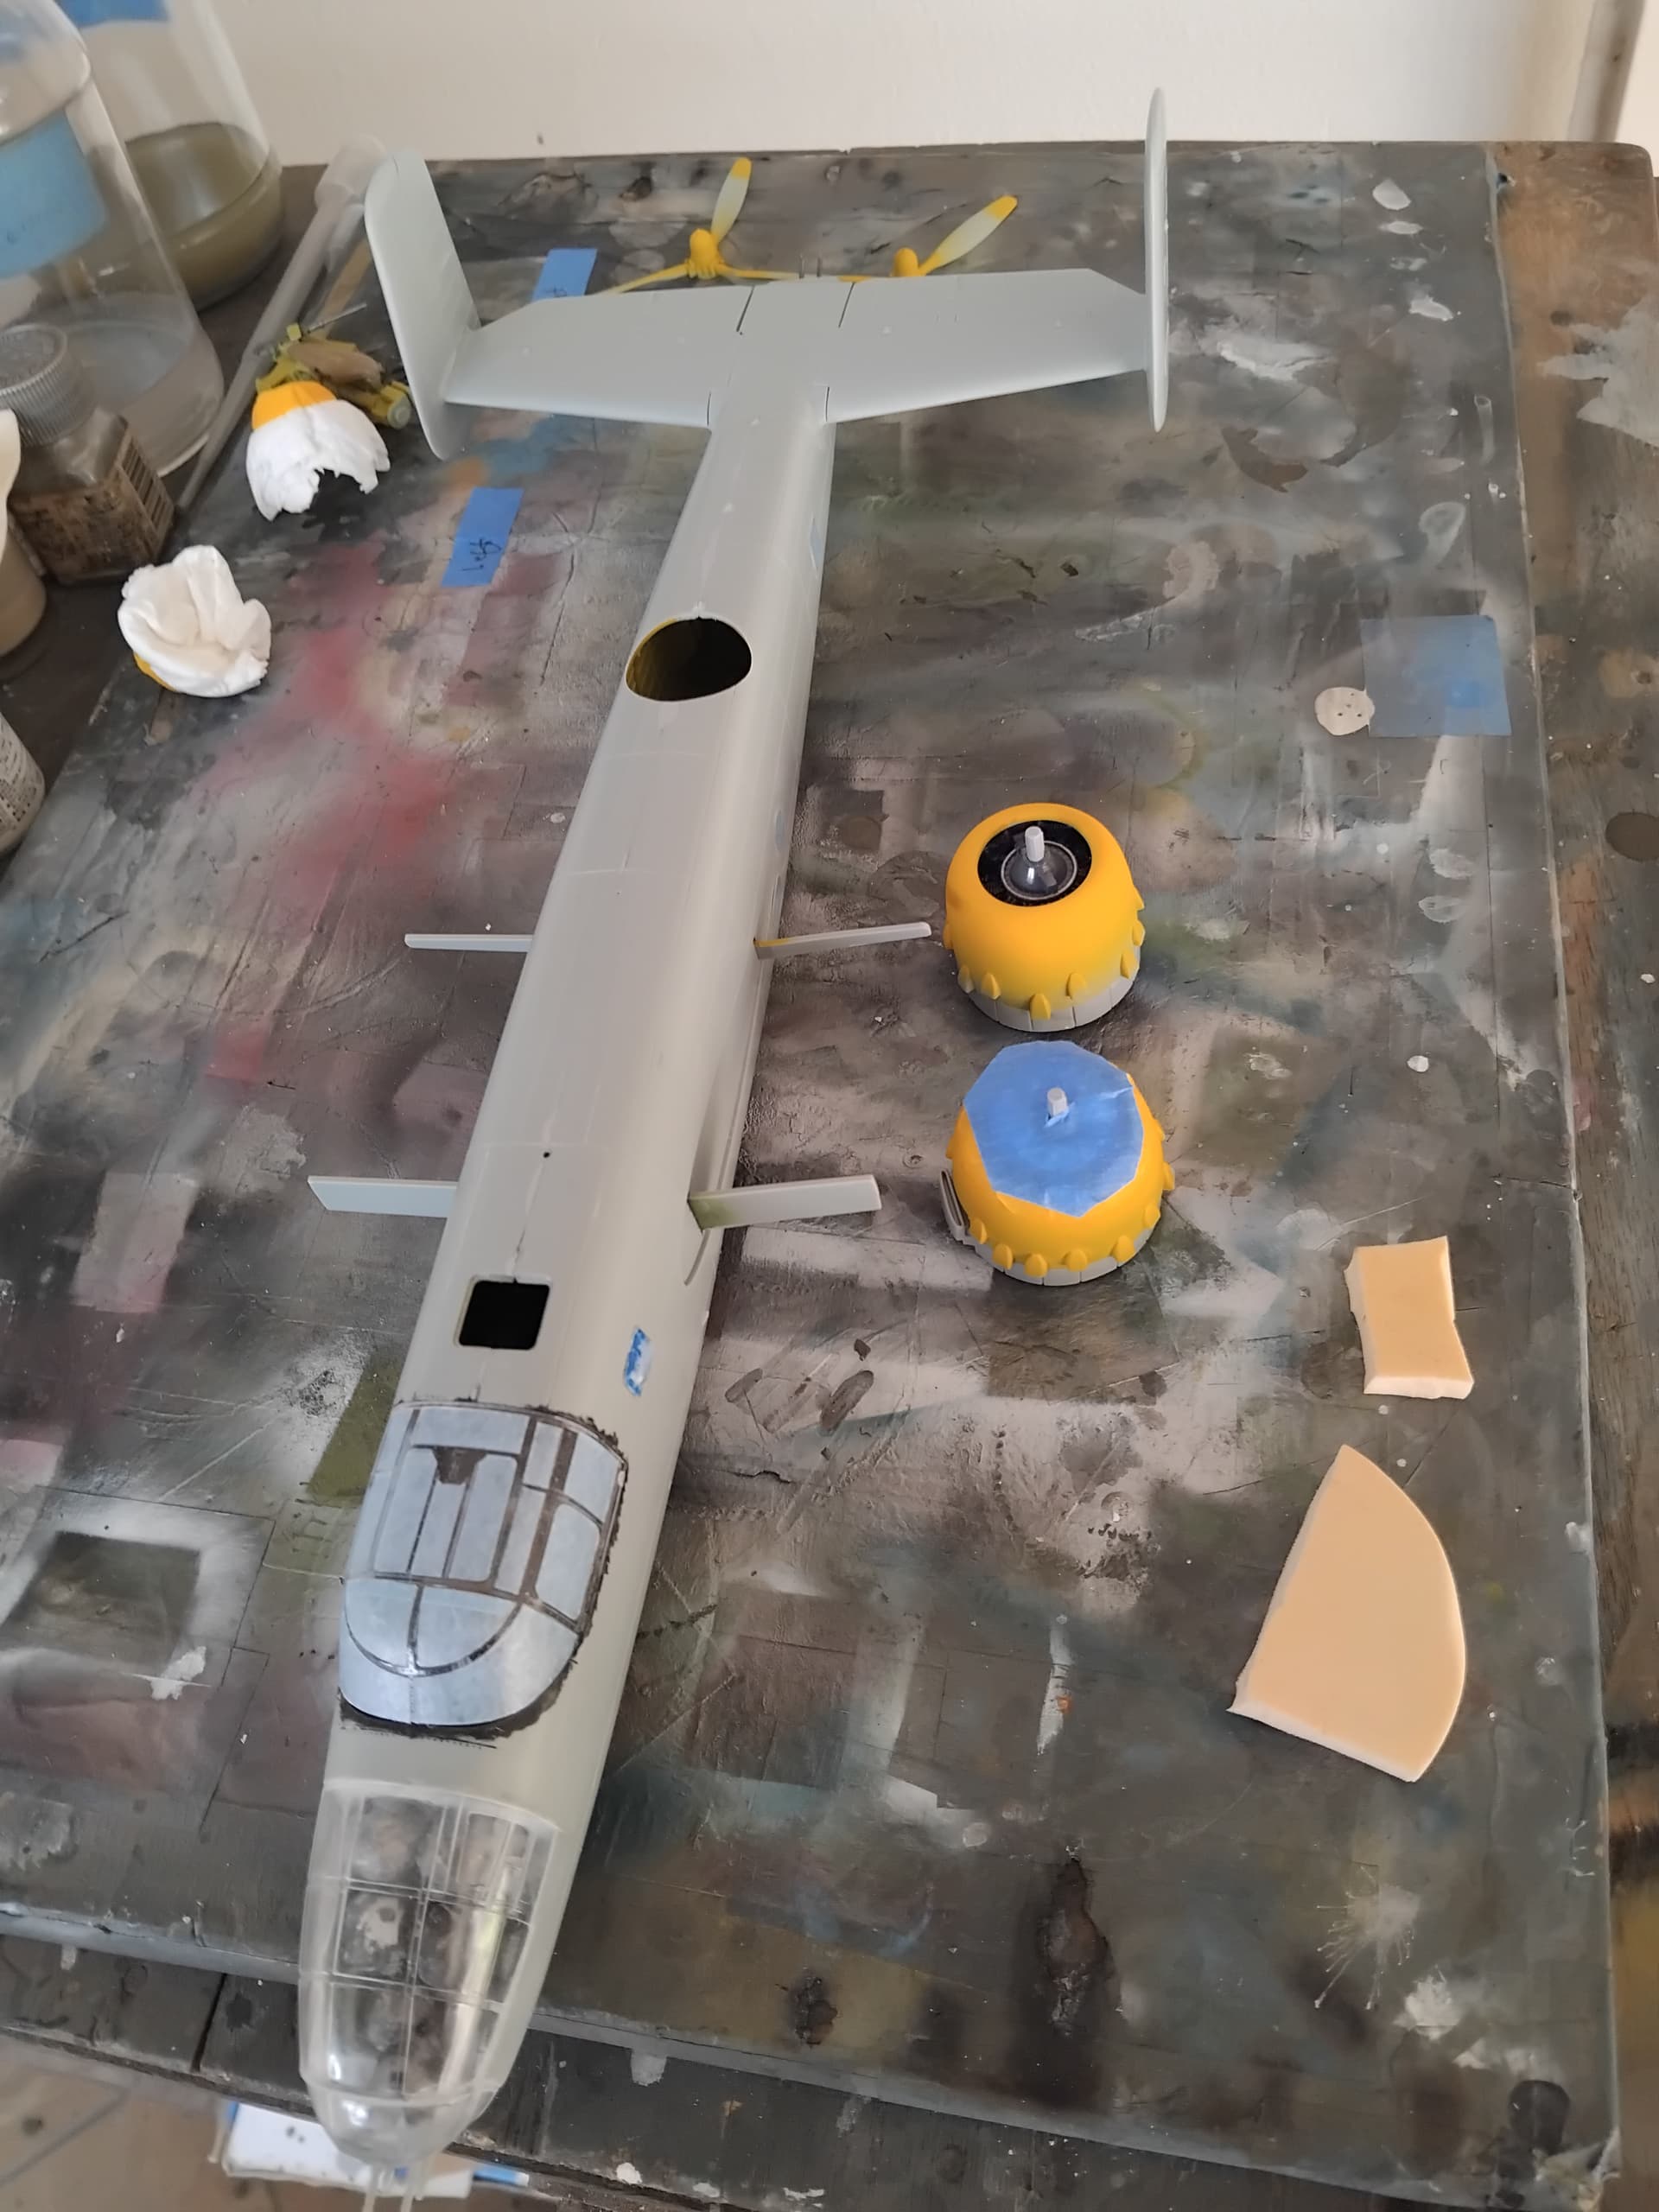
The twin 50’s for the turret.
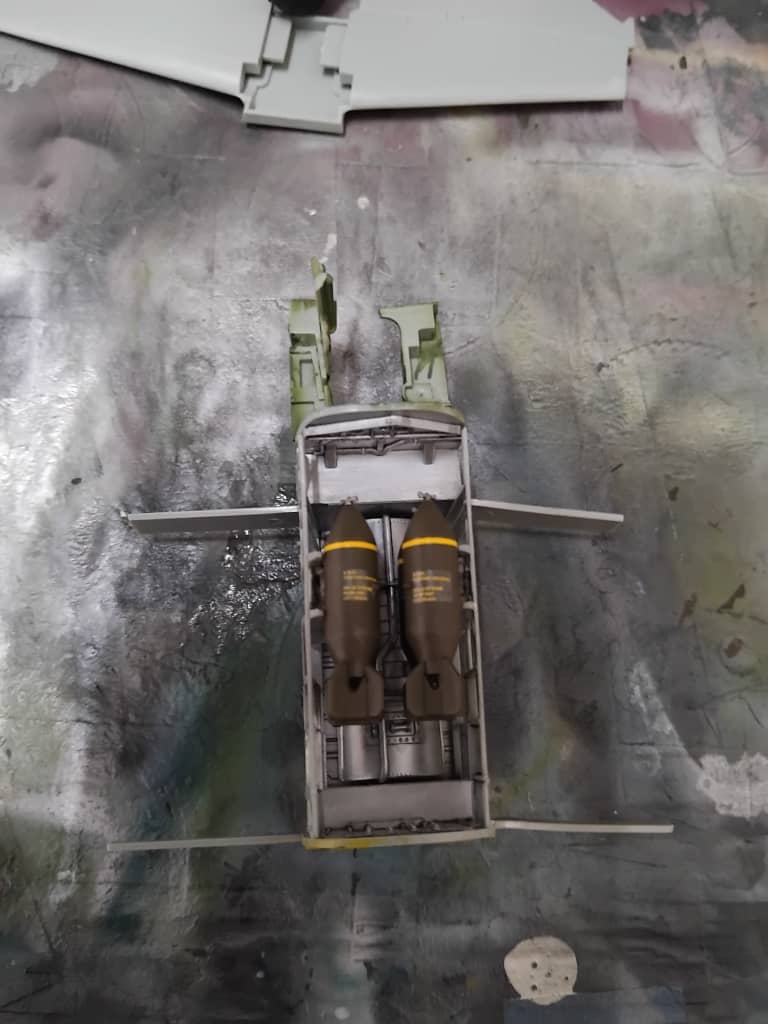
The bomb bay, which was very accurate and includes the extra fuel tank, something that would of been in use in the Pacific. Typical of bomber models, very few kits seem to have an easy way to attatch the bombs. The only exception for me to date are Tamiya kits, and even then it’s a bit touchy.
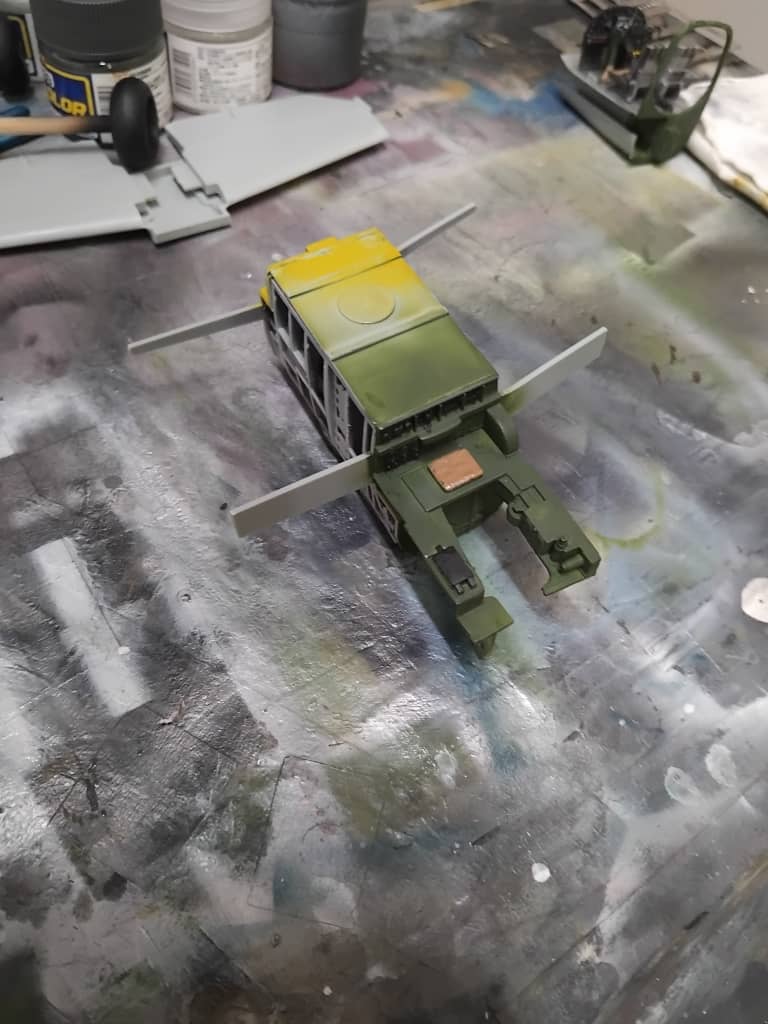
And finally the cockpit. Since this will be a strafer there was no need to worry about the front end, and what is nice, is that all the 45+g of weight can be plunked up front with no real effort!
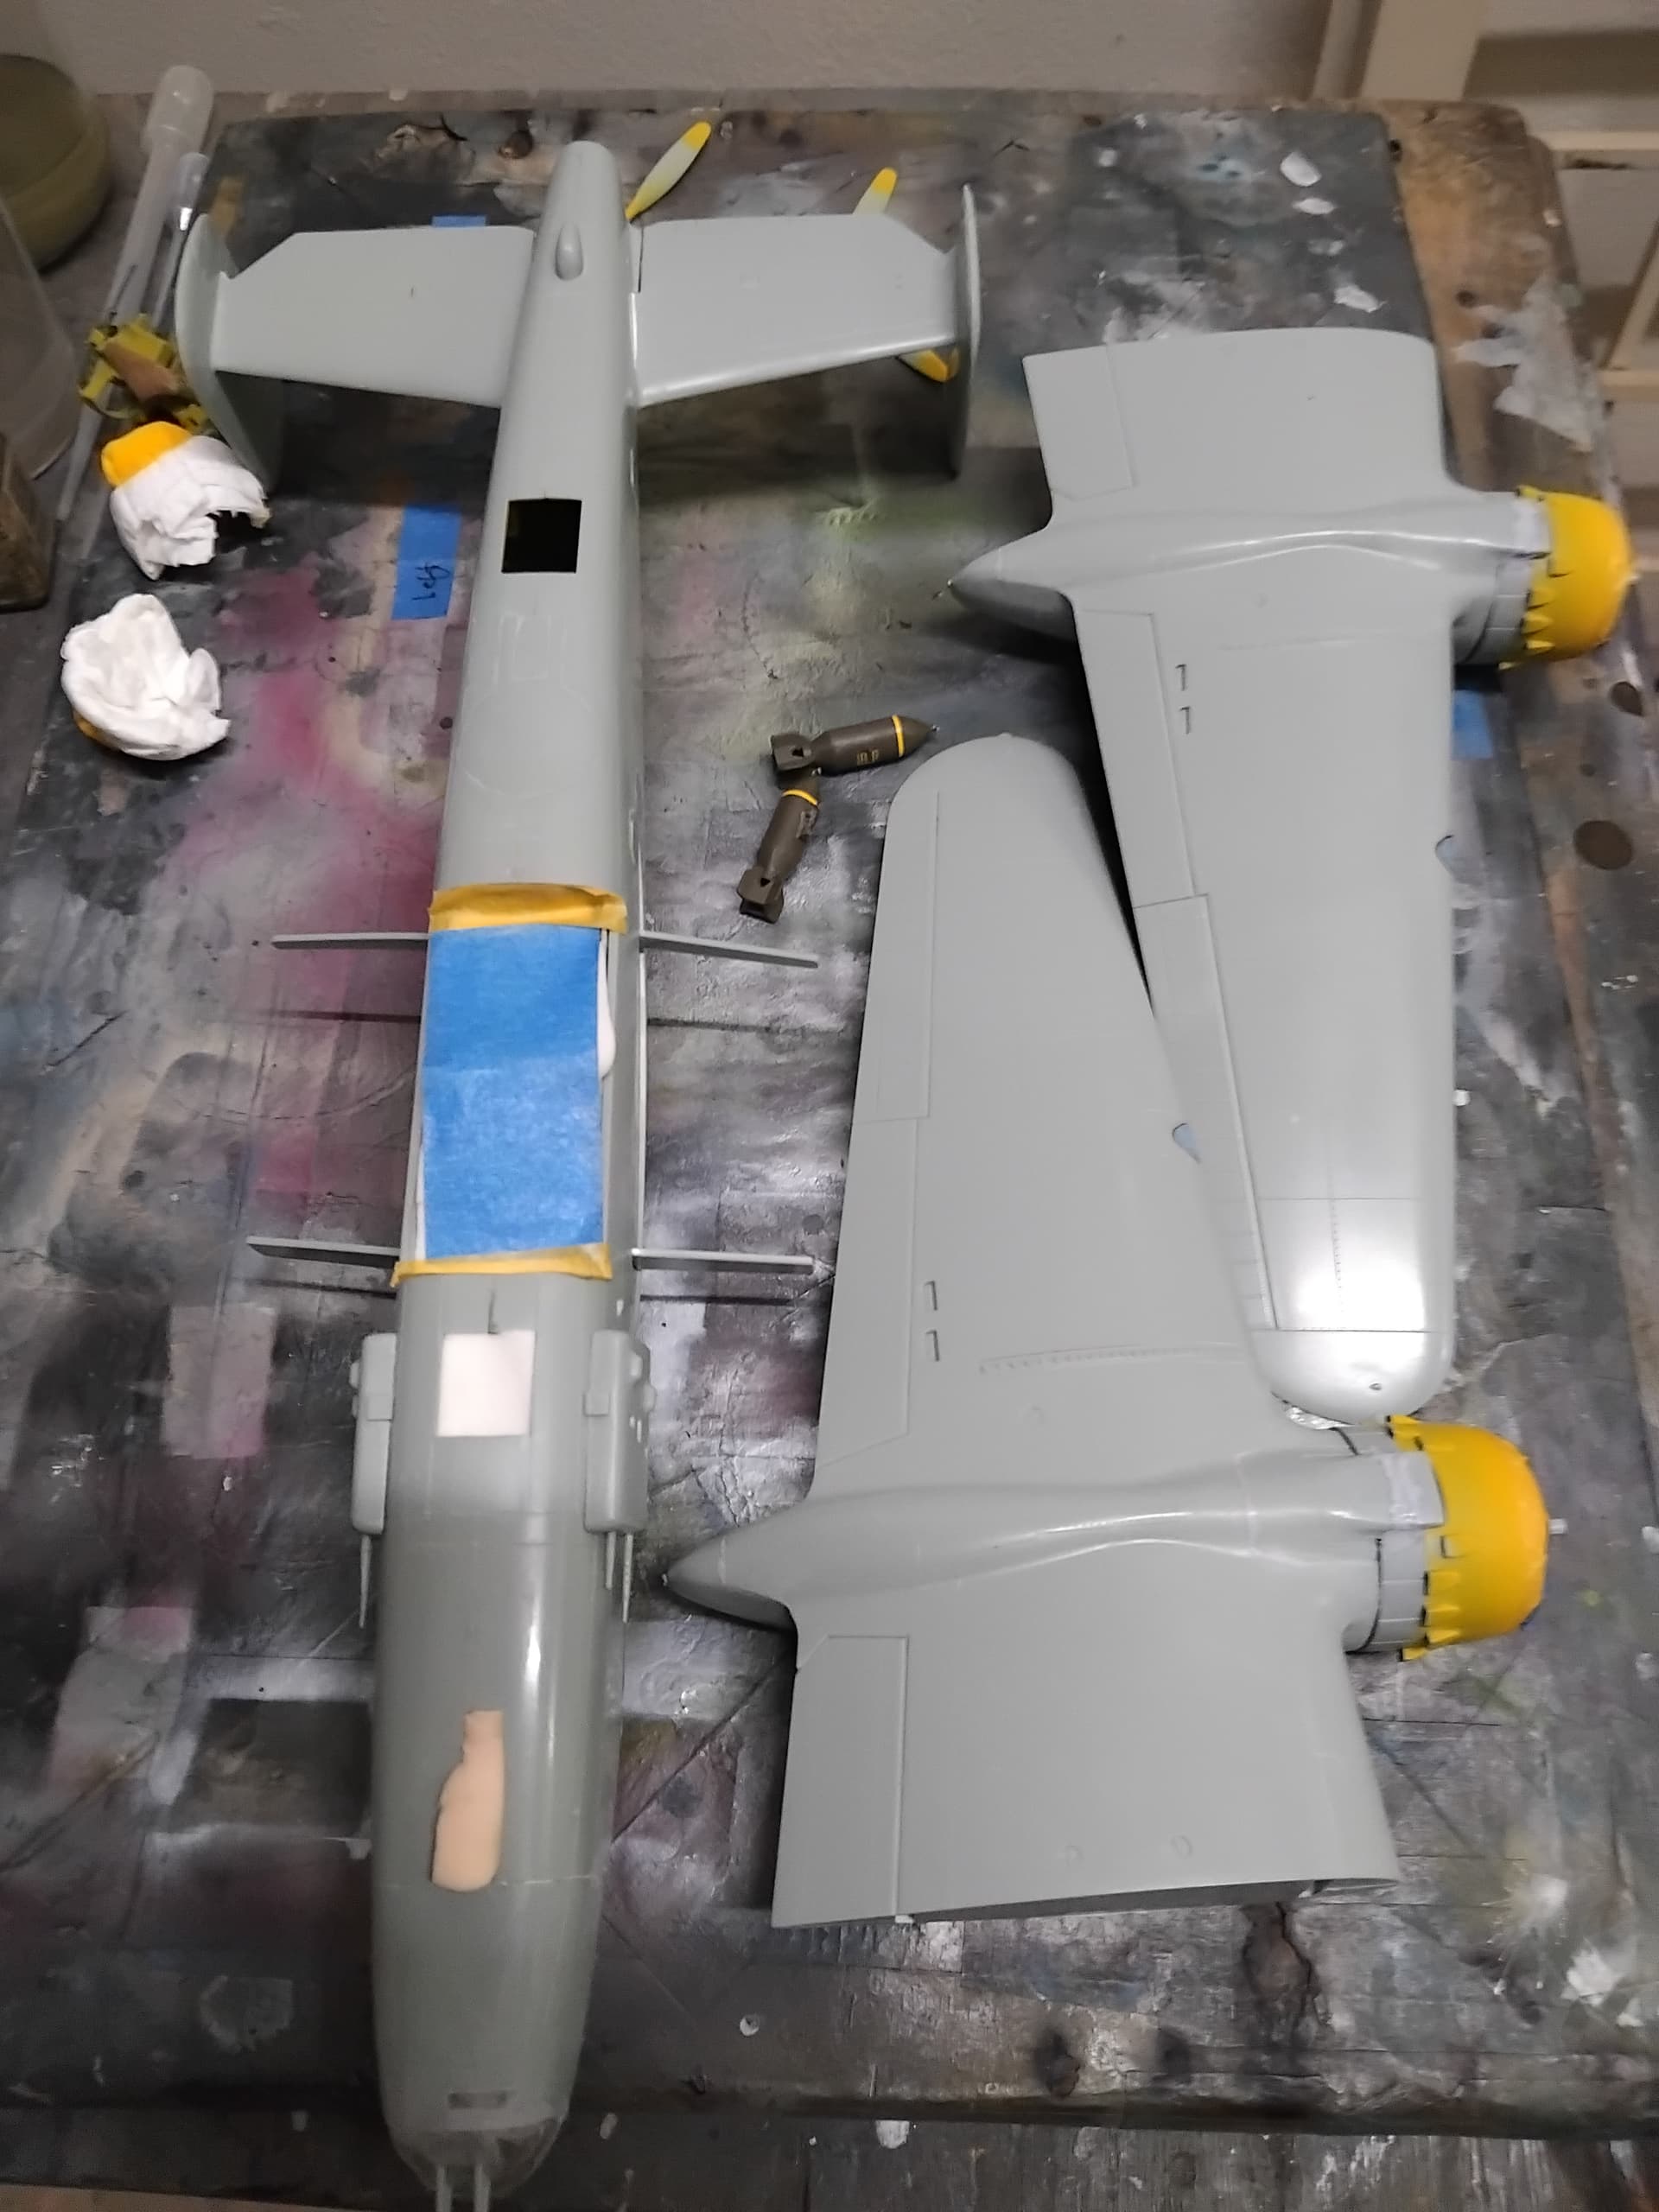
These subassemblies were then glued to the starboard side of the fuselage in preparation for the mating of the halves.
While all this was going on and as things dried, I moved onto the wings and stabilizer. Fit here was excellent, requiring minimal cleanup. There was a little filling needed for the landing lights, which were easily delt with using superglue.
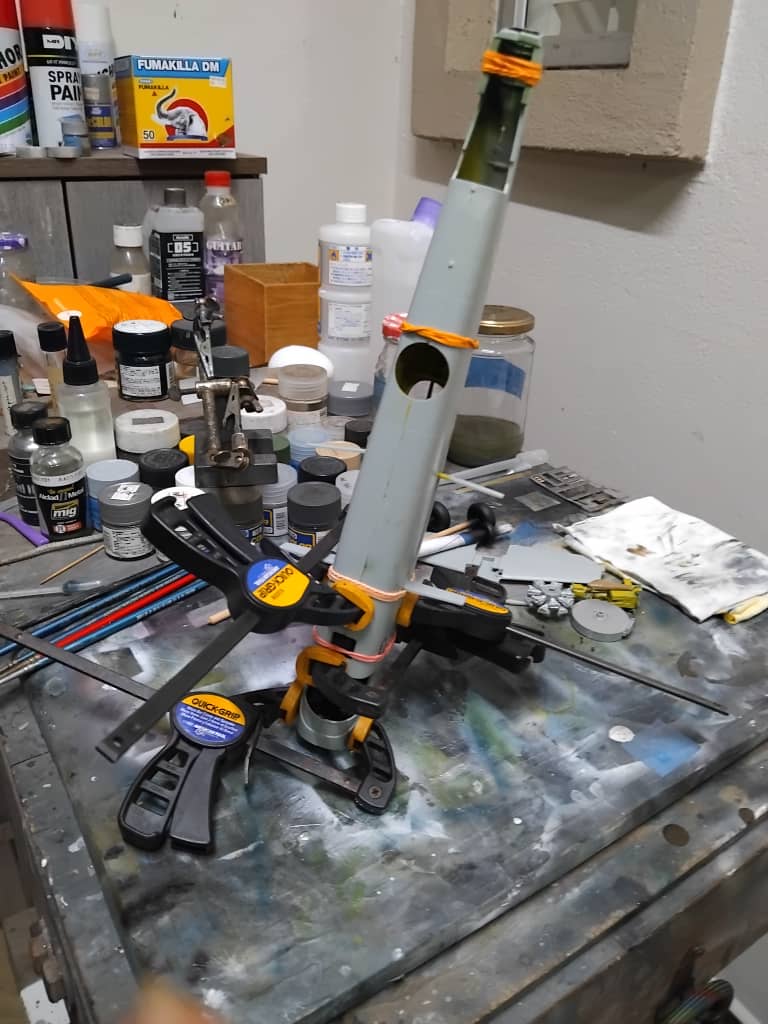
Once satisfied that things had dried I mated the fuselage halves. I really didn’t give the interior back end much in the way of washes, as nothing really will be seen. I’m a firm believer that if you won’t see it, don’t waste your time on it.
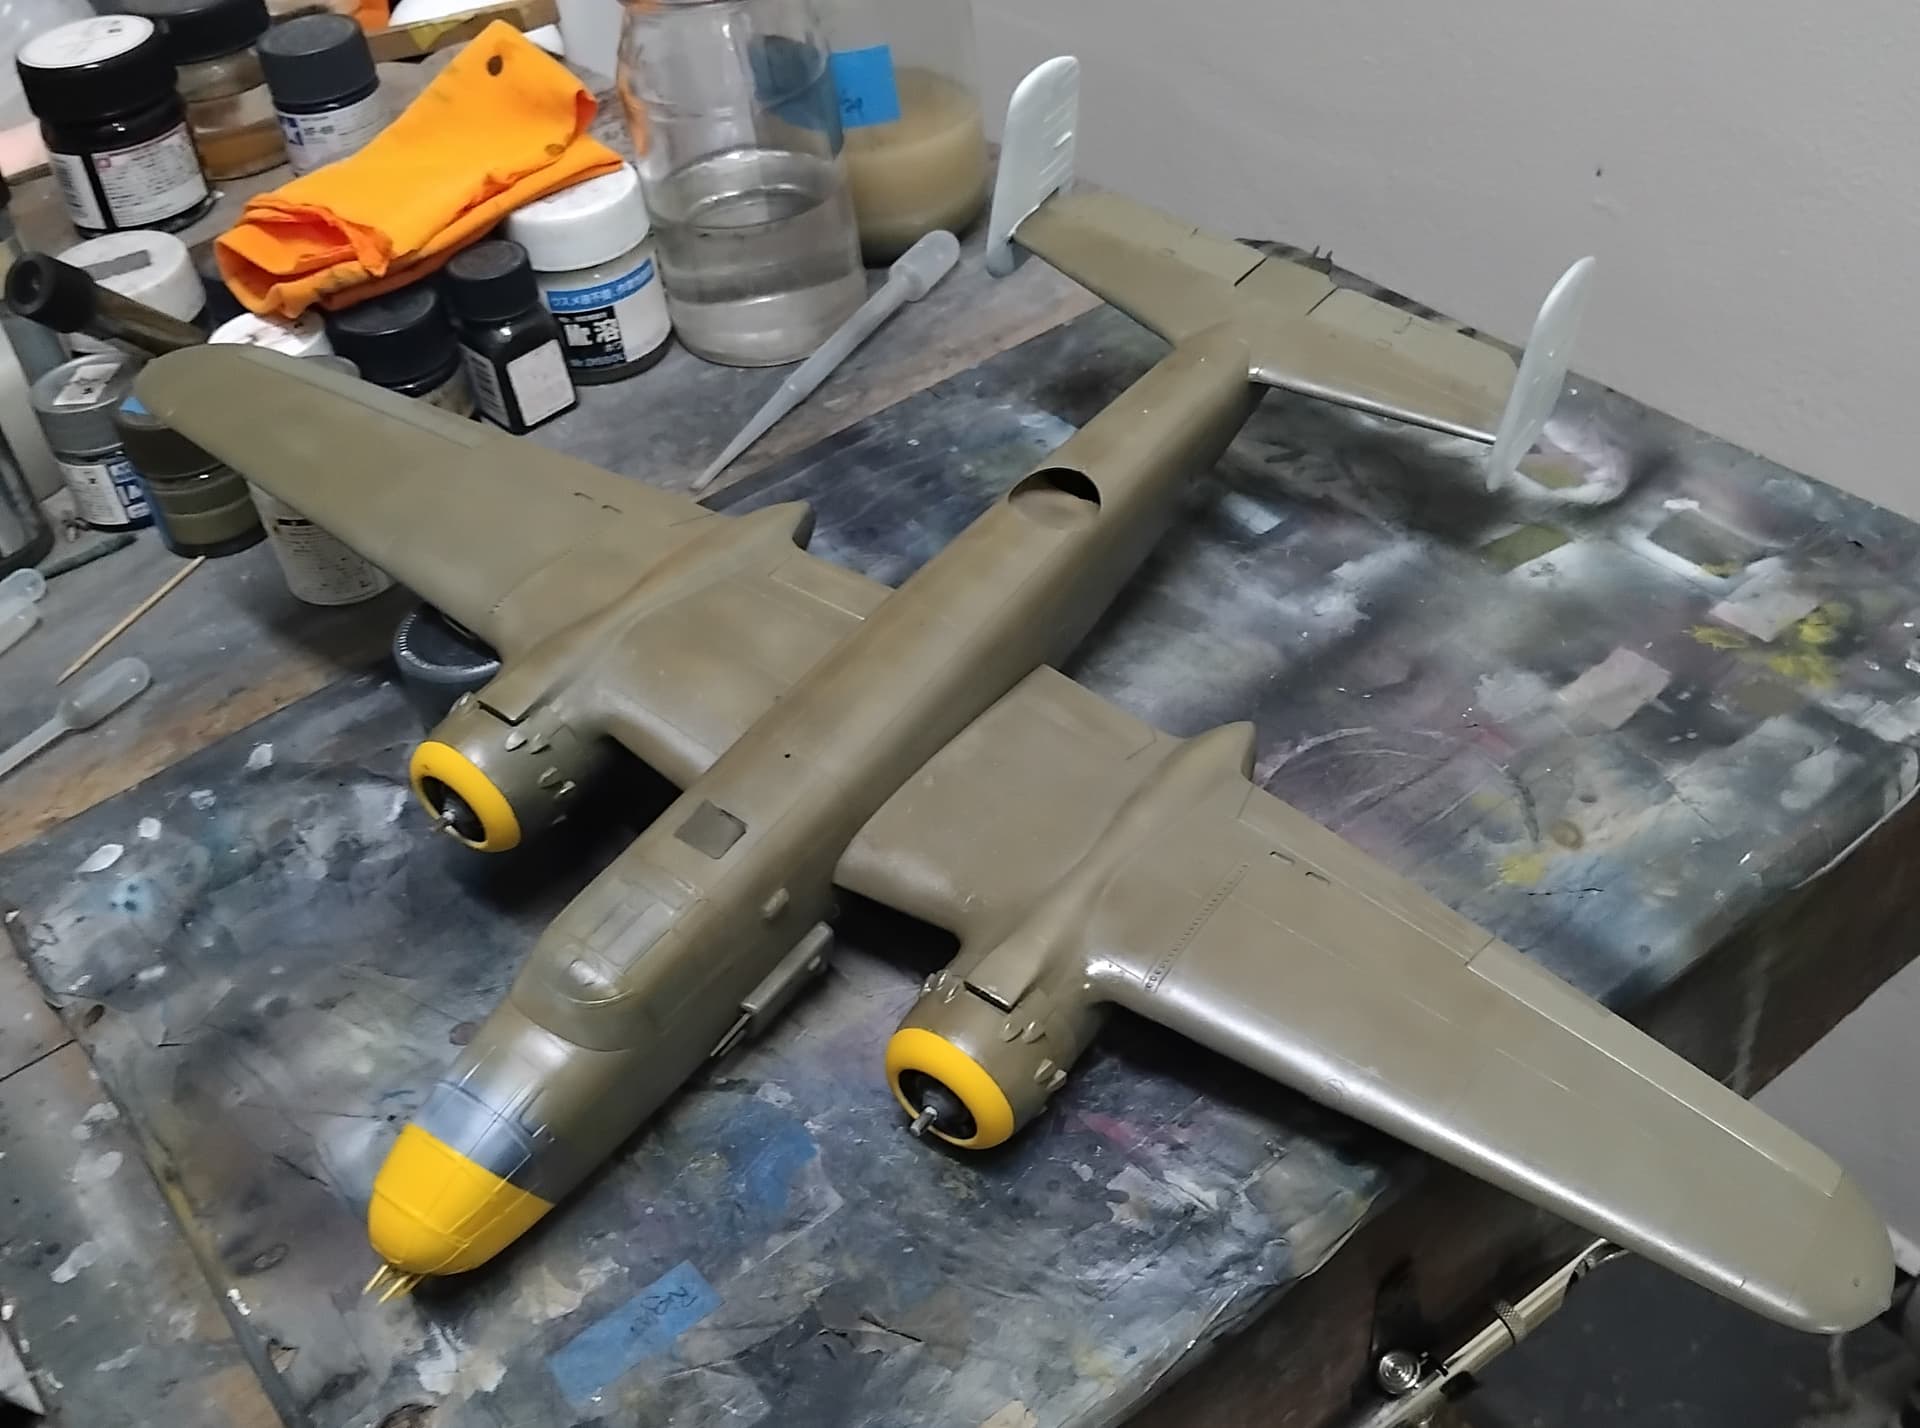
This morning, I removed the clamps and was left with a nice fuselage. There will a bit of cleanup as something this large if quite difficult to get to match perfectly in my experience. This where I stand at the moment, still lots of work to do, but it is taking shape. Overall, this is a pleasant kit to build and I’m enjoying it!
Till next time, be safe, wash your hands and have fun!
Hi Everyone,
Time for another update on the B-25D! The similarities between this kit and the Monogram kit are striking. Although, I suppose that there’s only so many ways to build a B-25. My build approach so far has been to make subassemblies, clean them up, and then assemble the subassemblies. Pretty straight forward, and so far, pretty fun!
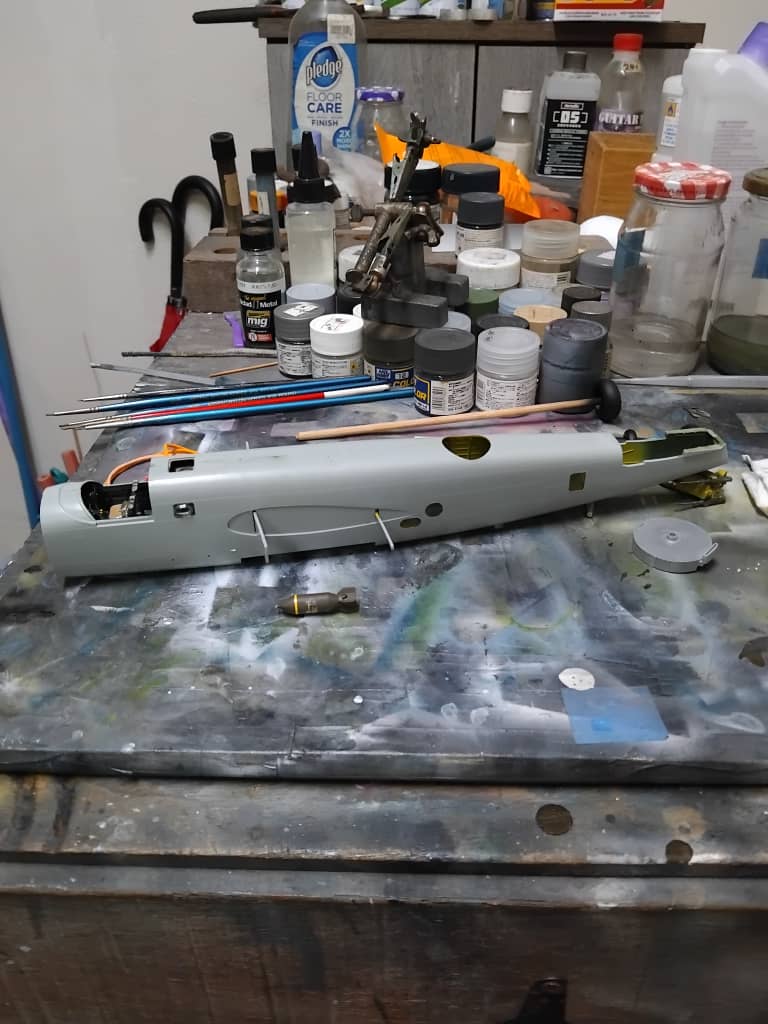
While not too extensive, the fuselage did require some substantial clean up. The seams were pretty basic, using Mr. Surfacer 500, sanded, and followed with superglue and subsequent sanding. The canopy glass fits fairly, well and the glazing over the front-end less fair. While the back portion fit great, the front end didn’t. I believe this was due to the lower front-end part being damaged during shipping, requiring extensive repair, which translated to poor fit up top. I used superglue to build up the low area around the glass, and once built up, it was sanded smooth. I think it turned out quite well.
This damaged part would continue to plague me as I completed the fuselage. After adding the guns, the shape of the front end required a lot of work. I began by gluing the front glass on using 5 minute epoxy. Followed by extensive sanding of the fuselage to get things to line up and look correct. Since the front end of the bird will be painted and decaled, my care gene didn’t express over the clarity of the glass.
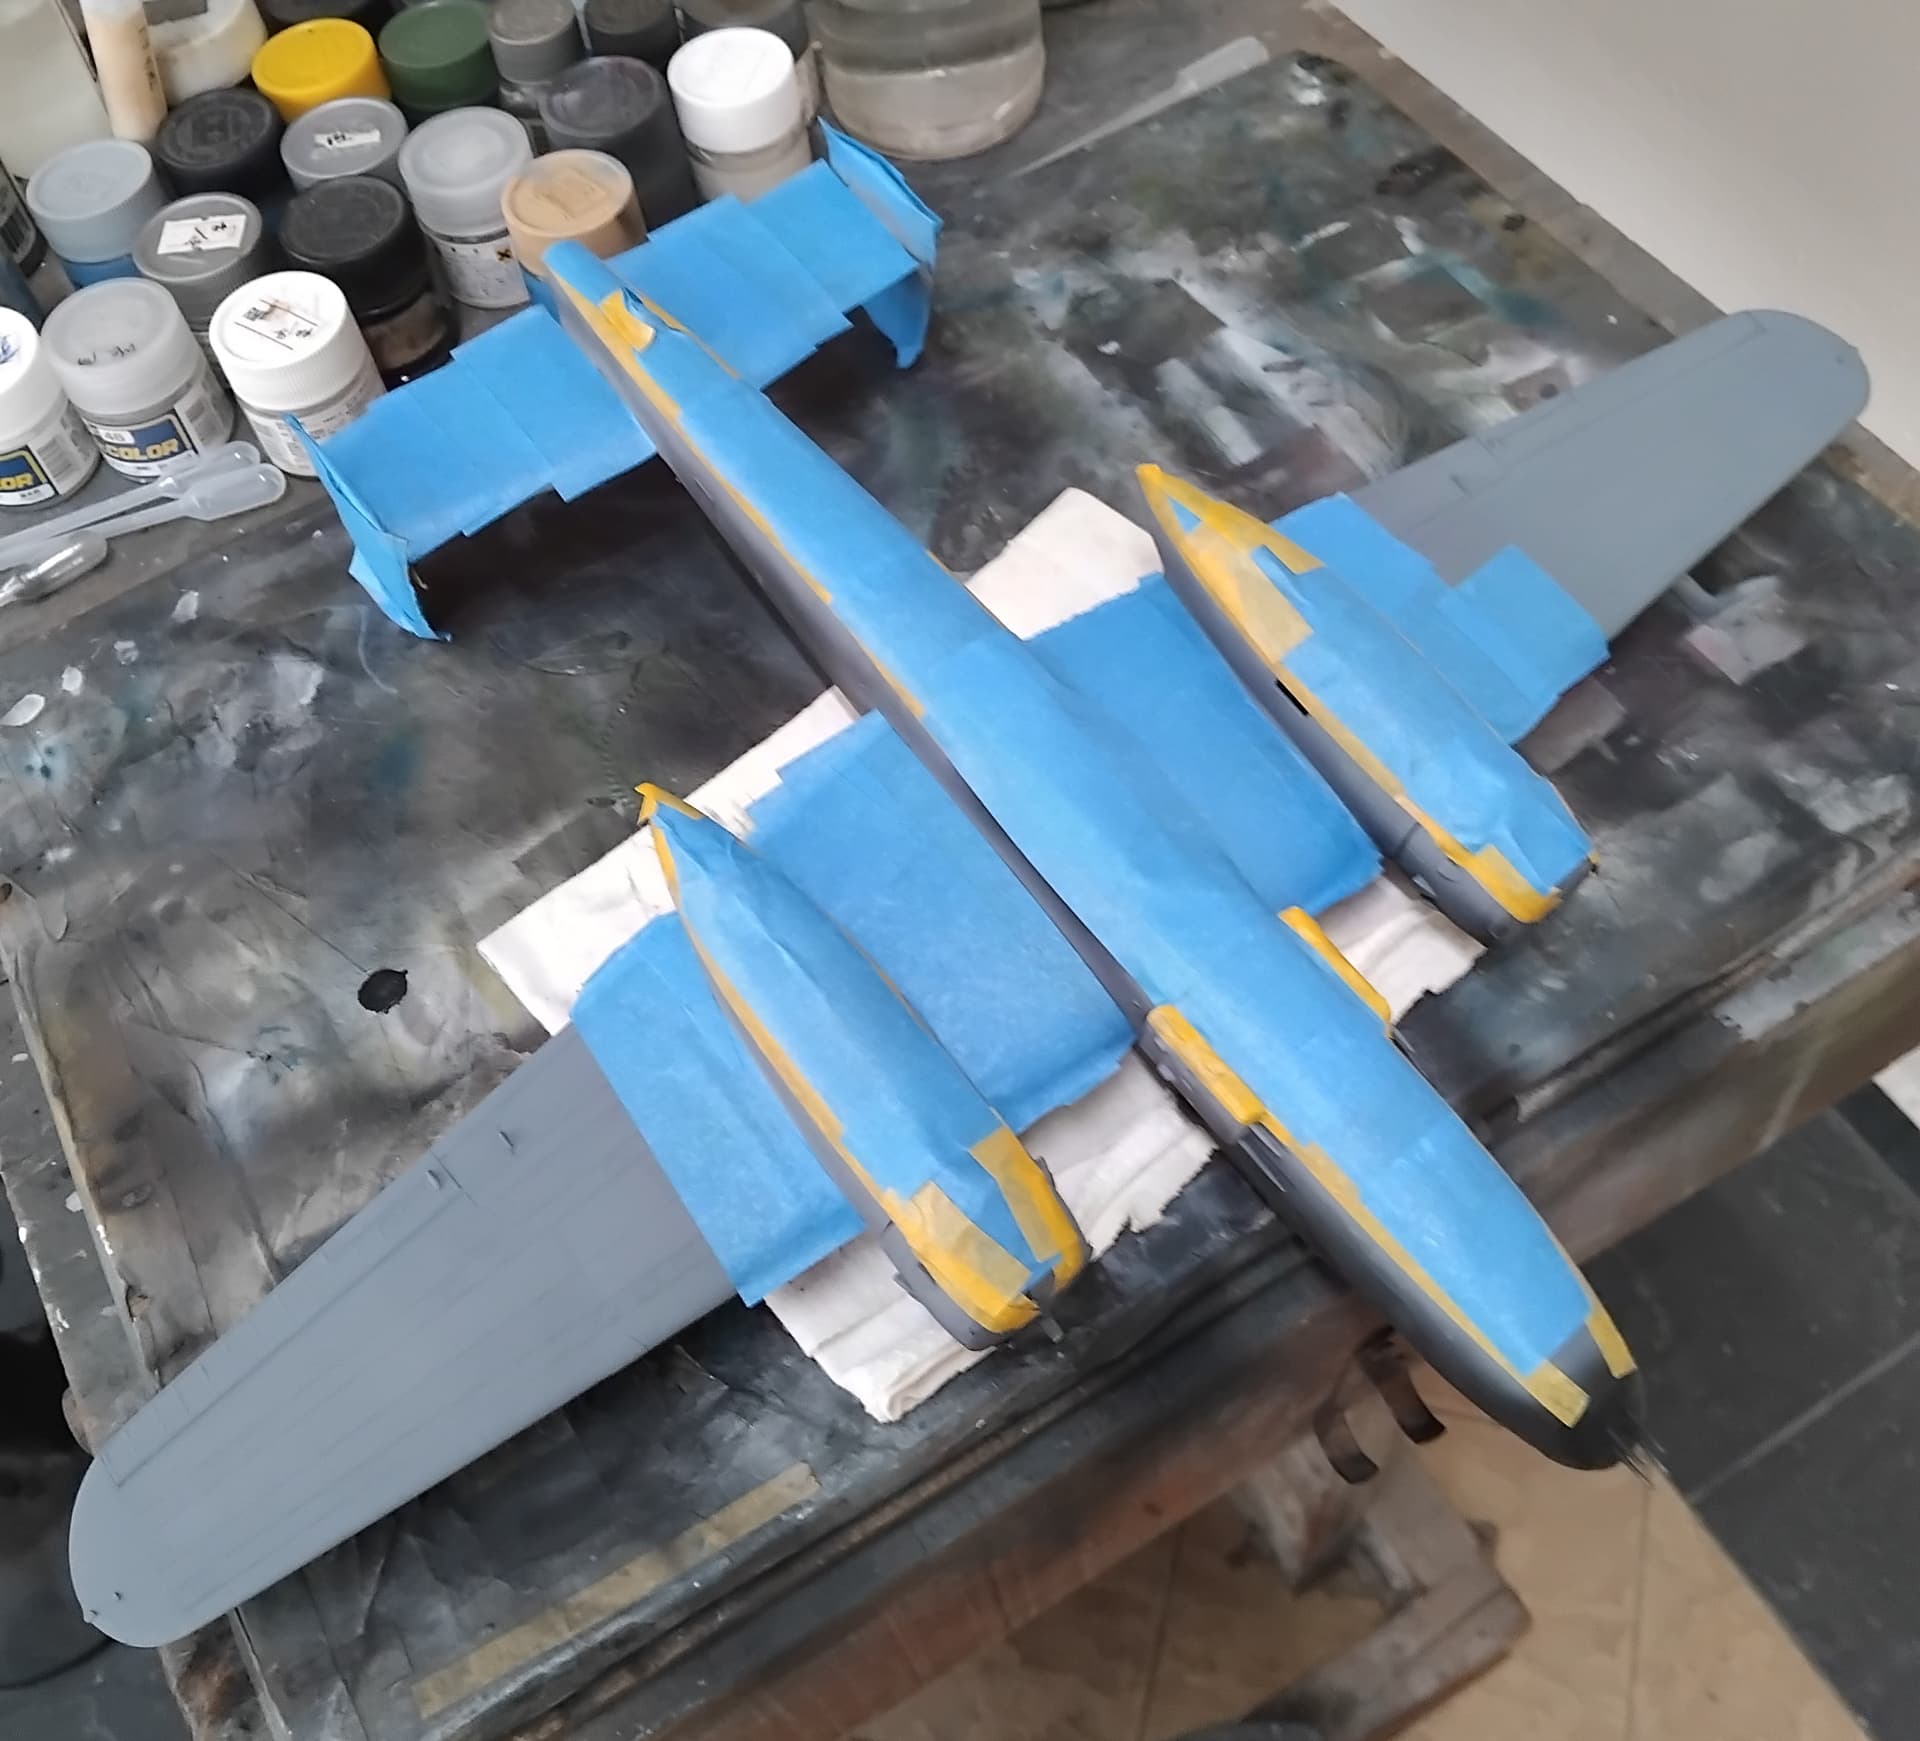
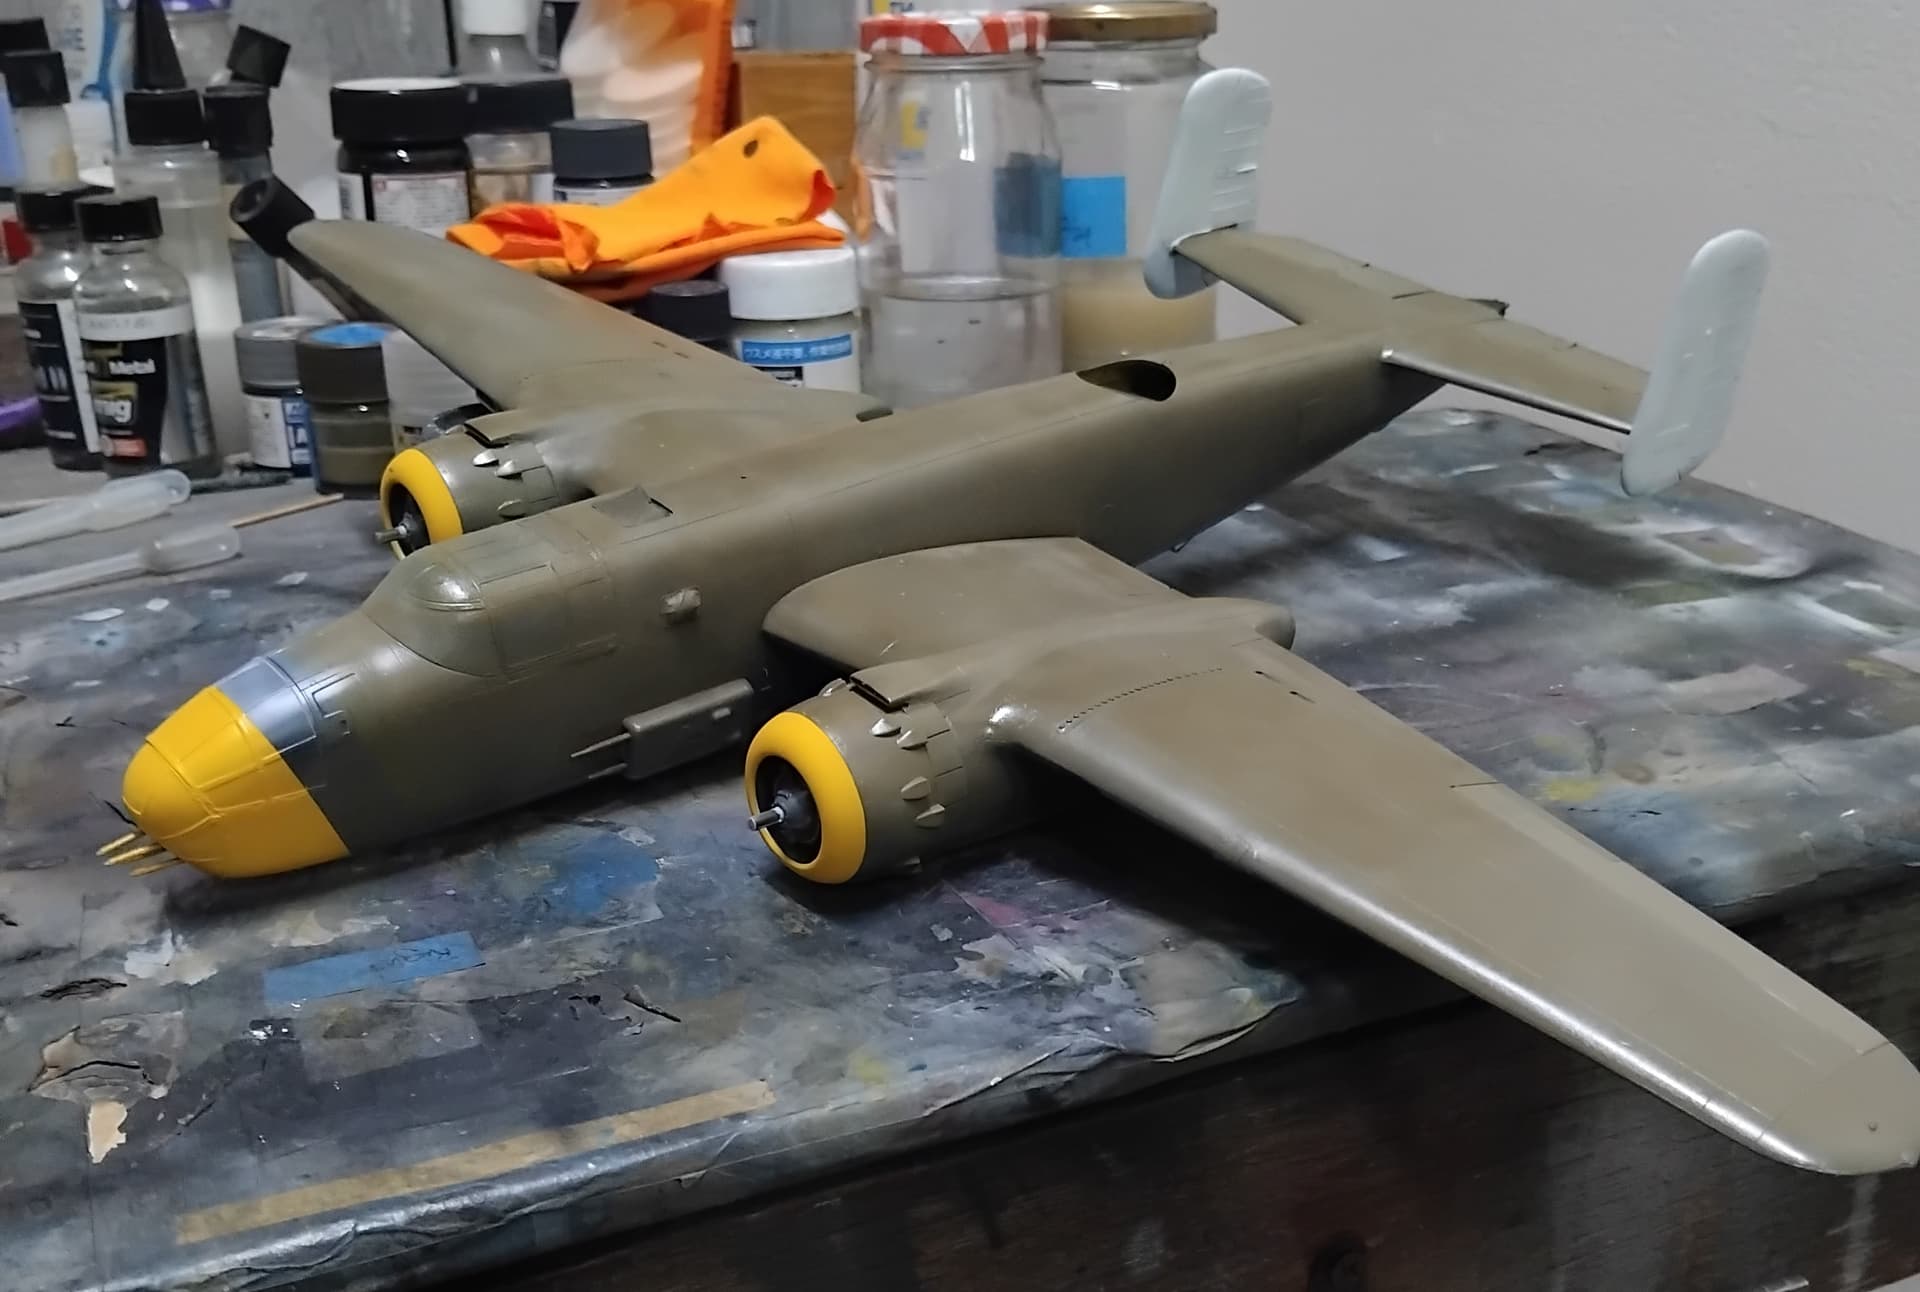
Once satisfied that the subassemblies were looking good, I opted to paint yellow for the prop tips and hub, as well as the engine cowlings. Mainly due to having the yellow on the bench, and to make things a bit easier with the engines not being attached to the wings.
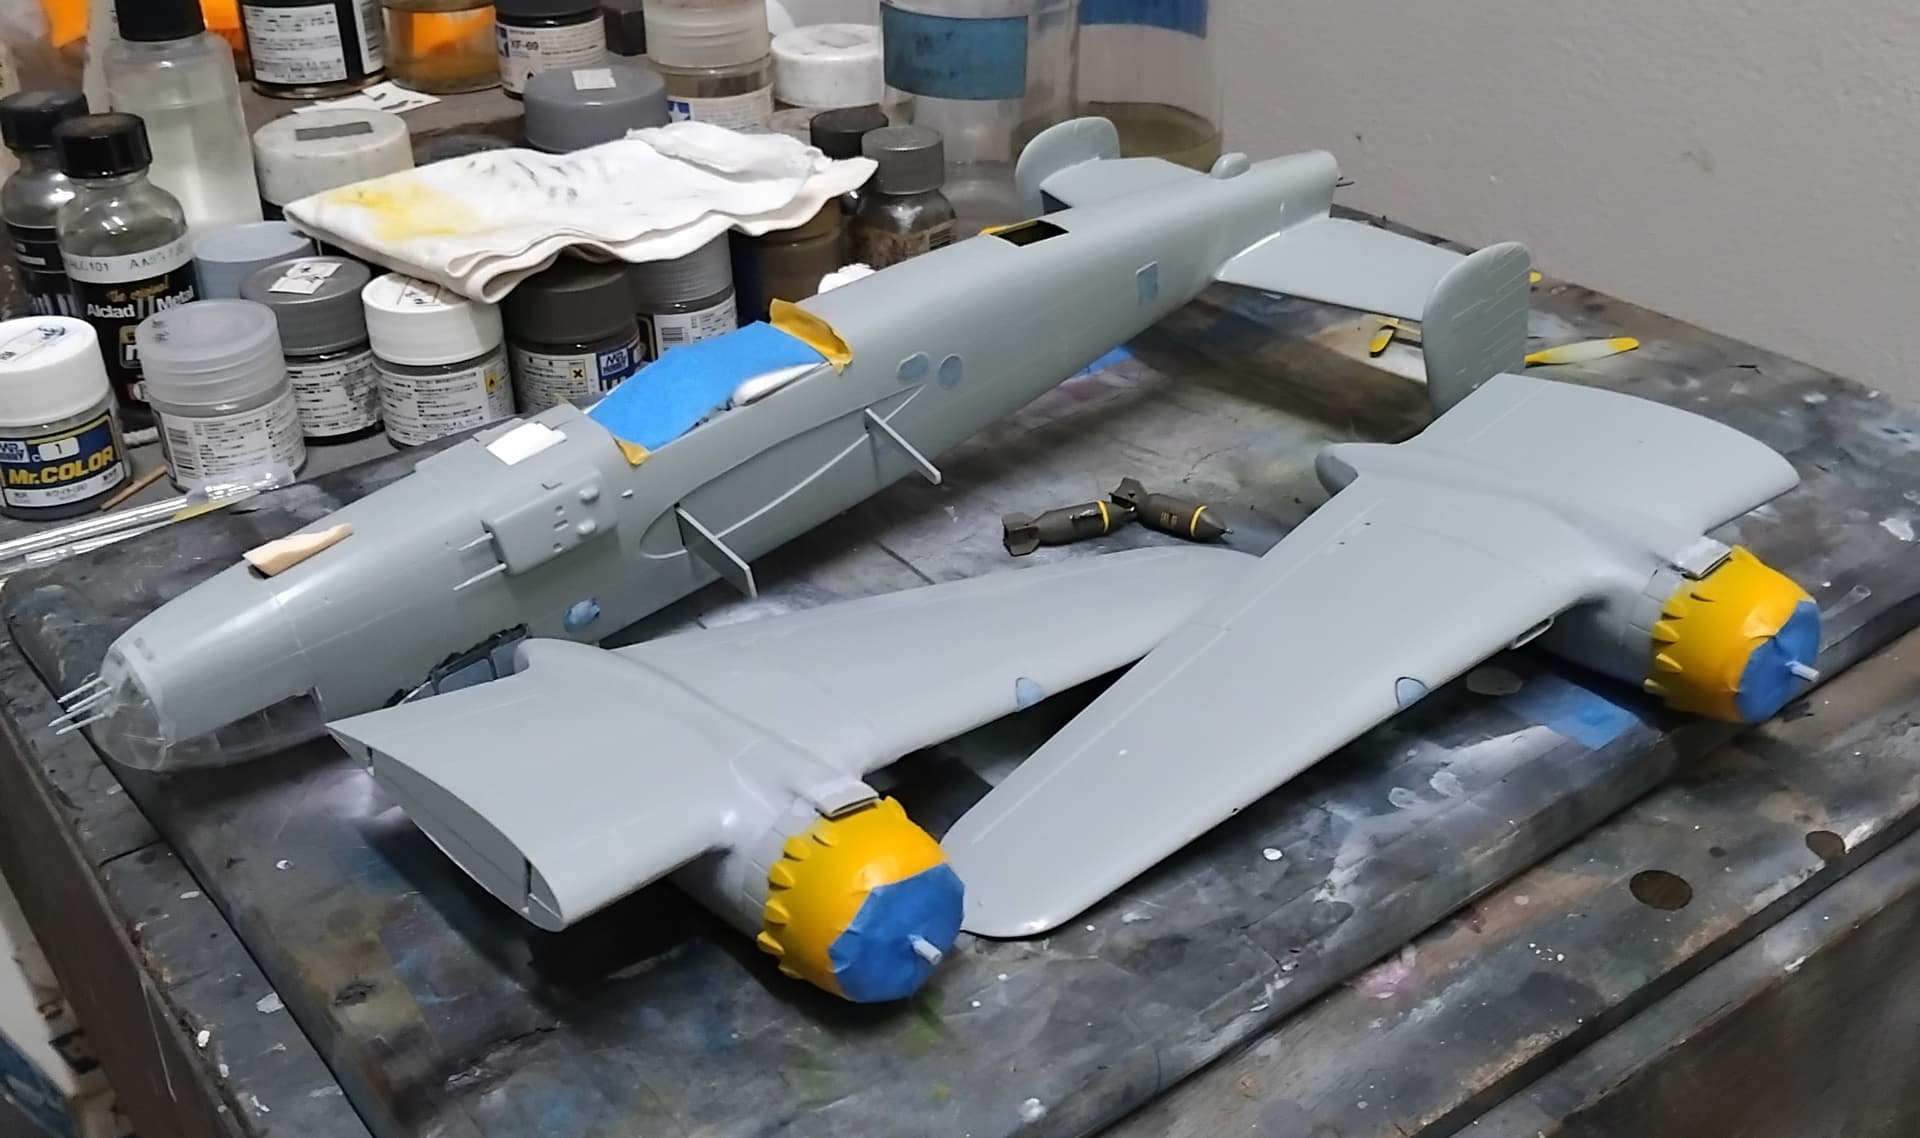
Finally, it was time to assemble the subassemblies and get this thing looking like a B-25! I gave the engines a once over with some silver, black and another wash, this one being burnt umber, and attached the cowlings to the engine assembly. Fit here was quite poor. My initial thoughts were that the alignment tab was too wide and thick. As I sanding this down fit improved, though not as well as I thought, and it became clear that the engines first cylinder ring was hitting the curve area of the cowling. Argh, more sanding. I sanded a bit at a time with frequent test fitting to get the lower cylinders shaved down enough to allow a good fit. After some time, all fit like a charm. One nice thing with a twin engine, is that after the primary sanding is done on the first engine, you know how far to go on the second. So, the second engine and cowling assembly was good to go in about 10 minutes. At this time I also attached the tail assembly to the fuselage. I also began masking the areas of yellow for the upcoming paint job.
With the engines looking good, I attached them to the wings. Again, fit here was less than stellar. More Mr. Surfacer 500 and superglue with a bit of sanding took care of things. It was pretty easy to get the air scoops to smooth out, however, the area where the scoop meets the cowl flaps was a different story. I wound up using Vallejo plastic putty to fill the gaps, and then superglue to smooth things out.
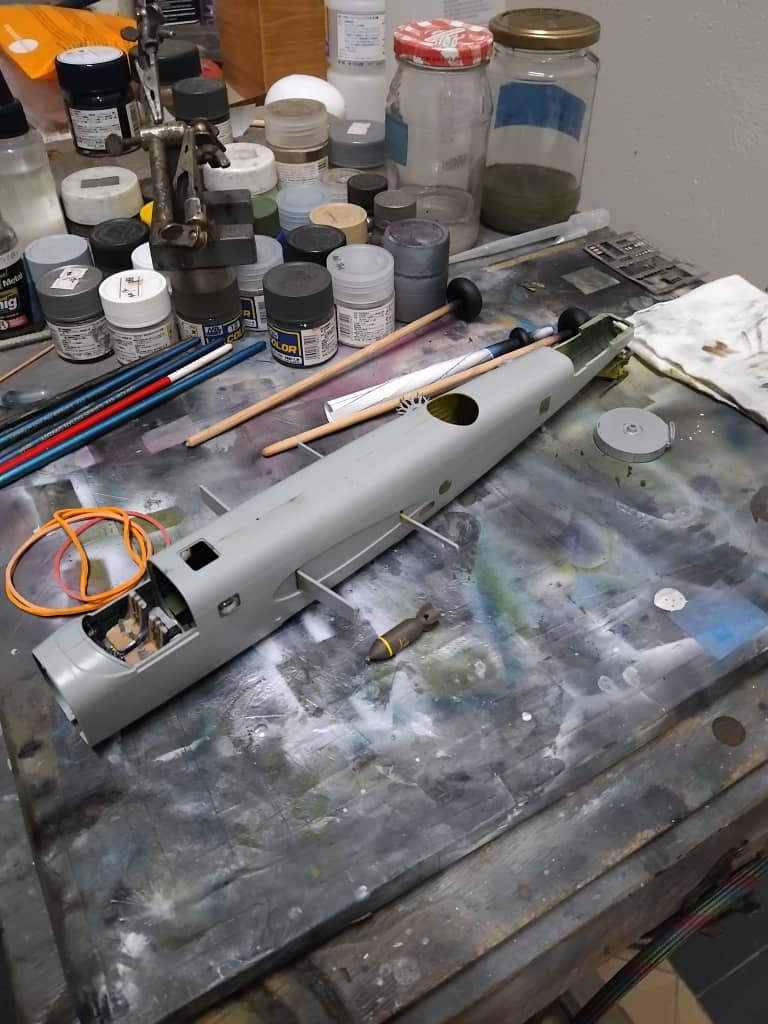
With all this progress made, it was time to attach the wings. Test fitting found that the handling of the fuselage and dealing with the spars designed to align things was a little off, however, things turned out well.
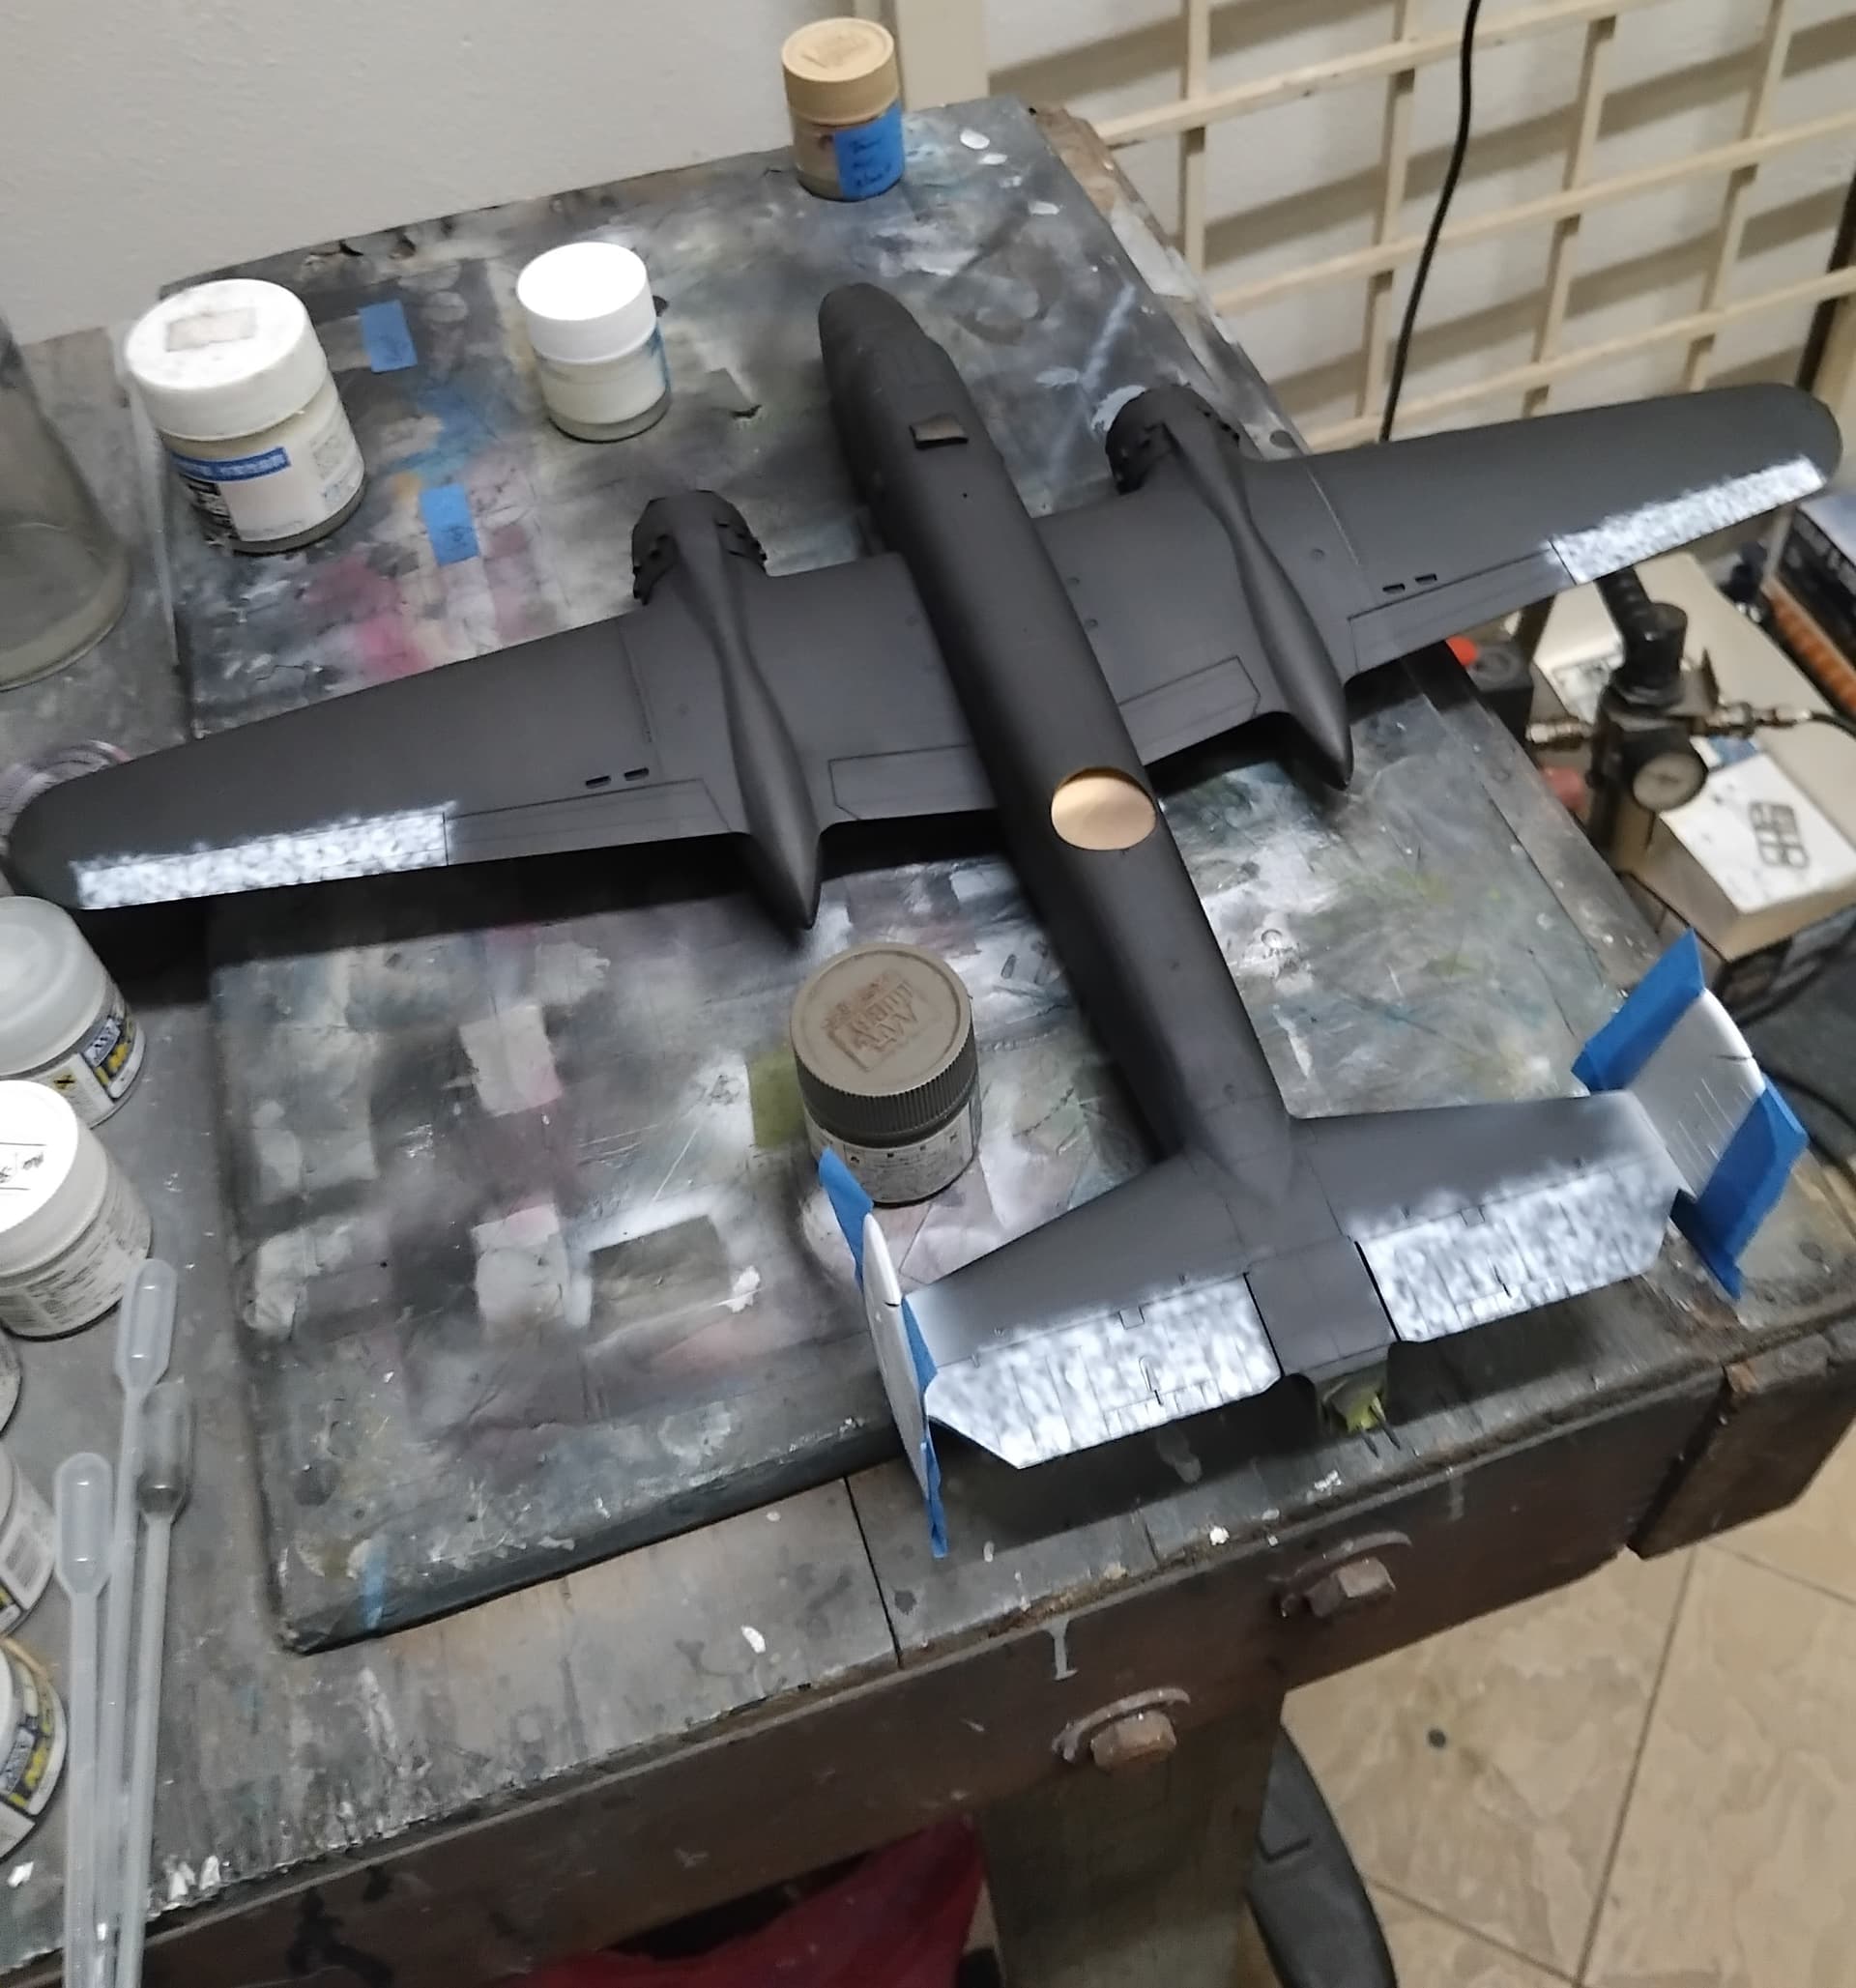
With a completed airframe, the various holes are being covered in preparation for painting. A final review for gaps or the need to replace lost panel lines/rivets etc. is being conducted. Once satisfied, this monster will get a black base of Mr. Surfacer 1500 black. I’m looking forward to it!
Till next time, be safe, wash your hands and have fun!
Hi Everyone,
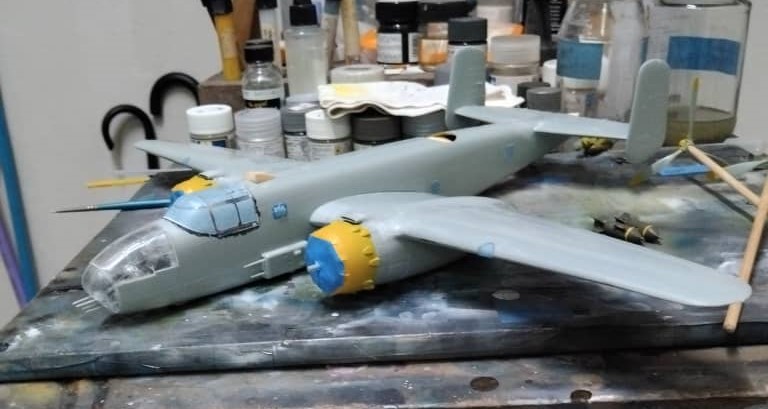
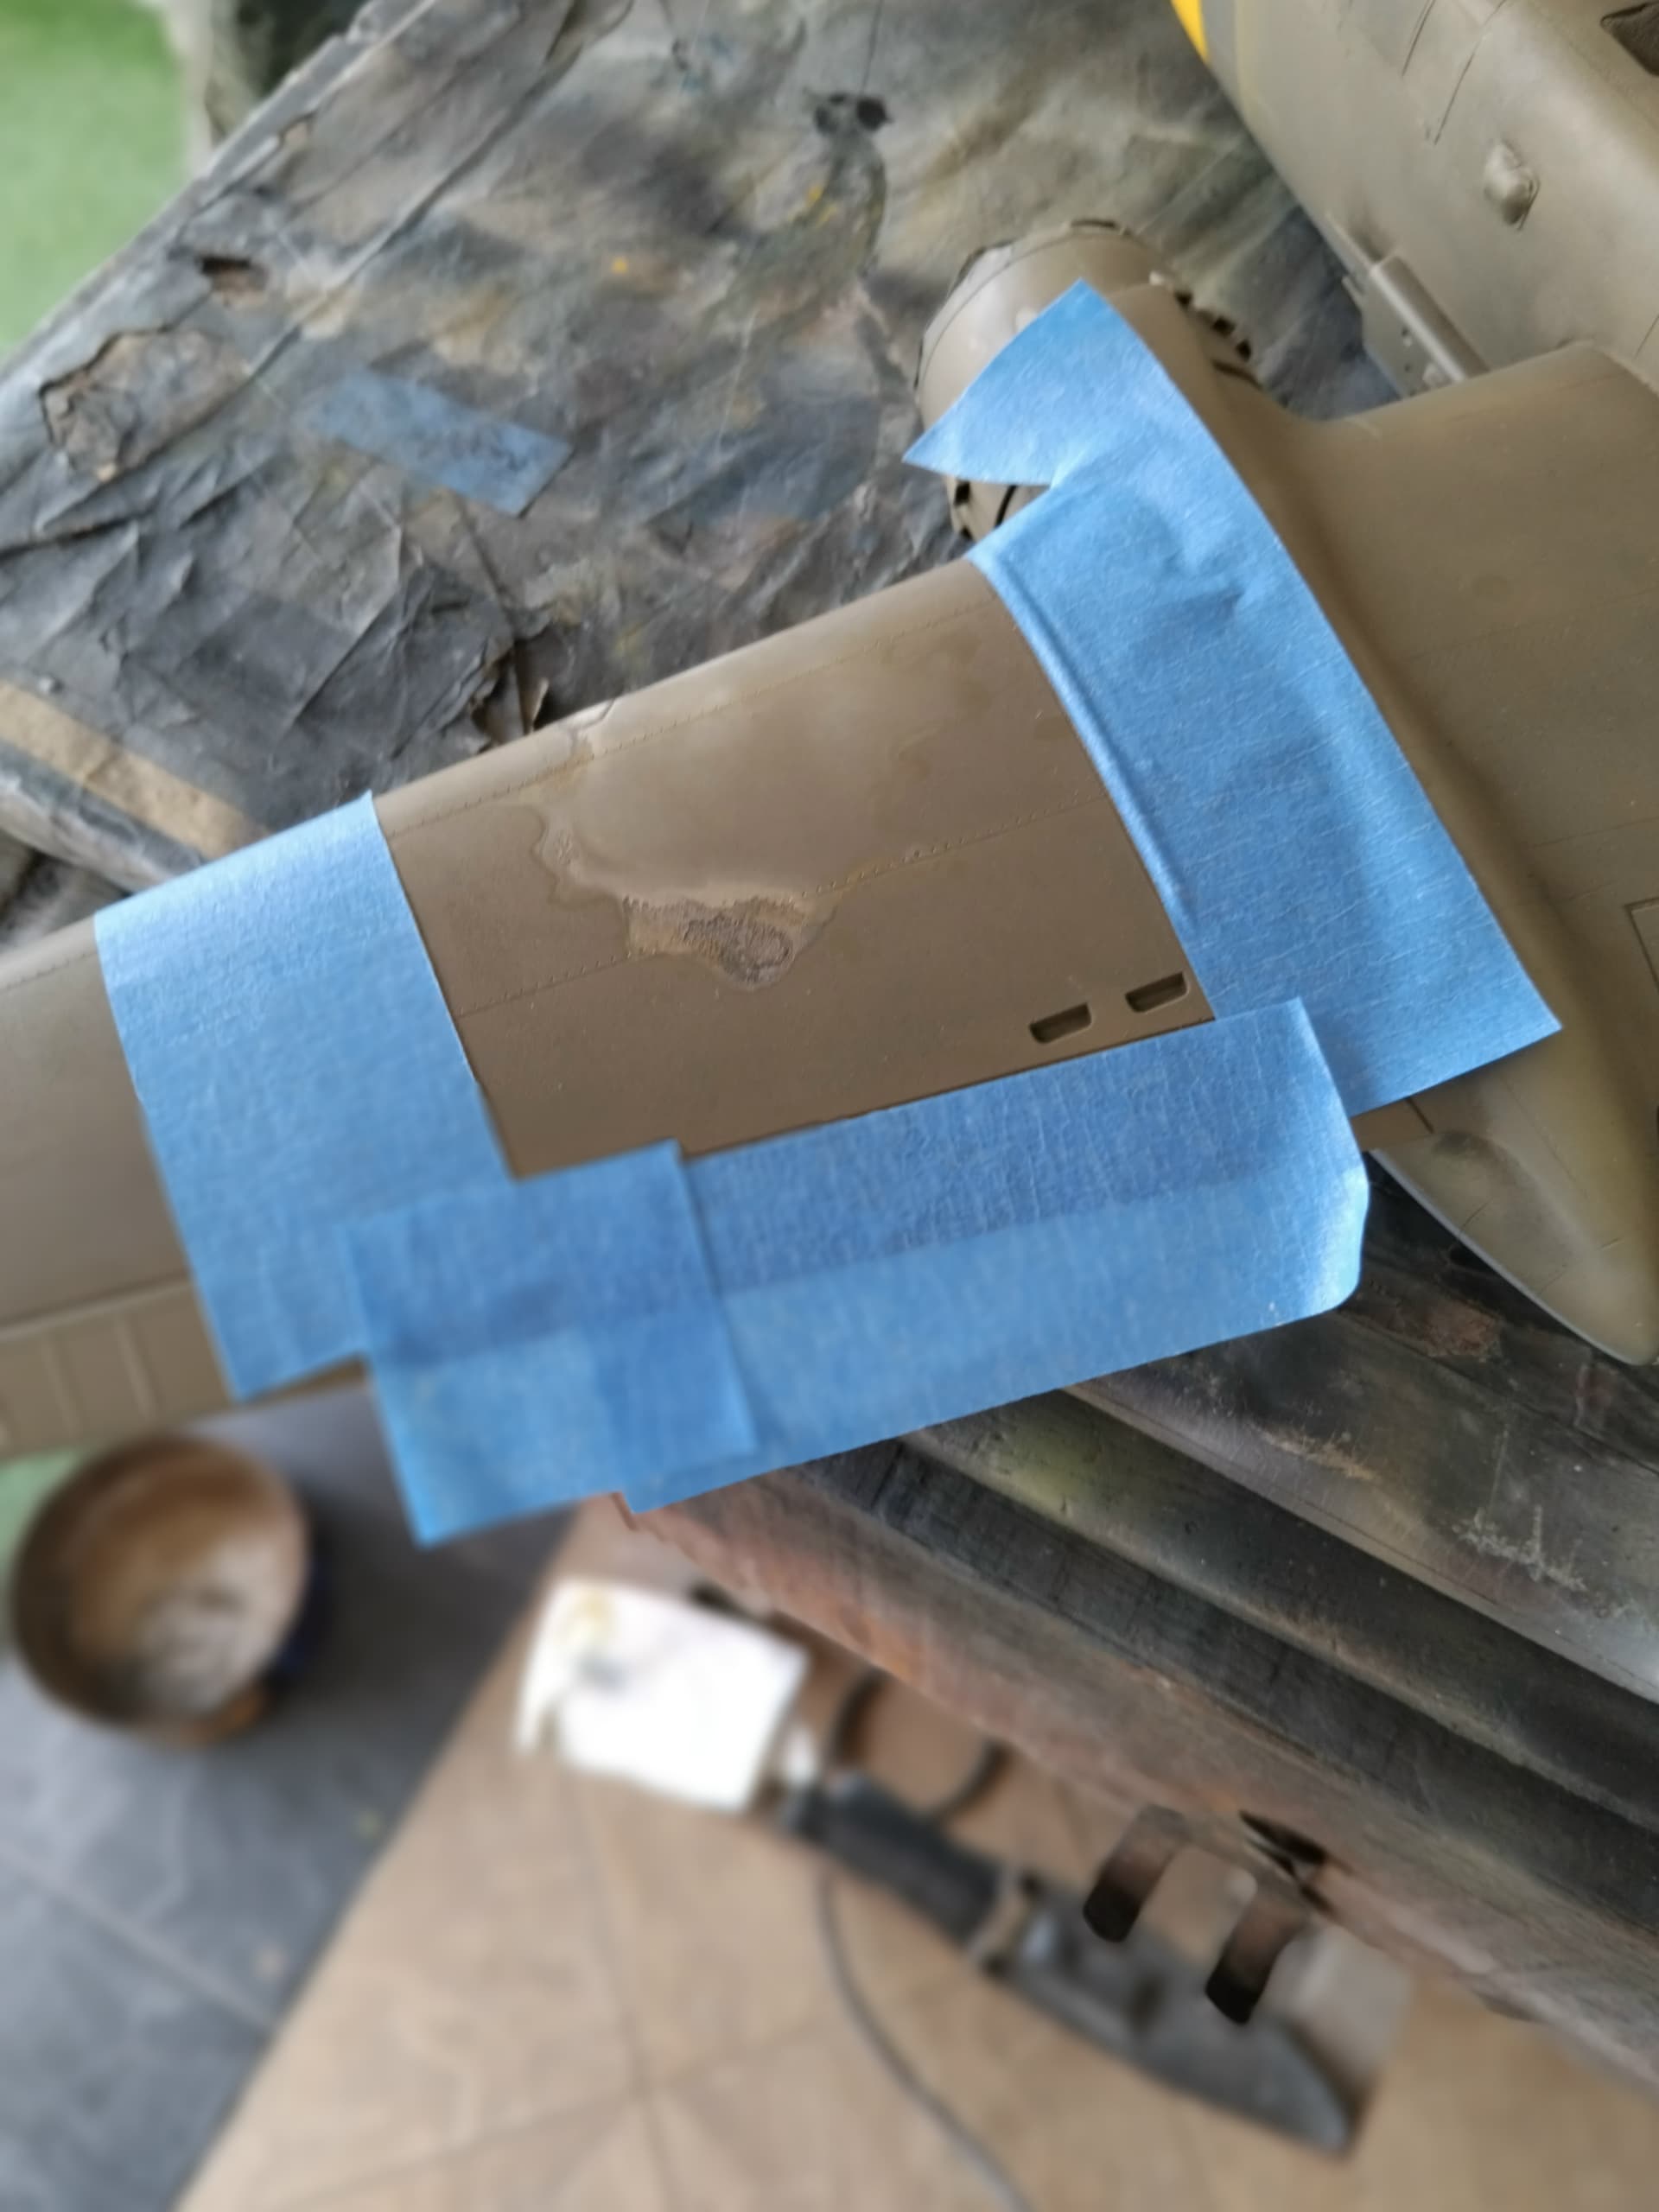
Painting of the B-25D commenced! This started off with a full priming using Mr. Surfacer 1500 black, and then checked for any missed seams and gaps. I found that the cockpit canopy wasn’t as good as I thought, and was filled with white glue, as were the other minor areas found. With this completed, the tail rudders were painted white, as were the topside control areas. The control areas were fabric covered and would fade at a different rate than the metal painted areas, since the underside wasn’t exposed to direct sunlight, nothing was done to differentiate the control surfaces there.
The tail rudders were covered using some blue masking tape and then, using the black base method, the underside was mottled with Tamiya neutral gray XF-53.
Then using thinned neutral gray (original 1:4 dil’n, diluted another 50% using leveling thinner (LT)) painting of the undersides was performed. Despite its looks, there is still some considerable real estate on this bird, so make sure that you prepare enough paint to avoid stopping to remix (ask me how I know).
With the undersides painted and allowed to dry, more masking was performed. With all this practice masking, I was a bit optimistic that I’d have very little rework when done. One can always hope!
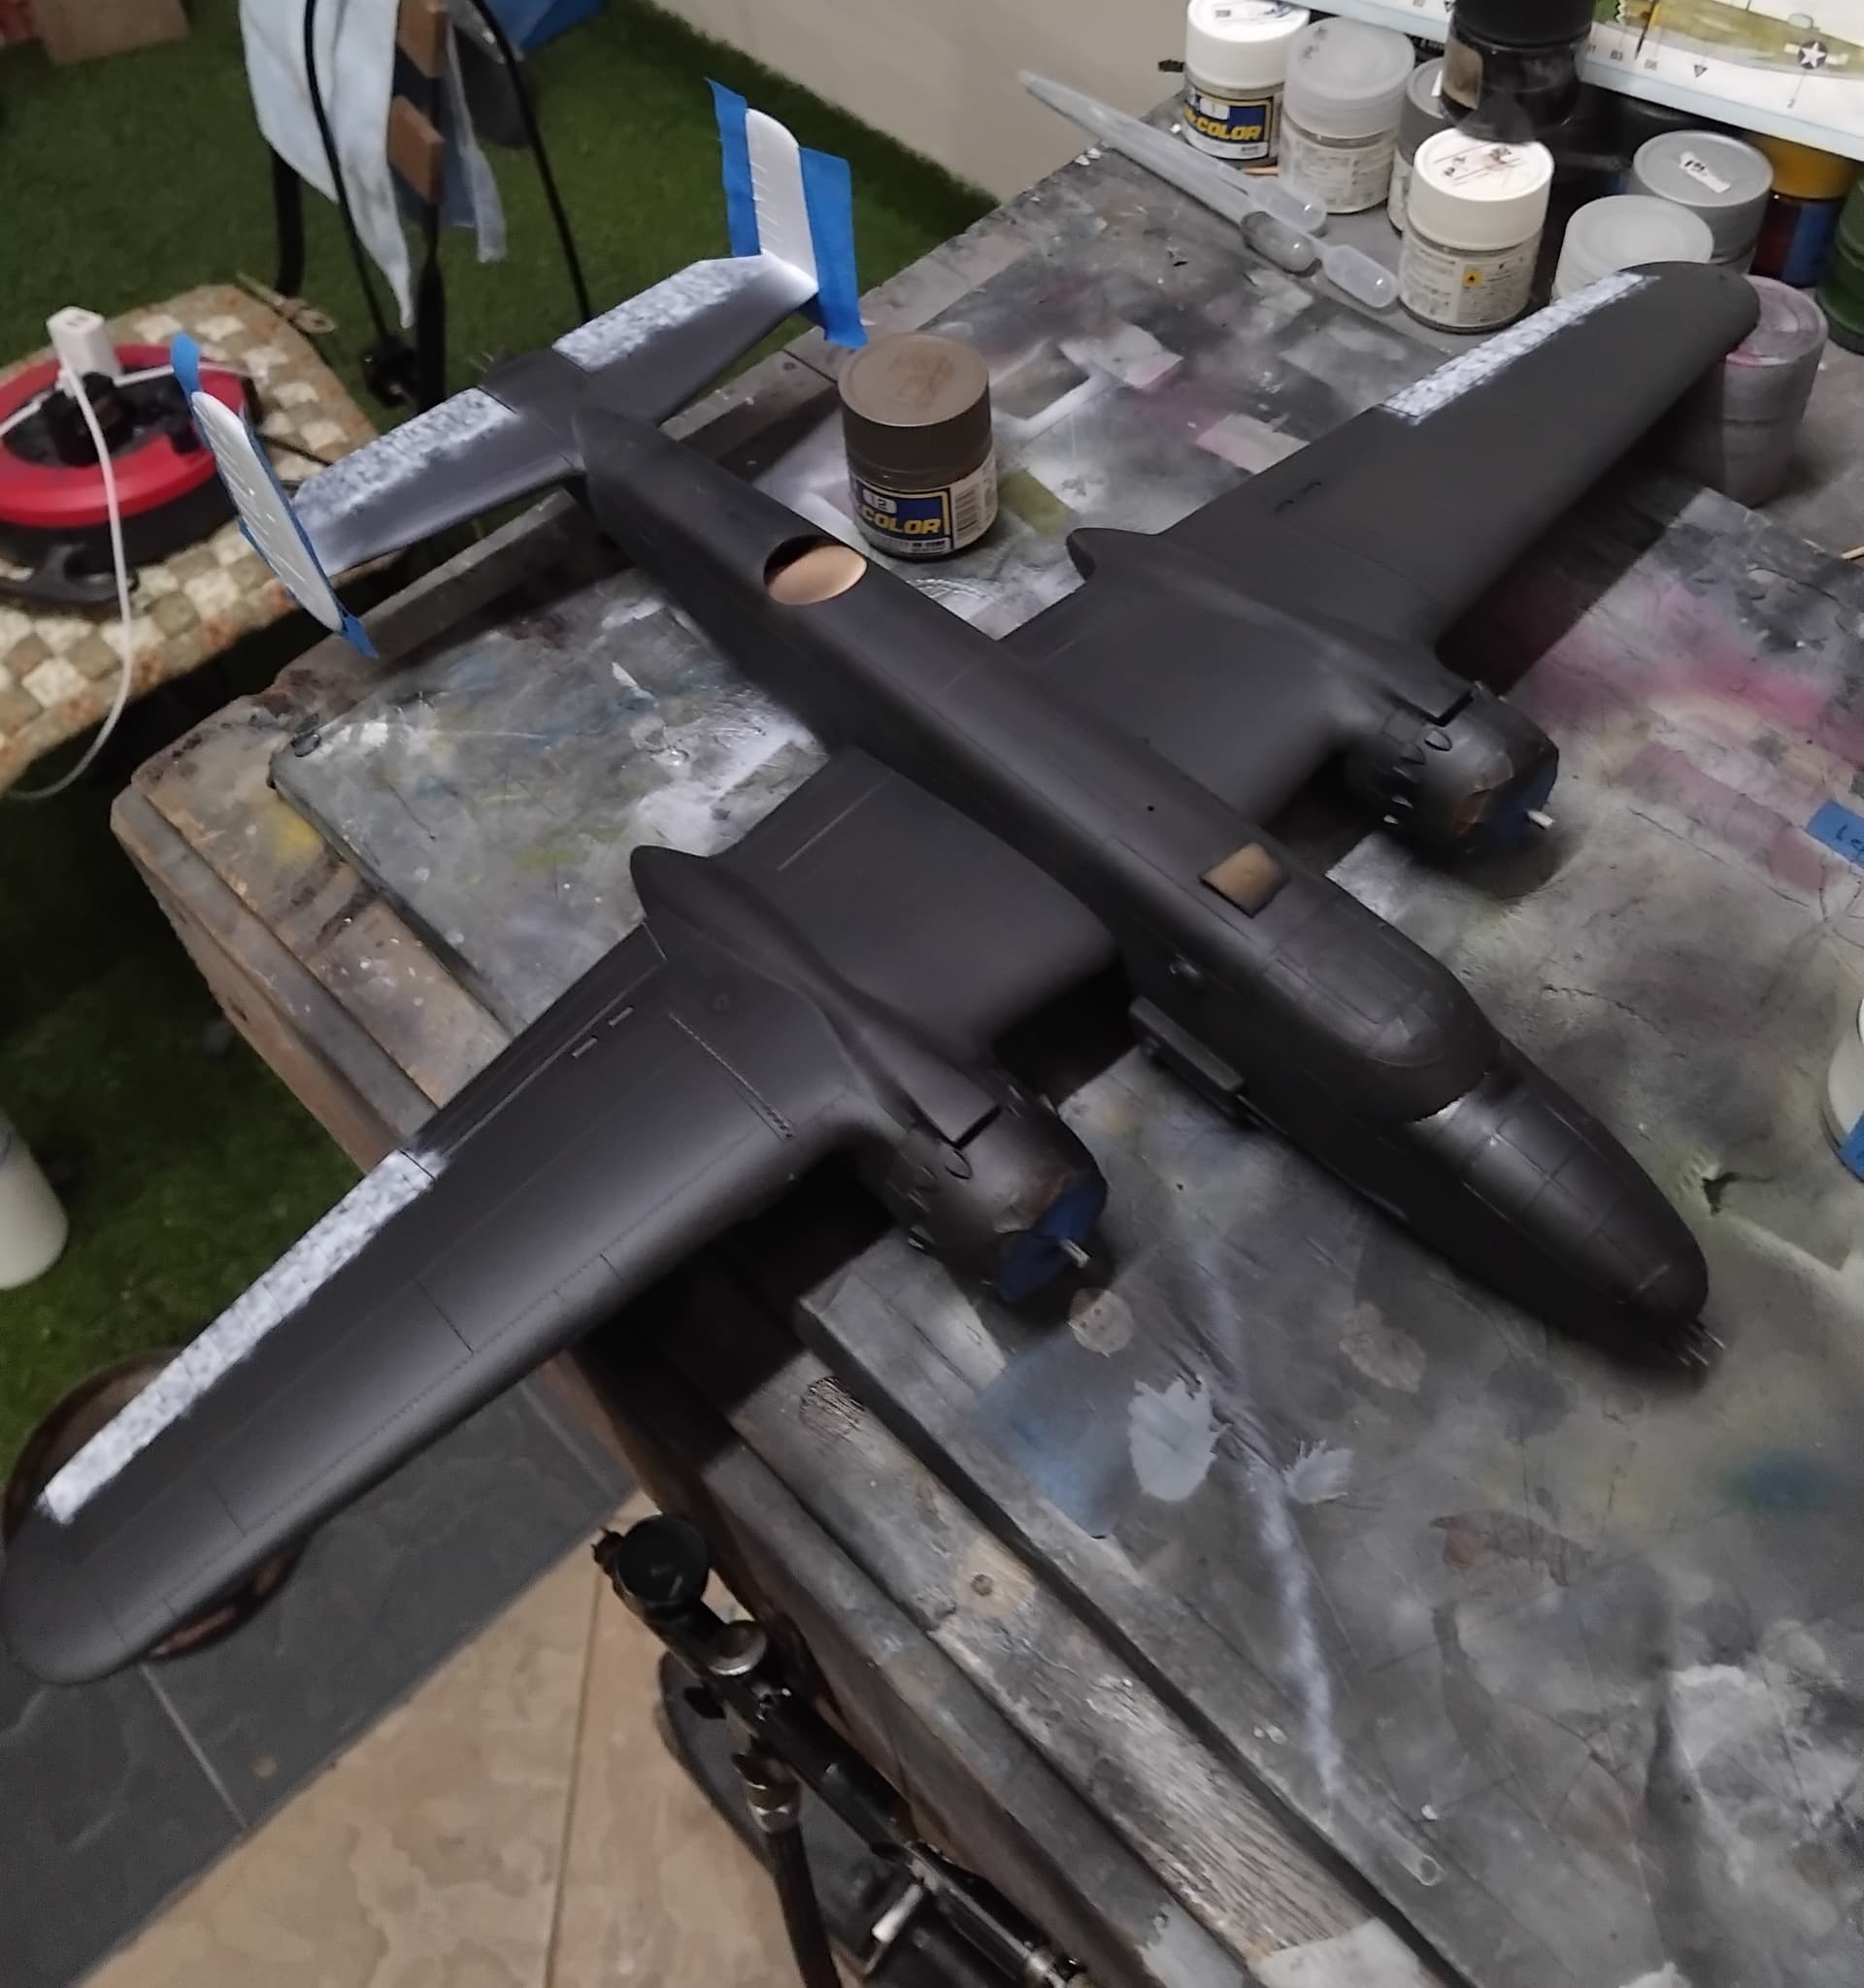
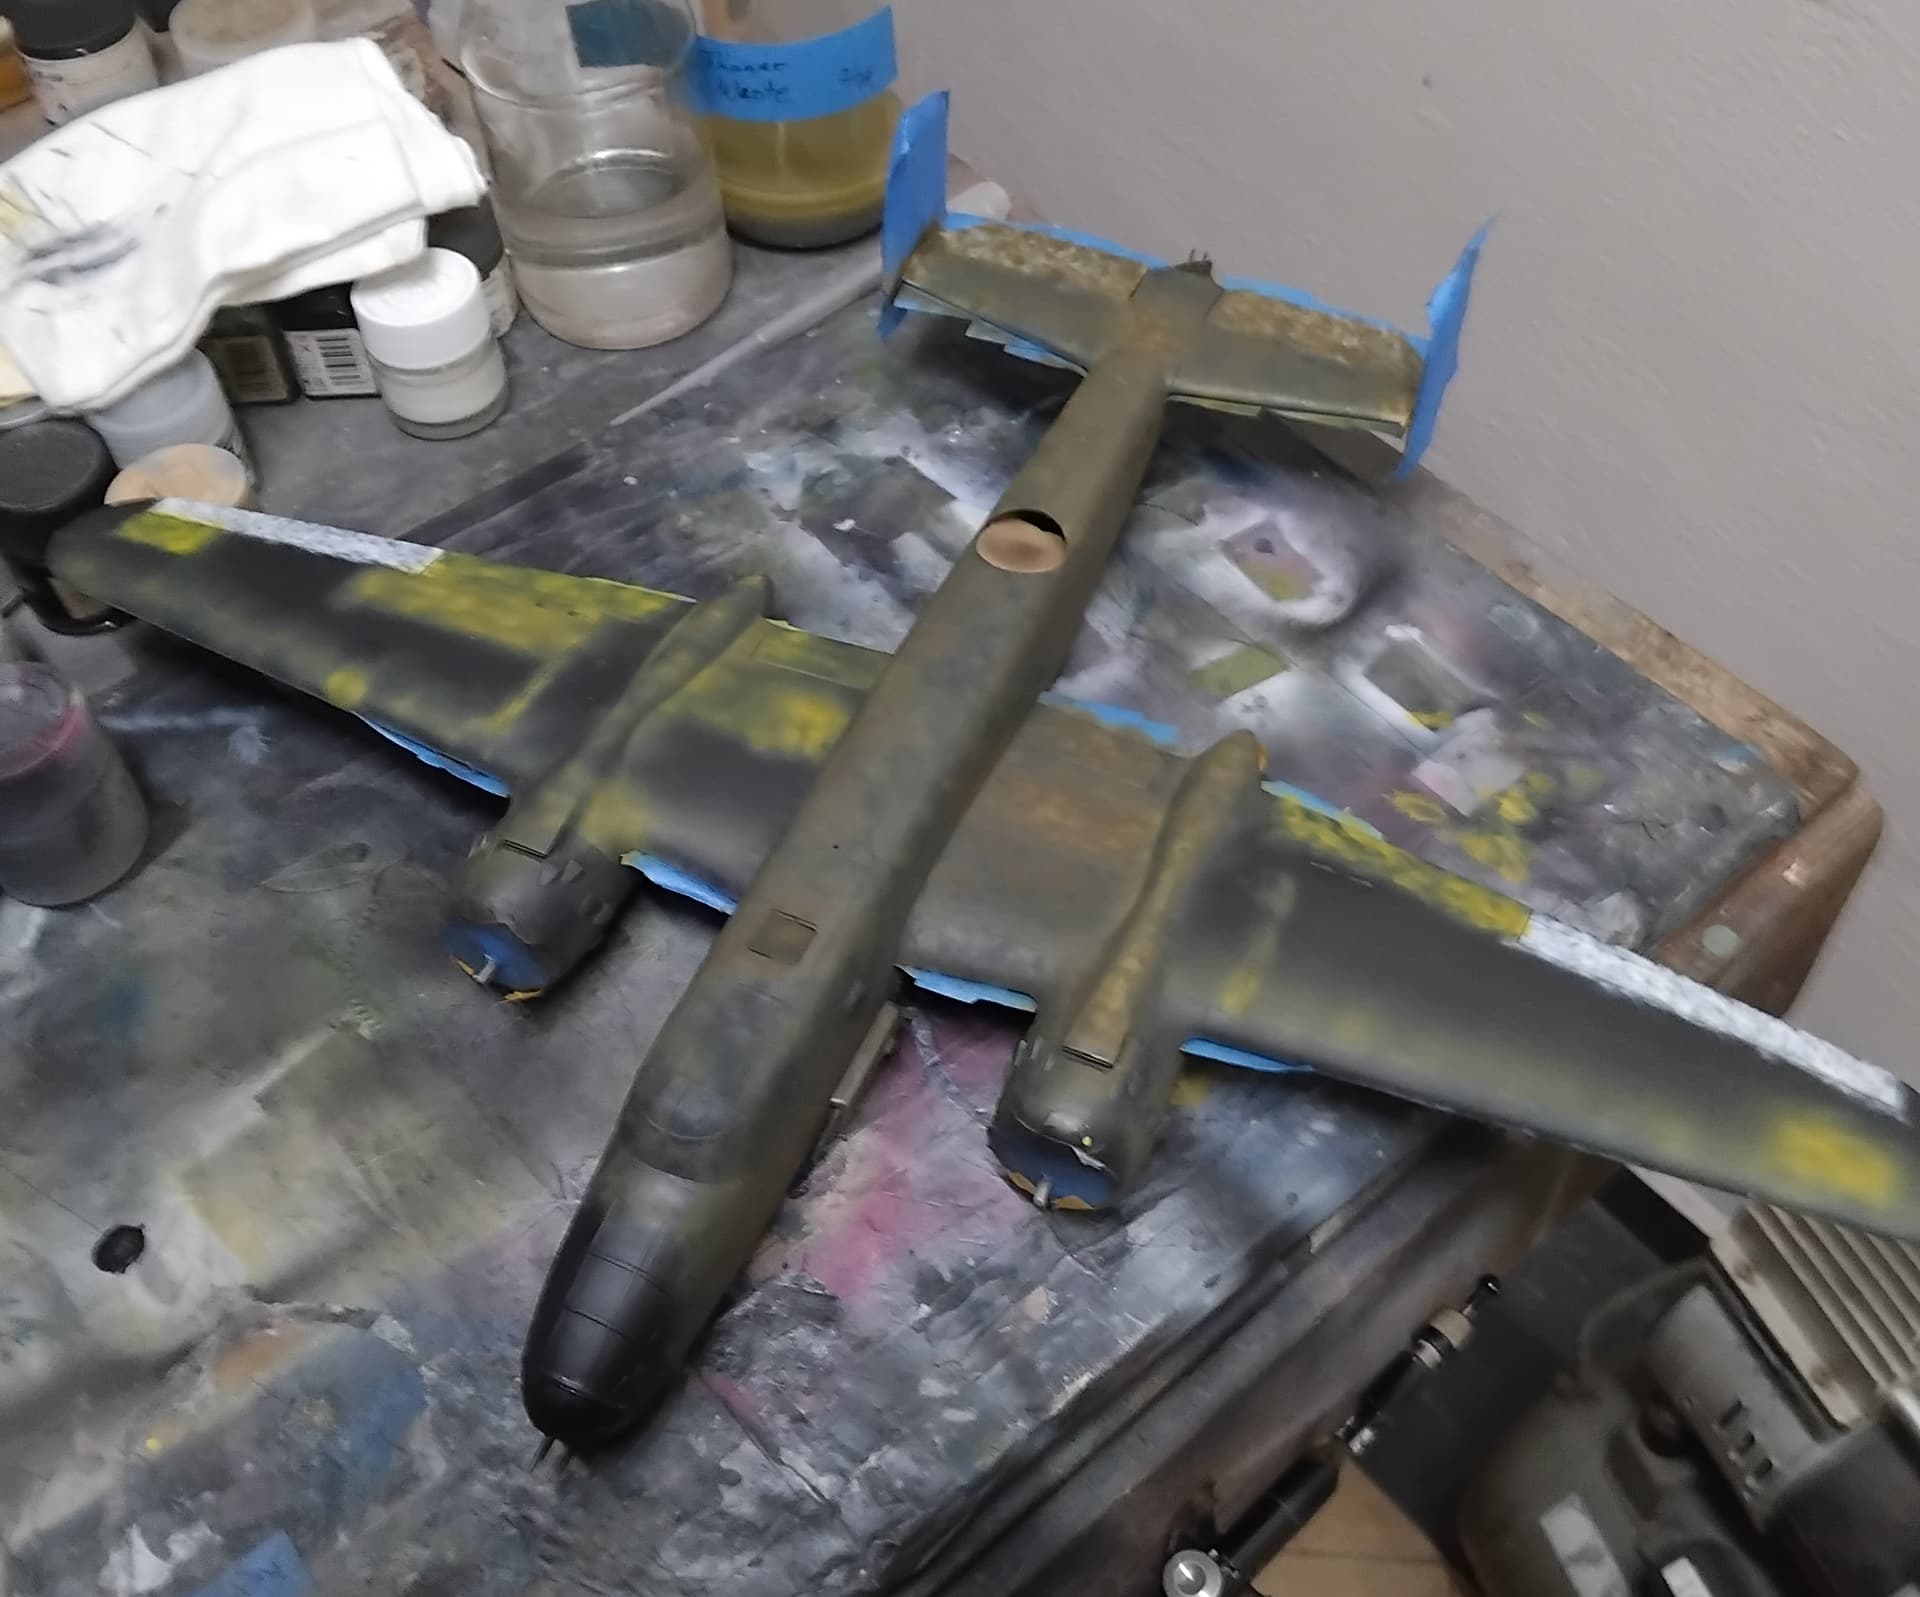
Feeling pretty good with the progress, it was time to move topside. Since this bird would spend most of its adult life outside in New Guinea, it would be very faded and heavily worn. So, I pre-weathered using Tamiya yellow XF-7 and MC white MC 1, to highlight various panels that would see more sun, and a little artistic license.
Next came some mottling using MC 12 Olive Drab lightened with some white (2 parts MC 12 + 1 part MC 1, diluted 1:4 with LT). While doing the dilutions, I took the opportunity to keep different mixes to have various shades of OD, from straight to 1:4 diluted with white.
As the painting process progressed, I felt that things were looking a bit too dark, also, my lightening of the control surfaces didn’t look quite right, so I gave them a dose of OD that was lightened more than what I’d be using for the rest of the bird. The control surfaces were taped off, and then I went about using some yellow to highlight areas of wear and sun exposure.
Next I played with some white to lighten out individual panels.
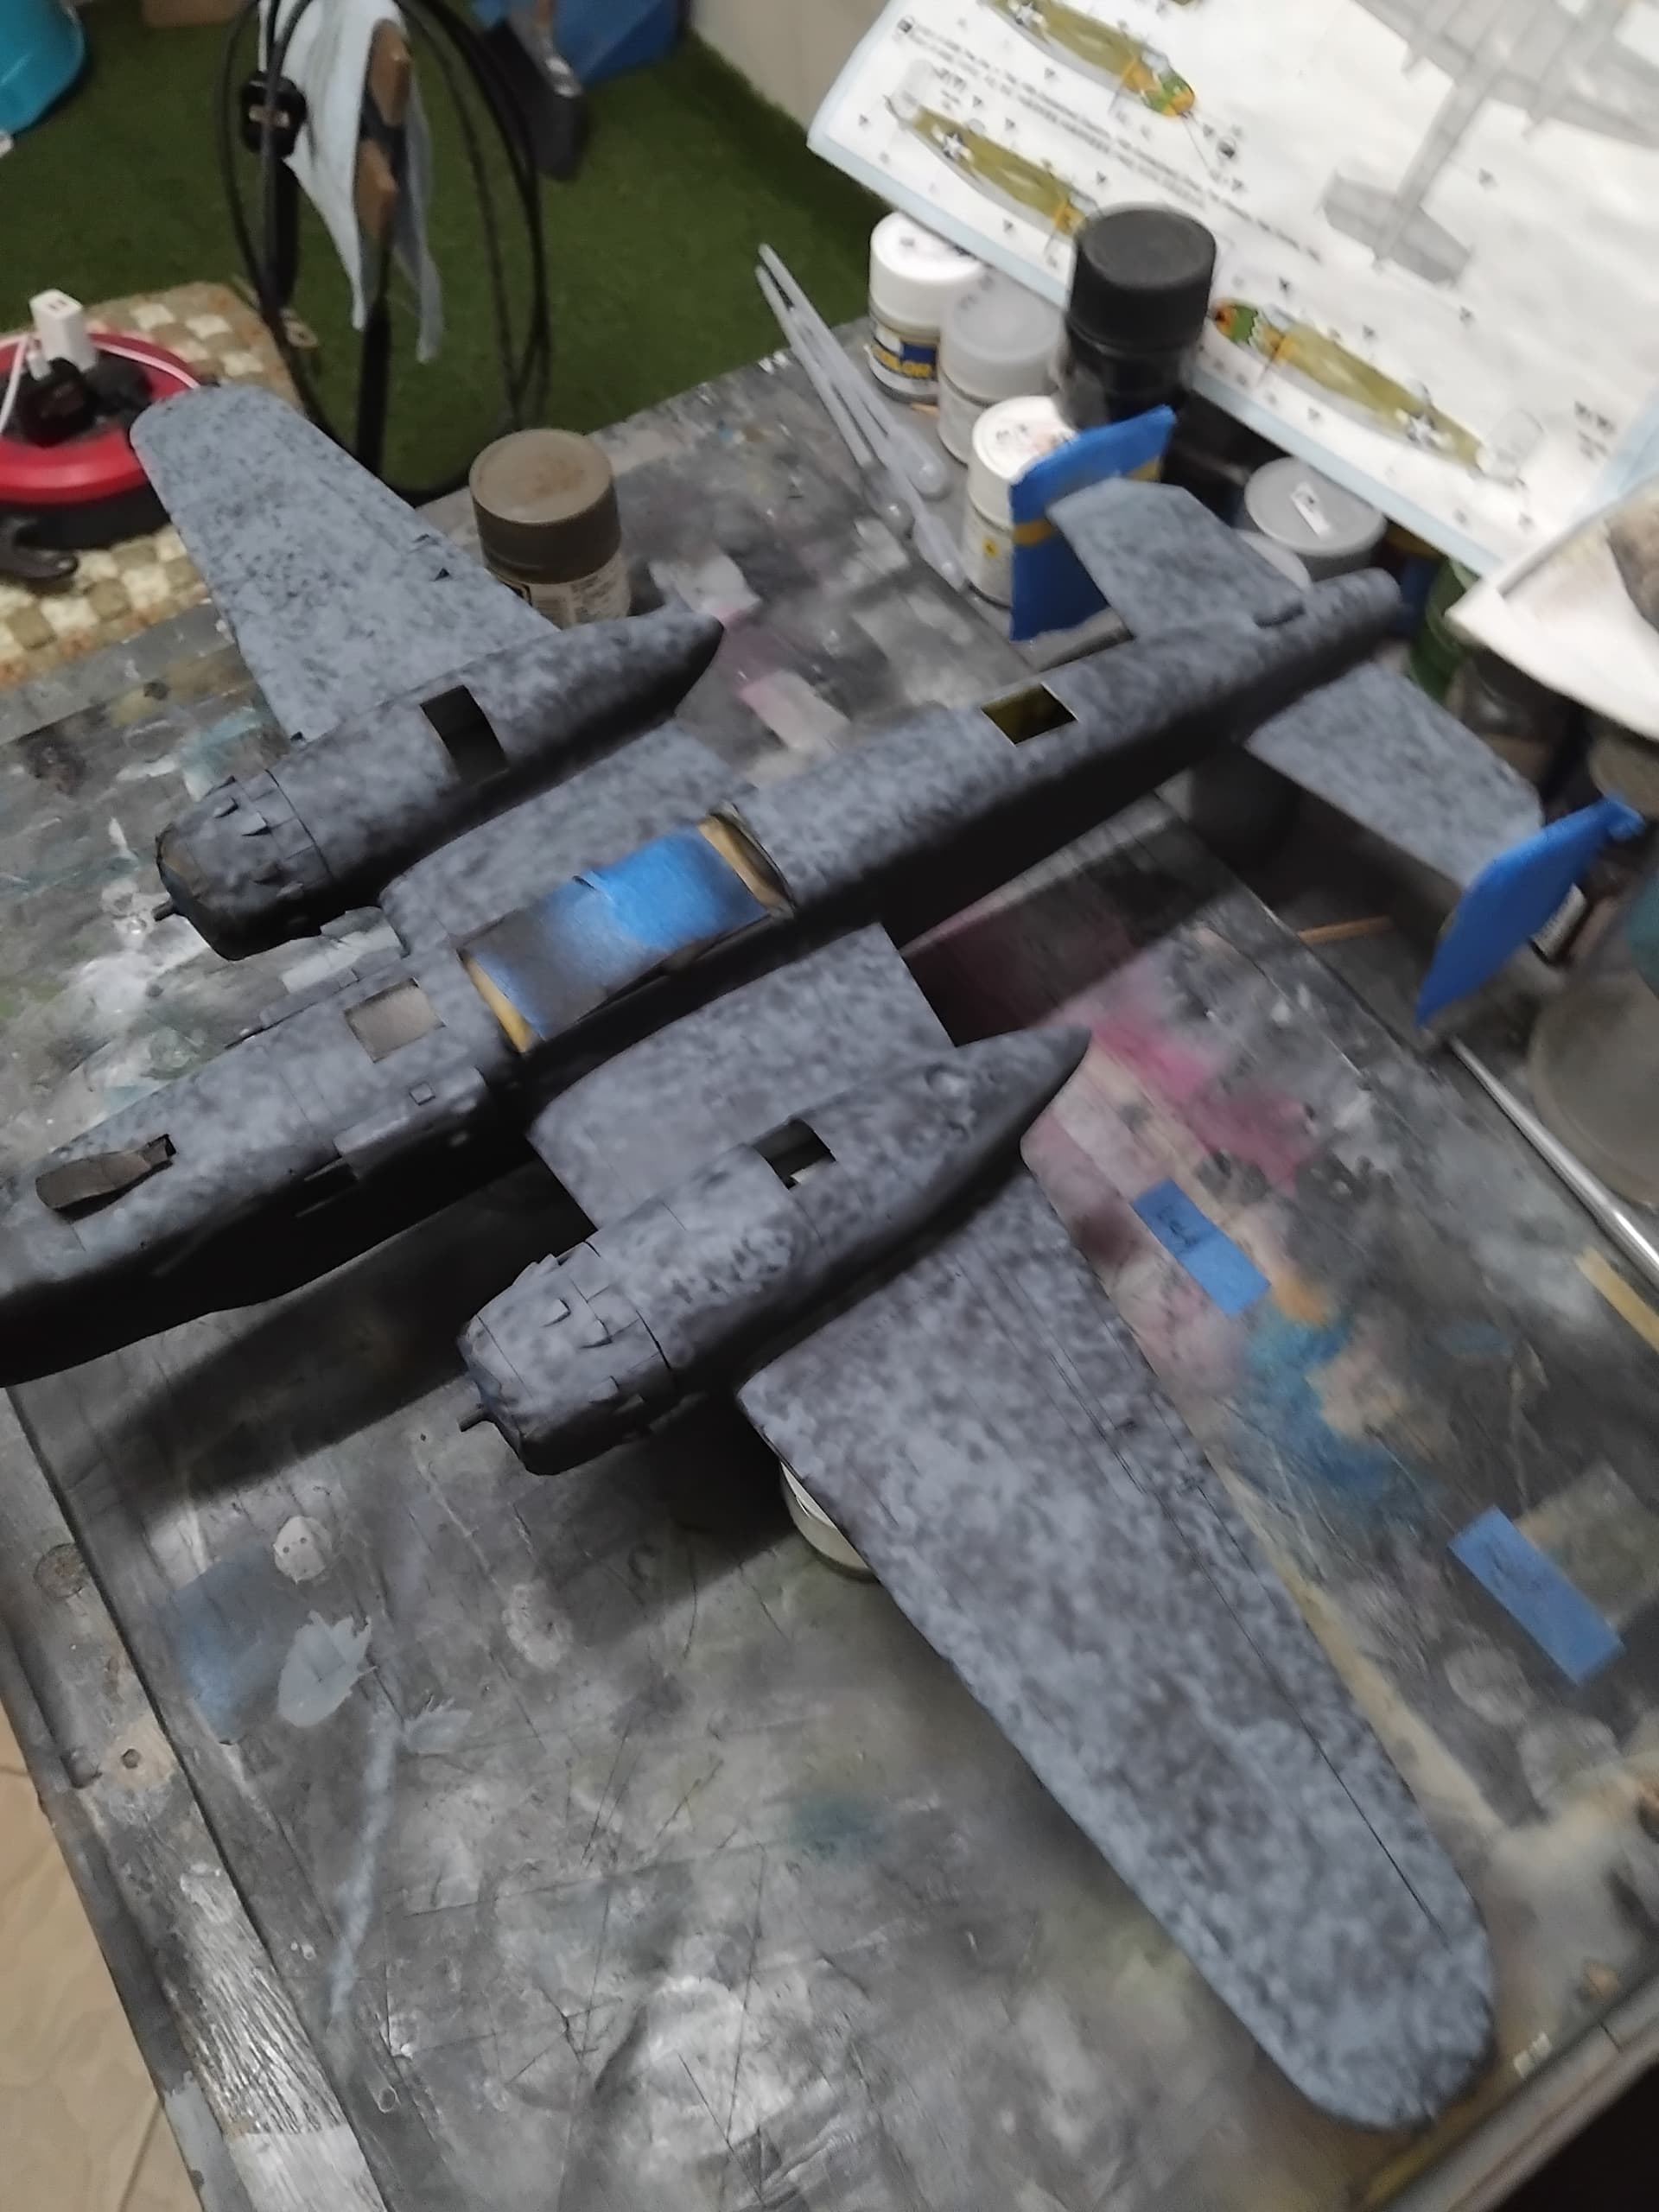
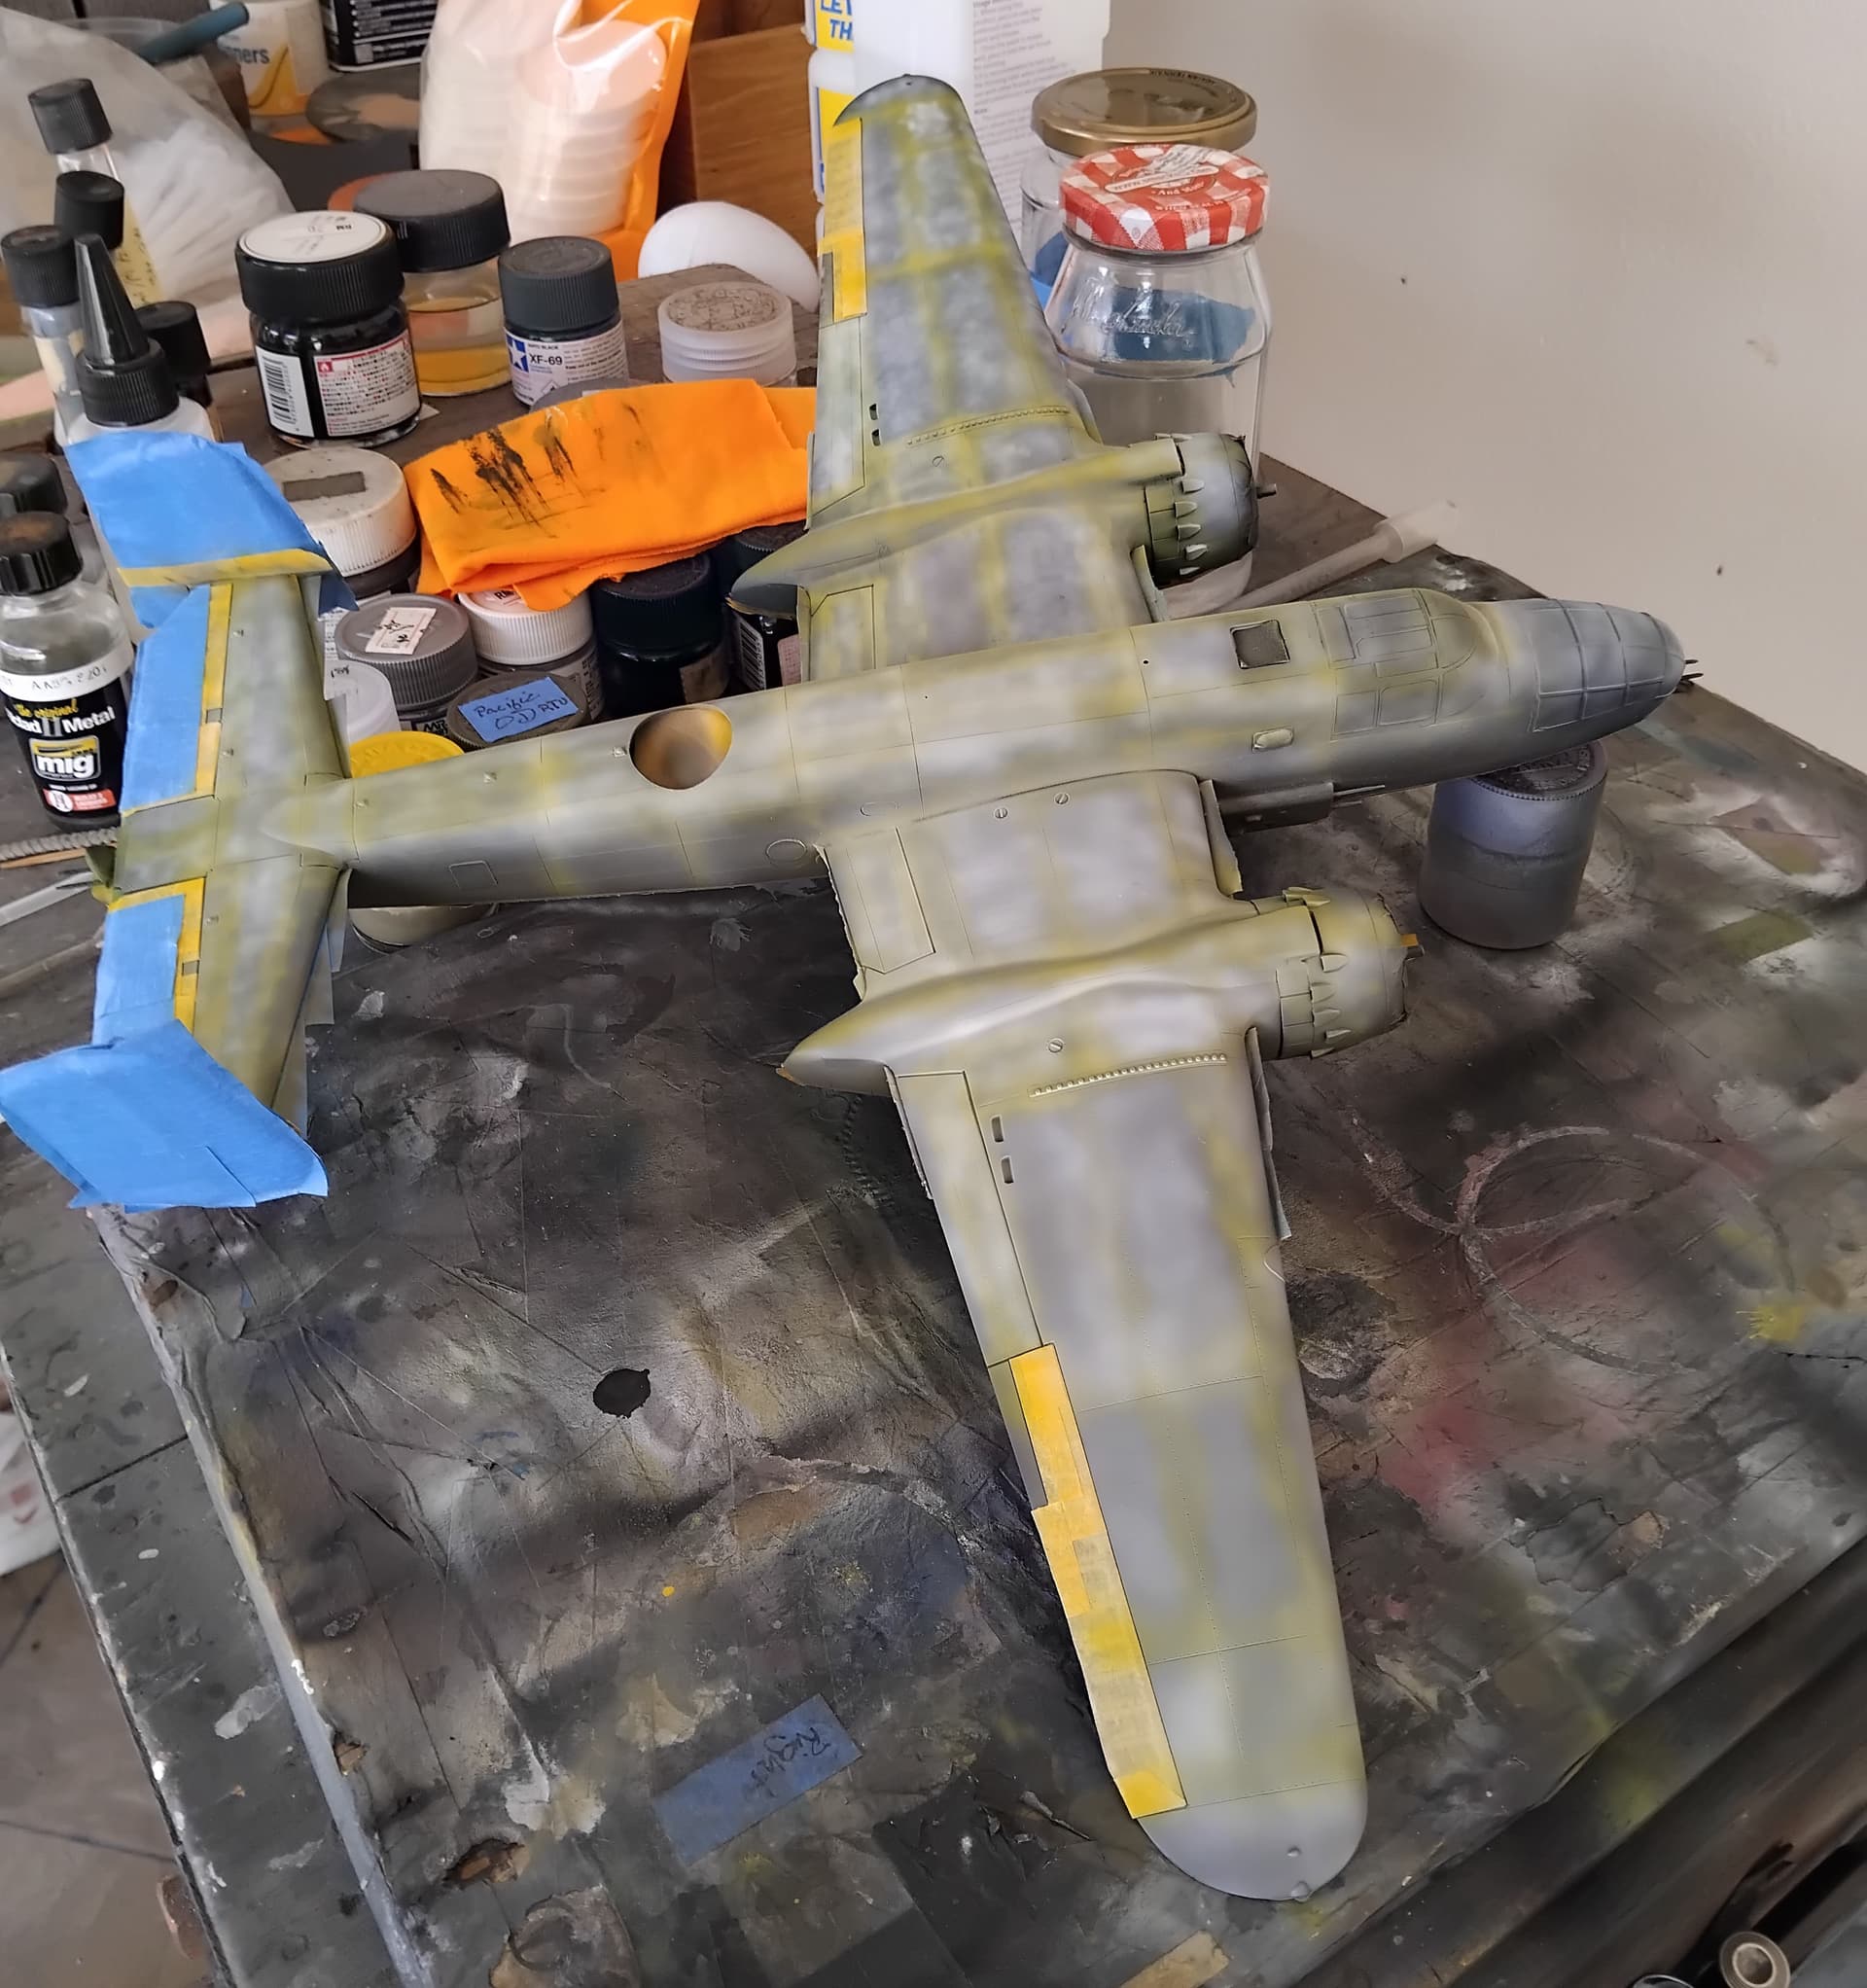
Then I went to town using a 50% diluted OD, of the original lightened 1:4 mix. Once this was done I masked off the front and painted it yellow for the parrot nose.
I was very pleased with the outcome! So happy was I that I didn’t move the bird off the bench before cleaning my airbrush. Which is when I discovered that my airbrush was upset with me, and decided to spit out some thinner. Of course, we all know where it went.
Many a modeler would freak out, grab a rag and try to wipe off the area to salvage the paint job. In my experience, DON’T! Call it a day, let the mistake dry thoroughly and assess the damage later. Here’s why, first the wiping will damage any work more, second the emotional state of the modeler can lead to far worse things than a thinner oops.
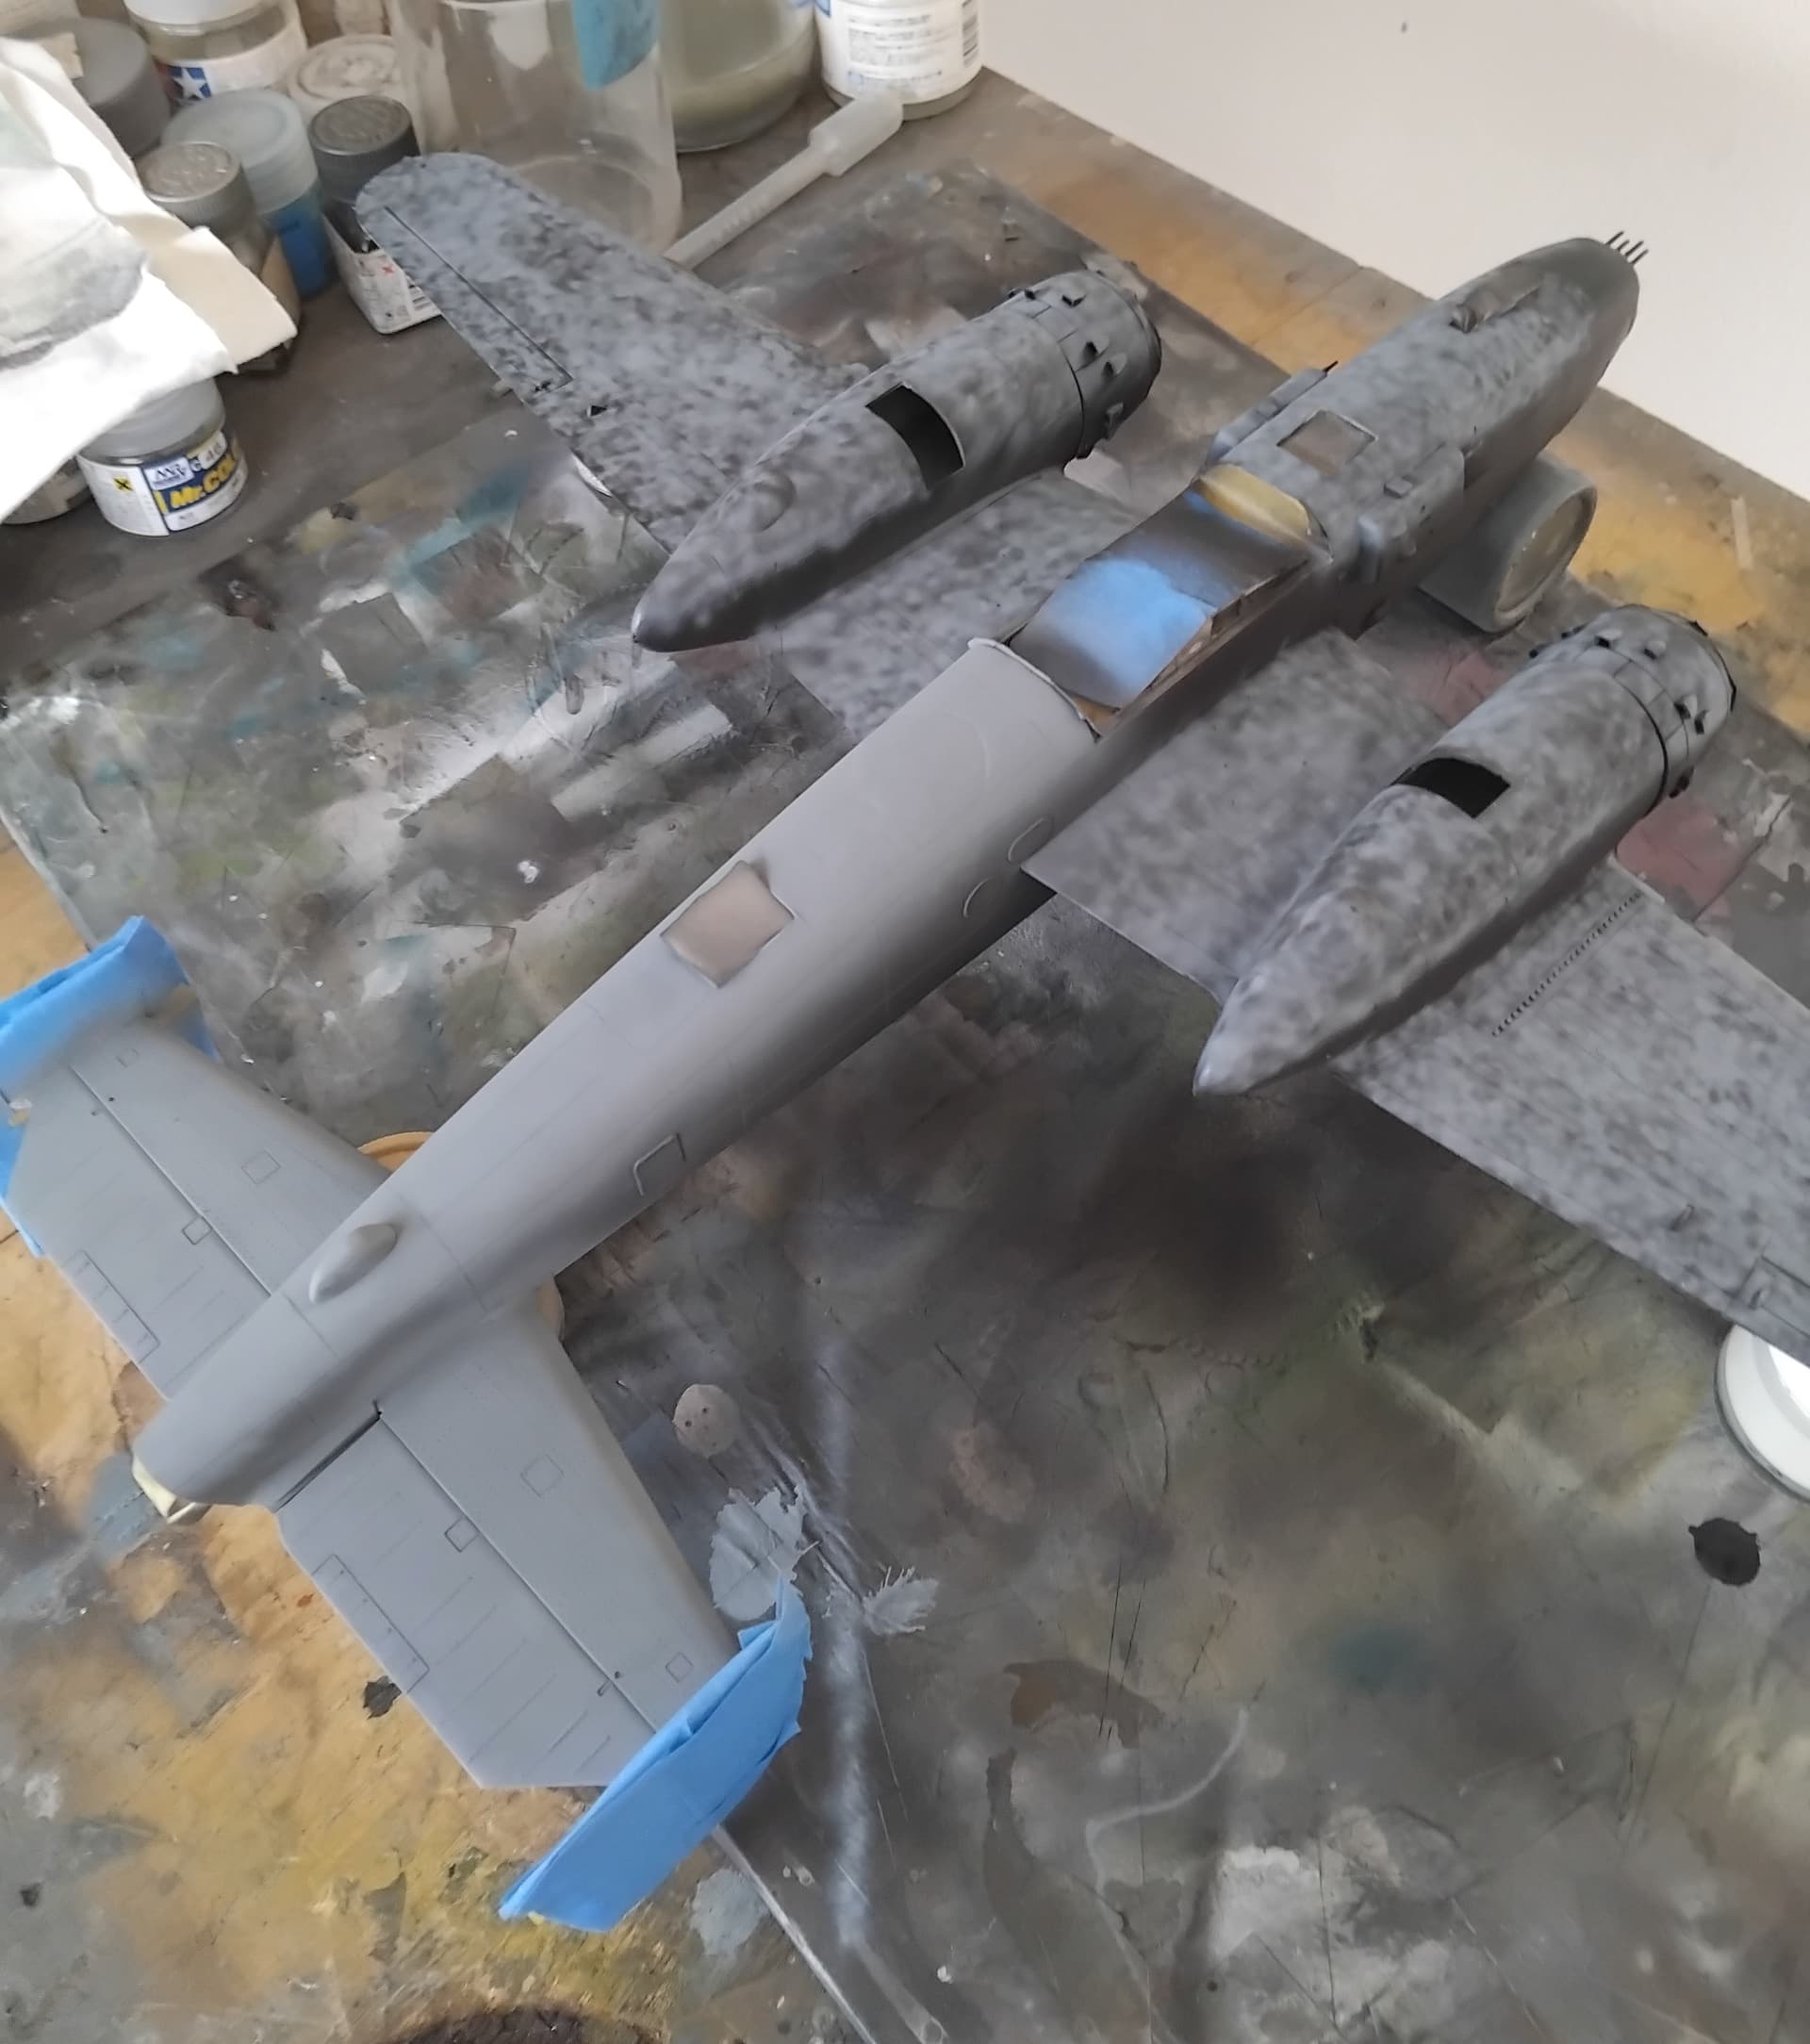
After the area dried, I was able to ascertain that the area wasn’t as bad as I thought. Some sanding would be involved and then a repaint of the affected area would most likely do the trick. The area was cordoned off using some masking tape, and then I could sand the area, using 1500 grit sandpaper and a very light touch. Things were smoothed out and ready for a “touch up” of paint trying my best to match the previous work.
My first pass wasn’t so good, so I removed the tape and proceeded to blend it into the rest of the paint job.
After playing with white and very light yellows, and the OD, things came together. Once again feeling pretty good about things I carefully moved the model to a secure place and then proceeded to give the airbrush all the love it felt it needed (complete break down and cleaning), it seemed quite happy.
Next up, some clear coats and decals, which are by Cartograph, so I don’t expect any issues, although the parrot nose art does have me a little concerned.
Till next time stay safe, wash your hands and have fun!
Nice work! Nice recovery.
Nice recovery! I love the paint job. I have the exact same kit in my stash, yours has turned out lovely so far!
Note that academy kit is the Accurate Miniatures molds! (Sorry misread your previous post, looks like you already knew this!)
Beautiful job on the paint job and good recovery. This will be a stunning model when finished.
Looking forward to see more ![]()
Hi Everyone,
Hey guys, thanks for the nice comments! I was beginning to think I was the only one here, ha!
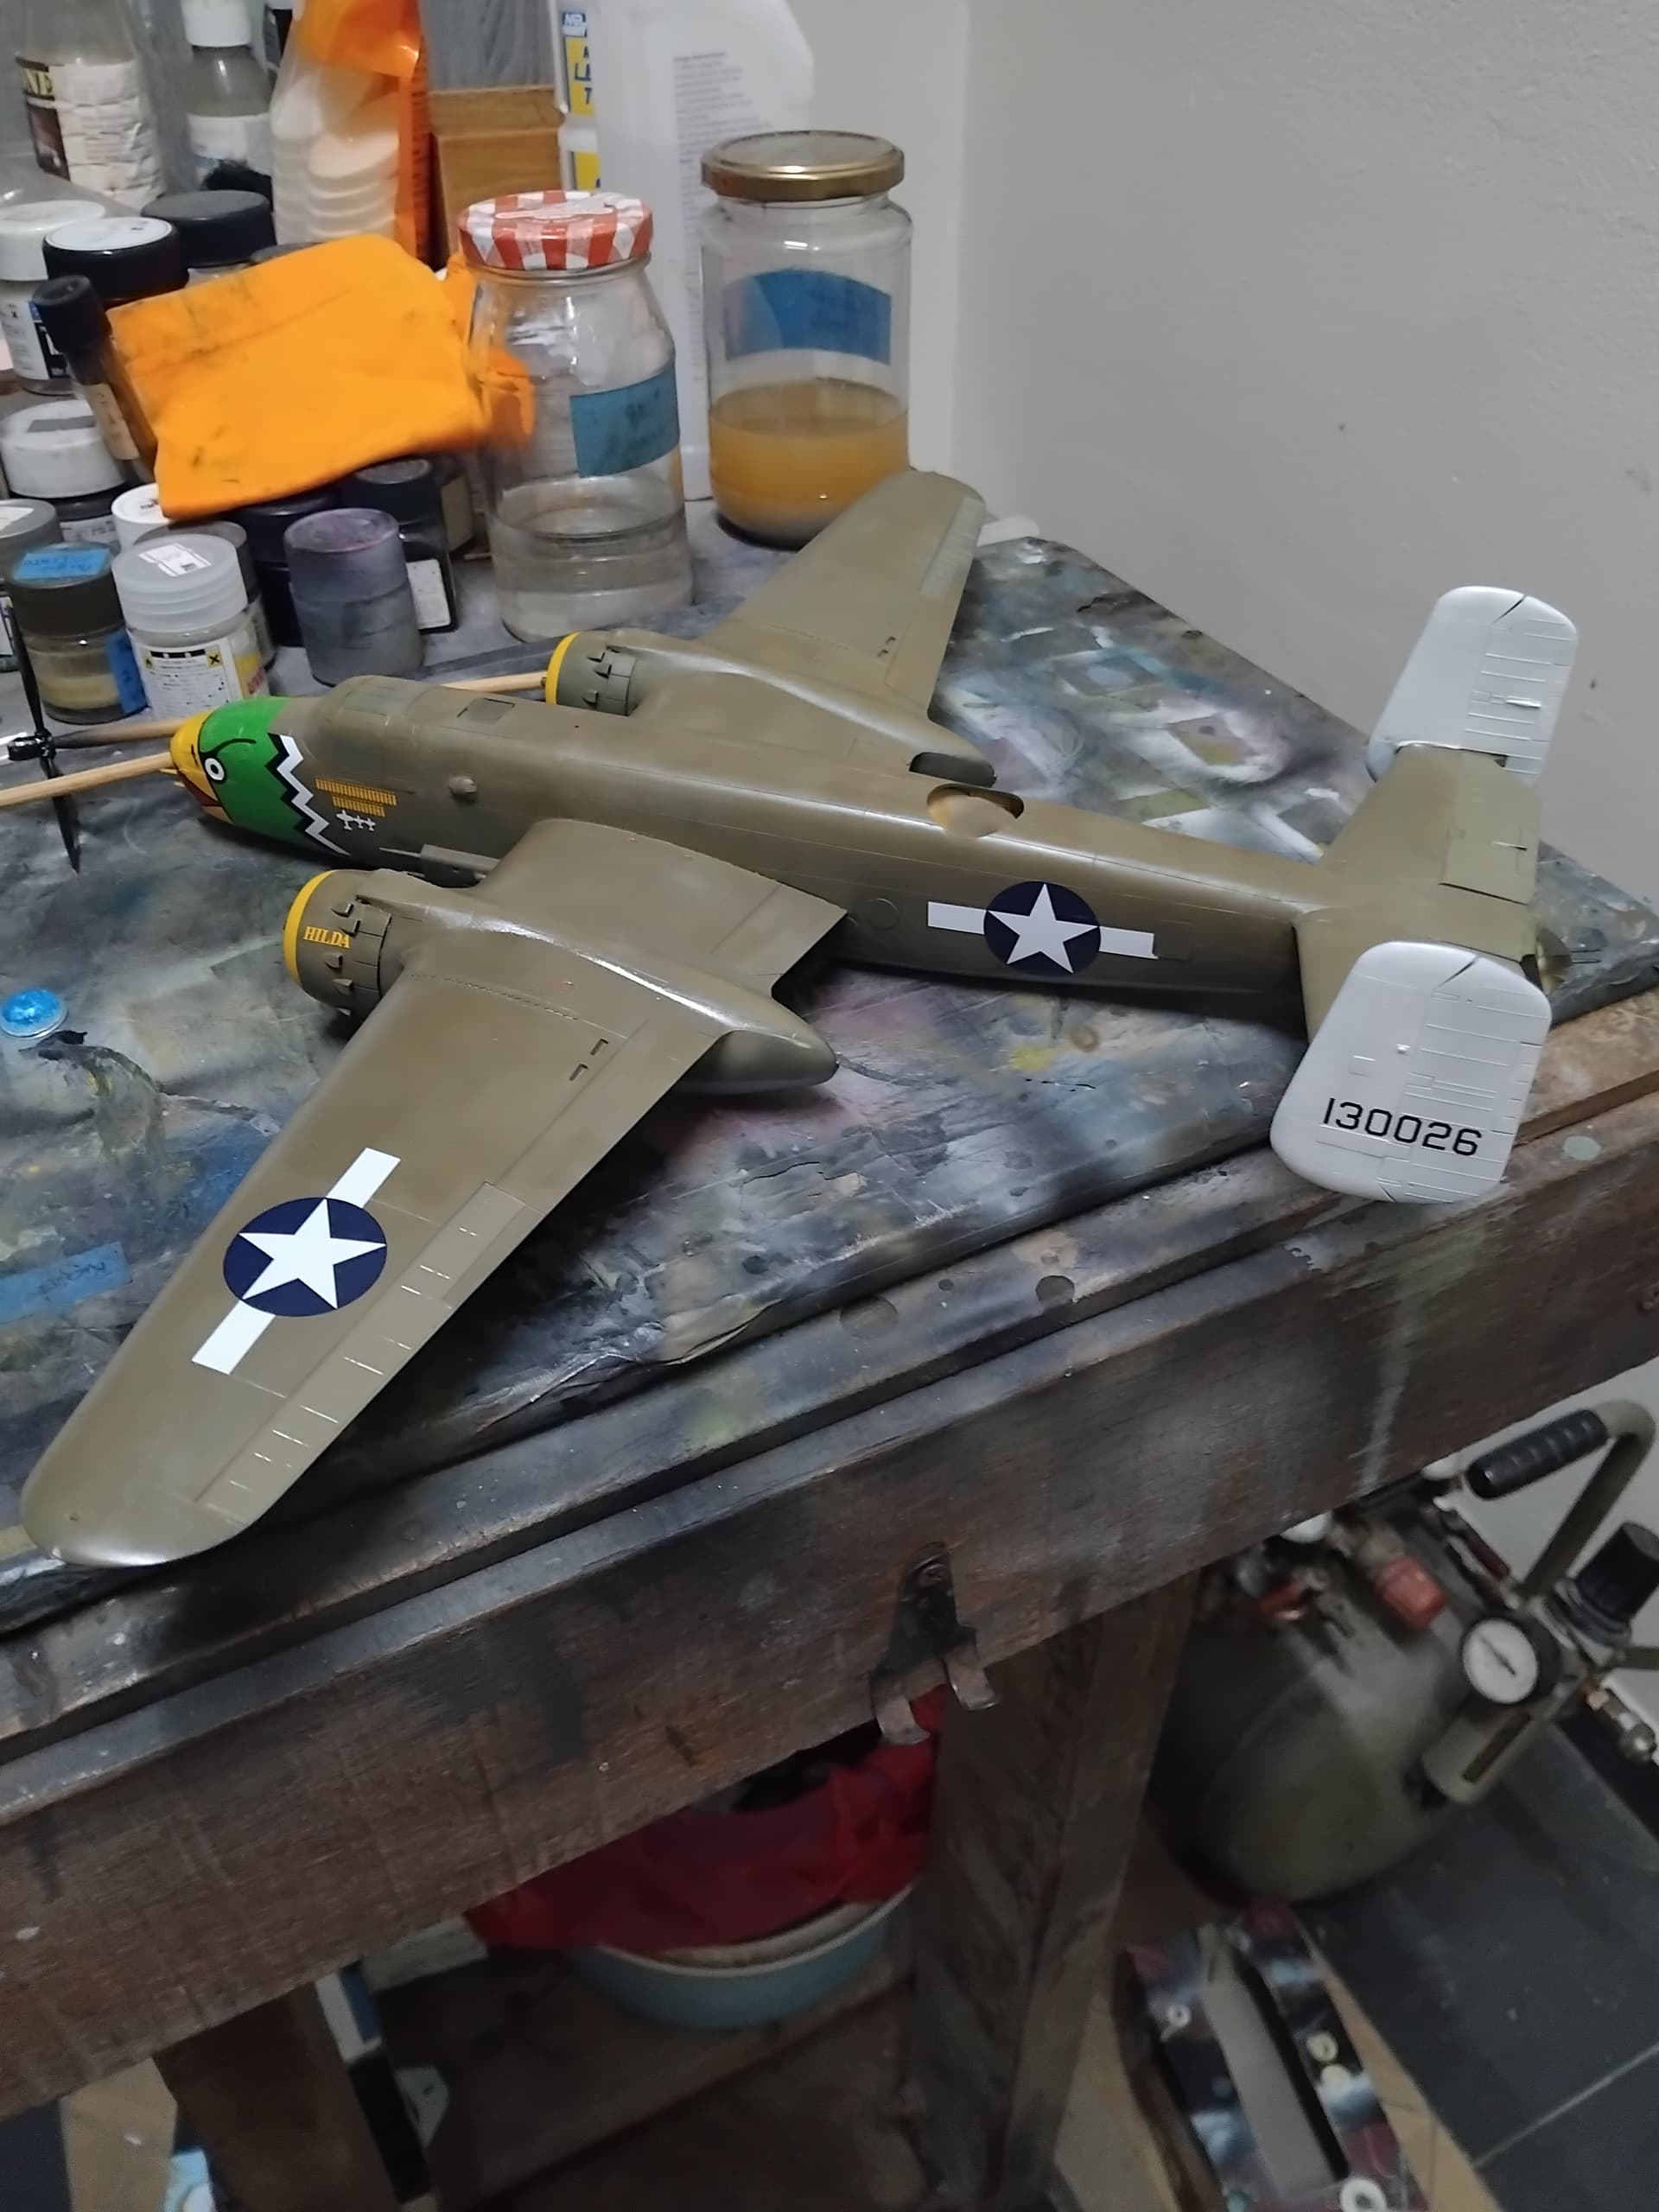
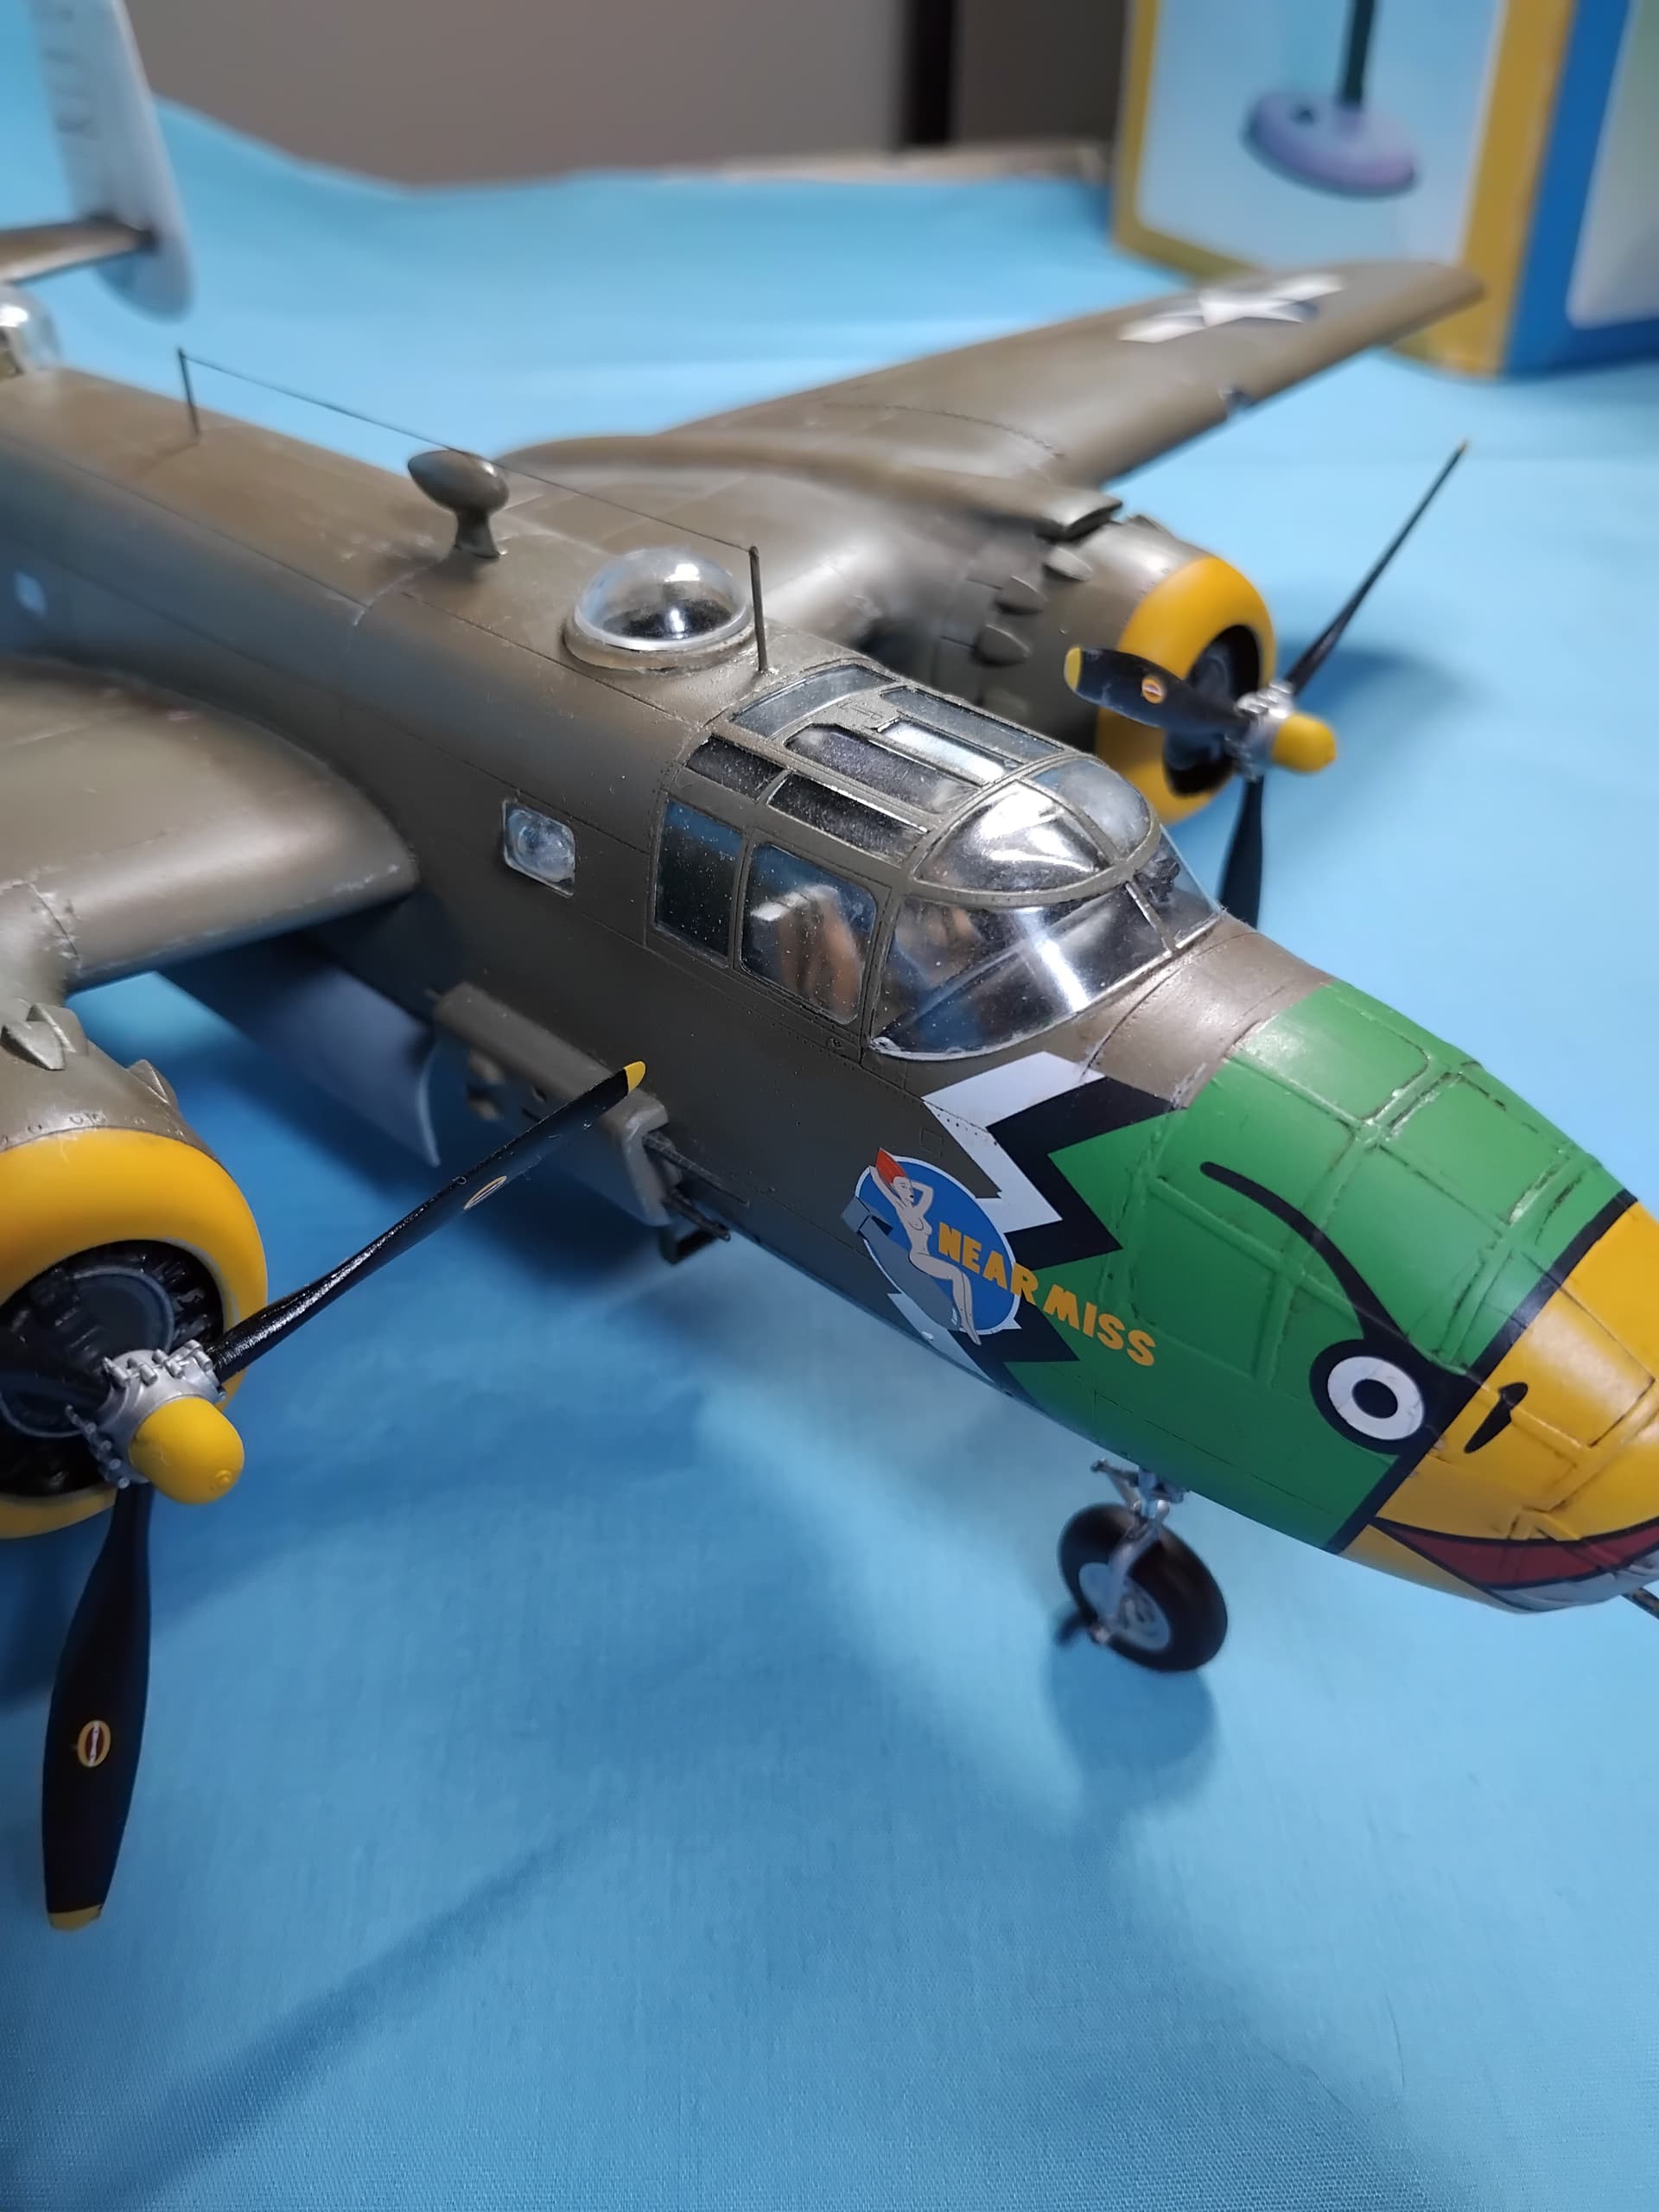
I got the decals on, and the Cartograph decals didn’t disappoint. All but three were textbook decaling, the three that were a bit of an issue were of course the parrot head up front. Word to the wise, double check for tape lines! I missed the line when I painted the front end yellow, and these decals snuggled right down around it. Oh well. With a bit of fiddling the green portion of the parrot head laid down, though I was a bit concerned that the mating point on top would leave a space, fortunately I was wrong, I really like these decals. They all settled down nicely with an application of Mr. Softener, though the parrot head did need about three to four applications. I then painted the guns and am in the process of getting all the fiddly bits in order. I believe the end game approaches!
Till next time, stay safe, wash your hands and have lots of fun!
Well, If I get some time at some point, I would love to join up I have 3 in the stash but it may be a while.
watching with interest.
Regards
If you get some spare time, that’s cool! Just pick one, they do tend to take a bit of time.!
Hi Everyone,
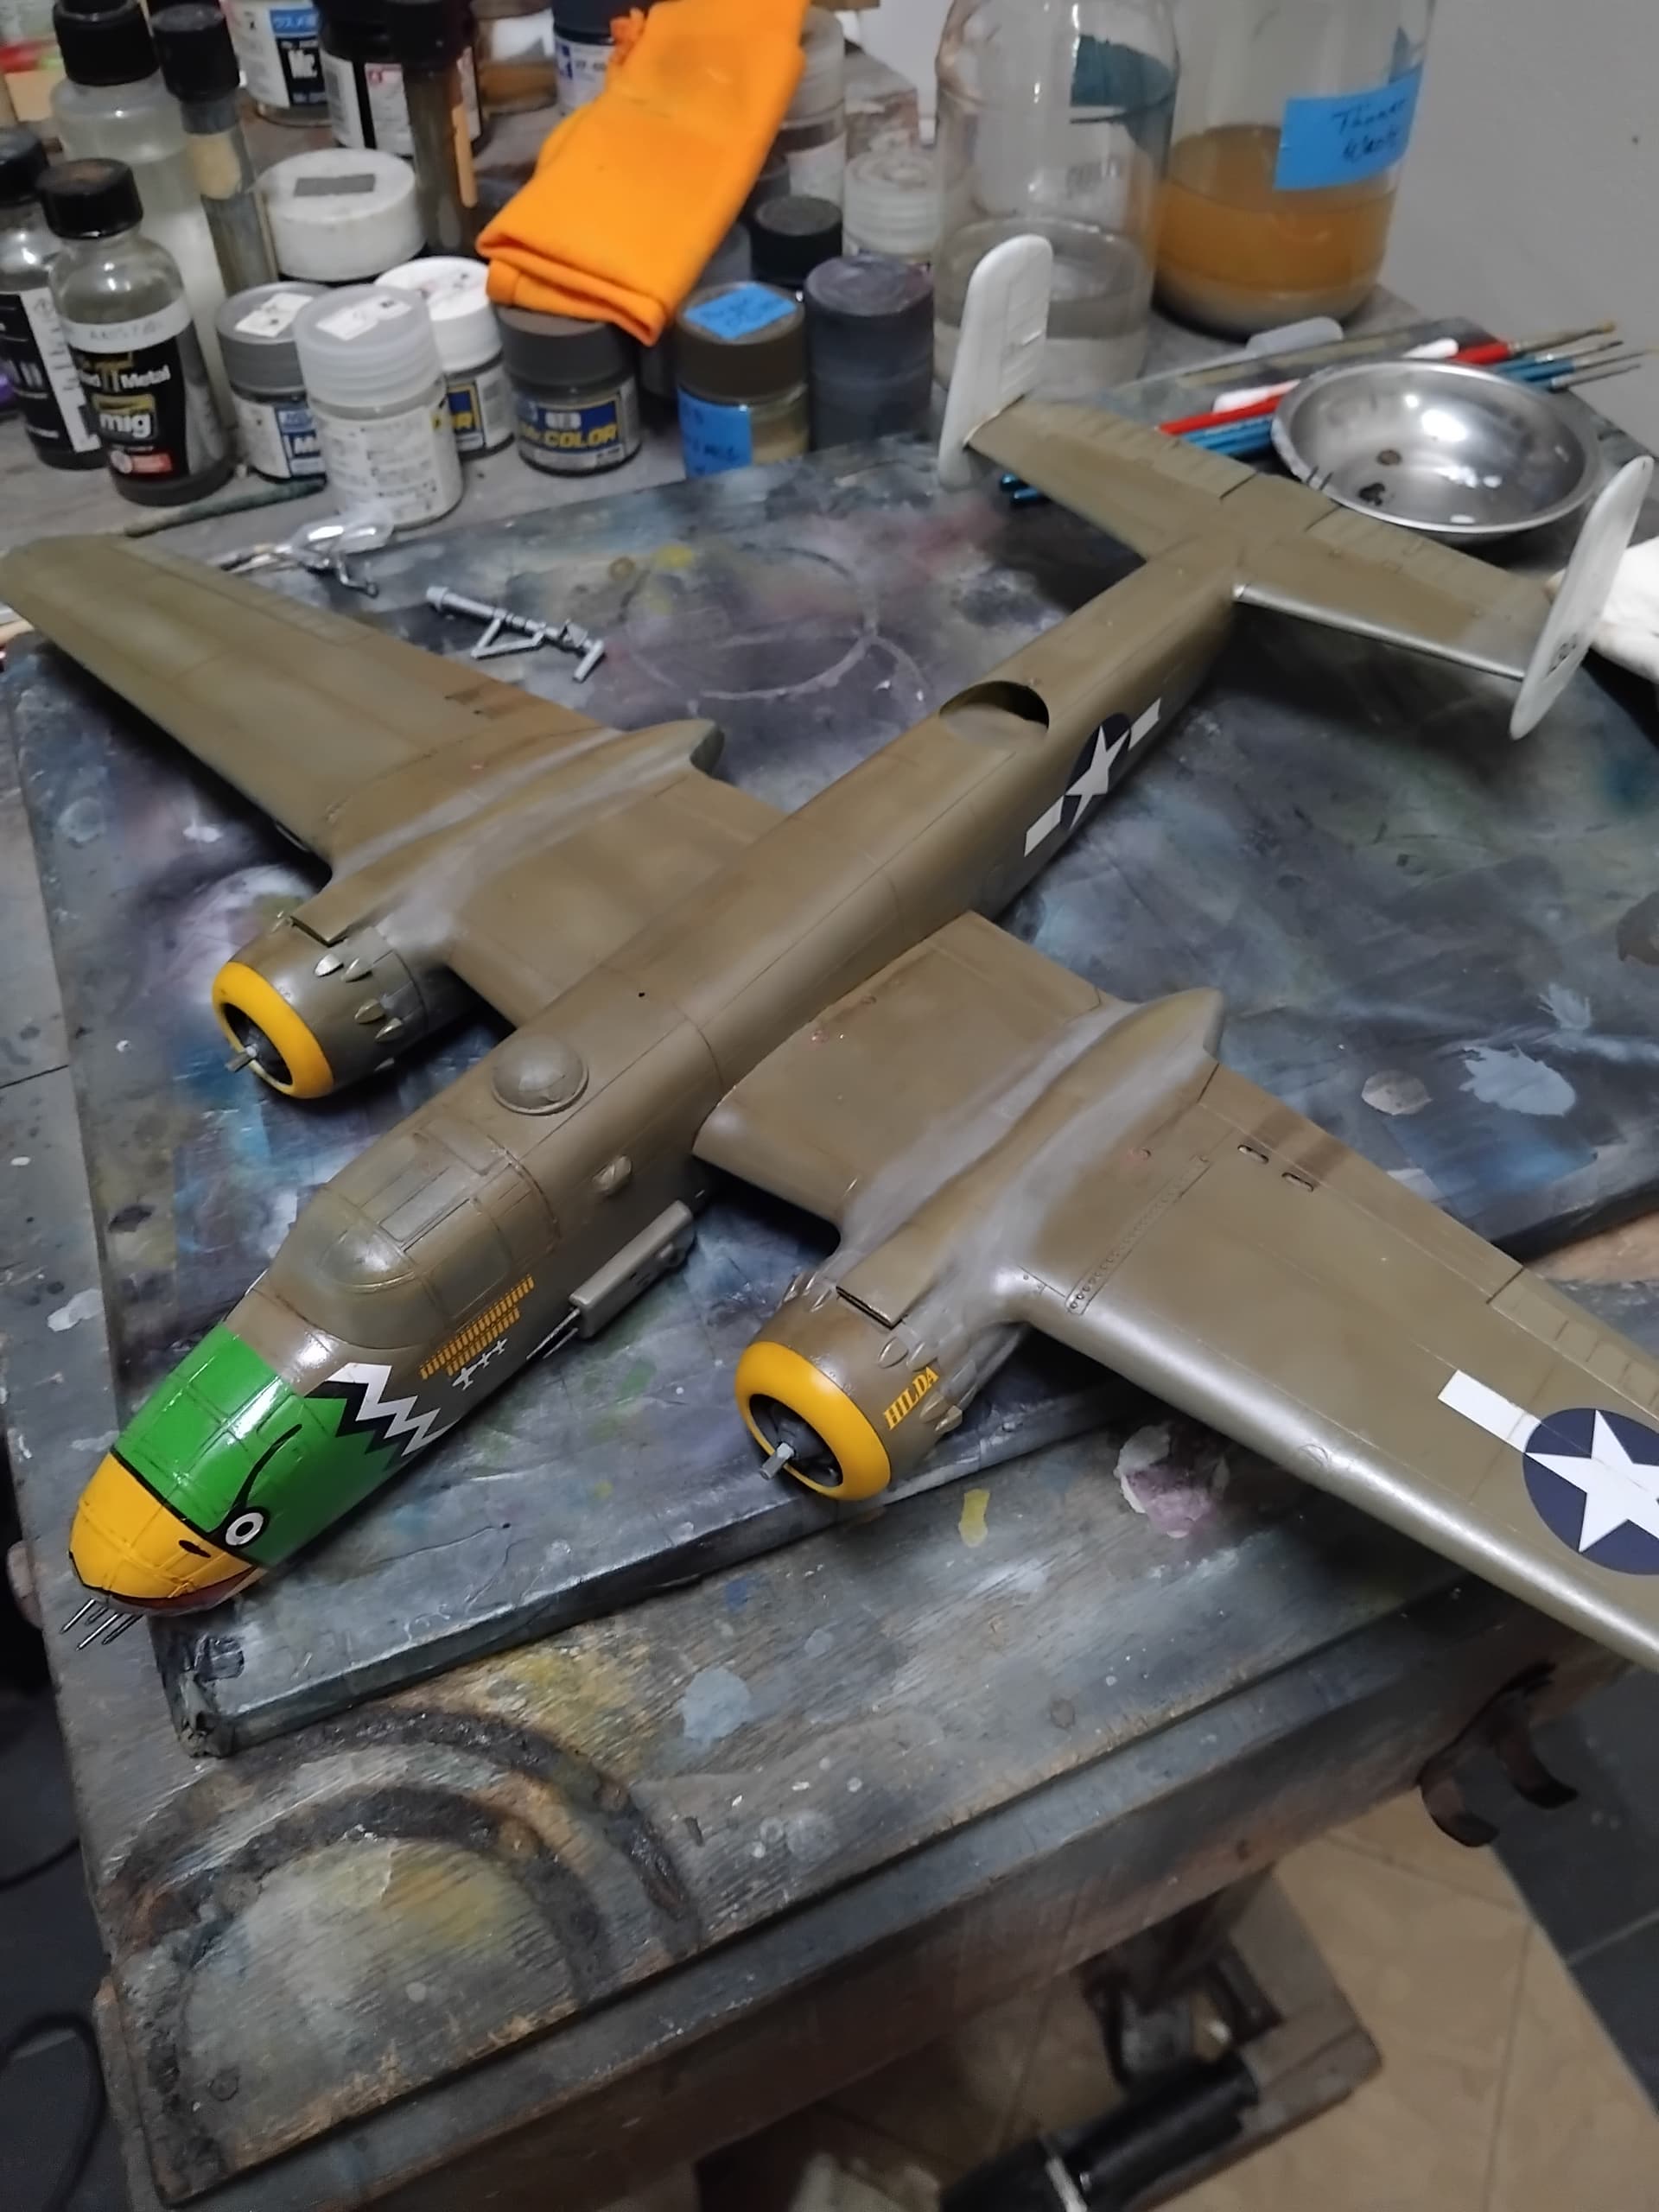
Time for an update! With the decals on and things sealed up, it was time for a wash and some weathering. While New Guinea was a harsh environment for painted aircraft in 1943, I chose not to go completely crazy with the weathering.
First up was an overall wash of burnt umber using oil paints.
Next, some exhaust stains were added, again using oils with a mix of white and black and some burnt umber. The fuel tank areas were also stained to replicate overfill.
I then simulated paint chipping using a Prisma silver pencil to simulate this along panel lines and wear areas.
Feeling pretty good about things, I felt it was time to remove the masks, and this is when I took a hit. Since putting on the guns on the front end, I had taken great care not to have any incidents. Yet, somehow while turning the plane to get the tape off, snap. In a nanosecond, the four 50 cal. gun barrels on the front end were relegated to reattachment… Normally I wouldn’t feel too bad, this one just got me, as I had tried so hard to not let it happen. Proof to me that any hanging stuff needs to be left off till the end.
On the bright side, the turret went in just fine, and I shifted focus to the landing gear where using some Bare Metal Foil, I added the oleo area to the landing gear and then gave them a wash. I think these turned out nicely.
So, for now it’s little stuff. Mainly getting the gear on and reattaching the gun barrels, though I’m not sure which to do first. Coin toss?
Till next time, stay safe, wash your hands with soap and water and have fun!
Pitty about the gun barrels but for the rest top job!!
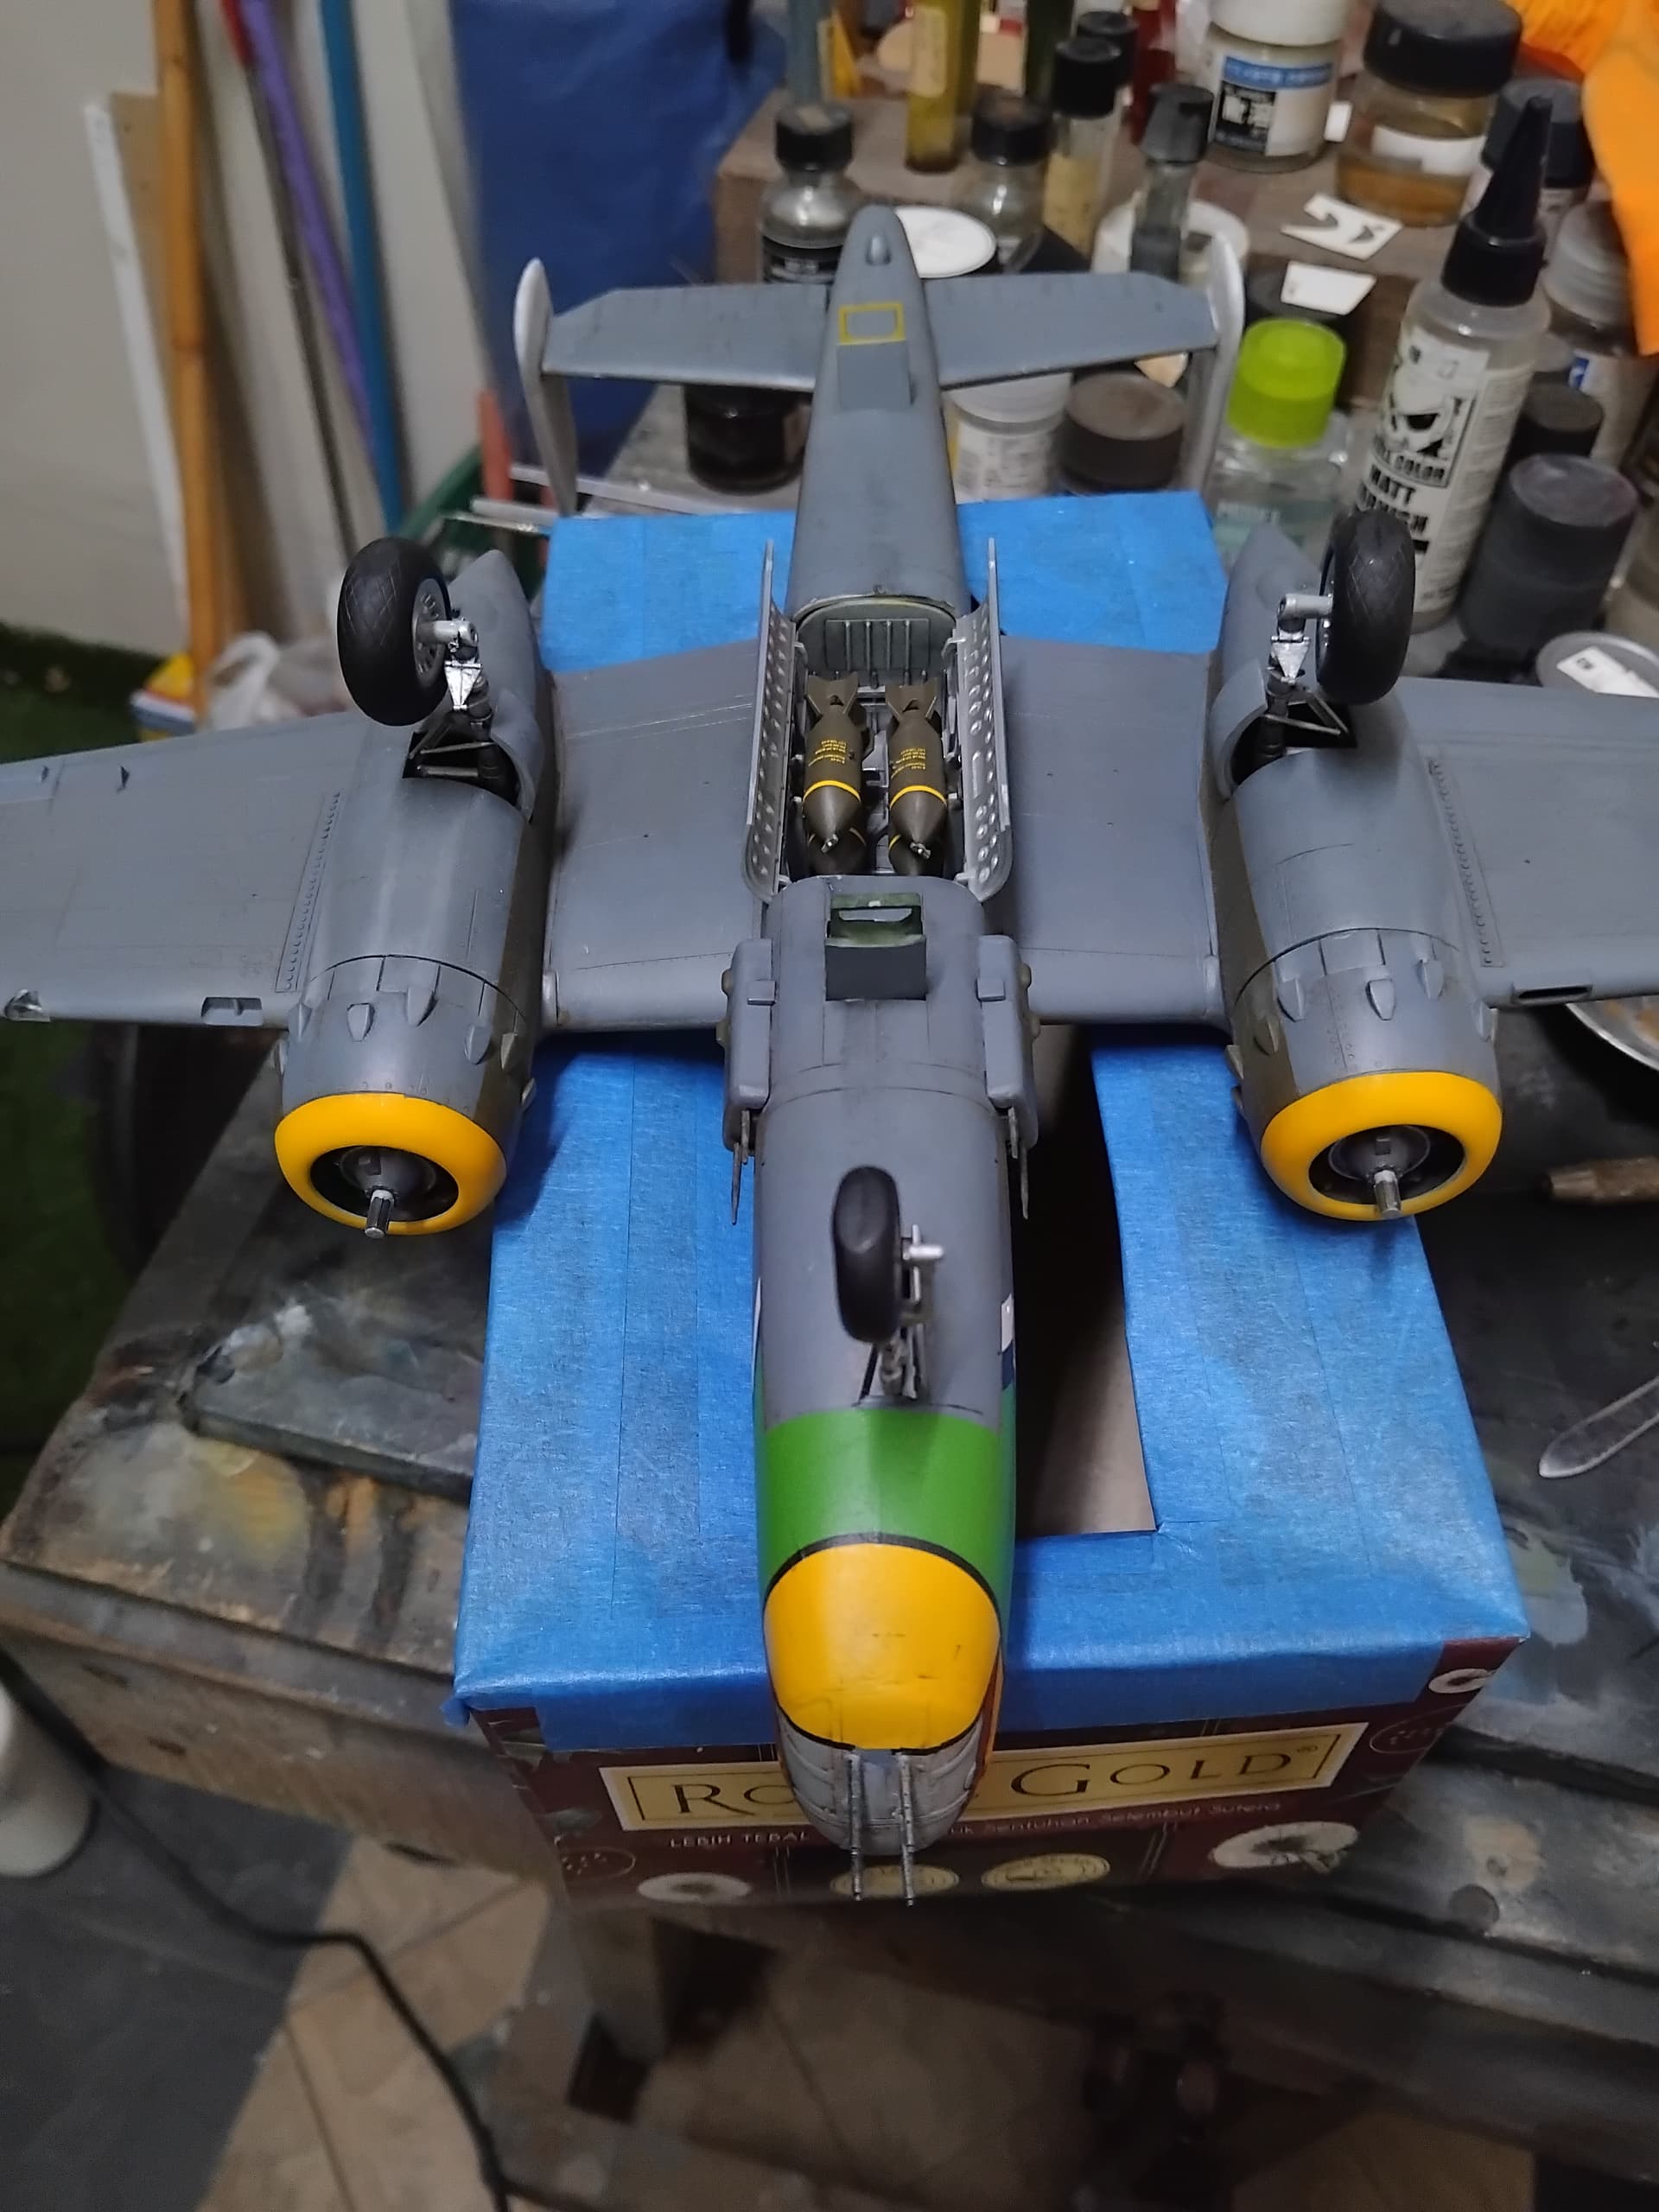
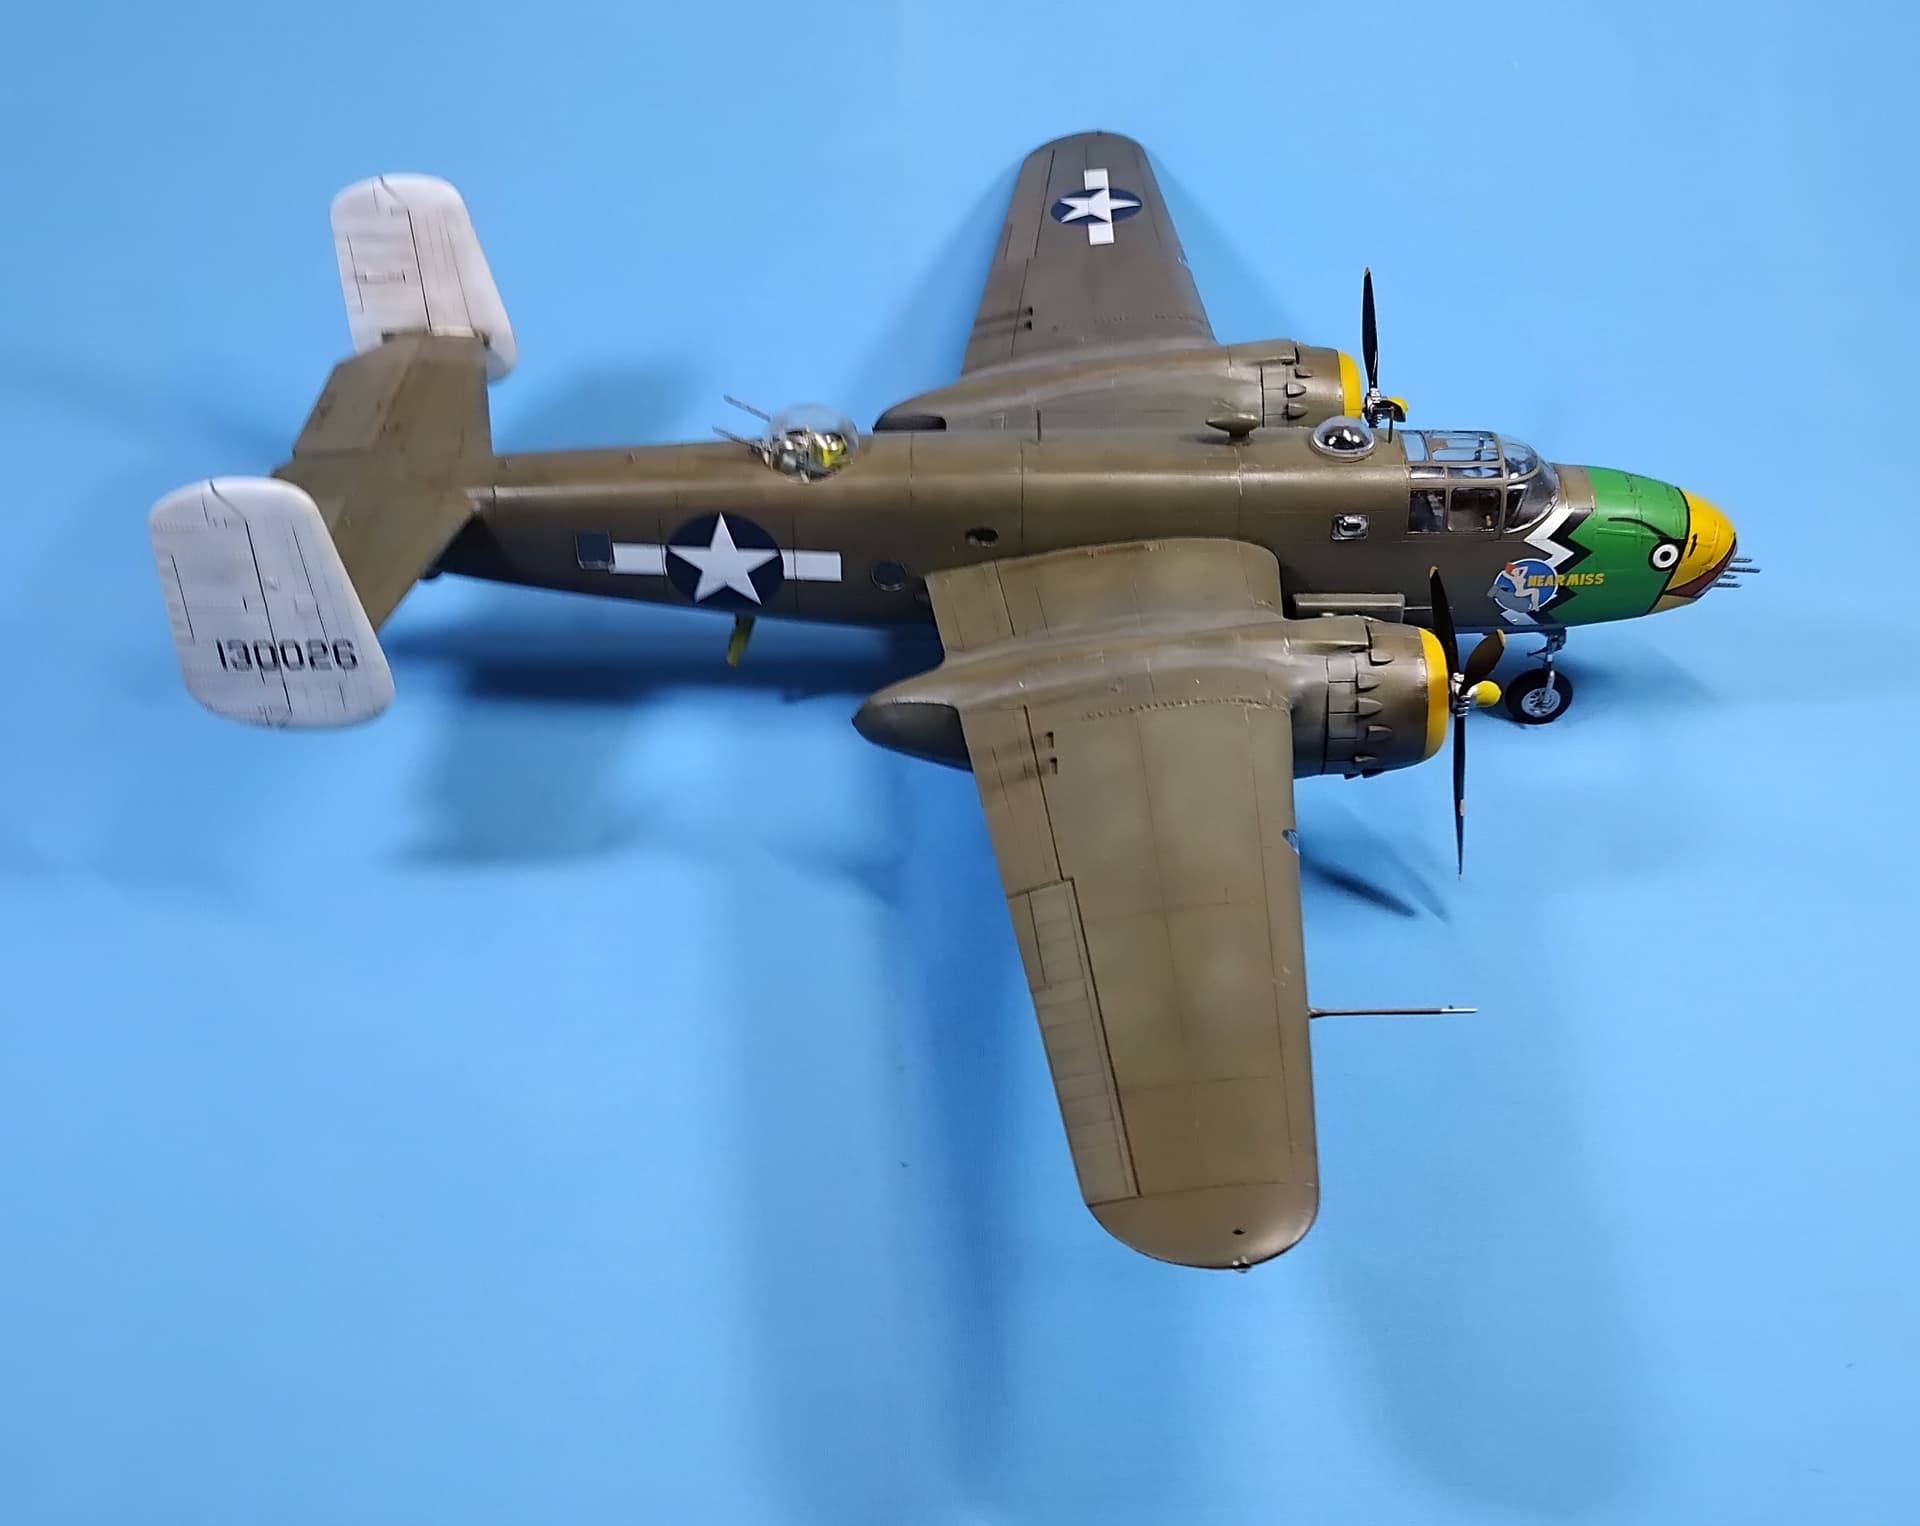
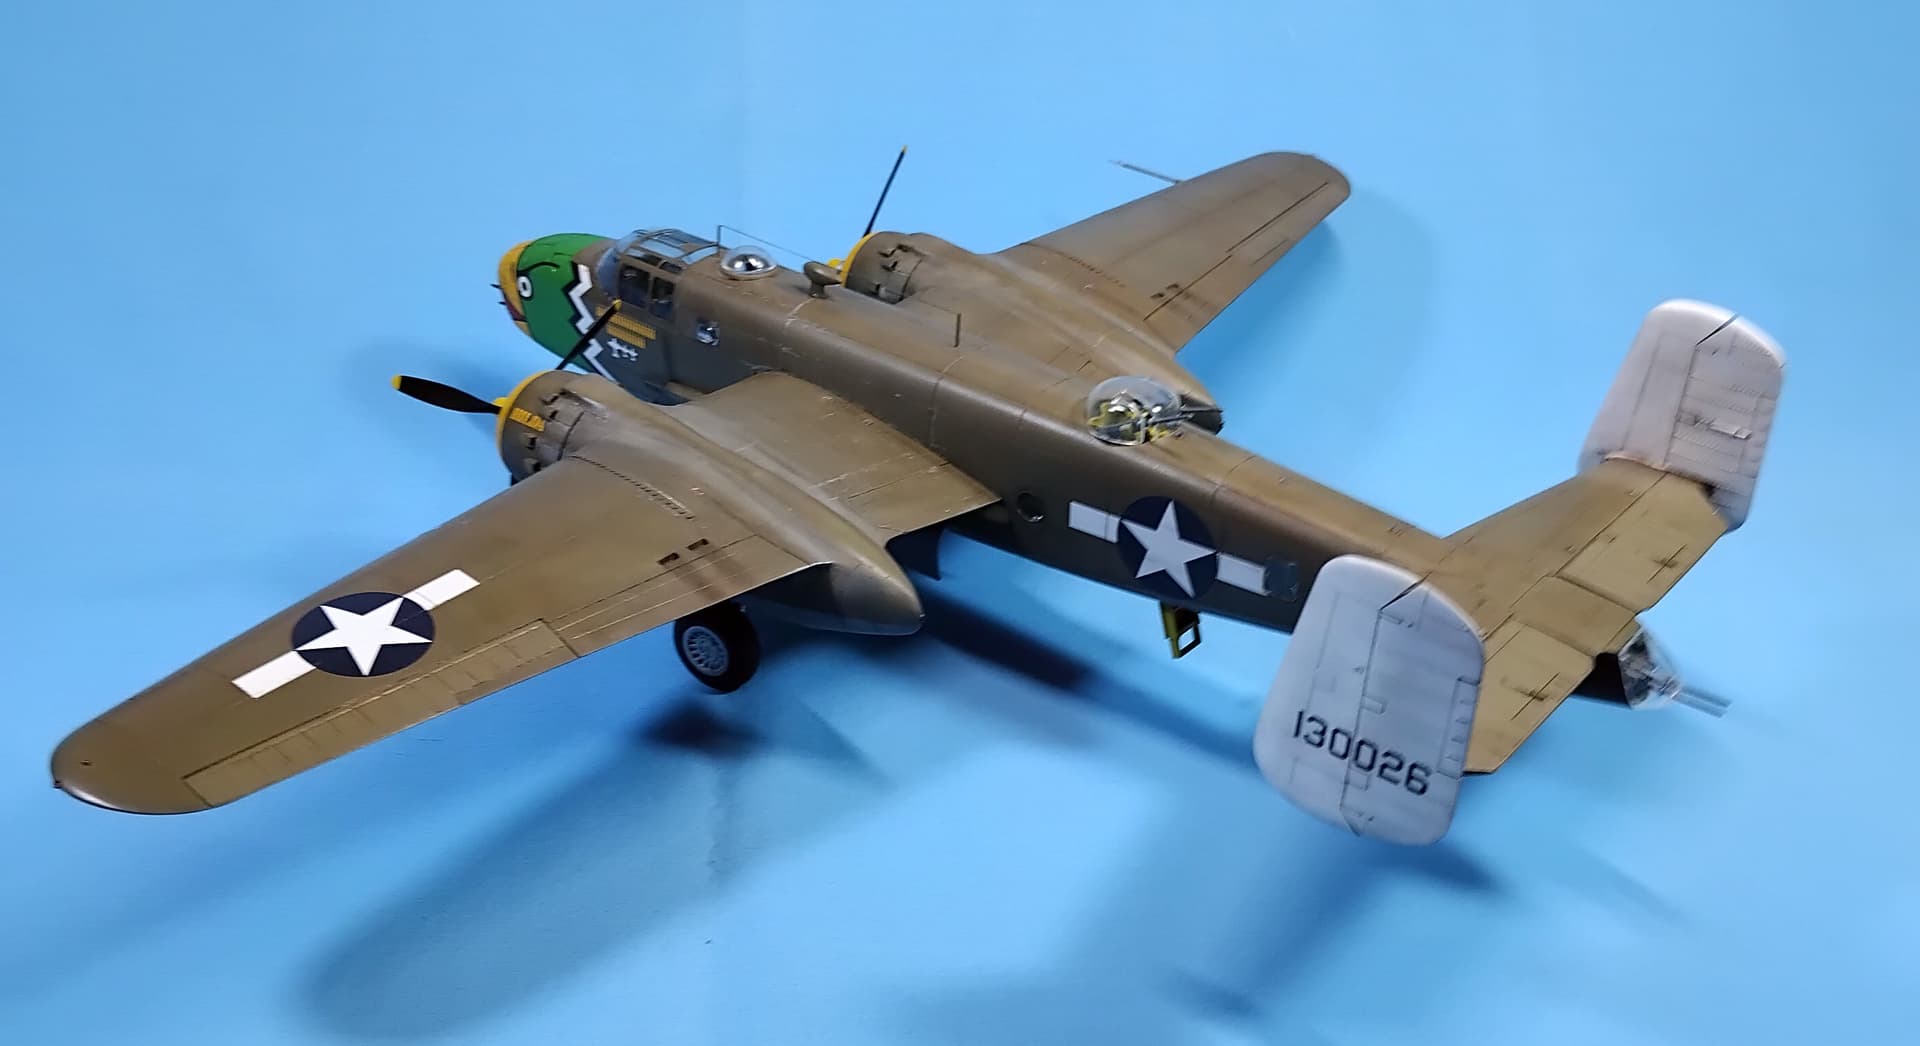
Hi Everyone,
Time for a final update! After getting the landing gear finished, I moved onto the few oddities that needed addressing. Not much. Overall, this is a very good kit, especially to the modeler that hasn’t done a twin engine.
It was time to remove the masks! While a point of apprehension for most modelers, the mask set provided by Academy worked wonderfully. On a personal note, I find that any model that has a greenhouse canopy, are best served with a mask set from Eduard or an equivalent. In this case, Academy has done a great job with their masks, and their choice to use Caracal as the decal manufacturer was masterful! The results are noticed by this modeler!
Selfless plug aside, once the masks were removed, all looked well. No leakage, and good hard lines, they did a great job.
I proceeded with the landing gear, guns lost the toss, and wound up using some 5 minute epoxy to get everything to set right. While it may sound hard, it’s not. lay the two materials from their tube, such that they are near but not touching, in equal amounts and then mix them, start your timer. Pretty simple, though one does have to work within the timeframe. Also, toothpicks and needles will help a lot!
Prior to the landing gear covers, I did reattach the forward 50 cal. gun barrels, and had issues as to where each would go, though I did figure it out! I think…
While there is much more that could be done, I opted to toss in the towel. It looks the part, could have done a bit more weathering, and so much more, though this one looked like it wanted to be done, and I agreed. I hope you enjoy!
Till nex time, be safe, wash your hands with soap and water and have lots of fun!