I had the same thoughts when assembling both of my wreckers, way too much hydraulic lines snaking all over the rear. Nope…
You did a great job on it, as usual!
Ken
Thank You.
Donald
Looks great, especially like the crane deployed that way.
It came out pretty nicely. Good job on it.
Looks great, I remember when we got those in the 3d ACR a loooong time ago, the dude driving it always had every blinking strobe on that thing going all the time, looked like a UFO coming at you out of the desert
Sir,
I want to say that I love this build and you did an amazing job bring this great beast of a truck to life. I have a couple of questions on what you did and about the kit in general. First off could you please teach me your winch cable method as I wish to recreate it. Second Is the piece at the very end of the truck where the winch cable runs thru poseable, I would like to position mine pinned in the up position with the cable running thru it. and lastly do the instructions tell you to put the two lower hydraulic cylinders on with the ridge facing up. I want to build the wrecker that I ran in Afghanistan, and I like to mentally plan my kits before I buy them.
I can tell you how I did the cable on the winch.
1 I used 0.51 Artistic Wire , I got it at a craft store not shure wich one
2 next after assembling the winch drum I drilled a small hole at the edge of the drum beside one of its flange sides tilting the drill slightly to ease in the cable.
3 I super glued the cable into the hole and wound it around the drum keeping it tighe.
4 When I reached the other side i started doubling back for a short distance and super glued it all down be shure to hold it tight until the glue sets up.
5 I just used one layer and a part .
6 I’m not shure how many layers are usually on a drum.
& the end I scratch built out of the parts box.
The part you are asking about is posable.
For the Hydraulic cylinders I think I put them on exactly as the instructions show , I could be wrong as sometimes I find myself reversing things. I don’t save the instructions so I don’t know If I got it write or wrong.
Regards
Donald
Amazing and thank you for the info one more question do you have a pic of the wire and where did you buy it? Also, I’m not sure about the cylinders I was just curious. And a quick question for the master builders who are wondering around the site, there is a spring the connects the end collar on the ends of the T-Bar on the recovery system (we called it a stinger) and it clips on the flanges on the lower hydraulic cylinders. The question is how to I make the spring any ideas would be great.
See Pic. #48 above I’m not shure where I got it Maby Michales Crafts any way most craft stores should have it. Look in their jewlery making section.
Regards
Donald
You know it’s pretty amazing how much info is available if you just pay attention. Thank you for all the great info and for sharing your amazing build…
Nice build and finishes.
Cheers,
Ralph
I stumbled across this thread hoping to answer a question, maybe some of the more knowledgeable might be able to help. Anyway, I have recently acquired a Trumpeter M983 Tractor kit and having a Hobby Fan M984A2 wrecker conversion kit, I wondered if this conversion kit will work with the Trumpeter M983 Tractor kit?
Thanks in advance,
Mike
Probably not directly as the frame on the M984 wrecker is longer. You would need to stretch the M983 frame.
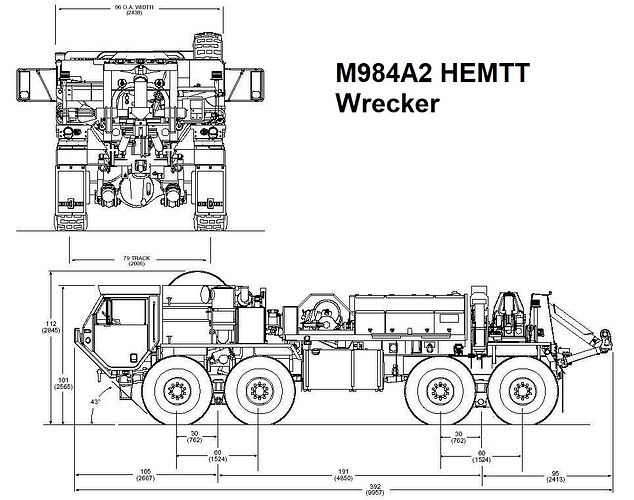
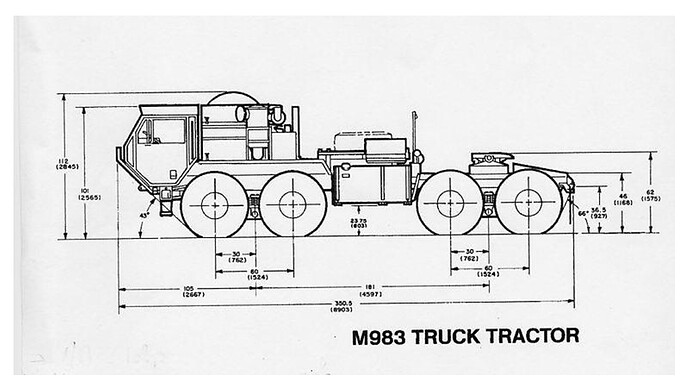
Here are the dims for both to compare. The key is the distance between the axle centers, 181 on the M983 and 191 on the M984. Add 10 scale inches to the M983 frame and you will be good. You will probably have to shave the added spacers for the 5th wheel as well.
Thanks for the info and diagrams, very helpful. I wonder if adding 10 scale inches, (slightly more than a quarter inch), is worth the effort. If the machinery lines up ok, I think I could live with the slight error. I have an Italeri HEMTT I could use, but fell the Trumpeter is a better kit. Probably should have just bought the Trumpeter wrecker to begin with.
Thanks again,
Mike
The Trumpeter kit is 1000 times better than the old Italeri one, which you would have to cut down the frame on anyways. I think you will have to add the extra length though as the M984 bed comes right up to the back of the engine area. I don’t think it will fit w/out the extra length. I am interested to see if it works though.
I guess it’s time to start laying out some pieces, what might be a good way to increase the frame length?
I do it using C channel styrene. Evergreen and Plastruct both have it. Get a piece the same size as the frame, about 1/4 inch should be right. Cut the frame, add the piece to extend it between the cuts. Use a piece of 0.030 styrene to strengthen the joint on the new piece inside the open part of the C channel. The added brace won’t be seen since it is inside the frame rails.
Ya, that’s kinda what I figured, where would you suggest making that cut?
I would cut just behind the fuel tank. If you look at the two drawings above, that is where the extra space is; between the fuel tank and rear wheels.
I did similar when stretching an M915 to an M920.


