It appears I can only reply 3 times (not sure how long that lasts), so I just wanted to update folks. There is an issue with this kit that if you build it according to the enclosed instructions, you will use the wrong frame rails. You can see the thread in the News section. I’m attaching a pic of the first page of the instructions for reference. I got an e-mail this morning from the seller and it appears that AFV Club is looking into the instructions issue and that they will be sending me some replacement parts. In the thread in NEWS, Namengr indicates that AFV Club is looking into this issue as well. So, in the meantime, if you have or get this kit soon, be sure to use the shorter frame rails from the “S” tree and download the instructions for the M51A2 Dump Truck and use those for building
the chassis.
4 Likes
This will change when you have participated more and been active a longer time.
1 Like
Here is a partial list of things I’ve found in error with the instructions. I haven’t done the cab yet so it’s not a complete list. Some items are just my suggestions for making things easier…YMMV.
I suggest you download the M51 dump truck instructions and follow them for the chassis, (minus the winch in which case you will need to follow the kit-provided instructions for removing the 6mm pieces from the frame rails) then jump over to the gun truck instructions for the rest (at least until they correct things which could take a while).
The following is a list of errors in the instructions provided with the kit: Numbers are the same as the numbers on the instruction sheet,
-
Box 1:Use frame rails from S tree, not A1 and A2.
-
Box 3: Do not glue B13, let them pivot until the axles are in place.
-
Box 5:Use drive shaft A12, not S22 (though this may change with the shorter frame, I still think the A12 will be the correct length)
-
Box 27: Do not install R30 at this time, wait until it shows again in step 29.
-
Box 32: Locations for parts S39 and S40 are reversed, the larger S40 goes on the inside, the smaller S39 goes on the outside. Diagram is correct, labels are reversed.
-
Box 35: When assembling the gun box, use solvent glue and install in the dump body before it cures. There are small locating holes on the front of the gun box that nest in the pins on the inside of the headache rack supports and once the gun box is rigid, there isn’t enough give to get the box secured in the dump body.
4 Likes
Ignore comment #3 above, S22 is the correct shaft for the dump truck (short frame)
1 Like
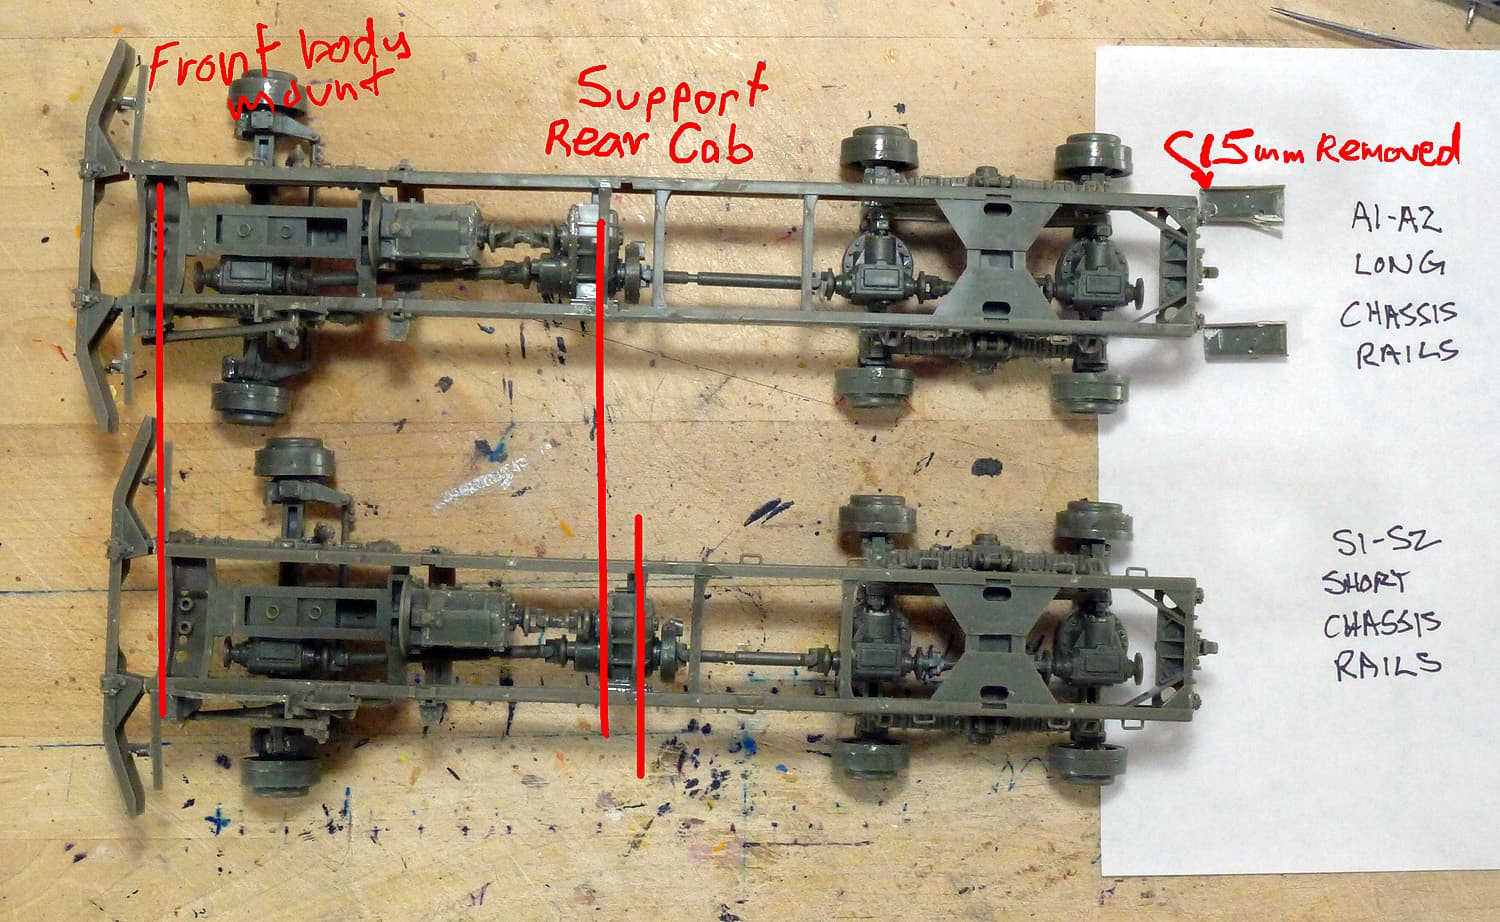
The non-GT M51 dump truck showed up yesterday afternoon. The chassis is mostly together, enough so that you can see the difference between the long chassis rails the instructions call for and the correct, shorter rails that are for the dump truck. In the photo, the long rails (A1/A2) are on the top and just removing 15mm from the back clearly won’t make it work. With the rear axles lined up, you can now see that the rear cab mount is too far forward as is the front body mount and front axle. Building this way leaves too much space between the back of cab and front of dump body/gun box. I received word today that the replacement parts are in and will be shipping out to me in the next few days. I’ll continue using the borrowed parts from the straight dump truck kit to complete the gun truck build.
4 Likes
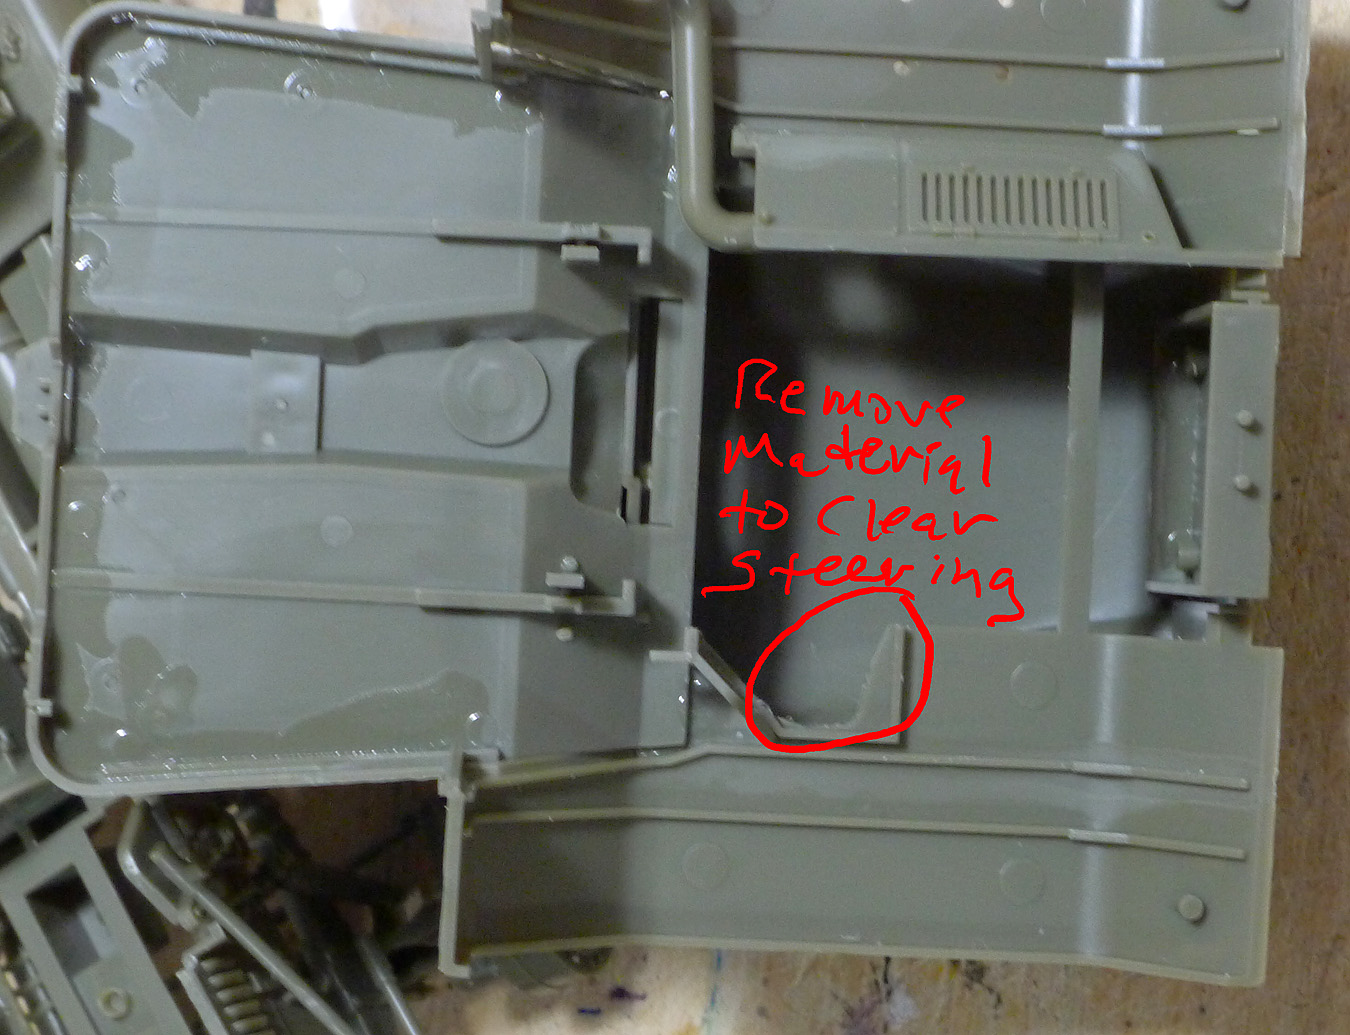
Found a conflict that was keeping the cab from sitting on the chassis. I removed a little material from the underside as shown and now the cab sits down where it’s supposed to.
2 Likes
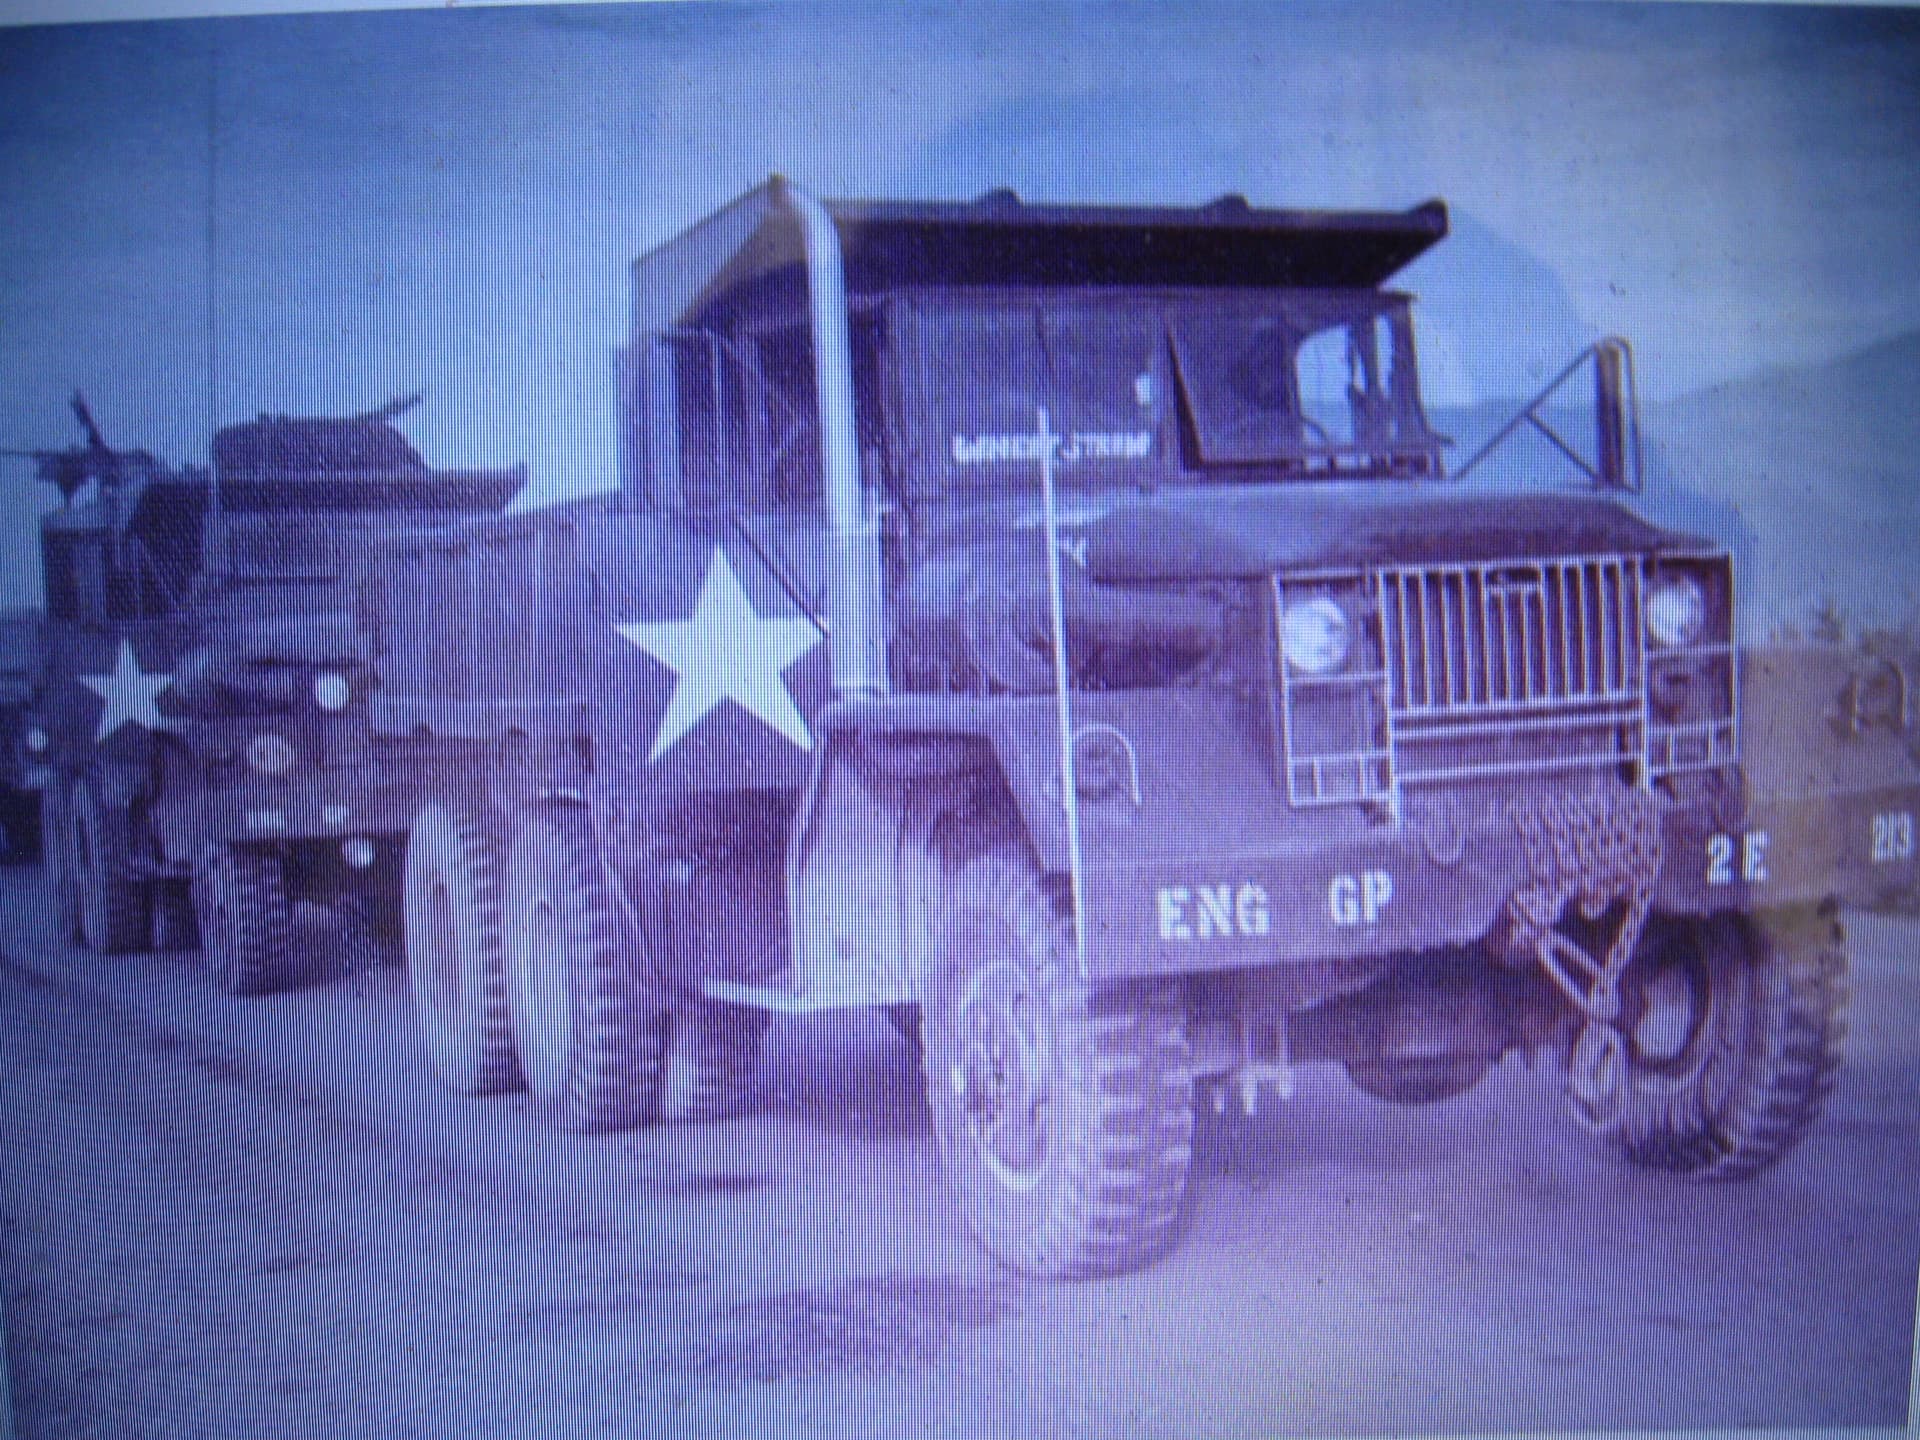
Morning Warren, just going over the instructions for both kits and you still need to remove the 6mm off the front of the frame rails to build it without the winch. The plain kit shows using the winch, which the one I drove didn’t have. Some changes I noticed on the picture I have of it as Mafia Operated are
the antenna mount moved to the windshield armor, spotlights under the bumper, and 2 M60s up front and the 50 moved to the passenger side rear and the twin 60s on the other corner. Also the spare on the headache rack. Not sure when these changes happened. Wayne
3 Likes
The winch thing seems to be a standard for all the 5-ton kits. I can’t recall right now but it was either the M37 or the M35 that the bumper flipped up-side-down (or maybe it was right-side-up) when adding a winch. Seems to be a common thing with the GT’s to move the antenna away from the fire zone! While the antenna was certainly necessary, it don’t work too well when it’s shot in half! LOL!!! I’ve been planning a few more GT builds, I had started collecting parts about 15 years ago when Real Model conversions for the M923 were about all that was available. What I’m finding is that the lower exhaust pipe that comes out behind the right front wheel is only in the AFV GT kits. While there are poor resin casts with the Real Model kits they don’t seem the right diameter so looks like I may need to get into casting some.
1 Like
Yep, the more I thought about it, it had to be the M35 as the M37 W/W has a 2 piece front bumper.
1 Like
If you look at my picture, the bumper is reversible for the winch or non winch variant. All versions could be adapted for the winch. Just have to look at the truck you want to show. Same with the exhaust setup and details. Wayne
2 Likes
Just found they mislabeled part v24 as o24. It’s the low stack instead of the high one on the regular dump. The 0 number is from Eve of Destruction sprue. Wayne
1 Like
My kit of the Eve Of Destruction didn’t have a sprue for the low stack, it was loose in the O bag but there isn’t any open area where it could have come from. AFV might be well advised to let someone unfamiliar with the kit build it and provide edits before putting them into production. Seems like I recall similar issues with the older M35 kits. Of course, AMT is known for less than complete instructions. I guess I’ve built so many 1/25 trucks I don’t even pay any attention to the instructions!
2 Likes
If you look at the sprue picture it is hanging off the end. Wayne
1 Like
A small detail that some might want to watch on a lot of the trucks is the bumper guides. Not all trucks had them, but they were on a lot of trucks. They were usually rebar or some guntrucks used old 50 cal. barrels! They were usually painted white or red and white. I even remember seeing an engineer truck with small engineer castles welded on top. Anyway, just a little detail. Wayne
2 Likes
THAT would make a really cool detail!


2 Likes
Yeah, they looked really neat. They welded a washer on top of the rod and somebody in the motor pool shop cut and ground the little castles and welded them on top. Wish I’d have taken pictures of them. I think they were on the 10 ton that pulled our dragon wagon trailer at Long Binh. Wayne
3 Likes
Wild Thing had beer cans atop red bumper guides.
4 Likes
I started decaling this morning and they are a bit of a challenge. Instructions say once on the model you can move them around but these seem to stick like glue where they land. I tried a variety of things and a light coat of the blue decal set before putting the decal on seemed to help a little but they still didn’t slide like I’m used to. The older AFV kits seem to act ok so not sure what changed.
1 Like
I got the replacement parts from AFV Hobby this afternoon. Cudos to AFV Club for standing behind their product.
3 Likes