Yes, thats correct Robin. They do mention that way in the instructions. I think which ever way I go, the construction of the running gear is going to be a time consuming affair for this one. But it has to be done right or you lose the look if its sitting wrong; and as as you said… the “eye ball method is doomed to abject failure” !!
John,
Please don’t see me as a heretic but why not go with the AA suspension? I appreciate you have the metal wheels which you identify as being a bit soft on detail, but in all honesty does that matter that much? I always sh***y my suspensions up so I would say that perhaps, but if you use the kit ones then at least the fit should be easier and you won’t have to do all that faffing about. I admit I am sometimes seen as a lazy modeller(!)
I’ve just referred to my unmade AA kit of the Spartan and note that the wheels are resin and the detail is quite sharp - so I’m lucky perhaps - and the locating fit all seems fairly straightforward (famous last words). I always mix up a 2 part epoxy when tackling the suspension on resin models as it enables me to tweak and align accordingly that much longer than say a Superglue gel. The AA resin tracks look superb in my kit but I have always been too much of a coward to try and bend them around an already delicate model; although I have some Fruils for my Spartan I note that AFV Club also produce a track set. Just a thought.
Brian
1 Like
AFV-Club actually produce two sets of tracks, early (35290) and late (35294).
Late started coming in, slowly, around 1991
The differences require a magnifying glass in 1/35th scale …
1 Like
Not really, a creative base can hide a number of sins. Jest saying!
2 Likes
Lots of mud and uneven “ground” hides many mistakes ![]()
1 Like
I have heard the later models did away with the metal parts. I will be going over some issues with mine later on lol. I will be having a good dig around the running gear and deciding on the best course of action, so nothing is off the table at the moment.
And ref the late and early tracks that @Uncle-Heavy mentioned I had seen those, and if needed i will be getting a set, however, the ones you get in the AFV club Scimitar kit are perfectly ok, and I had no problems with them on my Scimitar, and also managed to get the sag right as well…
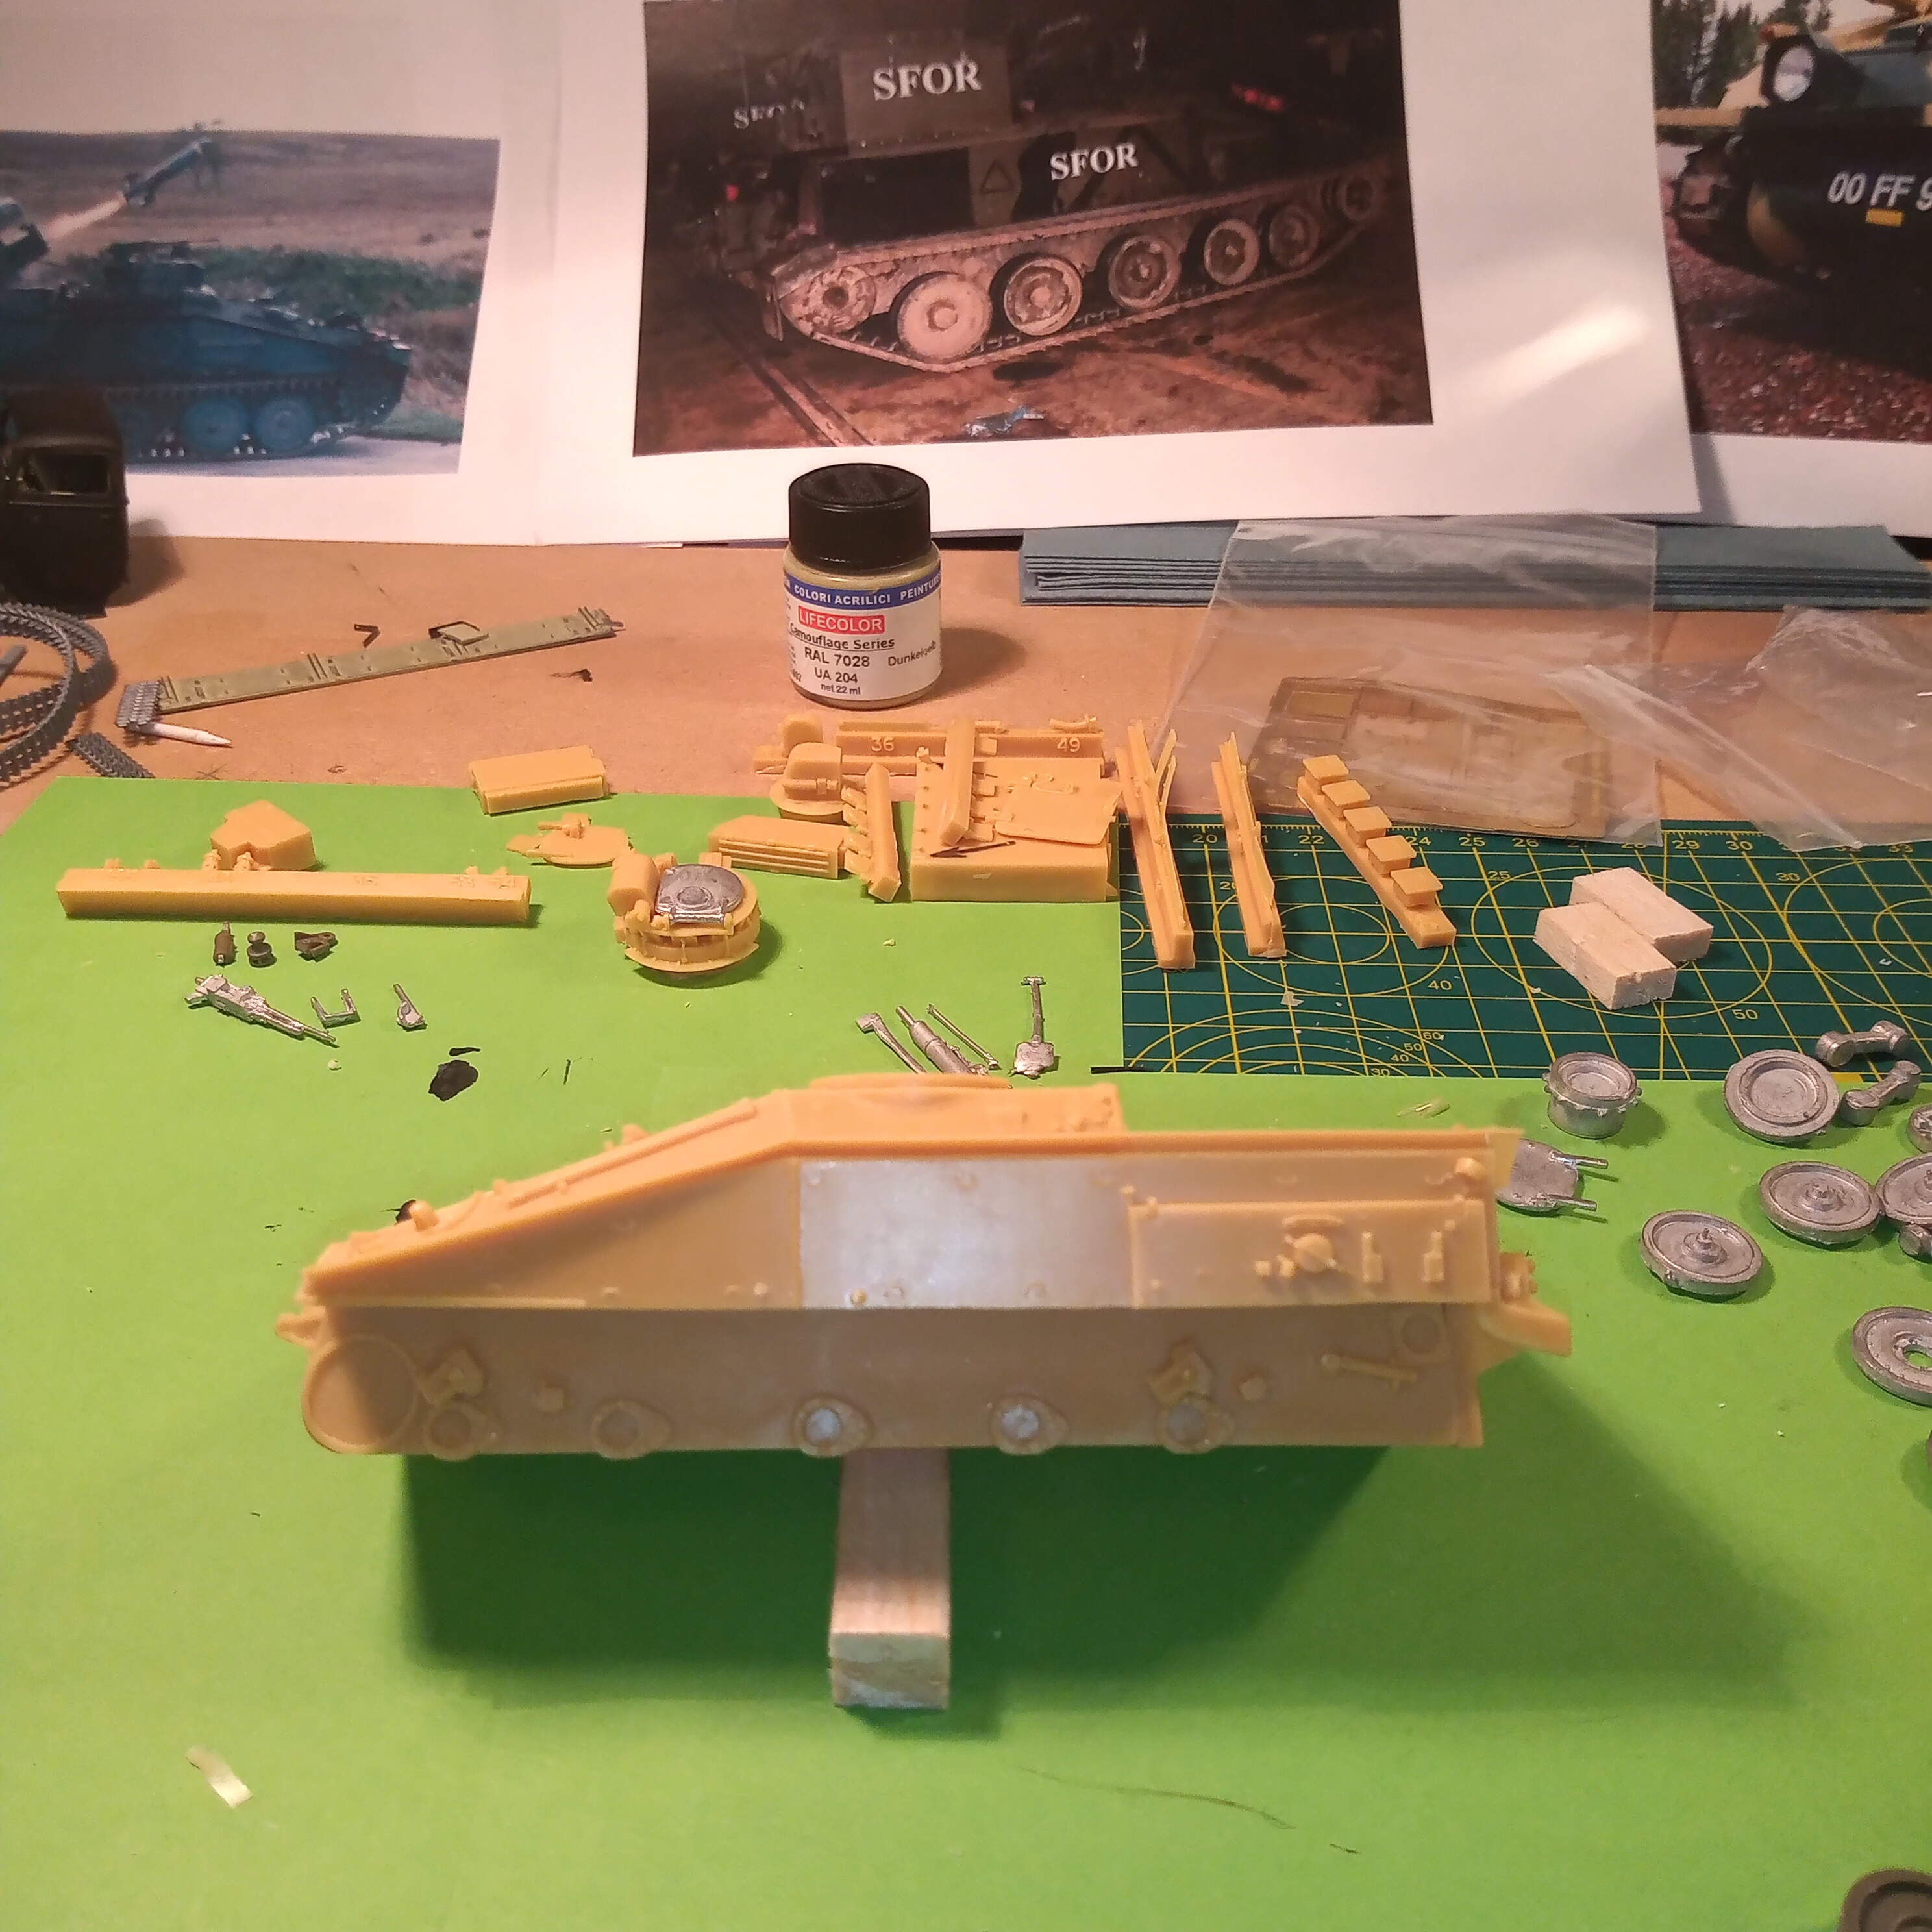
A quick afternoon update while works quiet.
ABAs will be getting replaced, as you can see in the pic below, the AA offerings are well out in scale. So, it’s the donor ones again which are far more realistic and better detailed.

Next was just quick a quick test fit for Comd’s hatch onto cupola.
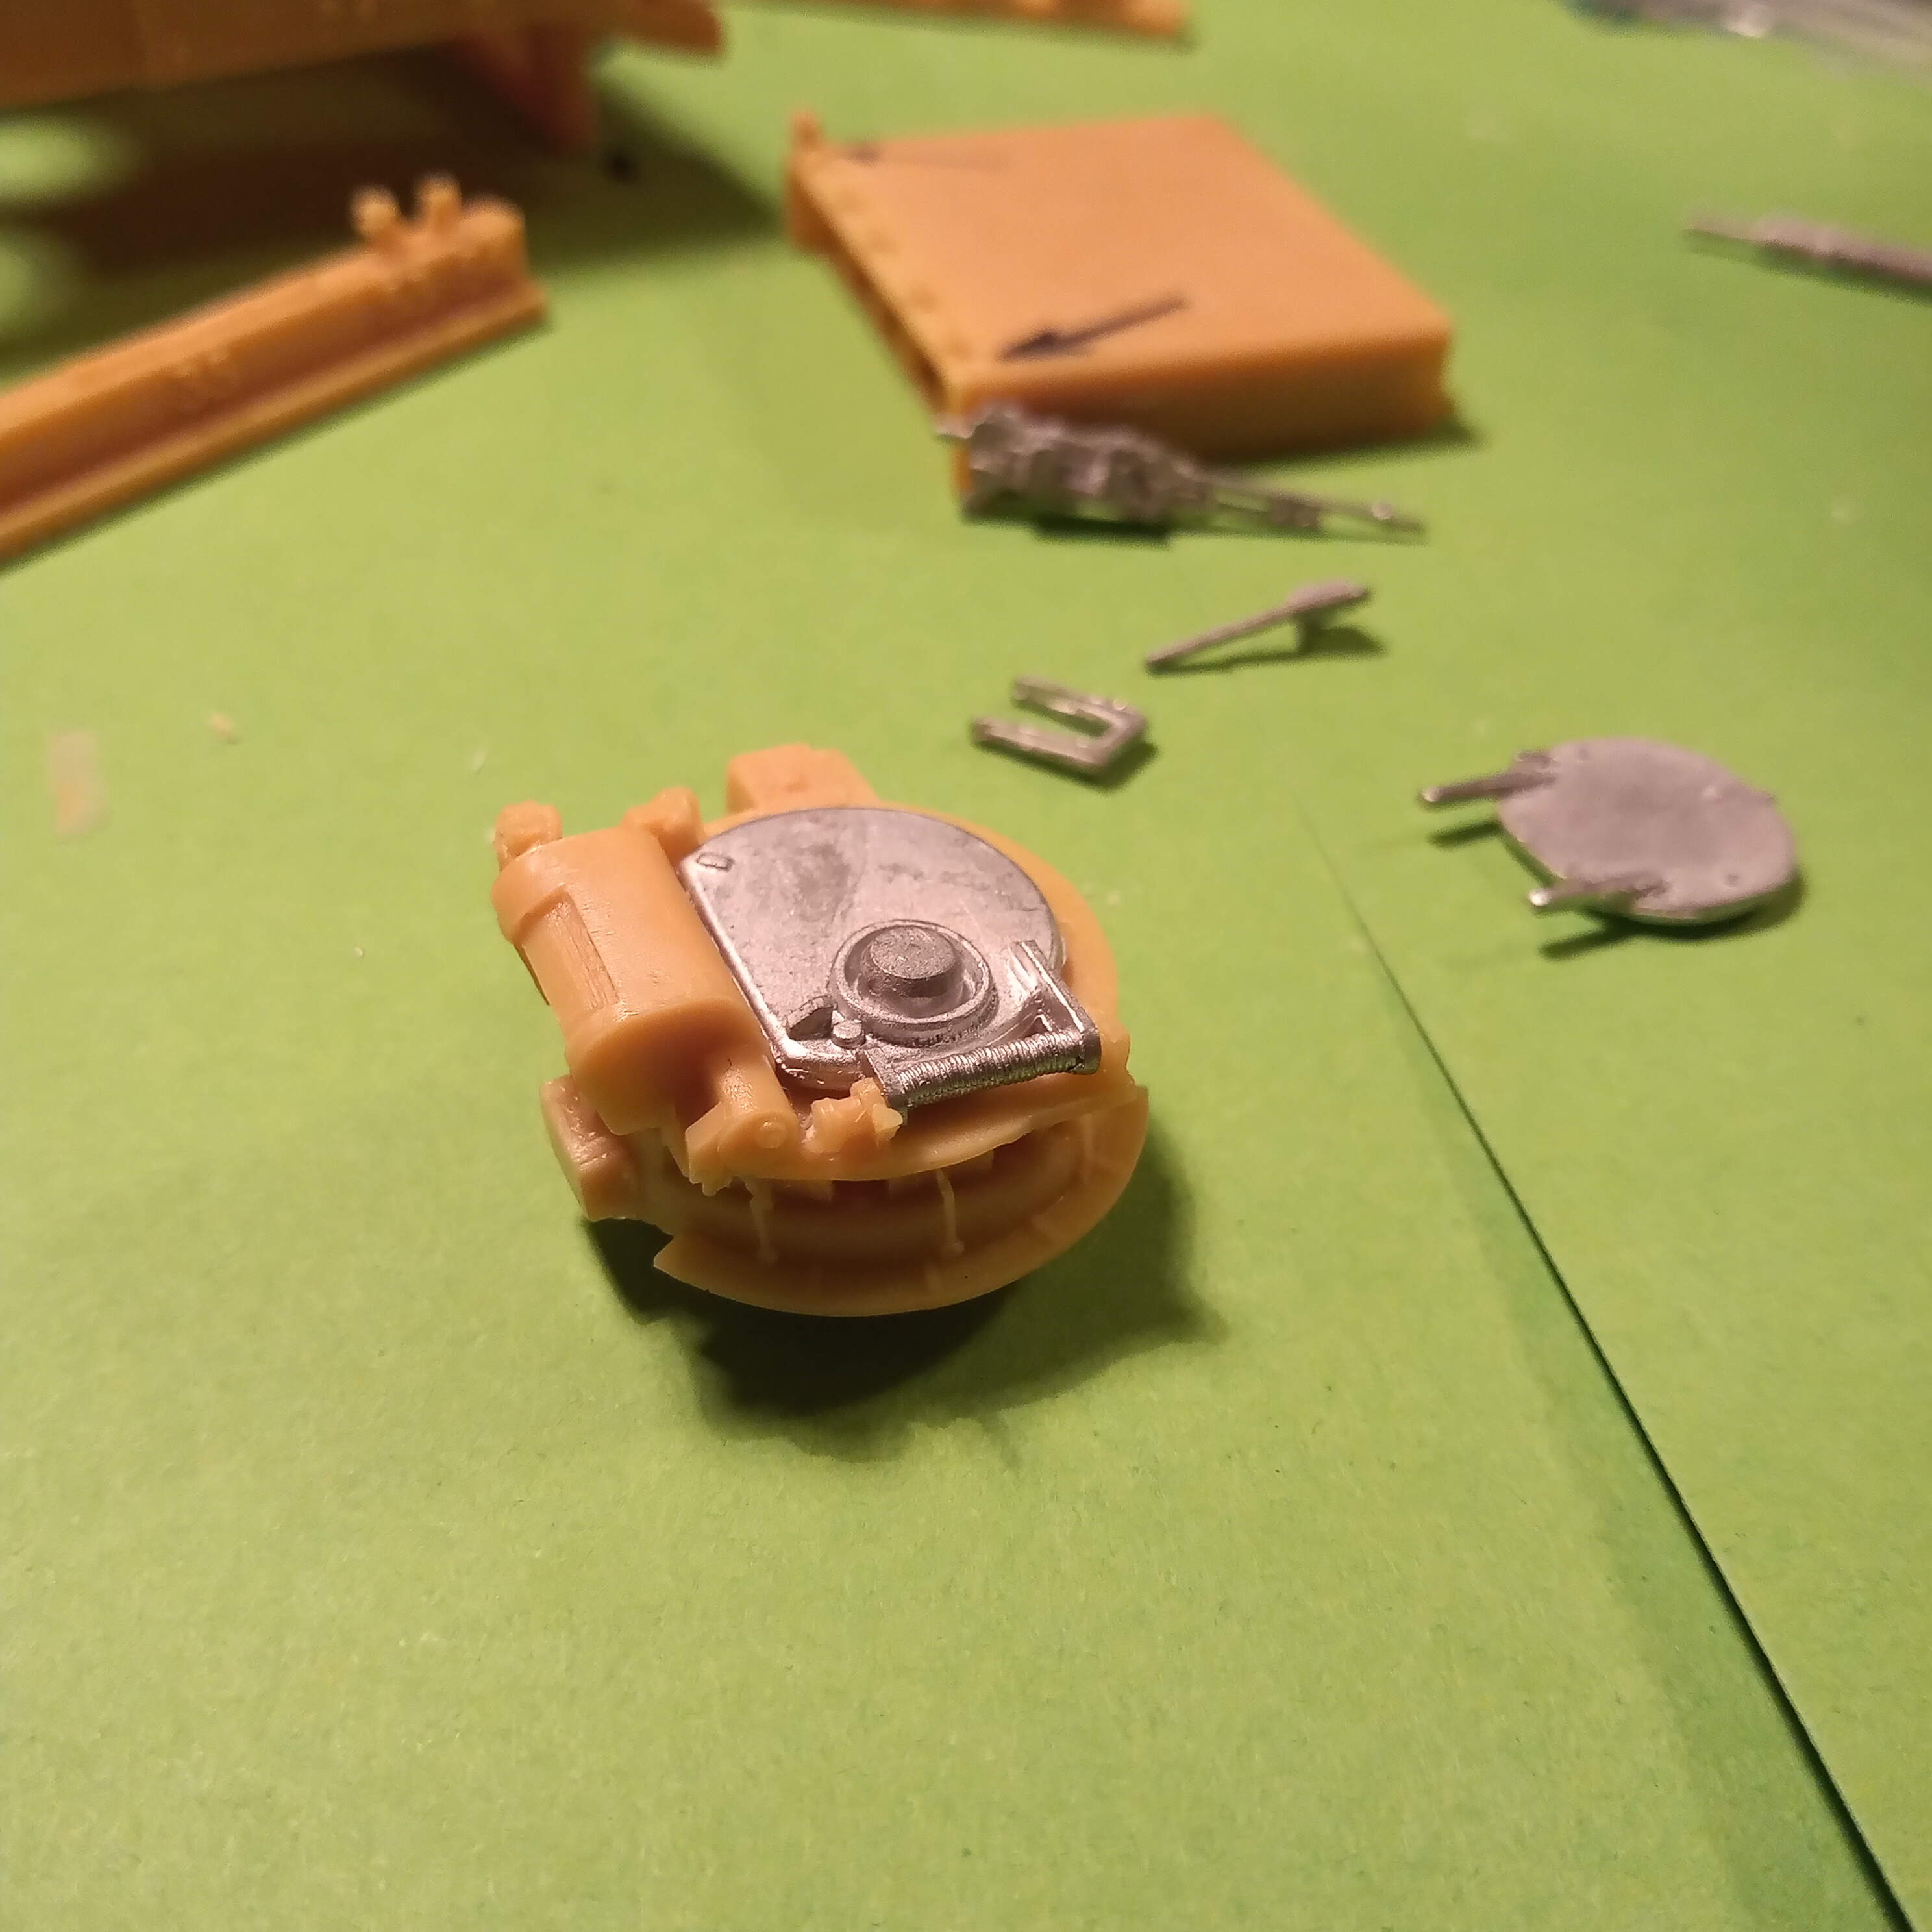
The resin cupola is very nicely detailed so pleased with that. Striker and Spartan ones are the same.
Hatch fits nice and is detailed well both inside and outside. Still debating on if I do it with a Comd figure and have it open.
If I had the skill and time and patience, I would seriously considering do a scratch build of the inside as if you had the hatches and rear door open you have some really nice views available which would reveal alot of internal detail…
Next, the dreaded metal GPMG and part of the mount.

It is very clunky even after a clean up. If I replace it (and I’m 99% sure I will) I am going to have scratch at least part of the mount as it’s moulded on the GPMG…
If I am brutally honest, I am confused with the metal parts in this kit and to why they are there at all. The operator’s hatch is resin and nicely detailed, so why not the rest ? They neither add or detract by being made of metal. And the same can be said for the remaining metal parts, even more so the running gear. All of those parts will require a huge amount of clean up.
Last image is of an AA and AFV wheel.

More to come later with more pics.
Stay safe.
3 Likes
Hi John,
I hadn’t realised there would be so much work involved, nor the amount of multi-media involved in this conversion.
I’m imagining this build will take much more planning than a straightforward plastic kit, and that there will be lots of test fitting for small steps in the overall build  . Does the AA elements come with an instruction ‘manual’ like those in a conventional kit, and does it tell you which specific donor parts are needed and where they go, or is it left to you to make such calls?
Having never touched resin (apart from a couple of ‘Hornet’ heads) or white metal components before I’m really intrigued to see this goes together. I always make a hash of using cyanoacrylate glue due to their flow and chunky applicators, do you use anything special to better control application?
Cheers,  ,
,
G
1 Like
This is my first resin build … so have no idea whatsoever lol … this will be straight off the cuff.
@petbat recommended using a cyano gel, and another mentioned 2 part epoxy so I may try both, but the gel will be a must as it gives more time to move and re-position if needed…
The AA instructions are in a booklet type affair, but they are basic. And nothing is mentioned about a donor vehicle as the kit is a complete resin kit.
The donor side of things comes from me alone. After I looked at the kit I knew there were bits missing and bits would need replacing, an example being the ABA’s above. And as a bit of luck, I had a donor AFV Scimitar I got from Evil bay that was missing its barrel and decals and PE.
It will be a long burn as like you said, there is going to be lots of test fitting and scratching bits I’m not happy with. But I’m going to enjoy it.
Its also nice having so many people getting involved, as all suggestions are listened to, and some I am sure will be new and golden tips.
Hi John,
You’re a braver man than me,  , I wouldn’t have the knowledge or the skills for such an undertaking…I struggle with a few bits of photo etch on a straightforward plastic kit,
  .
.
I know I’m going to benefit from from following this build for sure as I know absolutely zip when it comes to multi-media builds, or even resin only, so will be following your work with interest.
Cheers, ,
G
1 Like
Without I hope patronising anyone here, I only broke the mould (no pun intended) re a fear, or at least apprehension re resin kits a couple of years ago. My first full build (as opposed to a conversion - see my Charioteer elsewhere) was the RetrokiT M75 APC, which once I’d cleaned everything up, identified what was what and laid it all out, was actually quite straightforward. The suspension was a bit of a test that’s for sure and I used an AFV Club set of tracks (not separate links) and also kept the idler loose until I was ready to secure the tracks. The hull and hull bottom were quite substantial chunks of resin so I used an epoxy, ditto for the tracks as I wanted both a very secure fit, and needed to adjust slightly as it all dried.
My second resin kit was Commander Models MBT 70 (also shown elsewhere on the site) and I followed the same drills really and perhaps that’s the secret. Upon opening the box I was a bit dismayed at all the parts, not realising that whether through accident or design, there were several duplicate pieces. Anyway, once cleaned up, laid out, you can then work out the best approach, not necessarily following the instructions. Again I used an epoxy for joining the hull (for strength) and the suspension, and also kept the idler loose until I was ready to fit the track. Instructions were perhaps a little sparse but an article in Military Modelling helped.
The use of Superglue is of course, a bit unforgiving but just take your time. I cannot recommend the use of an epoxy to allow for adjustments when it comes to fitting the suspension enough.
Accurate Armour instructions in the scheme of things are actually quite good. So, what I’m really saying is don’t be daunted; be logical, pace yourself and lay things out and ensure you know what is what; you may have to devise your own sequence of construction. Of course, depending on your tastes, sometimes resin is the only game in town, so go for it!
Finally I must acknowledge that there are probably some resin Ninjas out there who are more than able to offer up their experiences and advice, which may vary from mine.
Brian
1 Like
I will without doubt be following the slow and steady advice @boots. Plus, I know that way i wont totally arse it up lol … Superglue gel is on my list this weekend, and epoxy as well.
I put a blob of CA on some scrap plastic and apply to the model with a toothpick for those small pieces.
1 Like
Another option, CA anti stick applicators.
https://store.spruebrothers.com/product_p/gungt57.htm
Great minds think alike @TankManNick ![]()
![]()
I put a blob of CA on some scrap plastic and apply to the model with a toothpick for those small pieces.
Great minds think alike @TankManNick
Only way to go with cyano. No hope controlling the thinner liquid out of the tube/bottle. Gel doesn’t flow, so easier to control. Epoxy is good, especially for larger parts like hulls, etc, but you need to watch the cure time and gravity effect. If you are not careful, the weight of the kit part can pull against the flush fit of the parts - the old ‘length of the part and its weight being a force against the fulcrum of the end connection’.
For the liquid type, get a needle and clip off the top of the eye, so a ‘fork’ bit remains. Dip that in the cyano and the glue will trap in the fork and release when you place it on the part. Heat the eye in flame to clean the cyano residue from time to time and it will last forever. I have mine secured in the end of an old paint brush for handling.
Re the suspension, Robin has the key. Secure the front an rear arms first and let them set, then do the ones in between. I make a jig out of Post-it notes when I can (sometime fixtures under the hull prevent this) . You can buy them thin enough to fit under the hull between the arms/wheels. The beauty of this is that you can remove as many leaves as you need to get the right height off the ‘ground’ and if you keep the sticky bit up, it doesn’t move around under the hull. For taller models I have made a jig of Lego to support the model and slip the Post-its under the wheels so they are all supported level at the right height off the ground until it all sets up.
Please don’t see me as a heretic but why not go with the AA suspension? I appreciate you have the metal wheels which you identify as being a bit soft on detail, but in all honesty does that matter that much?
@BootsDMS Brian, my AA kit had poor wheel mouldings with each side offset to the other, so they were not circular. After clean up, and as a result, the tyre was thin in some places and thick in others… to fix it I would need to remove all the rubber rim using the front face as a guide and add a strip of styrene around them (tried using putty but it just parted company with the resin…). Even so, keeping the front face circular, the rear face would have a gap where the metal rim was removed in one place and a section of rubber tyre remaining on the opposite side … hence the plan to replace. My vehicle was to be depicted as a specific one used in Gulf War 1, so copious quantities of mud was not an option…
Hi gang  , …
, …
So for @petbat. Resin top and bottom
Then with the AFV lower in roughly the correct place. The pencil lines on the upper hull show where the AA wheel stations are opposed to the AFV ones for comparison. The AFV lower has the rear end dry fitted in place.
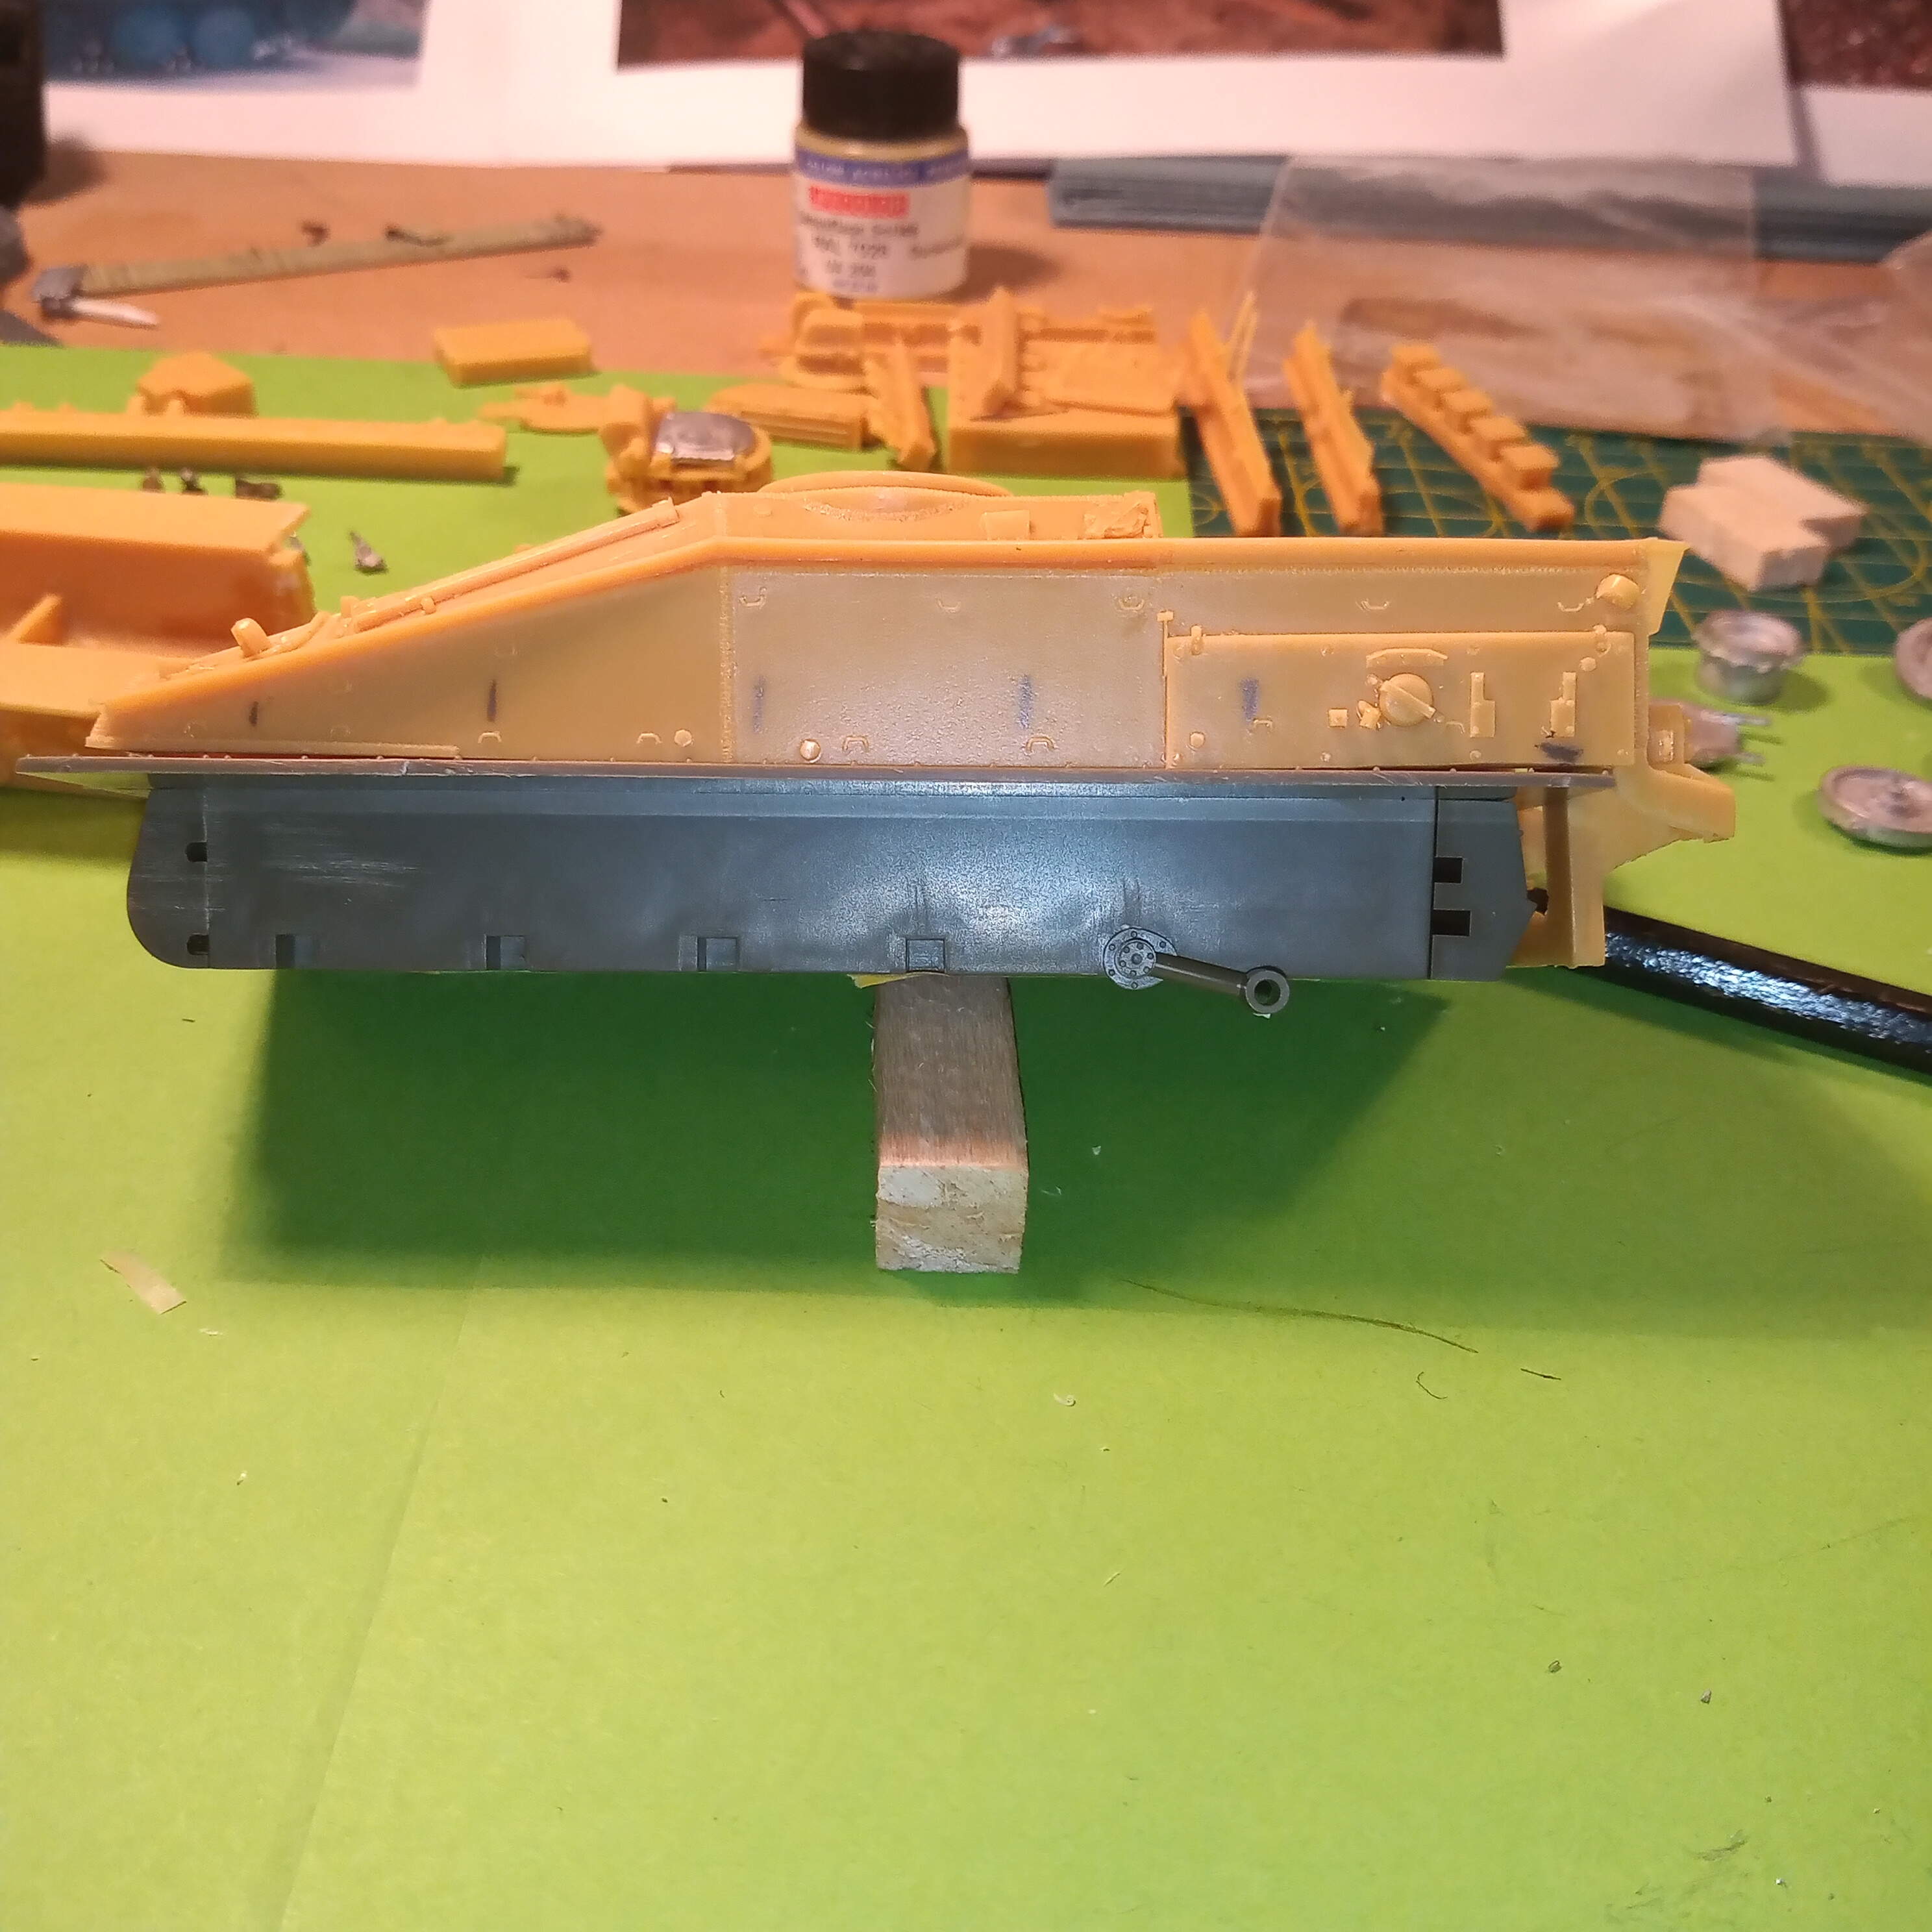
So you can see the AFV wheel mounts are out, going from No2 wheel backwards and when you get to No5, to align it properly for a striker, it would need to be relocated at least 1cm and the same for the idler.
Now I have had a good look at the the running gear and I really do not like the AA stuff, the resin items are fantastic, but I just honestly do not like the the metal…so
You may think me a tad unhinged, but I am going to attempt initially to chop the AFV lower and mate it up with the AA upper. To allow me to use all the AFV running gear.
The pic below shows the area I will need to make so the upper and lower fit. It’s just under 15mm. Within that I will have to make mounting points for the idler.

From the No2 drop arm mount, 3, 4 and 5 will all need to be relocated, which shouldnt actually be hard as they are just square blocks so easy to cut, then the original mounts filled in or covered.
I will also have to use the AA lower hull as a template to cut around the AFV lower sponsor so it fits inside the AA upper hull… A rough template is seen below.

I know it sounds mad, and maybe it is, but it will be a good test of my resolve and ability to see if I can crack it. And if it turns out to be a biblical fail, I still have the complete AA lower hull and running gear to fall back on.
Thoughts ??
1 Like
" Good luck" should just about do it! seriously though John, if this all works it might be a template for us all.
I’ll certainly take a closer look at the suspension elements of my Spartan, but in the meantime, over to you (no pressure then!)
Brian
1 Like
Peter,
'Take your point and I’ll certainly inspect my resin wheels much closer than I did earlier today, and of course, I fully appreciate the desert comparison; my preoccupation with NATO’s Central region allows me to get away with (modelling) murder re mud.
Brian
1 Like
Is there white metal in the Spartan kit Brian ? I take it that it has the PE basket etc ? Would be interesting to know when and why they changed the running gear to resin.
I forgot to mention I will be getting PE set for mine once I start the proper assembly of it all. Have decided on doing it in NATO black and green and then possibly as IFOR for Bosnia. I will also be keeping it fairly clean, and if anything, just a very very light dusting on the wheels and tracks.