Some folks will add the decal to a puddle of future. Add another coat of future after then dullcote the decal area to limit the silvering.
Thank you, Ryan. I completely forgot about that trick. If I recall correctly, I once used white glue for the same purpose but I could not remember if it actually worked. In any case, I decided there must be a better way which is why I am here.
Greetings, one year later! I suppose the title and first post of this thread successfully demonstrate that precognition is not one of my super powers. ![]() Real life kicked in and my plan to build 26 models and 26 figures in 2022 was obviously not successful. However, I recently rebuilt my work station, reorganized all my projects, and now return to the model making field of battle. I feel like a golf clap is in order.
Real life kicked in and my plan to build 26 models and 26 figures in 2022 was obviously not successful. However, I recently rebuilt my work station, reorganized all my projects, and now return to the model making field of battle. I feel like a golf clap is in order.
This thread proved extremely useful because it provides a historic account of my active projects. The models here are all accounted for, washed anew, and ready to progress. After some consideration, I decided to fire up the airbrush and prime the Sturmgeschutz IV.
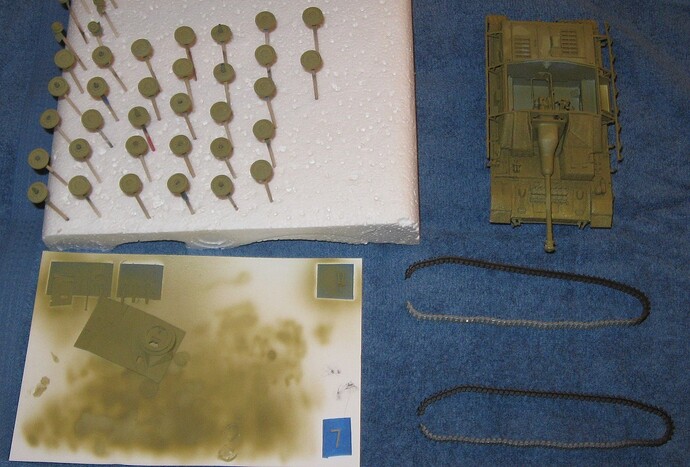
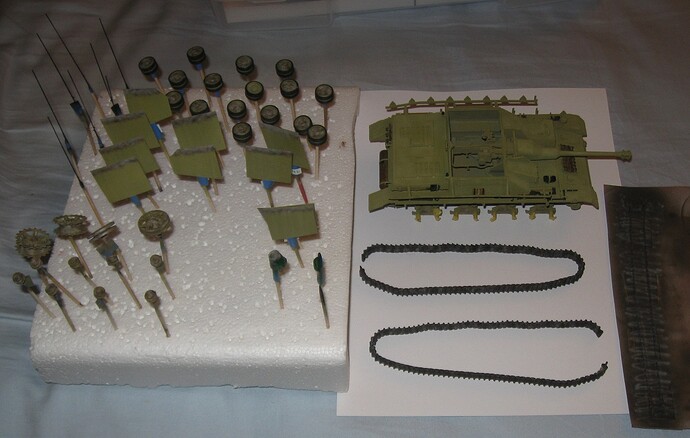
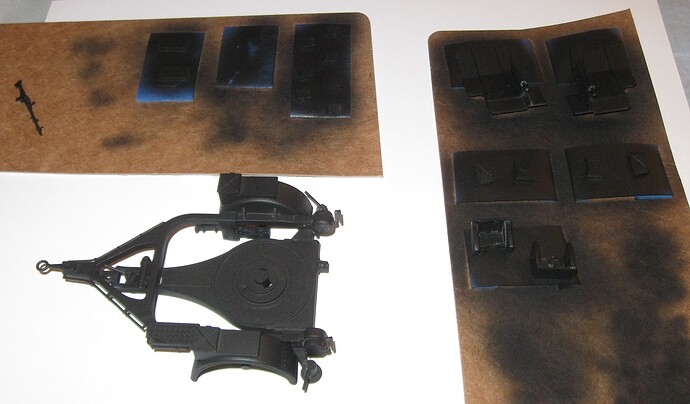
Right out the gate, my Iwata airbrush was frozen and required a thorough cleaning. On my first attempt to spray Testors enamel, the paint turned to tar in the cup. Fortunately, I noticed this before gumming up the entire airbrush. After another round of cleaning, I successfully primed the model over three sessions. At the end of the third session I made a rookie mistake, turned the air pressure way too high, backed too far away from the model, and laid down powdered paint. About 12 hours later I took a toothbrush to the model and scrubbed away as much loose paint as possible without breaking anything. The picture above shows where things currently stand.
I am of the opinion that careful painting and weathering will hide the bad primer coat. My plan is to switch to Vallejo acrylics, spray a base coat over the enamel, and see how that looks. I spent the evening watching Vallejo paint tutorials to refresh my memory. If that works out, I will clear coat the Bogward and advance that project into the home stretch, then revisit the Jagdpanzer IV.
As a side note, having recently watched many airbrushing tutorials to refresh my memory, my side feed Iwata airbrush was probably a mistake. I am seriously considering purchasing a top loading airbrush with a smaller needle. The trigger on my Iwata also sticks, up and down, something I have never experienced before.
Might have some paint in the trigger housing. Also have you Iwata lube or similar? I had an issue with my trigger and the lube helped.
Hope that helps.
Thank you for the advice, Tank_1812. My attempts to clean the airbrush, including the slot holding the trigger, did not improve the situation. However, placing some Iwata lubricant on the trigger shaft did improve the situation for an hour or two.
I continue to have many airbrush issues, especially clogging. The latest incident happened yesterday while spraying Vallejo Panzer Yellow. Maybe the paint was too thick. Maybe the airbrush was not cleaned correctly. Dunno.
Looking through the thread I am wondering on some of the issues if the different paint type are part of the problem. Mixing the types can leave the paint gummy and still in the hard to reach places.
With Vallejo, they can dry quickly. I would add Vallejo retarder to the mix of paint and thinner.
This seems very likely as the airbrush no longer sprays fine lines, often clogs, and the trigger continues to stick. I have created tar on numerous occasions.
Today will be my third Vallejo acrylic only paint session. I am mixing 4 to 5 drops of Vallejo Flow Improver into each full color cup and spraying during cool and wet weather. One problem I continue to struggle with is the highly varied consistency of Vallejo paints. Model Air, Model Color, Game Color, Primers, and Clears vary greatly in viscosity. If I get the pressure and/or thinning wrong it clogs or spiders resulting in much wasted paint and a gummed up airbrush. However, when I get the mixture right, paint coverage and leveling is impressive. Water clean up is fantastic.
I guess I keep cleaning and hope for the best.
Another thing to stick into this fun equation is the needle size and air pressure. I have had issues with my .30 needle, probably user error with the correct mixture/thinning of paint. I have a .50 needle now and I have less issue’s especially with primers. So my painting experience is more enjoyable. I don’t recall if I have sprayed Vallejo paints other than primer. My Tamiya paints work much better.
When first purchased, my Iwata HP-SBS with a 0.35 needle laid down very thin and precise lines but it never did broad coverage well. The fine line ability disappeared rather quickly, perhaps because of paint build up.
For a long time, I presumed my problems resulted from a weak and faulty air compressor. Last year, I purchased a much better air compressor that can easily maintain the 20 PSI suggested for the HP-SBS. Things definitely improved but I still get lots of clogging and weirdness.
If I could do it again, I would purchase two top feed airbrushes, one for very fine lines and one for broad coverage, both designed to spray at about 15 PSI. The next time a good airbrush sale comes around, I will pick up something for fine lines. For now, I will stick to Vallejo acrylics, stop using enamels, and continue trying to find and clean out any hidden paint deposits.
Also…progress! It may not seem like much but most of the painting here was done with Vallejo acrylics.
I’ve spent the last week working on the Sturmgeschutz IV and an old Staghound (entered in the Unfinished Business 2023 campaign)–hunting down parts, fixing broken things, and priming stuff.
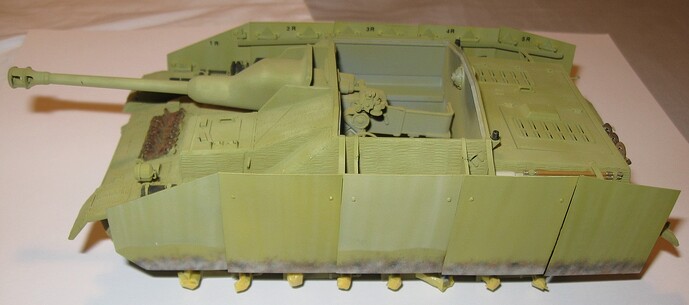
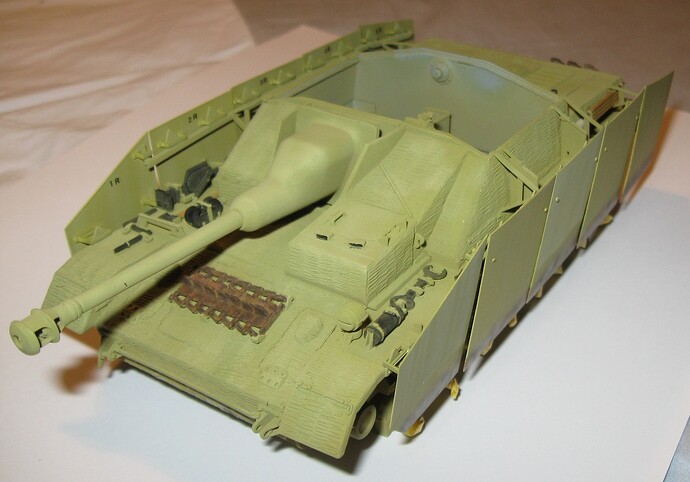
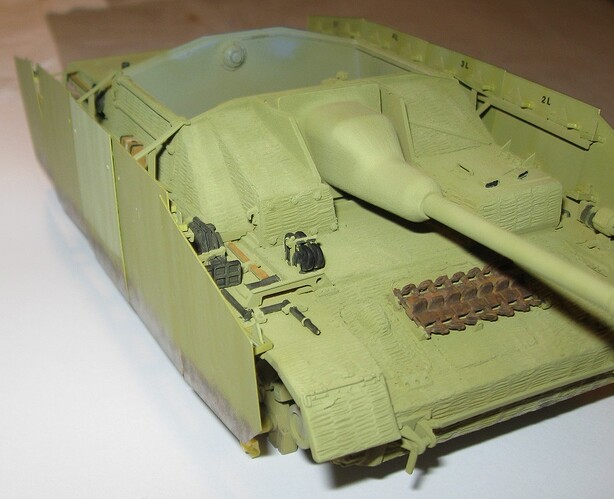
The Sturmgeschutz model came with metal apron plates but the stamped locator marks for brackets did not match up with the teeth on the holding rails. I have no clue why this happened. Rather than pulling apart and moving the rails, which would probably wreck the model, I cut new apron plates out of very thin plastic card. This allowed me to glue the plastic brackets directly to the plastic card while easily moving everything around to make the brackets match the rail teeth. While not accurate it looks quite good.
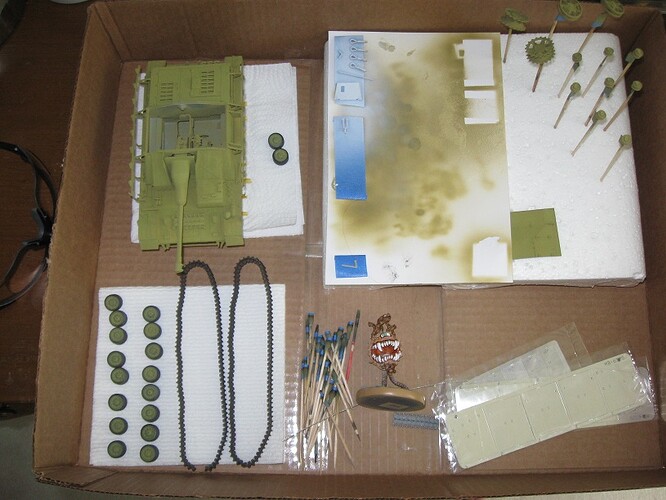
I sprayed Vallejo primer for the first time. At first, I thinned the primer way too much resulting in very weak coverage and minor airbrush clogging from dry tip. It took about two hours of trial and error to work out a good mix–8 thinner / 3 flow improver / 16 primer. The primer adheres very well and, after a night to dry, looks excellent.
In order to assemble the road wheels for the Sturmgeschutz I needed to spend about two hours scraping away paint from inner wheel surfaces and bogie axles. Since I am so long out of practice, I continue to lose a lot of time to mistakes like that. The Sturmgeschutz and Staghound axles are now masked off for further priming and painting.
While looking for something to enter into the Unfinished Business 2023 campaign I came across many old, unfinished models. Last night, after preparing the very last parts for the Sturmgeschutz and Staghound, I wanted to keep working and decided to add another model to the queue.
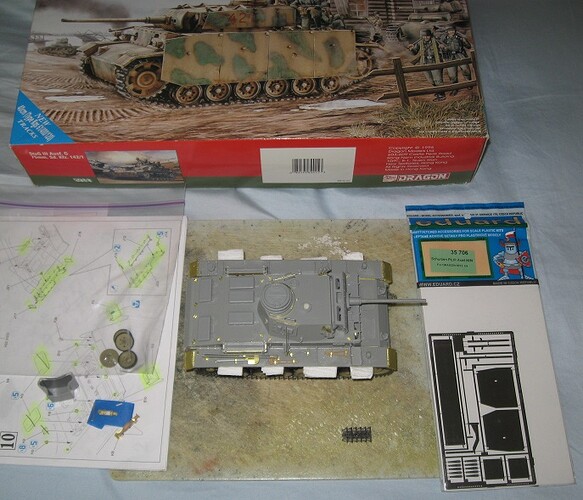
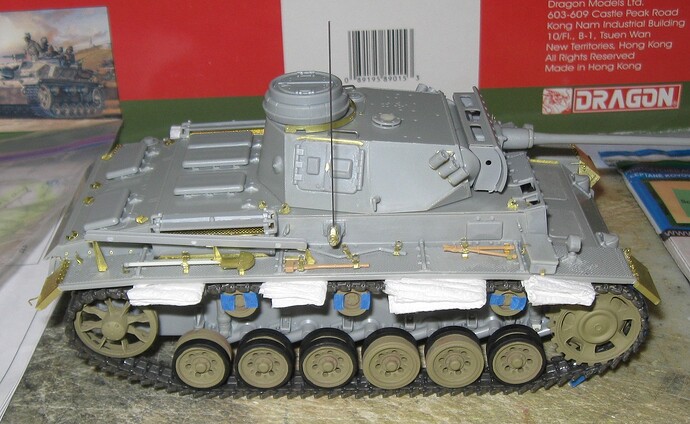
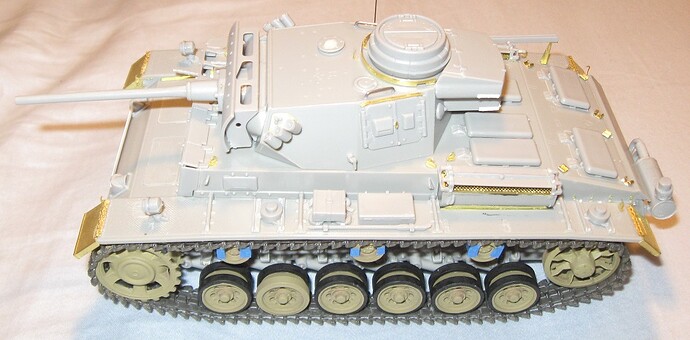
This Dragon Panzer III Ausfurung M/N was released in 1996. It is based on a Gunze Sanyo kit from the 1980s. While very good for its time, it has long since been eclipsed by better offerings.
If I recall correctly, I began work on this model sometime around 2006. It was one of the very first models I attempted with photo etch parts (from Aber). I made a significant effort to correct problems with the model with some success. Near the end of construction I realized the model comes with incorrect tracks. After ordering new tracks and metal apron fitting, I stuffed it in a box where it has remained ever since.
My priorities have changed over the last 20 years. I no longer have the will to clean up and assemble a set of metal tracks or apron armor. Therefore, after staring into the box for about 30 minutes, I decided to finish this vehicle by the most expedient means possible. The kit tracks are good enough and it does not need the apron armor.
The box included a set of individual link plastic tracks with solid guide horns, previously cleaned up, and a run of 30 assembled tracks. I actually remember doing that! At the time, I had no idea how to assemble individual link tracks and was doing it one piece at a time. Fortunately, I did a good job so, after three hours, this very old Panzer III finally wears tracks.
This model is so old you can also see where I hand painted individual tires. For the most part, I stayed within the lines.
A quick search on the internet turned up period photos of the vehicle on the box top. I also found a very nice restored museum vehicle, located in Germany, configured in similar fashion to mine. Over the next few days, while working on other models, I will look for a period vehicle to emulate. I welcome any suggestions on the matter. ![]()
Things continue to move along slowly at the Robotech Factory. Many bottles of glue, paint, and similar items went bad over the last decade, forcing me to put projects aside and work on other things while I wait on orders. Last night it was the super glue; one bottle bricked and the other stopped being, well, super. ![]()
I ended up spending most of the weekend working on the old Panzer III M. Since the super glue all went bad, I gave up on the photo etch parts and switched to making bits of junk out of rod and sheet stock. It looks okay, I guess.
Between paint sessions, cataloging paints, and throwing stuff away, I also spent many hours looking for a Panzer III to model. The solid tooth tracks (with cleats) on my model are a real problem. According to the references I found, they were introduced in late 1943. Only about 150 Panzer III Ms were produced. Most fought in Russia, especially during the Kursk offensive. A few went to Africa. Every vehicle I can find from that period wears tracks with open guide teeth.
However, I found references that after Kursk, surviving Panzer IIIs were withdrawn and reassigned to police duty in subjugated territories. It turns out some survivors were assigned to Panzer Brigade Norwegen, operating in Denmark and Norway. Panzer Division Norwegen was reconstituted from the remains of the 25th Panzer Division after Kursk. Most of the reconstituted division was eventually sent east but a panzer brigade was left behind for the police mission and that became Panzer Brigade Norwegen.
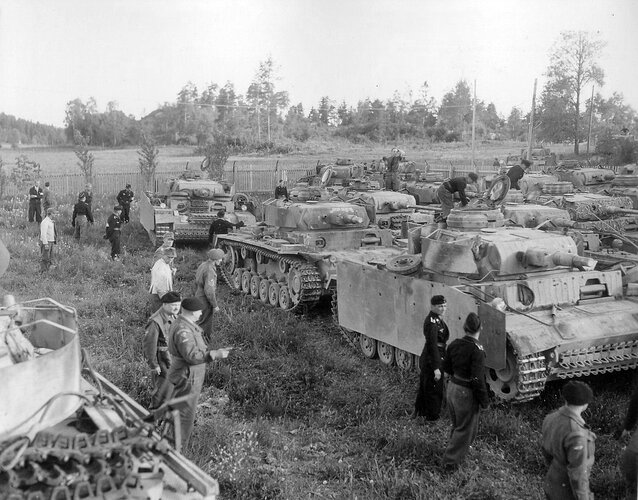
Panzer Brigade Norwegen continued to police Denmark and Norway right up until the end of the war, when it surrendered. Someone posted a picture of the surrender on Reddit.
It turns out quite a few late model Panzer IIIs survived with this formation. They were subsequently transferred to Norway and used by that nation into the 1950s. In the photo above, you will see a number of Panzer III Ns, some Panzer III Js or Ls, and maybe, just maybe, a Panzer III M. It is really hard to tell. If you look very closely at the tracks, you will find one or two links with solid guide horns.
I could model a tank from this group with solid horn tracks. It is possible, though not likely. However, if I do that, I need to add, at a very minimum, turret skirts and field applied zimmerit.
Another option is to accept the incorrect tracks and model a vehicle that went to Stalingrad and was lost in the encirclement. Accept for the tracks, my vehicle matches that configuration.
Both stories are interesting and worthy of telling through a model. Dunno what I’m gonna do.
There are good days and bad days at the Robotech Factory. For some time now, I have achieved some genuinely good results with Vallejo paints, both brush painting and with an air brush. Just this morning, I was talking with my brother and praising them.
Most of my current effort is going into a Staghound entered in the Unfinished Business campaign. It was almost ready for weathering. Almost. I also found the Flakvierling from last year and gave that a primer coat. The Staghound developed a couple paint boo boos on the bottom that needed sanding out and repainting. The Flakvierling suffers from my numerous rookie attempts to fill knock out pin marks and also needed sanding and repainting.
Well…
Just last night, while looking for a good tutorial on weathering armor models, I stumbled across some complaints that Vallejo primer sucks. “It cannot be sanded and comes off in sheets.” Uh oh. Someone suggested wet sanding to prevent issues. Well, I gave wet sanding a try and discovered that Vallejo primer does, indeed, come off in sheets. Silly me, I just ordered 4 more bottles of Vallejo primer. ![]()
Those will become mud spots or something.
Meanwhile, on the Flakvierling, the Vallejo primer sanded just fine. “What was the difference?”, you may ask. Last year, I primed the Flakvierling with Testors Light Ghost Gray enamel, then primed it again two days ago with Vallejo primer.
I really want to get away from oil based paints so Mr. Surfacer (which I have) and enamels (which I have) are not a long term primer option. Some people claim Badger acrylic surface primer is really good so I may try that next.
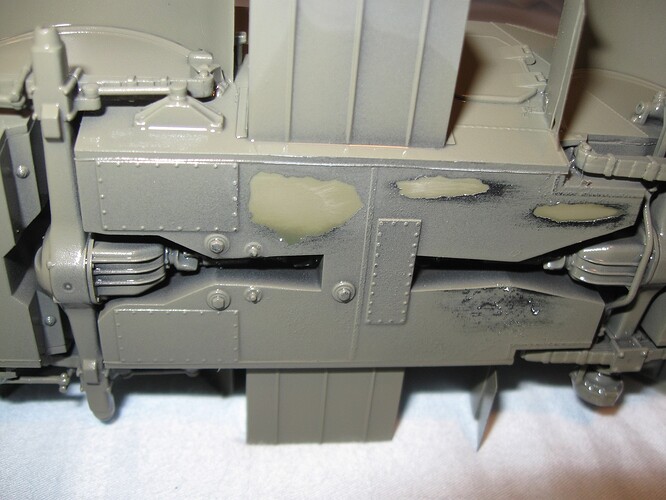
The other real bummer I continue to experience is filling seams and knock out pin marks. At this point I have tried Testors Contour Putty, Squadron Green Putty, Milliput Green, Milliput White, Super Glue, Super Glue with Baking Soda, Tamiya Two Part Putty, Mr. Surfacer, and…I forget. Milliput is good for really big stuff and Mr. Surfacer is good for really small stuff but I continue to fail with everything in between. A couple days ago, I tried using sanded styrene powder melted with Testors Liquid Cement. That shows promise.
Since I goofed up a batch of antennas and now cannot finish the Bogward or Jagdpanzer IV, I am practicing weathering on the Bogward. So far, my conclusion is that weathering with acrylic paints is significantly inferior to oil paints. However, one must try new things to learn so…that poor, poor little Bogward. ![]()
In other news, I continue to look for information on modeling tank stowage. All of you do really neat stuff with little bits of junk. My attempts so far look…bad. All my figure painting projects are on hold pending delivery of more and (I hope) better paint.
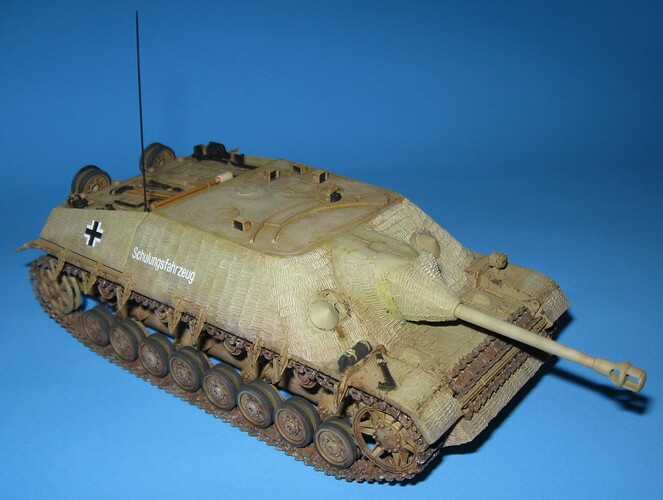
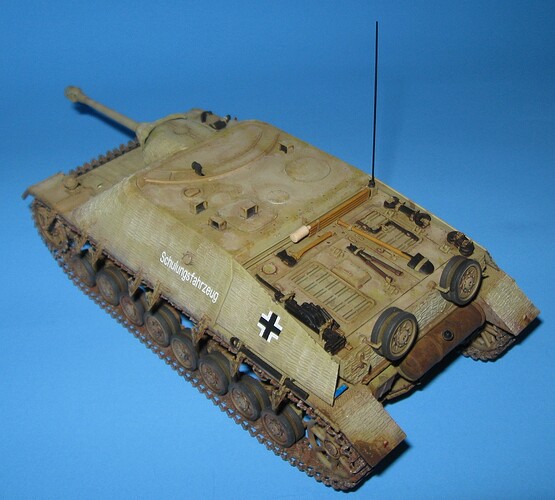
Finished: Dragon Models Limited 9059 Jagdpanzer IV A-0
Since this is a driving school vehicle I decided not to beat it up too much, left the tools in factory fresh condition, and eschewed additional stowage. Given my current skill, I feel like if I push any further something will go horribly wrong. Cheap models make better canvases for practicing techniques.
The base coat and initial weathering was sprayed with Model Master enamels. Details were hand painted with MIG oils and Vallejo acrylics. I chose not to use any pigment products and left off the apron armor plates provided in the kit because they do not fit and cover up too much detail. Zimmerit was made with Milliput and turned out okay. Tracks provided in the kit have solid guide horns. In period photos, the prototype wears apron armor plates and tracks with open guide horns. Tracks with solid guide horns and cleats came into use in mid 1943 so the vehicle could have worn them at some point. Drilling out the antenna base could have gone better.
While the journey was not an easy one, I relearned a lot building and painting this vehicle. It is my first finished model of 2023 and second plastic model competed since 2010.
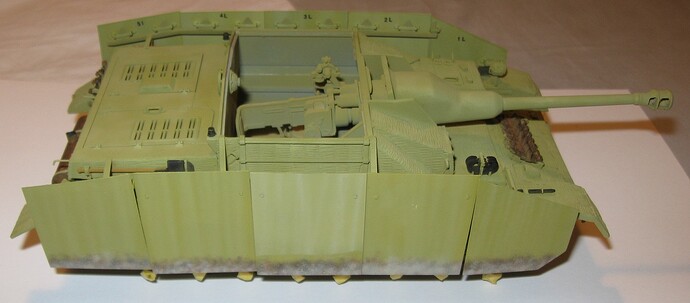
More progress on the Sturmgeschutz IV…
Almost everything is painted, minus some periscopes which escaped my notice, delaying final assembly of the main hull by over a week. The apron armor plates, tow cables, tracks, and wheels turned out pretty good. Thankfully, minus one small blemish, this model does not utilize Vallejo primer.
Sometime last year I purchased a Vallejo paint set for chipping and rusting. It works pretty good for mufflers and spare track.
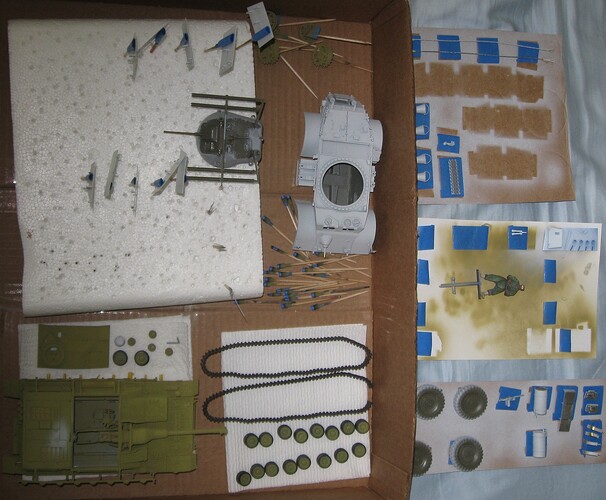
During the week I rearranged my work area for the third or fourth time in a month. My tendency to work on many projects in parallel results in a lot of lost time, sort of like German industry in World War II. ![]() My memory sucks and I lose track of stuff. In the future, I need to keep things to one or two projects building and one or two projects painting. When a project goes to paint, it needs to become top priority because any delays after that point increase the odds of dust and paint contamination, a problem that dogs all my efforts.
My memory sucks and I lose track of stuff. In the future, I need to keep things to one or two projects building and one or two projects painting. When a project goes to paint, it needs to become top priority because any delays after that point increase the odds of dust and paint contamination, a problem that dogs all my efforts.
One thing that helped with dust and hair contamination was switching from grocery bags to soda pop boxes as painting mats. Grocery bags fur up and lose a lot of fibers. Soda pop box cardboard is dense, thin, strong, and does not break down so easily.
Return of the Flakvierling…
It’s sorta like the sequel to a bad movie that ended with a cliff hanger. At this point I have severely messed up filling all the knock out pin marks and sink marks, sprayed it with grainy enamel paint, sprayed it again with terrible Vallejo primer, sanded away a bunch of details and messed up the primer (which sucks) while trying to fix the filling work, did all that again, did that all again, then sprayed it with a third primer (Badger Stylenze) in hopes it will fix the first primer, only to discover the filling work is still bad. Yeah. Boys and girls, this is why we experiment on cheap practice models.
There is good news. After some trial and error involving alcohol, flow improver, and air pressure, Badge Stylenze primer sprays quite well. Pigment is dense, coverage excellent, leveling excellent, and cleaning easier than expected. If it grabs plastic and sands well, which I will find out later this morning, it is a winner.
On the filling front I am now experimenting with sanded styrene dust and liquid cement for seam work and sink marks. Results are promising. For knock out pin marks, I am trying punched disks of styrene sheet. That method also shows promise.
The picture above also includes a bunch of little detail parts from various models that escaped my notice, resulting in many construction delays.
If all goes well, I hope to be experimenting with Milliput stowage and tarps by next weekend.
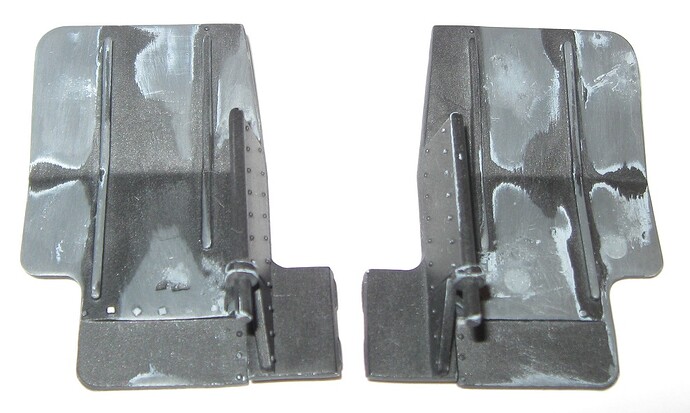
Last night, I sanded out the gun shields on the Flakvierling for, like, the twentieth time. Something very interesting happened!
These parts now have three layers of paint and primer–Testor’s enamel Light Ghost Gray, Vallejo Primer Gray, and Badger Stylenze Black. The ejector pin marks were filled with Testor’s Contour Putty, Super Glue with Baking Soda, and styrene dust set with Testor’s liquid cement.
Testor’s enamel Light Ghost Gray was a great primer but as I have written in a few places, I stopped using enamel paints for health reasons. Vallejo primer comes off in sheets when sanded, wet or dry, so I stopped using it. Badger Stylenze Primer, which I started using a few days ago, sprays, covers, and sands very well.
Filling work has always confounded me. I have used Testor’s Contour Putty since childhood but it never performed especially well. My attempts to use super glue as filler have mostly ended in failure. Sanded styrene dust and Testor’s Model Cement works very well as a filler but is time consuming to make, difficult to apply, takes a fair bit of time to dry, creates a lot of fumes, and taxes my health. The first filler for this project was actually Milliput, but it popped out of the knock out pin marks when sanded, forcing me to start over.
Having using all those primers and fillers on the Flakvierling gun shields, I gave them yet another sand with the results shown above. Curiously, the Vallejo Primer sanded fairly well! I hypothesize that one of two things happened. First, Vallejo Primer may take a very long time to cure. Alternatively, sandwiching Vallejo Primer between layers of enamel paint and Badger Stylenze Primer may have stabilized it enough to sand. I intend to conduct further experiments in this regard.
On the filler front, it appears styrene dust and Testor’s Liquid Cement finally filled the knock out pin marks. If sanded too early, it becomes a gummy mess. If left to dry for a full day, it works quite well. Unfortunately, model cement stinks and prolonged exposure gives me head aches (and rashes) so I need to use the technique sparingly.
Anyway, I thought someone might be interested in these ongoing experiments. ![]()
Oh. I should mention, I just purchased a new brand of Super Glue, Accelerator, and Debonder. Perhaps they will produce good results were previous super glues (and baking powder) failed.
Now if you will pardon me, I need to put back all the rivets I sanded off. ![]()
There was a minor accident at the Robotech Factory.
Some doof did not keep the airbrush moving while spraying a clear coat. The resulting paint drips needed sanding out. This served as an excellent opportunity to further test masking with Blue-tac.
After repainting the affected apron armor plates, inspectors discovered a minor problem.
The doof who cannot spray a clear coat also cannot match paint colors. However, it was noted that this technique would work very well in a diorama for simulating a tank coming out of shallow water.
Even worse, the scratch built apron armor plates do not line up correctly.
Management has reprimanded the doof and decided to leave off the plates.
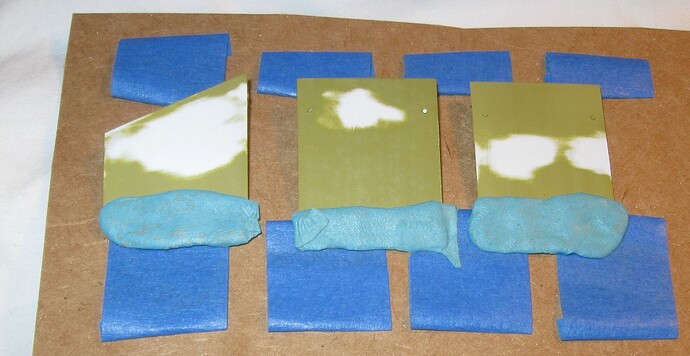
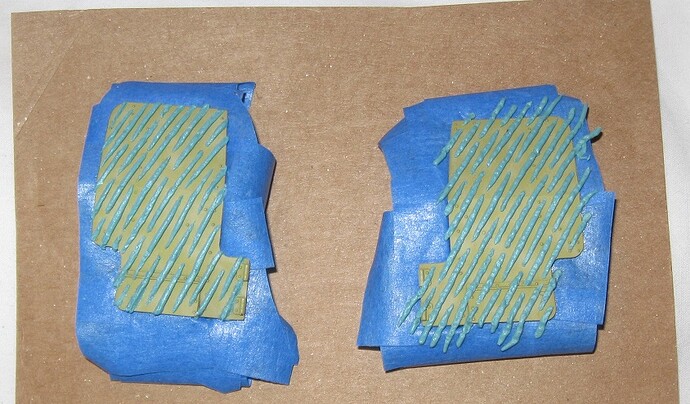
More adventures with Blu-tac…
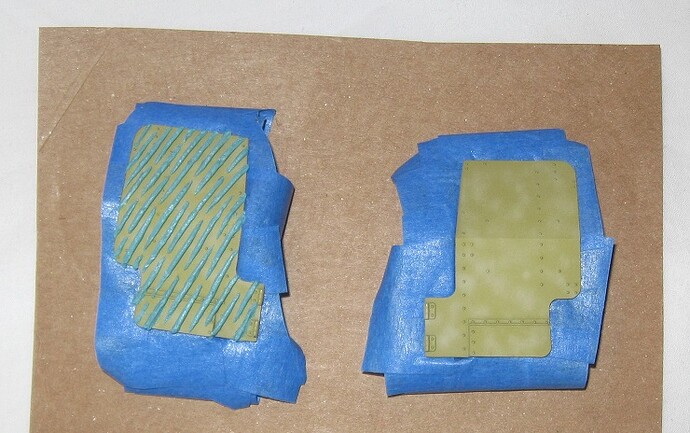
After covering the Flakvierling right gun shield with Blu-tac, I decided to mask off the back of the plate with tape to avoid an over spray accident. That proved rather messy with all the Blu-tac in place. Therefore, I mounted the left plate before applying the Blu-tac.
The left plate was far easier to mask.
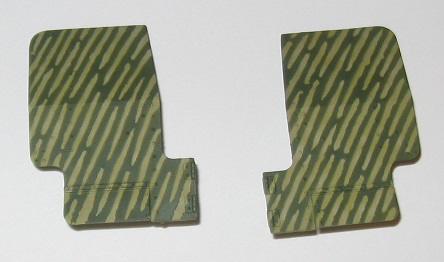
The experiment was interesting and informative but the final result is…not great. Green stripes on a yellow field would probably look better.
I should also mention that, even after two weeks of curing time, blue painter’s tape pulled up a small section of Vallejo Primer on the back of one gun shield.
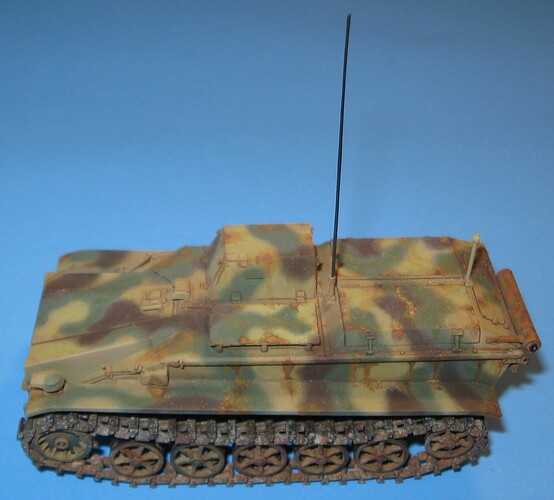
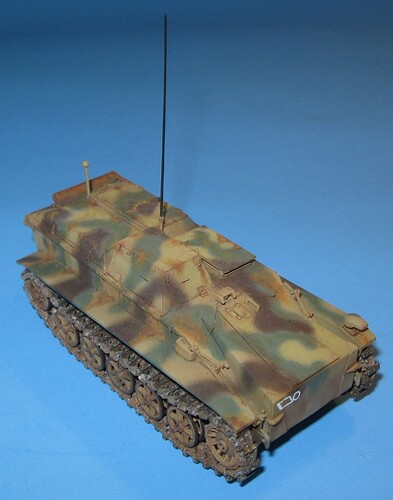
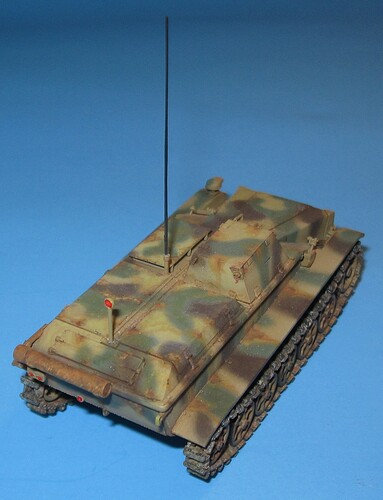
Finished: Dragon Models Limited 6101 Borgward Ausf. A Heavy Demolition Charge Vehicle
This was one of three practice models built in January of last year when I decided to return to model building. After construction and initial painting, it sat in a box for a year because real life made model building difficult.
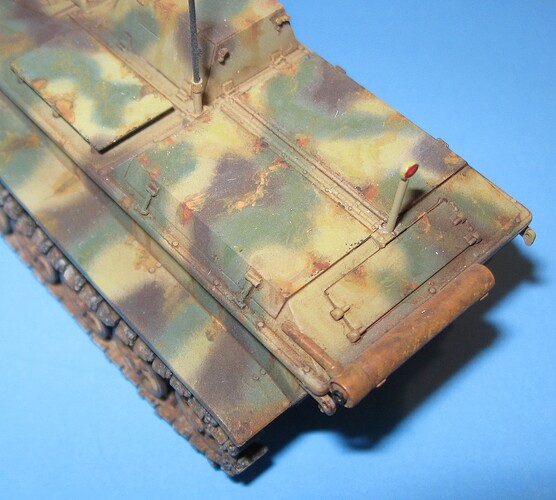
Primer and base coats were sprayed with Testor’s Model Master enamels. This was my first attempt to spray camouflage in 12 years and it shows. Numerous airbrush issues made things harder still. However, every problem will eventually succumb to elbow grease and tenacity.
After spraying the camouflage, I made the decision to switch from Model Master Enamels to Vallejo Acrylics for detail painting and some weathering. This was primarily driven by health concerns regarding solvent based paints. Mig oil paints were used for a pin wash and some tentative weathering.
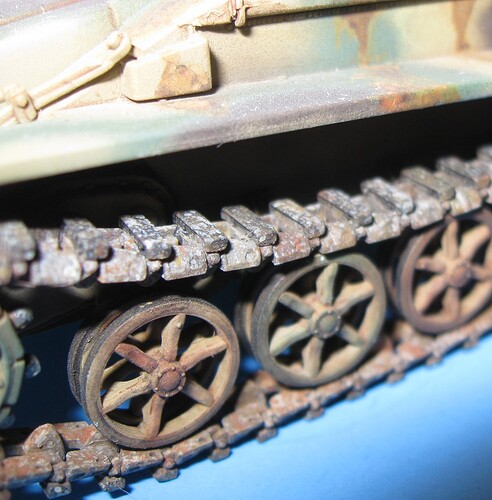
Tracks were weathered in a number of different ways including my first attempt at the Paint Splatter technique. While difficult to control, Paint Splatter definitely produces interesting results.
The Borgward’s final service to me was as a test subject for a rust and weathering paint set. It seems unlikely any Borward suffered this degree of wear during World War II so I chose not to turn the vehicle into a hulk.
In the final analysis, this little model, won in a model show raffle about 14 years ago, provided me with a wealth of opportunity to regain my model building skills and try new techniques. All hail the little mighty Borgward!
If I could do it again, the one thing I would add to this model is stowage. My experience adding stowage is extremely limited and I intend to explore that in future models.
Topic renamed by request from Damraska.
