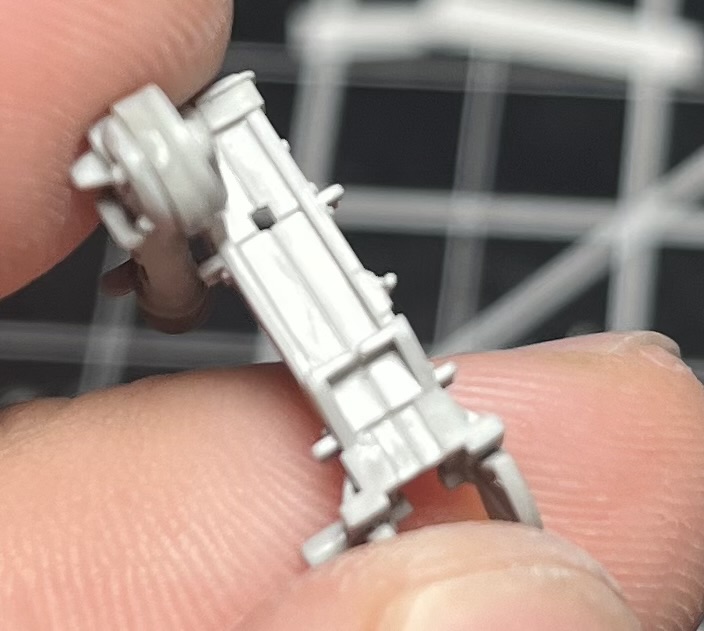
I am working in Dragons panzer II. It has an interior and I am currently working on the turret. The cradle for the gun comes in two halves, and leaves a nasty seam when the parts are glued
I also encounter these type of seams on breach blocks, and others similar assemblies. I always find them a pain to deal with as they are often in tight quarters with intricate detail.
I suppose it is part of the mold process causing the parts at the seam to have a slight angle.
What are some tips to fill these? I usually use sprue goo or super glue; but I find both a bit messy in tighr quarters
Another trick, though more time consuming, is to use very thin styrene (Evergreen or Plastruct) and cut pieces to drop into the area. If shaped right, won’t have much sanding in those tight areas. I have covered large areas in like wheel wells and such to cover push marks this way.
You may well be right to erase the seam in this case, but just as a general rule it’s a good idea to check photo-references if available – I can’t tell you the number of times I’ve scrubbed a seam off only to find it was there on the original
Use a filler that can be smoothed without the need to sand. Something that a solvent and a Qtip can smooth out the filler and clean the area when done. May need several coats. Think of something that works like sheet rock mud that a damp sponge can be used to smooth out the joints when almost dry.
Fill the seam with Mr. Surfacer 500 and let it dry. Then moisten a Q-Tip with Mr. Color Leveling Thinner and rub it across the seam. This will remove the excess putty and leave the seam filled without sanding.
In rebates like this, I fill the gap then when dry carefully use a chisel to remove the excess, or even a small sharp screwdriver used like a chisel. If the seam isn’t too badly sunken, it’s even possible to level the surface with a chisel without filling. I sometimes use this method on mould ejection marks where they are difficult to get at.
They’re also referred to as ‘scribers’ or ‘micro chisels’, and you can find sets of them on Amazon and elsewhere. They’re often used in the gunpla fandom for scribing extra panel lines, and sometimes in aircraft modeling for restoring panel lines, often when raised panel lines on old models have been sanded off. The ones referred to above have wider blades, and can be used for removing raised seams or panel lines when a part shape is too complicated to be able to get a sanding tool into the area of the part where you want to remove something.